TetraLite TetraStick Uno User manual

TetraStick UnoTetraStick Uno
USB Gaming Joystick
by TetraLite Products
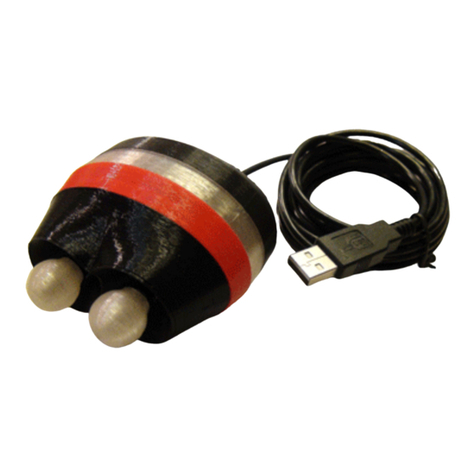
The TetraStick Uno is a proportional USB joystick providing X and Y axes pointer movement,Z,
rX, rY, and rZ axes control, hat switch (POV) control, joystick buttons 1 through 8, and various
user programable settings. A 1/8-inch (3.5mm) jack provides the ability to add a single “Control
Switch”, or add up to 8 external switches using the optional TetraStick Expansion Module, which
provides one Control Switch input and 7 more external switch inputs.
OVERVIEW
FEATURES
JOYSTICK BUTTON
DIRECTIONS
TETRASTICK EXPANSION
MODULE
Page 1
TetraLite Products
www.tetramouse.com
Manual Vers. 1.0
←Button numbers
12345678
Push the joystick inward for less than
the Hold Delay Time setting to switch
between Pointer and Button Modes, or hold
the joystick inward for the Hold Delay Time
to enter the Program Modes.
UP
RIGHT / UP
RIGHT
LEFT / UP
LEFT
RIGHT / DOWNLEFT / DOWN
DOWN
12
3
4
56
78
P
The TetraStick Expansion Module may be
plugged into the TetraStick Uno Input Jack to
allow connecting up to 8 external switches
providing a Control Switch and up to 7 more
joystick buttons (Buttons 9 - 15).
P
TOP VIEW BOTTOM VIEW
INDICATOR LIGHT MOUNTING STUD
1/4” x 20 - 3/8” LONG
MICRO-B USB JACK
JOYSTICK KNOB
INPUT JACK

OPERATIONAL AND PROGRAM MODES
MODE SELECTION & PROGRAM MODE 1
POWERING UP
The joystick on the TetraStick Uno may be operated in five Operational Modes and two Program Modes.
In XY Mode the joystick controls the X and Y axes.
In RXY Mode the joystick controls the rX and rY rotation axes.
In POV Mode the joystick functions as a hat switch.
In ZRZ Mode the joystick controls the Z and rZ axes.
In Button Mode the joystick selects buttons 1 through 8.
Operational Modes and settings are selected or controlled with two Program Modes.
In Program Mode 1, the joystick Operational Modes XY, RXY and POV Modes may be selected, and Push
Sensitivity can be set.
In Program Mode 2, XY Mode may be set to one of four Sensitivity settings, the audio chirps may be
enabled or disabled, Button Mode may be set to 4- or 8-button operation, and the Hold Delay Time can be
set to one of four settings.
When the TetraStick Uno is powered up it performs a quick calibration sequence indicated by changing color
patterns of the indicator light. Make sure the joystick is in its idle center position and not being touched while
the Uno is calibrating.
Calibration is complete when 1 to 4 chirps are heard and the indicator light is turquoise, indicating that the
Uno is in XY Mode. The number of chirps emitted represents the current Sensitivity setting number. The Uno
always starts in XY Mode. Various settings are stored in memory and are recalled during power up.
BUTTON MODE:
Switch to Button Mode from XY Mode, RXY Mode, POV Mode or ZRZ Mode with a quick inward push of the
joystick. The Uno emits one chirp and the indicator turns purple, indicating the Uno is now in Button Mode.
Push the stick in any of the 8 directions (see Page 1) to activate buttons 1 through 8. Hold the stick in any of
these directions for more than the current Hold Delay Time setting to put a button on hold. The hold is
maintained until a normal button push in the same button’s direction is performed while in Button Mode.
Button holds persist through Operational Mode changes. Changes to 4- and 8-way button mode selections
clear all current holds. Return from Button Mode back to the previously selected XY Mode, RXY Mode, POV
Mode or ZRZ Mode with another quick inward push. The Uno emits one chirp, the indicator turns turquoise,
and the Uno is now in its previously selected XY, RXY, POV or ZRZ mode.
PROGRAM MODE 1:
Selection of the XY Mode, RXY Mode, POV Mode and ZRZ may be done from any Operational Mode by
entering Program Mode 1. Push the joystick straight inward and hold it in for more than the currently
selected Delay Hold Time setting (described later). The Uno chirps once, the indicator turns red and the Uno
is now in Program Mode 1.
In Program Mode 1, push the joystick up to select XY Mode, or push the joystick right to select RXY Mode,
or push the stick down to select POV Mode, or push the stick left to select ZRZ Mode. Upon selection of
these modes, the indicator turns green for XY Mode, yellow for RXY Mode, red for POV Mode and blue for
ZRZ Mode, then fades out and chirps twice and the light turns turquoise (or purple if Program Mode 1 was
entered from Button Mode), indicating that the Uno has changed to the selected Mode and has exited
Program Mode 1.
The Uno remains in Program Mode 1 until an Operational Mode is selected, or Program Mode 1 is exited
with a quick inward push, or a long push is used to enter Program Mode 2 (described later). Exiting returns
the Uno to the previously selected XY, RXY, POV, ZRZ or Button Mode whether or not a mode selection was
made. If Program Mode 1 was entered from Button Mode, it will exit to Button Mode, and any change to XY,
RXY, POV or ZRZ Mode selection will be available when switched to by a quick inward push, exiting as
described in BUTTON MODE above.
Page 2

Page 3
PROGRAM MODE 2
Program Mode 2 can only be entered from Program Mode 1, and is done by pushing and holding the
joystick inward for the amount of time set by the Hold Delay Time. The indicator changes from red (for
Program Mode 1) to green, and one chirp is emitted to indicate the Uno is now in Program Mode 2.
The Joystick Sensitivity settings control the maximum amount of deflection output by the Uno in XY and
RXY Modes.
In Program Mode 2, set the XY joystick movement
sensitivity by pushing the stick up. The indicator
changes to the color associated with the current
Joystick Sensitivity setting, then fades out and the
Uno chirps the same number of times associated
with that Joystick Sensitivity setting.
To change the Joystick Sensitivity setting, push the stick right to increase and left to decrease. If you push
right when in the most sensitive setting (setting 4), it ‘wraps around” to the least sensitive setting (setting 1).
Similarly, pushing left while in setting 1 wraps around to setting 4. When a change is made, the Uno chirps
the same number of times as the associated setting number, and the indicator turns to the color associated
with that setting, then fades out.
The Uno remains in the Joystick Sensitivity setting mode until a quick inward push is performed, which
returns the Uno to Program Mode 2. The Uno chirps twice, the indicator turns green and the Uno is now in
Program Mode 2.
In Program Mode 2, set the Hold Delay Time by
pushing the stick down. The indicator changes to
the color associated with the current Hold Delay
Time setting, then fades out and the Uno chirps the
same number of times associated with that setting.
The Hold Delay Time is the amount of time the joystick needs to be pushed in and held before the desired
action is taken. Hold Delay Time works with joystick button press holds and when entering Program Modes.
Setting 1 Least sensitiveBlue
Setting 2 Green
Setting 3 Yellow
Setting 4 Most sensitiveRed
JOYSTICK SENSITIVITY
Setting 1 1/4 secondBlue
Setting 2 1/2 secondGreen
Setting 3 3/4 secondYellow
Setting 4 1 secondRed
HOLD DELAY TIME
To change the Hold Delay Time setting, push the stick right to increase and left to decrease. If you push right
when in the longest time setting (setting 4), it ‘wraps around” to the shortest time setting (setting 1). Similarly,
pushing left while in setting 1 wraps around to setting 4. When a change is made, the Uno chirps the same
number of times as the associated setting number, and the indicator turns to the color associated with that
setting, then fades out.
The Uno remains in the Hold Delay Time setting mode until a quick inward push is performed, which returns
the Uno to Program Mode 2. The Uno chirps twice, the indicator turns green and the Uno is now in Program
Mode 2.
Audio Chirps that occur when changing Operational Modes and performing Button Holds can be toggled on
and off in Program Mode 2 by pushing the joystick left. The audio chirps are always enabled while in
Program Modes 1 and 2 in order to indicate programming selections. Disabling chirps stops them while in
any Operational Mode and during Button Hold operations. Push the stick left to toggle the audio chirp mode.
The indicator light turns red, then fades out, and one chirp is heard indicating the chirps are disabled. The
indicator light turns red, then fades out, and two chirps are heard when audio chirps are enabled. After
selection of the chirp mode, the light turns green again indicating the Uno is in Program Mode 2.
Toggle between 4-way Button Mode and 8-way Button Mode while in Program Mode 2 by pushing the
stick right. In 4-way Button Mode, only buttons 1 through 4 are enabled. In 8-way Button Mode, buttons 1
through 8 are enabled. Push the stick right to toggle between these modes. The indicator turns red, then
fades out and one chirp is heard when switching to 4-way Button Mode. The indicator turns red, then fades
out and two chirps are heard when switching to 8-way Button Mode. After selection of the 4- and 8-way
Modes, the light turns green again indicating the Uno is in Program Mode 2. Any button holds are released.
Exit Program Mode 2 by pushing the joystick inward. The indicator turns red, two chirps are heard, and the
Uno is now in Program Mode 1.

Page 4
EXTERNAL SWITCH INPUTS
A single external switch connected to the TetraStick Uno’s Input Jack becomes a “control switch” that
performs the same functions as pushing and/or holding the Uno’s joystick inward while in all modes of
operation.
Adding the TetraStick Expansion Module to the TetraStick Uno’s Input Jack provides 8 external switch
input jacks numbered 1 through 8. The input jack numbers are engraved on the top of the module’s housing
above each input jack.
A switch connected to input jack 1 of the TetraStck Expansion Module becomes the “control switch”, and
performs the same functions as pushing or holding the joystick inward while in all modes of operation.
Switches connected to input jacks 2 through 8 perform standard joystick button functions 9 through 15
respectively, and are functional while the Uno is in XY, RXY, POV and Button Modes. Buttons 8 through 15
must be physically held by the user to perform a button hold, unlike the timed button holds available using
the joystick when the Uno is in Button Mode.
External switches perform mode selections and settings while in Program Mode 1:
A switch connected to input jack 2 can be used to select XY Mode.
A switch connected to input jack 3 can be used to select RXY Mode.
A switch connected to input jack 4 can be used to select POV Mode.
A switch connected to input jack 5 can be used to toggle the inward Push Sensitivity setting.
External switches perform mode selections and settings while in Program Mode 2:
A switch connected to input jack 2 can be used to enter the Joystick Sensitivity settings.
A switch connected to input jack 3 can be used to enter the Hold Delay Time settings.
A switch connected to input jack 4 can be used to toggle the 4- or 8-way Button Modes.
A switch connected to input jack 5 can be used to toggle the Audio Chirp setting.
The joystick is still able to perform these functions while the Expansion Module is connected.
Switches connected to inputs 6, 7 and 8 do nothing while in either Program Mode.
INPUT JACK
NUMBER
INDICATOR
COLOR
OPERATIONAL
FUNCTION
PROG. MODE 1
FUNCTION
PROG. MODE 2
FUNCTION
1
None
Control Switch
Control Switch
Control Switch
2
Green
Joystick Button 9
Select XY Mode
Joystick Sensitivity
3
Yellow
Joystick Button 10
Select RXY Mode
Hold Delay Time
4
Red
Joystick Button 11
Select POV Mode
4/8-way Select
5
Blue
Joystick Button 12
Select ZRZ Mode
Chirps On/Off
6
Green
Joystick Button 13
7
Yellow
Joystick Button 14
8
Red
Joystick Button 15
MEMORY
Changes to the Joystick Sensitivity, Hold Delay Time, 4-way/8-way Mode and Audio Chirp settings are
stored in the Uno’s internal memory. These settings are restored to their previous states when the Uno is
powered up.
The Uno always powers up in XY Mode.

TetraStick Uno
XAC Left USB
XAC Right USB
Joystick Up
Pointer Up
Pointer Up
Joystick Down
Pointer Down
Pointer Down
Joystick Left
Pointer Left
Pointer Left
Joystick Right
Pointer Right
Pointer Right
Button 1
X1
View
Button 2
X2
Menu
Button 3
LS
RS
Button 4
LB
RB
Button 5
A
X
Button 6
B
Y
Button 7
View
X1
Button 8
Menu
X2
XBOX ADAPTIVE CONTROLLER DEFAULT MAPPINGS
NOTES ON USAGE
Table showing the default mappings of the TetraStick Uno functions when connected to the left USB port or
the right USB port on the Xbox Adaptive Controller. Re-mapping the button functions is strongly
recommended to achieve practical and efficient usage.
Button Re-mapping: In order to take full advantage of the TetraStick Uno it is strongly recommended that
the buttons be re-mapped for function and ease of use. Remapping may be available in some game
settings, gaming consoles and on devices like the Xbox Adaptive Controller. The functions most often used
should be assigned to buttons that are easiest for the user to operate.
TetraLite Products
www.tetramouse.com
Page 5
Table of contents
Other TetraLite Video Game Controllers manuals
Popular Video Game Controllers manuals by other brands
Sunrise Medical
Sunrise Medical Switch-It DriveStation owner's manual

Trust
Trust 16064 Quick installation guide

Thrustmaster
Thrustmaster Ferrari F458 Spider manual
Tandy
Tandy TRS-80 Model II owner's manual

Sony
Sony CHU-ZCT1E instruction manual
Microsoft
Microsoft Xbox 360 Wireless Speed Wheel quick start guide
