TEVVA TEV75B User manual

RADIO MANUAL
TEV75B BATTERY ELECTRIC VEHICLE
ISSUE 01 – JANUARY 2023

1
Controls on mid panel
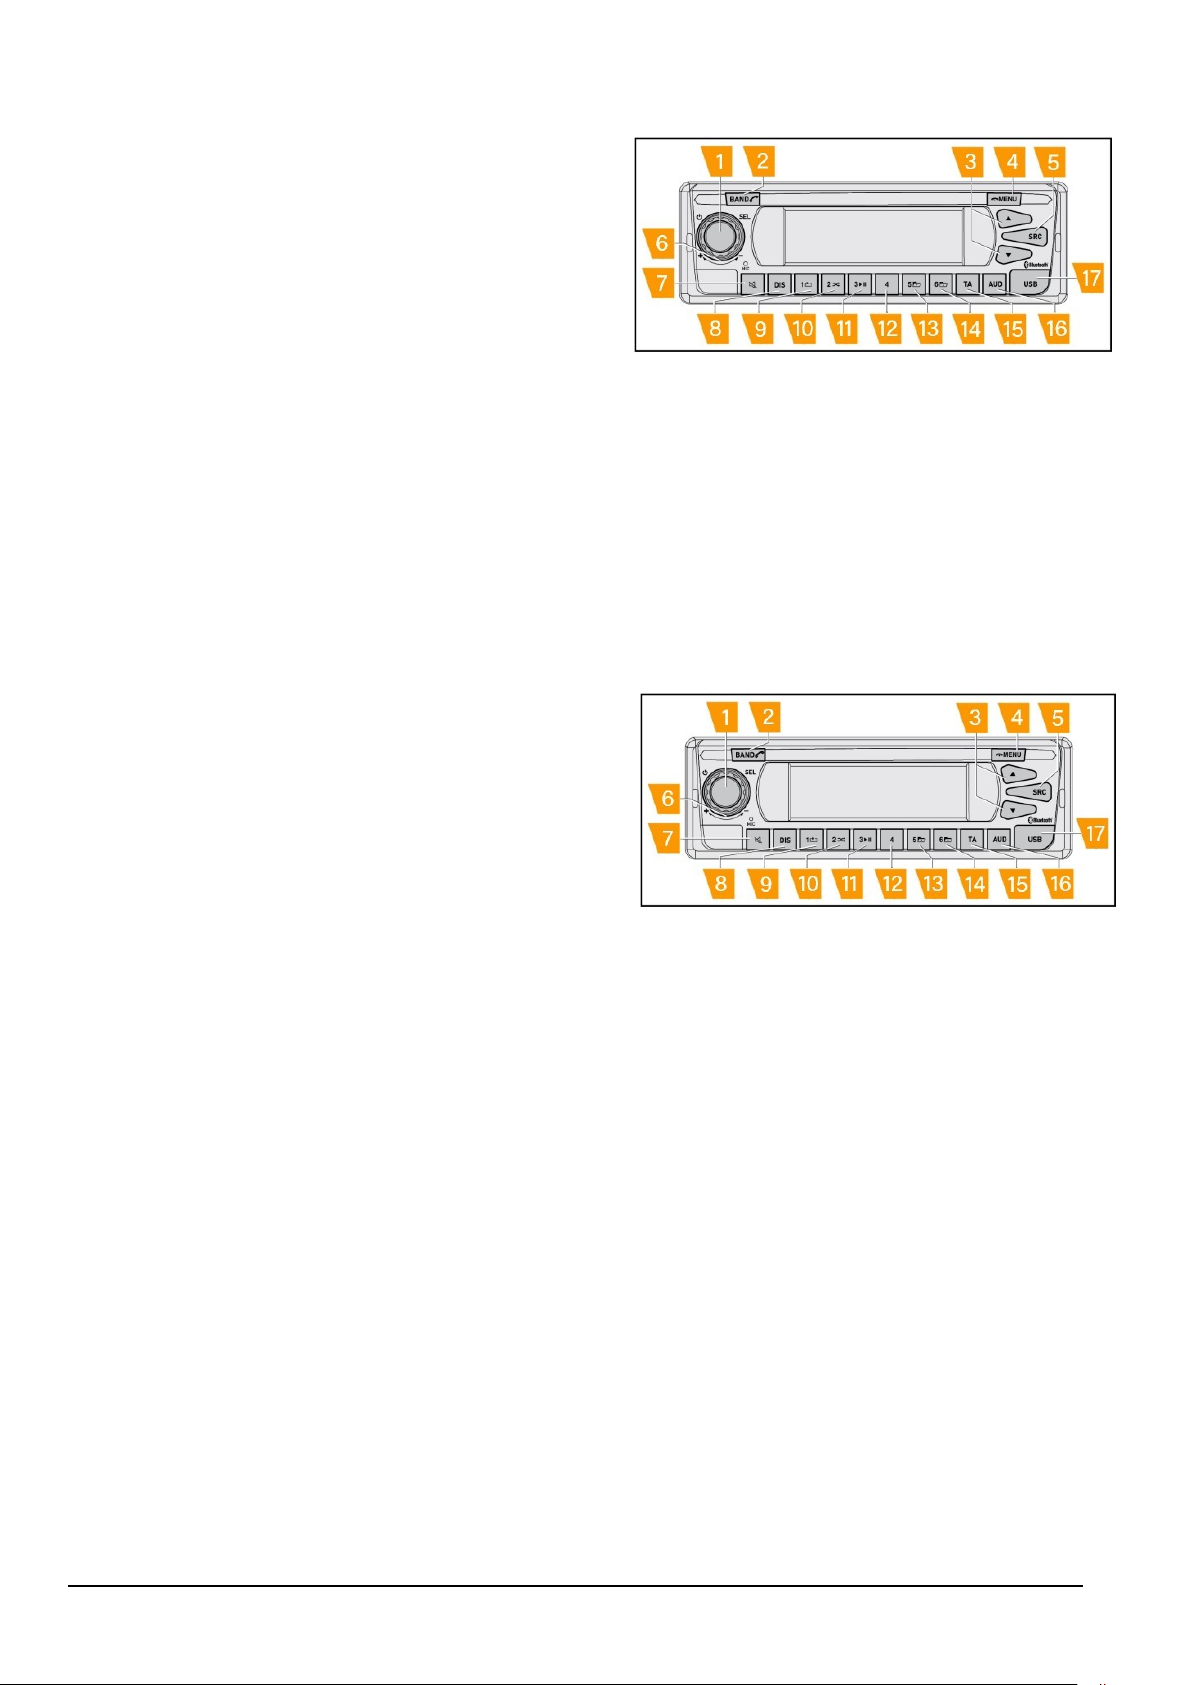
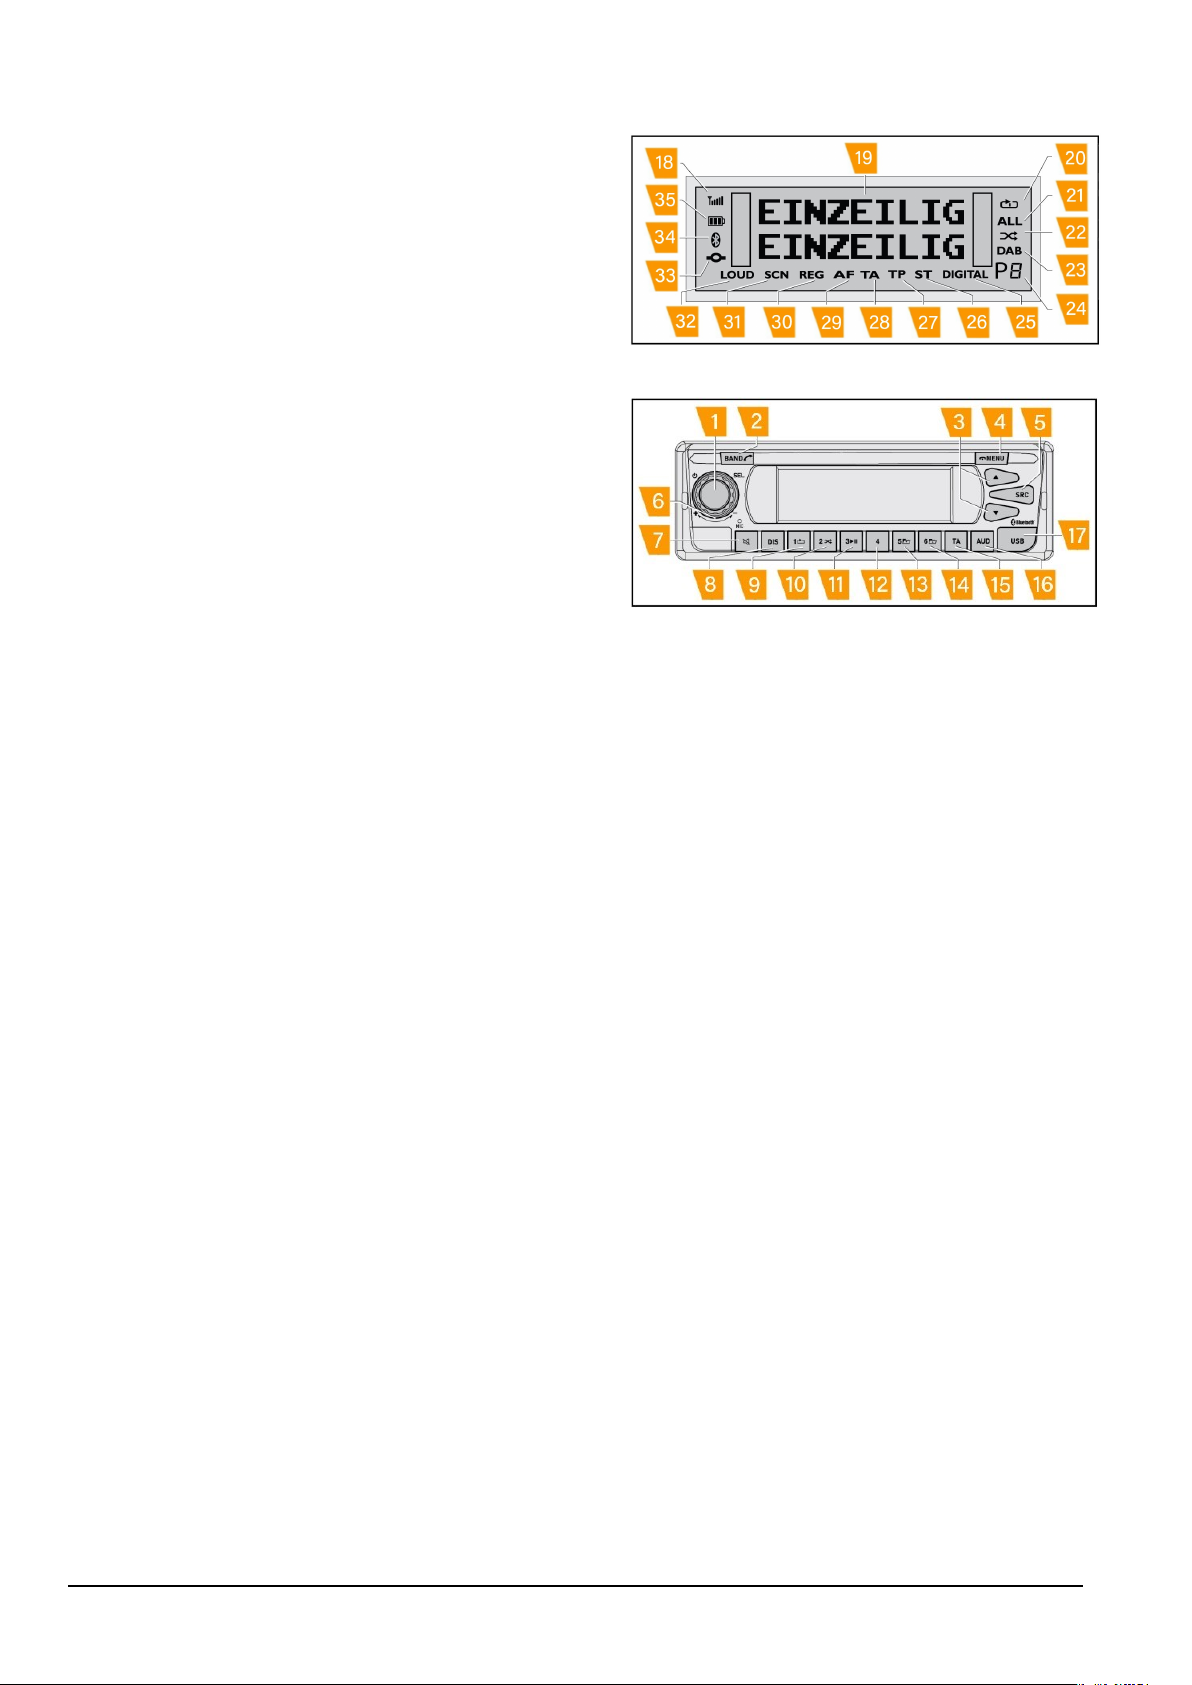
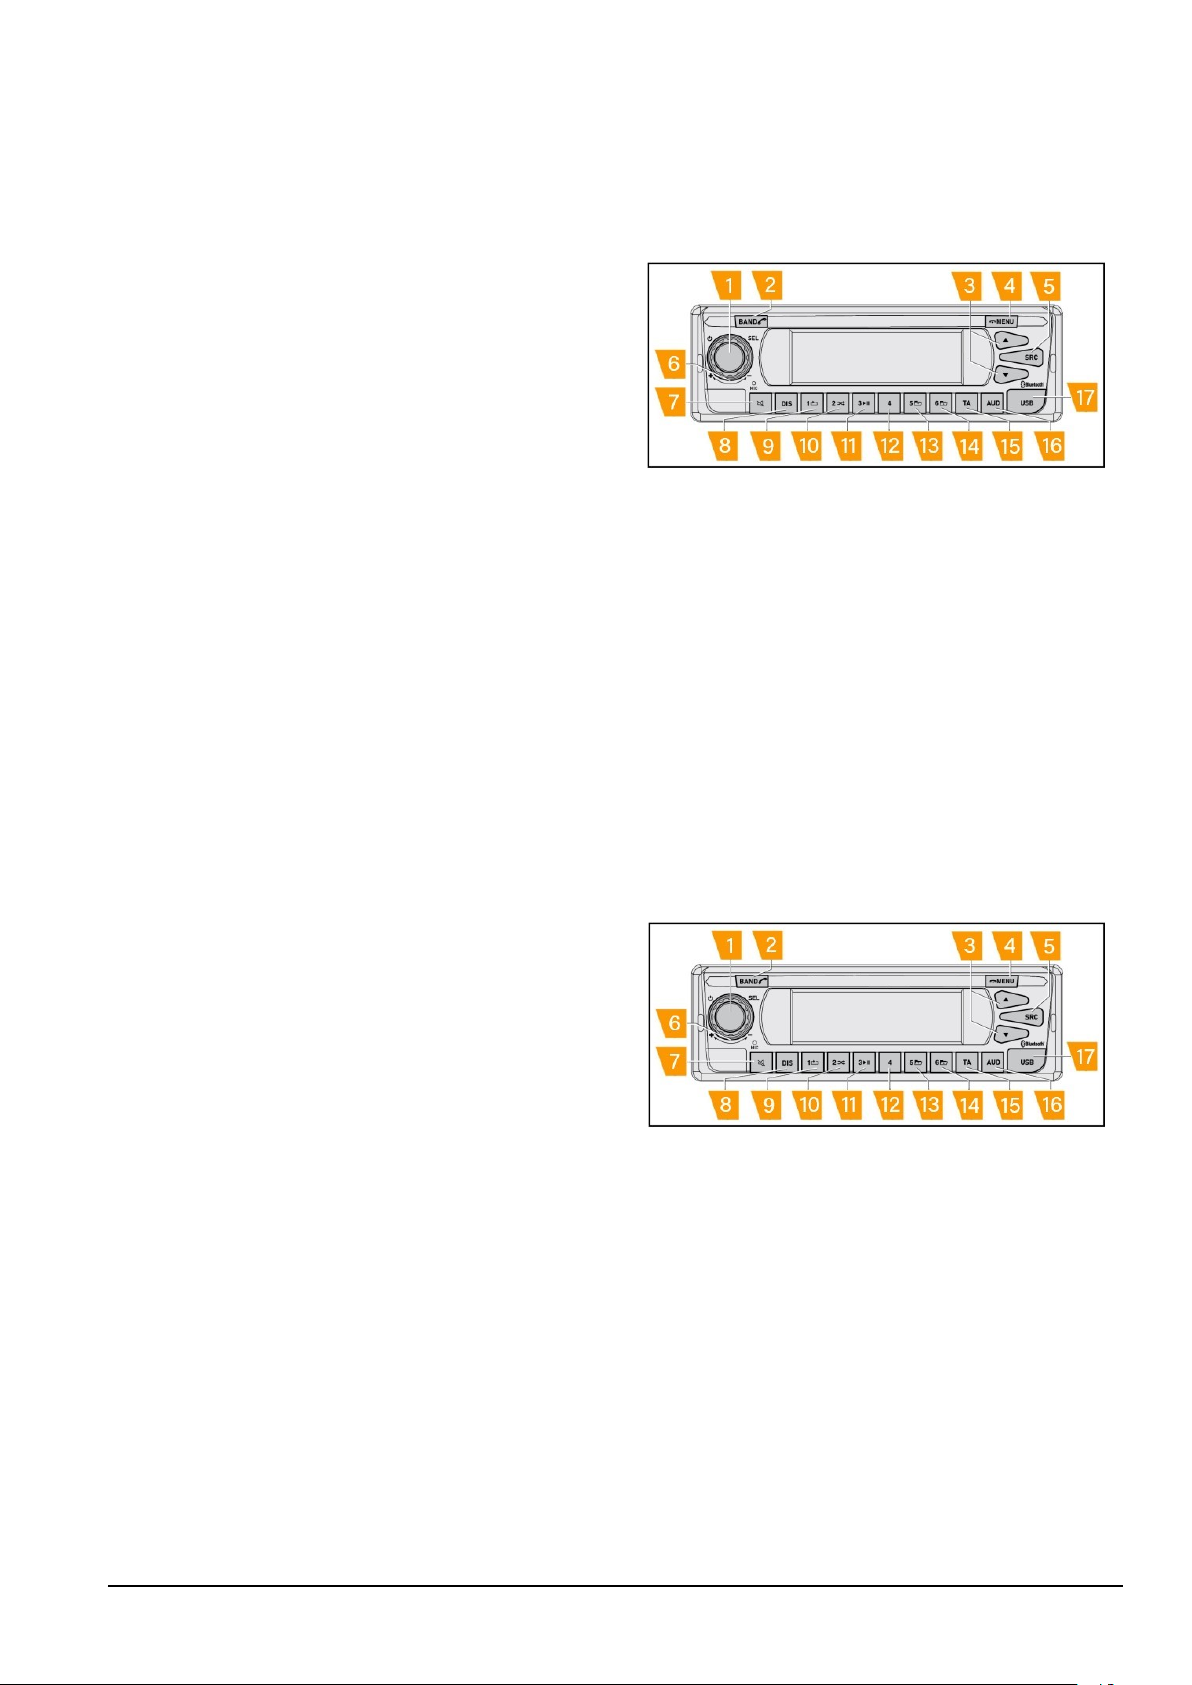
1.On/off button: long press to turn the Radio on if
it was previously off or turn the Radio off if it was
previously on. When setting some options, a short
press confirms the chosen setting.
2. BAND: with FM source, a short press lets you
switch between memory banks and choose the MW
frequency range. A long press opens the Bluetooth
(BT) menu with which it possible to PAIR a phone,
select or delete a phone from the list. If a phone is
connected to the ra-dio via BT , a long press allows
you to view the phone book and the call history of
the connected device. If a phone is connected to the
Radio via BT and a call is received, a short press
allows you to answer the phone call.
3. Selection switch: in FM source, a short
press allows you to switch to the following frequency,
a long press enables the manual seek function
whereby the Radio automatically moves to the
next station. In DAB source, a short press allows you
to move to the follow-ing station. In USB / BT
source, a short press allows you to move to the next
track a long pressing enables the fast forward/fast
rewind function.
4. MENU: in FM and DAB source, a short press
allows you to access the automatic scan frequency
function. In USB source, a short press allows you to
enter a folder browser menu. When a phone is con-
nected via BT to the radio and a phone call is
received, a short press allows you to reject the
phone call. A long pressing allows to enter in the
main settings.
5. Source (SRC): Switches between the radio
source (both FM and DAB ) and USB / iPod and
Bluetooth® (if inserted, connected or activated).
6. Selector: rotate the selector to adjust the
volume level. When entering in some menu,
rotate the selector to scroll all the items.
7. Mute: a short press enables the complete mute
of the audio source. If mute is activated, a short press
clears the complete mute.

2
8. Display: a short press allows display of the
current information of the current source (such as
PTY for Radio source, tag IDR3 for USB / BT source
and current timing).
9. Pre-set 1/RPT: in Radio source, a short press of
the button selects the radio frequency stored in
position 1 of the memory level set. A long press
stores the currently tuned frequency in position 1. In
USB source a short press allows the repeat setting
(repeat the current one, repeat all, repeat off) using
consecutive short presses.
10. Pre-set 2/RDM: in Radio source, a short press
of the button selects the radio frequency stored in
position 2 of the memory level set. A long press
stores the currently tuned frequency in position 2. In
USB source a short press allows the shuffle func-
tion to be set (shuffle all, shuffle only the content of
the current folder, shuffle off) using consecutive
short presses.
11. Pre-set 3/Play and pause: in Radio source, a
short press of the button selects the radio frequency
stored in position 3 of the memory level set. A long
press stores the currently tuned frequency in
position 3. In U SB / BT source a short press allows
you to pause the current track. A short press then
allows the current track to be played.
12. Pre-set 4: in Radio source, a short press of the
button selects the radio frequency stored in posi-tion
4 of the memory level set. A long press stores the
currently tuned frequency in position 4.

3
13. Pre-set 5 / folder down: in Radio source, a short
press of the button selects the radio frequency
stored in position 5 of the memory level set. A long
press stores the currently tuned frequency in
position 5. In USB source, a short press allows you to
select the first track of the following folder (if
present).
14. Pre-set 6 / folder up: in Radio source, a short
press of the button selects the radio frequency
stored in position 6 of the memory level set. A long
press stores the currently tuned frequency in
position 6. In USB source, a short press allows you
to select the first track of the following folder (if
present).
15. Traffic announcement (TA): a short press en-
ables the transmission of the traffic announcement
with higher priority than the current source. Anoth-
er short press disables the transmission of the traffic
announcement.
16. Audio option (AUD): Displays the audio menu
for adjusting bass, mid, treble tones, loudness and
bal-ance.
17. USB: USB type-A port

4
Steering wheel controls
On vehicles with the option available, the Radio can be
controlled via the steering wheel buttons.
In general, the following controls are possible using the
steering wheel buttons:
• Volume adjustment as for button (6).
• Deactivates / activates audio as for button (7).
• Automatic seek up/down or change the track as for (3).
• Change source as for button (5).
• Answer a call as for button (2).
• Reject a call as for button (4).
NOTE: The detailed list of the controls supported by the
vehicle is available in the vehicle user manual.

5
Bed module control
In vehicles that have the option available,the Radio can
be controlled via the Bed Module.
In general, using the bed module button, the following
controls are available:
•Adjust the volume as for (6).
•Mute/unmute the volume as for (7).
•Seek up/down or change the soundtrack as for (3).
•Change source as for (5).
•Turn the radio on/off as for (1).
NOTE: The detailed list of the controls supported by
the vehicle is available in the vehicle user manual.

6
Display
Display description
18. Signal strength: when the phone is connected
via BT to the radio, the icon reports the antenna
signal information of the phone. The absence of the
icon indicates that no phone is connected via BT .
19. Text display: the Radio displays text in two rows.
The upper row reports the main information such as
RDS info, track number and so on. The lower row
reports a details information such as frequency, track
title and so on. The display is updated depending the
current operation.
20. Repeat one: in USB source, the symbol indicates
the selection of the ‘repeat one’ option. The absence
of the icon indicates the selection of the ‘repeat off’
option.
20. Repeat folder: in USB source, the symbol
indicates the selection of the ‘repeat folder’ option.
The absence of the icon indicates the selection of
the ‘repeat off’ option.
21. Repeat all: in USB source, the symbol indicates
the selection of the ‘repeat all’ option. The absence of
the icon indicates the selection of “repeat off” option.
22. Random folder: in USB source, the symbol
indicates the selection of “random folder” option. The
absence of the icon indicates the selection of the
‘random folder off’ option.

7
22. Random all: in USB source, the symbol indicates
the selection of the ‘random all’ option. The absence
of the icon indicates the selection of the ‘random
folder off’ option.
23. DAB: the symbol indicates the selection of the
DAB. option. The absence of the icon indicates that
the current source is other DAB.
24. Pre-set station: in Radio mode ( FM and DAB )
the symbol indicates the selection of pre-set station.
The icon is updated with the preselected number
(from 1-6 as per the pre-selection buttons (9-14 in
the diagram). The absence of the icon indicates the
selection of a station not stored in memory.
25.DIGITAL: in DAB source, the symbol indicates
that the current station has a digital signal. The
absence of the symbol indicates that the current
station does not have a digital signal.
26. ST: in FM source, the symbol indicates that the
current station has a stable signal. The absence of
the icon indicates that the current station does not
have a stable signal therefore a certain level of dis-
turbance might be emitted.

8
27. TP: in FM source, the symbol indicates that the
current station carries traffic announcement.
28. TA: in FM source, the symbol indicates the se-
lection of the ‘traffic announcement option on the
cur-rent station. The option can be set with (15).
29. AF: in FM source, the symbol indicates the se-
lection of the ‘ALTERNATE FREQUENCY’ service.
The option can be selected using the main settings
menu (4).
30. REG: in FM source, the symbol indicates the se-
lection of the ‘REGIONAL’ service. The option can
be selected using the main settings menu (4).

9
31. SCN: in FM source the icon indicates that the
‘frequency scan’ or ‘PRESET SCAN’ option has
been selected. The option can be set with (4).
32. Link: when a phone is connected via BT, the
symbol indicates that the link has been established
and the BT source is available.
33. Bluetooth (BT): when a phone is connected
via BT, the symbol indicates that the Bluetooth®
connection is available. The icon blinks during
“pairing mode” and while the phone book is being
downloaded.
34. Phone battery status: when a phone is
connected via BT, the symbol indicates the status
of the battery of the phone.

10
Alarm code
This device is equipped with a four-digit code to protect
against theft. This code must be inserted when prompted
by the Radio. The code request function is activated in
the factory.
NOTE: The code is indicated in the "radio pass" of your
truck radio. If you lose the code, please contact Tevva
Aftersales.
NOTE: Do not keep the radio password in the vehicle!
When Radio prompts password, the initial digits consist
of four *
To insert your own password:
•First digit: repeatedly press the station 1 pre-selection
button (9) until the display shows the first digit of its
own numeric code.
•Second digit: repeatedly press the station 2 pre-selec-
tion button (10) until the display shows the second digit
of its own numeric code.
•Third digit: repeatedly press the station 3 pre-selection
button (11) until the display shows the third digit of its
own numeric code.
•Fourth digit: repeatedly press the station 4 pre-selec-
tion button (12) until the display shows the fourth digit
of its own numeric code.
•
Brief press (1) to confirm the code.
If the password is correct, the Radio turns (ON) and al-
lows normal operation.
NOTE: If the entered password is incorrect, the
display will show the error ‘Wrong psw xx’ where xx is
the number of failed attempts. After that, the radio
automatically goes back to the “Enter passwd”
window, filling the password with “****”

11
NOTE: the attempt failed number is not cleared with
battery cut-off.
The protection mechanism intervenes in all phases of Ra-
dio operation in order to detect anomaly situations. Al-
though the Radio can always be used even with the vehi-
cle stationary and key set to OFF, when the key is subse-
quently inserted, the Radio, switched on previously, may
show the message ‘VIN ERROR’ and then automatically
switch off after a few seconds.
In this case the Radio needs to confirm the password for
the vehicle on which it is currently mounted and the fol-
lowing procedure must be implemented:
•Switch off the radio with a long press on the ON/OFF
button (1) .
•Switch off the vehicle (key OFF).
•Start the vehicle (key ON).
•The radio shows the password required screen.
•Enter the password in the 'radio pass' using the proce-
dure described above.
NOTE: As protection strategy against tampering,
after some failed attempts Radio waits some time
before enabling the prompt of the password. The
waiting time is related to the number of failed
attempts and follows the below table.
Number of incorrect
passwords entered
Wait time
12 s
230 s
3120 s
4600 s
51200 s
6 - 20 3600 s
>20 Permanent
ATTENTION: After 20 attempts, the Radio is no longer
recoverable.
NOTE: If the vehicle is switched off during password
input lock, the remaining timer is resumed the
following time the Radio turns on.
NOTE: If battery cut off happens during password
input lock, the following time that the Radio is switched
on, the waiting time restarts from the beginning. For
example: total waiting time is 600 s, remaining time is
300 s and the battery is then deactivated. The next
time that the Radio is switched on, the waiting time is
restored again to 600 s.

12
System operation
Turning on/switching off the device
The device could be turned on/off in several ways.
During start-up, the device shows the Tevva splash
screen.
Turning on/off using the ON/OFF button
•Long press the button (1) ON / OFF to activate the
device.
•Long press the button (1) ON / OFF to deactivate the
device.
NOTE: The device could be turned on/off even if the
ignition is off.
NOTE: If the device is turned off when the ignition
key is set to ‘ON’, the knob light is on.
NOTE: In order to save the vehicle battery, if the
device is turned on when ignition key is set to ‘OFF’ ,
the device only stays on for 20 min .
NOTE: If the phone is connected via Bluetooth® and an
active call is ongoing, it is not possible to turn off the
radio during the call.
Turning on/off using ignition key
When the ignition key is set to ‘ON’, the device recalls
the last status.
If the device was off before ignition on, when the ignition
is set to ‘ON’ :
•The device stays off.
•The knob light is set to ‘ON’ .
If the device was on before ignition on, when the ignition
is set to ‘ON’ :
•The device will turn on.
•The knob light is set to ‘ON’ .
When the ignition key is set to ‘OFF’ , the device:
•Deactivates if the ‘AUTO OFF’ function is not activated.
•Remains active if the ‘AUTO OFF’ function is not acti-
vated.

13
Auto off option
The ‘AUTO OFF’ option handles the behaviour of the de-
vice when the ignition is switched off.
Conditions for ‘AUTO OFF’ :
•When the ignition is switched off, the radio stays on for
20 min .
•After 20 min, the radio is automatically deactivated.
When ‘AUTO OFF’ is not set:
•When the ignition is switched off, the radio is
automatically turned off.
In any case, during the ‘AUTO OFF’ timer, it is possible to
manually deactivate the radio by pressing the ON / OFF
button (1) .
To activate the ‘AUTO OFF’ option:
•Long press (4) .
•Scroll the main settings using (6) .
•When the cursor points to ‘AUTO OFF’ , short press
(1) .
•To enable the option, point the cursor to ON and then
short press (1) to confirm.
•To disable the option, point the cursor to ‘OFF’ and then
short press (1) to confirm.
•After the selection, the display return to the main set-
tings window.
•Press (4) to exit the menu instantly or after 10 s the
radio automatically exits the menu.
NOTE: The ‘AUTO OFF’ function is active as the default
setting;.
Call management
If a phone is connected via Bluetooth® and an active call
is ongoing:
•It is not possible to turn off the radio via (1) .
•It is not possible to turn off the radio via the Bed module
(where available) .
If vehicle ignition is switched off during an active call, the
radio stays on for 20 min . After 20 min the radio
is automatically turned off even if the call has not ended:
in this case the audio is transferred from the radio to the
phone and the call stays on.
NOTE: If the ‘AUTO OFF’ option is set to ON and the
ignition is switched off: if the call ends within 20 min ,
la radio remains on until the timer ‘AUTO OFF’ expires.
If the ‘AUTO OFF’ option is set to OFF and the ignition
is switched off: If the call ends within 20 min , the
radio is automatically turned off at the end of the call.

14
Turning on/off using Bed Module
Where available, it is possible to turn on/off the radio using
bed module buttons.
NOTE: See the vehicle user manual for further details
about the bed module function
Volume adjustment
It is possible to gradually adjust the system volume from
0 (off) to 40 (max.).
•To increase the system volume, turn the volume adjust-
ment control (6) clockwise.
•To decrease the system volume, turn the volume ad-
justment control (6) anti-clockwise.
Acoustic signal (BEEP)
In FM source a confirmation sound is emitted ( beep )
during manual forward / backward search using a long
press on the button (3) or during manual storage of
stations in the pre-set bank in radio mode with a long
press one of the pre-set buttons: (9) (10) (11) (12) (13)
(14) .
The confirmation acoustic signal can be deactivated:
•Long press the MENU button (4) to access the main
settings.
•Scroll the main settings using the selector (6) .
•When the cursor points to BEEP , short press (1) .
•To enable the option, point the cursor to ON and then
short press (1) to confirm.
•To disable the option, point the cursor to OFF and then
short press (1) to confirm.
•After the selection, the display return to the main set-
tings window.
•Press (4) to exit the menu instantly or after 10 s the
radio automatically exits the menu.
Volume when turning ON the vehicle
To protect your hearing from excessive volume, the radio
applies a strategy to decide the starting volume each
time it is switched on.
If at the previous power-on the last volume value was
lower than the default volume, the start volume will be
the same as the previous volume; if at the previous
power-on the last volume value was higher than the
default volume, the start volume will be the same as the
default volume;
In case of battery cut off, when Radio turns on again, the
volume starts to the default value.
NOTE: Default volume by factory setting is 15.

15
The default volume can be modified:
•Long press the MENU button (4) to access the main
settings.
•Scroll the main settings using the selector (6) .
•When the cursor points to START VOLUME , short
press (1) .
•To enable the option, point the cursor to (ON) and then
short press (1) to confirm.
•To disable the option, point the cursor to OFF and then
short press (1) to confirm.
•Press (4) to exit the menu instantly or after 10 seconds
radio automatically exits the menu.
NOTE: During the selection of the START VOLUME ,
the volume of the radio is modified according to the
chosen START VOLUME value. This way the user can
evaluate the START VOLUME selected. As soon as the
user exits the START VOLUME menu, the previous
volume is restored.
Volume when the safety systems intervene
The device applies automatic volume setting in case the
safety systems intervenes.
NOTE: The function is active only if the safety systems
are available and activated by the driver.
LDWS
In case of LDWS activation, the Radio volume switches
automatically to 0.
When LDWS is deactivated, the Radio volume automati-
cally switches to the previous one.
NOTE: See the vehicle user manual for detailed infor-
mation about the LDWS system.
AEBS
In case of AEBS activation, the Radio volume switches
automatically to 0.
When AEBS is deactivated, the Radio volume automati-
cally switches to the previous one.
NOTE: See the vehicle user manual for detailed infor-
mation about the AEBS system.
Volume in blackout mode
On vehicles in which the function is supported, in case of
“ blackout ” activation, the Radio volume switches auto-
matically to 0 and the display turns off.
When blackout mode is deactivated, the Radio volume
automatically switches to the previous one and the display
turns on.

16
NOTE: See the vehicle user manual the availability of the
function and for detailed information.
Volume adjustment via Bed Module
On vehicles where the option is available, volume and
mute can be adjusted using the Bed module button as for
the selector (6) and the button (7) .
NOTE: Check the vehicle user manual for further
details about the Bed module controls.
Volume adjustment via Steering wheel but-
ton
On vehicles where the option is available, volume and
mute can be adjusted using the steering wheel controls
as for the selector (6) and the button (7) .
NOTE: Check the vehicle user manual for further
details about the steering wheel controls.
Volume during a call
During a call, it is applied a dynamic default volume.
NOTE: At the first call, the default volume is 15
If the volume is increased/decreased during a call (rolling
selector (6) ), the chosen volume value will be applied for
the following calls until the user increases/decreases the
volume during the call once again.
The volume during active call is not related to the general
volume.
At the end of the call, the volume set before the call is
applied again.
NOTE: It is not possible to mute the volume during an
active call using (7) or the external controls (steering
wheel button, Bed module).

17
Volume during Traffic announcement
When the traffic announcement function (short press of
(15) ) is activated on a station that transmits the traffic
an-nouncement, the volume is automatically increased
when there is an announcement.
The volume increase starts from the current main vol-
ume and it can be selected using the TA option in the
main settings menu.
•Long press the MENU button (4) to access the main
settings.
•Scroll the main settings using (6)
•When the cursor points to TA , short press (1)
•Scroll the list of the level (from 0 to 10) using (6) .
•When the cursor points to the chosen level, short press
(1) .
•After the selection, the display return to the main set-
tings window.
•Press (4) to exit the menu instantly or after 10 s the
radio automatically exits the menu.
At the end of the traffic announcement transmission, vol-
ume switches automatically to the previous one.
When TA function is activated, the icon (28) is shown on
the display.
NOTE: The default TA value is 3.
Volume muting (MUTE)
The system volume can be muted instantly:
•Short press the (7) button .
While the volume is muted, the display will indicate
‘MUTE’ .
To restore the previously set volume level:
•Short press the button (7) again.

18
Mute priority
In case several mute conditions are applied at the same
time, Radio applies a priority in order to detect if the mute
could be released.
Radio follows this level of priority (from the highest to the
lower):
•Blackout mode.
•AEBS .
•LDWS
•Steering wheel button and Bed module button.
•(7)
If the AEBS and LDWS systems are activated at the same
time, the device is not muted if the LDWS system is dis-
abled.
NOTE: The priority is applied only if the setting is
available and activated.
Volume adjustment based on vehicle speed
(GALA)
Volume adjustment based on vehicle speed is a function
used to increase the normal volume selected by the cus-
tomer based on vehicle speed (GALA) .
Radio supports three different levels:
•Level 1
•Level 2
•Level 3
As the level increases, both sensitivity and the amplifica-
tion applied to the specific speed range of the vehicle
also increases.
The GALA options can be set using the main settings.
•Long press the MENU button (4) to access the main
settings.
•Scroll the main settings using (6) .
•When the cursor points to GALA , short press (1) .
•Scroll the list of the levels (from OFF to LEVEL 3 ) using
(6) .
•When the cursor points to the chosen level, short press
(1) .
•After the selection, the display return to the main set-
tings window
•Press (4) to exit the menu instantly or after 10 s the
radio automatically exits the menu.
NOTE: GALA LEVEL 1 is set by default.

19
Sound option
The user could adjust the sound following his feeling in
order to control:
•Bass.
•Mid.
•Treble.
•Loudness.
•Balance.
NOTE: The settings is independent of the source,
therefore a single setting is used for all audio sources.
Adjusting Bass, Mid and Treble tones
•Short press the AUD button (16) .
•Use the volume control (6) to select the option ‘Bass’ ,
‘Mid’ or ‘Treble’ .
•To set the level of the bass, mid, treble tones to a value
between -7 to +7, turn the volume adjustment control
(6) anti-clockwise or clockwise.
•To confirm the chosen level, short press (1) .
• To close the menu, press the button (16) .
• If the button is not pressed, the radio
automatically switches to the previous main page after
10 s .
NOTE: The default Bass, Mid and Treble value set by
factory is 0.
Adjustment of volume distribution – balance
(left/right side)
• Short press the button (16)
•Use the volume adjust control (6) to select the BAL-
ANCE option.
•To set the volume distribution to a value between -10 to
+10, turn the volume adjustment control (6) anti-clock-
wise or clockwise.
•To confirm the chosen level, short press (1) .
• To close the menu, press the button (16) .
• If the button is not pressed, the radio
automatically switches to the previous main page after
10 s.
NOTE: The default Balance value set by factory is 0.
Other manuals for TEV75B
2
Table of contents
Other TEVVA Electric Vehicle manuals