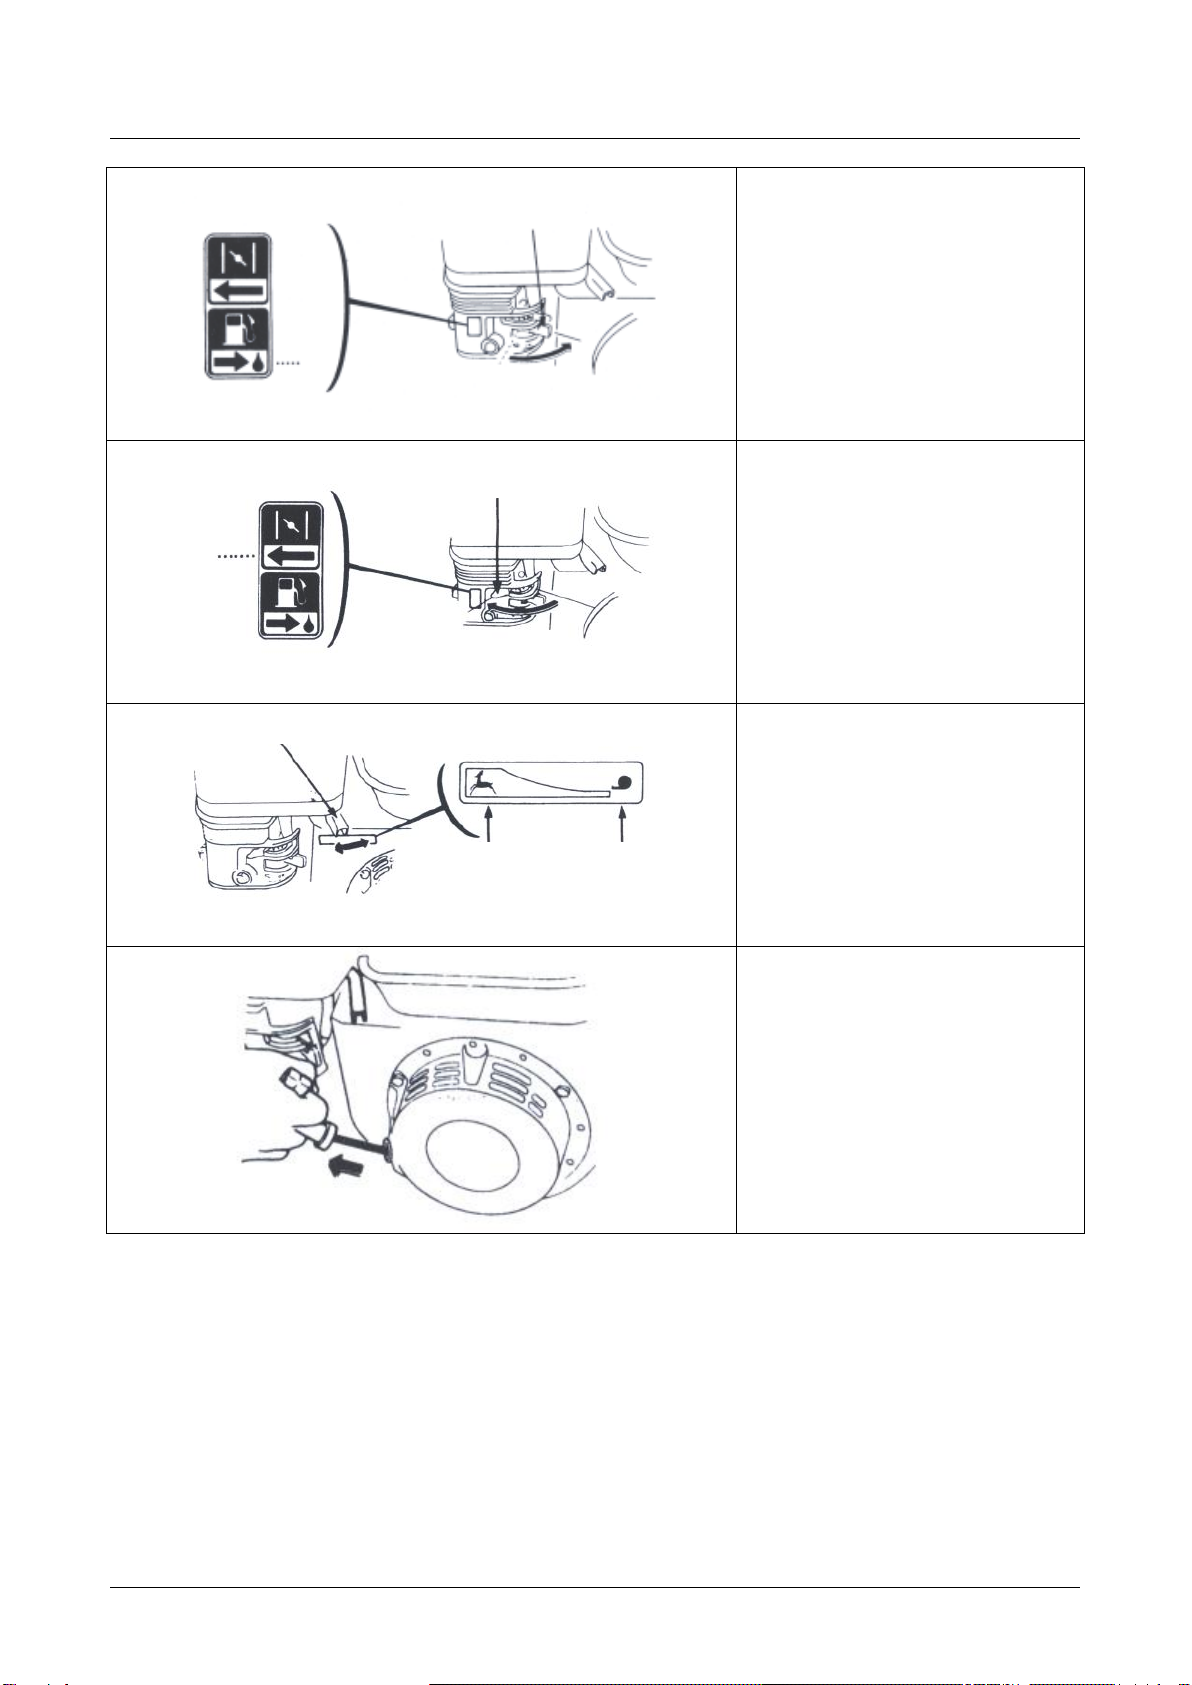
Texas Power Line TG510 User manual

TG510
DK Betjeningsvejledning
GB Instruction Manual
D Bedienungsanleitung
F Manuel de I’utilisateur
Рус Инструкция по эксплуатации
NL Handleiding
Texas A/S - Knullen 22 - DK-5260 Odense S - Denmark 09.02

2
2. Illustrationer
Fig 1
Fig 2
Fig 4
Fig 6
1
1
2
1
2 3

3
Fig 8
Fig 9
Fig 10
1
2
1
1
2
3

4
Fig 11
Fig 12
Fig 13

5
Fig 14
Fig 15
Fig 16
Fig 17

6
ADVARSEL - Læs altid betjeningsvejledningen før brug af din motor.
ADVARSEL - Følg altid de retningslinjer, din lokale Power Line forhandler giver med
hensyn til Power Line.
ADVARSEL - Stop altid din motor før opfyldning.
ADVARSEL - Hvis spild forekommer, tør da altid grundigt op.
ADVARSEL - Hold altid motoren på afstand af olier og andet brandfarligt.
ADVARSEL - Udstødningen er farligt, brug derfor kun motoren, udenfor eller i et godt
ventileret område.
ADVARSEL - Vær opmærksom på ikke at komme i kontakt med motorens bevægelige
dele, under kørsel.
ADVARSEL - Vær opmærksom på ikke at komme i kontakt med motorens udstødning
og blok, da den bliver meget varm under kørsel.
ADVARSEL - Brug aldrig motoren efter indtagelse af alkohol, eller narkotika.
1. Indholdsfortegnelse
1. Illustrationer………………………………………………………………………………………3
2. Montering.........................................................................................................................7
3. Olie / olieskift ...................................................................................................................7
4. Brændstof........................................................................................................................8
5. Luftfilter............................................................................................................................8
6. Start.................................................................................................................................9
7. Stop af motor...................................................................................................................9
8. Kørsel ............................................................................................................................10
9. Tændrør.........................................................................................................................10
10.Vedligeholdelse ............................................................................................................10
11. Specifikationer .............................................................................................................12

7
2. Montering
FREMGANGSMÅDE
1. Spænd motoren sikkert fast på basen.
2. Vær sikker på at motorens PTO er i lige linje med modtagerens PTO.
Motor –Maskine.
En skæv PTO vil resultere i at motoren ikke trækker ordentlig, og vil blive
beskadiget.
SPØRGSMÅL
Hvis der opstår problemer eller spørgsmål omkring montering af din Power Line Motor, er
du altid velkommen til at kontakte din Lokale forhandler.
3. Olie / olieskift
OLIE
Brug den rigtige olie for den rigtige årstid.
ved 20
10-20
Under 10
SAE 30
SAE 30
SAE 10W - 30
OLIE KAPACITET
Check altid olie niveauet, når motoren står vandret.
Check altid olie niveauet uden at skrue oliepinden fast.
Se figur 8 og 9, side 4.
TG510
0,6 Liter
OLIESKIFT
Olien bør skiftes ifølge betjeningsvejledningen for maskinen.
1. Lad motoren køre 5 minutter, så olien når at blive varmet op. Dette gør at den løber
lettere og at olieskiftet bliver mere komplet.
2. Efter 5 minutter slukkes motoren. Motorens oliebundprop kan nu skrues løs, og
olien løber ud af motoren. Husk at have en passende beholder klar.
3. Bundproppen kan nu skrues i på ny, og ny olie kan hældes i motoren.
4. Dette gøres ved at fjerne oliepinden og hælde den rigtige mængde olie på.
Husk at skaffe dig af med den brugte olie, så du ikke er til gene for naturen.
Brug din lokale genbrugsstation.

8
4. Brændstof
BRÆNDSTOF
Brug kun blyfri 95 oktan brændstof på din motor. Samt den rigtige kapacitet
Overfyld aldrig tanken. På tanken er der en indikator, der viser mængden af det
resterende brændstof.
Se figur 10, side 5.
TG510
3,6 Liter
5. Luftfilter
LUFTFILTERET
Luftfilteret skal efterses og renses jævnligt. Hvis filteret ikke er blevet renset i en længere
periode, vil dette kunne mærkes på motorens kraftoverførsel, samt kunne ses på
udstødningsgassen.
1. Afmonter fingermøtrikken, der holder dækslet til luftfilteret, og fjern dækslet.
2. Rengør let omkring luftfilteret, inden det fjernes.
3. Tag forsigtigt filteret ud, og undersøg det. Pas på der ikke kommer snavs ned i
karburatoren.
4. Afvask skumelementet i benzin eller petroleum.
5. Vrid elementet og lad det tørre. Derefter gennemvædes det i ny olie, og
overskydende olie vrides ud.
VIGTIGT: Er motoren monteret med papirelement. Må der under ingen
omstændigheder komme olie på filteret.
6. Rens filter beholderen.
7. Elementet sættes igen på plads.
8. Vær opmærksom på at alle dele er samlet rigtigt.
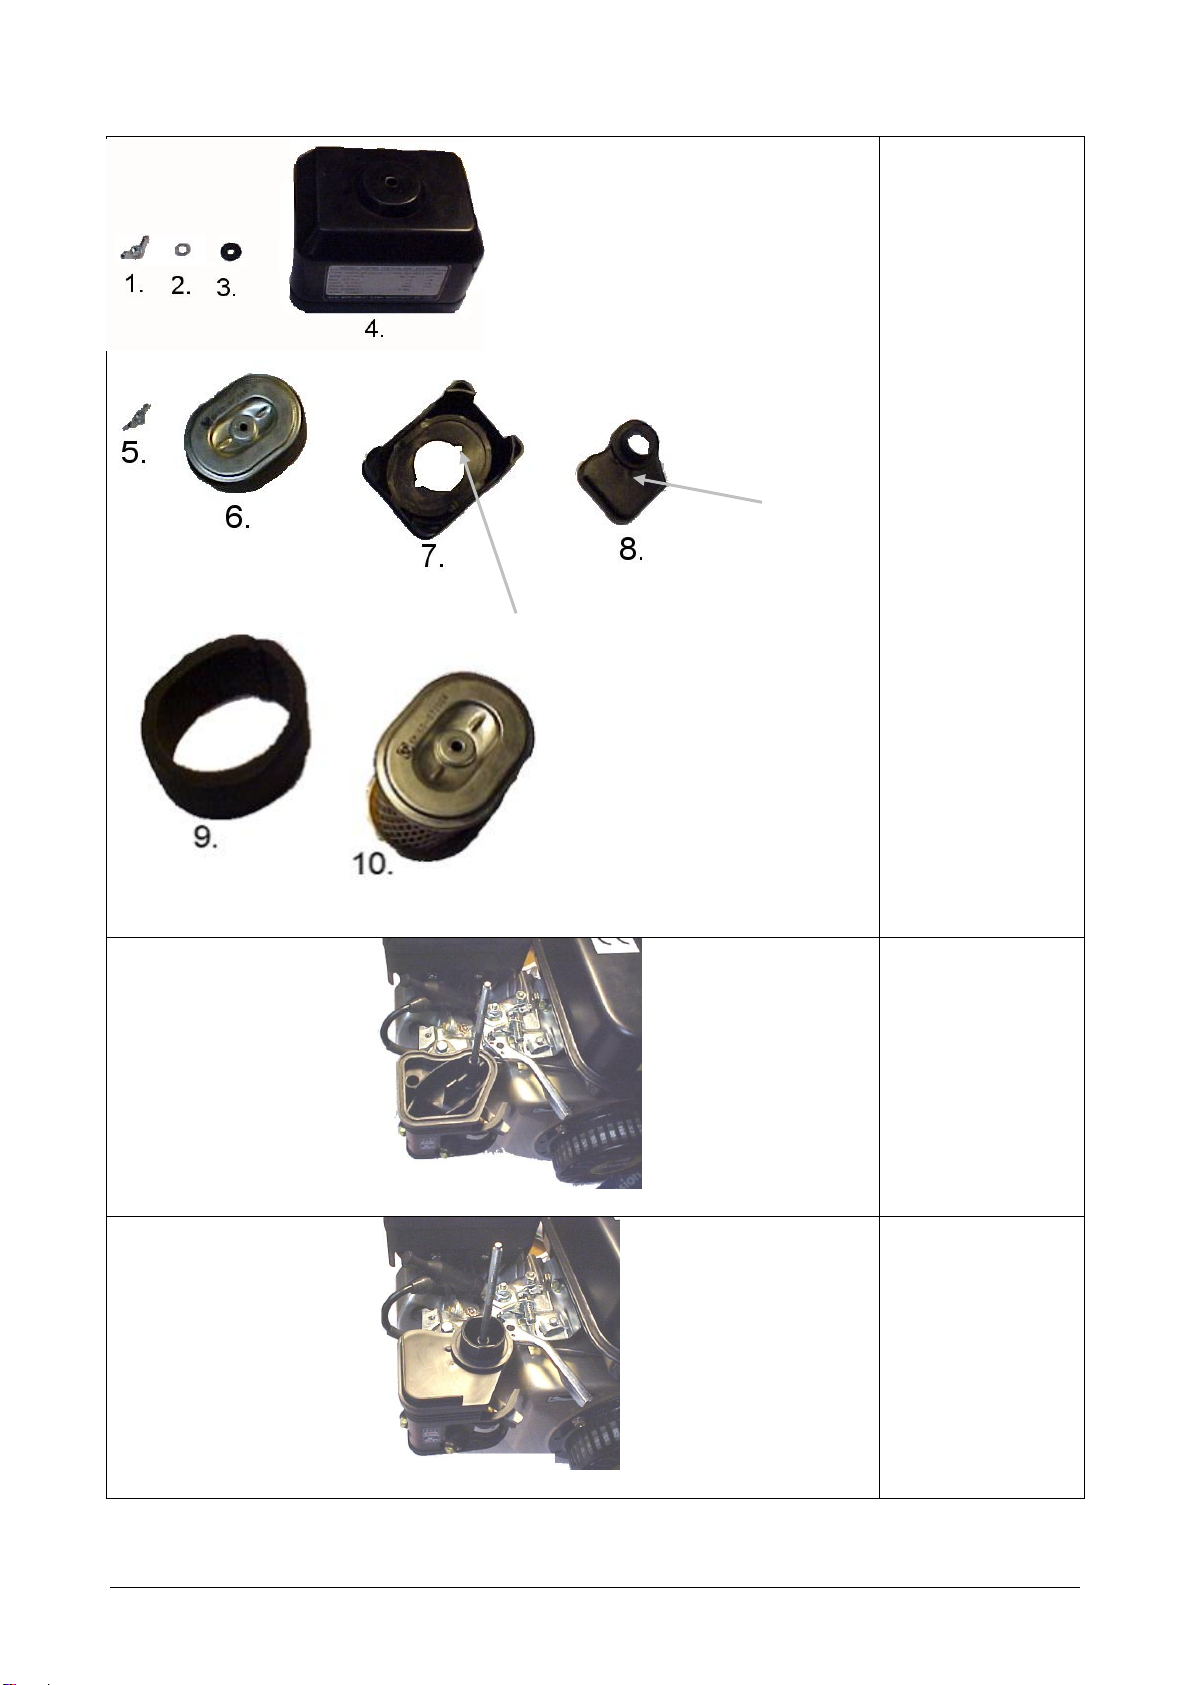
1. Er filteret et papir element, renses det på følgende måde.
2. Sku fingermøtrikken af, der holder dækslet til luftfilteret, og fjern dæksel.
3. Tag forsigtigt filteret ud, og undersøg det. Pas på der ikke kommer snavs ned i
karburatoren.
4. Kontroller omhyggeligt for revner og huller, udskift om nødvendigt.
5. Fjern støvet fra luftfilteret ved at banke let på elementet nogle gange. Eller ved at
blæse trykluft igennem indefra., forsøg aldrig at børste støvet væk. En børste vil
kun presse støvet ind i elementet. Udskift luftfilteret, hvis elementet er meget
snavset.
6. Elementet sættes igen på plads.
7. Vær opmærksom på at alle dele er samlet rigtigt.
Se Figur 11, 12-17
1.Møtrik
2.Spændeskive
3.Pakning
4.Dæksel
5.Møtrik
6. Luftfilter
7. Holder
8. Låg
9. Skumfilter
10.Luftfilter kasse

9
MONTERING
1. Bunden af luftfilterindtaget, figur 12.
2. Låg på indtaget. Det er vigtigt at låget bliver presset godt ned i holderen, så det
passer. Her er det vist rigtigt, figur 13.
3. FORKERT !! Bemærk åbningen mellem bund og låg, figur 14.
4. Placer holderen til selve luftfilteret på låget. Det er vigtigt at tappen på låget passer
ind i tappen på holderen. Vist på billedet på forrige side, figur 15.
5. Placer filteret i holderen. Brug fingermøtrikken til at fæstne det med. Det er vigtigt
at det bliver skruet godt fast, figur 16.
6. Låget monteres. Pakning og spændeskive sættes på, hvorefter der fæstnes med
en fingermøtrik. Vær sikker på at alle dele passer rigtigt sammen, så der ikke
kommer falsk luft ind i motoren, figur 17.
SPØRGSMÅL
Hvis du er i tvivl om dit luftfilter er monteret rigtigt, bør du kontakte din lokale Power Line
forhandler.
6. Start
FREMGANGSMÅDE
1. Åben for brændstofhanen.
2. Drej chokeren til højre, hvis motoren er varm er det ikke nødvendigt at anvende
choker.
3. Drej motorens gaskontrol helt til venstre, derved gives der fuld gas.
(Hvis motoren er monteret på en maskine, med kabelreguleret gas, gives der fuld
gas).
4. Sæt maskinens gashåndtag på ”start”
5. Træk langsomt i motorens startsnor, indtil der føles modstand. Træk derefter
kraftigt i ét lang træk. Lad aldrig startsnoren løbe tilbage af sig selv, følg den altid
tilbage med hånden.
6. Reguler chokeren, indtil motoren har en jævn motorgang.
Se figurer 1, 2, 4, 6, side 3
7. Stop af motor
FREMGANGSMÅDE
1. Placer gaskontrollen i ”low” position og lad motoren køre lidt tid.
2. Sluk maskinen på tændingskontakten.
3. Drej benzinhanen til ”off”
Se figurer 4, 7, side 3

10
8. Kørsel
KØRSEL
1. Efter motoren er startet, flyt da gradvist chokeren mod højre.
2. Indstil gassen til den ønskede fart.
Se figurer 2, side 3
BEMÆRK
-Læg mærke til følgende under kørsel.
-Udstødningsgassen skal ikke være sort. Hvis dette forekommer er det fordi
belastningen er for høj, eller motoren ikke er justeret rigtigt.
-Ingen uretmæssige lyde og vibrationer.
-Hvis dette forekommer, sluk motoren og juster motoren, kontakt evt. et
autoriseret Texas Powerline værksted.
9. Tændrør
FREMGANGSMÅDE
-Fjern tændrørshætten.
-Børst skidt og snavs væk fra tændrøret.
-Brug en tændrørsnøgle til at løsne tændrøret.
-Check om isoleringen er intakt.
-Rens tændrøret med en stålbørste .
-Mål elektrodeafstanden, pas på ikke at beskadige elektroden.
-Afstanden bør være: 0,7 –0,8 mm
-Hvis tændrøret er godt, monter igen.
-Monter tændrørshætten.
10. Transport og opbevaring
OPBEVARING
Under transport er det vigtigt at sikre sig, at maskinen er placeret vandret for at undgå,
at benzin og olie løber ud.
Lad motoren køre til den stopper. Løsn karburatorens aftapper bolt og lad benzinen
løbe ud. Når benzinen er løbet ud, skrues bolten fast igen og benzinslangen monteres.
Opbevar benzinen i en godkendt dunk.

11
OILESKIFT
Tag stikket af tændrøret.
Endvidere skal olien skiftes. Løsn motoren bundprop, hvorved olien løber ud. Opbevar
olien i en godkendt dunk.
Hæld frisk olie på.
Se figur 9
OPBEVARING
Afmonter tændrøret og hæld 1 spiseskefuld olie i cylinderen, og monter tændrøret igen.
Monter ikke tændrørshætten. Træk herefter i startsnoren, indtil der mærkes modstand.
dette lukker for ventilerne og beskytter dem mod rust og korrosion.
Beskyt motoren med et tyndt lag olie for at undgå rust.
Opbevar på en plan flade i et tørt støvfrit område, hvor børn ikke kan komme til den.
Inden motoren tages i brug igen, skal tændrørskablet monteret igen.
11. Vedligeholdelse
Interval
Del
Hver gang
For hver
20
køretimer
For hver
50
køretimer
For hver
100
køretimer
For hver
200
køretimer
Check bolte og
møtrikker
X
Check og påfyld olie
X
Skift olie
X
X
Rens / skift olie filter
X (rens)
X (rens)
Check olie lækage
X
Check luft filter
X
Rens Luftfilter
X*
Rens brændstoffilter
X
Check tændrør
X
Check
brændstofpumpe
X
Juster ventiler
X
Check ventiler
X
* følg henvisning fra betjeningsvejledning angående luftfiltervedligeholdelse, når
motoren er monteret på en fræser.
BEMÆRK
-Formålet med vedligeholdelsen er at holde generatoren i bedst mulig stand.
-Reparationer bør altid blive udført på et autoriseret Power Line værksted.

12
12. Specifikationer
Model
TG510
Type
4 takt, luftkølet OHV, 1 cylinder, benzin motor
Boring x slaglængde mm
8 x 45
Slagvolumen L
0,163
Max power kW (HK) / Omdr/min
3,6 (4,9) / 3600
Konstant power kW (HK) / omdr/min
3,3 (4,5) / 3600
Brændstof
Blyfri benzin
Brændstof kapacitet
3,6 L
Brændstofforbrug (g/PS.h)
275
Smøreolie
SAE30
Smøreolie kapacitet
0,6 Liter
Start system
Rekyl
Tændrør
DENSO W20 EPRU
Reguleringssystem
Mekanisk
Roterende retning af PTO
Med uret, set fra PTO’ens ende
Dimension (L x B x h), mm
305 x 365 x 335
Tør vægt, kg
14

13
WARNING Always read the user manual before use of the engine.
WARNING Always follow the guidelines given by your Power Line dealer with
regard to the engine.
WARNING Always stop the engine before filling with gasoline or oil.
WARNING Always clean thoroughly if fluids are spilled.
WARNING Always keep the engine at a distance from oils or other
inflammable objects.
WARNING Exhaust is dangerous, only use the engine outdoors or in a well
ventilated area.
WARNING Draw attention to not getting into contact with the engine’s rotating
parts during operation.
WARNING Draw attention to not getting into contact with the engine’s
0exhaust and the engine’s block as it gets very warm during
operation.
WARNING Never use the engine under influence of alcohol or drugs.
1. Contents
1. Illustration………………………………………………………………………………………...3
2. Assembly.......................................................................................................................14
3. Oil / changing oil............................................................................................................14
4. Fuel................................................................................................................................14
5. Air filter...........................................................................................................................15
6. Starting ..........................................................................................................................16
7. Stopping the engine.......................................................................................................17
8. Operation.......................................................................................................................17
9. Sparking plug.................................................................................................................17
10. Maintenance ................................................................................................................18
11. Specifications...............................................................................................................19

14
2. Assembly
PROCEDURE
1. Fasten the engine securely onto the base.
2. Make sure that the engine’s PTO is on a straight line with the receiver’s PTO.
Engine –Machine.
An uneven PTO will result in the engine not pulling correctly and being damaged.
QUESTION
If problems arise or if you have any questions regarding the assembly of your
Power Line engine, you are always welcome to contact your Power Line dealer.
3. Oil / changing oil
OIL
Use the correct oil for the specific time of year.
By 20C
10-20C
Below 10C
SAE 30
SAE 30
SAE 10W - 30
OIL CAPACITY
Always check the oil level when the engine is placed in a horizontal position.
Always check the oil level without fastening the oil stick.
TG510
0.6 l
CHANGING OIL
Oil should be changed in accordance with the user manual for the machine.
1. Let the engine run 5 minutes, so that the oil is heated. This makes the oil flow more
easily and it is easier to complete the oil change.
2. After 5 minutes the engine is turned off. Unscrew the engine’s oil drain plug and the
oil runs out of the engine. Remember to keep an appropriate container ready.
3. Put the drain plug back in its place and new oil is added to the engine.
4. You add oil by removing the oil stick and adding the correct amount of oil.
Remember to dispose the used oil so that you are of no nuisance to the nature.
Use your local recycling station.
4. Fuel
FUEL
Only use unleaded octane 95 fuel on your engine and the right capacity.
Never overflow the tank with gasoline. On the tank an indicator is places
which shows the amount of remaining fuel.
See figure 10 on page 5.
TG510
3.6 l

15
5. Air filter
AIR FILTER
Please inspect and clean the air filter on a regular basis. If the filter has not been cleaned
for a longer period, this will be noticed on the engine’s power take-off and the exhaustion.
1. Dismount the winged nut, which fastens the cover to the air filter and remove
the cover.
2. Clean easily around the air filter before it is removed.
3. Remove the filter carefully and inspect it. Make sure no dirt gets in the
carburettor.
4. Clean the foam element in gasoline or petroleum.
5. Squeeze the element and let it dry. Wet the element in new oil and squeeze
out the extra oil.
IMPORTANT: If the engine is mounted with a paper element, oil must under
no circumstances be applied on the filter.
6. Clean the filter holder.
7. Put the element back in its place.
8. Draw attention to all parts being assembled correctly. See figure 12-17.
9. If the filter is a paper element, clean as follows.
10.Dismount the knurled nut, which fastens the cover to the air filter and remove
the cover.
11.Remove the filter carefully and inspect it. Make sure no dirt gets in the
carburettor.
12.Inspect thoroughly for cracks and holes, replace if necessary.
13.Remove the dust from the air filter by tapping the element easily a few times, or
by blowing compressed air through the filter. Never try to brush away the dust.
A brush will only push the dust further into the element. Replace the air filter if it
is very dirty.
14.Put the element back in its place.
15.Draw attention to the parts being assembled correctly. See figure 11, 12-17.
1. Nut
2. Washer plate
3. Gasket
4. Cover
5. Nut
6. Air filter
7. Holder
8. Lid
9. Foam filter
10. Air filter box

16
ASSEMBLY
1. The bottom of the air filter intake, figure 12.
2. Lid on the intake. It is important that the lid is pushed down in the holder so that it
fits. Correct assembly shown on picture, figure 13.
3. WRONG !! Notice the gap between bottom and lid, figure 14.
4. Place the holder to the air filter on the lid. It is important that the tap on the lid fits
with the tap on the holder, figure 15.
5. Place the filter in the holder. Use the knurled nut to fasten with. It is important it is
fastened securely, figure 16.
6. Mount the lid. Gasket and washer plate are added and fastened with a knurled nut.
Make sure all parts fit correctly so that no false air gets into the engine, figure 17.
Figure 12-17
QUESTION
If you are in doubt that the air filter is mounted correctly, please contact your
Power Line dealer.
6. Starting
PROCEDURE
1. Open the fuel tap.
2. Turn the choke to the right, if the engine is already warm it is not necessary to
use the choke.
3. Turn the engine’s gas control completely to the left, thereby full gas is applied.
4. (If the engine is mounted on a machine with cable-regulated gas, full gas is
given).
5. Turn the throttlecable to “start position”.
6. Pull the engine’s starting cord slowly until you feel resistance. Thereafter pull in
one long draw. Never let the starting cord run back by itself, always follow it with
your hand.
7. Regulate the choker until the engine is running evenly.
See figures 1, 2, 4, 5, 6 on page 3.
Fuel tap

17
7. Stopping the engine
PROCEDURE
1. Turn the gas control to a ”low” position and let the engine run for a while.
2. Turn off the machine on the ignition switch.
3. Turn the fuel tap to the ”off” position
See figures 4, 5, 7 on page 3.
8. Operation
OPERATION
1. When the engine has been started move the choke gradually to the right.
2. Adjust the gas to the requested speed.
NOTE
-Please draw attention to the following during operation.
-Exhaustion must not be black. If the exhaustion is black the load is too high or
the engine has not been adjusted correctly.
-No incorrect noises and vibrations.
-If these appear turn off the engine and adjust it. Contact your Power Line dealer
9. Sparking plug
PROCEDURE
-Remove the sparking plug cover.
-Brush off dirt from the sparking plug.
-Use a sparking-plug wrench to loosen the sparking plug.
-Inspect if the isolation is intact.
-Clean the sparking plug with a steel brush.
-Measure the electrode distance, make sure not to damage the electrode.
-The distance should be: 0,7 –0,8 mm
-If the sparking plug is okay, put it back in its place.
-Put the sparking plug cover back in its place.
Closed
Closed
Choke
HIGH
LOW
Ignition switch

18
10. Transport and storage
STORAGE
To avoid any spillage of fuel and oil is it important that the engine is placed horizontal
during transport.
-Let the engine run till it stops.
-Loosen the drainscrew on the carburettor and drain the remaining fuel.
-Reinstall the drainscrew, and mount the fuelline.
-Keep the fuel in an approved container.
OILCHANGE
Remove the sparkplug cap
Change the oil, remove the drainscrew and drain the oil. Keep the oil in an approved
container.
Add new oil.
See fig 9
STORAGE
Remove the sparkplug and poor 1 tablespoon of oil into the cylinder, mount the
sparkplug.
Do not mount the sparkplug cap. Pull the sparking cord, until there is resistance. This
will close the valves and protect them from rust.
Protect the oil with a thin layer of oil to avoid rust.
Store the engine in a dust free environment, out of reach of children.
Mount the sparkplug cap before use.

19
11. Maintenance
Interval
Part
Every time
For every
20 running
hrs
For every
50 running
hrs
For every
100
running
hrs
For every
200
running
hrs
Inspect bolts and
nuts
X
Inspect and fill with
oil
X
Change oil
X
X
Clean / replace oil
filter
X (clean)
X (clean)
Inspect for oil
leakage
X
Inspect air filter
X
Clean air filter
X*
Clean fuel filter
X
Inspect sparking
plug
X
Inspect fuel pump
X
Adjust valves
X
Inspect valves
X
* Maintenance of air filter in accordance with the user manual to the machine where
the engine is mounted.
12. Specifications
Model
TG500
Type
4 stroke, air-cooled OHV, 1 cylinder, gasoline
engine
Drilling x length of stroke mm
8 x 45
Stroke volume L
0,163
Max power kW (HP) / rev/min
3,6 (4,9) / 3600
Constant power kW (HP) / rev/min
3,3 (4,5) / 3600
Fuel
Unleaded gasoline
Fuel capacity
3,6 L
Fuel consumption (g/PS.h)
275
Lubricating oil
SAE30
Lubrication oil capacity
0,6 Litre
Starting system
Recoil
Sparking plug
DENSO W20 EPRU
Regulating system
Mechanical
Rotating direction of the PTO
Clockwise seen from the PTO’s point of view
Dimension (L x W x H), mm
305 x 365 x 335
Dry weight, kg
14
NOTE
-The purpose of maintenance is to keep the engine in its best possible shape.
-Repairs should always be carried through by an authorized Power Line dealer.

20
ACHTUNG Lesen Sie vor Inbetriebnahme des Motors stets die
Bedienungsanleitung durch.
ACHTUNG Richten Sie sich stets nach den Anweisungen, die Ihnen Ihr Händler zu
Power Line gibt.
ACHTUNG Vor dem Betanken muss der Motor ausgeschaltet werden.
ACHTUNG Wird etwas verschüttet, ist gründlich aufzuwischen.
ACHTUNG Halten Sie den Motor von Ölen und anderen feuergefährlichen Stoffen
fern.
ACHTUNG Da Auspuffgase gesundheitsschädlich sind, sollte der Motor nur im
Freien oder in gut belüfteten Räumen eingesetzt werden.
ACHTUNG Achten Sie darauf, während des Betriebs nicht mit den beweglichen
Teilen des Motors in Berührung zu kommen.
ACHTUNG Achten Sie darauf, nicht mit Motorblock oder Auspuffrohr in Berührung
zu kommen, da diese während des Betriebs sehr heiß werden.
ACHTUNG Unter Einfluss von Alkohol oder Drogen darf der Motor nicht betrieben
werden.
1. Inhaltsverzeichnis
2. Einbau............................................................................................................................21
3. Öl / Ölwechsel................................................................................................................21
4. Kraftstoff ........................................................................................................................22
5. Luftfilter..........................................................................................................................22
6. Start...............................................................................................................................23
7. Stoppen des Motors.......................................................................................................24
8. Betrieb ...........................................................................................................................24
9. Zündkerze......................................................................................................................24
10. Wartung.......................................................................................................................26
11. Technische Daten........................................................................................................26
Table of contents
Languages:
Other Texas Engine manuals

Texas
Texas TG485 User manual

Texas
Texas LC 165 User manual

Texas
Texas PowerLine TG500B User manual

Texas
Texas GARDEN SNOWBUSTER (160F) User manual

Texas
Texas TG 620 User manual

Texas
Texas TG565 User manual

Texas
Texas TG595 User manual

Texas
Texas TG715 User manual

Texas
Texas TG470VF User manual

Texas
Texas TD420E User manual