TFI AXT-225 User manual

AXT-225
Deluxe Home Gym
AXT-225_Rev1
Revision Date 12-17-2015
OWNER’S MANUALOWNER’S MANUAL
Maintenance & Assembly Instructions
IMPORTANT: KEEP THIS MANUAL FOR FUTURE REFERENCE
TUFFSTUFF FITNESS INTERNATIONAL
*Shown with AXT-RIG Cable Outrigger Arms
(Sold separately)

AXT-225 Deluxe Home Gymwww.tustutness.com
2
OVERHEAD SPECIFICATIONS .........................................................................Page 3
DANGER, WARNING, & CAUTION LABELS INFORMATION ...............Page 4-9
IMPORTANT SAFETY INSTRUCTIONS.................................................Page 10-11
REGISTRATION, SERVICE & ASSEMBLY..................................................... Page 12
INSPECTION/MAINTENANCE...................................................................... Page 13
CABLE INSPECTION........................................................................................ Page 14
STEP 1-6 .......................................................................................................Page 15-20
STEP 7 LAT CABLE ROUTING....................................................................... Page 21
STEP 8 ABDOMINAL CABLE ROUTING...............................................Page 22-23
STEP 9 ANTI-TWIST CABLE ROUTING....................................................... Page 24
STEP 10 LEG EXTENSION/CURL CABLE ROUTING ............................... Page 25
IMPORTANT NOTE .......................................................................................... Page 26
STEP 10 TENSION CABLE ROUTING.......................................................... Page 27
STEP 12-15 ..................................................................................................Page 28-31
PARTS LIST...................................................................................................Page 32-33
PRE ASSEMBLED COMPONENTS .........................................................Page 34-37
BASIC EXERCISE GUIDE...........................................................................Page 38-39
WARRANTY ....................................................................................................... Page 40
Table of Contents
TuStu Fitness International Inc. continually engages in research related to product improvements. Please take the time to carefully read through
this owner’s manual thoroughly. Instructions contained in this owner’s manual are not intended to cover all details or variations possible with
equipment, or to cover every contingency that may be met in conjunction with assembly, installation, operation, maintenance or troubleshooting of
the equipment. Even though we have prepared this owner’s manual with extreme care, neither the manufacturer nor the author can accept
responsibility for any errors in, or omission from, the information given. Should additional information be required, or should situations arise that are
not covered by this owner’s manual, the matter should be directed to Customer Service at TuStu Fitness International Inc. in Chino, California.
AXT-225 Deluxe Home Gym www.tustutness.com 3
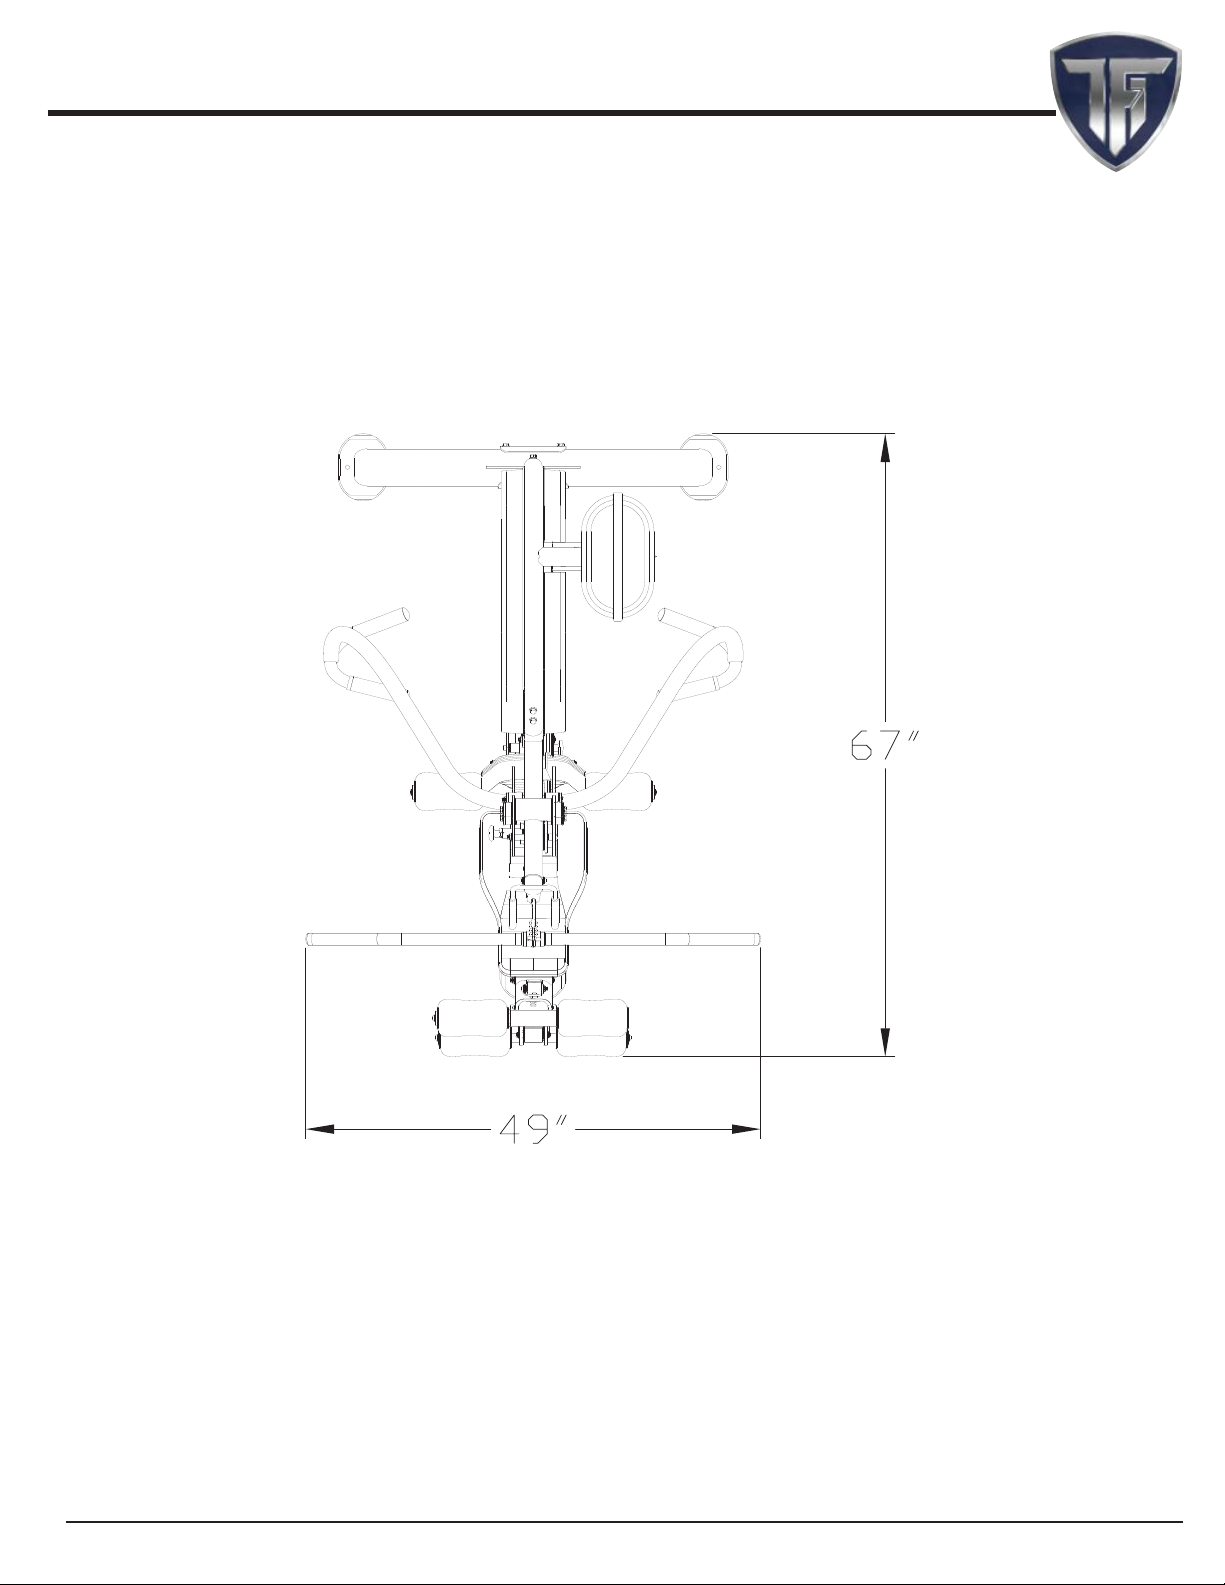
OVERHEAD SPECIFICATIONS
L 67” X W 49” X H 84”
PRODUCT WEIGHT 480 lbs.
MAX-LOAD WEIGHT LIMIT - 200 lbs.
www.tustutness.com AXT-225 Deluxe Home Gym
4
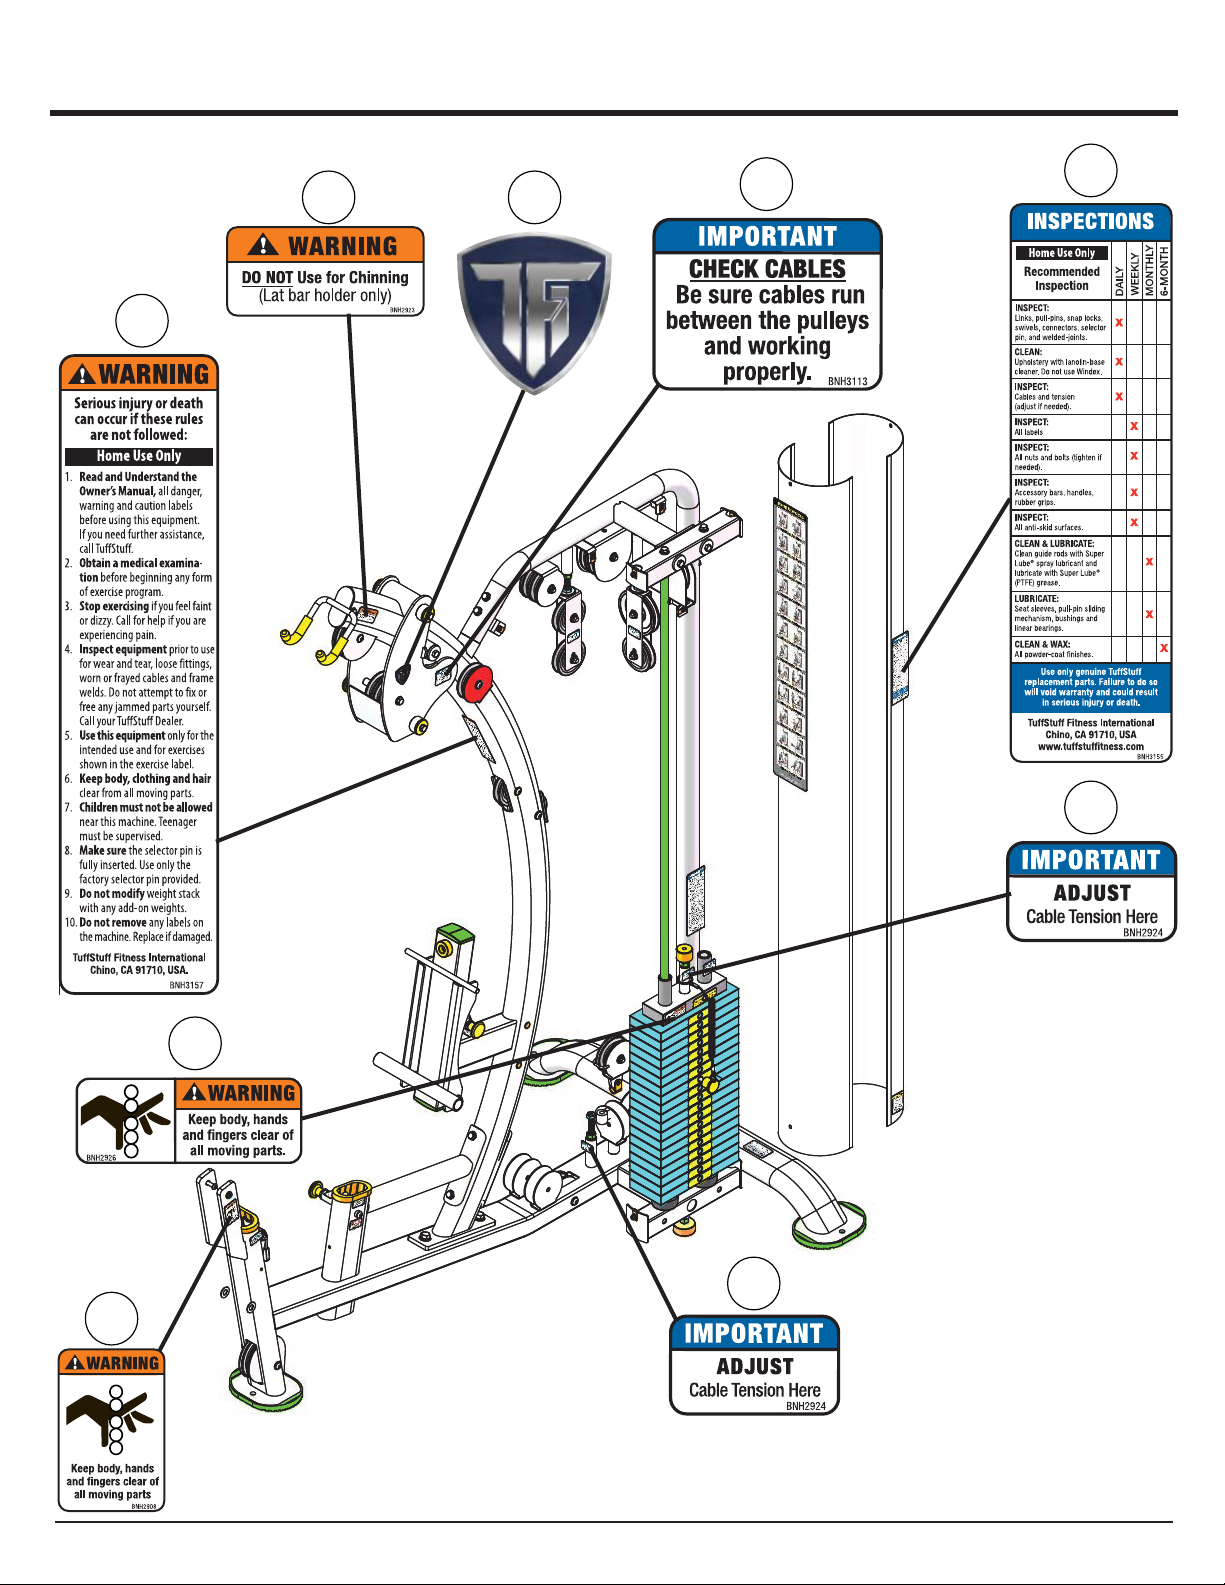
Carefully read ALL Danger, Warning & Caution labels posted on the machine
142 131
125
127
136
143
89 136
138

www.tustutness.comAXT-225 Deluxe Home Gym 5
Carefully read ALL Danger, Warning & Caution labels posted on the machine
127
135 129
129
130
141
140

www.tustutness.com AXT-225 Deluxe Home Gym
6
Carefully read ALL Danger, Warning & Caution labels posted on the machine
34
136
123
137
98
128
124
132

www.tustutness.comAXT-225 Deluxe Home Gym 7
Carefully read ALL Danger, Warning & Caution labels posted on the machine
134
130
130
89
129
129
124

www.tustutness.com AXT-225 Deluxe Home Gym
8
Carefully read ALL Danger, Warning & Caution labels posted on the machine
34 125 138 123
137
134 135 130
124
140
136 132 131

www.tustutness.comAXT-225 Deluxe Home Gym 9
BE ALERT!
THE FITNESS EQUIPMENT YOU
HAVE JUST PURCHASED PRESENTS
HAZARDS WHICH, IF NOT AVOIDED,
COULD CAUSE SERIOUS INJURY
OR DEATH.
Prior to using the equipment, READ the OWNER’S
MANUAL thoroughly, all danger, warning & caution
labels and instruction placards affixed to the machine.
If you are unsure on how to use the equipment,
seek the assistance of a certified training instructor,
TuffStuff authorized dealer or TuffStuff customer
service personnel.
Immediately report any piece of equipment that is
not functioning properly. DO NOT ATTEMPT to use or
fix any piece of equipment yourself. Contact TuffStuff
immediately.
TUFFSTUFF FITNESS INTERNATIONAL, CHINO, CA 91710ASTM F1749-96
BNH3139
Carefully read ALL Danger, Warning & Caution labels posted on the machine
It is extremely important that the BE ALERT! Sign shown to the
left be installed in plain view of the unit.
You should have received it along with this Owner’s Manual. If
you did not receive this Sign with your order, you can
obtain one at no cost to you from TuStu Fitness by contacting
our service department at:
1 (888) 884-8275
service@tustu.net
service1@tustu.net
114
142 141 143 128
89 127 98 129

AXT-225 Deluxe Home Gymwww.tustutness.com
10
Important Safety Instructions
DANGER
DO NOT pull or perform any exercises to the sides or to the back of
the machine. Excessive pulling or force can cause the machine to tip
over, and may result in serious injuries of death
AXT-225 Deluxe Home Gym www.tustutness.com 11
Important Safety Instructions
If you have not participated in a regular exercise program, smoke or have signs of high blood pressure, you must obtain a
medical exam or consult with your personal physician before performing any AXT-225 exercises illustrated in this manual.
SERIOUS INJURY OR DEATH CAN OCCUR
IF THESE SAFETY PRECAUTIONS ARE NOT OBSERVED:
1. Read and understand Owner’s Manual and all Danger,
Warning and Caution labels before using this equipment. If you
still need help, call TuStu Fitness International.
2. Inspect the equipment before each use for wear and tear, loose
ttings, worn or frayed cables and frame welds. DO NOT USE
if it appears to be inoperable or damaged.
3. Stop exercising if you feel faint or dizzy. Call your doctor
immediately if you are experiencing pain.
4. Use this equipment only for the intended use and for exercise(s)
shown on pages 37-38.
5. Keep body, clothing and hair clear from all moving parts.
Do not attempt to free any jammed parts by yourself.
6. Do not lean against or pull on the framework, weight stack or
any component, whether the machine is in use or at rest.
7. Do not use accessories or accessory attachments that are not
recommended by TuStu.
8. Children must not be allowed near the equipment.Teenager
must be supervised.
9. Make sure selector pin is completely inserted and never pin the
weights in an elevated position. Use only the selector pin
provided by the manufacturer.
10. Do not remove any decals axed to the machine. Replace if
damaged.
11. Do not alter or modify the original manufacturer’s 200 lbs. weight
stack with any add-on incremental weights, weight plates or
dumbbells except those with standard factory installed option.
12. Perform regular maintenance (see INSPECTION Label). Pay special
attention to areas most susceptible to wear and tear, including but
not limited to cables, pulleys and rubber grips.
13. Replace immediately all parts at rst sign of wear or damage.
Use only genuineTuStu replacement parts. Failure to do so
will void warranty and could result in serious injury or death
to you.
DANGER: indicates an imminently hazardous situation which, if not
avoided, will result in death or serious injury.
WARNING: indicates a potentially hazardous situation which, if not
avoided, will result in death or serious injury.
CAUTION: indicates a hazardous situation which, if not avoided, could
result in minor or moderate injury.
Training Safety
1. Always warm-up before and cool-down after weight training.
Warm-up for 10-15 minutes with stretching and cardiovascular
exercises. Cool-down should include light stretching exercises
for 5-15 minutes.
2. Never hold your breath – will limit the ow of oxygen to your
brain and may cause dizziness. The most often used breathing
pattern is inhaling during least resistance and exhaling during
maximum resistance.
3. Always choose a light resistance when using the machine
the rst time.
4. Trained at a controlled rate of speed

AXT-225 Deluxe Home Gymwww.tustutness.com
12
Registration, Service & Assembly
Thank you for purchasing the AXT-225 Deluxe Home Gym. This machine is part of the TuStu line of quality
strength training equipment. To maximize your use of the equipment, please study the Owner’s Manual thoroughly.
Required Tools
The basic tools that you will need to assemble the AXT-225 but are not
limited to:
• 9/16”, 3/4”, 1/2”combination wrenches
• Adjustable wrench
• Ratchet wrench with 9/16”, 3/4”, 1/2”sockets
• External retaining ring pliers
• Rubber mallet, measuring tape & utility knife
• Super Lube® spray lubricant and grease
• Windex or household glass cleaner
Assembly Requirements
Follow these installation requirements when assembling the AXT-225.
Use the overhead view on the Content Page to layout your oor plan
before assembling.
Set up the AXT-225 on a clean, solid, at surface. A smooth, at surface
under the machine helps keep it level.
Allow ample space around the machine for safe unrestricted use and
easier access.
Insert all bolts in the same direction. For aesthetic appearance, insert all
bolts in the same direction unless specied (in text or illustration) to do
otherwise.
Leave room for adjustments. Do not fully tighten fasteners until in-
structed in the assembly steps to do so (to prevent any diculty with
alignment of parts during the assembly process). When not instructed,
tighten fasteners such as bolts, nuts and screws so the unit is stable, but
leave room for adjustments.
Assembly Tips
Read all“Notes”on each page before beginning each step.
While you may be able to assemble the AXT-225 using the illustrations
only, IMPORTANT safety notes and other tips are included in the text.
Some pieces may have extra holes that you will not use. Use only those
holes indicated in the instructions and illustration.
NOTE: With so many assembled parts, proper alignment and
adjustment is critical.While tightening the nuts and bolts,
be sure to leave room for nal adjustments.
CAUTION: Obtain assistance fromTFI if you have diculty
assembling the AXT-225. Please do not attempt to
complete the assembly as this could result in equipment
failure and serious injuries to the users.
Symbols & Description
Registration
To avoid unnecessary delays on warranty parts and to insure that a
permanent record of your purchase is on le with our company, be
sure to register online at http://www.tustutness.com or mail to
address shown below within 10 days of purchase.
Obtaining Service
Please use this Owner’s Manual as your guide to all parts included in
your shipment. When ordering parts, you must specify the part number
and description from this owner’s manual. Use only genuine TuStu
replacement parts when servicing the equipment. Failure to do
so will void warranty and could result in serious injury or death.
For information about product operation or service:
Phone: 909-629-1600 Toll Free 888-884-8275
Fax: 909-629-4967
E-mail: service@tustu.net or service1@tustu.net
Hours: M–F 8:00 – 4:30 PST
Or write to: TuStu Fitness International Inc.
Customer Service
13971 Norton Avenue, Chino, CA 91710
Retain this Owner’s Manual for future reference when ordering
service or parts. To assist you better, please be prepared to
provide the following information:
1. Model Number 2. Place of Purchase
3. Serial Number 4. Part # and Description
Loosely Fasten
Loosely tighten all hardware in this step. DO NOT fully tighten. Some
component(s) may need pre-assembly and or alignment during the
assembly process.
Fully Fasten
Wrench tighten all hardware in this step.

AXT-225 Deluxe Home Gym www.tustutness.com 13
Inspection/Maintenance
INSPECTION / MAINTENANCE RECORDS
DATE REPLACEMENT REPAIRS INSPECTED BY
WARRANTY REPAIRS
DATE REPLACEMENT REPAIRS INSPECTED BY
Perform regular maintenance (see Inspection Label). Pay special attention to areas most susceptible to wear and tear, including
but not limited to cables, pulleys and rubber grip. TFI recommends you maintain a service contract with a TFI Authorized Dealer or a
Professional Service Company approved by TFI. Keep a service log of all maintenance and repair activities. Extra copies can be downloaded
from our website www.tustutness.com

AXT-225 Deluxe Home Gymwww.tustutness.com
14
Cable Inspection
WARNING:
THE FOLLOWING CONDITIONS MAY INDICATE A WORN CABLE. REPLACE IMMEDIATELY.
IMPORTANT NOTE:
DAMAGED OR WORN CABLE (AS SHOWN ABOVE) MAY DAMAGE THE PULLEY(S). YOU MUST INSPECT THE
PULLEYS AT THIS TIME FOR WEAR AND TEAR. REPLACE IF NEEDED.
“NECKING”, STRETCHED CABLE COVERING
A TEAR IN THE CABLE COVER
CABLE END SLIPPING OUT
A CRACK IN THE CABLE COVER
A BREAK ON THE CABLE

AXT-225 Deluxe Home Gym www.tustutness.com 15
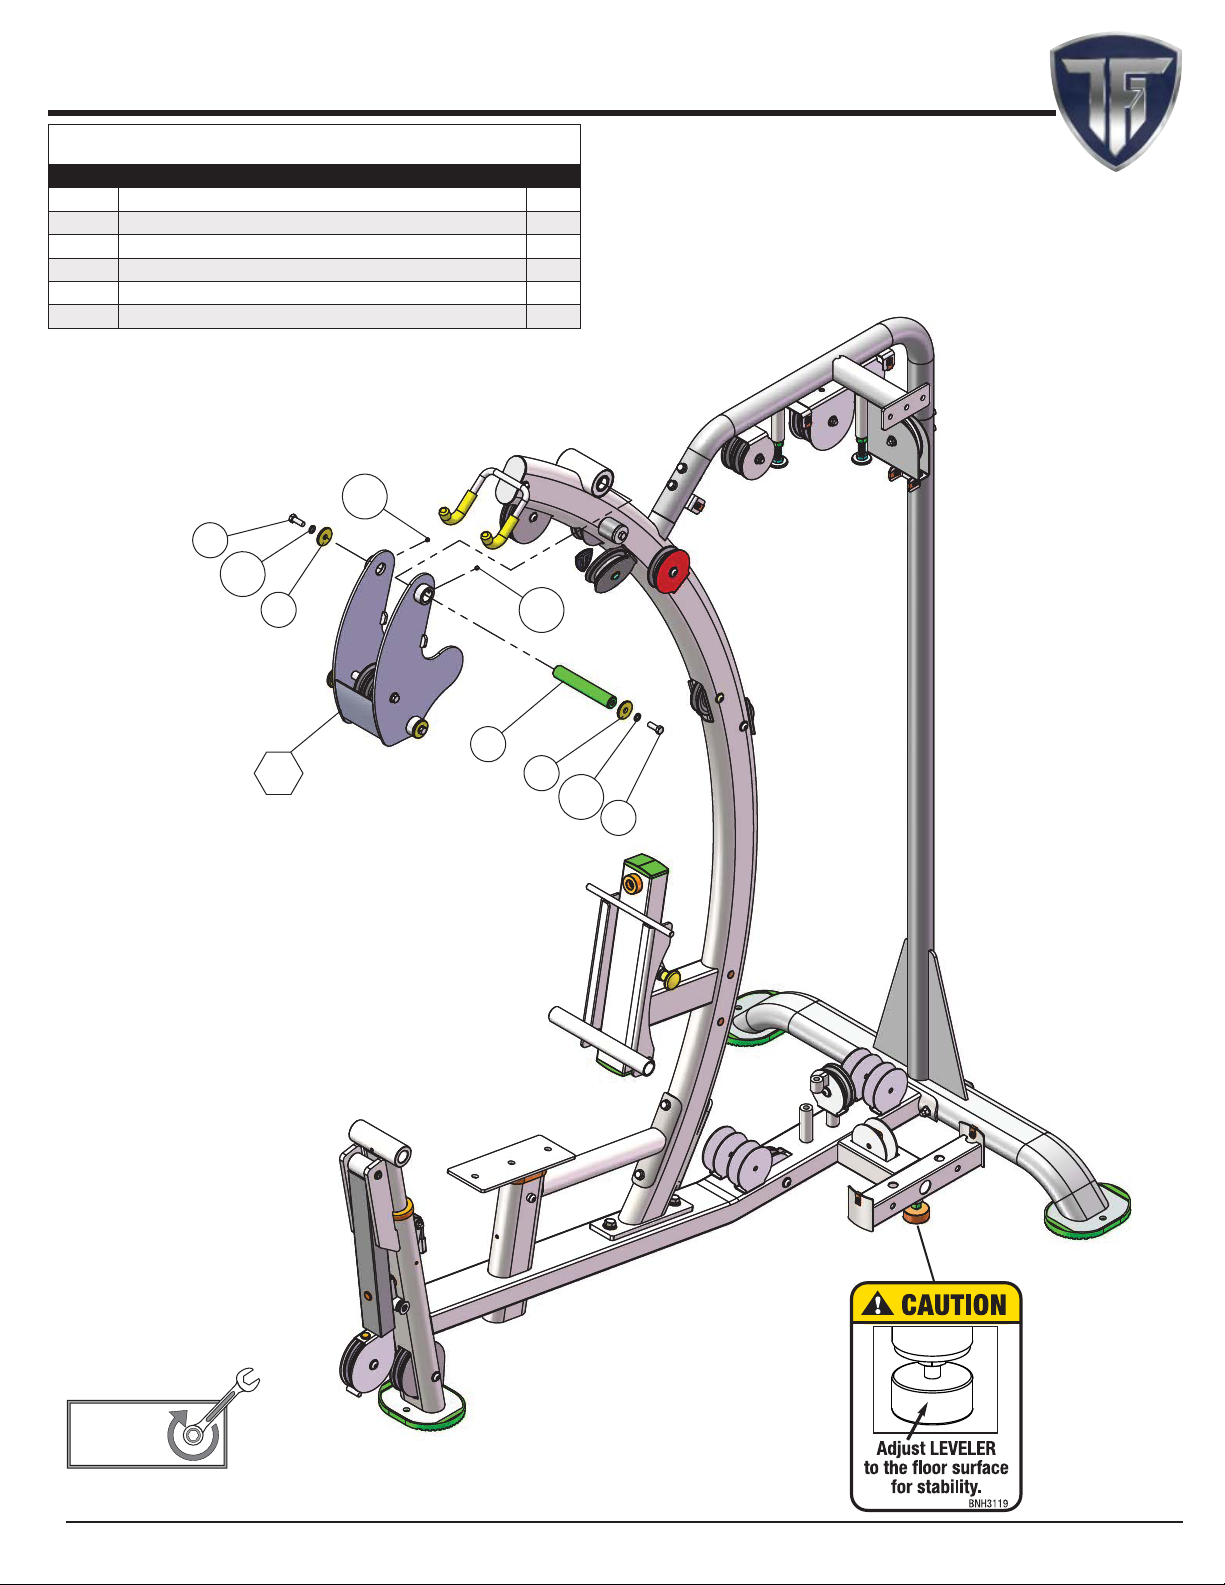
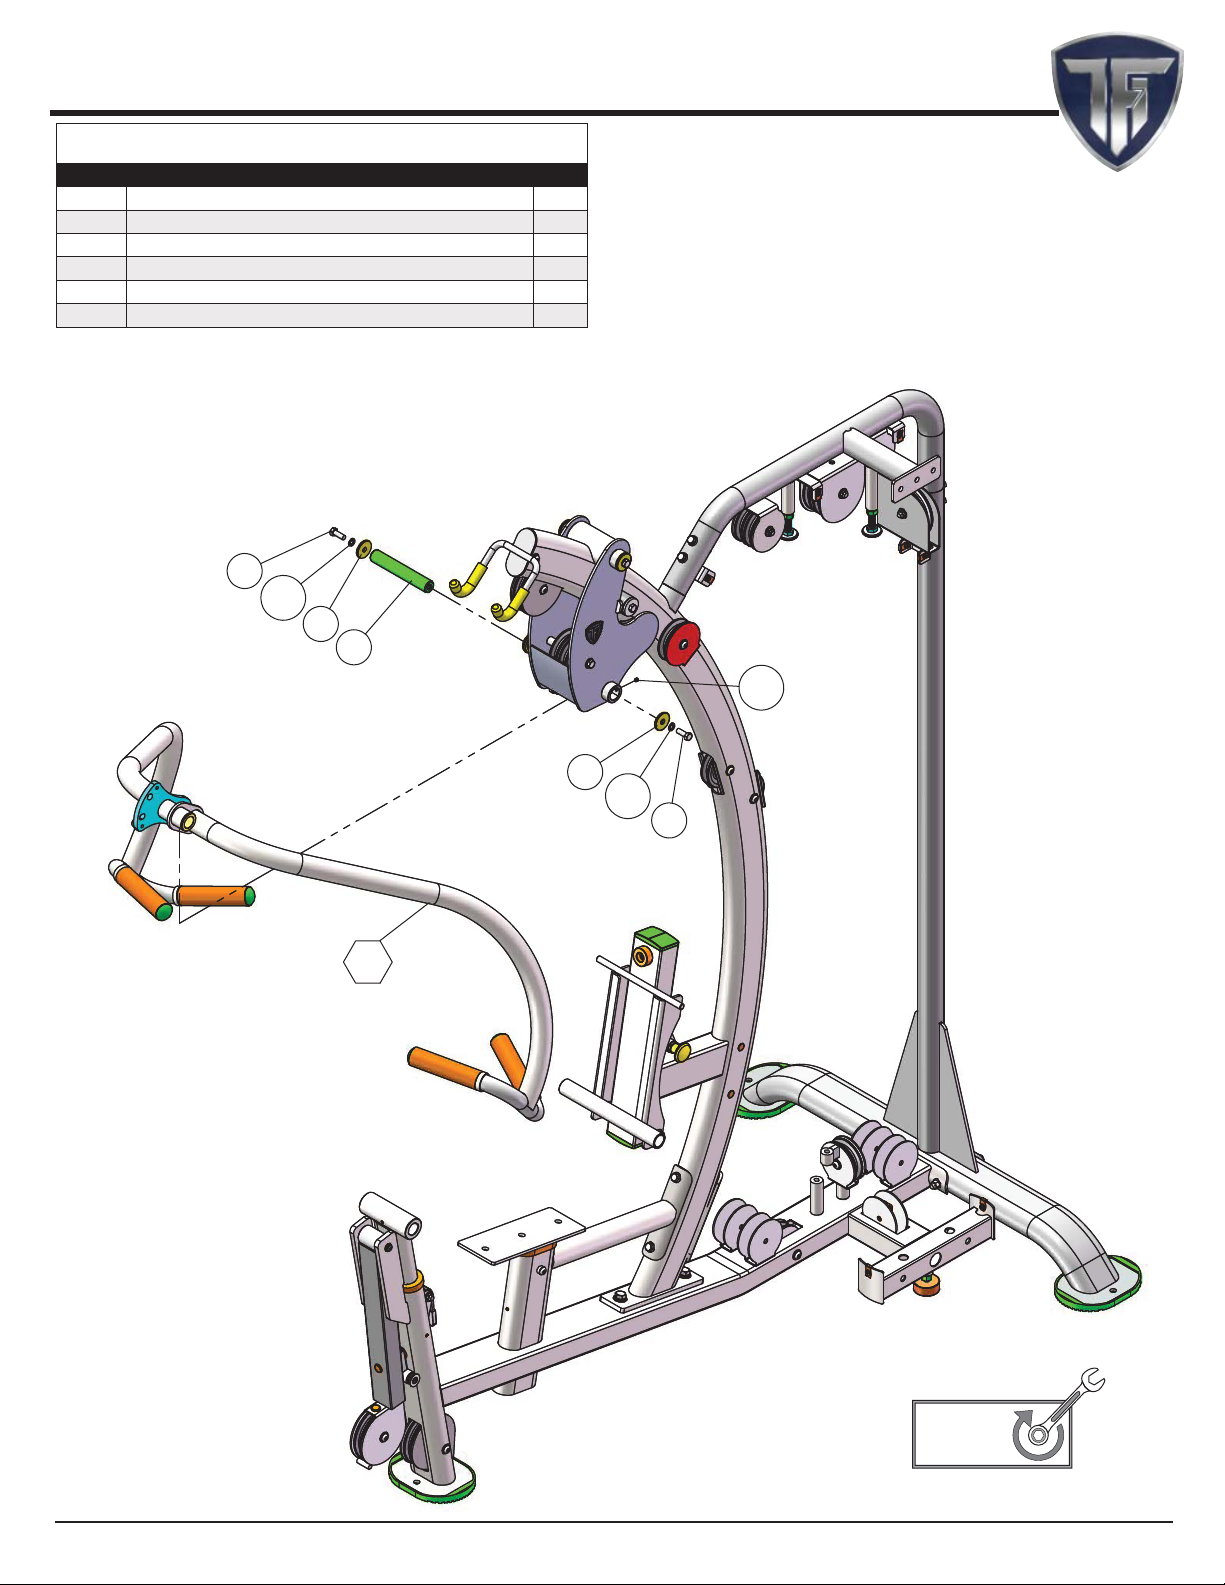
71
126
83
*23
126
*7
Step 1
Step 1 Assembly List
Item # Description Qty.
*7 BASE FRAME 1
*23 REAR FRAME 1
71 HEX HEAD CAP SCREW Z/P 3/8-16 X 5 1/8 2
83 NYLON INSERT THIN PATTERN LOCK NUT Z/P 3/8-16 2
126 OVAL WASHER Z/P 3/8” 4
Loosely Tighten
Loosely tighten all hardware in this step.
Loosely Tighten
70%
NOTE:
1. It is strongly recommended that 2 people participate in the assembly
of this unit.

AXT-225 Deluxe Home Gymwww.tustutness.com
16
*12
68
115
126
83
66
61
113
126
71
68
126
115 126
68
115
68
126
115
126
*24
Step 2
Step 2 Assembly List
Item # Description Qty.
*12 FRONT UPRIGHT 1
*24 TOP FRAME 1
61 FLAT WASHER SAE Z/P 1/2” 2
66 HEX HEAD CAP SCREW Z/P 1/2-13 X 1 1/4 2
68 HEX HEAD CAP SCREW Z/P 3/8-16 X 1 7
71 HEX HEAD CAP SCREW Z/P 3/8-16 X 5 1/8 2
83 NYLON INSERT THIN PATTERN LOCK NUT Z/P 3/8-16 2
113 SPLIT LOCK WASHER Z/P 1/2” 2
115 SPLIT LOCK WASHER Z/P 3/8” 7
126 OVAL WASHER Z/P 3/8” 11
100%
Fully Tighten
Fully Tighten
Wrench tighten all hardware in this and
previous loosely tighten steps.
AXT-225 Deluxe Home Gym www.tustutness.com 17
Step 3
41
115
68
115
41
109
19
109
*21
68
Step 3 Assembly List
Item # Description Qty.
19 PIVOT AXLE SS 1 RD CR X 6 1/32 1
*21 PRESS BAR HOUSING 1
41 SUPPORT WASHER Z/P 3/8 ID X 1 1/2 OD X 3/16 2
68 HEX HEAD CAP SCREW Z/P 3/8-16 X 1 2
109 SOCKET SET SCREW ALLOY 1/4-20 X 1/4 2
115 SPLIT LOCK WASHER Z/P 3/8” 2
100%
Fully Tighten
Fully Tighten
Wrench tighten all hardware in this step.
AXT-225 Deluxe Home Gymwww.tustutness.com
18
41
19
115
68
68
115
41
*20
109
Step 4
100%
Fully Tighten
Fully Tighten
Wrench tighten all hardware in this step.
Step 4 Assembly List
Item # Description Qty.
19 PIVOT AXLE SS 1 RD CR X 6 1/32 1
*20 PRESS BAR 1
41 SUPPORT WASHER Z/P 3/8 ID X 1 1/2 OD X 3/16 2
68 HEX HEAD CAP SCREW Z/P 3/8-16 X 1 2
109 SOCKET SET SCREW ALLOY 1/4-20 X 1/4 2
115 SPLIT LOCK WASHER Z/P 3/8” 2

AXT-225 Deluxe Home Gym www.tustutness.com 19
36
83
68
115
68
62
41
69
27
13
35
97
97
62
115
*32
62
Step 5
100%
Fully Tighten
Fully Tighten
Wrench tighten all hardware in this step.
Step 5 Assembly List
Item # Description Qty.
13 GUIDE ROD 3/4” X 73 13/16 2
27 SELECTOR PIN W/COIL 3/8 X 4 GOLD KNOB 1
*32 TOP GUIDE ROD HOUSING 1
35 10 LB STEEL WEIGHT PLATE BLACK 19
36 10 LB TOP PLATE W/ADJ. SELECTOR BAR 1
41 SUPPORT WASHER Z/P 3/8 ID X 1 1/2 OD X 3/16 2
62 FLAT WASHER SAE Z/P 3/8” 6
68 HEX HEAD CAP SCREW Z/P 3/8-16 X 1 4
69 HEX HEAD CAP SCREW Z/P 3/8-16 X 3 2
83 NYLON INSERT THIN PATTERN LOCK NUT Z/P 3/8-16 2
97 RUBBER DONUT 3/4 X 2 1/2 4
115 SPLIT LOCK WASHER Z/P 3/8” 4

AXT-225 Deluxe Home Gymwww.tustutness.com
20
Step 6
Weight stack label and lubrication instructions
1. Wipe front surface of weight stack with rubbing alcohol and wipe dry.
2. Peel o back sheet (adhesive side) from label (#128) and make sure that the label remains
attached to the application tape.
3. Line up left edge of label sheet with outside edge of weight holes.
4. Line up the rst label to hole on top plate.
5. Make sure label is straight and slowly press into place.
6. Gently remove application tape and rub each label rmly against the weight stack.
7. Allow labels to stand for 2 days to allow adhesive to cure fully.
8. Open the lube package provided and apply a thin lm of lubricant around the rst 3 inches
of the guide rods above the top plate.
9. After the cables are installed, do a set of reps to spread the lubricant thoroughly.
NOTE:
1. TOP PLATE LABEL GOES ON HOLE OFF
CENTER AS SHOWN. LABEL WILL
COVER HOLE ON CENTER.
128
Step 6-7 Assembly List
Item # Description Qty.
*3 ADJUSTABLE DOUBLE PULLEY BRACKET 1
15 LAT CABLE 1
36 10 LB TOP PLATE W/ADJ. SELECTOR BAR 1
37 7/8 RD X 1 5/8 LINK 3/16 CABLE 1
56 CABLE STOPPER SHELL 1 1/2 X 1 3/4 1
58 COIL CHAIN Z/P 3/16 X 8 1
60 FINISHED HEX NUT Z/P 1/2-13 1
73 LAT BAR 1 1/4 ALUMINUM 1
86 OVAL HEAD PHILLIPS MACHINE SCREW Z/P #10-32 X 1 1/8 1
104 SNAP LINK Z/P 8MM X 80MM 2
112 SPLIT HEX TAP BOLT Z/P 1/2 -13 X 3 1/2 1
113 SPLIT LOCK WASHER Z/P 1/2” 1
128 DECAL NUMBERS 10-200 LBS/KGS 7/8 X 3 YELLOW 1
Table of contents
Other TFI Fitness Equipment manuals

Popular Fitness Equipment manuals by other brands


SPORTNOW
SPORTNOW A91-261V00 Assembly instructions

Gaide Intelligent Technology
Gaide Intelligent Technology GD06 manual

JOHARI DIGITAL
JOHARI DIGITAL HI-LIPO CONTOUR instruction manual

Domyos
Domyos abs bench 500 manual

HOMCOM
HOMCOM A91-120 Assembly & instruction manual

Paramount Fitness
Paramount Fitness SF-1500 Assembly manual