Thömus Stromer ST1 User manual
Stromer Manual | Version 1.1
CONGRATULATIONS
on your new Stromer.
In this manual you will find all of the
necessary information relating to the use
of the Stromer.

TABLE OF CONTENT
+ScopeofDelivery…………………………………………………………………....4
+ Stromer – SpareParts……………………………………………………………......5
+ Battery – Removal …………………………………………………………………....6
+ Battery – Insertion …………………………………………………………………....7
+ Battery – ChargeInternallyorExternally………………………..……………….....8
+ Distance – InfluencesandTips……………………………………………………...9
+ Interface – DisplayandFunctions………………………………………………....10
+ Interface – Operation………………………………………………………………11
+ Interface – BasicSettings………………………………………………………….14
+MaintenanceandCare……………………………………………………………..16
+Troubleshooting……………………………………………………………………18
+WarrantyServices………………………………………………………………….20
+ Legal ………..…………………….…………………………………………………20
+Service………………………………………………………………………………21
+OurLocations……………………………………………………………………….22

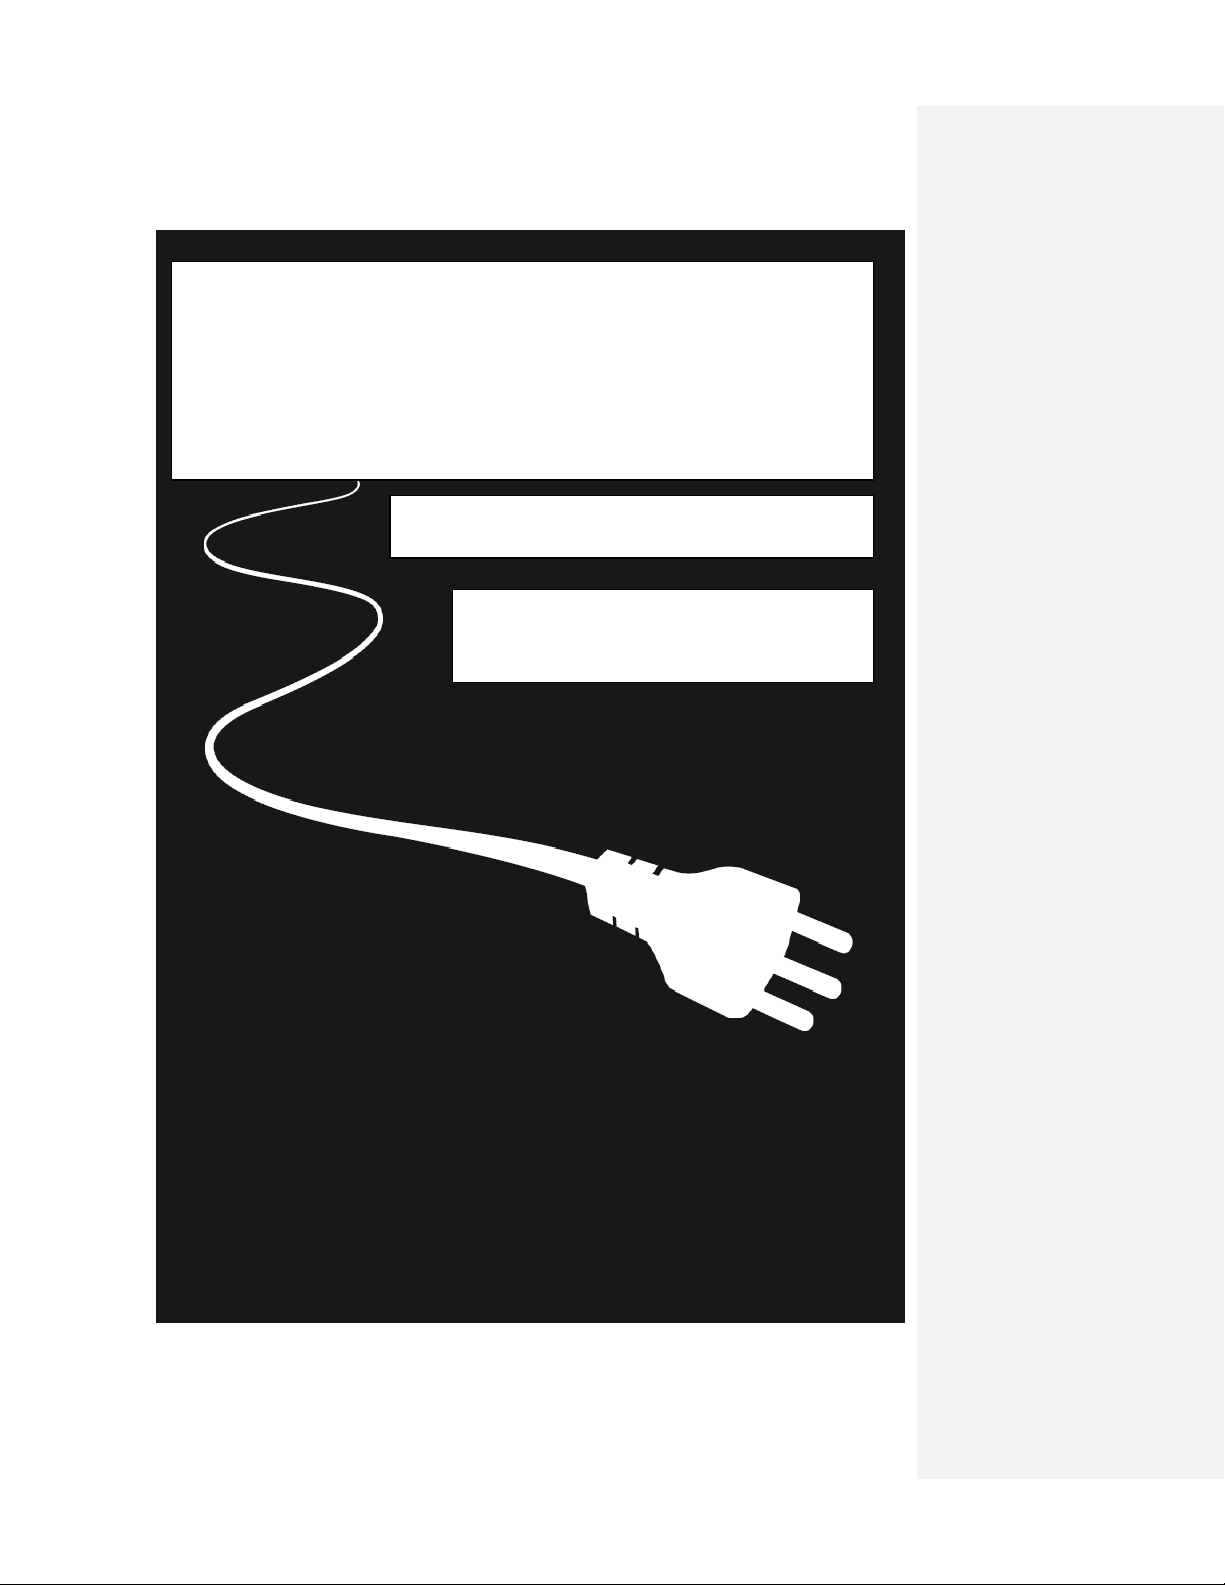
Battery
Power Cable
SCOPE OF DELIVERY
Manual
Charger
Adapter

STROMER
SPARE PARTS
……………………………………………………………………………………..
1) Battery ejector button
2) Battery charge socket
3) Battery compartment lock
4) Interface
5) Brake sensor
6) Battery compartment
7) Torque sensor
8) Hub drive
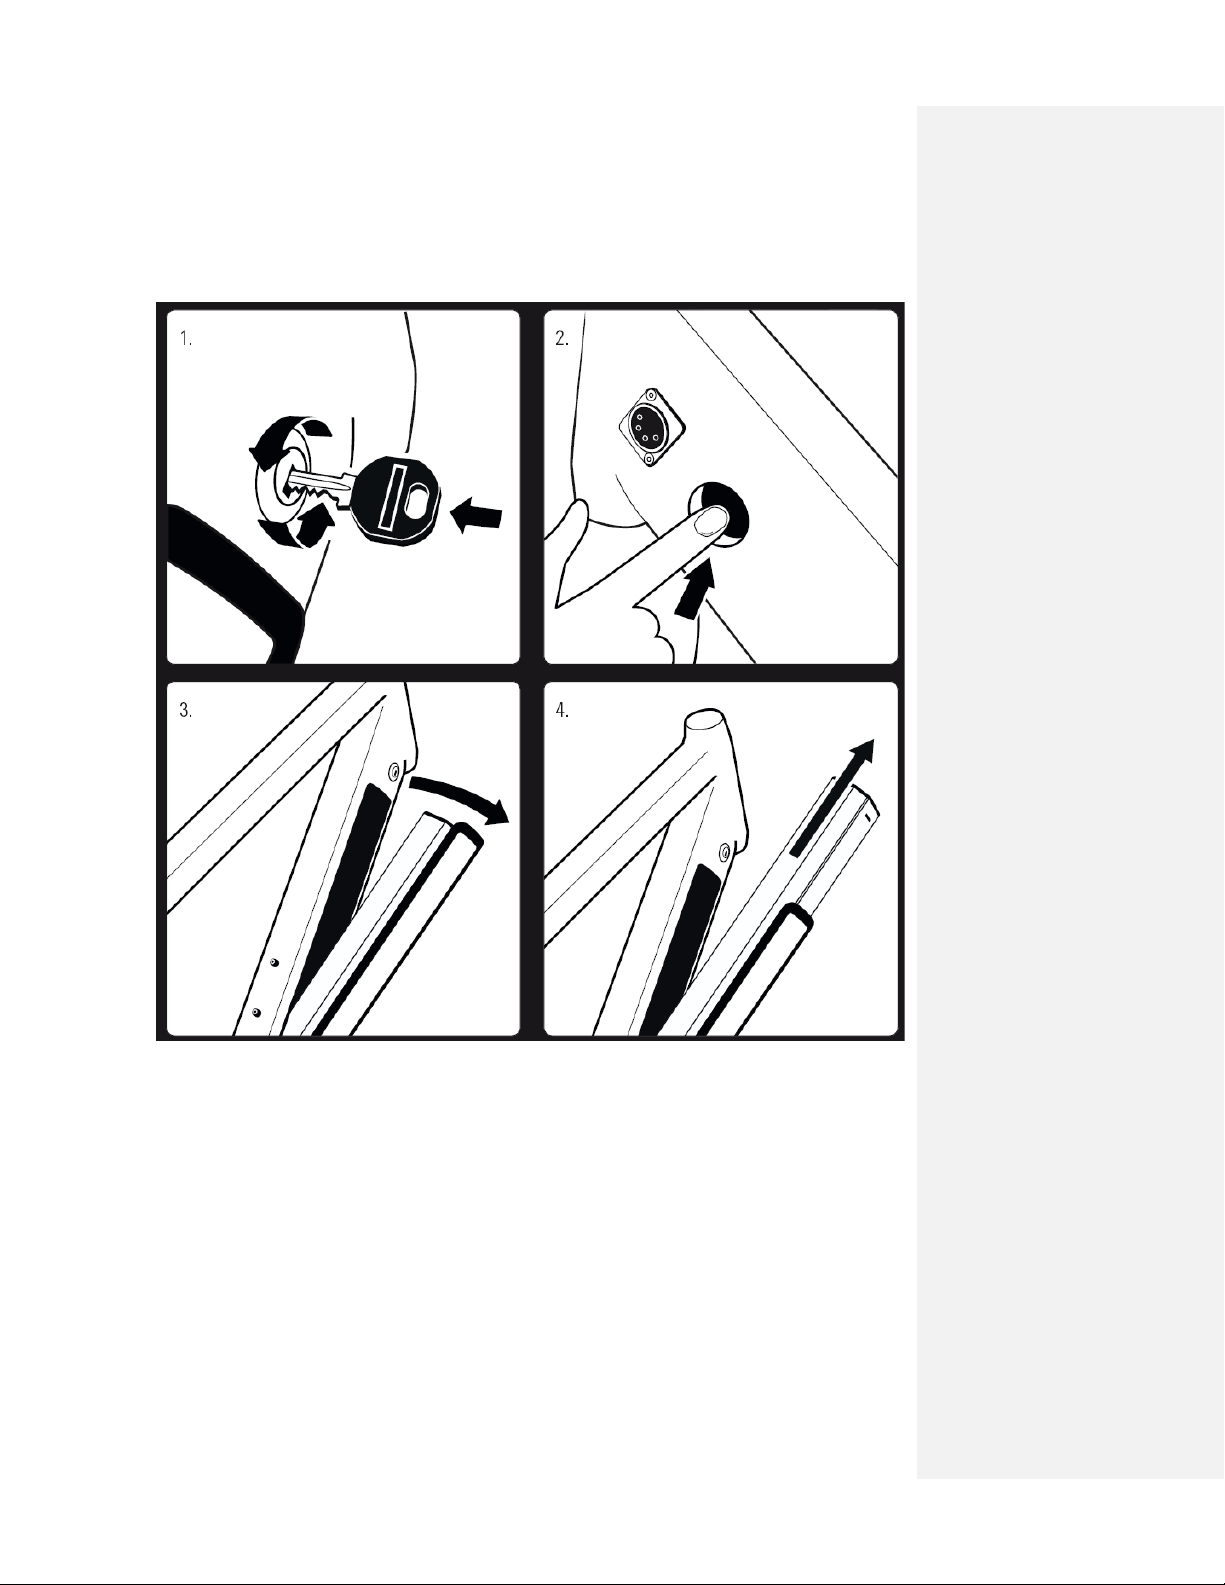
BATTERY REMOVAL
1. Unlock the battery compartment with the supplied key.
2. Unlatch the battery compartment with a push of the button.
3. Open the battery compartment
4. Remove the battery.
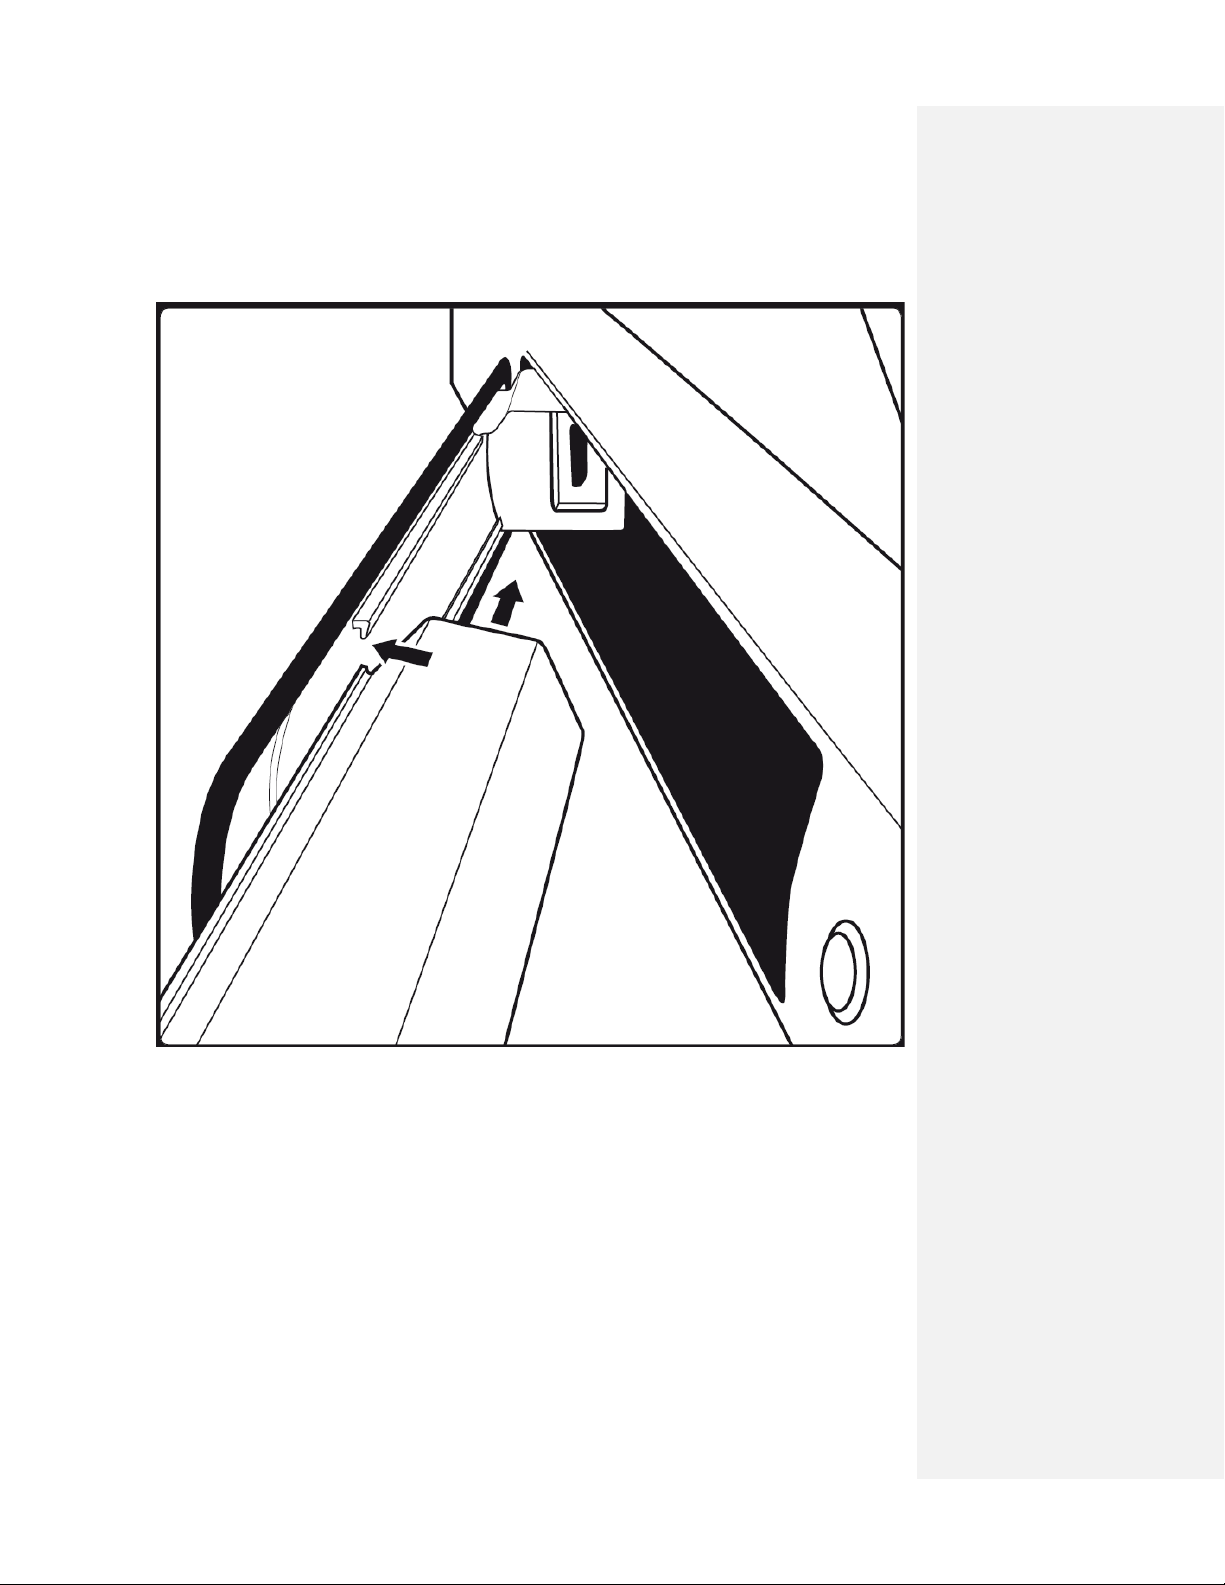
BATTERY INSERTION
Insert battery into the guide rail with the connector on the bottom.
Make sure that the battery is also inserted into the upper guide rail.
Insert the battery into the compartment until it stops.
Close the cover and lock the compartment with the key.

BATTERY – CHARGE INTERNALLY AND EXTERNALLY
The charging process and charger
The Stromer battery may only be charged with the appropriate charger. The battery can
be charged directly on the Stromer or separately. Charging time is approx. 3.5 hours.
on/off Stromer socket
230/110* Vent opening LED1
Power converter LED2
*230V used exclusively in Switzerland (basic setting)
Checking the charging process
Check the charging process with the control LEDs. As soon as the charger is turned on
LED1 lights up in red. During the charging process LED2 lights up in yellow. LED2
changes to green when the battery is fully charged.
If LED2 switches immediately to yellow or green when turned on then the battery is not
properly connected or an error occurred. In the latter case reconnect and restart the
charger.
………………………………………………………………………………………………
External charge
Remove the battery from its compartment. Make sure that the charger is turned off before
connecting it to the power source.
Connect the battery to the charger. Turn the charger on with the on/off switch.
Internal charge
Make sure that your charger is turned off before connecting it to the power source.
Turn the Stromer system off. Plug the power cable and the charger into the socket.
Turn the charger on with the on/off switch.

DISTANCE – INFLUENCES AND TIPS
The ratio between motor power and muscle power can be adjusted individually with the
sensor sensitivity (for instructions see Page 15). The following applies: the smaller the
sensor sensitivity the greater the distance.
The Stromer uses the most energy during acceleration. Try to maintain a constant speed.
In order to avoid short-term accelerations it is recommended to ride with an even
pedaling motion. Ideally, the pressure on the pedal should remain constant during full
crank revolution.
With greater weight (rider and luggage) the motor must use more power during
acceleration and on an incline. Minimize your luggage to obtain greater distance.
Check the tire pressure on a regular basis. With reduced tire pressure the roll resistance
increases which considerably reduces the distance traveled. The recommended tire
pressure can be found on the side of the tire.
With steep inclines the speed and the distance decreases since the motor must output
more power in order to gain speed and elevation.
The efficiency decreases at low speed (up to 10 km/hr). At high speed (as of 35 kg/hr) the
aerodynamic resistance increases considerably. Ride at medium speed in order to obtain
maximum distance.
To increase the distance with recuperation, the braking should only be done electrically,
not mechanically. To do that you will have to ride in recuperation mode or just slightly
tap the brake. The longer the recuperation is active the greater the distance traveled.
Increase the pedaling frequency (low gear) at constant speed; you will now ride more
economically and increase the distance traveled.
The assist mode changes the ratio between motor power and muscle power. You will
save the most battery power when you change to a reduced assist mode on inclines.
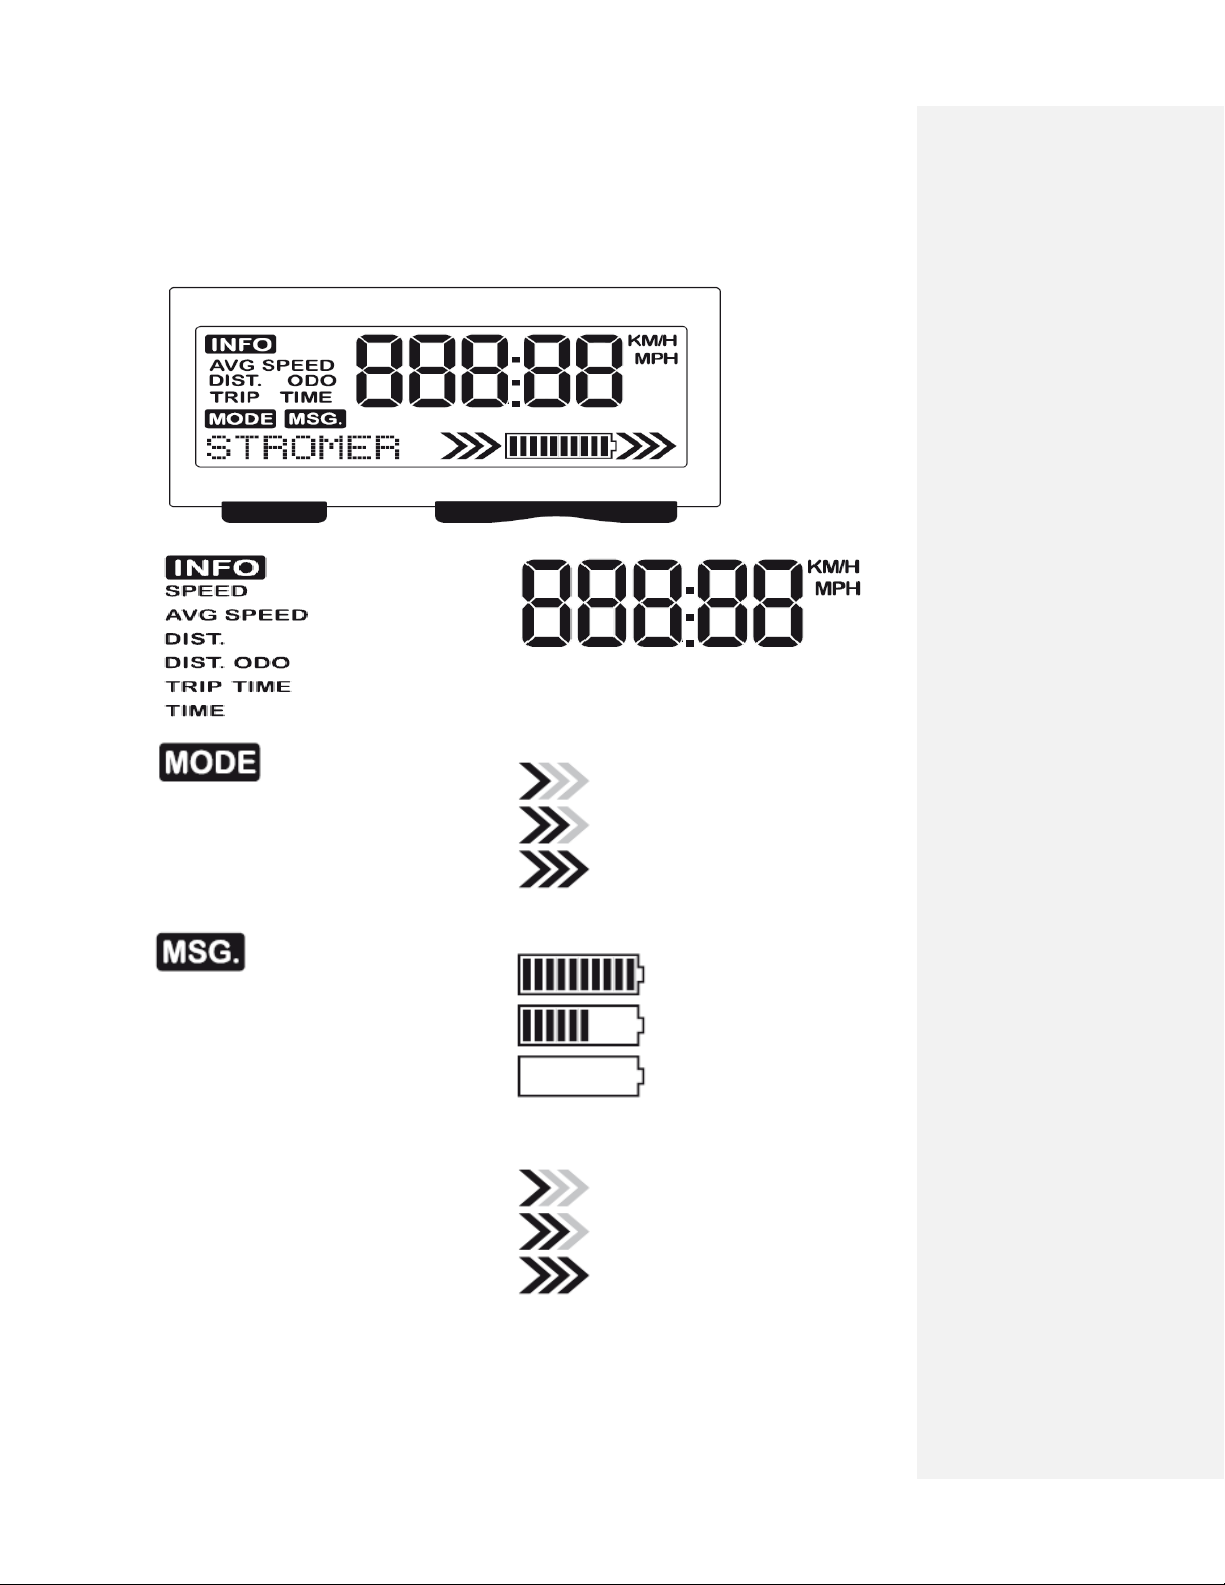
INTERFACE – DISPLAY AND FUNCTIONS
Current speed
Average speed
Kilometer per day
Total kilometers
Trip time
Time
The following can be displayed here, among
others: Speed, average speed and time
The Mode display
shows the current
assist mode or
recuperation mode
(such as e.g. Eco,
City Tour, or
Power)
Energy recovery (shown to the left of the battery display)
Little
Medium
Maximum
The MSG-display
(message) shows a
message, a status,
or a code.
Battery charge status
100%
60%
0%
STROMER
General Information Display
The following can be displayed here, a.o.
POWER Assist mode
REKUP2 Recuperation mode
LOCKED System status info
CODE 0004 Setting parameter
HALL Error messages
Energy consumption (shown to the right of the battery display)
Little
Medium
Maximum

INTERFACE – OPERATION
1. Turn Stromer on
Important information: The pedal must bear no weight at all when turning on.
2. Turn Stromer off
3. Select Assist Mode or Recuperation Mode
Back Next
Manual Recuperation Mode
The energy recovery is usually active
during braking. It can, however, be
activated with mode selection as well.
Select «Recoup-Mode» to recover energy
and thus brake electrically.
Assist Mode
The Stromer is equipped with four different
modes: Eco (150%), City (200%), Tour
(250%), and Power (300%).
When idling (Zero Mode) nothing is shown
in the mode display and the motor does not
provide any assistance.
Ready
off
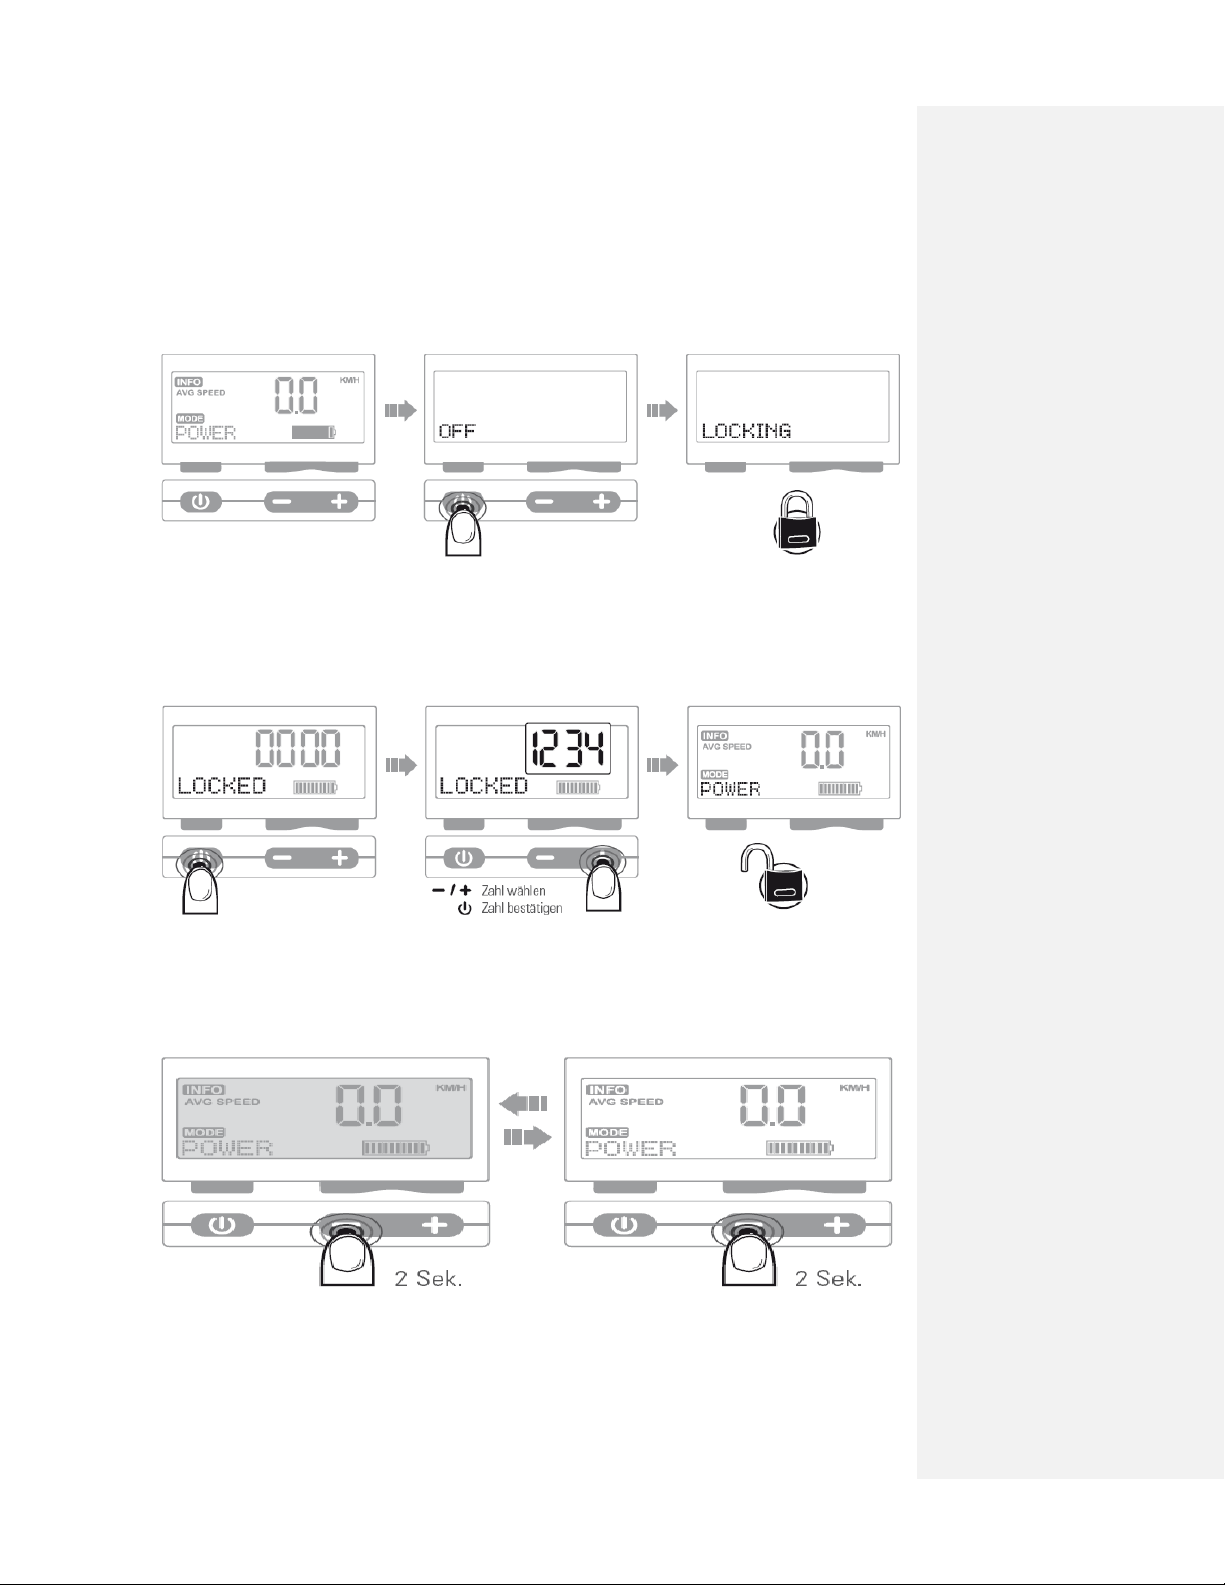
4. Locking the System
To lock the system hold the On/Off key for approx. 6 seconds until the message
«Locking» appears.
5. Unlock System
Turn on the Stromer (see page 11) and enter your password. Select the number using -/+
and confirm with the On/Off key. Password: Factory setting «1234». To set your own
password, see page 14.
Select number / confirm number
6. Background Light
To turn the background light of the interface on or off, press the minus key for 2 seconds.
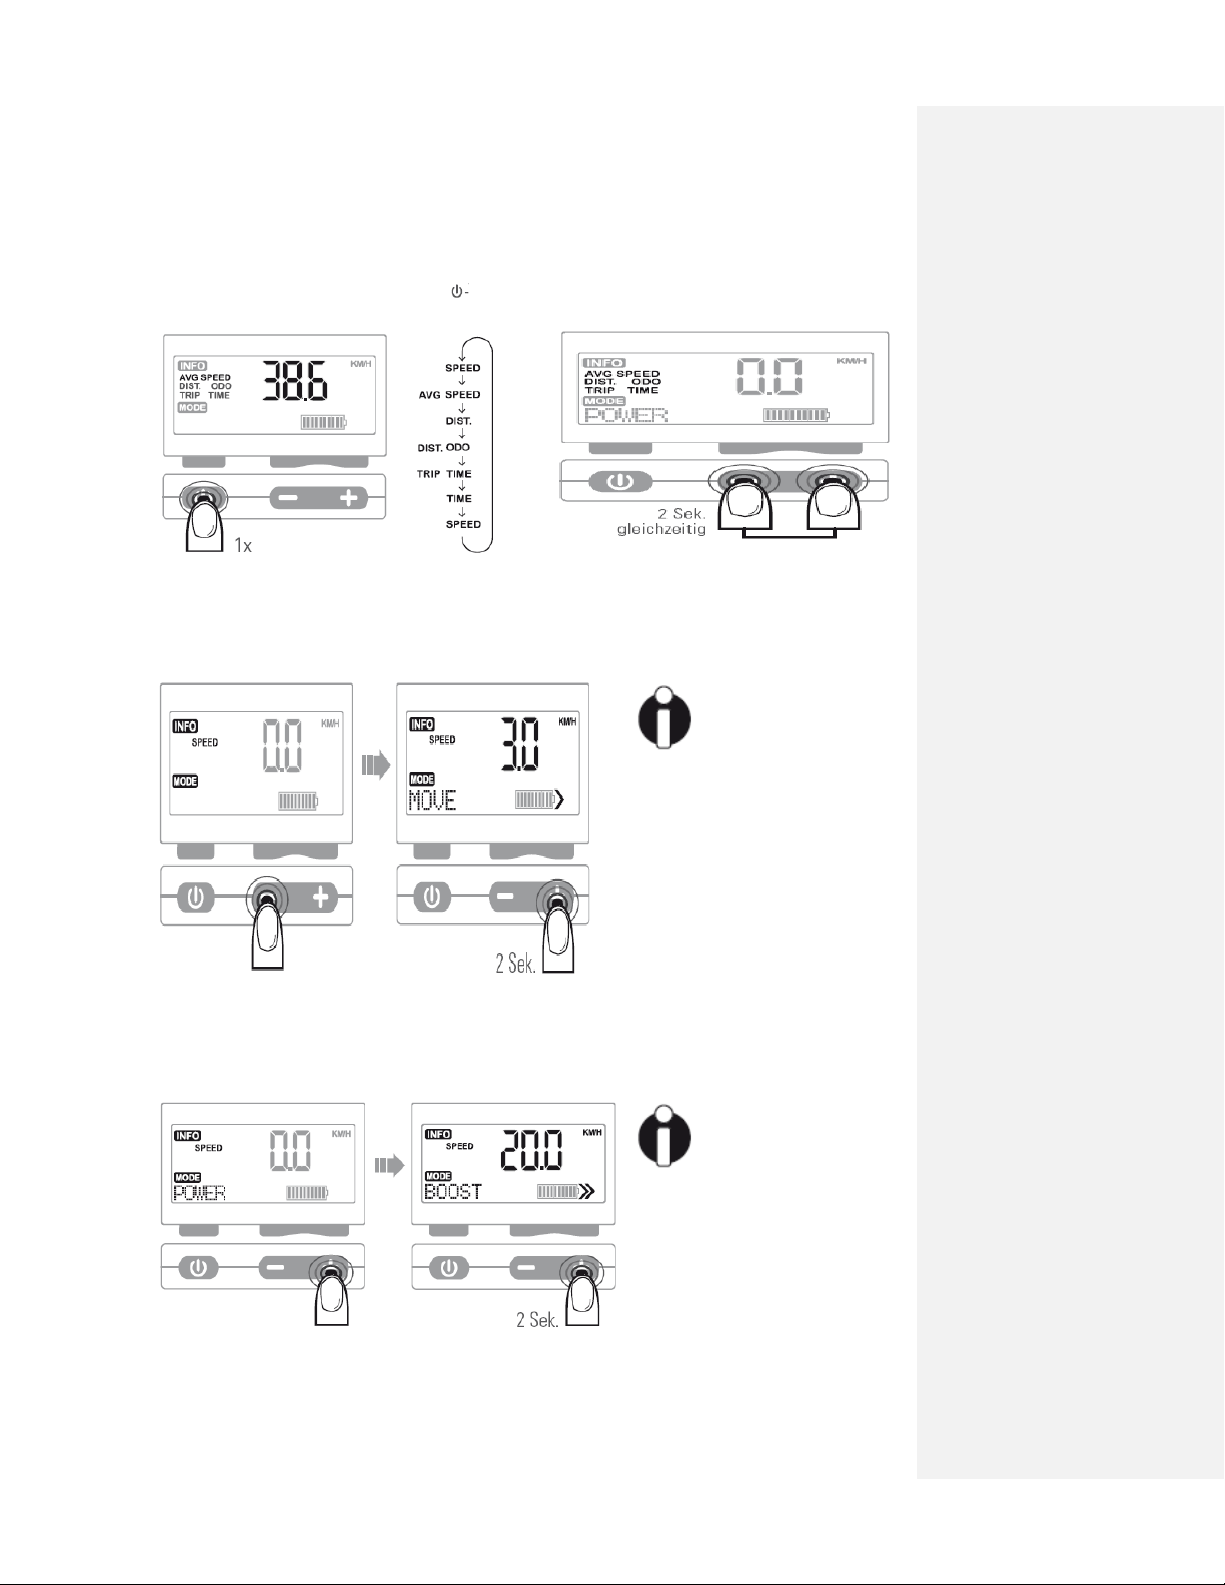
7. Select Information Display
You will reach the various information
displays by repeatedly pushing the key
8. Reset the Information Display
The information display blinks briefly
when the reset has been successfully
completed.
2 seconds simultaneously
9. Use Move Mode
The Move Mode must be enabled before it can be used (see Page 15).
Select «Zero Mode» (see page 11) and hold down the plus key.
This push assist is
limited to
walking pace.
10. Use Boost Mode
The Boost Mode must be enabled before it can be used (see Page 15).
Select the Power Mode and hold down the plus key.
The Boost requires a
min. of 3 km/hr, and
is limited to 20 km/hr.

INTERFACE – BASIC SETTINGS
You can change the various basic settings in three simple steps:
1. Call up menu
2. Enter code
3. Select value
Simultaneously push the
On/Off key and the plus
key for 3 seconds.
Select the desired number
using the plus and minus
keys and confirm with the
On/Off key. To confirm the
code hold the On/Off key
for 3 seconds.
Select the desired value
using the plus and minus
keys and confirm by
holding the On/Off key for
3 seconds. Save is
displayed.
Setting the time
Allow password change
In order to change the
password with the code
«0004» the value must be
set to 1. After the change
reset to 0.
Change password

Set sensor sensitivity
With this setting you can
define the ratio between
muscle power and motor
assist. The sensor
sensitivity, therefore
influences, the distance
traveled (see Pg.9)
Enter total kilometers
Here you can manually
enter your total kilometers.
Turn Recuperation Mode
on/off
Enable Move Mode
This mode is used as push
assist. The Stromer rides
along at walking pace.
(for instructions see page
13)
Enable Boost Mode
In this mode the Stromer
can be driven up to 20
km/hr without pedal assist.
(for instructions see page
13)

MAINTENANCE AND CARE
The battery must be removed
from the battery compartment
and the compartment itself
Battery – Important Information
Care Instructions
+ If the battery has completely lost
Charge, you will have to recharge it
directly after the trip; otherwise the
battery will be exhaustively discharged.
+ If the battery has not been used for a
longer period of time it must be
completely charged again. Store at
room temperature and recharge every 2
to 3 months.
+ Charge your battery at room
temperature
Safety Instructions
Under no circumstances should you do
the following with your battery:
+ short-circuit
+ immerse in water or clean with water
+ open or manipulate
+ charge with a different charger
+ expose to heat or fire source.
Do not use high pressure cleaners. These
can affect the ball bearings and the
electrical system.
must be closed for any type of work to be
performed on the Stromer.
Have your Stromer serviced once or twice
per year, depending on use. The first service
should be performed after approx. 6 months.
Regularly check the tire pressure to keep
rolling friction to a minimum and to prevent
flats.
Regularly check the plug connections on the
display and on the motor (underneath the
Neoprene guard on the inside of the left
chain stay).
Clean your Stromer with a bicycle care
product and water. It is best to use a sponge
or a rag. Motor, display, battery compartment
and electrical connectors should not be hosed
down.

Sprocket and Chain
The sprocket and chain should be cleaned
on a regular basis and checked for wear.
This will extend the service life.
Depending on the effect of dirt, humidity,
salt and traction, the chain will have a
service life of 1,000 to 3,000 km.
During each cleaning, the chain rings
should be inspected for broken off or
bent teeth. This is often caused by
imprecise shifting or the chain coming
off, and increased wear of the chain.
It is best to use a dry lubricant for sunny
days and a wet lubricant for rainy days
and during the winter.
Use: Clean the soiled chain with a rag.
Then turn the crank anti-clockwise and
apply oil on the inside of the chain.
Finally, remove any excess oil from the
chain with a rug.
Winter-Specific Maintenance
and Care
If you are also using your Stromer during the
winter,then the chain should be lubricated
more often than during the summer due to
the effect of salt on the chain.
Store and charge your battery at room
temperature. Cold batteries will not operate
as well as warm batteries.
Clean your Stromer regularly of salt.
Protect you Stromer from weather influence
when not in use.

TROUBLESHOOTING
Step 1
Try to solve the problem using the troubleshooting list below.
Step 2
If your problem is listed in the troubleshooting list you can try to remedy the problem
using the proposed solution listed next to it. If this does not work or the problem is not
listed, continue to the next step.
Step 3
Contact the service hotline at 0848 31 45 01 or the nearest service center (for address list
see pages 22 and 23).
TROUBLESHOOTING LIST
Message (MSG)
Solution
HEAT
Motor temperature too high. Continuing
the trip can lead to overheating.
OVERHEAT
The motor is overheated and turned off
automatically to protect the electronic
system. Let the motor cool off. Afterwards,
it is safe to continue the trip.
NO_COM
The power supply plug is disconnected or
the motor is defective. Check the
connection. If the problem persists contact
the nearest service center.
HALL
Motor is defective. Contact the nearest
service center

Problem
Solution
The Stromer does not assist or very
irregularly.
Turn off the control unit. Make sure that
the pedal bears no weight at all. Reconnect
the control unit and try again.
The brake sensor on the right brake lever
could have shifted. This will cause the
sensor to send a constant turn-off signal to
the motor.
Disconnect the brake sensor from the
control unit and try again. If this solves the
problem you can have the sensor reset
during your next service.
When connected, the display shows the
number zero four times (0000), and the
first number is blinking.
The system lock was activated during the
connection. To deactivate the system lock
see page 12.
The control unit cannot be turned on.
Change the battery of the control unit. To
do this you will have to remove the
steering wheel. You will need a size 4
Allen wrench and a button battery
(CR2032). You can also contact one of our
service centers and we will be happy to do
this for you.

LEGAL
The Stromer is available in two categories:
+ Mountain 33 and Power 48
(in some countries a moped driver’slicenseisrequired)
+ Mountain 25
Ask for the local law in your area!
_______________________________________
WARRANTY SERVICES
Service offer
When purchasing a Stromer the following applies:
3-year option for customization
We replace steering wheel, stem and saddle at no charge to you and adjust your Stromer
according to your needs.
3-year warranty on all parts
On manufacturer’sandmaterialdefects,exceptforwearparts(chains,cable,pads,tires,
rims, bearings, etc.) as well as improper use and accidents.
3-year frame warranty
3-year or 750 full-charge cycles warranty on the battery
Warranty for defects and liability
The warranty period for the Stromer is 3 years from the date of purchase. The warranty
covers all components and accessories on the Stromer. Depending on use, the Stromer
should be serviced once or twice per year. It is recommended to have the first service
done after approx. 6 months. If the annual service is not performed myStromer AG will
not be held liable for any production or assembly defects. In particular, myStromer AG
will not be liable for damages caused by improper use or natural wear and tear, or for
damages that did not occur on the delivery object itself (consequential harm caused by a
defect).
This manual suits for next models
3
Table of contents


