The Handy 10794 User manual

Thank you for purchasing our new Multi-Use Head
Magnifying glass. This innovative glasses type mag-
nier, with headband and 2 LED lights, can be easily
used for reading books, reading newspaper, drawing,
handicraft, tailoring, viewing owers and plants, and
so on.
Please read the user guide carefully before the rst
usage.
• With two LED lamps
• The eciency of the LED lamp is 10 times more
than any ordinary bulb, so this item is ECO-friend-
ly and energy saving
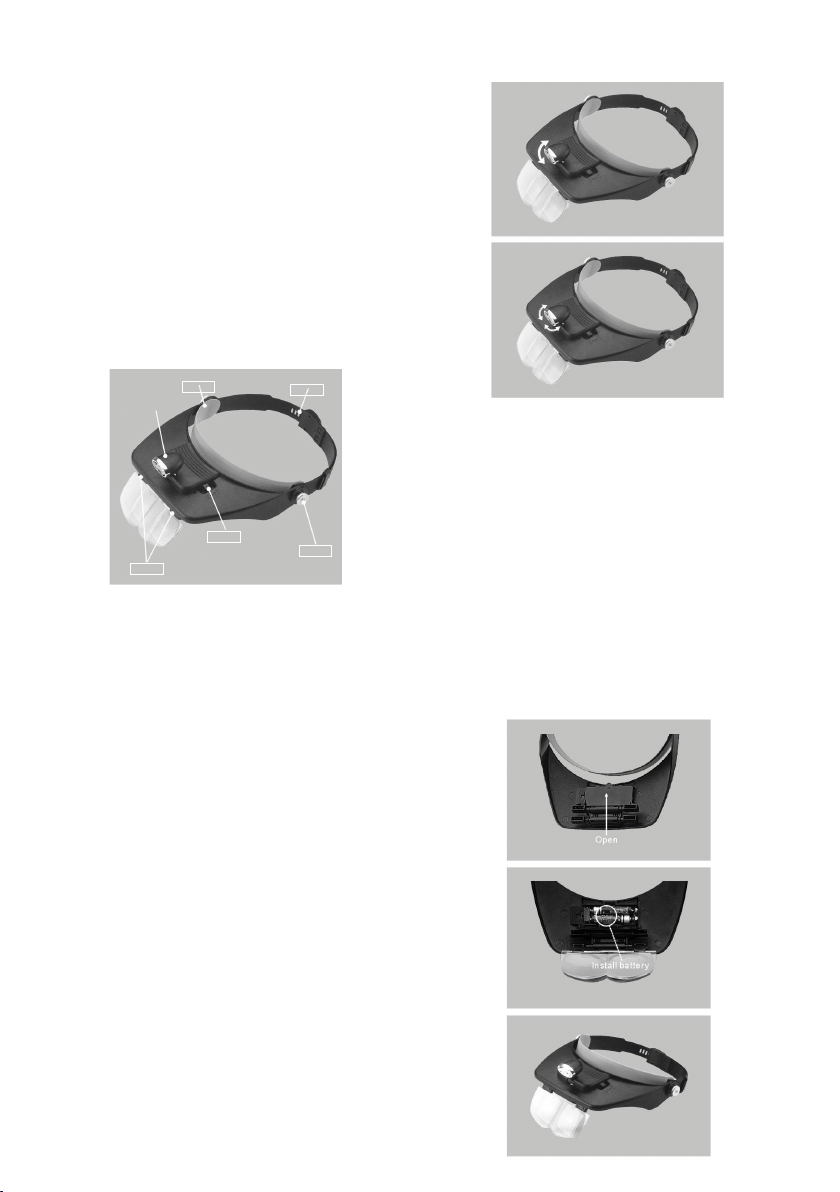
1. Fixing band
2. Head band
3. Plug-in hole for lens
4. Light switch ON/OFF
5. Lens Adjusting screw
1. 2.
3.
4.
5.
Features:
This product is a super-light head magnifying of wide
scope of vision with lens and LED light (Weight: about
100 g).
This product is developed and produced according to
many years of experience of our company. It is suita-
ble to use by technicians from various elds or by any-
body who works in precise production elds.
Due to its simple use, it is widely used in manufactur-
ing and processing small products, repairing cameras,
electric products, electronic parts of vehicles and com-
puters, and so on.
It’s also suitable for dentists, veterinarians, and beauty
industry workers, jewel productions, sewing, embroi-
dery processes, stamp collectors, or just for reading,
drawing, and so on. You can also see small things
without your magnifying glasses with the help of our
multi-use product. If you turn the light on, you can
light your way up while going ont he road in the dark.
The surface of lens has been processed specically, if
its surface is dirty, please clean with a soft cloth and
apply only alcohol or warm water.
* Note: Please avoid using any chemical detergent be-
cause they can deteriorate the surface of the lens.
I. Usage of the light:
1. Referring to gure on the left, please adjust the
UP and DOWN button. (ON – OFF)
2. You can also turn the light left or right, and up-
ward or downward.
II. Change of the batteries:
1. When changing the battery, please open the
hole to 10 mm width and 10 mm height, to the
position which is about 4 mm. Open the battery
cover with the signal A and the word OPEN, and
press there with the top of a pen, thus, the cover
will pop out, then open the cover by your hand.
2. After inserting the new batteries, close the bat-
tery cover.
3. Use only 2 x AAA type batteries.
4. Please get rid of the used batteries in accordance
with your local stipulations.
5. The switch is marked with ON and OFF for use,
please refer to gure.

III. Method of installing and removing the lens:
1. Installing the lens:
1. Do not touch the surface of the lens, use a soft
cloth to handle with them.
2. During the installation, place the convex side of
lens outward and the at side towards your eyes.
3. Insert the bracket which is on the lens into the
hole of the lens, at this time, the installation of
lens is nished.
Side:Outward Flat side:Towards eyes Reversed U type of
groove can move up
and down
2. Removing the lens:
1. The steps are opposite to the above installation
method. (Fingerprint cannot be on the lens, and
when taking the lens use a soft cloth.)
2. When installing or removing lens, keep the lens
parallel to the groove or keep them on a straight
line. If they are not parallel when installing, the
upside of the lens can be damaged.
3. When installing, the lens should be installed by
following the gure. (Lens and plug-in hole of
the lens are always in parallel position.)
* Note: : If this product falls o the ground, lens and
bracket will be damaged easily, so please pay atten-
tion while using the product.
IV. Adjustment of head band:
1. Fix the head band, press the band button print-
ed with the word“PUSH”and adjust the length of
the band to t your head. (Refer to gure)
2. Fix the head band, grasp the band button print-
ed with the word “PUSH” and move it to the di-
rection of tightness, then x the head band after
hearing the sound of “click”.
3. Head band does not have a standard size, so
please adjust the suitable length for your sizes.
The magnications of the lens:
1. 4 types of magnications: 1.2X, I.8X, 2.5X and
3.5X
2. The magnication is shown on the right upper
corer of the lens.
3. Select a suitable magnier size in accordance
with the distance and the object.
4. The suitable magnier should be set according
to the distance between the object and your
eyes.You can set the perfect magnier according
to the following table:
Magnications Distance to the object
1.2X 520 - 620 mm
1.8X 230 - 320 mm
2.5X 150 - 250 mm
3.5X 80 - 120 mm
Specications:
• Battery: 2 x AAA batteries
• Light source: 2 x LED
Warning:
• Avoid any direct contact and looking into the
direct sunshine through the lens because it can
cause serious damages.
• Do not place the item under direct sunshine, at
the window or at any combustible surface.

Köszönjük, hogy a LEDes, dupla lencsével ellátott Fej-
pántos Nagyítót megvásárolta. Ez a forradalmian új
multifunkcionális fejpántos nagyító kiválóan használ-
ható horgászáskor, olvasáskor, illetve kertészkedéskor
is.
Első használat előtt kérjük, hogy olvassa át gondosan
a használati útmutatót a biztonságos üzemeltetés el-
éréséhez.
• 2 LED lámpával
• A LEDek teljesítménye több mint 10szer erősebb,
mint egy hagyományos izzóé, környezetvédelmi
szerepe és energiatakarékossága kiemelkedő
1. Rögzítő pánt
2. Fejpánt
3. Lencserögzítő bemenet
4. Fény be/ki-kapcsolása
5. Lencséket szabályozó csavar
1. 2.
3.
4.
5.
Jellemzők:
Ez a termék egy szuperkönnyű, széles látószöggel
rendelkező, fejpántos nagyító lencsékkel és lámpával
(súlya körülbelül 100 g). Egy gondosan megtervezett,
speciálisan kidolgozott, tesztelt és minőségileg elle-
nőrzött fejpántos nagyító, mely kiválóan használható
több területen, mint például technikusok és precíziós
munkát végzők által.
Egyszerű használatából adódóan kiválóan alkalmaz-
ható precíziós gyártási folyamatok, aprólékos mun-
kafolyamatok, kamerák, számítógépek, járművek
javításakor, vegyipari termékek előállításakor, labo-
ratóriumi munkafolyamatok során is. A termék kiváló
lehet továbbá fogorvosoknak, állatorvosoknak, szép-
ségszalonokba, ékszerkészítőknek, varróknak, hímzési
folyamatok során, bélyeggyűjtőknek, olvasáshoz, raj-
zoláshoz és még számos más területen való felhaszná-
lásra is, ahol jól jön egy kis extra nagyítás. Amennyiben
sötétben alkalmazza a terméket, a lámpa felkapcsolá-
sával könnyedén bevilágíthatja az utat.
A lencsék speciális kialakítása lehetővé teszi, hogy
könnyedén tisztíthassa egy puha anyaggal, illetve len-
csetisztító alkohollal vagy langyos vízzel.
* Megjegyzés: Kérjük, hogy ne alkalmazzon vegyi tisz-
títószert a lencsék tisztítására, mert azok módosíthat-
ják a lencsék felületét.
I. Lámpa használata:
1. A baloldalon található ábrára hivatkozva állít-
sa be a gombot felfele vagy lefele. (BE- illetve
KI-kapcsolás)
2. A lámpát állíthatja bal, jobb, lefele vagy felfele
irányba is.
II. Elemek cseréje:
1. Elemcsere esetén kérjük, hogy nyissa fel az elem-
tartót 10 mm széles és 10 mm magas pozícióban,
mely körülbelül 4 mm-re távolodik így el az elem-
tartó fedelétől, majd nyomja meg egy toll hegy-
ével az A jelnél. Így az elemtartó fedele felnyílik,
melyet a kezével le tud pattintani.
2. Helyezze be az új elemet, majd zárja vissza az
elemtartót.
3. 2 db AAA típusú elemet használjon.
4. Helyi előírásoknak megfelelően szabaduljon
meg a lemerült elemtől.
5. A kapcsoló „ON” illetve „OFF” jellel van ellátva,
lásd az ábrán.

III. Lencsék üzembe helyezése, illetve cseréje:
1. Lencsék behelyezése:
1. Ne érjen hozzá a lencsék felületéhez, használjon
egy puha anyagot azok megérintéséhez.
2. Behelyezéskor ügyeljen arra, hogy a lencsék
domború oldala kifele, homorú oldala befele
nézzen.
3. Helyezze be a lencséket a keretbe ügyelve a
jelzésekre.
Domború oldal:
kifelé
Homorú oldal:
szemek felé
Fordított U típusú
vájat mozgatható fel,
illetve le
2. Lencsék eltávolítása:
1. A lencsék eltávolításának folyamata megegyezik
a lencsék behelyezésének folyamatával, mind-
össze visszafele kell haladni. Fontos, hogy sima
kézzel a lencséket soha ne érintse meg, használ-
jon egy puha anyagot a lencsékkel való művele-
tek végrehajtásához.
2. Amikor a lencséket behelyezi, illetve kiveszi,
ügyeljen arra, hogy parallel irányban mozgassa,
illetve helyezze be azokat a keretbe. Amennyi-
ben ezt elmulasztja, a lencsék felső része sérül-
het.
3. Behelyezéskor a lencsék bepattannak a helyükre,
lásd az ábrán. (Lencsék és a keret egyenes vonal-
ban vannak.)
* Megjegyzés: Amennyiben a terméket a földre ejtené,
a lencsék és a keret könnyen megsérülhetnek. Ügyel-
jen arra, hogy minden esetben körültekintően járjon
el.
IV. A fejpánt beállítása:
1. Rögzítse a fejpántot és nyomja meg a„PUSH” fel-
iratú gombot, majd állítsa be a fejpántot a meg-
felelő méretre (lásd ábra).
2. Rögzítse a fejpántot és mozdítsa el az „PUSH”fel-
iratú gombot addig, amíg a megfelelő szorossá-
got el nem éri, majd rögzítse a beállított méretet
miután a„klikk”hangot meghallja.
3. A fejpántot saját igényeinek és méreteinek meg-
felelően beállíthatja.
A lencse nagyító részei:
1. 4 különböző nagyító résszel: 1.2X, 1.8X, 2.5X és
3.5X
2. A nagyítási mértékek a lencsék jobb felső sarkán
találhatóak.
3. Válassza ki a megfelelő nagyítást, gyelembe
véve a tárgyat és a távolságot.
4. A lent található táblázat alapján egyszerűen ki-
választhatja, hogy melyik nagyító lencsére lesz
szüksége munkája során a távolság illetve a tárgy
elhelyezkedését gyelembe véve:
Nagyító Távolság a tárgytól
1.2X 520 - 620 mm
1.8X 230 - 320 mm
2.5X 150 - 250 mm
3.5X 80 - 120 mm
Specikáció:
• Elem: 2 x AAA elemek
• Fényforrás: 2 x LED
Figyelem:
• Kérjük, hogy a lencsén keresztül soha ne nézzen
közvetlenül a napfény irányába, mert a nagyítós
lencséknek köszönhetően a napfény felerősödik,
mely sérülést okozhat.
• Ne helyezze az eszközt közvetlen napfényre,
ablakpárkányra vagy bármilyen gyúlékony felü-
letre.

Vă mulţumim că aţi ales această lupă de lucru multi-
funcţională, extrem de utilă la cele mai variate lucrări
profesionale sau de agrement.
• Două lumini LED
• De 10 ori mai eciente de cât becurile clasice –
foarte economice în exploatare
1. Banderolă de xare
2. Banderolă de mână
3. Locaş pt. lentilă
4. Comutator LED On/O
5. Şurub de reglare a lentilei
1. 2.
3.
4.
5.
Caracteristici:
Lupa de lucru oferă mărire cu câmp vizibil extins,
având masă proprie foarte redusă (cca. 100 g)
Domeniul de utilizare este cât se poate de extins, de
la citirea textelor mărunte, la operaţii de montaj piese
ne, până la reparaţii de aparatură electronică, opti-
că sau mecanică nă, aproape că nu există domeniu
unde să nu îşi găsească utilitatea.
Luminile LED oferă un plus notabil în utilizare, acestea
putând utilizat şi ca lanternă pe timp de noapte.
Suprafeţele lentilelor sunt tratate special, curăţire efec-
tuându-se cu apă cu detergent sau alcool.
Se va evita folosirea oricăror solvenţi, aceştia prezen-
tând pericol pt. materialul lentilelor.
I . Utilizarea luminii LED:
1. Conform g. punerea în funcţiune a iluminării se
face cu butonul ON/OFF pe partea stângă
2. Lumina poate dirijată în orice direcţie, în func-
ţie de necesităţi
II. Schimbarea bateriei:
1. Deschideţi locaşul bateriei prin apăsarea cu un
pix în dreptul inscripţiei OPEN. Capacul se va
deschide.
2. După ce v-aţi convins de poziţia corectă a bateri-
ilor, reînchideţi capacul.
3. Folosiţi 2 baterii mărimea AAA
4. Eliminaţi bateriile uzate conform prevederilor le-
gale în vigoare.
III. Montarea şi demontarea lentilelor:
1. Montarea lentilelor:
1. Nu atingeţi lentila cu degetele, folosiţi un şerve-
ţel sau o cârpă moale
2. La montare, îndreptaţi partea convexă spre exte-
rior şi partea plată spre ochi
3. Fixaţi levierul de xare a lentilei în canalele de
xare şi montarea este terminată

2. Dmontarea lentilelor:
Se vor urma paşii de la pct. 1 în ordine inversă
IV. Reglarea banderolei de xare pe cap:
Apăsaţi butonul cu inscripţia PUSH şi reglaţi lungimea
banderolei pt. o xare sigură şi comodă pe cap
Gradul de mărire a lentilelor:
1. Lentilele au diferite puteri de mărire, astfel: 1.2x,
I.8x, 2.5x şi 3.5x
2. Factorul de mărire este inscripţionat în colţul
dreapta-sus a lentilelor
3. Alegeţi un factor potrivit pt. distanţa de privire şi
natura lucrării
Mărire Distanţa ochi-obiect
1.2X 520 - 620 mm
1.8X 230 - 320 mm
2.5X 150 - 250 mm
3.5X 80 - 120 mm
Specicaţii:
• Alimentare: Baterii: 2 x AAA
• Sursa de iluminare: 2 x LED
Instrucţiuni privind utilizare lupei:
• Nici o dată nu priviţi direct spre Soare cu lupa pe
ochi. Pericol de dăunare a vederii.
• Pe timp însorit nu păstraţi lupa expusă la razele
solare (ex. fereastră). Pericol de aprindere
Ďakujeme, že ste si vybrali práve túto multifunkčnú
lupu na čelo. Táto multifunčná lupa príde vhod pri
výrobe návnad na rybárčenie, pri čítaní a iných drob-
ných prácach.
Prosíme, ešte pred prvým použitím lupy si starostlivo
prečítajte tento návod a dodržujte pokyny a rady v
ňom uvedené.
• Osvetlenie 2 x LED
• Napájanie z dvoch batérií typu AAA
• Účinnosť LED osvetlenia je 10-krát vyššia oproti
klasickej žiarovky, toto prispieva k úspornejšej
prevádzke a k ochrane životného prostredia
1. Upevňovací pásik
2. Hlavový pásik
3. Rýchlo upínacie miesto na šošovky
4. Vypínač osvetlenia ON/OFF
5. Vymeniteľné šošovky
1. 2.
3.
4.
5.
Popis:
Tento produkt je veľmi ľahká pomôcka na čelo, ktorá
má vymeniteľné zväčšovacie šošovky a LED osvetlenie
(Hmotnosť: cca 100 g).
Tento produkt bol vyvinutý a vyrobený na základe dl-
horočných skúseností, doporučujeme ho pre všetkých
technických pracovníkov z rôznych odvetví a zamest-
nancov, ktorí pracujú s drobnými súčiastkami.
Pre svoje jednoduché použitie sa dá využiť v rôznych
výrobných a opravárenských spoločnostiach, ktoré sa
zaoberajú výrobou, montážou alebo opravami drob-
ných výrobkov, elektroniky, chemických prípravkov,
automobilových súčiastok alebo počítačov a pod.
Svoje miesto si zastane aj u zubárov, veterinárov,
kozmetičiek, manikérok, zlatníkov, šičiek, vyšívačiek,
zberateľov známok, použiť sa dá pri čítaní, kreslení a
pod. Veľmi užitočnou pomôckou môže byť pre vášni-
vých rybárov, ktorý si doma radi vyrábajú a opravujú
nástrahy.
Pomôže pri práci s drobnými predmetmi bez nutnosti
nosiť okuliare. S rozsvieteným svetlom sa môžete bez-
pečne pohybovať aj v úplnej tme.
Povrch šošoviek je špeciálne upravený. Znečistenie sa
dá jednoducho odstrániť mäkkou papierovou utier-
kou, alkoholom alebo vodou.
* Poznámka: Prosíme nepoužívajte agresívne chemic-
ké čistiace prostriedky, ktoré by mohli poškodiť povrch
šošoviek.
I . Zapnutie a použitie osvetlenia:
1. Tak ako je to naznačené na obrázku pomocou
posuvného prepínača na ľavej strane smerom
HORE a DOLE zapínate/vypínate osvetlenie
2. Osvetlenie je možné pootočiť do ľava alebo do
prava a sklápať hore alebo dole, ak je to potrebné
II. Výmena batérií:
1. Pri výmene bateriek otvorte najprv dvierka, ktoré
kryjú držiak bateriek. Jemným povytiahnutím na
mieste označenom OPEN dvierka vyskočia. Po-
tom vyberte staré batérie.
2. Umiestnite do držiaku nové batérie, dbajte na
ich správnu polaritu tak, ako je to naznačené. Po
výmene zatlačte dvierka až dokiaľ nezapadnú na
miesto.
3. Používajte mikrotužkové batérie AAA
4. Vybité batérie zneškodnite v súlade s platnými
predpismi. Nikdy ich nevhadzujte do domového
odpadu. Vhoďte ich do na to označených zber-
ných nádob.
5. Pre zapnutie osvetlenia posuňte prepínač do po-
zíci ON a OFF ak ho už nebudete používať, pozri
obrázok.

III. Nasadenie a vybratie šošoviek:
1. Nasadenie šošovky:
1. Uchopte opatrne šošovku za bočnú stranu alebo
mäkkým papierom, handričkou
2. Pri nasadzovaní šošovky musí byť vypuklá strana
smerom von a plochá strana smerom k očiam
3. Vložte šošovku do držiaku tak, aby úplne zapadla
na svoje miesto
Vonkajšia strana Vnútorná strana Držiak je otočný, šosovku
je možné sklopiť alebo
zdvihnúť.
2. Vybratie šošovky:
1. Postupujte presne opačne ako pri nasadzovaní.
(Prstami sa nedotýkajte šošovky, použite mäkký
papier alebo handričku.)
2. Pri nasadzovaní a vyberaní šošovky dbajte na
to, aby ste ich do držiaku dávali alebo vyberali
rovnobežne. Nezaťažujte držiak iba jednostrane,
lebo to môže viesť k jeho poškodeniu.
3. Pri nasadzovaní a vyberaní postupujte podľa
obrázku. (Šošovka a držiak by mali byť v jednej
línii.)
* Poznámka: Pri páde ktorejkoľvek časti výrobku, či už
držiaku alebo šošovky, môže veľmi ľahko dôjsť k jej
poškodeniu. Pri manipulácii preto postupujte opatrne.
IV. Hlavový pásik:
1. Pre upravenie veľkosti hlavového pásiku stlačte
tlačítko na mieste. kde je napísané “PUSH” a po
otvorení nastavte veľkosť tak, aby sa vošiel na
hlavu.
2. Pre úpravu veľkosti stlačte tlačítko “PUSH” a pri-
tiahnite pásik tak, aby tesne obopínala hlavu a
západka pevne zapadla na svoje miesto.
3. Hlavový pásik je možné nastaviť podľa individu-
álnych požiadaviek užívateľa.
Zväčšenie šošoviek:
1. V balení sú šošovky s nasledujúcim zväčšením:
1.2x, I.8x, 2.5x and 3.5x
2. Násobok zväčšenia je uvedený na každej v pra-
vom hornom rohu
3. Vhodný násobok vyberajte podľa vzdialenosti od
predmetu
4. Doporučené násobky podľa vzdialenosti od
predmetu nájdete uvedené nižšie
Zväčšenie Vzdialenosť od pred-
metu
1.2X 520 - 620 mm
1.8X 230 - 320 mm
2.5X 150 - 250 mm
3.5X 80 - 120 mm
Technické údaje:
• Napájanie: 2 x mikrotužková batéria AAA
• Zdroj svetla: 2 x LED
UPOZORNENIE:
• Cez lupu sa nikdy nepozerajte priamo do slneč-
ných lúčov, pretože by mohlo dôjsť k vážnemu
popáleniu očí.
• Lupu nikdy nepokladajte v blízkosti okna tak, aby
smerovala na horľavé predmety.
Table of contents
Languages:


