The Handy THSSWB User manual
OPERATOR’S MANUAL AND PARTS LIST
Electric Silent Shredder - THSSWB
Spares & Support: 01793 333212
www.thehandy.co.uk
Before use please read & understand this manual, paying
particular attention to the safety instructions.
21/03/2014

1
12
2
1
3
13
5
6
4
9
5
11
10
7
1 - Filling Hopper
2 - Power Switch
3 - Handle
4 - Power Supply Plug
5 - Lock Lever
6 - Control Panel
7 - Upper Enclosure
8 - Collection Box
9 - Base Frame
10 - Adjusting Knob
11 - Fixing Knob
12 - Blade Cover
13 - Feed Hopper
8
2
2
4 3
5 6
3
7 8
16
14
11
10
15
9
13
4
40 mm
DESIGNATION OF PARTS
1 Filling hopper
2 Power switch
3 Handle
4 Power supply plug
5 Lock lever
6 Control Panel
7 Upper enclosure
8 Collection Box
9 Base frame
10 Adjusting knob
11 Fixing knob
12 Blade cover
13 Feeding hopper
14 Screw
15 Counter blade
16 Cutting roller
TECHNICAL DATA
Model
Name Electric Shredder
Motor AC-Motor 230V~50Hz
Motor rating P1 S6-40% 2,500W
Motor rating P1 S1 2,000W
Rotational speed cutting roller 40 min–1
Power switch overload protection; cutting and reverse function, zero-
voltage initiator
Weight 25 kg
Max. branch diameter (only for freshly cut wood) Max.
Safety class I
Protection class IP X4
NOISE DATA
measured sound power level 89.33dB(A)
K=2.39dB(A)
guaranteed LwA 95.0dB(A)
The sound intensity level for the operator may exceed 80 dB (A). Wear ear protection.
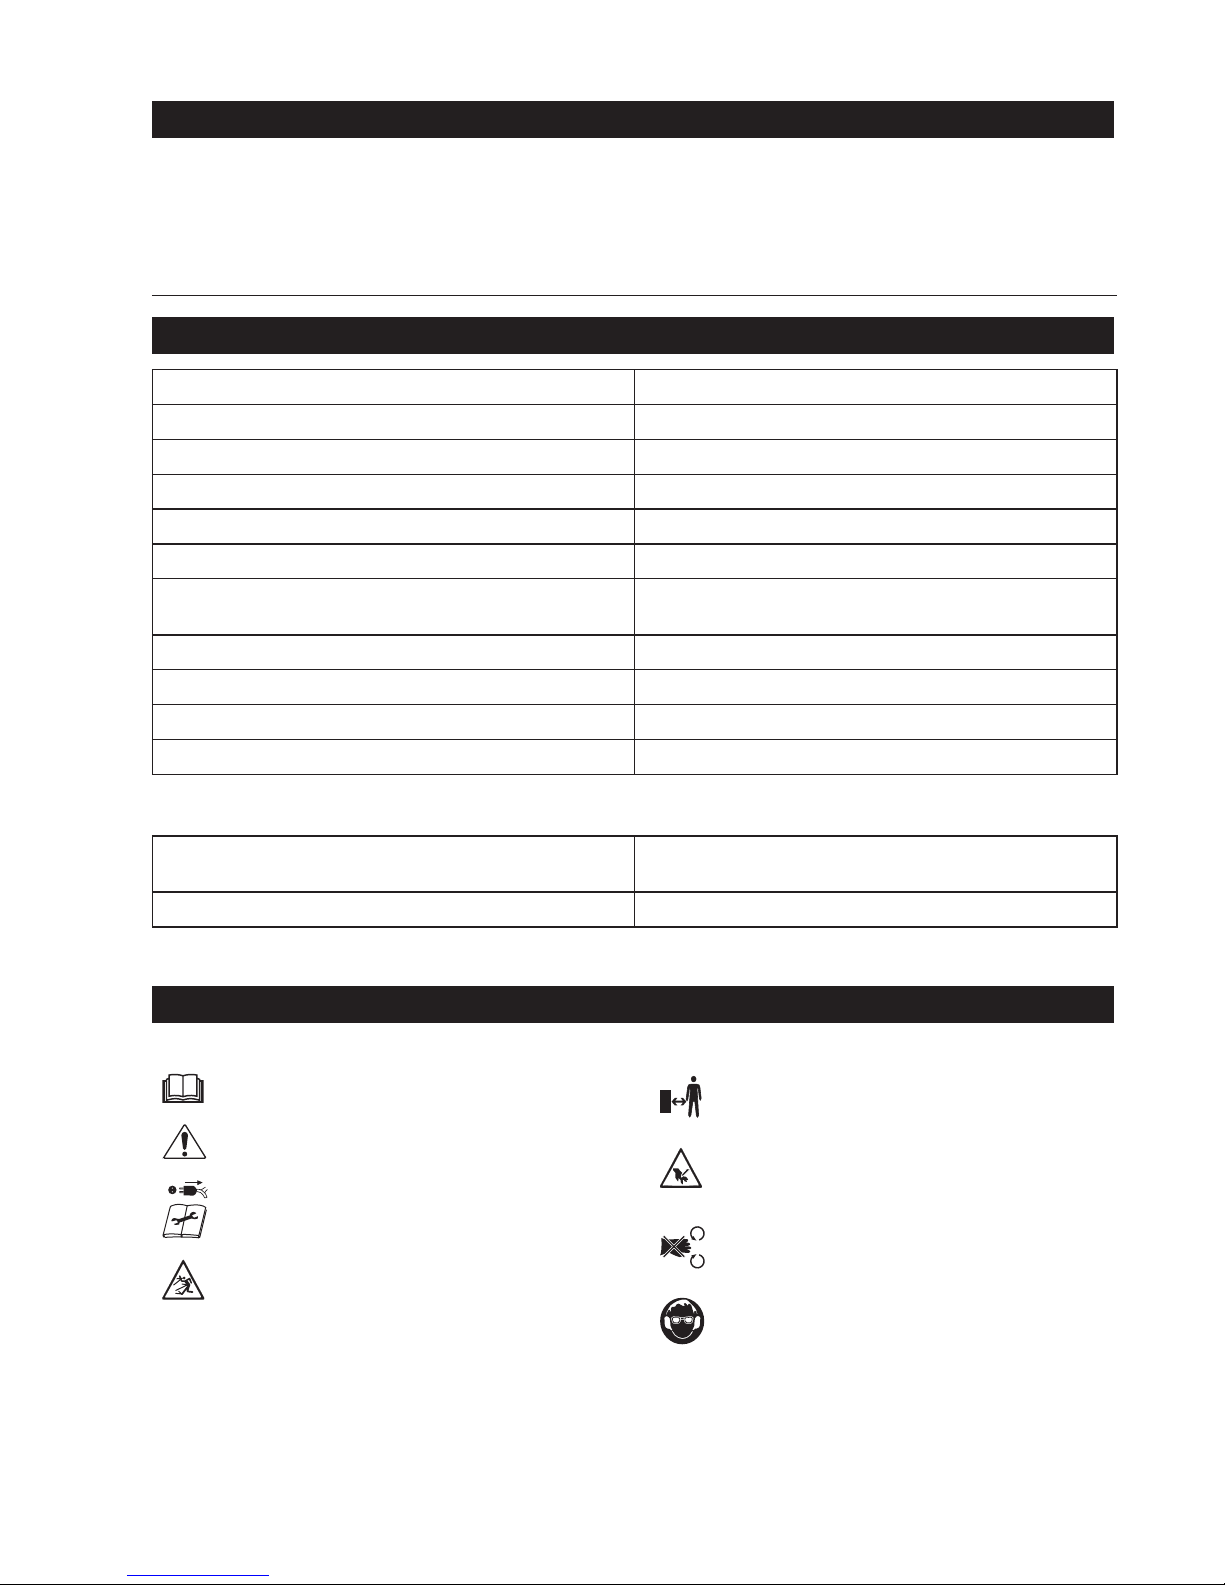
SYMBOLS
The following symbols are used for the machine. Be sure that you understand their meaning before use.
Read instruction manual.•
Take particular care and attention.•
Switch off the motor and unplug it
before servicing, cleaning, maintenance or
repairing.
•
Objects may be thrown out at high speed.•
Keep bystanders and pets away from
the workarea.
•
Danger — Rotating blades. Keep hands
and feet out of openings while the
machine is running.
•
Danger — Rotating blades. Keep hands
and feet out of openings while the
machine is running.
•
Wear eye and ear protection.•
THSSWB
5

Wear protective gloves.•
Do not expose to rain or moisture.•
Turn the knob clockwise for narrower
clearance / turn the knob
counter-clockwise for wider clearance.
•
Open the blade cover to adjust the blade or
clean the wood.
•
Wait until all the machine parts stop
completely.
•
Do not use the machine as a step.•
Only for EU countries
Do not dispose of electric equipment or
battery packstogether with household
waste material! In observance of European
Directive 2002/96/EC on waste electric
and electronic equipment, 2006/66/EC
on batteries and accumulators and waste
batteries and accumulators and their
implementation in accordance with national
laws, electric equipment and battery pack
that have reached the end of their life must
be collected separately and returned to
an environmentally compatible recycling
facility.
•
SAFETY WARNINGS
READ CAREFULLY BEFORE USE
KEEP INSTRUCTION MANUAL FOR FUTURE
REFERENCE
Do not start to operate the machine until you have
read these operating instructions. Observe all the
instructions given, and install the machine as described.
Intended use of the machine
The garden shredder is intended for shredding the
following items:
All types of branches up to a maximum diameter
of 40mm (depending on the type and
and condition of the wood.)
Garden refuse such as plants should be dried
before shredding and fed alternately with
branches to avoid blocking the shredder.
The garden shredder is intended for private use only,
and not for commercial use. Do not use it in public
places either.
•
–
–
•
For public low-voltage distribution systems of
between 220 V and 250 V.
Switching operations of electric apparatus can cause
voltage uctuations. The operation of this device under
unfavourable mains conditions can have adversly effect
the operation of other equipment. With a mains impedance
equal or less than 0.45 Ohms it can be presumed that
there will be no negative effects. The mains sockets used
for this device must be protected with a fuse or protective
circuit breaker having slow tripping characteristics.
General Instructions
Read this instruction manual to become familiar with
how to handle the machine. Users insufciently
informed are more likely to be involved in accidents
due to improper handling.
Do not lend the machine to people who have not read
the instruction manual.
When lending the machine, always attach this
instruction manual.
The electric shredder is not intended for use by persons
with reduced physical, sensory or mental capabilities,
or a lack of experience and knowledge. Young
children should be supervised to ensure that they do
not play with the machine. Do not allow children to
operate this equipment.
Operate only if you are in good physical condition.
Perform all work calmly and carefully. The user is
responsible for the safety of bystanders and any
damage caused by the machine in the operating area.
Never use this machine after consumption of alcohol or
drugs, or if feeling tired or ill.
Use the machine in accordance with these instructions,
considering the working conditions and the application.
It can be dangerous to use the machine for applications
which it is not intended for.
Never alter the machine, including safety devices such
as the interlock device. This will endanger your safety.
National or local regulation may restrict the handling of
the machine.
Stay alert. Watch what you are doing. Use common
sense. Do not operate machine when you are tired.
Personal protective equipment
Dress Properly. Work clothes should be functional and
appropriate, i.e. it should be tight-tting but not
cause hindrance. Do not wear either jewelry or clothing
which could become entangled in the machine.
Cover long hair, tying it back may not be sufficient.
Always wear ear protection to avoid hearing loss.
Wear protective glasses or goggles to protect your eyes
from debris thrown from the lling hopper.
Wear protective gloves to prevent injury to ngers.
Wear a face mask when shredding dry branches,
hedges with leaves or anything that will create dust.
When using the machine, always wear sturdy shoes
with a non-slip sole. This will reduce the chance of
injuries and ensure a good footing.
Work area safety
Keep children and bystanders clear while operating the
machine.
Operate the machine in open space on a rm, level
surface. Do not operate the machine close to a wall or
other objects.
•
•
•
•
•
•
•
•
•
•
•
•
•
•
•
•
•
•
6

Do not operate the machine in explosive
atmospheres, such as in the presence of ammable
liquids, gases or dust. The machine creates sparks
which may ignite flammable materials.
Do not operate the machine on a gravel or uneven
surface where ejected material may result in injury.
Keep the work area clean and well lit. Cluttered or
dark work areas invite accidents.
Do not expose the machine to rain or wet conditions.
Water entering the machine may increase the risk of
electric shock.
Starting up the machine
Before connecting the plug to the machine:
Check all the screws, nuts and other fasteners
are properly secured.
Check guards, deectors and screens are in
place and good working condition.
Make sure the lling hopper is empty.
Make sure the inlet and discharge opening
guards are properly in place.
Check all the parts of the machine carefully to
determine if it operates properly and performs
its intended function. Especially, never use the
machine if the switch does not work normally.
If the supply cord is damaged, ask one of our
authorised service dealers, always using genuine
replacement parts, to replace it.
Electrical safety
WARNING:
This is a Class I appliance. Connect with a supply
socket with an earth terminal. Improper earth may
cause electric shock and death. Use only three-wire
extension cords which have three-prong grounding-
type plugs and three-pole receptacles which accept the
tool’s plug.
Avoid contact with earthed or grounded surfaces
(e.g. pipes or radiators) during operation.
Use only IEC60245 (H07RN-F) extension cable for
outdoor use with splash-proofed connector. Its cross-
section must be at least 1.5 mm2for cable lengths up to
25 m, and 2.5 mm2for cable lengths over 25 m.
Voltage drop may occur when using a long thin cable,
this will reduce the power of the machine.
When using the extension cable, make sure that it does
not interfere with the operation of the machine and is
not squeezed or bent, and the plug does not get wet.
When using a cable reel, wind the cable completely off
the reel.
Do not misuse the cord. Never use it for carrying,
pulling or unplugging the machine. Keep it away
from heat, oil, sharp edges or moving parts. Damaged
or entangled cords increase the risk of electric shock.
Check the extension cable regularly for damage to the
insulation. Replace it if damaged.
If the connecting cable is damaged, withdraw the mains
plug immediately. A damaged cable may cause contact
with live parts and electric shock.
Never use damaged cables.
Only plug the machine into sockets in tested electrical
circuits. Check that the system voltage matches that on
the rating plate.
•
•
•
•
•
–
–
–Make sure you are wearing appropriate clothes.
–
–
–
•
•
•
•
•
•
•
•
•
•
•
•
Never deactivate or bypass the protective devices.
When using the machine outdoors, always use a
residual current-operated circuit-breaker (RCD) with an
operating current of 30 mA or less.
Operation
Keep your face and body away from the inlet opening.
Never put your hands or other partsyour body or
clothing inside the inlet and discharge opening, or near
moving parts. This may result in serious injury.
Do not overreach. Keep proper footing and balance at
all times. This enables better control of the machine in
unexpected situations. Don't stand at a higher level than
the base of the machine when feeding material into it.
Always keep clear of the discharge opening during
operation.
Observe regional regulations for noise protection.
Do not shred rocks, metal, bottles or other foreign
matter. Make sure that these foreign objects are not
in the branches that you shred.
Immediately switch off the motor and unplug it if the
blade strikesa foreign object or the machine starts
vibrating or making noise unusually. Check the
shredder for damage, and tighten any loose parts. Ask
an authorised service dealer to repair the machine.
Do not let the processed material accumulate in
the discharge opening. Otherwise it may result in
material being thrown through the inlet opening.
Switch off the motor and unplug it:
Whenever leaving the machine unattended
Before clearing a blockage or any fault
Before checking, cleaning or working on the
machine
Before making any adjustments, changing
accessories or storing
Whenever the machine starts vibrating or making
noise unusually
Clearing the inlet or discharge opening
Attaching or removing the collection box
Transporting.
Do not tilt the machine during operation.
Keep well clear when you shred long material. It may
spring back and this may result in personal injury.
Do not operate without the lling hopper.
Do not force the machine. It will do the job better
and safer at the rate for which it was designed.
Frequent overload may cause motor damage or re.
Use the right appliance. Do not use appliances for
purposes that it is not intended for. Never shred
metal, glass, stone, ceramics, plastics, thicker
branches, hard wood or thick wood plates, etc.
Maintenance instructions
Have your machine serviced by our authorised service
dealer, only use genuine replacement parts. Incorrect
repair and poor maintenance can shorten the life of the
machine and increase the risk of accidents.
Before servicing, inspection, adjustment, storage, or to
change an accessory, take following steps:
Shut off the power
Disconnect the machine from the power supply
Make sure that all moving parts have come to a
complete stop
Allow the machine to cool.
•
•
•
•
•
•
•
•
•
•
•
–
–
–
–
–
–
–
–
•
•
•
•
•
•
•
–
–
–
–
7

Check the machine for damage.
Make sure safety devices work properly for
their intended function
Check that all the moving parts work smoothly
and adequately
Ensure parts are not damaged and are properly
installed
Any damaged parts should be replacedor
repaired by one of our service dealers.
Pay close attention when servicing the cutter. The
cutter may move manually even if theinterlock feature
is enabled.
Do not clean the device with water. It may cause
electrical shock.
Wear protective gloves during maintenance or
assembly work to reduce the chance of injury.
Do not carry out maintenance or repair work other than
that described in this instruction manual. Any other
work must be carried out by one of our authorised
service dealers.
Only use original replacement parts and accessories
intended for your machine. Use of non-genuine parts
may result in personal injury or damage to the machine.
Store the machine in a dry room. Keep it out of reach of
children. Never store the machine outdoors.
ASSEMBLY
CAUTION:
Always be sure that the machine is switched off and
unplugged before carrying out any work on the tool.
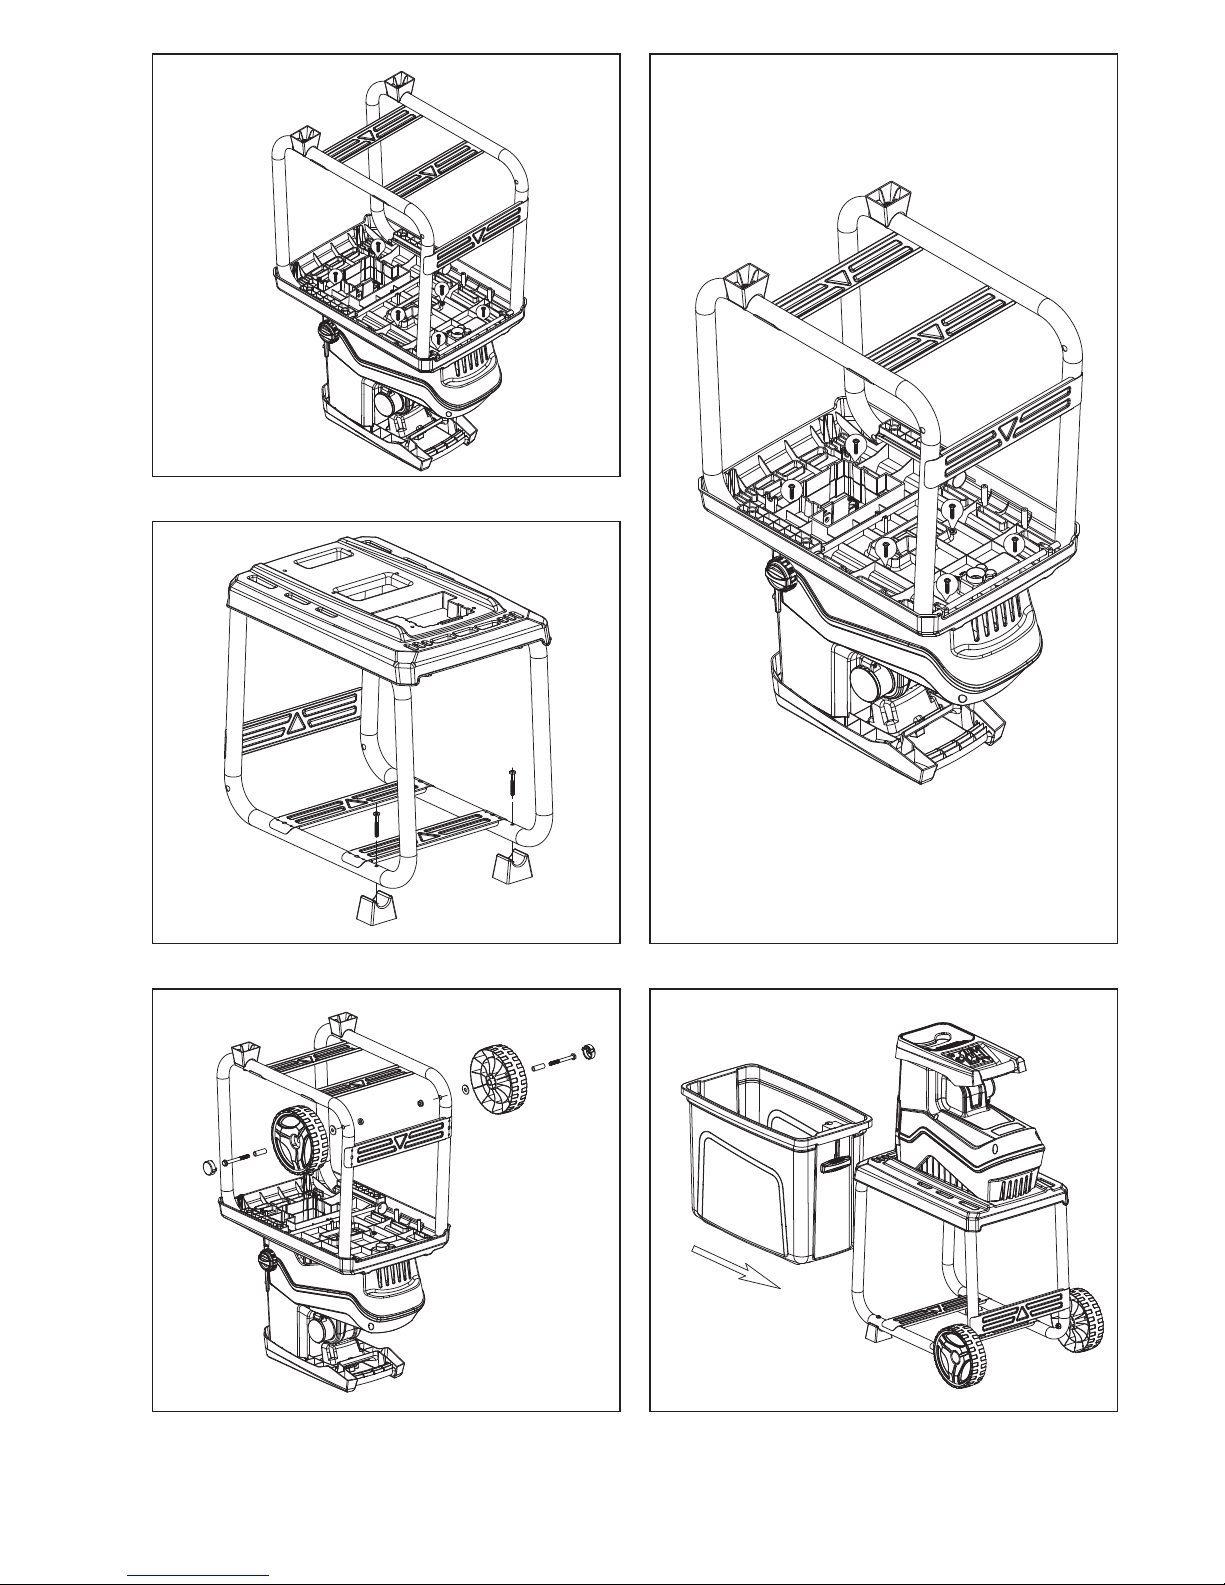
1. Place the upper enclosure upside down on aat
surface. Then put the base frame onit. Make sure
the base frame is the right way around.(Fig. 2)
2. Fasten each part by tightening the screws. Make sure
all parts are perfectly stable. (Fig. 3)
3. Attach the feet using screws. Make sure they are
fastened tightly. (Fig. 4)
4. Attach the wheels by following these steps: (Fig. 5)
Put the wheel bolt through the spindle sleeve.
Place the wheel on the wheel bolt.
Place a washer on the wheel bolt before
inserting the bolt through the base leg. Secure
it with a nut. Make sure the nut is tight.
Repeat on the other side.
5. Insert the collection box. And then raise the lock
lever. (Fig. 6)
FUNCTIONAL DESCRIPTION
WARNING:
Before plugging the machine in, always make sure that
the machine is switched off. Plugging the machine in
with the switch on may cause an unexpected start
resulting in serious personal injury.
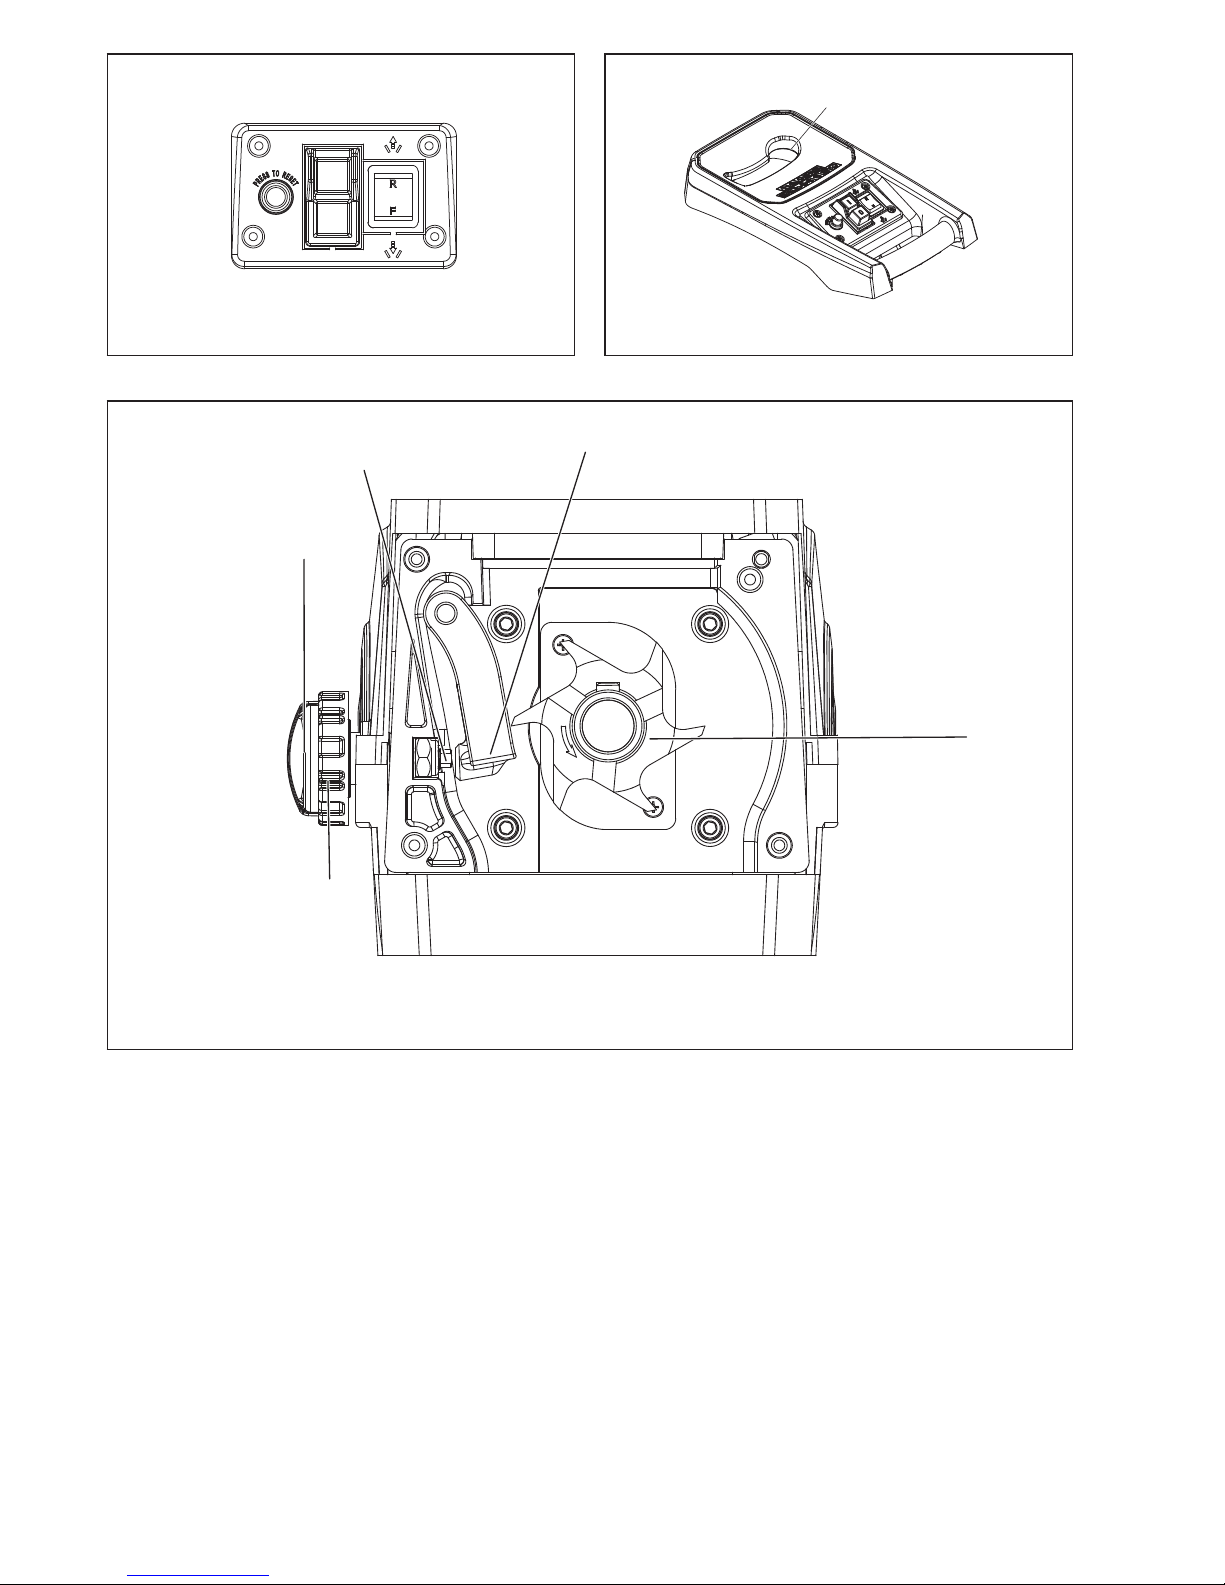
Power Switch (Fig. 7)
CAUTION:
Do not use the machine if the switch does not turn it on
and off. Defective switches must be replaced by one
of our authorised service dealers.
To turn on the machine, push the green button.
To turn off the machine, push the red button.
•
–
–
–
–
•
•
•
•
•
•
•
–
–
–
–
LED light
The LED light indicates the status of the machine as
follows:
RED color: When the machine is connected to the
power supply and the machine is switched off.
GREEN color: When machine is switched on.
Flickering GREEN color constantly: When the
machine is blocked during operation.
Flickering RED color: When the machine cannot
recover automatically. Clear the problem manually
when this happens.
Unintentional restart proof
The machine switches off automatically when a power
failure occurs. To restart, push the green button again.
Overload protection
The motor is equipped with overload protection. When
overloaded, the machine will run the following procedure:
The blade will run in reverse for 2or 3seconds
to try to push the shredded material back out.
The blade runs forward again.
If the material is still clogged after three
attempts to unblock itself, the machine will stop
and the LED light will icker red.
When the LED flickers red follow the steps below:
Turn off the machine.
Wait until the blades stop completely.
Remove the clogged material.
Turn the shredder on again after about 5 minutes,
and feed material that is easier to shred.
If you cannot turn on the machine after this
waiting time, refer to “Trouble Shooting”.
Forward / Reverse switch
CAUTION:
Switch off the shredder before changing the forward /
reverse switch.
Position e
The blades rotate in the forward direction.
Position d
The blades rotate in the reverse direction to release
jammed material.
When you change the direction into d(reverse), hold
the green power switch to rotate the blades. The
shredder automatically stops when you release the
power switch.
NOTE:
Several repetitions of reverse and forward operations
may be required to shred a large object.
CAUTION:
Always use a hook or a stick to remove jammed objects
to prevent accidents.
Always wait until the shredder stops completely before
restarting.
Collection Box
CAUTION:
Switch off and unplug the machine before attaching or
removing the Collection Box.
Check the functionality of the interlock feature every
two hours for safe operation.
Never attempt to override the interlock feature.
–
–
–
–
–
–
–
–
•
•
•
•
•
•
8

Lock lever:
Upper position →The collection box is locked.
Lower position →The collection box is unlocked.
The device does not switch on
because of a safety function.
The machine cannot be switched on if the lock lever is in
the unlock position. The machine automatically stops if
the collection box is unlocked during operation.
Blade cover
CAUTION:
Make sure that the machine is switched off and un-
plugged before opening the blade cover.
Wear protective groves before opening the blade
cover.
The cutter does not stop immediately after switch off.
Wait until all the parts stop.
Ifthe material clogs badly in the upper enclosure,
remove it by opening the blade cover.
OPERATION
Set up the machine:
On a flat, level surface. Do not place the machine on
graveled ground.
Work at a safe distance (at least 2 m) away from
walls or other objects.
Before starting, make sure that:
The connection cables are not damaged. If there are
cuts or tears, stop operation and replace it immediately.
There is no damage on the machine, and all screws
are tight.
The machine is assembled completely and correctly.
Check the mains connection:
Make sure that the mains voltage matches the rated
voltage on the nameplate and the machine is properly
grounded.
Use only extension cords with sufficient core
cross-section.
The shredder can process the following types of
material:
All types of branches up to the machine's maximum
diameter capacity of 40mm, depending on type and
condition of the wood.
Dry garden refuse such as plants, which should be
dried before shredding and fed alternately with
branches to avoid blocking the shredder.
The shredder can NOT process the following types
of material:
Glass, metal, plastic, stone, ceramics, thicker
branches, hard wood, thick wood plates, cloth, plastic
bags, roots with soil.
Refuse which is in an almost liquid state, e.g. kitchen
waste.
Operation: (Fig. 8)
Feed the material into the filling hopper from the right
side.
In case of branches, twigs and wood, shred them just
after they are cut. They may get very hard as they
become dry.
•
•
•
•
•
•
•
•
•
•
•
•
•
•
•
•
Remove any side shoots from branches if they are not
easy to feed.
Turn off the motor and disconnect the machine from the
power supply before cleaning the ejection opening.
Do not let the shredded material accumulate in the
ejection opening. Otherwise the shredded material
may block the ejection opening. Empty the collection
box regularly.
Do not shred material which is more than the maximum
branch diameter of 40mm. The maximum branch
diameter may vary depending on the freshness and
condition of the wood.
Shredding wet garden waste may clog the shredder.
To reduce the chance of the machine clogging
alternate waste with wood.
Soft material or wet branches may be torn instead of
being cut. A worn counter blade may also cause this
problem.
Adjusting the blade clearance (Fig. 9)
For an effective operation, adjust the clearance between
the counter blade and cutting roller.
Setting the clearance:
Switch on the device.
Turn the fixing knob counterclockwise to release the
adjusting knob.
Turn the adjusting knob clockwise slowly to place the
counter blade closer to the cutting roller. Turn it until fine
aluminum chips are falling from the ejection opening.
Turn the fixing knob clockwise to lock the adjusting
knob.
MAINTENANCE
CAUTION:
Always be sure that the machine is switched off and
unplugged before inspectingor performing maintenance.
Wear protective gloves before performing inspection or
maintenance.
The cutter does not stop immediately after switch off.
Wait until all the parts stop before performing any
maintenance work.
Make sure that all the tools are removed after
maintenance work.
Never use petrol, benzine, thinner, alcohol or similar.
Discoloration, deformation or cracks may result.
To clean the machine, use only moist cloth and soft
brush.
Do not hose or clean the machine with high pressured
water.
After each operation, perform the following maintenance:
Check whether all the locking screws are tight (tighten
if necessary).
Lubricate metal parts to protect them against
corrosion.
Keep the vents clean and free from dust.
The cutting roller and counter blade will wear out over
time. Ask your nearest authorised service dealer for
replacement when it is necessary.
•
•
•
•
•
•
•
•
•
•
•
•
•
•
•
•
•
•
•
Before operation, adjust the Adjusting Knob to release
any foreign objects which may interfere with the Cutting
Roller and Counter Blade.
Switch on the tool, then adjust the Adjusting Knob, you
should hear the Cutting Roller touching the Counter Blade.
The shredder should produce small metal filings. Tighten
the Fixing Knob, make sure the Counter Blade is tight.
REVERSE SWITCH
The shredder is fitted with a reverse switch to enable
the removal of jammed material. If material becomes
jammed stop the machine by pressing the OFF button.
When the machine has come to a complete stop
change the direction of rotation by pressing the reverse
arrow on the reverse switch and pressing the ON button
(note that the machine will not stay ON while in reverse
-- the button has to be held down). When the blockage
has cleared,stop the machine and return the reverse
switch to its original position. Do not continue to run the
machine in reverse mode as this could cause injury to
the operator or damage to the machine.
9

TROUBLE SHOOTING
WARNING: Before performing maintenance, switch off the machine, pull out the mains plug, and wait until the
machine stops completely.
Problem Possible cause Remedy
Motor does not start No power supply Check the mains supply.
Mains cable defective Ask one of our authorised service dealersto inspect it.
Overload protection is activated Wait until the machine cools down and press the green
button.
Collection box safety cut-out device
(collection box is unlocked) Check and lock the collection box.
Motor sounds but does not
start
Cutting roller is blocked
Turn off the device.
Switch the forward/reverse switch into the reverse direction.
Switch on the machine until the jam has been cleared.
Switch the machine off again.
Change the direction to forward rotation.
Capacitor fault Bring the machine to one of our service dealers for repair.
The shredding material isnot
drawn into the shredder Reverse rotation. Turn off the machine and change the direction of rotation
using the selector switch.
Shredding material caught in lling
hopper
Switch off the machine. Switch the forward/reverse switch
to the reverse direction. Switch on the machine to release
the material, remove any foreign matter.
Switch the machine off again.
Change the direction to forward rotation.
Shredding material too soft or wet Push down with a branch
Cutting roller worn
Adjust the xed counter blade as described under
"Adjusting the blade clearance”.
If the cutting roller is severely worn, replace it.
Shredding material is not cut
cleanly
Fixed counter blade is not adequately
adjusted Adjust the counter blade.
Device starts but is blocked
by even a slight load, and
is switched off bythe
protective motor switch.
Extension cable is too long or
cross-section is too thin.
Socket is too far from mains supply or
cross-section of mains cable is too thin.
Check the extension cable is at least 1.5 mm2, maximum
25 m long. If using longer cable, minimum cross-section
is 2.5 mm2
10
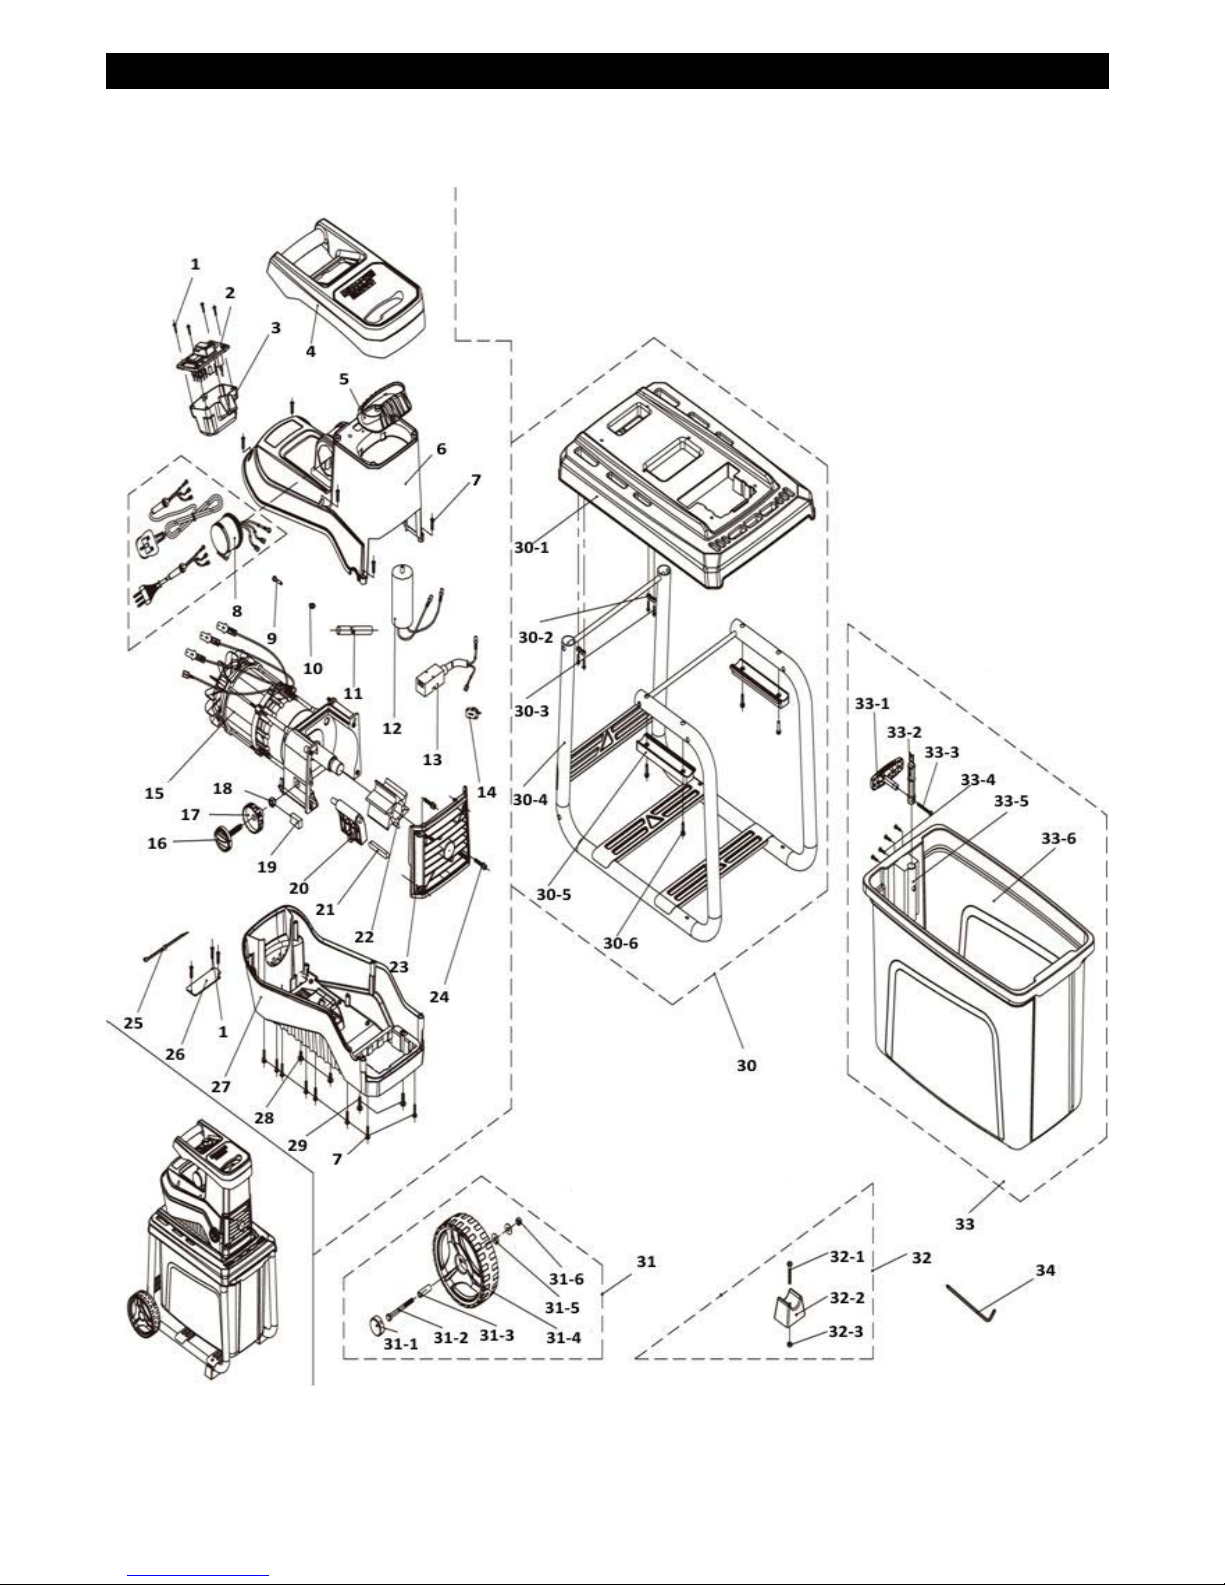
PARTS DIAGRAM
11

No Part No Description QTY No Part No Description QTY
1 TH203-1 Screw 7 28 TH203-28 Screw 2
2 TH203-2 Switch Assembly 1 29 TH203-29 Screw 2
3 TH203-3 Switch Housing 1 30 TH203-30 Base Assembly 1
4 TH203-4 Hopper Top 1 30-1 TH203-30-1 Base Plate 1
5 TH203-5 Feeder 1 30-2 TH203-30-2 Cable Clamp 2
6 TH203-6 Upper Housing 1 30-3 TH203-30-3 Self Tapping Screw 4
7 TH203-7 Self Tapping Screw 18 30-4 TH203-30-4 Support Base 1
8 TH203-8 Power Cable 1 30-5 TH203-30-5 Clamp 2
9 TH203-9 Screw 1 30-6 TH203-30-6 Self Tapping Screw 4
10 TH203-10 Lock Washer 1 31 TH203-31 Wheel Assembly 2
11 TH203-11 Heat Shrinkable tube 1 31-1 TH203-31-1 Wheel Cap 1
12 TH203-12 Capacitor 1 31-2 TH203-31-2 Wheel Bolt 1
13 TH203-13 Switch 1 31-3 TH203-31-3 Spindle Cover 1
14 TH203-14 Microswitch 1 31-4 TH203-31-4 Wheel 4
15 TH203-15 Motor 1 31-5 TH203-31-5 Washer 2
16 TH203-16 Adjustor Knob 1 31-6 TH203-31-6 Nut 1
17 TH203-17 Lock Knob 1 32 TH203-32 Bracket Assembly 2
18 TH203-18 Nut holder 1 32-1 TH203-32-1 Screw 1
19 TH203-19 Nut Housing 1 32-2 TH203-32-2 Bracket Assembly 1
20 TH203-20 Inlet Baffle 1 32-3 TH203-32-3 Nut 1
21 TH203-21 Type A Flat Key 1 33 TH203-33 Collector Box 1
22 TH203-22 Blade 1 33-1 TH-203-33-1 Push Button 1
23 TH203-23 End Cover 1 33-2 TH-203-33-2 Button Rod 1
24 TH203-24 Screw 2 33-3 TH-203-33-3 Self Tapping Screw 1
25 TH203-25 Nylon Cable Tie 6 33-4 TH-203-33-4 Screw 4
26 TH203-26 Switch Board 1 33-5 TH-203-33-5 Rod Housing 1
27 TH203-27 Lower Housing 1 33-6 TH-203-33-6 Collector Box 1
34 TH203-34 Allen Key 1
PARTS LIST
12

EC Declaration of Conformity
We, Importer
Handy Distribution
SN3 4NS
Declare that the product
Designation: ELECTRIC SILENT SHREDDER
Model: THHSWB
Complies with the following directives:
2006/42/EC / Annex 1 - Machinery Directive
2006/95/EC / Annex 1 – Low Voltage Directive
2000/14/EC amended by 2005/88/EC / Annex 3 - Noise Emission in the Environment by
Equipment for Use Outdoors Directive.
The conformity assessment procedure followed was in accordance with
Directive 2006/42/EC
Name of the Notified Body: TÜV Rheinland LGA Products GmbH
Address: Tillystraße 2 - 90431 Nürnberg
- Measured Sound Pressure Level: 84.4 dB (A)
- Guaranteed Sound Power Level: 95 dB (A)
Standards and technical specifications referred to:
2006/42/EC / Annex 1 - DIN 11004-1:1988, EN136:2003+A2, EN 292-1:1991, EN 953,
EN 954-1:1996, EN13683:2003+A2:2011, EN ISO 3744:1995, EN 41003, EN 50366,
EN 60068-2-75, EN 60335-1:2002+A11+A1+A12+A2+A13+A14+A15 Annex H,
EN 60335-1:2012, EN 61032, EN 62233-2008, ISO 3767-1:1998, ISO 3767-3:1995,
ISO 3767-4:1993, ISO 9772, ISO 11094:1991, EN 11688-1, EN ISO 11691-1995,
EN ISO 11820:1996, EN ISO 12100-2:2003, EN 13849-1, EN ISO 13857: 2008, IEC 60065,
IEC 60068-2-31, IEC 60068-2-78, IEC/TR 60083, IEC 60112, IEC 60127, IEC 60245,
IEC 60252-1, IEC 60227, IEC 60238, IEC 60320-1, IEC 60309, IEC 60320-1, IEC 60320-2-2,
IEC 60320-2-3, IEC 60335-1:2012, IEC 60335-1:2010 (Fifth Edition), IEC 60384-14,
IEC 60417-5005, IEC 60417-5006, IEC 60417-5019, IEC 60417-5036, IEC 60417-5172,
IEC 60417-5180, IEC 60529, IEC 60664-1, IEC 60664-3, IEC 60664-4, IEC 60691,
IEC 60695-2-11, IEC 60695-2-12, IEC 60695-2-13, IEC 60695-10-2, IEC 60695-11-5,
IEC 60695-11-10, IEC 60730-1, EN 60730-2-8, EN 60730-2-10, IEC 60906-1, IEC 60990,
IEC 60999-1, IEC 61000-4-2:2008, IEC 61000-4-3:2006+A1+A2, IEC 61000-4-4:2012,
IEC 61000-4-5:2005, IEC 61000-4-6:2008, IEC 61000-4-11:2004, IEC 61000-4-13:2002+A1,
IEC 61000-4-34, IEC 61032:1998, IEC 61058-1:2000+A1+A2, IEC 61058-1:2002+A2,
IEC 61558-1, IEC 61558-2-6, IEC 61770, IEC 62151, IEC 62233:2008, ZEK 01.4-08/11.11
Authorised signatory and technical file holder
Date: 19/03/2014
Signature:
Name / title: Mr. Simon Belcher / Managing Director
Hobley Drive, Stratton St Margaret, Swindon, Wiltshire, SN3 4NS.
13

GUARANTEE
This product is guaranteed against manufacturing
defects for a period of 12 months. This does not cover
the product where the fault is due to misuse, abuse,
use in contravention of the instructions, or where the
product has been the subject of unauthorised
modifications or alterations. This warranty only covers
domestic use and will be void if the tool is used for a
commercial application.
In the event of a problem with the product within the
guarantee period, please contact Customer Service on
01793 333212 or email:
If the issue cannot be resolved over the telephone or by
email, you may be referred to your local approved
service dealer.
Please keep your sales receipt as proof of purchase
Your statutory rights remain unaffected.
Guarantor: Handy Distribution SN3 4NS
Whilst every effort is made to accurately represent the
product, small variations in colour, design and
specification may occur. We reserve the right to alter
the product without giving notice. All images are
illustrative only and may differ from the product due to
ongoing product development.
14

A SELECTION OF QUALITY PRODUCTS FROM OUR VAST RANGE
A SELECTION OF QUALITY PRODUCTS FROM OUR VAST RANGE
HAND PUSH LAWN MOWERS
HAND PUSH LAWN MOWERS
ELECTRIC & PETROL BLOW VACS
ELECTRIC & PETROL BLOW VACS
ELECTRIC & PETROL SHREDDERS
ELECTRIC & PETROL SHREDDERS
ELECTRIC, PETROL & MANUAL
ELECTRIC, PETROL & MANUAL
LOG SPLITTERS
LOG SPLITTERS
LAWN SWEEPERS
LAWN SWEEPERS
PETROL LINE TRIMMERS
PETROL LINE TRIMMERS
PETROL BRUSHCUTTERS
PETROL BRUSHCUTTERS
PETROL MULTICUTTERS
PETROL MULTICUTTERS
ELECTRIC & PETROL CHAINSAWS
ELECTRIC & PETROL CHAINSAWS
LOG SAW HORSES
LOG SAW HORSES
CORDLESS & PETROL
CORDLESS & PETROL
HEDGETRIMMERS
HEDGETRIMMERS
ELECTRIC & PETROL TILLERS
ELECTRIC & PETROL TILLERS
AERATORS & DETHATHERS
AERATORS & DETHATHERS
GARDEN & SALT SPREADERS
GARDEN & SALT SPREADERS
PUSH & TOWED ROLLERS
PUSH & TOWED ROLLERS
SNOW CLEARANCE TOOLS
SNOW CLEARANCE TOOLS
SPRAYERS
SPRAYERS
SACK TRUCKS
SACK TRUCKS
TROLLEYS & TRAILERS
TROLLEYS & TRAILERS
LIGHT CONSTRUCTION
LIGHT CONSTRUCTION
FIND OUT MORE AT WWW.THEHANDY.CO.UK
FIND OUT MORE AT WWW.THEHANDY.CO.UK
15

To order spare parts and see the complete range of garden
machinery and garden equipment from Handy, visit:
www.thehandy.co.uk
Spares & Support: 01793 333212
Other manuals for THSSWB
1
Table of contents
Other The Handy Paper Shredder manuals

The Handy
The Handy THIS User manual

The Handy
The Handy THSS User manual

The Handy
The Handy THHSWB Installation and maintenance instructions

The Handy
The Handy THPDS65 User manual

The Handy
The Handy THIS Installation and maintenance instructions

The Handy
The Handy THIS User manual

The Handy
The Handy THSSWB User manual

The Handy
The Handy THISWB User manual
Popular Paper Shredder manuals by other brands


EBA
EBA 430 E operating instructions

Andrew James
Andrew James Electric Garden Shredder & Ear Protectors manual

Fellowes
Fellowes POWERSHRED 73Ci manual

Q-Connect
Q-Connect CROSS-CUT 10 instruction manual

Lervia
Lervia KH 4402 Operating and safety instructions

QShred
QShred SENTIN-L PROW operating instructions


