The Wand Tonearm Master Unipivot Tonearm User manual
1.
2.
3. Thanks for Buying The Wand Master Unipivot Tonearm®
The best tonearm in the world will sound like the worst if it is badly set up.
These instructions will help you achieve great performance with your tonearm.
Installation videos may be accessed via www.thewandtonearm.com or the QR code
The Wand Tonearm has been meticulously designed using computer
modeling and refined by listening. All attention has been focused on
maximizing musicality, this you never grow tired of.
The Wand Tonearm, musical magic!
Your Tonearm
Serial Number
Your arm was hand built for you by;
Date
Designed and hand-made in Aotearoa / New Zealand by design build listen Ltd.
P.O.Box 5415, Dunedin 9058, New Zealand Ph / Fax; +64-3-4773817
Features of The Wand Master Tonearm
Big diameter (22mm) carbon-fibre tube is 4x stiffer than a normal diameter arm.
Ergonomic cueing via tip of arm or damped cueing mechanism.
Laser sintered titanium headshell and great termination of arm vibrations.
Defined contact bearing. Low friction while maintaining energy transmission.
Medium effective mass suits most cartridges. (13.5g for 9in, 15g for 10.3in, 16g for 12in)
Drop in replacement for Rega geometry arms (~240mm). SME, Technics, Linn & Lenco mount options.
Silver/Copper hybrid wire with captive female RCA/phono plugs
Thread / weight type antiskate.
Standard Baerwald alignment (with consideration given to real world inner groove dimensions).
Vibration shunt (damping trough)
……and it looks really cool! Winning Silver at the 2016 BEST Design Awards

The Wand dimensions & data; Check the arm will fit on your turntable before you start.
Check what we have sent you ;
Supplied
Picture
Sent
Check
Supplied
Picture
Sent
Check
Grease (In a tube)
Below
1
M5 screws (2 diff.)
C1
2
Cartridge Screws
A2
2
M4 screw
G3
1
Cartridge Spacer
A4
2
Ortofon Balance
D2
1
Protractor
B1
1
Arm Lift Assembly
E1
1
Spindle Assembly
B4
1
Anti-skate weight
E3
1
Hex Keys
B4
3
Silicone Oil
E5
1
Check what tools you need;
Tools you need (Not supplied)
Check
Drill; 6mm (or ¼”)
Drill; 24-25mm (1”)
Small flat bladed screwdriver
Pozi or Philips Screwdriver
Long nose pliers or tweezers
55 max
Record Surface
www.thewandtonearm.com
© Feb 2017 design build listen Ltd. v17
Maintenance; Re-grease the bearing tip occasionally with
the grease supplied. (Touch tip in grease as shown >)
Problem Solving; If the arm is not performing well;
Check the stylus is clean.
Check the cartridge tracking weight.
Check the wires are not pushing the arm sideways.
Notes;
Don’t ship the turntable with the arm on the spindle.
Black and silver metal parts may be lightly oiled to
keep them looking good. (Do in humid climates)
With our continuous improvement program the parts
shown here may be slightly different from yours.
Data;
Weight =0.75kg (0.8kg for 12in)
Effective mass of arm = 13.5g
(15g for 10.3in, 16g for 12in)
Warranty; 2 years (Note;
shipping cost to us is the
responsibility of the sender.)
40mm min
28 min
Ø50>
Ø23>
Stylus to Pivot 240mm
(262mm for 10.3in arm)
(308.8mm for 12in arm)
Pivot to TT Spindle 222mm
(246mm for 10.3in arm)
(295mm for 12in arm)
81mm

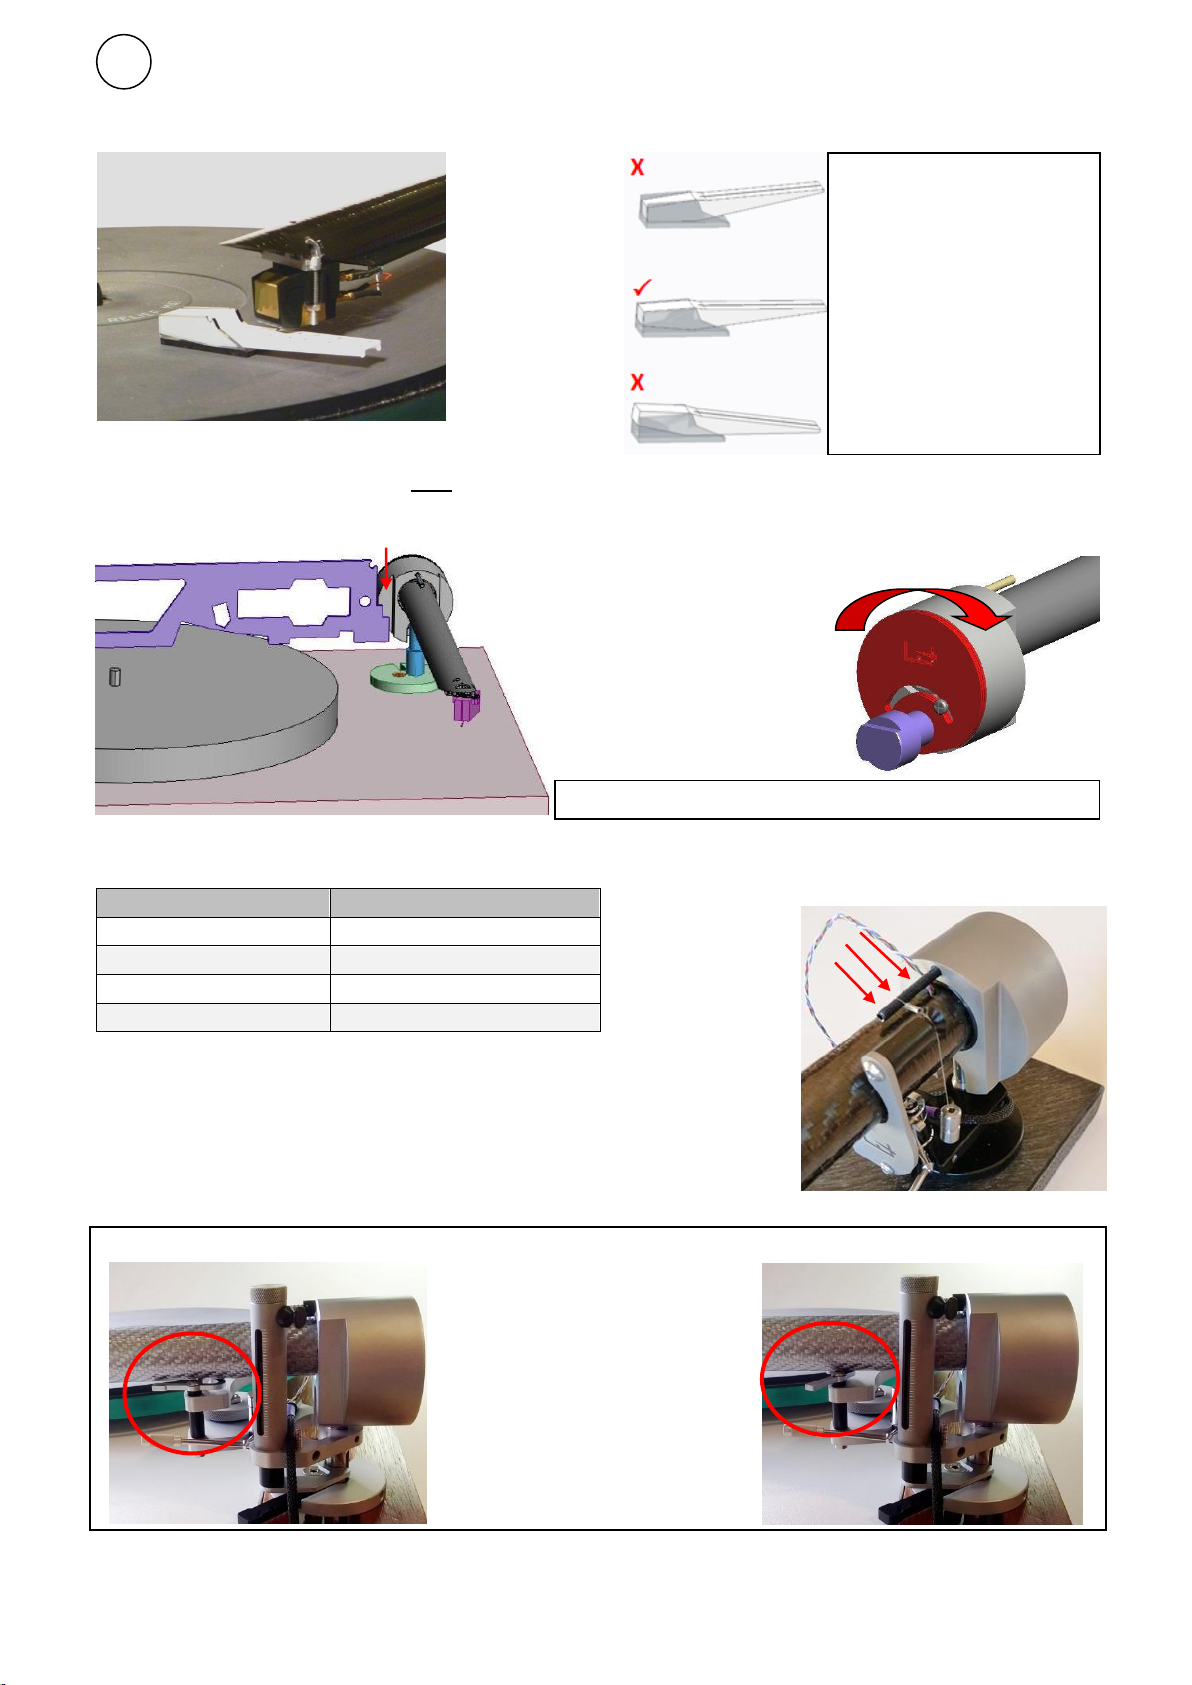
Fitting & Balancing the Cartridge
Step 1; Rough Balance
Three plates are fitted to the arm as shipped. This is fine for the
majority of cartridges.
But if your cartridge is light (<6g) you will probably only need
one plate.
If you cartridge is heavy (>8.5g) it is likely you will need three
or more plates.
Extra plates can be ordered for really heavy cartridges (>11g)
The smaller square edged plate can be used to give an
intermediate step and on its own for light cartridges.
Step 2; Attaching the cartridge Where possible use the supplied Aluminium M2.5 screws unless;
Your cartridge has tapped holes (use screws supplied with cartridge).
You need more mass. Either for a very light weight cartridge or a very low compliance cartridge.
Step 3; Attach the Leads to the cartridge
Left (Black)
Right (Red)
.
Blue=Left Ground
White=Left + / Hot
Red=Right + / Hot
Green=Right Ground
A
WARNING; Be careful, cartridges
are easily damaged.
Use your stylus guard.
Screws should be done up
firmly but not over-tightened.
We cannot be liable for
damage to the cartridge either
in installation or use.
www.thewandtonearm.com
© Feb 2017 design build listen Ltd. v17
Plates
1
2
3
Cartridge Spacer Option;
You have been provided with a small metal plate with two holes.
This may be put between the cartridge and the arm in three circumstances;
If the cartridge is too light to balance
If the cartridge suit a heavier arm (This spacer adds 2g) eg; Denon DL103
If the cartridge is short or touches the carbon fibre when installed.
NOTE; Vertical Tracking Angle may need to be higher than indicated in section B4
A 5g weight is available as an option, just ask.
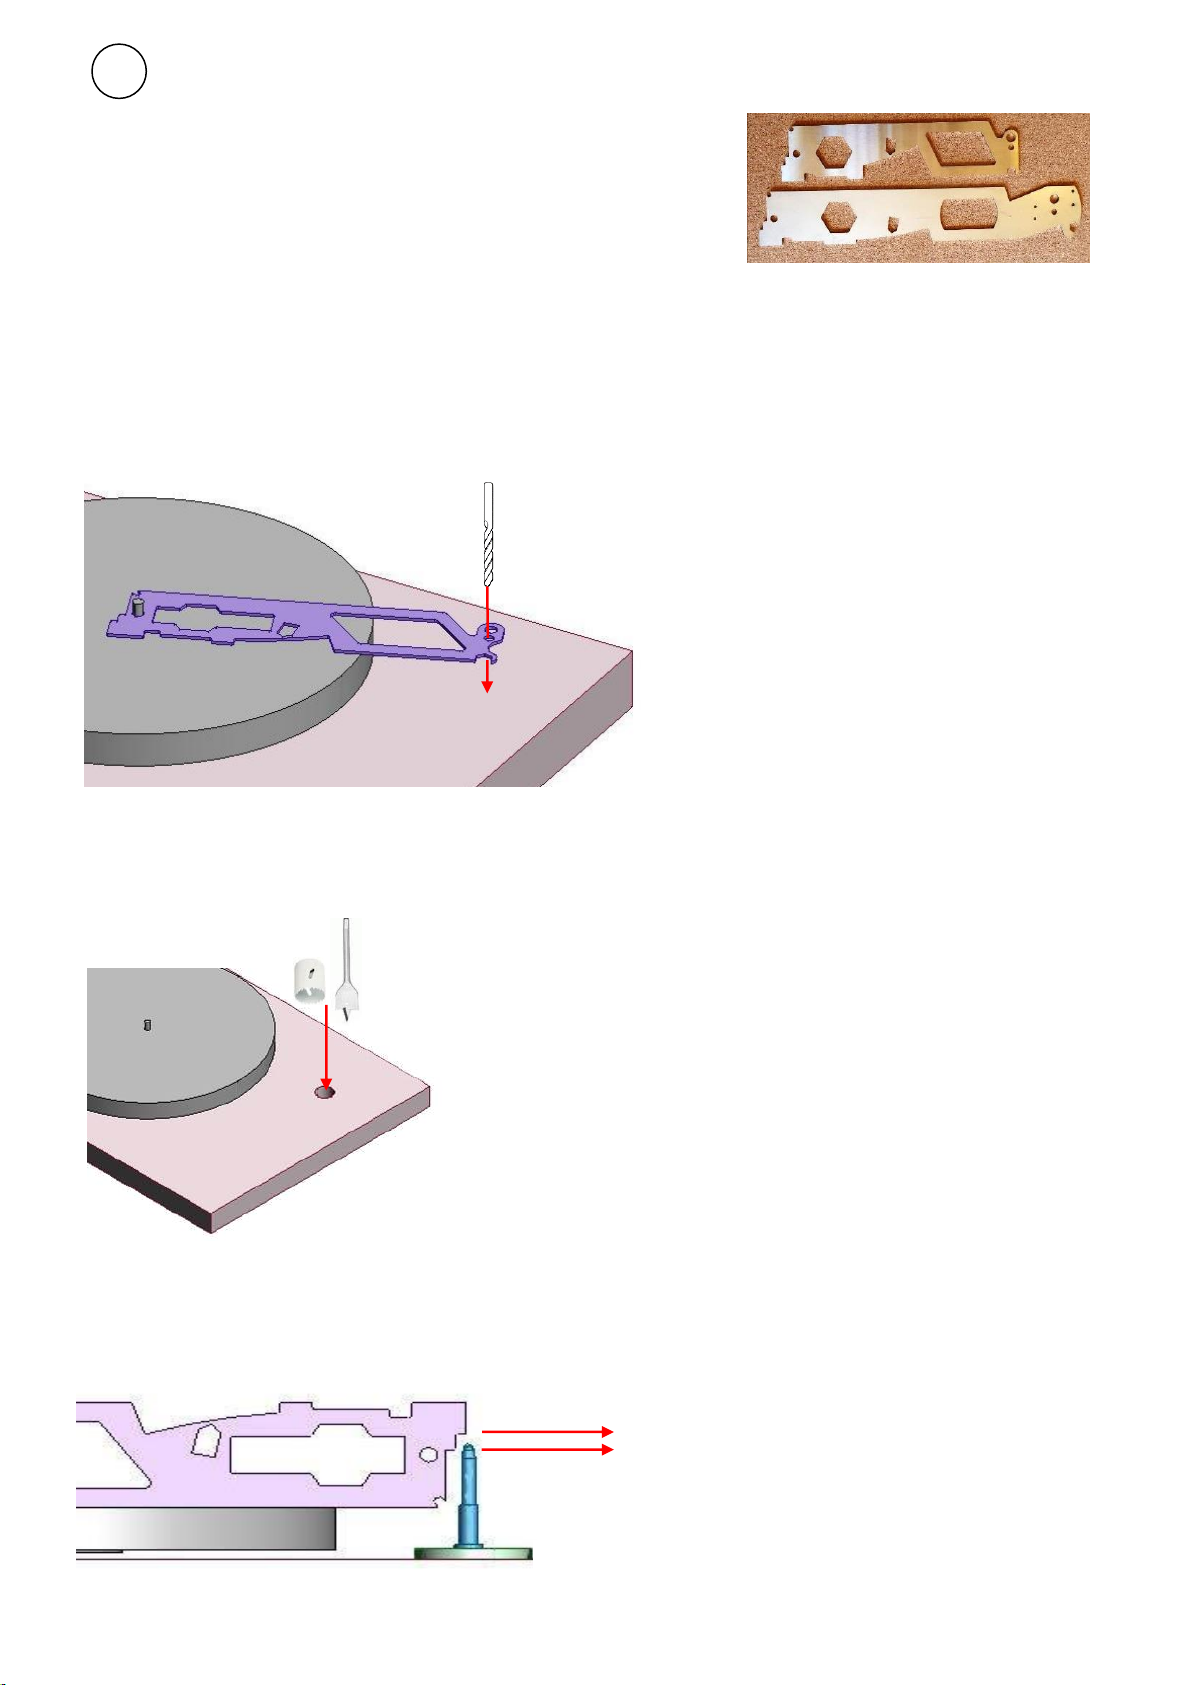
4. Drilling the Mounting Hole for The Wand Tonearm Rega hole is ok(9in)
5.
Step 1; Check rear & side clearance to the turntable lid
You need at least 50mm / 2” from the centre of the hole to the side or back of the lid
Note; The protractor you receive may be different from the below
(as they are being updated).
Shown at right top to bottom; 9in / 12in
Step 2; Drill 6mm Pilot hole (1/4”) Through the smaller hole.
\
Step 3; Drill 23- 25mm hole (1”) Use 6mm hole as guide for drill (from Step 2 above)
Existing holes up to 28mm are fine. (Contact us about holes 28mm to 48mm which can be made to work)
Step 4; Set arm height. Put the spindle in the round plate (The black lever unlocks clockwise
but it will still be firm to fit) Sit the protractor on the playing surface. Adjust the height as below. Lock
the spindle with the hex key in the side hole as below.
www.thewandtonearm.com
© Feb 2017 design build listen Ltd. v17
B
-Arm at +2 degrees
-Arm level (nominal)
Note; We suggest starting with the arm level. Later adjust
upwards by ear. 2 degrees up may be good. This exact height
depends on many factors. (See; P29 “SRA, VTA & My Sonic
Lab” by Michael Fremer Stereophile June 2010)
< Hex
Key
here
Note; If you wish to pass the RCA / Phono plugs through
the plinth you will need to feed them through the slot at this
stage. See below
But we don’t recommend doing this on initial installation as
it is easier to lift the arm off for adjustment. Get it running
first.
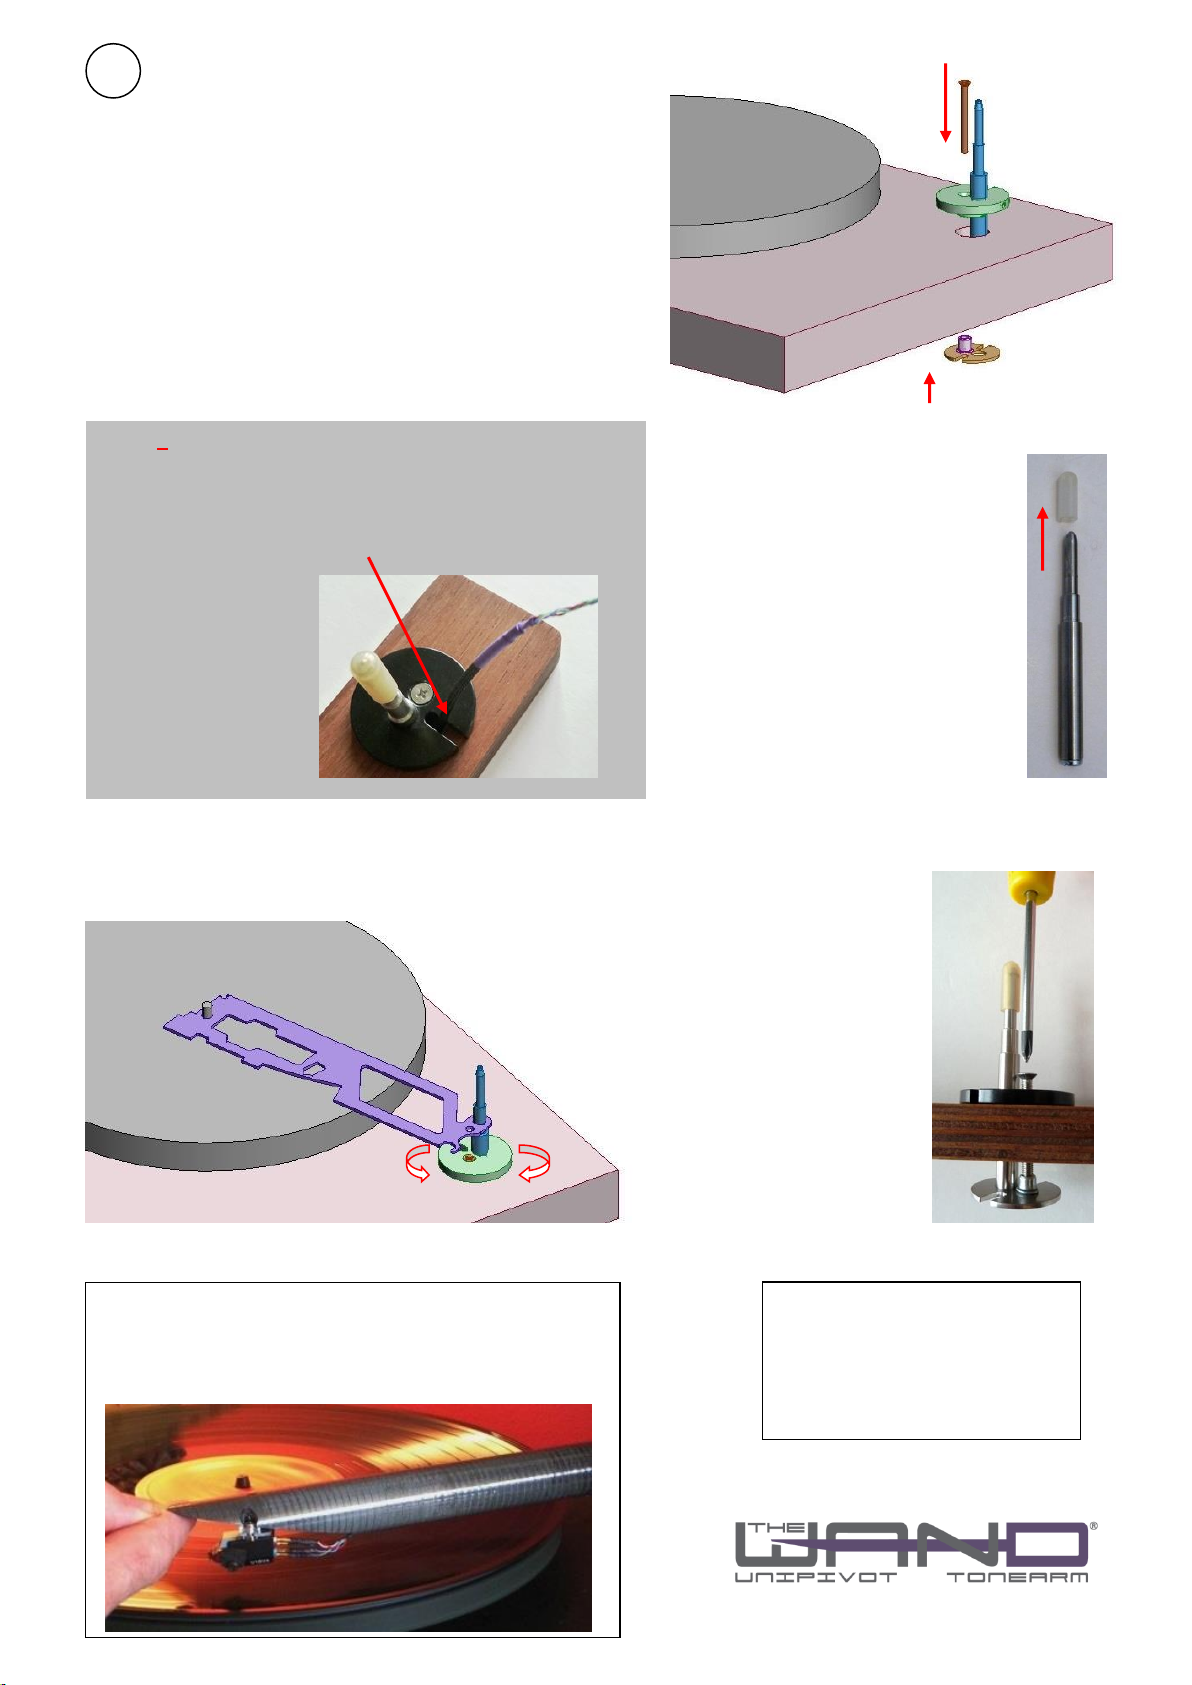
Fitting The Wand Tonearm Mount
Step 1; Feed the bolt down to the boss on the
clamping plate and do up loosely (but not tighten yet).
Two screw lengths are provided for different plinth thickness.
The lower clamping plate may go either way up.
Step 2; Remove rubber transit cap.
Step 3; Position mount using protractor. Step 4; Tighten to clamp.
(Rotate to get in the correct place). Use supplied hex key
www.thewandtonearm.com
© Feb 2017design build listen Ltd. v17
C
Hint; Cueing with The Wand Tonearm
We suggest using the side of your finger.
Rather than trying to grip the tip.
Other Protractor systems;
If using another brand of
protractor. The centre of the
pivot is aligned with the
shoulders of the main body.
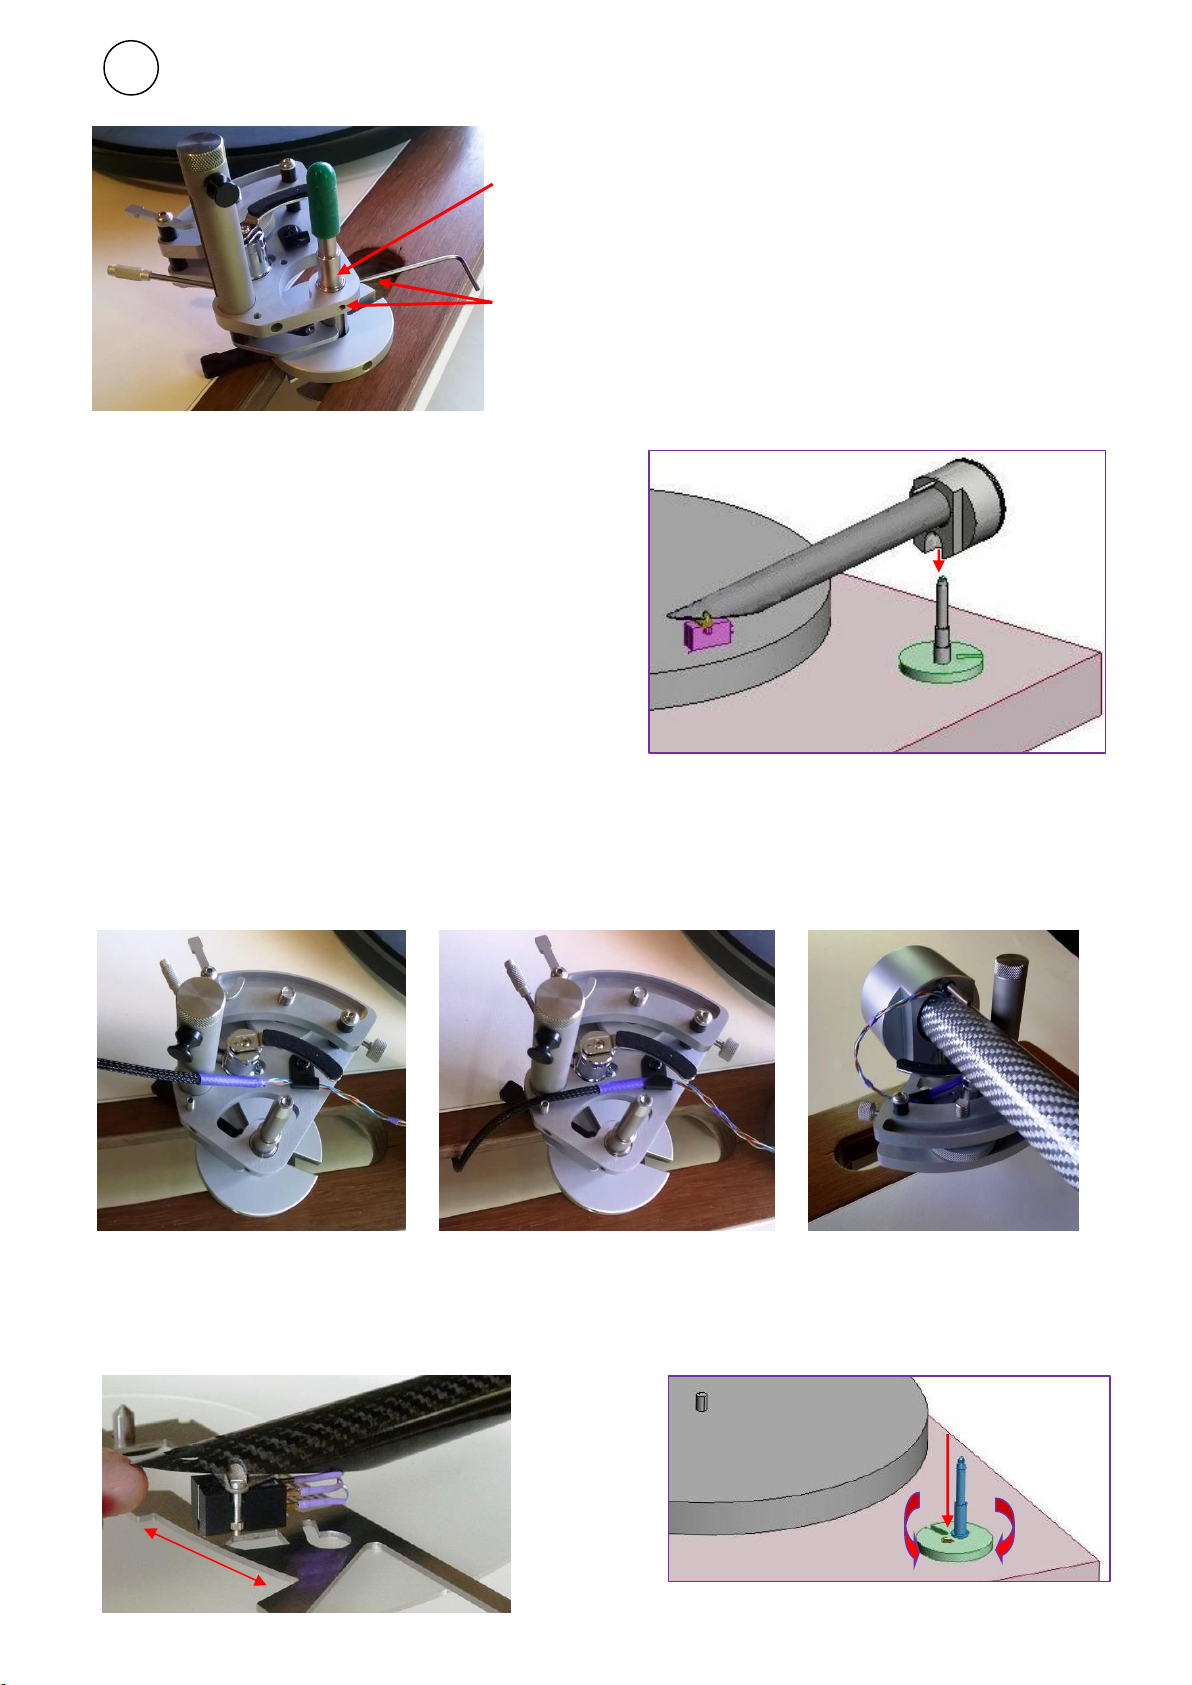
Fitting the Arm Wand & Setting Overhang
Step 1; Add Armrest
Step 2; Place arm on Mounting
IMPORTANT!
Make sure the turntable plinth is level at this point.
(armrest omitted for drawing clarity here)
Step 3; Guide cables….. (See also Page G)
Feed the purple part of wire into the black P-Clip, Slide to thicker section, so it forms a loop.
Step 4; Overhang setup.A) Swing the protractor and arm round so the stylus is above the arc XY
NOTE; To avoid damage to the stylus, do not let it touch the protractor (hold slightly above)
B) Swing above the arc X-Y. If it doesn’t align at either end then
C) Loosen the screw (below right) and rotate until it aligns through the whole arc.
D
www.thewandtonearm.com
© Feb 2017design build listen Ltd. v17
X
Y
Align to level with the step in spindle.
Adjusting this slightly affects the rest
height of the arm)
Lock with small hex key (Two screws)
Vertical Balance & Sideways Balance (VTA & Azimuth)
Step 1; Vertical Balance (Tracking weight, as recommended by your cartridge maker.)
Use supplied balance scale (15mN = 1.5g etc)……….. and rotate the rear bolt to set fine balance.
Step 3; Side Balance (Azimuth); Aim; To have the stylus standing vertical in the groove (Viewed from
the front). Use protractor as below.
Adjust side balance by moving the rear balance plate as below (Shown as red)
Step 3; Add antiskate force; (Approximate only, refine by ear or test record as desired.)
Hint; To stop the loop slipping towards the body you can slide the rubber plug along the rod.
Tracking Weight / g
Position A-C (below)
< 1.0g
No Weight
1.0-1.6
C
1.6-2.2g
B
>2.2 g
A
Step 4; Plug into amplifier.
Red into Right, Black to Left & green wire to green earth post
(If no earth post, try attaching to amplifier chassis)
Our wiring is low capacitance so some cartridges maybe better with more.
Enjoy!
E
www.thewandtonearm.com
© Feb 2017 design build listen Ltd. v17
C
B
A
Arm Catch: The arm may be latched when parked, as below. (Left unlatched, Right latched)
We also recommend: ‘Fozgometer’ or ‘Adjust Plus’ tools
Too light; Wind bolt in
or take off a plate if the bolt is
right in (see section A1).
Lift the arm off the scale when
doing this.
Correct; Back part is level
Too heavy; Wind bolt out
or put on a plate if the bolt is
right out (see section A1).
Lift the arm off the scale when
doing this.
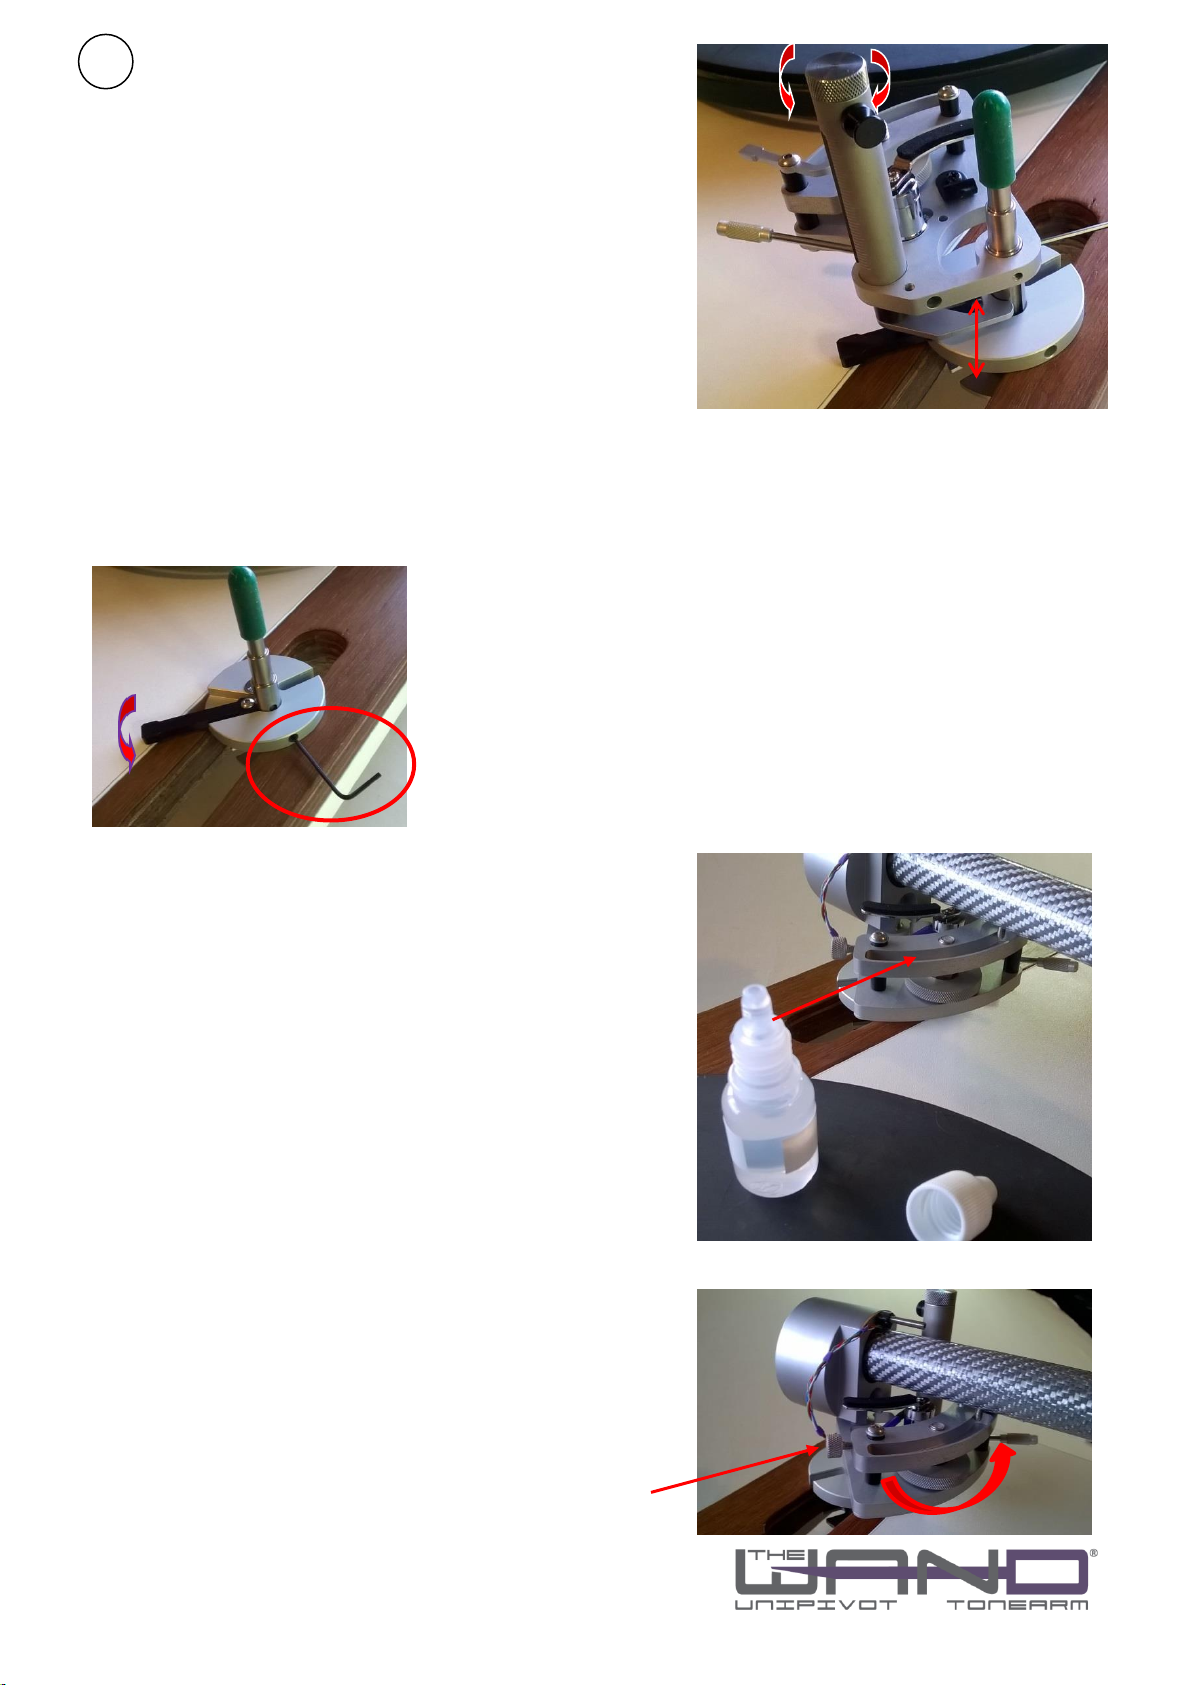
VTA (Vertical Tracking Angle) Adjustment
It is assumed you have got the spindle at roughly
the right height (see Page B Step 4)
Twist the knurled dial anticlockwise to wind the
‘fork’ down till it touches the mounting plate.
Step 2; The main spindle has two Step3; Twist the knurled dial to adjust VTA
separate locking mechanisms Lock. Use the friction lock if you frequently
-Hex key adjust VTA or if you generally are happy
-Black Friction lock lever (Unlocks clockwise) with one setting use the hex hey to lock it as
-Release them both this is more rigid.
When adjusting VTA downward, finger
Pressure may be needed to help it down.
Using the Vibration Shunt; Your Wand Master Series
has been provided with a Vibration Shunt.
While this may also be seen as an ‘arm damper’ the
thought behind this naming is that this is designed to
‘shunt’ vibrations from the arm using a silicone oil trough.
Using this is system and taste dependent, it may be
easily raised and lowered.
.
Step 1; Fill Start using the lower viscosity (smaller
number), fill to 2/3 the depth of the trough.
Step 2; Engaging the Vibration Shunt. With the arm
in place, raise the trough by turning the knurled dial
clockwise. Raise it till the threaded rod on the
underside of the arm is just in the silicone. Listen!
To disengage, just wind the trough down. Once you
have found a position you like, the trough may be
locked in place using the lock nut on the inside end.
If you want to change oil (or remove it) use a cotton
bud and paper towel.
F
www.thewandtonearm.com
© Feb 2017 design build listen Ltd. v17
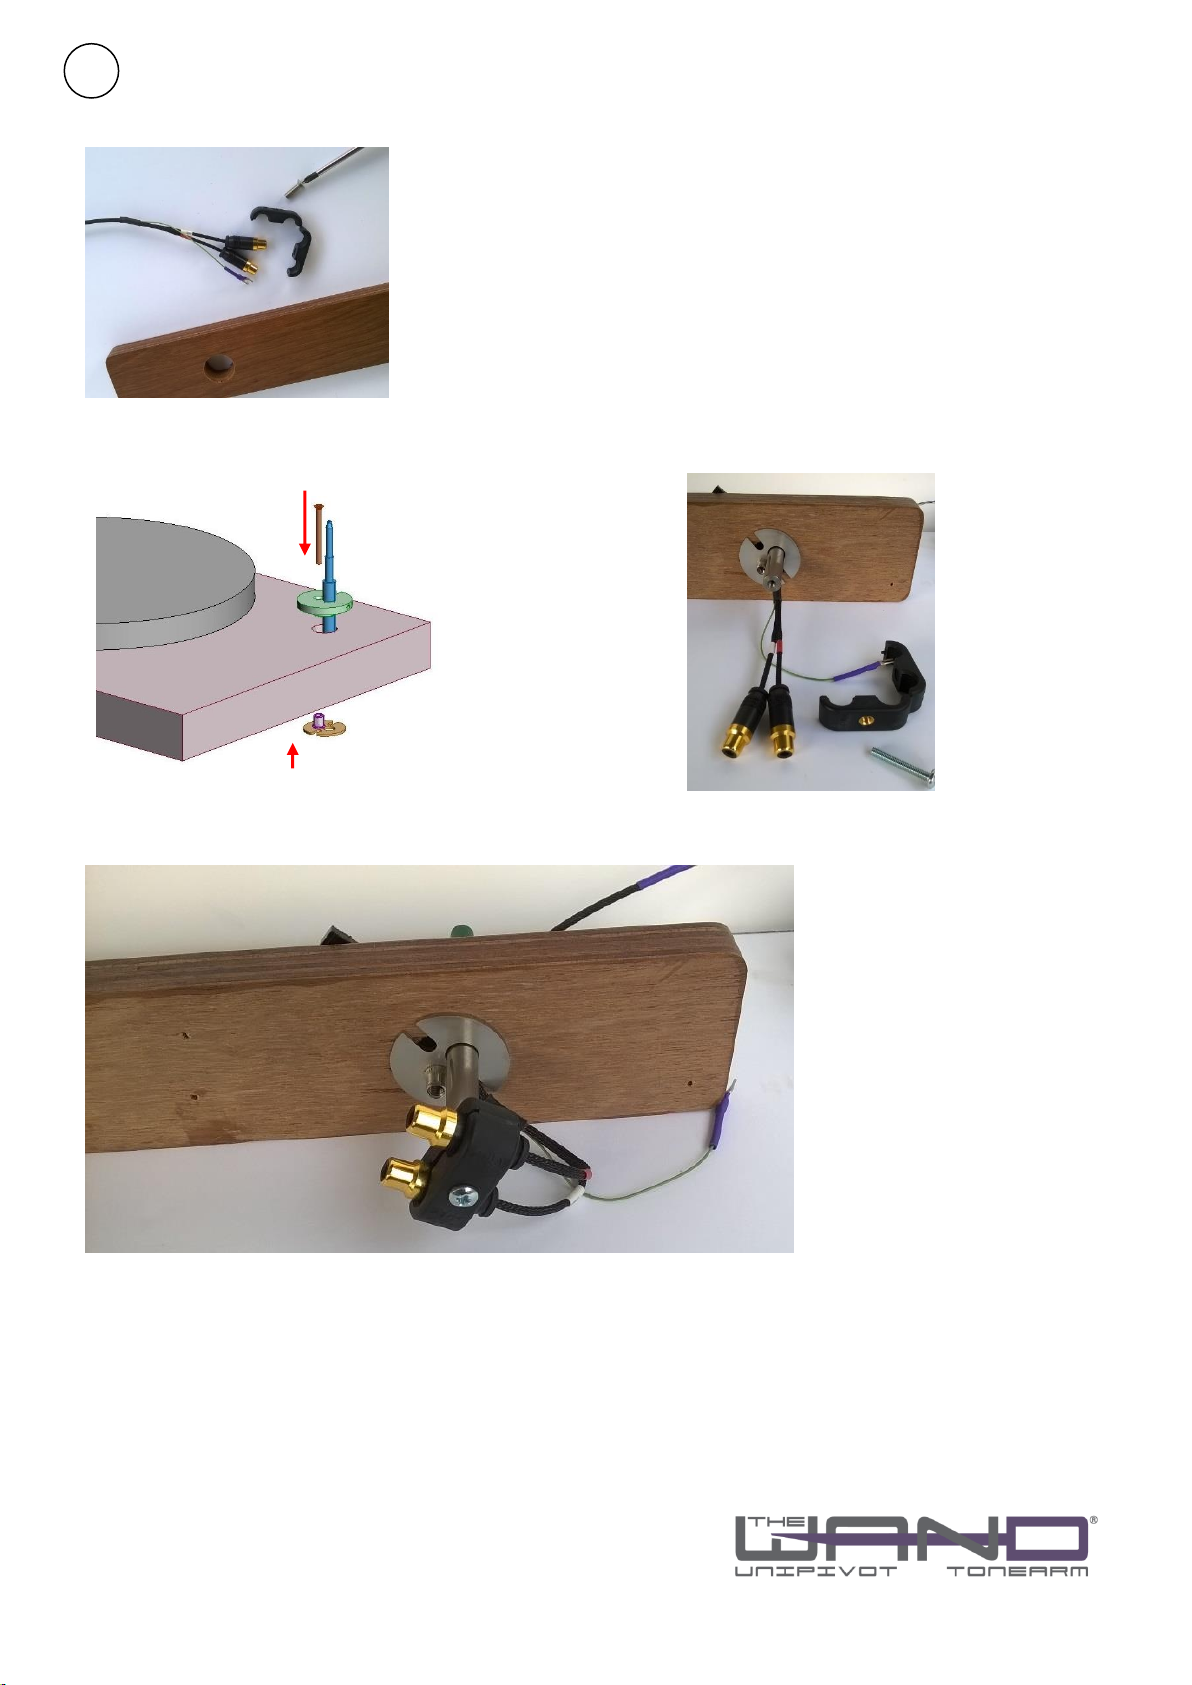
Mounting the Plugs on the bottom of the spindle (Optional)
Step 1; Disassemble the Plug Clamp
Step 2; Feed the plugs through the mounting hole Then fit the top / bottom mounts, feeding
wires thought he slots. Add bolt and do up.
Step 3; Use the supplied 4mm Bolt to secure the plugs to the shaft.
www.thewandtonearm.com
© Feb 2017 design build listen Ltd. v17
G

Cartridges & The Wand Tonearm;
The Wand Tonearm lets cartridges express themselves for what they are but not neutral in the
‘cold and analytical’ sense.So cartridge recommendation comes down to the flavour you like.
The Wand is "Medium Mass" at 12.5g effective mass (15g for the 12in), so will work with most
cartridges. Even a high compliance cartridge like a Shure V15Vx gives a measured resonance at 7Hz, so is
ok. At the other extreme, conventional low compliance cartridges work well.
Arm/Cartridge matching is frequently over-stated, unless you have a system with massive bandwidth or
insist on playing badly warped records, it shouldn't be an issue.
The Wand Tonearm has been used with some of the world’s best cartridges. Two of my retailers have
independently chosen Transfiguration cartridges, one of them having settled on the Axia & Phoenix S.
(after trialling Ortofon’s Cadenza Red & Black along with the Rondo Blue, ZYX B50 Bloom & Zu / Denon
103.) But many users have ‘exotic’ Japanese cartridges, particularly ZYX models. My Swedish & French
Distributors favour Lyra and Dynavector cartridges which are at the analytical / quick end of the
spectrum. Miyajima are musical cartridges and work well with The Wand. Analogue Works and my
German distributor like dynamic /punchy cartridges, both have used Soundsmith, Nagaoka and Decca
London. The latter is very notable as Decca’s are wonderful (I had one) but are fickle and very hard to
match to arms. Ask for our Blog on why The Wand is a good match for Decca’s.
Popular Cartridges; Denon 103 and related cartridges are the most popular to use with The Wand, (they
have a grand sweeping sound). Ortofon 2M Blacks are popular but may hum in some systems. Hana
have a wonderful balance of virtues. Dynavector DV10x and 20 are also popular and seem to work well.
In terms of high output cartridges; Sumiko Blue Point are good options. Nagaoka cartridges are
wonderfully dynamic and punchy without being edgy.
Problem Solving;
Mounting the arm;
-The existing Mounting hole is too big;
-Holes up to 28mm are fine
-For holes 28-48mm we can provide an alternative clamping plate, contact us.
-For holes above 48mm, you can use out ‘SME style’ mounting plate. Contact us.
-There is not enough space beside the mounting plate; We can provide a smaller diameter mount.
-The platter is too low or high; if the platter is too low (<23mm from the arm mounting surface to the
top of the platter), you may have to use a thicker mat. If the platter is thick, a thicker mounting boss is
available. (the black mounting part can be turned over too). Contact us.
-The plinth is too thick / thin; For thicker plinths, longer bolts or ‘top mounting’ may be substituted
-The mounting hole is in the wrong place; Generally you will have to drill a new hole but there is a kit
that gives an offset hole. Designed originally for Lencos, this may work in other contexts, just ask.
Noise problems; Always tricky as you can have too many earthing points as well as to few. A great
resource is Jim Hagermans website; http://www.hagtech.com/pdf/eliminatingnoise.pdf Be aware that
that Carbon fibre has less electromagnetic shielding than metal so may be more prone to hum pickup
with MM cartridges. But this is very system dependent. We offer a ‘short leads’ option that may help.
Setting up the cartridge:
-Tracking weight is too low; If the bolt can’t wind in far enough, remove a plate (or two)
-Tracking weight is too high; If the bolt can’t wind out far enough, add a plate (or two)
If neither of these work, talk to us!
-If you can’t get the azimuth right; talk to us.
-If you can’t get the antiskate right; talk to us.
www.thewandtonearm.com
© Dec 2012 design build listen Ltd. v17
Table of contents


