Theben Timeguard WFDBC Manual
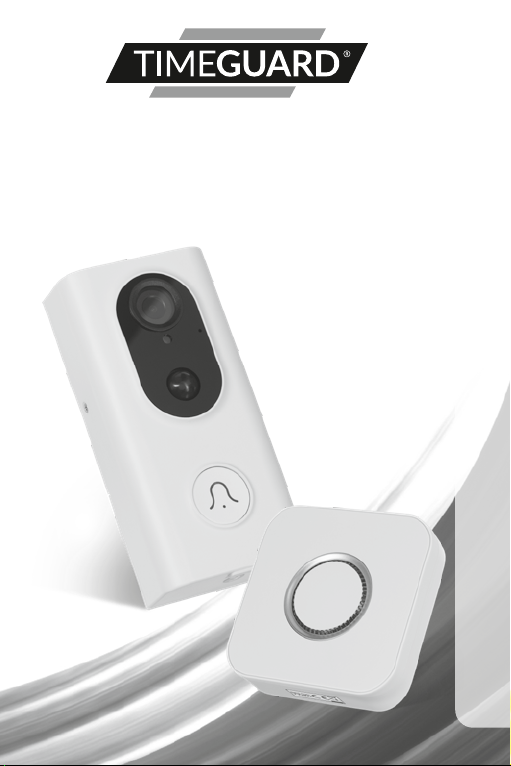
Installation & Operating Instructions
Wi-Fi Smart Camera Doorbell
& Chime
Model: WFDBC

1
1. General Information
These instructions should be read carefully in full before installation and retained
for further reference and maintenance.
2. Safety
• If cleaning of the Smart Doorbell Camera is required, wipe with a dry cloth.
• For reasons of electrical safety, do not immerse in water or any other liquid.
• Do not drop or damage the device, or scratch the camera lens.
• Please do not use the device if you find that it is damaged in any way.
3. Technical Specifications
Camera Doorbell
• Batteries: 2 x 18650 Rechargeable batteries (supplied).
• Power Consumption: Standby current 300μA, Working current 300mA
• Resolution: 1280x720P
• View Angle: 148°
• Infrared Light: 6 Pieces 810 LED lights.
• Motion Detection: PIR motion detection, Sensitivity high/medium/low
adjustment via app.
• Audio: Two-way voice with echo cancel function, Built-in 38dB microphone
(pickup distance 5m), Built in speaker (8Ω 1W).
• Storage: Supports SD card 128G max (not supplied).
• Operating Temperature: -10°c to +55°c
• WLAN-Standard: 802.11 b/g/n
• CE Compliant
• EC Directives: Conforms to the latest directives
• Dimensions: H= 124mm, W= 61mm, D= 34.5mm
Chime
• Voltage: 230V AC 50Hz
• Power Consumption: <0.5W
• Transmission Range: 100 – 200 feet (Line of sight)
• Selectable Ring Tones: 52
• Volume Range: 30 to 110dB, 4 Levels
• Audible Range: Up to 200 feet
• Up to 6 x WFDC Chimes can be used with the WFDCB Smart Camera
Doorbell (additional WFDC Chimes sold separately)
• CE Compliant

2
• EC Directives: Conforms to the latest directives
• Dimensions: H= 82mm, W= 82mm, D= 55.6mm
4. System Requirements
• Smartphone/Tablet with at least iOS 8.0 or Android 5.0
• WLAN-enabled router: 2.4GHz (Separate Band)
• Tuya Smart App
5. Installation
Doorbell
• Remove the wall plate from the Wi-Fi doorbell by undoing the retaining
screw with the screwdriver provided. The wall plate can now be removed
from the body of the Wi-Fi doorbell.
• Mark the position of the mounting holes on the wall using the wall plate
as a template. Drill out the mounting holes taking care to avoid any joists,
electrical cables or water/gas pipes that may be hidden beneath the
surface.
• Once the holes have been drilled out insert the rawl plugs into the holes
and fix the wall plate to the wall using the correct mounting screws
provided.
• Before placing the body of the Wi-Fi doorbell on the wall plate, insert the
18650 batteries into the battery compartment of the doorbell. The unit
should switch on and be ready for pairing.
• It is recommended that the pairing process is complete before fully affixing
the product to the wall as the unit may need resetting during this process.
If you wish to register on the Tuya Smart App and pair the device before
mounting the product to the wall, skip to the next section of the manual.
It is also worth noting that the installation location should be in a suitable
area where a 50% or more Wi-Fi signal can be established.
• Once pairing is complete mount the body of the Wi-Fi doorbell to the wall
plate and tighten the retaining screw so the body and wall plate are held
firmly together.
3
6. Downloading App and Registration
Note: the smartphone or tablet must be connected to a 2.4GHz band
on the router. Paring on the 5GHz band will result in paring either
timing out or being unsuccessful. Refer to your ISP (Internet Service
Provider) on separating the bands if required.
• Ensure your phone or tablet is connected to your local Wi-Fi network.
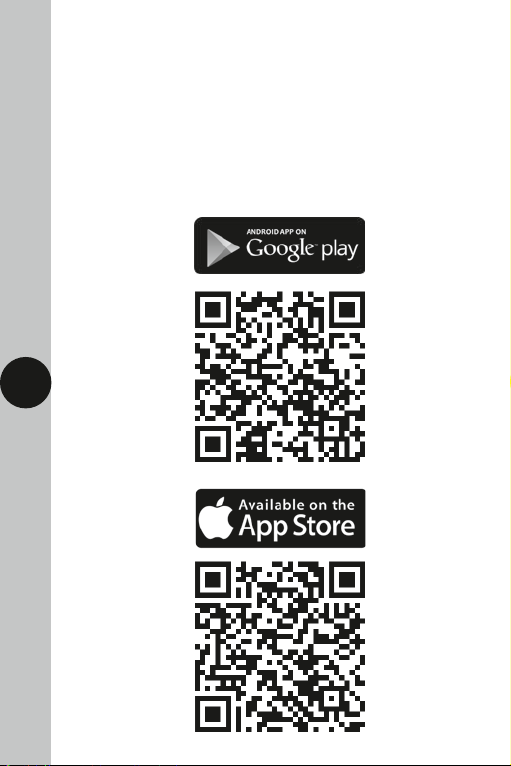
• Download the Tuya Smart App onto your phone or tablet by searching for
‘Tuya Smart’ on Google Play Store or the App Store. You can also scan the
applicable QR code below.

4
• Install the App and open it
to the registration screen.
Click on the ‘Register’ button.
• Tap ‘Agree’ to accept
the privacy policy.
5
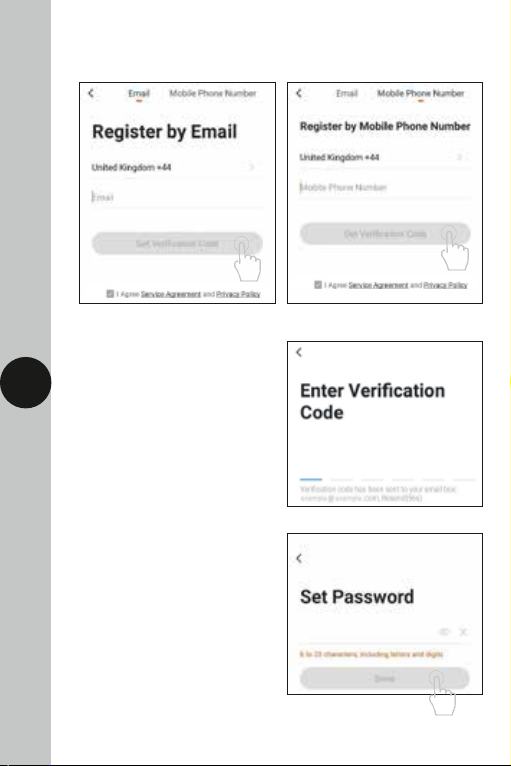
• Choose your region by selecting the Country Code. Enter your email
address or phone number and click ‘Get Verification Code.’
• Assign a Password (this must
be between 6 to 20 characters
including letters and digits)
and click ‘Done.’ IMPORTANT:
maintain your login credentials for
the Tuya Smart App as Timeguard
are not able to gain access to any
user information as this is a 3rd
party software platform.
• Enter the Verification Code sent
to the email address or phone
number that you provided. Once
you have successfully entered the
code, it will automatically move
you to the Password screen.

6
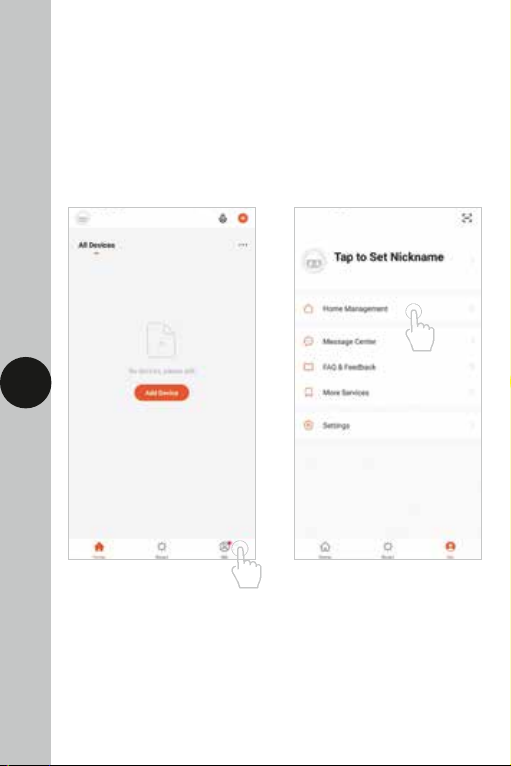
• You are now registered and by default will see the App home page.
7
7. Home Management
Note: Before adding any devices to your account, structuring your
household (or the property) may be a consideration if you plan on
using Smart devices in different rooms or locations.
• Select the ‘Me’ option from the home page which will navigate you to your
personal settings. From here you can setup a nickname for your profile i.e.
‘Mr Smith’s Account. After this select the ‘Home Management’ option.

88. Pairing Device(s)
Note: If you are using a VPN, make
sure it is disabled before continuing.
• To add a new device to your
account, click the ‘Add Device’
button (or click on the + button in
the top right hand corner).
• Select the ‘Home Name’ option
and enter a name for the property
such as ‘My Home’ if preferred.
(This is required to allocate devices to
separate rooms later once paired).
• Next tick the rooms you wish to
assign to your account; this can be
changed at any time and custom
room names can also be added.

9
• Notice the different categories
of products; it is essential that
the correct product is selected for
the pairing process to be successful.
For the Wi-Fi Doorbell, select the
‘Security and Sensor’ category
on the left hand side and then
choose the ‘Smart Camera’ option
from the list.
• Press and hold the reset button on
the back of the Wi-Fi Doorbell for
5 seconds, the (Wi-Fi doorbell will
now be in pairing mode). Proceed
to the next step instructed by the
Tuya Smart App. If the device is in
AP mode after being reset, select
this pairing option from the
‘Other Mode’ section and move
to section 9.
AP Mode
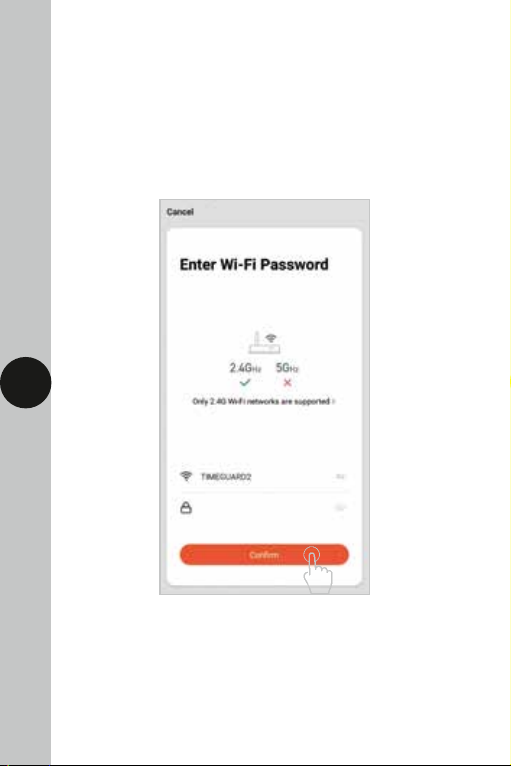
10
• Enter the Wi-Fi password for your network if the field is not
filled in already.
Note that dual band or 5GHz networks will not be supported and
may require either being disabled or split as a separate network.
Refer to your ISP (Internet Service Provider) on how to do this
if required. Press confirm on the App to move on to the next stage
of the pairing process.

11
• The App will prompt you to scan a QR code that needs to be read by the
camera in the Wi-Fi doorbell to initiate pairing, press continue on the
App and a QR code should now be generated to pair the product to your
account. Position your mobile or tablet device in front of the camera lens
and ensure the QR code is in full frame of view, once you hear the sound
prompt confirm this on the App, this will commence the final stage of
pairing the Wi-Fi doorbell to your account.

12
• The App will now begin pairing the
smart camera to your account.
• Once the device is paired you can change the default name to anything of
your choice by selecting the pen icon. Once you are happy with the device
name press the done button to view the live feed of the Wi-Fi doorbell.
13
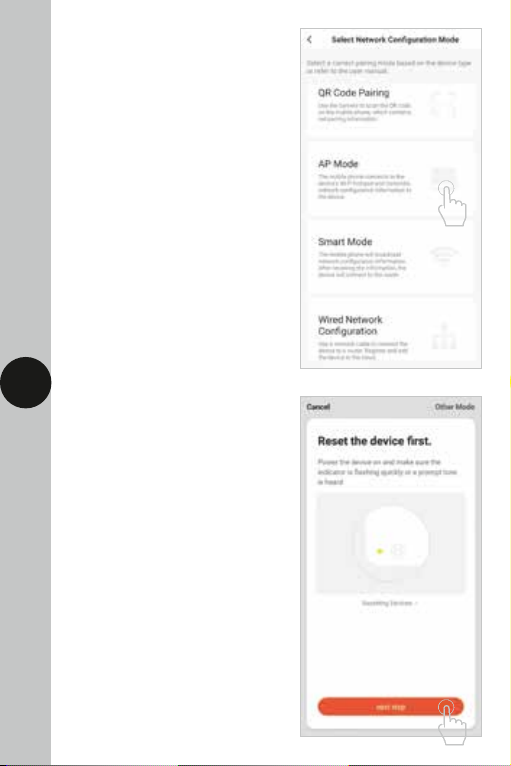
9. Pairing Device(s)
AP Mode
Please note that this section is a
continuation of ‘Section 8’ bullet
point 3 and should only be used if
the product is in AP Mode
(Access Point Mode).
• After selecting the ‘Other Mode’
option from the reset device screen
the ‘Network Configuration Mode’
menu can be seen. Select ‘AP
Mode’ from the list of configuration
options.
• The App may ask you to reset the
device, however if this has already
been done proceed to the next step.

14
• Enter the Wi-Fi password for
your network if the field is not
filled in already.
Note that dual band or 5GHz
networks will not be supported and
may require either being disabled
or split as a separate network.
Refer to your ISP (Internet Service
Provider) on how to do this if
required. Press confirm on the App
to move on to the next stage of the
pairing process.
• The App will prompt you to connect
to the Wi-Fi doorbell’s hotspot via
Wi-Fi. Press the ‘Go to Connect’
button to open your mobile phone
or tablets Wi-Fi connections.
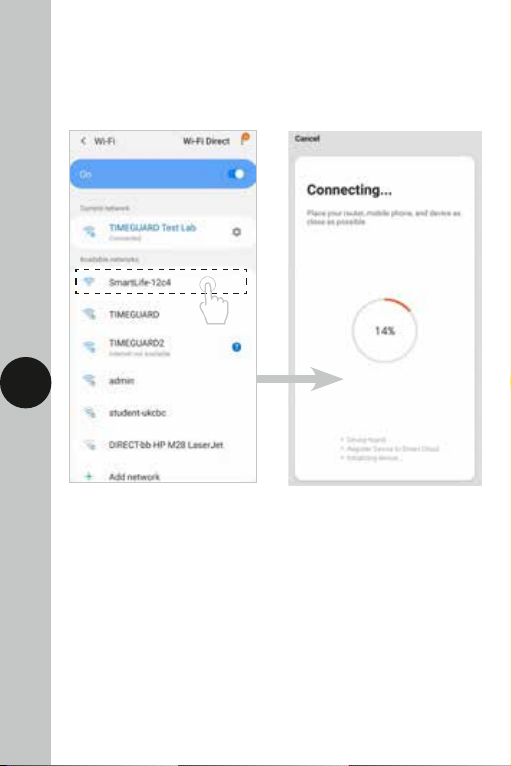
15
• At this stage the devices hotspot should be visible, connect to the
‘smart life’ Wi-Fi network on your mobile phone or tablet. Once you are
connected head back to the Tuya Smart App. The App and device should
now start the pairing process.

16
• Once the device is paired you can change the default name to anything of
your choice by selecting the pen icon. Once you are happy with the device
name press the done button to view the live feed of the Wi-Fi doorbell.
10. Pairing the chime
• Ensure that the chime is firmly plugged into a 230V AC mains socket
• To pair the chime to your Wi-Fi doorbell, press and hold the volume button
for 5 seconds.
• The chime will make an audible sound to show it is in pairing mode.
• Within 3 seconds of the chime being in pairing mode, press the doorbell
button to establish a connection. The Chime should now activate in line
with the Wi-Fi doorbell.

17
11.Removing your device(s)
You can remove the device from your account. For example, if you’re giving away
your Wi-Fi doorbell or transferring ownership of the product, you need
to do this first so that someone else can set it up under their own account.
Once the Wi-Fi doorbell is removed, all activity history including recordings
related to the Wi-Fi doorbell will be erased apart from what is saved locally on
your mobile or tablet device’s gallery and the SD card connected to the camera
(SD card not included). Make sure to download and archive all content prior to
removing the device or handling the product over to another user.
• To remove the device from your account, press the pen icon from the
device controls menu to navigate to the device settings.
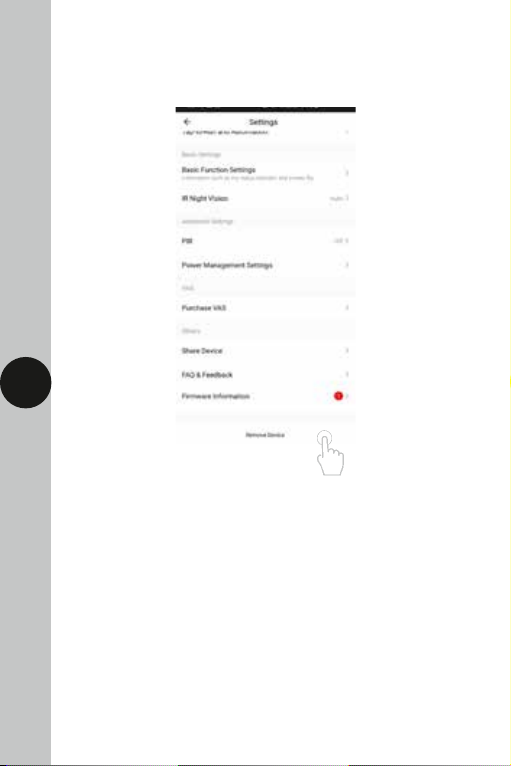
18
• Once on the settings menu scroll to the remove device option and select it
to remove the device from your account.

19
12.Smart Home Assistant
• To add your device to your Smart Home Assistant services, such as Google
Home or Amazon Alexa, follow the on-board instructions located on the
TuyaSmart App. To do this, select the ‘Me’ option from the home menu,
and then select ‘More Services.’
Table of contents
Other Theben Accessories manuals


