Theben LUXORliving User guide

2022-11-28
LUXORliving
System Manual
Version 6

LUXORliving system manual
Contents
1General 3
2System 4
3Installation 5
4Simple start-up in 6 steps 7
4.1 Start project 7
4.2 Create overview 7
4.3 Integrate devices 8
4.4 Define functions 8
4.5 Program functions 8
4.6 Prepare visualisation 9
5Start-up with LUXORplug 10
5.1 Establish a connection 10
5.2 Configuration with LUXORplug 13
5.3 LUXORliving RF 55
5.4 Programming with LUXORplug 60
6Operation with LUXORplay 66
6.1 Users and authorisations 66
6.2 Scenes 69
6.3 "Time switch" function 71
6.4 LUXORplay settings 78
7LUXORliving – the Theben Cloud 80
7.1 Add other users 84
7.2 Cloud access for an existing user 85
8Integration of personal assistants 87
8.1 LUXORliving and Amazon Alexa 87
8.2 LUXORliving and Google Home 89
8.3 LUXORliving and Home Connect Plus 91
8.4 LUXORliving and IFTTT 93
9Appendix 96
9.1 Debug mode 96
9.2 Device update 97
10 FAQs concerning the LUXORliving webpage 98
10.1 General information 98
10.2 Problem solving 101
11 Contact 104

General
LUXORliving system manual 3
1General
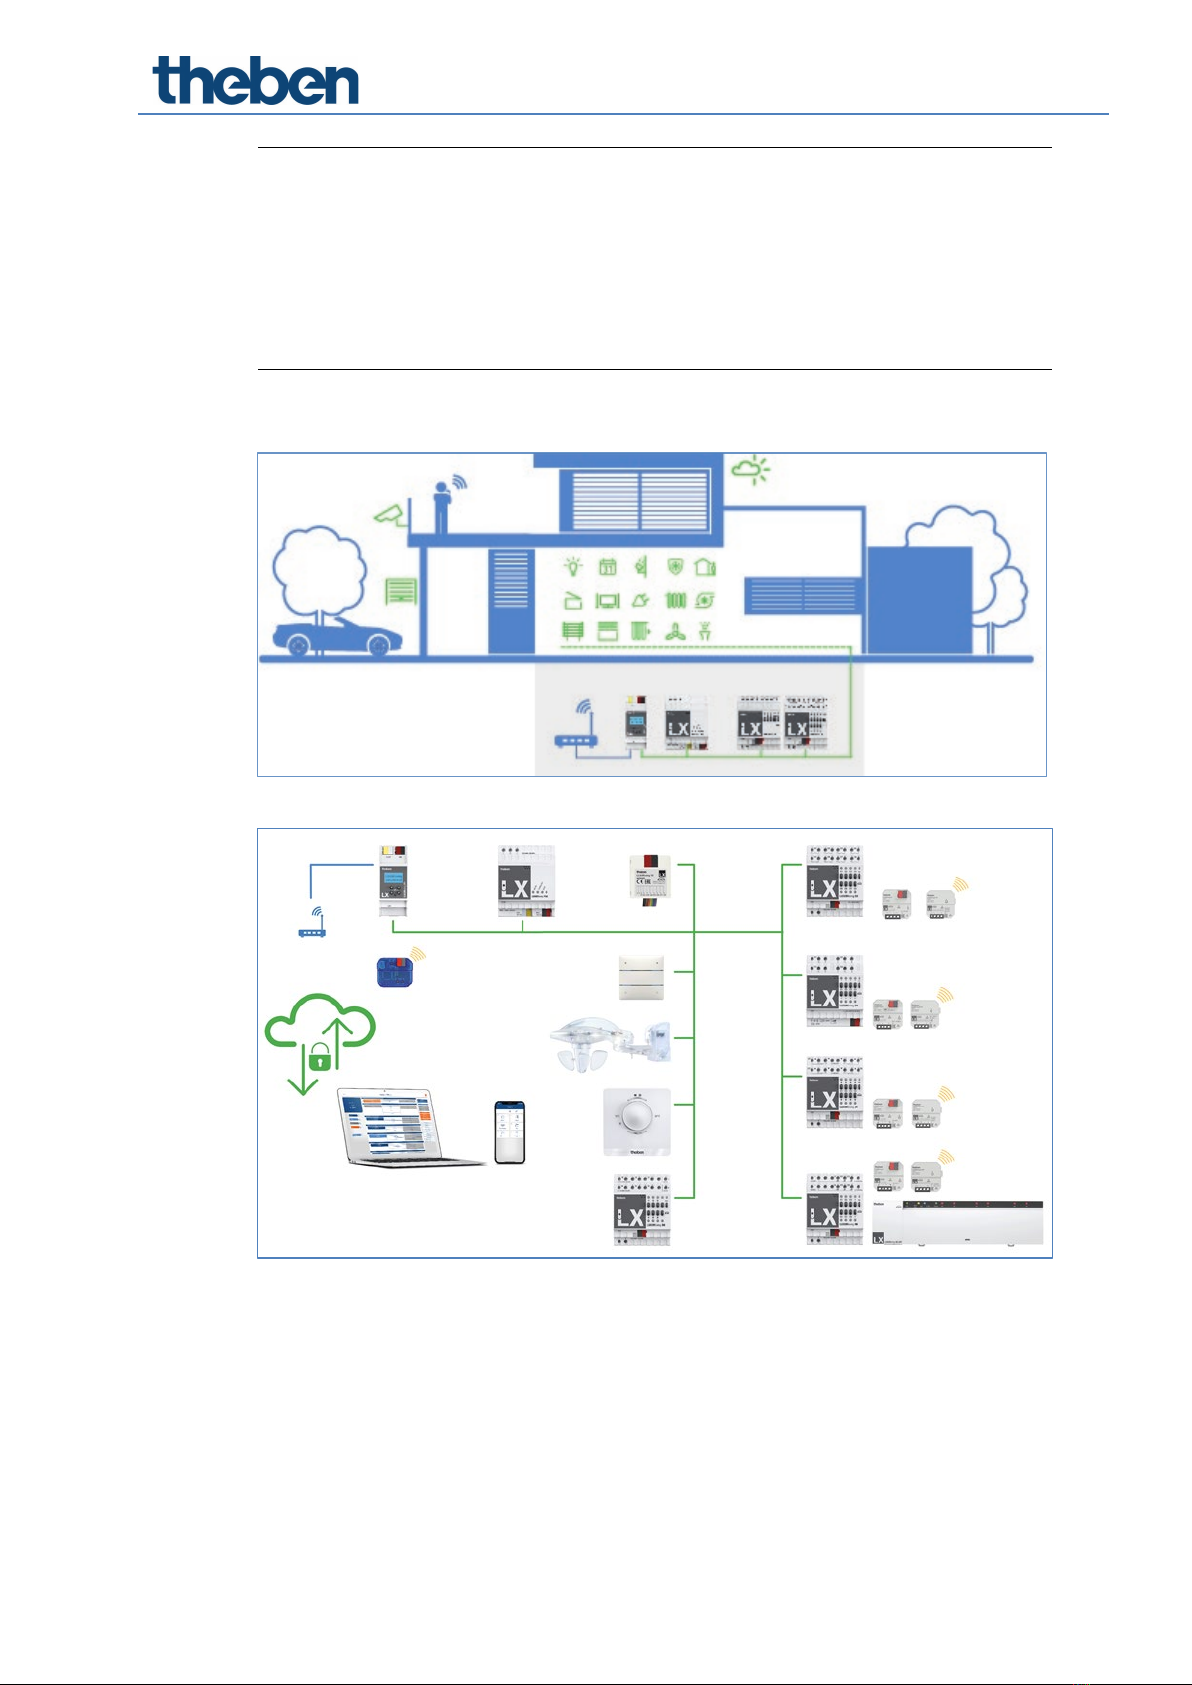
LUXORliving smart home control is based on a bus communication and includes control of
lighting, actuators and indoor climate. LUXORliving is taken into operation by using the free
LUXORplug programming tool.
(http://luxorliving.de/luxorplug/)
LUXORplug assigns all functions, which can also be changed later on.
Operation is done via permanently installed operating controls or by using the free LUXORplay
app, which can be installed on a smartphone or tablet.
For iOS - App Store
For Android - Play Store
When operating via app, the LUXORliving IP1 system control centre has to be connected
to your home network.

System
LUXORliving system manual 4
2System
•All components of LUXORliving communicate via a bus connection according to the KNX
standard (KNX S-mode).
•The connection to the home network is via the LUXORliving IP1 system control centre.
This allows operation via the LUXORplay app.
•The system can be equipped with a maximum of 64 LUXORliving devices, which
includes system devices, sensors and actuators.
System devices
-LUXORliving IP1 (system control centre),
-LUXORliving P640 (power supply)1
Sensors
-Weather station
-Room sensors
-Binary inputs
-Button interfaces
-iON tactile sensors
Actuators
-Switch actuators
-Dimming actuators
-Blind actuators
-Heating actuators
•For operation, conventional buttons are used. They are integrated into the system via
button interfaces/binary input. Control is always via button. Only for the "switch"
function you can chose between "button" and "motion detector" (switch).
Alternatively, operation can be carried out via the LUXORliving iON tactile sensors.
Also, the LUXORplay app (for iOS, Android, Windows-PC) can be used for operation.
1Only one system control centre and one power supply are allowed to be installed in one system.
Installation
LUXORliving system manual 5
3Installation
•The components of LUXORliving are intended for installation in a switch cabinet, in a
flush-mounted box, or for wall mounting.
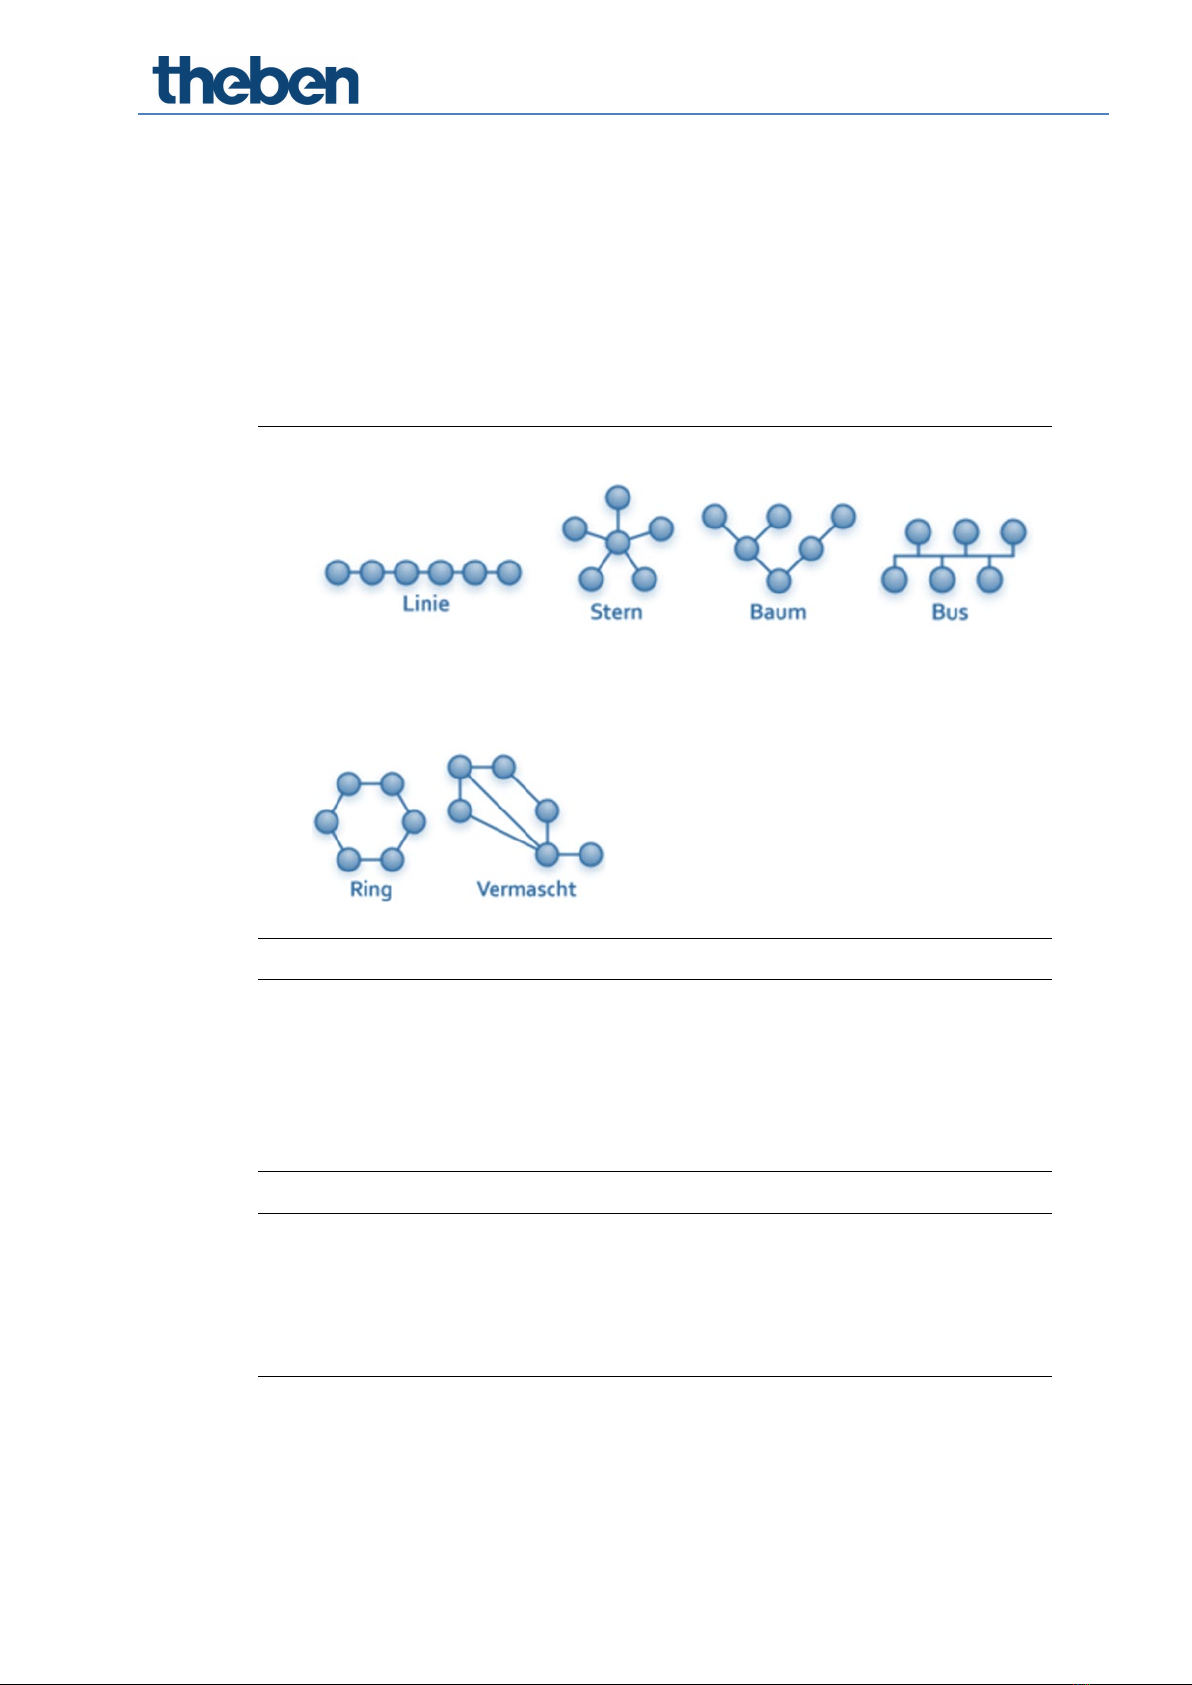
•Communication is via a 2-wire bus, to which each device has to be connected. The bus
connection can be executed as a line, star or tree topology.
The various wireless actuators and sensors also allow wireless communication.
The bus connection can be executed as a line, star, tree, or bus topology.
A connection as a closed ring or meshed is not allowed and leads to functional problems
in programming and communication!
The following cable lengths have to be observed:
power supply – participant max. 350 m
participant – participant max. 700 m
total cable length max. 1,000 m
For the bus connection, a KNX-certified bus line (J-Y(St)Y 2 x 2 x 0.8 mm) has to be used.
For operation, conventional buttons are used. They are integrated into the system via
button interfaces/binary input. Control is always via button. Only for the "switch"
function you can chose between "button" and "motion detector" (switch). Alternatively,
operation can be carried out via the LUXORliving iON tactile sensors. Also, the LUXORplay
app (for iOS, Android, Windows-PC) can be used for operation.
Installation
LUXORliving system manual 6
Please note that outdoors, a bus line can pose an increased safety risk. As an alternative
in the outdoor area, normal motion detectors with relay contact can for instance be
integrated into the system via the LUXORliving B6 binary input. When using the
LUXORliving M140 weather station, installation location and cable routing should be
chosen in a way, so access to the bus line is difficult.
When using the modular LUXORliving M130/M100 weather sensors, the system's bus
line is not routed to the outside, which ensures increased safety.

Simple start-up in 6 steps
LUXORliving system manual 7
4Simple start-up in 6 steps
4.1 Start project
First, complete the formalities by entering all relevant product information, such as the
project name, builder, address and installer.
4.2 Create overview
Using drag & drop, you can add the rooms to the relevant floors and assign them individual
names.

Simple start-up in 6 steps
LUXORliving system manual 8
4.3 Integrate devices
Devices that have already been installed can be imported, identified and named
automatically. Or you can create the device list manually and offline.
4.4 Define functions
Use drag & drop to add functions to the devices in each room. This determines which
devices communicate with each other.
4.5 Program functions
These functions can be transferred at any time. The project planning does not have to be
completely finished to program the devices.

Simple start-up in 6 steps
LUXORliving system manual 9
4.6 Prepare visualisation
The project file is transmitted to the system control centre. The functions are then
extremely easy to operate and configure using the LUXORplay app.

Start-up with LUXORplug
LUXORliving system manual 10
5Start-up with LUXORplug
5.1 Establish a connection
LUXORliving is always put into operation by using the LUXORliving IP1 system control centre and
the LUXORplug software. The LUXORplug software can be downloaded for free at
https://www.theben.de/ (https://luxorliving.de/luxorplug/).
For operation, the LUXORplay app is used, which is also available as a free download for your
smartphone/tablet.
https://luxorliving.de/luxorplug/
System requirements for LUXORplug:
- Windows 7 to Windows 11
- 32 bit and 64 bit
https://itunes.apple.com/de/app/luxorplay/id1319899246?mt=8
https://play.google.com/store/apps/details?id=de.theben.LUXORplay&hl=de
https://luxorliving.de/luxorplay/
System requirements for LUXORplay:
- Windows 7 to Windows 11
- 32 bit and 64 bit
- Android from version 4.4,
- iOS from version 9.x
The connection between PC and LUXORliving IP1 system control centre can be established in
various ways. We recommend the connection via a router.
We recommend the connection via a router.
5.1.1 Option 1 – Connection via a router
Connect PC (WLAN or LAN) and LUXORliving IP1 system control centre (LAN) with the router
and switch on the power supply of the LUXORliving IP1 system control centre.
The LUXORliving IP1 system control centre is delivered with activated DHCP service and receives
its IP address automatically from the router. After start-up, the IP address is displayed in the
LUXORliving IP1 display. If the router does not support DHCP, the IP address of LUXORliving IP1
has to be assigned manually. Please find further information on this in the manual of the router.
In LUXORliving IP1, the IP address can be configured as follows:
Press the " " button and open the "IP Config" menu with the " " button.
Select the "DHCP" setting with the " " button.

Start-up with LUXORplug
LUXORliving system manual 11
Set it to "Manual" with " ", and confirm with " ". Now, you can set the IP address,
subnet mask and gateway by using the arrow keys.
e.g. IP address 192.168.0.100/subnet mask 255.255.255.0/gateway 192.168.0.1
5.1.2 Option 2 – Connection without router using the DHCP service of
LUXORplug
Via an integrated DHCP service in LUXORplug, an IP address can be assigned to the LUXORliving
IP1 system control centre and the PC. This changes the network settings, which requires the
appropriate access rights. When exiting LUXORplug, these settings will be undone.
Start the LUXORplug application "As an administrator"
Simply right-click to the “LUXORplug”-Icon.
Confirm the ensuing message with “YES”.
After this LUXORplug will run in “Administrator mode”.
Activate "Settings" – "Direct connection to LUXORliving IP1" in the "File" menu.
Update the adapter settings and start the process with "OK".
Start-up with LUXORplug
LUXORliving system manual 12
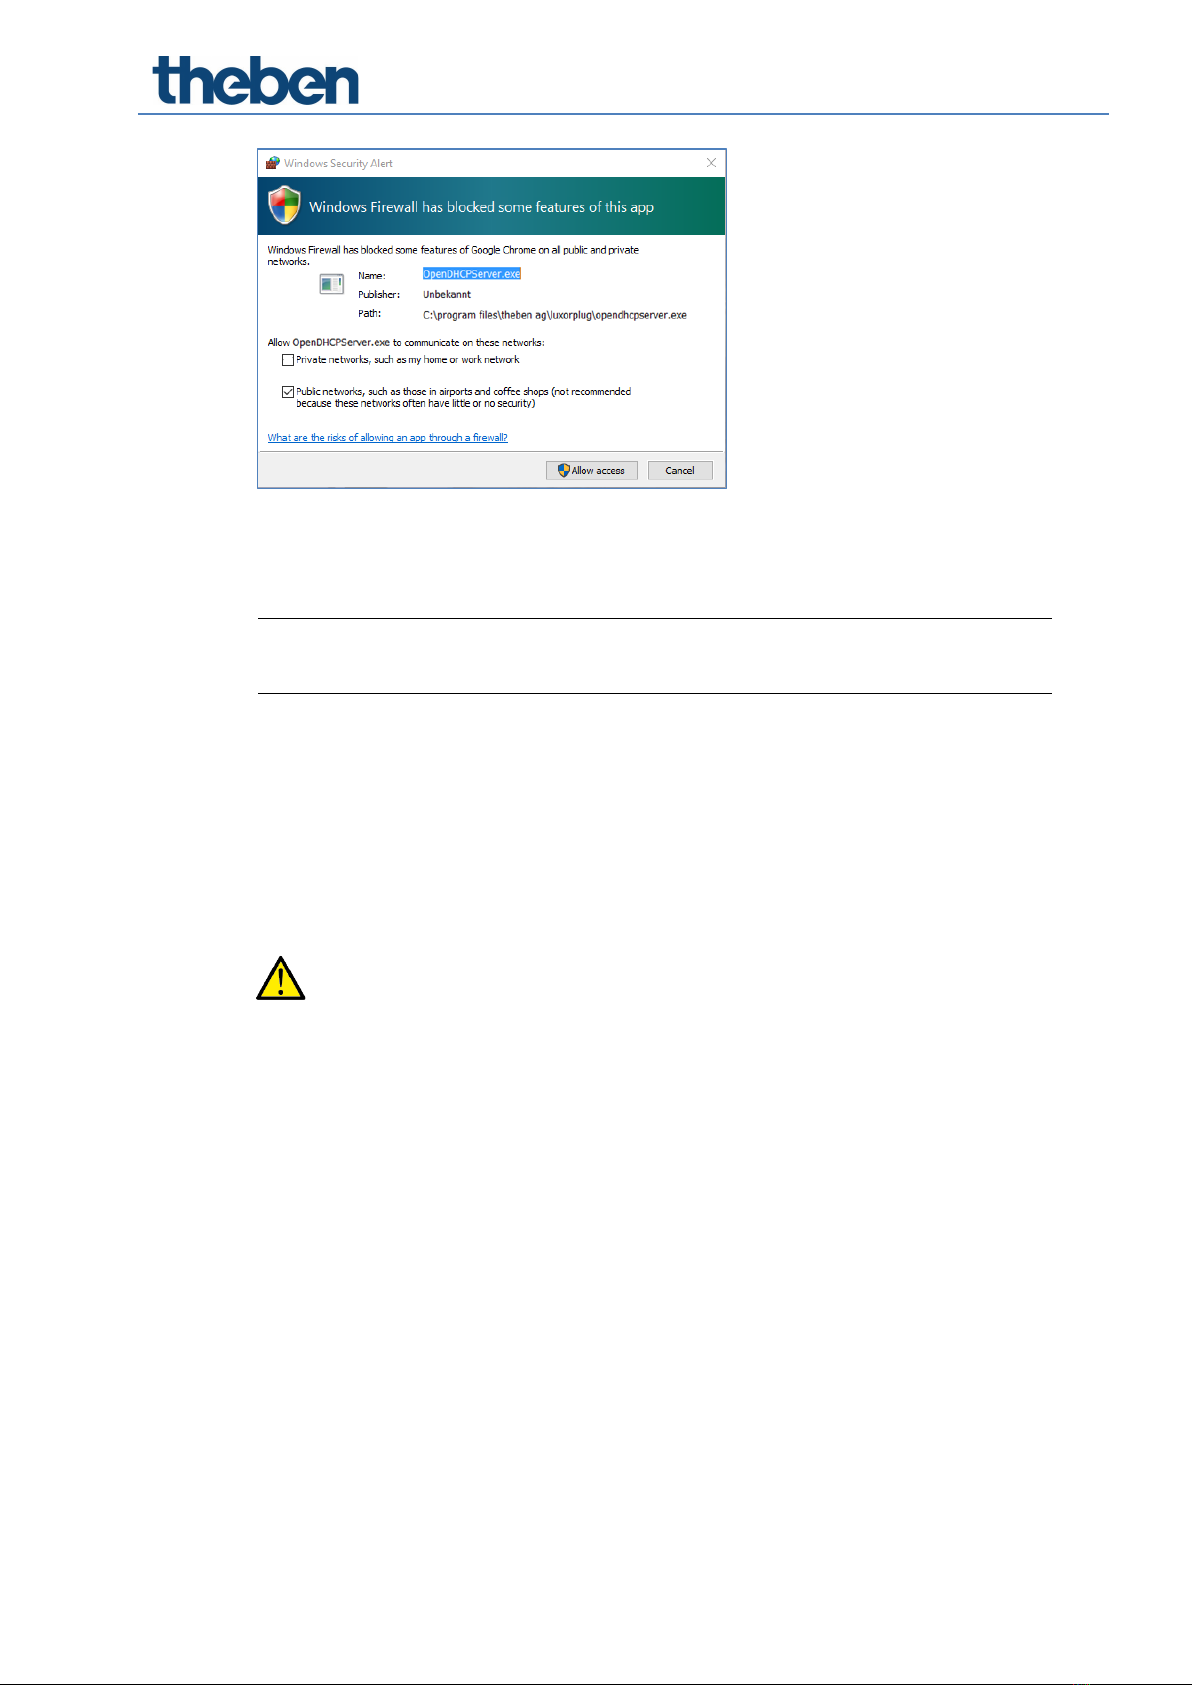
In the firewall settings, allow access in "Public networks".
Afterwards, an IP address will be assigned to the LUXORliving IP1 system control centre as
well as the PC.
If LUXORliving IP1 has not received an IP address from the PC, LUXORliving IP1 must be
restarted, or the direct connection may have to be repeated.
5.1.3 Option 3 – Connection without router using manual network settings
Deactivate the WLAN connection at the PC.
Use a network cable to connect the PC directly with the LUXORliving IP1.
The PC normally obtains the IP address automatically via an existing network. Since no network
is available, the IP address of the PC has to be set manually. This setting has to be made in the
control panel.
The following settings interrupt possibly existing network connections. This might lead to
a loss of data in open applications.
Close all applications, before making these changes.
Example
Open the file explorer (by using the shortcut Win + E), right click on "Network" and select
"Properties".
In the new window, click on "Change adapter settings".
→A list with the connections of all network adapters will be shown.
Double click on the "Ethernet" connection and open "Properties".
In a new window, double click on "Internet protocol, version 4 (TCP/IPv4)".
In the following window, activate the entry "Use the following IP address".
Complete the fields below correctly.
e.g. IP address 192.168.0.10/subnet mask 255.255.255.0/gateway 192.168.0.1

Start-up with LUXORplug
LUXORliving system manual 13
Undo these settings after finishing your activities in the LUXORliving system and activate
DHCP.
At LUXORliving IP1, the IP address has to be set manually as well:
Press the " " button and open the "IP Config" menu with the " " button.
Select the "DHCP" setting with the " " button, set it to "Manual" with " " and confirm
with " ".
Set the IP address, subnet mask and gateway by using the arrow keys.
e.g. IP address 192.168.0.100/subnet mask 255.255.255.0/gateway 192.168.0.1
→The connection between PC and LUXORliving IP1 is now established.
Start the LUXORplug application and start configuration.
5.2 Configuration with LUXORplug
For creating a project, the following steps have to be done:
- Project details (project name, address, etc.)
- Create building structure (floors and rooms)
- Create a device list (loading the system or creating the device list manually)
Only if the last step is confirmed with (), the device list will be saved in the project!
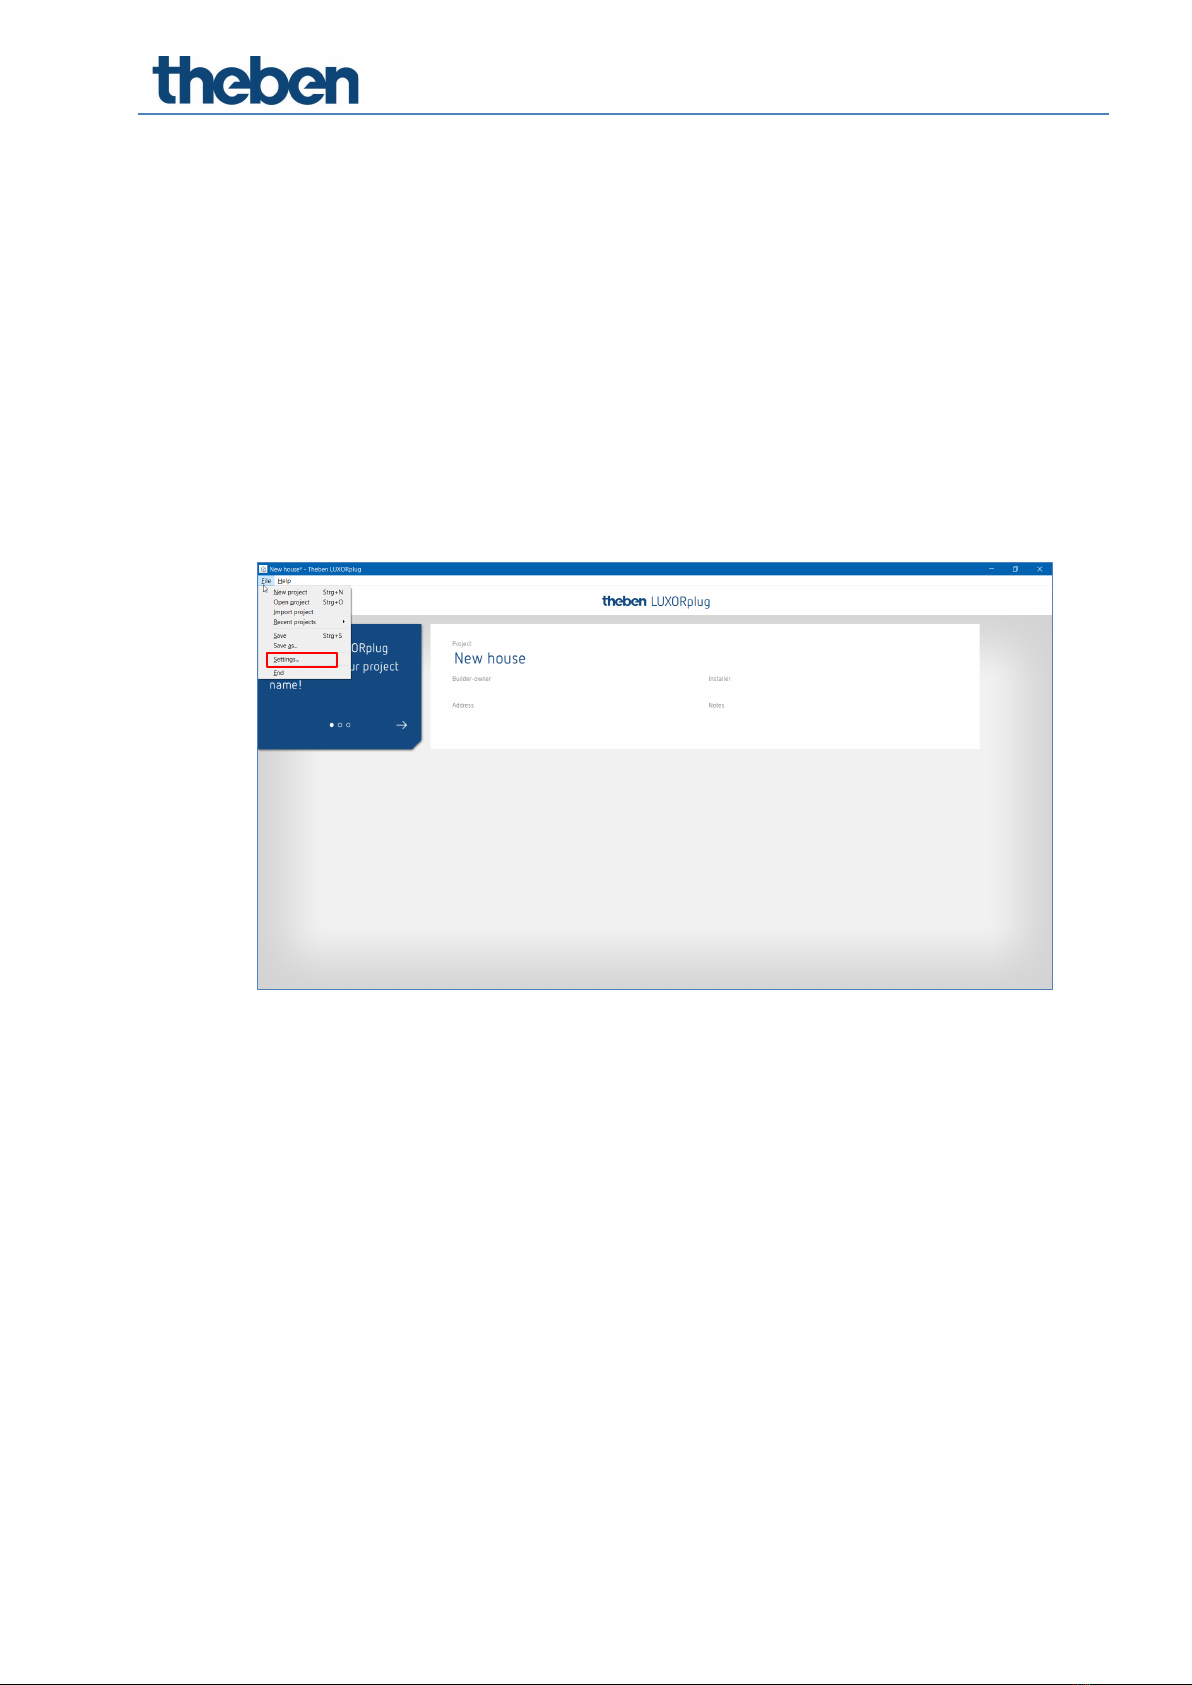
Click on the icon.
→The home page appears with the following information on the project:
Enter project name, address, installer etc.
Start-up with LUXORplug
LUXORliving system manual 14
5.2.1 "File" menu
In the "File" menu, several functions are available.
New project: Create a new project
Open project: Open an existing project
Import project: Import a project file from LUXORliving IP1
Previous projects: List of previously edited projects
Save: Saves the current project with the most recently selected filename
and storage location
Save as: Save the current project with the save dialogue (filename and storage
location selectable)
Settings: Set the menu language of LUXORplug, demo mode, activate direct link,
change IP1 password and debug mode
Quit: Quit and exit LUXORplug
Functions of the menu "File" – "Settings"
Demo mode
In demo mode, the connection to a system is simulated. This mode is used for displaying the
LUXORplug functions and has to be disabled if there is an existing connection to a LUXORliving
system.
Direct connection to LUXORliving IP1
This function is used if LUXORliving IP1 is connected directly to the PC via a LAN cable. When
activated, a DHCP service is started in LUXORplug, which automatically assigns an IP address to
LUXORliving IP1 and to the PC. For this, the network settings of LUXORliving IP1 and PC must
have activated the DHCP service.
Debug mode
Debug mode can be activated by clicking five times on the free space. Debug mode is used for
troubleshooting in the configuration. You can find further information in the appendix.
Change LUXORliving IP1 password
This is where you can change an existing password.

Start-up with LUXORplug
LUXORliving system manual 15
Change project password
This is where you can change an existing project password.
5.2.1.1 Define floors and rooms
By navigating with the arrow icons, you can go one menu step ahead () or back ().
In the next step, you can define the number of floors and include the corresponding rooms on
each floor.

Start-up with LUXORplug
LUXORliving system manual 16
5.2.1.2 Further functions
Add further floors or rooms
Delete floors or rooms
Edit floors or rooms
Click on the pin. In this way, you can change the names of rooms and floors.
Click on a room (e.g. bedroom)
→A choice of alternative icons for the respective room is displayed.
Start-up with LUXORplug
LUXORliving system manual 17
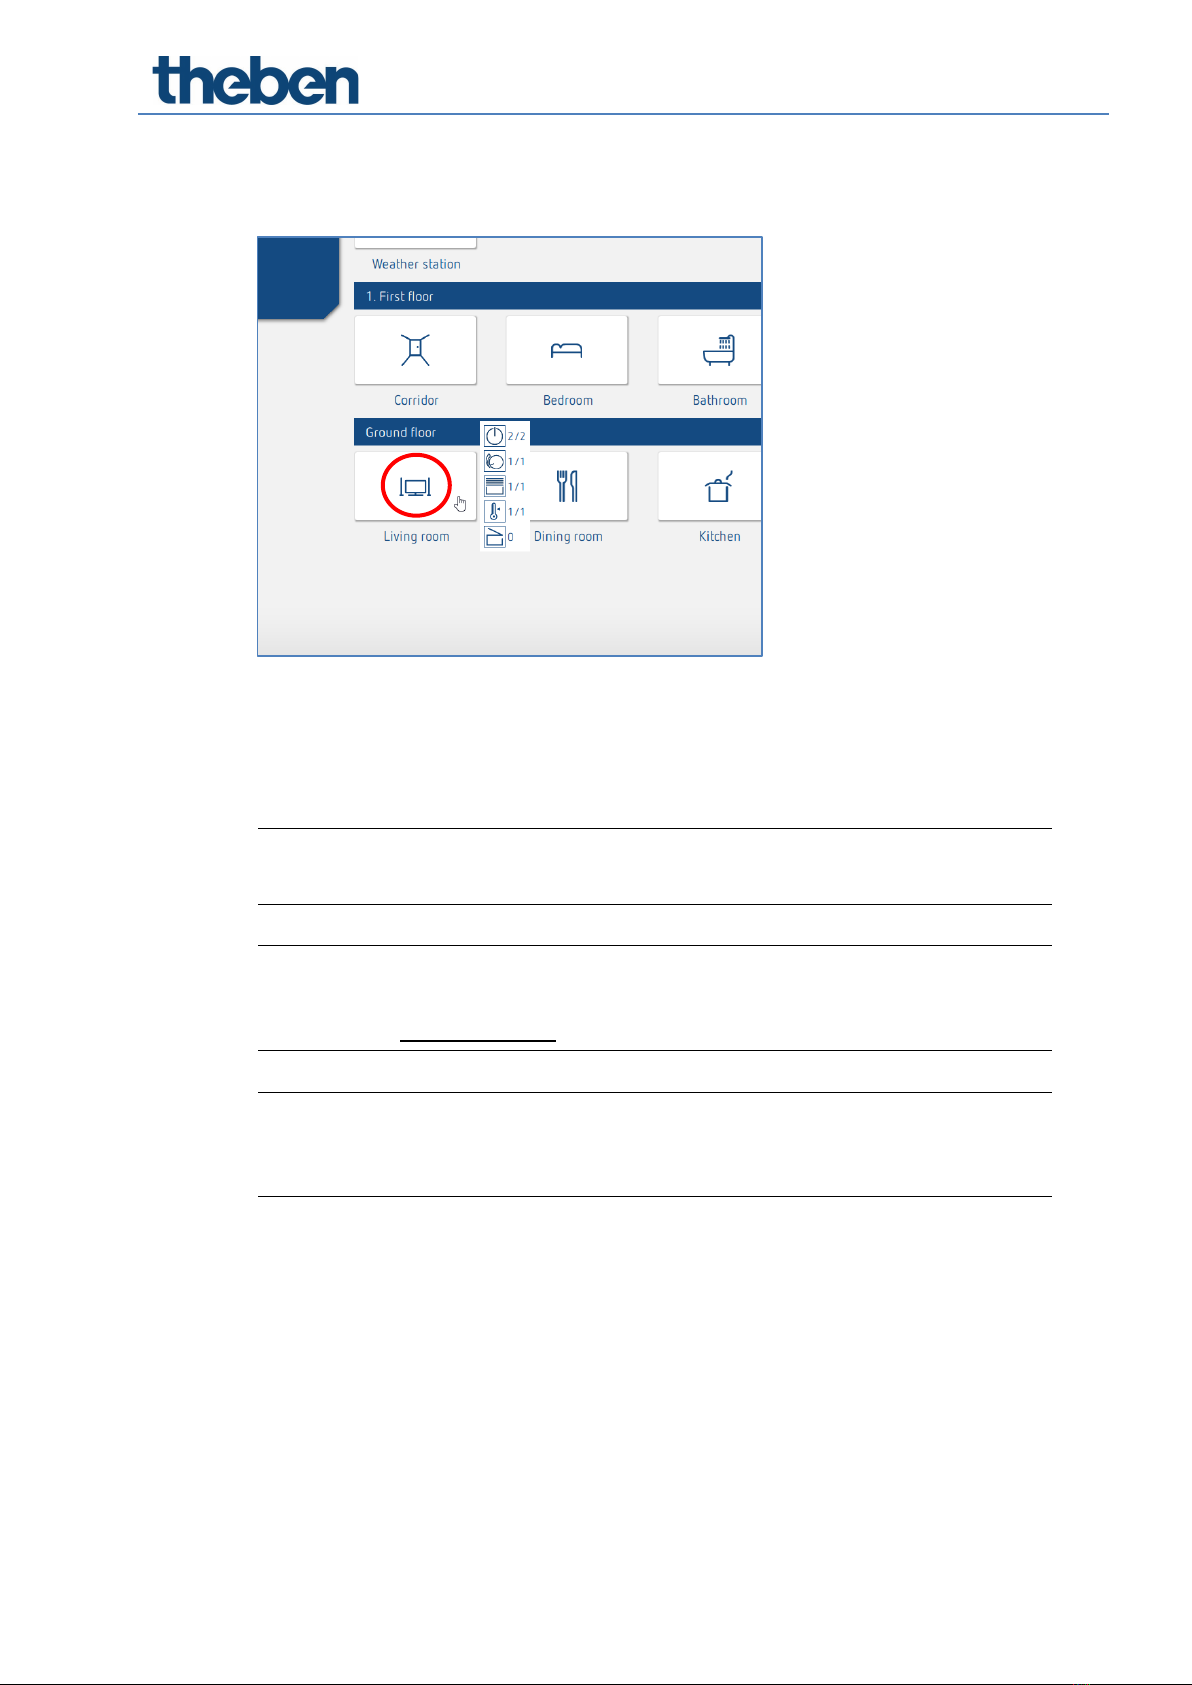
In room view, place the cursor on a room.
The functions configured in this room are displayed.
5.2.1.3 Load devices of the system
By navigating with the arrow icons, you can go one menu step ahead () or back ().
In the next step, you can load the system.
In order to do this, the PC must be connected to LUXORliving IP1 and other LUXORliving
components. As an alternative, you can skip this step and create the device list manually.
In contrast to TP devices, RF devices cannot be found using the "Read in devices"
procedure (exception: LUXORliving RF1 media coupler). Further information can be found
in chapter 5.3 LUXORliving RF.
Field "Reset all devices before loading the system“.
If this function is activated, all detected devices will be reset, at first. This step should be
performed if devices from another project are integrated in the system.

Start-up with LUXORplug
LUXORliving system manual 18
Click on the "Load system" field.
Before the connected LUXORliving components are loaded automatically, the user is prompted
to enter the password for the LUXORliving IP1 system control centre.
The default password is "admin".
For security reasons, LUXORplug prompts the user to change the password. The user can then
create a new, secure password.2
2In the LUXORplay app, the administrator has to authenticate themselves with this password in order to be
able to create other users, define those users' rights and set individual passwords for each user.

Start-up with LUXORplug
LUXORliving system manual 19
If the password is forgotten, the LUXORliving IP1 system control centre will need to be
reset with a master reset. This can be done directly at the device ("Reset" menu –
"Master Reset"). Afterwards, the password can be created again via LUXORplug. The
default password after a master reset is always "admin".
For security reasons, the new administrator password must be entered before the system
is loaded each time and whenever the system is being programmed.
The connected LUXORliving components are then automatically loaded and shown in the device
list.
Device list
The arrangement of the devices in the left column (devices) can be adjusted by clicking, holding
and moving.

Start-up with LUXORplug
LUXORliving system manual 20
5.2.1.4 Identify and name devices
Each device has to be clearly named, in order to be assigned to functions and rooms. For
instance, each device can show the installation location, function or another identification.
For identifying the device inside the installation, the "magnifying glass" icon is used.
Click on the "magnifying glass".
→The red LED of the device flashes and allows an identification.
If devices which are installed in a switch box are already fitted (e.g. button interfaces or
flush-mounted actuators), the connected button can be pushed briefly 3 times. The
"magnifying glass" icon then indicates the respective device. The identification can be
finished by pressing the button again briefly.
After all devices have been identified and clearly named, configuration can be completed with
"".
Other manuals for LUXORliving
1
Table of contents
Other Theben Home Automation manuals


Popular Home Automation manuals by other brands


SwannOne
SwannOne SWO-SMP1PA quick start guide

weinor
weinor WeiTronic Combio-868 MA Operating and installation instructions

Abriblue
Abriblue Nextpool WING SYSTEM installation manual

G-Homa
G-Homa EMW302WF quick start guide

netelec
netelec HUB15B-PIR user manuel

brel-motors
brel-motors DD7002B installation manual


