Theben TIME GUARD Programstat TRT034 Product guide

7 Day Digital
Programmer
Cat. No. TRT034
Operating & Installation Instructions
These apply to every day independent of whether
weekday/weekend (5-2) or individual (7) day
option is chosen.
Note: to omit days and programmes please refer
to “Omitting days and programmes”
To change from default values, proceed as follows:
Press set and MON will flash (with programme (P)
1 on time displayed). Press select and P1 on hour
digit(s) will flash, use buttons to get the
required hours.
Press select and P1 on minute digits will flash,
use buttons to get the required minutes.
Press select and P1 off hour digits will flash,
use buttons to get the required hours.
Press select and P1 off minute digits will flash,
use buttons to get the required minutes.
Press select and programme (P) 2 on hour digit(s)
will flash, use buttons to get the required
hours.
Press select and programme (P) 2 on minute digit(s)
will flash, use buttons to get the required
minutes. This procedure of alternatively using
select and can be continued to set
programmes P2 and P3.
Once complete the second day can be started by
pressing the set button when MON will begin to
In 5-2 day mode the weekend can be omitted by
using the same technique for the 2 day (Sat &
Sun) programmes.
A programme (usually P2) can also be omitted
for a given day by making the P2 on and off times
the same. This can also be applied to P1 and P3
if required.
Boost
In operating mode, there is a boost facility
for between 1 and 9 hours in one hour steps.
Press the boost button the required number of
times for the number of hours of boost required.
The programmer returns to operating mode
15 seconds after the last button push. To cancel
boost, press the boost button until 0 hours is shown.
Press and hold the light button and the
programmer will enter holiday mode. Use the
buttons to set the required number of days.
The programmer will return to operating mode
15 seconds after the last button push. To exit holiday
mode, press and hold the light button again.
Screen illumination
Press the light button briefly at anytime,
and the screen will illuminate for 15 seconds.
To clean use a clean dry cloth only. Do not use
any liquid cleaners.
5. Specifications
Current rating: 3 (1) A
Voltage: 230V, 50Hz
Switch type: Single pole, double throw
(SPDT)
Operating
temperature
range: 0ºC to 50ºC
Complies with: BS EN 60730
Conforms to
directives: Conforms to latest directives
Micro
disconnection: Type 1.B control action
Setting time and date
To programme the current time and date,
simultaneously press and hold both the select
and set buttons for 3 seconds.
The option 12 hour or 24 hour is displayed and
needs to be set. Use the up and down
buttons to select the required mode.
Press select to move to setting the hours.
Use the up and down buttons to set
the hour, and press select to set the minutes.
Again use the up and down buttons to set
the minutes, and then select to set the year (y),
the month (m), the day (d), and automatic
summer/winter time change or daylight saving
(dls) on/off, in each case using the up and down
buttons . Once the time and date have been
set, press set to exit back to the operating mode.
If at any time a button is not pressed for
15 seconds, the unit will return to operating mode.
Individual (7 day) programming on/off times
The default on/off times are as follows:
6:00 AM on
8:00 AM off
10:00 PM on
12:00 PM off
6:00 PM on
10:00 PM off
flash. Press the butons to get the required
day for programming, then press select and this
day can be programmed as Monday above.
Complete all 7 days in the same manner. If set is
then pressed twice the TRT034 will return to
operating mode.
This defaults to permanently off – refer to “Setting
the operating mode” to get into timed mode.
Weekday/weekend (5-2) programming
on/off times
For 5-2 day mode, time periods will need to be
programmed for M-F (Mon-Fri) and then for S-S
(sat-sun). Only 2 sets of times need to be
programmed, not 7.
Setting the operating mode
Once programmed, the default mode is
‘continuously off’. To enter programmed mode,
press the advance/mode button. One press changes
the output to ‘continuously on’, two presses changes
to ‘programmed’, and three presses changes to
‘advance to next programme’. In advance mode,
once the next time period has past, the programmer
returns to programmed mode.
Omitting days and programmes
Days can be omitted by entering the same time in
each of the 3 on/off programmes for that day.
4.
Operation
Decide whether weekday/weekend (5-2) or
individual (7) day programming is required, and move
the jumper on the rear of the product (see Fig. 2).
It is important to make this decision first, as after
any change of jumper position, reset needs to be
pressed, which will return the unit to default time
and programme.
Reset
When programming a new unit or one that has
been disconnected from the mains for more than
24 hours, open the program access flap and press
the reset button (see Fig. 1a) using a pen or
similar implement which will clear the memory.
All of the screen segments will show briefly, and
then the default programme will be displayed.
This unit is double insulated, and hence does
not need connection to earth. If earth continuity
is required, please use earth terminal on wall plate.
To reinstall the unit on the wall plate hook the top
of the unit over the retaining tabs, and push firmly
back. There will be some resistance from the terminals.
Once in place, secure with the retaining screws.
Restore mains to the unit after checking all system
wiring is complete.
For a product brochure please contact:
Timeguard Ltd. Victory Park, 400 Edgware Road,
London NW2 6ND Tel: 020 8452 1112
A Group company
67-058-325 (issue 2)
A Group company
HELPLINE
020 8450 0515
For assistance with the product please contact:-
3 Year Guarantee
In the unlikely event of this product becoming
faulty due to defective material or manufacture
within 3 years of the date of purchase, please
return it to your supplier in the first year with proof
of purchase and it will be replaced free of charge.
For years 2 and 3 or any difficulty in the first year
telephone the helpline on
020 8450 0515.
Note: a proof of purchase is required
in all cases. For all eligible replacements (where agreed by
Timeguard Ltd) the customer is responsible for all shipping/
postage charges for sending replacements outside the UK.
All shipping costs are to be paid in advance before
a replacement is sent.

1. Introduction
TRT products are a cost effective comprehensive
range of thermostats and timers designed for
internal use only.
The TRT034 is a single channel programmer,
with automatic summer/winter time changeover
(which can be cancelled), 5 day plus 2 or 7
(individual) day programming with 3 on and
off operations per day, holiday mode, boost
function, advance to next programme and
permanent on/off over ride.
The unit is fitted with a factory installed
battery which gives up to 24 hours back up
of time, date and programmes in the event
of a mains failure.
It is designed to be surface mounted on its
supplied wall plate.
The electrical supply must be isolated before
removing the thermostat from the wall plate.
2. Siting
The TRT034 should be located at a position
which eases wiring runs and gives good access
for programming. It should be mounted
approximately 1.5m above floor level.
3. Installation
This product should be installed by a qualified
installer to current installation standards.
If in any doubt contact the Timeguard Helpline
020 8450 0515.
Always isolate the mains supply before
removing the unit from its wall plate.
The TRT034 is designed to be surface mounted
on the supplied wall plate.
Isolate 230VAC mains supply.
Incoming and outgoing cable should be 1.5mm sq.
Remove wall plate from unit, by undoing
retaining screws, and pivoting the bottom of the
unit outwards. The unit can then be lifted off.
Contents
TRT034 programmer
TRT034 wall plate
TRT034 instruction leaflet
2 x wall plugs
2 x screws
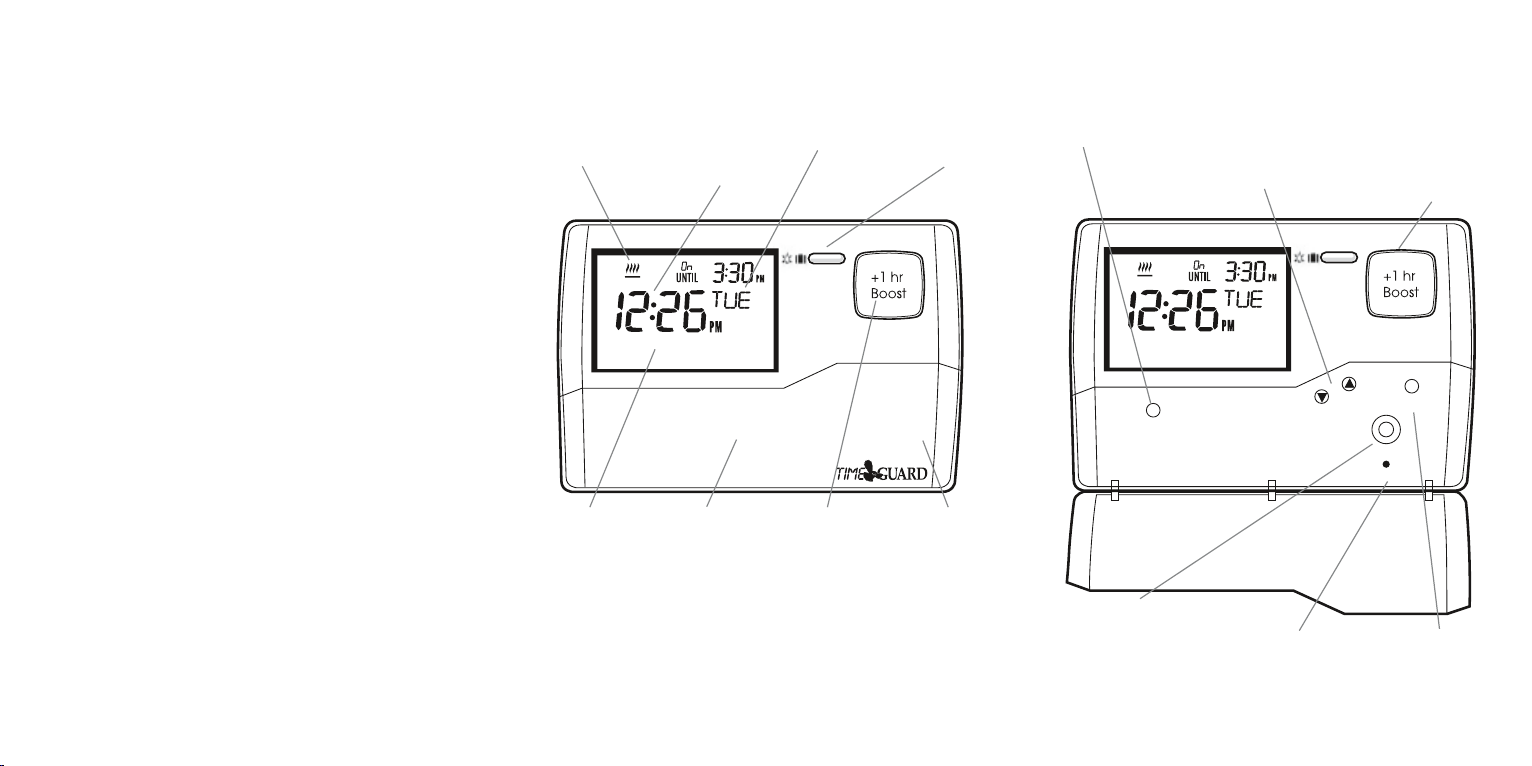
select
Advance Mode
set
reset
Day of
week
Time of day
programme,
flashes during
setting
Blue illuminated
light/holiday
button
Shows when
heat is
demanded
Blue illuminated
boost button
Stylish
design
Pull down
flap for
programming
Blue electro-
luminescent
screen
Fig. 1
TRT034 7 Day Digital Programmer
(normal position)
select
Advance Mode
set
reset
Selects time,
temperature or
date to be changed
Reset
button
Advance/mode
button
Up and down
buttons
(used in
programming)
Initiates programme
setting sequence and in
conjunction with the select
button initiates time and
date setting sequence
Border illuminates
when +/- buttons
are pressed and
for 15 seconds
after release
Fig. 1a
TRT034 7 Day Digital Programmer
(programming cover lowered)
Programmers allow you to set ‘On’ and ‘Off’ time
periods. Some models switch the central heating
and domestic hot water on and off at the same
time, while others allow the domestic hot water
and heating to come on and go off
at different times.
Set the ‘On’ and ‘Off’ time periods to suit your
own lifestyle. On some programmers you must
also set whether you want the heating and
hot water to run continuously, run under
the chosen ‘On’ and ‘Off’ heating periods,
or be permanently off.
The time on the programmer must be correct.
Some types have to be adjusted in spring and
autumn at the changes between Greenwich
Mean Time and British Summer Time.
You may be able to temporarily adjust the
heating programme, for example, ‘Override’,
‘Advance’ or ‘Boost’. These are explained in the
manufacturer’s instructions.
The heating will not work if the room thermostat
has switched the heating off. And, if you have a
hot-water cylinder, the water heating will not
work if the cylinder thermostat detects that the
hot water has reached the correct temperature.
®
What is a programmer?
...an explanation for householders
7 5 - 2
PROGRAM
Connection
pins
Wall plate retaining screws
(at bottom of TRT034)
7 day or
5 + 2 jumper
Press reset after
moving jumper
Fig. 2
Fig. 3
Rear View of TRT034
Back Plate Removed
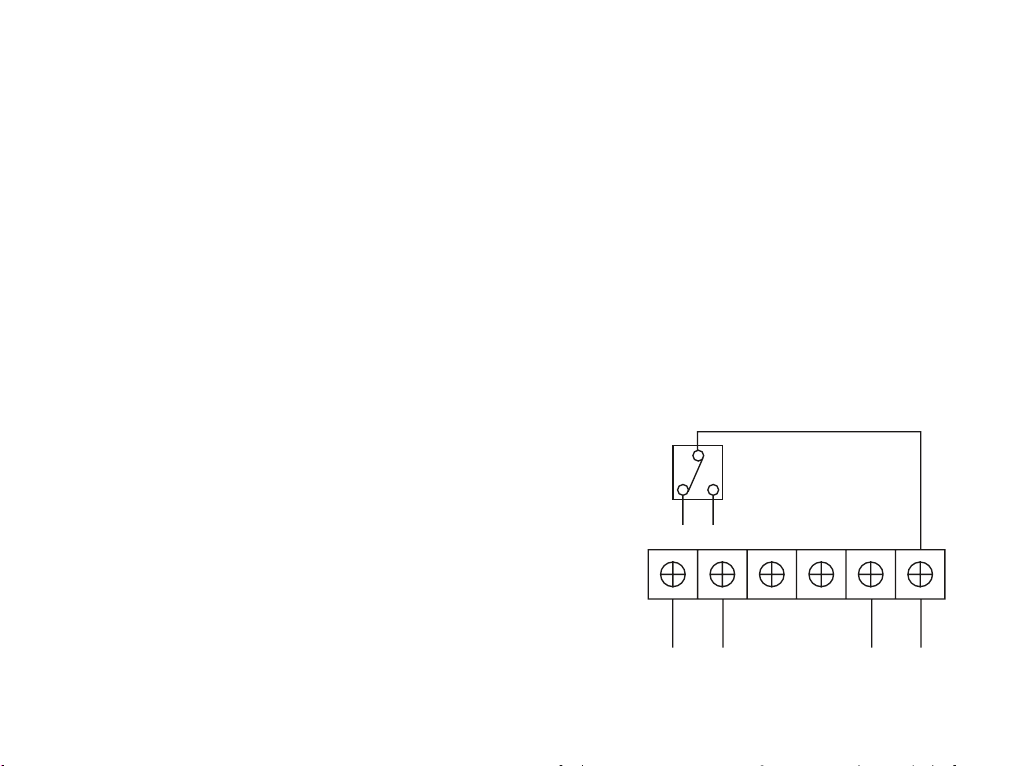
NC1 NO1 N L
Alternative
fixing holes
Mount the wall plate in this configuration only
Product
retaining
screws
Terminal for
retaining
continuity
of earth
N
N
CH
230 VACOFF ON
NC1 NO1
L
L
CH
Fig. 4
Wiring Diagram
Pass incoming wires through opening in wall
plate, and fix wall plate securely to the wall,
using screws provided (and wall plugs if
necessary). The screws which hold the product
to the wall plate should point downwards.
Allow sufficient excess cable to wire up the unit,
but not too much to make it difficult to close
the unit to the wall plate.
Connect the conductors to the relevant terminal,
according to the wiring diagram on the wall
plate (or below). Ensure that the curved brass
washer grips the conductor.
Note:
Check boiler
instructions
before
connecting.
1. Introduction
TRT products are a cost effective comprehensive
range of thermostats and timers designed for
internal use only.
The TRT034 is a single channel programmer,
with automatic summer/winter time changeover
(which can be cancelled), 5 day plus 2 or 7
(individual) day programming with 3 on and
off operations per day, holiday mode, boost
function, advance to next programme and
permanent on/off over ride.
The unit is fitted with a factory installed
battery which gives up to 24 hours back up
of time, date and programmes in the event
of a mains failure.
It is designed to be surface mounted on its
supplied wall plate.
The electrical supply must be isolated before
removing the thermostat from the wall plate.
2. Siting
The TRT034 should be located at a position
which eases wiring runs and gives good access
for programming. It should be mounted
approximately 1.5m above floor level.
3. Installation
This product should be installed by a qualified
installer to current installation standards.
If in any doubt contact the Timeguard Helpline
020 8450 0515.
Always isolate the mains supply before
removing the unit from its wall plate.
The TRT034 is designed to be surface mounted
on the supplied wall plate.
Isolate 230VAC mains supply.
Incoming and outgoing cable should be 1.5mm sq.
Remove wall plate from unit, by undoing
retaining screws, and pivoting the bottom of the
unit outwards. The unit can then be lifted off.
Contents
TRT034 programmer
TRT034 wall plate
TRT034 instruction leaflet
2 x wall plugs
2 x screws
select
Advance Mode
set
reset
Day of
week
Time of day
programme,
flashes during
setting
Blue illuminated
light/holiday
button
Shows when
heat is
demanded
Blue illuminated
boost button
Stylish
design
Pull down
flap for
programming
Blue electro-
luminescent
screen
Fig. 1
TRT034 7 Day Digital Programmer
(normal position)
select
Advance Mode
set
reset
Selects time,
temperature or
date to be changed
Reset
button
Advance/mode
button
Up and down
buttons
(used in
programming)
Initiates programme
setting sequence and in
conjunction with the select
button initiates time and
date setting sequence
Border illuminates
when +/- buttons
are pressed and
for 15 seconds
after release
Fig. 1a
TRT034 7 Day Digital Programmer
(programming cover lowered)
Programmers allow you to set ‘On’ and ‘Off’ time
periods. Some models switch the central heating
and domestic hot water on and off at the same
time, while others allow the domestic hot water
and heating to come on and go off
at different times.
Set the ‘On’ and ‘Off’ time periods to suit your
own lifestyle. On some programmers you must
also set whether you want the heating and
hot water to run continuously, run under
the chosen ‘On’ and ‘Off’ heating periods,
or be permanently off.
The time on the programmer must be correct.
Some types have to be adjusted in spring and
autumn at the changes between Greenwich
Mean Time and British Summer Time.
You may be able to temporarily adjust the
heating programme, for example, ‘Override’,
‘Advance’ or ‘Boost’. These are explained in the
manufacturer’s instructions.
The heating will not work if the room thermostat
has switched the heating off. And, if you have a
hot-water cylinder, the water heating will not
work if the cylinder thermostat detects that the
hot water has reached the correct temperature.
®
What is a programmer?
...an explanation for householders
7 5 - 2
PROGRAM
Connection
pins
Wall plate retaining screws
(at bottom of TRT034)
7 day or
5 + 2 jumper
Press reset after
moving jumper
Fig. 2
Fig. 3
Rear View of TRT034
Back Plate Removed
NC1 NO1 N L
Alternative
fixing holes
Mount the wall plate in this configuration only
Product
retaining
screws
Terminal for
retaining
continuity
of earth
N
N
CH
230 VACOFF ON
NC1 NO1
L
L
CH
Fig. 4
Wiring Diagram
Pass incoming wires through opening in wall
plate, and fix wall plate securely to the wall,
using screws provided (and wall plugs if
necessary). The screws which hold the product
to the wall plate should point downwards.
Allow sufficient excess cable to wire up the unit,
but not too much to make it difficult to close
the unit to the wall plate.
Connect the conductors to the relevant terminal,
according to the wiring diagram on the wall
plate (or below). Ensure that the curved brass
washer grips the conductor.
Note:
Check boiler
instructions
before
connecting.

7 Day Digital
Programmer
Cat. No. TRT034
Operating & Installation Instructions
These apply to every day independent of whether
weekday/weekend (5-2) or individual (7) day
option is chosen.
Note: to omit days and programmes please refer
to “Omitting days and programmes”
To change from default values, proceed as follows:
Press set and MON will flash (with programme (P)
1 on time displayed). Press select and P1 on hour
digit(s) will flash, use buttons to get the
required hours.
Press select and P1 on minute digits will flash,
use buttons to get the required minutes.
Press select and P1 off hour digits will flash,
use buttons to get the required hours.
Press select and P1 off minute digits will flash,
use buttons to get the required minutes.
Press select and programme (P) 2 on hour digit(s)
will flash, use buttons to get the required
hours.
Press select and programme (P) 2 on minute digit(s)
will flash, use buttons to get the required
minutes. This procedure of alternatively using
select and can be continued to set
programmes P2 and P3.
Once complete the second day can be started by
pressing the set button when MON will begin to
In 5-2 day mode the weekend can be omitted by
using the same technique for the 2 day (Sat &
Sun) programmes.
A programme (usually P2) can also be omitted
for a given day by making the P2 on and off times
the same. This can also be applied to P1 and P3
if required.
Boost
In operating mode, there is a boost facility
for between 1 and 9 hours in one hour steps.
Press the boost button the required number of
times for the number of hours of boost required.
The programmer returns to operating mode
15 seconds after the last button push. To cancel
boost, press the boost button until 0 hours is shown.
Press and hold the light button and the
programmer will enter holiday mode. Use the
buttons to set the required number of days.
The programmer will return to operating mode
15 seconds after the last button push. To exit holiday
mode, press and hold the light button again.
Screen illumination
Press the light button briefly at anytime,
and the screen will illuminate for 15 seconds.
To clean use a clean dry cloth only. Do not use
any liquid cleaners.
5. Specifications
Current rating: 3 (1) A
Voltage: 230V, 50Hz
Switch type: Single pole, double throw
(SPDT)
Operating
temperature
range: 0ºC to 50ºC
Complies with: BS EN 60730
Conforms to
directives: Conforms to latest directives
Micro
disconnection: Type 1.B control action
Setting time and date
To programme the current time and date,
simultaneously press and hold both the select
and set buttons for 3 seconds.
The option 12 hour or 24 hour is displayed and
needs to be set. Use the up and down
buttons to select the required mode.
Press select to move to setting the hours.
Use the up and down buttons to set
the hour, and press select to set the minutes.
Again use the up and down buttons to set
the minutes, and then select to set the year (y),
the month (m), the day (d), and automatic
summer/winter time change or daylight saving
(dls) on/off, in each case using the up and down
buttons . Once the time and date have been
set, press set to exit back to the operating mode.
If at any time a button is not pressed for
15 seconds, the unit will return to operating mode.
Individual (7 day) programming on/off times
The default on/off times are as follows:
6:00 AM on
8:00 AM off
10:00 PM on
12:00 PM off
6:00 PM on
10:00 PM off
flash. Press the butons to get the required
day for programming, then press select and this
day can be programmed as Monday above.
Complete all 7 days in the same manner. If set is
then pressed twice the TRT034 will return to
operating mode.
This defaults to permanently off – refer to “Setting
the operating mode” to get into timed mode.
Weekday/weekend (5-2) programming
on/off times
For 5-2 day mode, time periods will need to be
programmed for M-F (Mon-Fri) and then for S-S
(sat-sun). Only 2 sets of times need to be
programmed, not 7.
Setting the operating mode
Once programmed, the default mode is
‘continuously off’. To enter programmed mode,
press the advance/mode button. One press changes
the output to ‘continuously on’, two presses changes
to ‘programmed’, and three presses changes to
‘advance to next programme’. In advance mode,
once the next time period has past, the programmer
returns to programmed mode.
Omitting days and programmes
Days can be omitted by entering the same time in
each of the 3 on/off programmes for that day.
4.
Operation
Decide whether weekday/weekend (5-2) or
individual (7) day programming is required, and move
the jumper on the rear of the product (see Fig. 2).
It is important to make this decision first, as after
any change of jumper position, reset needs to be
pressed, which will return the unit to default time
and programme.
Reset
When programming a new unit or one that has
been disconnected from the mains for more than
24 hours, open the program access flap and press
the reset button (see Fig. 1a) using a pen or
similar implement which will clear the memory.
All of the screen segments will show briefly, and
then the default programme will be displayed.
This unit is double insulated, and hence does
not need connection to earth. If earth continuity
is required, please use earth terminal on wall plate.
To reinstall the unit on the wall plate hook the top
of the unit over the retaining tabs, and push firmly
back. There will be some resistance from the terminals.
Once in place, secure with the retaining screws.
Restore mains to the unit after checking all system
wiring is complete.
For a product brochure please contact:
Timeguard Ltd. Victory Park, 400 Edgware Road,
London NW2 6ND Tel: 020 8452 1112
A Group company
67-058-325 (issue 2)
A Group company
HELPLINE
020 8450 0515
For assistance with the product please contact:-
3 Year Guarantee
In the unlikely event of this product becoming
faulty due to defective material or manufacture
within 3 years of the date of purchase, please
return it to your supplier in the first year with proof
of purchase and it will be replaced free of charge.
For years 2 and 3 or any difficulty in the first year
telephone the helpline on
020 8450 0515.
Note: a proof of purchase is required
in all cases. For all eligible replacements (where agreed by
Timeguard Ltd) the customer is responsible for all shipping/
postage charges for sending replacements outside the UK.
All shipping costs are to be paid in advance before
a replacement is sent.
Table of contents
Other Theben Home Automation manuals


