Theben PresenceLight 180A-KNX series User manual
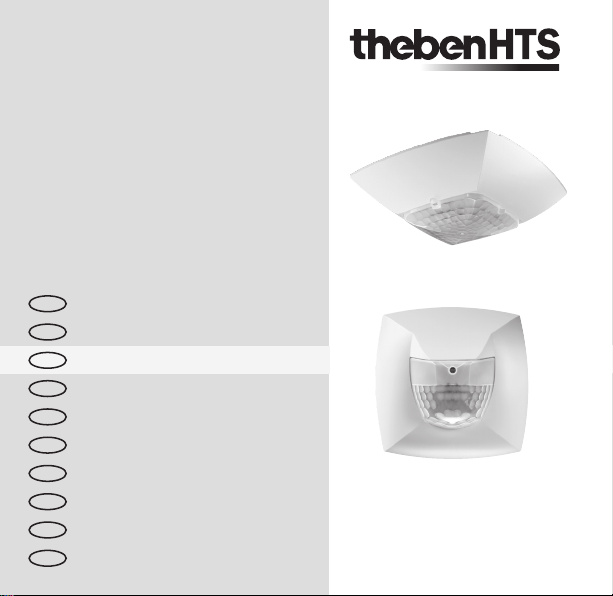
1103066201 © 05.2011 Theben HTS
PresenceLight 180A-KNX ..
PresenceLight 360A-KNX ..
PresenceLight 180B-KNX ..
PresenceLight 360B-KNX ..
Presence detector
DK
D
F
GB
E
I
NL
S
N
FIN
Bedienungsanleitung 2
Notice d´utilisation 32
Operating Manual 62
Manual de instrucciones 92
Istruzioni per l´uso 122
Gebruikshandleiding 152
Bruksanvisning 182
Bruksanvisning 212
Käyttöohje 242
Betjeningsvejledning 272

62
English Operating Manual
Presence detector
PresenceLight 180A-KNX ..
PresenceLight 360A-KNX ..
PresenceLight 180B-KNX ..
PresenceLight 360B-KNX ..
Table of contents
1. Safety....................63
2. Function and performance . . . .63
3. Location..................65
4. Installation . . . . . . . . . . . . . . . .69
5. Start-up..................71
6. Alterable parameters via
remote control . . . . . . . . . . . . .73
7. Test-Mode . . . . . . . . . . . . . . . .75
8. Control commands . . . . . . . . . .79
9. Troubleshooting . . . . . . . . . . . .80
10. Technical data . . . . . . . . . . . . .82
11. Warranty declaration. . . . . . . . .86

63
GB
1. Safety
Familiarise yourself with the presence detecors PresenceLight 360 KNX and Pres-
enceLight 180 KNX before assembly and startup by reading this operating instruc-
tions.
!CAUTION!
The unit requires no maintenance. Opening the unit or inserting foreign bodies
into it will invalidate the warranty.
1.1 Designated use
The presence detector is intended for indoor installation.
The presence detector is solely intended for the purpose contractually specied
between the manufacturer and the user. Any other or extended use has to be
regarded as not complying with the designated use.The manufacturer is not liable
for any resulting damage.
2. Function and performance
The presence detectors PresenceLight 360 KNX and PresenceLight 180 KNX de-
tect persons within a room on account of slightest movements. Simultaneously,
their light sensor measures the brightness in the room and compares it to the
pre-set brightness threshold.
●Mixed light measurement
●Adjustable sensitivity

64
●Control of one or two lighting groups
●Switching or constant light control with stand-by function
●Fully or semi-automatic function mode
●Presence channel with switch-off delay and switch-on delay time
●Channel monitoring with manipulation protection
●Channel brightness (Lux)
●Parallel circuit operation of several detectors (Master-Slave, Master-Master)
●Short presence; Reduced switch-off delay time in case of a short presence
●Suitable for uorescent lamps, compact uorescent lamps, halogen, incandes-
cent lamps and LEDs.
●Management remote control SendoPro 868-A (optional)
●User remote control SendoClic (optional)
The presence detector PresenceLight 360x-KNX is intended for use in ofces,
schools and residential premises for comfortable and energy efcient control of
lighting, HVAC and shading.
●Detection range up to 49 m2moving and 20 m2seated persons at 3.0 m
installation height
PresenceLight 180x-KNX is the presence detector of choice for use in corridors,
transit zones and wet zones (IP 54).
●detection Range up to 25 m2seated persons rectangular 7 x 3,5 m, 100 m2
moving with 8 m radius at 2,2 m installation height

65
GB
2.1 Control type
Switching
The lighting switches on in case of presence and insufcient brightness, and off in
case of absence or sufcient brightness.
Constant Light Control
In Constant Light Control mode, the brightness is constantly maintained at th pre-
set value. It can be started fully automatically or manually using the push button
or remote control. Manually switching off, dimming or changing the settings stops
control mode for the duration of the presence.
2.2 Installation and service support
Helpful functions are available for start up and subsequent maintenance support.
●Changing parameters using the management remote control SendoPro 868-A
The presence detector can send conguration and diagnostic information to the
management remote control SendoPro 868-A via radio transmission (868MHz).

66
3. Location
3.1 Detection Range PresenceLight 360x-KNX
The ideal mounting height is 2,0–3,0 m. The sensitivity of the detector decreases
with increasing mounting height. In order to ensure proper detection of persons,
the PresenceLight 360x-KNX requires an unobstructed “view” of the persons. Of-
ce equipment, plants, suspended lamps etc. may affect the presence detection
(shading).
M’height Seated persons Walking persons
2,0 m 9 m23,0 m x 3,0 m 20 m24,5 m x 4,5 m ± 0,5 m
2,5 m 16 m24,0 m x 4,0 m 36 m26,0 m x 6,0 m ± 0,5 m
3,0 m 20 m24,5 m x 4,5 m 49 m27,0 m x 7,0 m ± 1,0 m
3,5 m --- --- 64 m28,0 m x 8,0 m ± 1,0 m
3.2 Detection Range PresenceLight 180x-KNX
The recommended mounting height is 2,2 m. Mounting the device in the height
of the switches is not recommended (possible obstacles in the detection range
and vandalism).
M’height Seated persons Walking persons
2,2 m 25 m27,0 m x 3,5 m 100 m2env. 8 m radial distance
Due to the horizontal orientation of the PresenceLight 180x-KNX, the detection
range is very large.The sensitivity decreases by increasing distance.

67
GB
PresenceLight 360x-KNX PresenceLight 180x-KNX
2
3
1
0
m0
23
112
33.5
0.8
3.5
Lux
3,5 3,5
32 1 12 30
3,5
32 1 12 30
o
o
2,2 m
12356 7 8
04
0
2
1
3
0
2
1
3
2
1
3
5
6
7
8
4
5
6
7
8
4
68
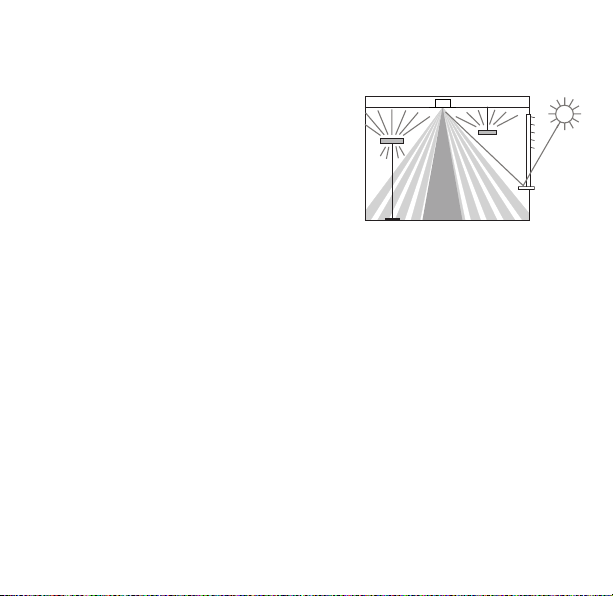
3.3 Light measurement
The detector measures articial and daylight that is reected directly below the
detector (aperture ± 30°).
The surface brightness below the installation
site is used as a lighting level reference.
Switching
With indirect lighting, the articial light at
the detector installation site must not exceed
2000 Lux (with brightness value >200 Lux ).
Constant light control
The detector must be positioned so that it only receives articial light that it con-
trols itself. Articial light controlled by other detectors or manually operated work
lights affect the brightness measurement of the detector. Direct articial light on
the detector should be avoided.
Correction factor
The room correction factor is dened as a proportion for the brightness measure-
ments differece on the ceiling and the surface below the installation site.

69
GB
4. Installation
4.1 General tting
Flush-mounting
The presence detector will be ush mounted into a concealed housing. The
enclosed set of seals is to be used for IP 54 installation.
Surface-mounting
A suitable frame for surface mounting is also available. If the surface-mounting
seal set is used for surface mounting, the detector will also comply with protec-
tion class IP 54.
4.2 Protection Class IP 40
Device types:
PresenceLight 180A-KNX ..
PresenceLight 360A-KNX ..
Flush-mounting IP 40
The presence detector will be ush
mounted into a concealed housing.

70
Surface-mounting IP 40
A suitable frame for surface mounting is also available. The surface-mounting
frame is prepared for cable feed-through with metric cable glands (M16 or M20).
4.3 Protection Class IP 54
Device types: PresenceLight 180B-KNX .. ,
PresenceLight 360B-KNX ..
Flush-mounting IP 54
To ensure compliance with Pro-
tection Class IP 54 when ush
mounted, the presence detec-
tor must be installed using the
enclosed IP 54 seal set for ush
mounting as shown in the gu-
re alongside. If the seal set is
not used, only Protection Class
IP 40 will be achieved.
Surface-mounting IP 54
Refere to the tting instruction PresenceLight surface-mounting frame.
IP 54 mounting with gasket set IP 54 only!

71
GB
5. Start-up
5.1 Settings
All settings are adjusted using ETS. See ‘KNX handbook PresenceLight 180 KNX /
PresenceLight 360 KNX’ document (application description).
The management remote control SendoPro 868-A is optionally available for sup-
port during the installation. The SendoPro 868-A can be used to adjust and op-
timise parameters. In this respect, the SendoPro 868-A helps with setting up. A
range of alterable parameters is available for adjustment with the SendoPro 868-A
(see chapter 6 page 73). By means of control commands, the behaviour during in-
stallation can be changed via the SendoPro 868-A (see chapter 8 page 79).
5.2 Correction factor
The presence detector›s brightness actual values is adjusted to the room proper-
ties with the room correction factor and thus, the area under the presence detector
can be compared to the measured lux meter value.
See KNX handbook, application description
5.3 Programming mode
The programming mode can be set using the program button on the back of the
presence detector or via the management remote control SendoPro 868-A without
dismantling the presence detector.
5.4 Set device to original condition
The presence detector is supplied with a factory setting. This factory setting can
be restored as desired.
72
Activation Description
Powerup Press and hold the program button while switching on the bus voltage.
5.5 Operation mode
The PresenceLight 180x-KNX and PresenceLightx-360 KNX have 3 operation modes:
●Normal ●Test presence (page 75) ●Test light (page 77)
5.6 Switch-on behaviour
After every time the bus voltage is switched or the parameters are downloaded by
ETS, the detector runs through its start-up phase (indicated by LED).
1. Start-up phase (30 seconds)
●LED blinks once per second
●Switching: outlet light receives an ON telegram irrespective of brightness
●Constant light control: control is inactive, lighting is maximum dimmed (Value
telegram 100 %).
●If there is no presence or sufcient brightness, an OFF telegram is sent after
30 sec. (Light off).
2. Operation mode normal
●The detector is ready for use (LED off)
3. Event of malfunction
●LED ashes rapidly
●Troubleshooting see page 80

73
GB
6. Alterable parameters via remote control
The following parameters can be adjusted and optimised via the management re-
mote control SendoPro 868-A for support during installation as well as servicing.
This adjustment of parameters does not change the settings
in ETS.
Parameter Chapter /
Page
Brightness level channel A light Level increase/decrease 6.2 / 74
Alternativ brightness level channel A light Level increase/decrease 6.3 / 74
6.1 Adjustment with the remote control
Parameters are sent to the presence detector via infrared with the SendoPro 868-
A. Changed parameters are immediately accepted and applied by the detector.
LED Description
Flickering during
3 sec
After pressing the send function on the management remote control, the pres-
ence detector displays correct receiving by ickering for 3 sec.
Lights up shortly The command/parameter sent from the management remote control via infrared
is rejected by the presence detector. The command is not valid. Check the
selected detector type and the sent parameters.

74
6.2 Brightness level channel A light
Brightness level dene the minimum brightness required. Current prevalent bright-
ness is measured below the presence detector. If the prevalent brightness is below
the setpoint value, the light will switch on as long as presence is detected (with
function mode fully-automatic).
Value range
The actual brightness level can be increase or decrease in 5 %-steps.The
actual brightness level setting can be read-out via KNX communication object.
Lux value
The current measured brightness level can be adopted by the SendoPro command
Teach-in.
5 %-steps
5–2000 Lux
If setting values for brightness <= 2.5 AND switch-off delay time light <= 2 min:
faster response to changes in actual brightness when in operating mode switching
of one lighting row.
6.3 Alternativ brightness level channel A light
The alternative brightness level value can be used to set a second different
brightness set point value. For example, a day and night mode with two different
brightness levels can be set up in combination with the brightness set point value
channel A light. The alternative brightness set point value is activated or changed
via a bus object.
Value range
The actual brightness level can be increase or decrease in 5 %-steps. The actual
brightness level setting can be read-out via KNX communication object. Lux value
The current measured brightness level can be adopted by the SendoPro command
Teach-in.
5 %-steps
5–2000 Lux

75
GB
If setting values for brightness <= 2.5 AND switch-off delay time light <= 2 min:
faster response to changes in actual brightness when in operating mode switching
of one lighting row.
7. Test-Mode
The PresenceLight has two test modes.
●Test presence, page 75
●Test lighting, page 77
The test mode can only be started with voltage.
7.1 Test presence
The test presence serves to test presence detection and parallel switching.
Activate -"Test presence on" with the management remote control SendoPro 868-A
-via bus object (33)
The test mode presence can always be activated.
Terminate With subsequent restart:
-Command "Test presence off" with the management remote control
SendoPro 868-A
-Loss of bus voltage
-Automatically according to the time set with the ETS
Without restart:
-Activation of test lighting with the management remote control SendoPro 868-A
LED display
channel status Description
On With movement (LED on) close channels A lighting and H presence.
76
LED display
channel status Description
Off With absence (LED off) open both channels after 15 sec.
Test response
-Deactivate brightness measurement, light output does not react to brightness
-Detector does not respond as in fully-automatic function mode, also if semi-
automatic is set.
-The control type changes to switching if the control type is set to constant
light control. The light is not controlled.
-Light «On» with movement; light «Off» with absence or no movement
-Channel A lighting and H presence have a xed switch-off delay time of 15 sec.
-Room monitoring responds normally as in normal mode.
-Switch-on delay time channel H and J presence is set xed to 0 sec.
Commands and adjustable parameters
During test mode the following commands are possible with the management
remote control SendoPro 868-A:
-Terminate test presence
-Activate test lighting
The presence detector resets after test mode has terminated.

77
GB
7.2 Test lighting
The test mode test light serves to monitor the brightness set point value (bright-
ness threshold).
Activate -Test lighting «On» with the management remote control SendoPro 868-A
-via bus object (34)
The test lighting can always be activated.
Terminate With subsequent restart:
-Test lighting «Off» with the management remote control SendoPro 868-A
-Loss of bus voltage
-Automatically according to the time set with the ETS
Without restart:
-Activation of test presence with management remote control SendoPro 868-A
LED display Description
Blinking, 3 sec On
0.3 sec Off
The LED blinks, as long as the test lighting is active.
Test response
The presence detector behaves 100% as in normal operation, only the reaction
to light/dark is faster. Thus the brightness threshold and the adaptive response
is tested.
All selected functions and parameters remain unchanged.
Commands and adjustable parameters
During test mode the following commands are possible with the management
78
remote control SendoPro 868-A:
-Terminate test lighting
-Change alternative brightness level A
-Change brightness set point channel A light
-Activate test presence
The presence detector resets after the test mode has terminated.
!Do not get the presence detector to switch by means of a ash light. The presence
detector will learn this and thus falsify the adaptive threshold settings and and
the hysteresis.
In order to simulate this response, it is ideal to light the area below the presence
detector or open the blinds. Reactivate test brightness for a new test.

79
GB
8. Control commands
The following control commands are available with the management remote
control SendoPro 868-A:
Programming mode Activating the programming mode
Teach-in channel A The actual measured brightness value is applied to the brightness
level channel A.
Transfer is made to current active brightness set point value. That is,
if the alternative brightness set point value is switched to, the current
measured brightness value [lux] is transferred to the alternative
brightness set point value via the teach-in command.
The value transfer is not carried out if the measured brightness value
is outside the value range of the brightness set point value (displayed
via LED).
Master/Slave? The operating mode master or slave can be determined using the
remote control. Is the request consistent with the setting in the
presence detector, does the detector conrm this with a icker for 3
s. Is the request not consistent, the LED lights up briey.
Switching light The switching output light can be switched on and off.
Select <On> or <Off> with the function keys.
Test presence See chapter 7.1 page 75
Test lighting See chapter 7.2 page 77
Restart The detector restarts. Setting values are retained.

80
9. Troubleshooting
Fault Cause
Light does not switch on and/or off
when presence and darkness
Lux value is set too low; detector set on semi-automatic;
light was switched off manually via push-buttonor or with
SendoClic; person not within detection range; obstruction(s)
interrupting detection; switch-off delay time set too short
Light stays on with presence even
though it is bright enough
Lux value is set too high; light was switched off manually via
push-button or with SendoClic (wait 30 min.); detector is in
testing mode
Light does not switch off and/or
light switches spontaneously on
when no one is present
Wait for the switch-off delay time (self-learning);
thermal interruption source in the detection range: Fan
heater, incandescent lamps / halogen spotlight, moving
objects (e.g. curtains hanging in an open window);
Start up does not run smoothly.
Malfunction blinking
(4x per second)
Malfunction during start-up phase or during operation; device
is not fully functional!
This manual suits for next models
3
Table of contents
Popular Security System manuals by other brands


Adp
Adp QuickPunch installation guide

Visonic
Visonic POWERMAX - user guide

Panasonic
Panasonic A02-ACAM3KIT quick start guide

IMAGE 4SECURITY
IMAGE 4SECURITY Guardsman installation instructions

AIRfire
AIRfire ARMANfire FK-5-1-12 Installation and Maintenance user Manual

Honeywell
Honeywell LYNX Touch Security System user guide


