Theiling E-Cone 1000 User manual

1
Operation manual
E-Cone 1000/2000/3000
Protein Skimmer for saltwater aquariums up to a volume of 2500l
Congratulations for your new E-Cone protein skimmer. It is a quality product and has been
specially designed for use in marine aquariums. It has been developed and tested by
specialists.

2
1. Delivery
The E-Cone protein skimmers are delivered ready to go, including the venturi pump. They
can be placed directly into the filter sump.
Features of the E-Cone:
-Due to their space saving construction with a small footprint, they fit into almost
every filter sump.
-A high foam production is ensured by the conical shaped reaction pipe.
-The powerful but energy saving and silent running needle wheel pumps combine high
air intake with low energy consumption.
-The E-Cone 3000 is supplied with a 24V DC pump. The fine tuning of the foam
production can be adjusted using the included pump controller. The speed of the
pump can be adjusted to the organic load of the aquarium to achieve a perfect
skimming.
2. Technical Date of the E-Cone skimmers:
The E-Cone are delivered in 3 sizes
The E-Cone 3000 DC is supplied with a 24V low voltage pump.
E-Cone 1000
DC
E-Cone 2000
E-Cone 3000
E-Cone 3000 DC
For aquaria up to
a volume of
1000l
2000l
2500l
2500l
Power
consumption
36 Watts max
29 Watts
45 Watts
34 Watts
voltage
24V =
230V~, 50 Hz
230V~, 50 Hz
24V=
Dimensions,
20x17x52,5cm
(L x W x H)
22,5x20x57,5cm
( L x W x H)
41 x 25 x 66 cm
( L x W x H)
41x25x66 cm
( L x W x H)
weight
kg
kg
kg
kg
3. Safety advice
The protein skimmer may only be used indoors. For all works at the aquarium or the protein
skimmer unplug it from the mains. The power cable of the pump or the plug may not be
replaced. If the cable is damaged, the pump may not be used.
4. Working principle
During protein skimming a large quantity of smallest air bubbled are blown into the reaction
pipe of the E-Cone skimmer. At the same time aquarium water is pumped through the
skimmer. Water inlet is in the middle of the pipe, the outlet at the bottom. Organic waste,
3
protein, fatty acids attach to the air bubbles and form dirty foam that rises up and is pushed
into the foam cup. In this way the load of the biofilter is reduced and the build-up of nitrate
and phosphate minimized.
The E-Cone is placed in the filter sump. The water level should not fall below 15 cm. The
pump of the E-Cone will take in water and air simultaneously and mix both. The purified
water is directed from the bottom through the outlet pipe back into the filter sump. A flow
regulator is placed at the top of the outlet pipe. It can be used to adjust the water level in
the reaction pipe and so the skimming capacity. The air rises in the reaction pipe and is
collected as foam and pushed into the foam cup.
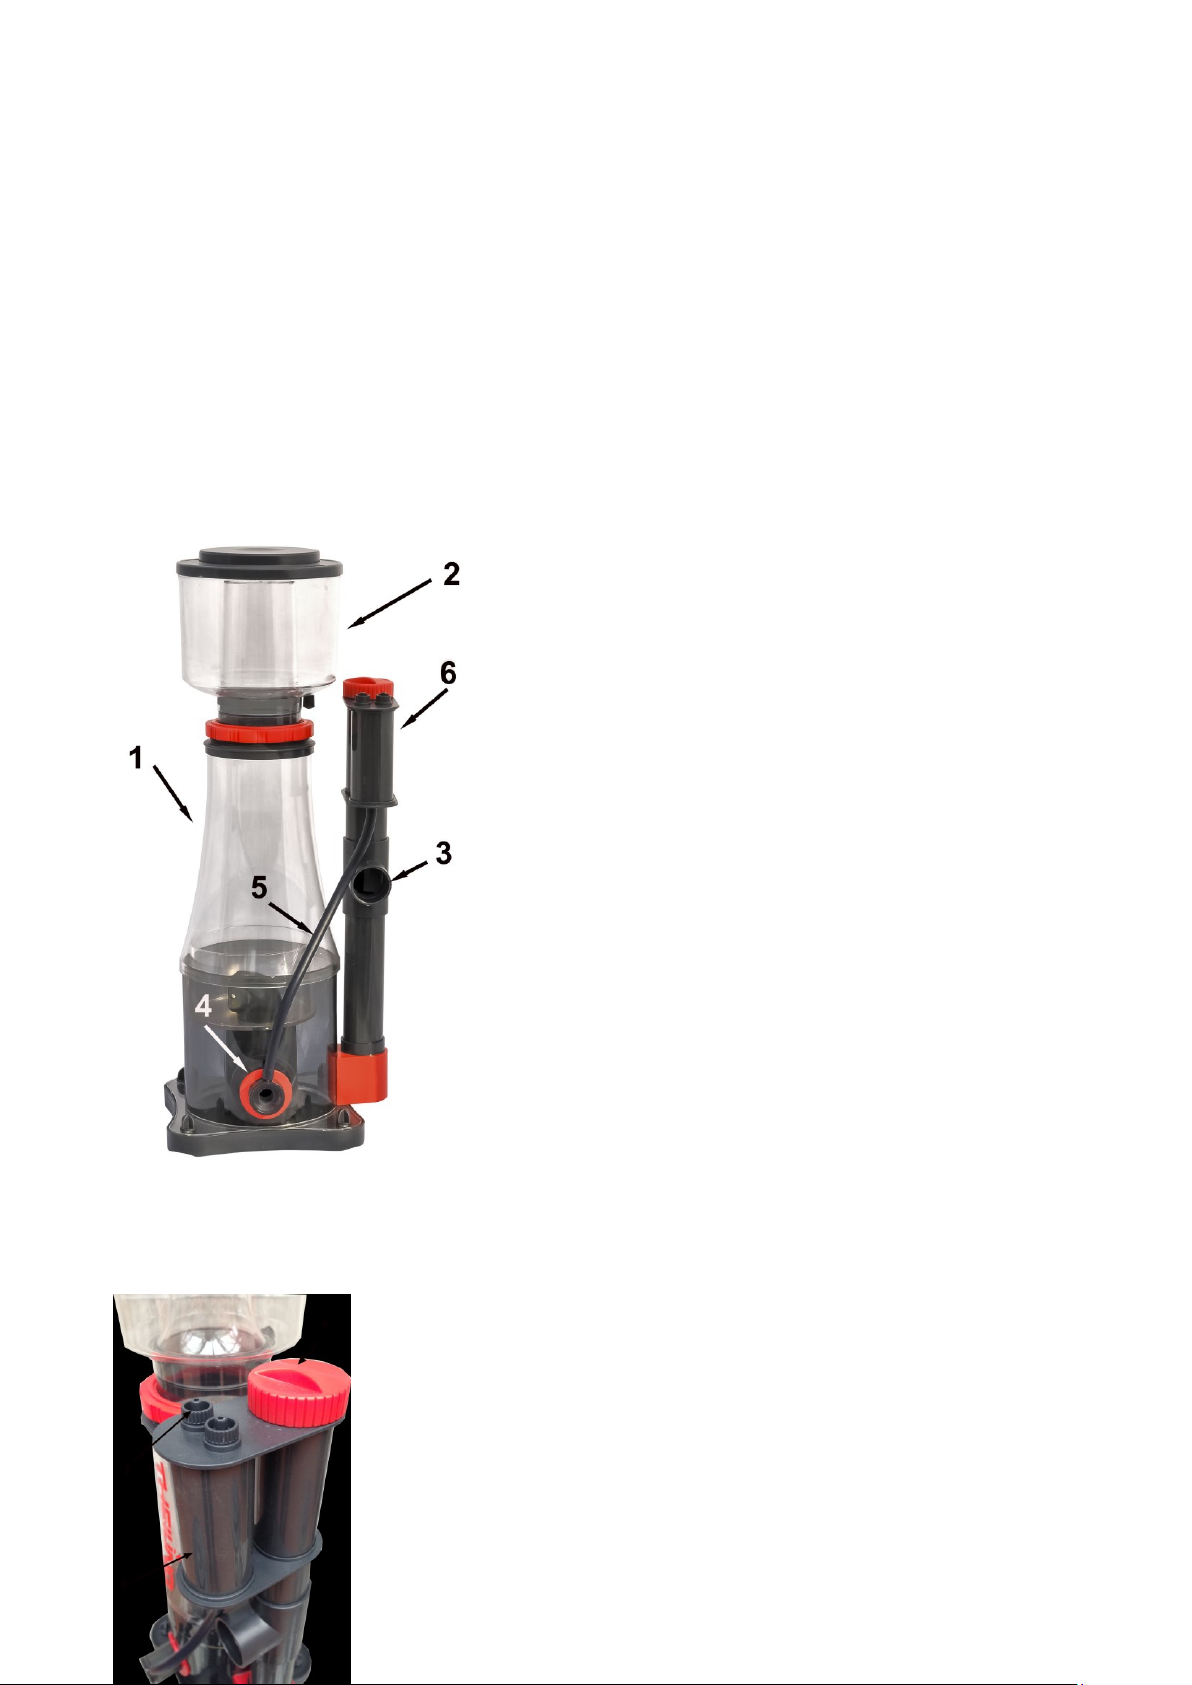
Fig1:
Construction of the E-Cone:
1. Conical shaped reaction pipe
2. Foam Cup with Lid
3. Water outlet
4. Water inlet, venturi pump and nozzle
5. Air tube
6. Silencer/air intake, regulation valve (red)
5. Starting
After placing the skimmer into the filter sump, it can be
started. After switching on the pump, it will start
automatically to blow air and pump water into the
skimmer. The air hose is mounted to the silencer to
minimize the noise. The air is cut into finest bubbles by
the rotation of the brush wheel. The construction of the
brush avoids bussing noise. After the first start it will take
a few hours before the first foam is produced. This is
caused by the reaction of the aquarium water with the
acrylic pipe. Latest the next day foam should be pushed
into the cup. The amount of foam produced depends on
the organic load of the aquarium water.
4
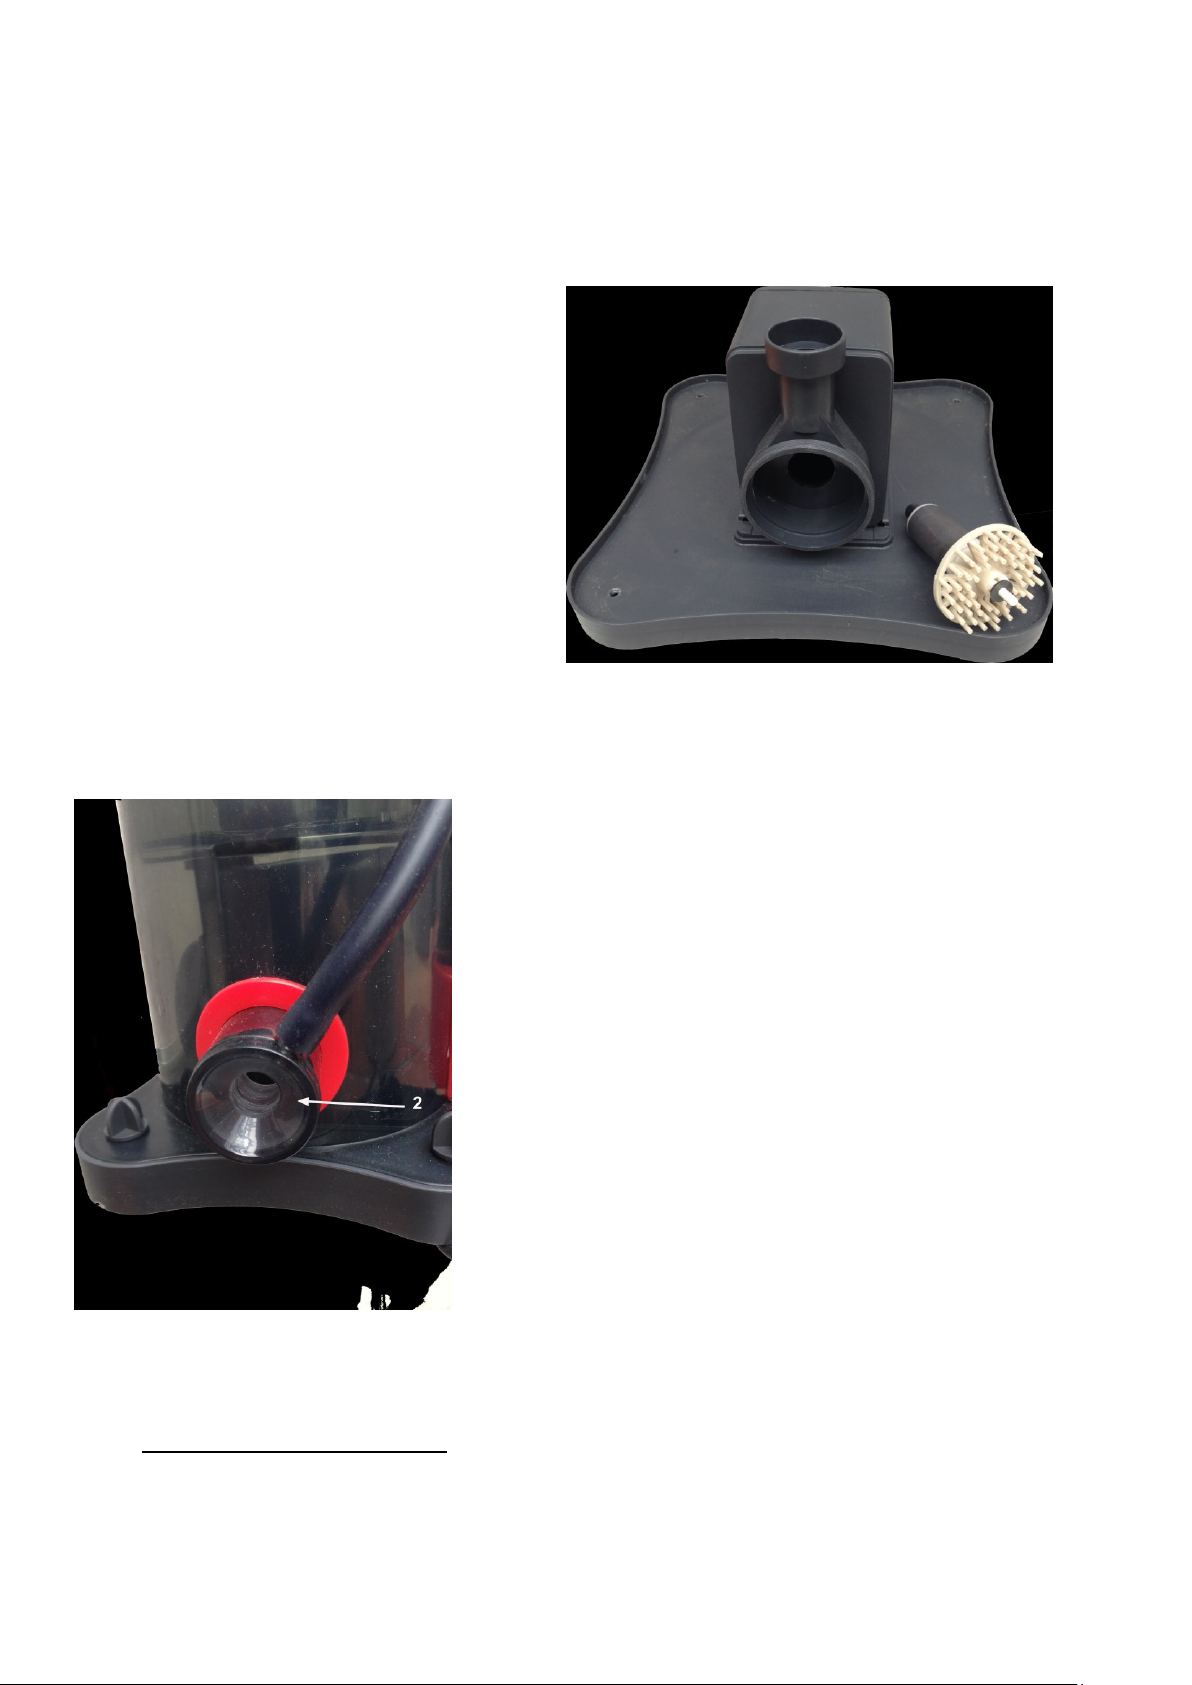
Fig 2:
1. Regulation valve for the water outlet
2. Air injection fitting
3. Silencer
Fig 3: E Cone
Pump with brush wheel
Fig 4:
1. Thumbscrew to disassemble the E-Cone.
2. Venturi nozzle
6. Failures
Adjustment: The skimmer can be adjusted with the
regulation valve at the water outlet (fig 2). The water level
in the reaction pipe is adjusted with this valve.
If there are problems with the skimmer, check first that the
venturi nozzle is tightly fixed to the pump.
Air bubbles in the water outlet:
If the skimmer is attached to an existing aquarium, it may be, that the water already
contains a high concentration of organics. This results in very tiny air bubbles in the

5
skimmer. These bubbles remove organics effectively; however they may enter into the
aquarium and disturb the animals. Latest after some days, the organic load should be
reduced, so the skimming is normalized and this effect disappears.
Wet foam:
If the saltwater is fresh prepared or if foam producing water conditioners have been added,
it may happen, that too much too wet foam is pushed into the foam cup.
Empty the foam cup frequently. After 24 hours the organic load should be reduced and the
foam production is normalized. If it is not normalized, open the regulation valve to reduce
the water level in the reaction pipe.
Dry foam, not enough air bubbles:
Low foam production is mostly caused by a dirty or even clogged brush wheel or clogged
injection nozzle (mainly the air intake). Clean both parts carefully.
7. Maintenance
The foam cup should be cleaned regularly, minimum once per week. The venturi pump and
the air injection nozzle should be cleaned when necessary, minimum twice per year to keep
the air intake high. To take out the pump, open the 4 thumbscrews at the bottom of the
skimmer. Now the skimmer can be taken from the bottom plate and you can work at the
pump.
8. Warranty
Should any defect in material or workmanship be found within 12 months of the date of
purchase.
Theiling GmbH undertakes to repair or, at our option, replace the defective part free of
charge –always provided the product has been installed correctly, is used for the purpose
that was
Intended by us, is used in accordance with the operating instructions and is returned to us
carriage
paid. The warranty term is not applicable on the all consumable products. Proof of Purchase
is required by presentation of an original invoice or receipt indicating the dealer’s name, the
model number and date of purchase, or a Guarantee Card if appropriate. This warranty may
not apply if any model or production number has been altered, deleted or removed,
unauthorized persons or organisations have executed repairs, modifications or alterations,
or damage is caused by accident, misuse or neglect. We regret we are unable to accept any
liability for any consequential loss. Please note that the product is not defective under the
terms of this warranty where the product, or any of its component parts, was not originally
designed and / or manufactured for the market in which it is used. These statements do not
affect your statutory rights as a customer. If your Theiling GmbH product does not appear to
be working correctly or appears to be defective, please contact your dealer in the first
instance. Before calling your dealer, please ensure you have read and understood the
operating instructions. If you have any questions your dealer cannot answer please contact

This manual suits for next models
2
Table of contents


