Figure F
SAFETY
WARNING: FOR YOUR PROTECTION, ALWAYS UNPLUG THE UNIT FROM THE
POWER SOURCE BEFORE INSTALLING OR SERVICING. SHOULD THE UNIT
APPEAR TO BE NOT WORKING, DO NOT ATTEMPT TO REACH, REMOVE, OR
DISASSEMBLE BEFORE DISCONNECTING IT FROM THE POWER SOURCE.
1. ALWAYS use a properly grounded AC outlet. Do not immerse the plug in water or
attempt to plug in a wet plug.
2. Provide a “drip loop” for the power cord. This is a loop in the cord below the level of the
receptacle or plug that prevents water from traveling along the cord in the direction of
the receptacle.
3. Be sure that a ground fault circuit interrupter (GFCI) is installed in the branch circuit
supplying the pond equipment.
4. NEVER remove the ground pin from the plug.
5. The PowerUV™ is not suitable for use in swimming pools, swimming ponds, or other
situations where humans may make bodily contact with the water. Although the
PowerUV™ is designed to be used outdoors it should never be submerged in water.
6. The power cable cannot be replaced. If the power cable becomes damaged, the
PowerUV™ should be discarded.
7. Avoid contact with the UV-C light. Light omitted can be harmful to the eyes and skin.
To avoid overheating do not run the bulb if the PowerUV™ does not have water moving
through it.
IMPORTANT: The Pond Guy®, Inc. is not responsible for losses, injury or death resulting
from a failure to follow these safety precautions, misuse or abuse of equipment.
TECHNICAL SPECS
MODEL POWER UV MAX FLOW RATE MAX POND SIZE
(GALLONS)
PLUMBING SIZE
(STEP DOWN BARB FITTING)
PowerUV™ 9 120V / 60 Hz 9 Watts 700 GPH 1,200 ¾”, 1”, 1¼”, 1½”
PowerUV™ 13 120V / 60 Hz 13 Watts 1000 GPH 2,200 ¾”, 1”, 1¼”, 1½”
PowerUV™ 18 120V / 60 Hz 18 Watts 2000 GPH 3,600 ¾”, 1”, 1¼”, 1½”
PowerUV™ 36 120V / 60 Hz 36 Watts 2400 GPH 4,800 ¾”, 1”, 1¼”, 1½”
PowerUV™ 55 120V / 60 Hz 55 Watts 3000 GPH 6,000 ¾”, 1”, 1¼”, 1½”
INSTALLATION
These PowerUV’s are designed to be run 24 hrs a
day. Operating these units any less may result in
poor water quality.
For best results the PowerUV™ should be placed before
the biological lter although not necessary. Water should
also be pre-ltered by either a sponge lter or skimmer
to minimize debris from coming in contact with the
UV-C bulb. The lter should be installed horizontally on a
solid surface and secured with four screws (not included)
through the securing plate connected to the unit. Plumb
water from the pump or lter directly to the PowerUV,
water will discharge out the opposite end. There is no
standard inlet or outlet; you are free to choose the most
convenient option for your particular plumbing setup.
Connect UV cord to transformer by inserting plug into
transformer and tightening compression nut. Plug
transformer cord into outlet. Indicator light will glow on
end of UV unit while unit is functioning.
MAINTENANCE
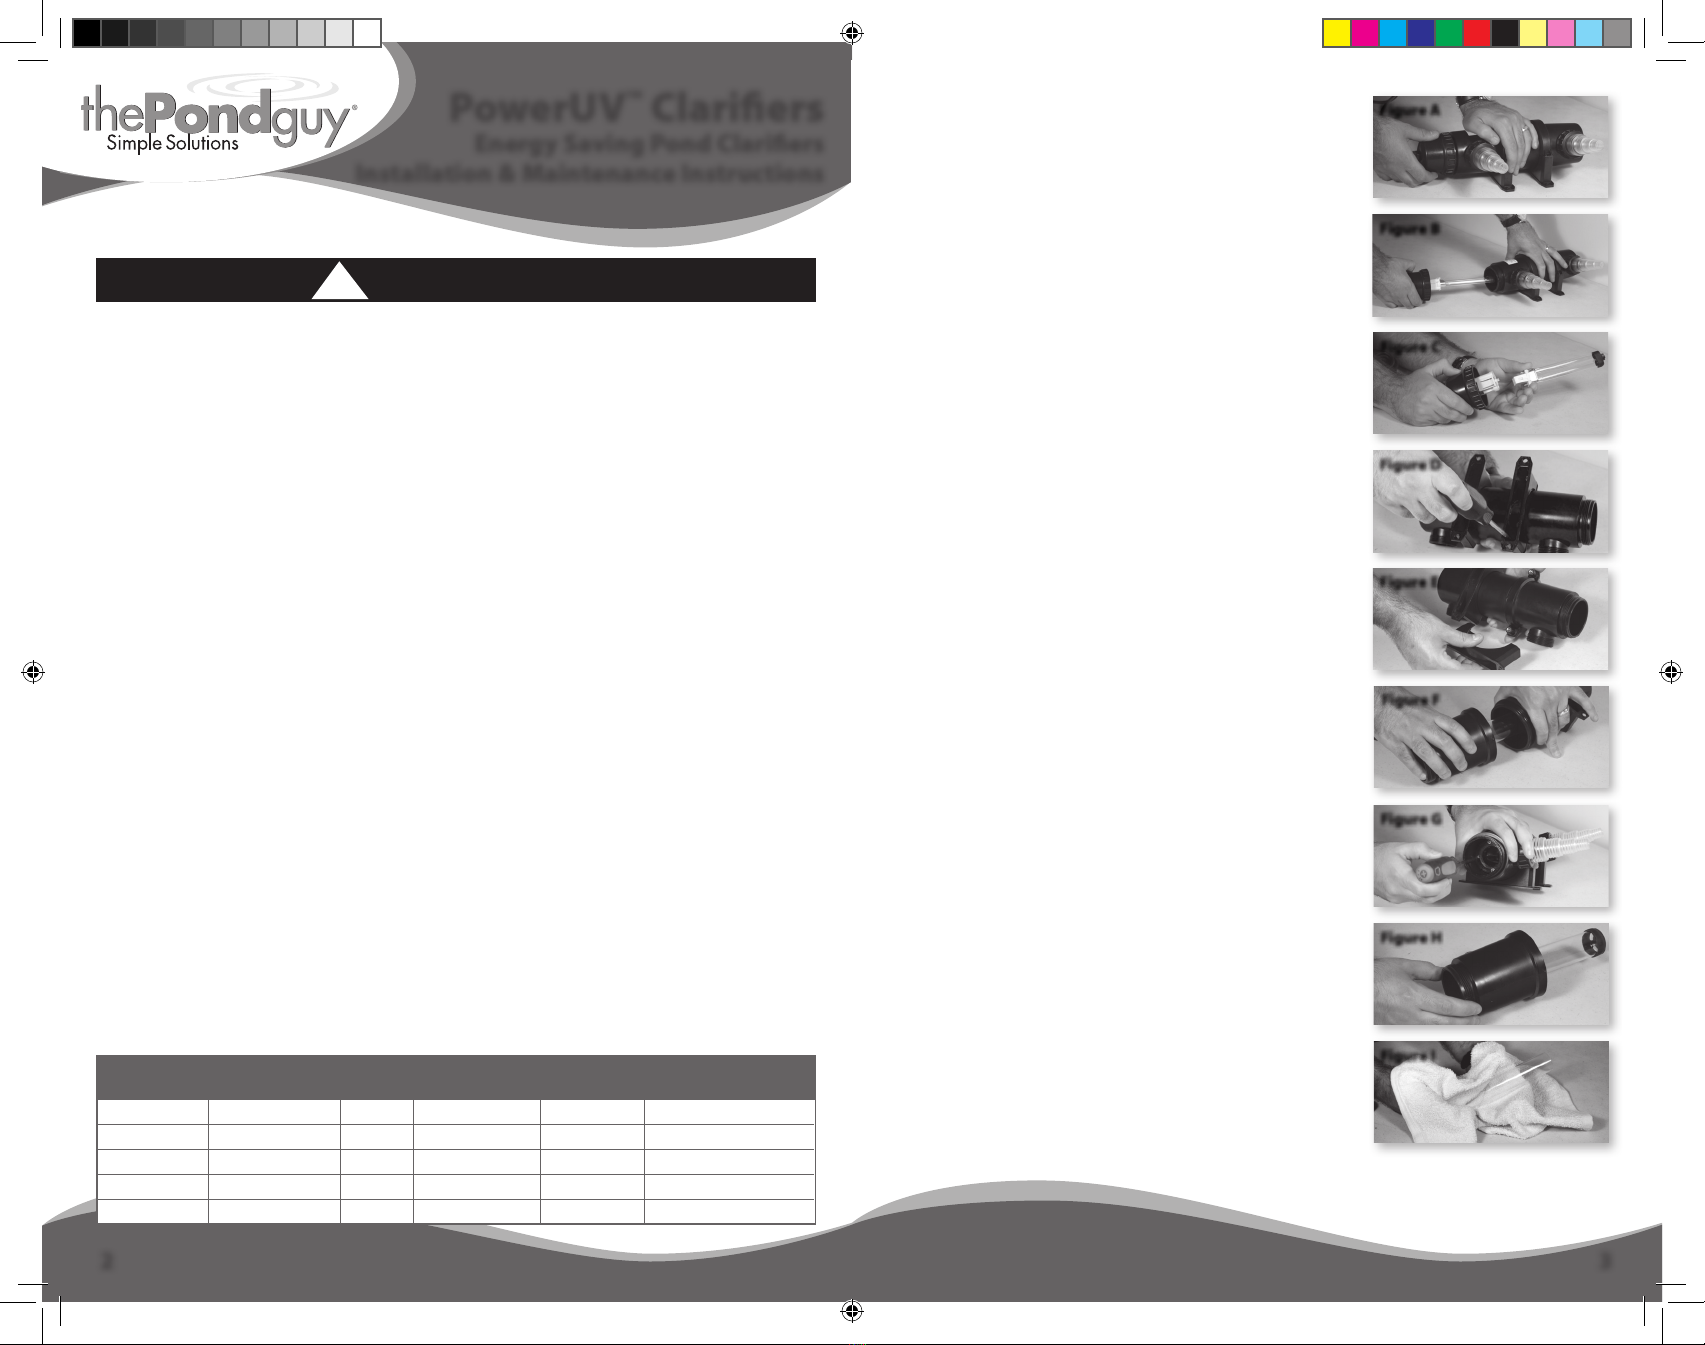
Replacing the UV bulb:
Figure A & B: To replace the UV-C bulb, unscrew the cap
counter-clockwise and gently pull the unit apart.
Figure C: You can then remove the UV-C bulb. Be careful
NOT to touch the bulb with bare hands. Grab from the
bottom base and gently pull to remove the UV-C bulb.
Install new bulb and reassemble.
Cleaning the Glass Tube (Quartz Sleeve):
Figure A & B: To clean the glass tube, unscrew the cap
counter-clockwise and gently pull the unit apart.
Figure D & E: Remove the clamp closest to the cap.
Figure F & G: Gently grab both sides of the UV and twist
to unscrew the top half of the UV from the other half. This
will expose the glass tube. Clean the glass tube with a soft
cloth or sponge. Most cleaning can be done at this point.
However, if needed, the entire tube can be removed by
unscrewing from within the UV unit (Figure H & I).
Once complete, carefully reassemble the unit and
ensure a watertight seal is made.
32
PowerUV™ Clariers
Energy Saving Pond Clariers
Installation & Maintenance Instructions
Figure A
Figure E
Figure B
Figure H
Figure D
Figure I
Figure G
Figure C
WARNING
!
WARNING: To avoid possible electric
shock, special care should be taken since
water is employed in the use of this
qeuiptment. For each of the following
situations, do not attempt repairs
yourself; return the appliance to an
authorized service facility for service or
discard the appliance.
• If the appliance falls into the water,
DO NOT reach for it! First unplug it and
then retrieve it. If electrical components
of the appliance get wet, unplug the
appliance immediately. Never submerge
the unit in water.
• Always unplug an appliance from an
outlet when not in use, before putting
on or taking o parts, and before
cleaning. Grasp the plug and pull to
disconnectl never yank the plug.
• Do not use an appliance for other than
intended use. The use of attachments
not recommended or sold the appliance
by the manufacturer may cause an
unsafe condition.
• Always unplug the unit if there is no
water running through it to prevent
overheaating.
manual_pu_series 2 10/28/10 10:09 AM


