Therm-App Hz User manual

Updated to Version 2.5.0 January 2017
Therm-App® Hz–High Resolution
Mobile Thermal Imaging Device
Operation Manual
Copyright © 2016 Therm-App®All rights reserved
Therm-App®Operation Manual
Document: D03101_05 Page 2of 19
Visit the Therm-App®website: www.therm-app.com
Table of Contents
Safety and Caution Notes ...........................................................................3
Product Description ...................................................................................5
Quick Start Guide ......................................................................................6
Android Device Minimum Requirements ......................................................7
Contents of Therm-App® Hz Box..................................................................7
Installation................................................................................................7
Set Up ......................................................................................................8
Application Operation................................................................................9
Settings .................................................................................................. 11
Specifications.......................................................................................... 17
Troubleshooting ...................................................................................... 18

Therm-App®Operation Manual
Document: D03101_05 Page 3of 19
Safety and Caution Notes
Read this document in full, as well as the warranty document provided with the product.
Attach the Therm-App®Hz device to your Android device with care.
Tighten the sizing knob until the Therm-App®Hz device is securely
attached to your Android device. Do not use tools, as applying too
much pressure might mark or damage the device.
To obtain accurate temperature measurements, wait a minimum of
three minutes after start-up to enable stabilization of the detector.
The Therm-App®Hz device uses specific factory-prepared
calibration data. If degraded performance is noted after a prolonged
field use, it can be sent to the Therm-App®lab for recalibration.
Please contact our support team at support@therm-app.com for
further instructions.
Use only the USB OTG cables provided with the Therm-App® Hz,
as using other types of cables could damage the Therm-App® Hz
device.
Power the Therm-App®Hz device 5V DC using the micro USB
connector by connecting it to a smartphone or other USB host
connectors only. Using any other type of power source may
damage the Therm-App®Hz device.
To avoid breakage, do not drop the Therm-App®Hz device or apply
pressure on the IR lens. If the IR lens breaks, do not touch the
broken pieces as it may cause injury.
Do not point the infrared detector (with or without the lens and lens
cover) at intensive energy sources (e.g. the sun, laser radiation or
open flames). This could damage the detector.
Do not use the Therm-App®Hz device in temperatures higher than
+50 degrees Celsius (+122 degrees Fahrenheit). High temperatures
can cause damage to the detector.
The Therm-App®Hz device is not water resistant sealed. As such,
do not expose the Therm-App®Hz device to water, rain, or dust.
Do not apply solvents or similar liquids to the detector or the lens.
The lens has a delicate anti-reflective coating. Clean the lens using
only a soft cloth applying very light pressure.
Do not use pressurized air to remove dust from the Therm-App®Hz
device. Pressurized air contains oil mist intended to lubricate
pneumatic tools, which could damage the detector and lens.
Therm-App®Hz is a Class B digital product. This product has been tested and
found to comply with the limits for a Class B digital product, pursuant to Part 15
of the U.S. FCC Rules.

Therm-App®Operation Manual
Document: D03101_05 Page 4of 19
When changing lenses, the IR detector is exposed. Avoid all
contact with the detector. Do not touch, clean or blow on the
detector. Replacement of the lens must be done in a clean, dry
area. Do not leave the IR detector exposed longer than necessary
when replacing the lens.
A tamper-evident label is attached to one of the screws on the back
of the Therm-App®Hz device. Removing this label or the S/N label
will void the warranty.
As with most electronic products, the Therm-App®Hz device must
be disposed of in an environmentally friendly manner and in
accordance with existing regulations for electronic waste. Please
contact our support team at support@therm-app.com for more
details.
For the most recent Therm-App®Hz device manuals, product
notifications, compatibility updates, FAQ’s and much more, please
visit our website at http://www.therm-app.com.
Therm-App®Operation Manual
Document: D03101_05 Page 5of 19
Product Description
Therm-App®Hz extends human vision by turning an Android device into a thermal camera. This
lightweight, modular, high resolution device attaches onto your Android device allowing you to
display, record, and share thermal images for Night Vision and Thermography applications.
Therm-App®Hz combines the power of a fully functional thermal camera with the mobility,
connectivity, processing power, display capabilities and advanced features provided by Android
devices today.
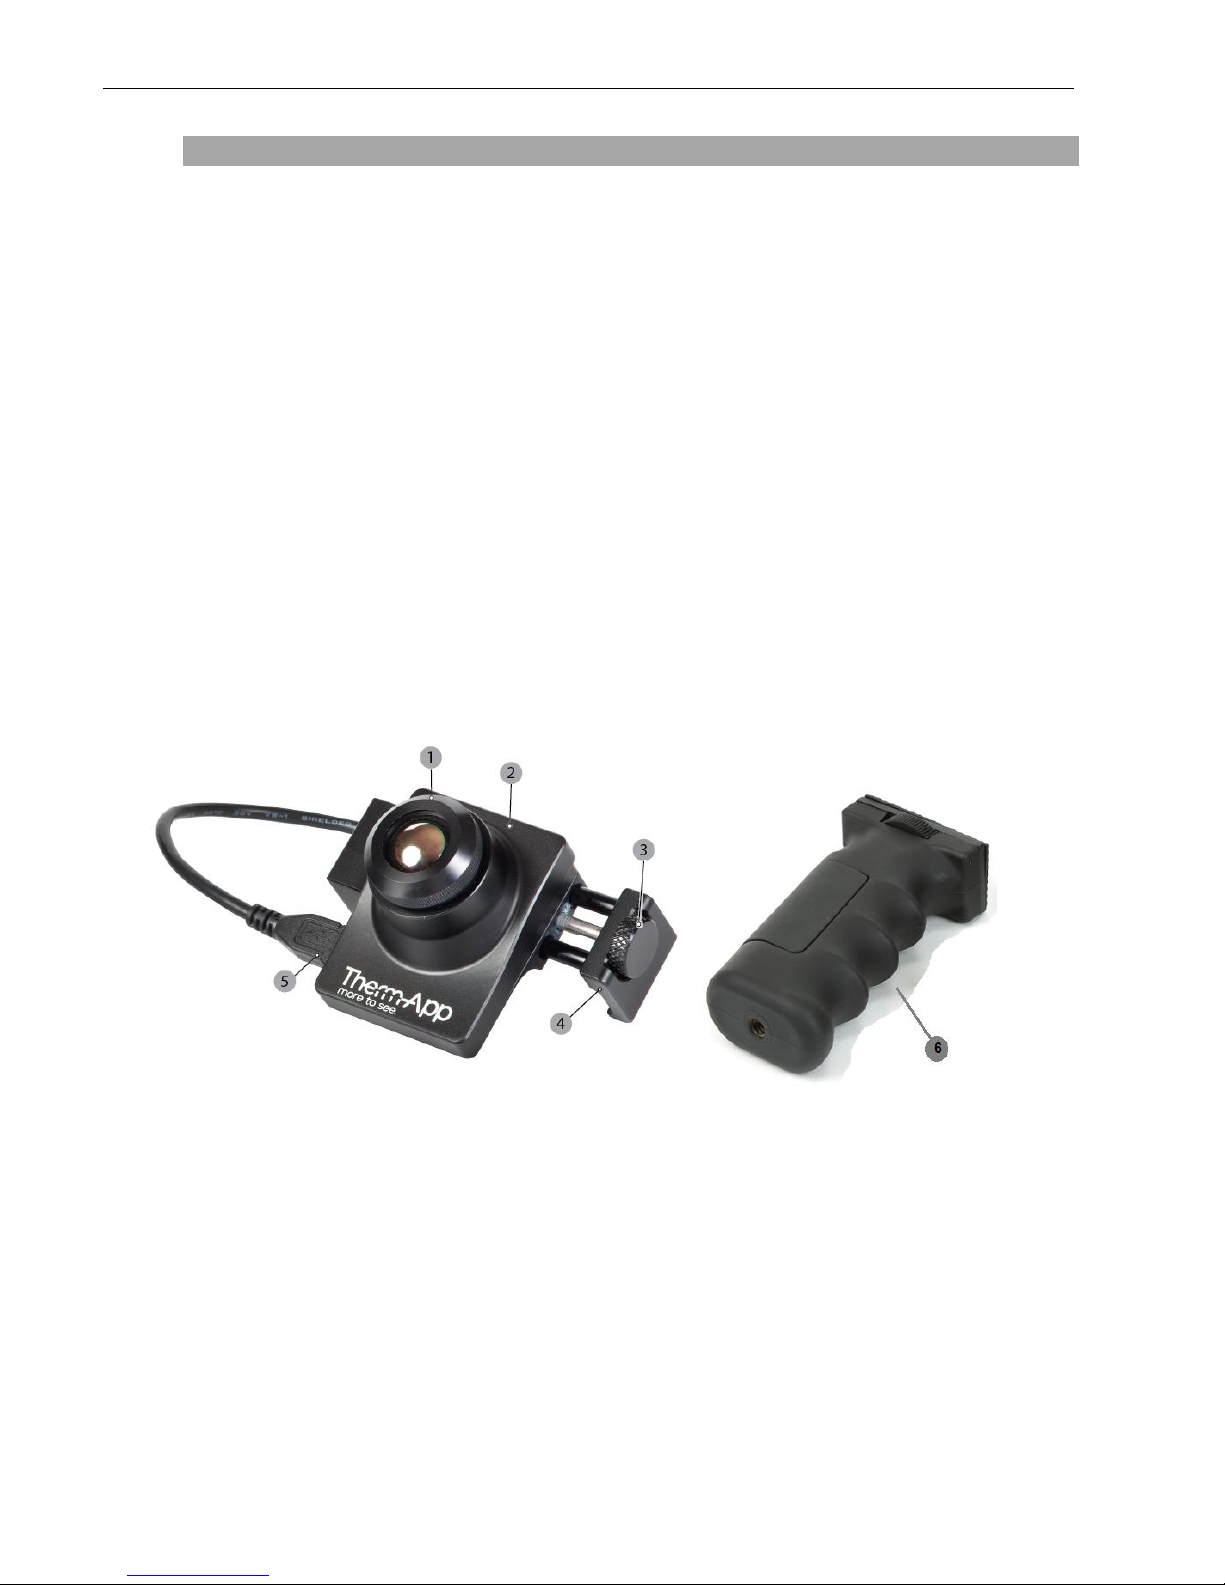
The Therm-App®Hz device is comprised of:
Thermal lens [1]
Therm-App®Hz device housing [2]
Sizing knob [3] –adjusts to fit Android devices.
Attachment bracket [4] –connects the Therm-App®Hz device with the Android device.
USB-OTG port [5] –for communication with the Android device.
Ergonomic gripping handle [6]

Therm-App®Operation Manual
Document: D03101_05 Page 6of 19
Quick Start Guide
Before using Therm-App® Hz, make sure Android device is compatible with Quick Start Guide.
Quick Start Guide
1. Verify that you have a stable internet
connection before installing the Therm-App®
application on your Android device.
2. Download the free Therm-App®
application online from Google Play or
scan the QR code.
3. Insert the Android device (3) into the
Therm-App®Hz attachment bracket (2)
and carefully fasten the sizing knob (1).
4. Connect the Android device [1] to the
Therm-App®Hz device [2] using the USB-
OTG cable supplied.
5. The Therm-App®application should start
automatically.
6. After approving the Terms of Use, the
application will begin downloading
calibration files from the Therm-App®
server. This is required for first-time use
only.
7. Wait until the download and initialization
process is completed (the process can
take a few minutes, depending on your
internet connection).
8. You are now ready to start using your
Therm-App®Hz device.

Therm-App®Operation Manual
Document: D03101_05 Page 7of 19
Android Device Minimum Requirements
1. Therm-App®was designed to work with Android OS ver. 4.1 and above. Due to variations in
operating systems, compatibility issues may occur.
2. Your Android device must support USB OTG (On-The-Go, also known as USB host mode).
3. Therm-App®requires the use of a USB-OTG cable (male to male, micro USB).
*Please note: Most off-the-shelf cables are not USB-OTG and will not operate with the Therm-App®Hz
device. Use only the USB-OTG cables that are provided with the product.
For a full updated list of Android devices that support Therm-App® Hz, click here.
Contents of Therm-App®HzBox
Therm-App®Hz comes with:
19mm lens
Ergonomic gripping handle
15cm right angle USB-OTG cable
15cm left angle USB-OTG cable
21cm straight USB-OTG cable
Quick start guide
Installation
Installing the Application
1. Make sure the Android device operating
system (OS) is either version 4.1 or above,
supporting USB On-The-Go (OTG).
2. Visit Google Play online and download the free
Therm-App®application, or scan the QR code.

Therm-App®Operation Manual
Document: D03101_05 Page 8of 19
Set Up
Connecting Therm-App®Hz to the Android Device
A. Turn the sizing knob [1] opening the
clamps just enough so that the
Android device [3] slides into the
attachment bracket [2].
B. Attach Therm-App®Hz to the back of
the mobile device by turning the sizing
knob.
C. Tighten the sizing knob [1] and the
bracket [2] to fit the Android device.
Ensure that the device is firmly
attached.
Note: Do not fasten the sizing knob too tightly
as it could damage the Android device.
D. Connect the USB-OTG cable to both
Therm-App®Hz [2] and mobile device [1].
Note: Use only the USB-OTG cable supplied.
In most cases, the micro USB cables
supplied with mobile phones do not support
USB-OTG functionality.
Note: Verify that the USB-OTG cable is
properly connected to the Therm-App®Hz
and the mobile device.
Note: For the first use of the Therm-App®
Hz device with an Android device, an
initialization process must be completed.
This process may take a few minutes and
must not be interrupted. Make sure you
have a stable internet connection prior to
connecting your mobile device to the
Therm-App®Hz device.

Therm-App®Operation Manual
Document: D03101_05 Page 9of 19
Application Operation
Initialization
When first connecting Therm-App®Hz to the Android
device, proceed as follows:
1. Select Use by default for this USB device check
box and tap OK. The Therm-App®application will
automatically start and display the Terms and
conditions screen.
2. Review and accept the Terms and conditions.
The application will download the calibration files
(a download progress bar will appear on the screen).
3. When download is completed, the application will
display the image screen in Night Vision mode.
While operating Therm-App® Hz, you can change
modes between Night Vision and Thermography
(see page 12).
Selecting Night Vision / Thermography
Color Palettes
On each imaging mode, the Therm-App®Hz device
image can be displayed using one of several palettes.
To change the selected palette, swipe your finger
across the image on the main screen:
Available palettes:
White Hot
(Available using Thermography and Night Vision)
Black Hot
(Available using Night Vision)
Spotter: Black, White, Red
(Available using Night Vision)
Rainbow: Blue, Green, Yellow, Red
(Available using Thermography and Night Vision)
Iron: Purple, Yellow
(Available using Thermography and Night Vision)
Vivid: Purple, Aqua, Pink, Yellow
(Available using Thermography and Night Vision)
PSY: Purple, Blue, Green, Yellow, Red
(Available using Thermography and Night Vision)
Lava: Black, Blue, Red, Yellow
(Available using Thermography and Night Vision)
Green Light: Black, Dark Green, Bright Light Green
(Available using Thermography and Night Vision)
Therm-App®Operation Manual
Document: D03101_05 Page 10 of 19
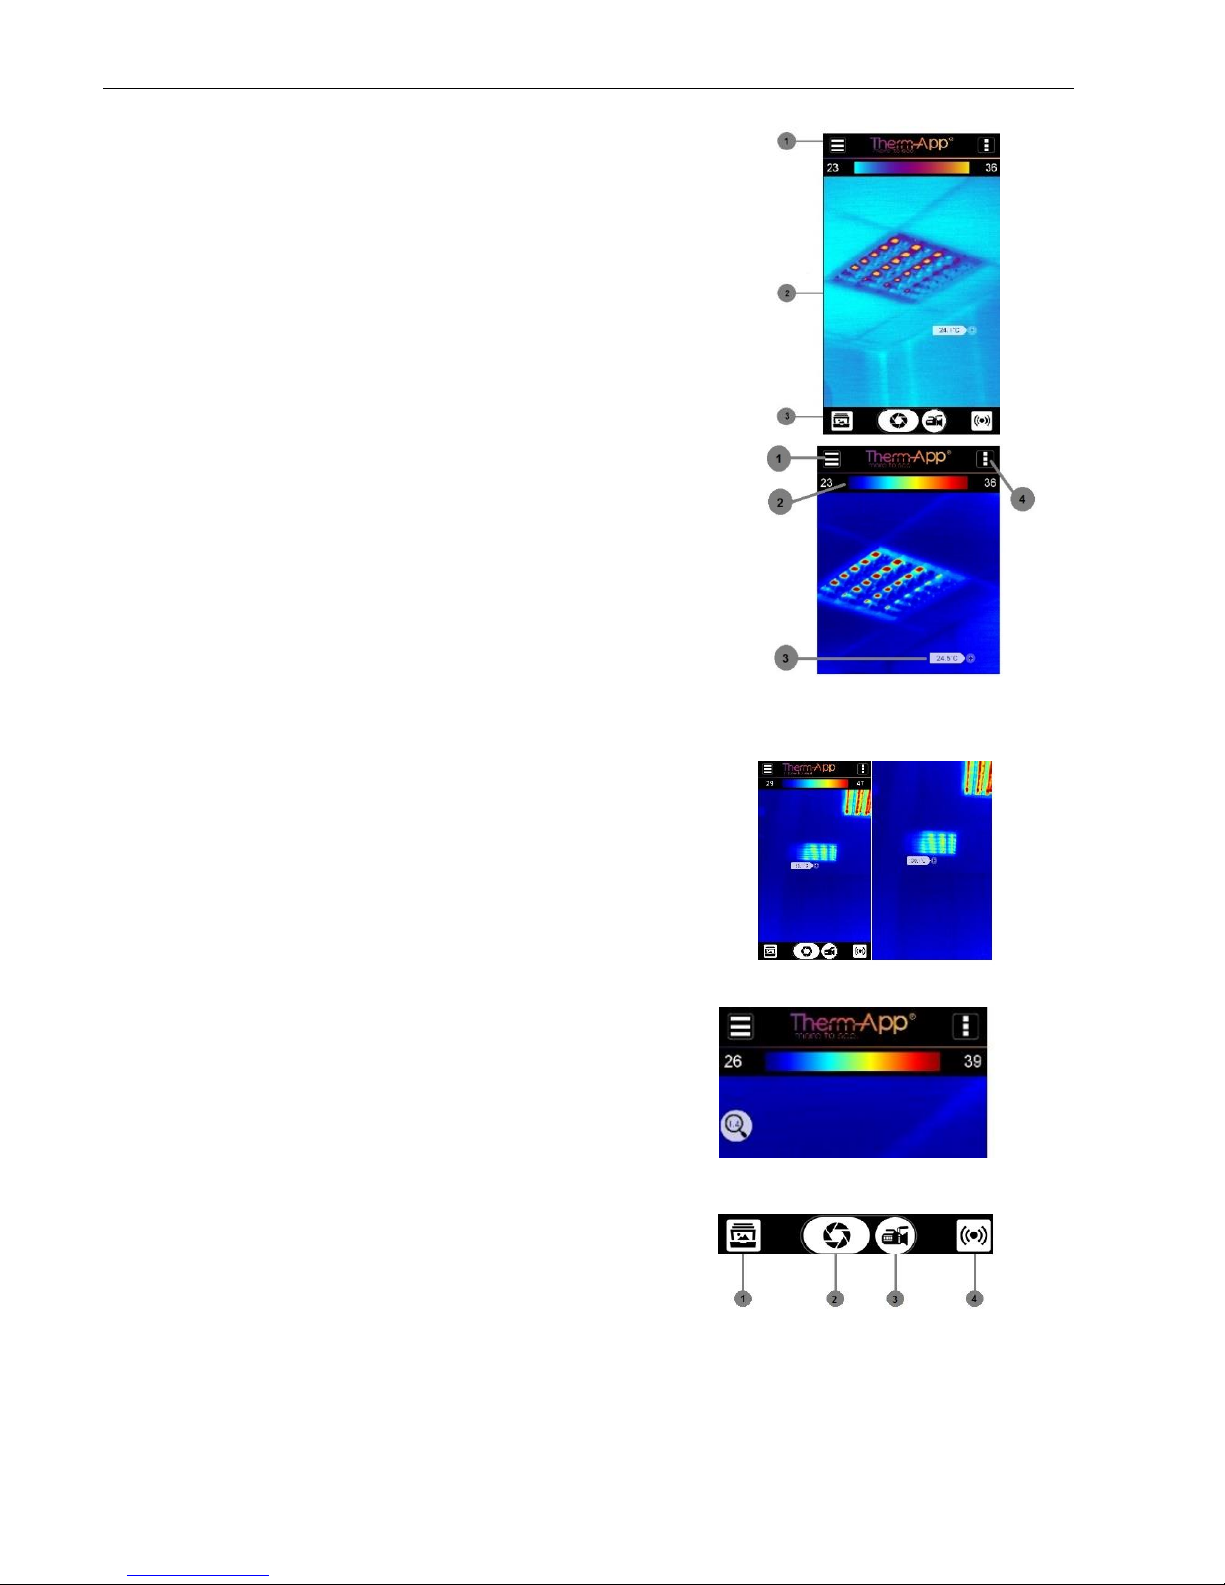
App Screen layout
Upper toolbar [1]
Image display [2]
Lower toolbar [3]
Upper Toolbar
Settings button [1] –For configuring
Therm-App®Hz settings (for a detailed
settings explanation, see page 12).
Temperature bar (Thermography mode)
[2] –Presents the range of temperatures
currently being viewed. The minimum and
maximum temperatures are displayed on
both sides of the bar.
Temperature reading (Thermography
mode) [3] –Displays the temperature at the
selected point on the screen (marked by a
little box).
Quick Settings Menu [4] –Allows selection
of mode, emissivity, temperature alerts, and
palette (for details see page 11).
Image Display
Full Screen Mode
By tapping the screen twice quickly, you can switch
between standard and full screen modes:
Digital Zoom & Pan
By making a pinching motion on the screen, the image
will zoom in or out. In zoom mode, a magnifying glass
with the zoom level appears on the top left corner of
the thermal image. While zooming, the image can be
panned up, down, left, or right.
Lower Toolbar
Gallery [1] –Displays pictures stored on the Android
device using the default album application.
Snapshot [2] –Takes a snapshot of the image
displayed on the screen.
Video Recording [3] –Records a video stream of
the image displayed on the screen.
Live Video Streaming [4] –Stream the video of the
image displayed on the screen (for detailed
streaming instructions, see page 15).
Therm-App®Operation Manual
Document: D03101_05 Page 11 of 19
Settings
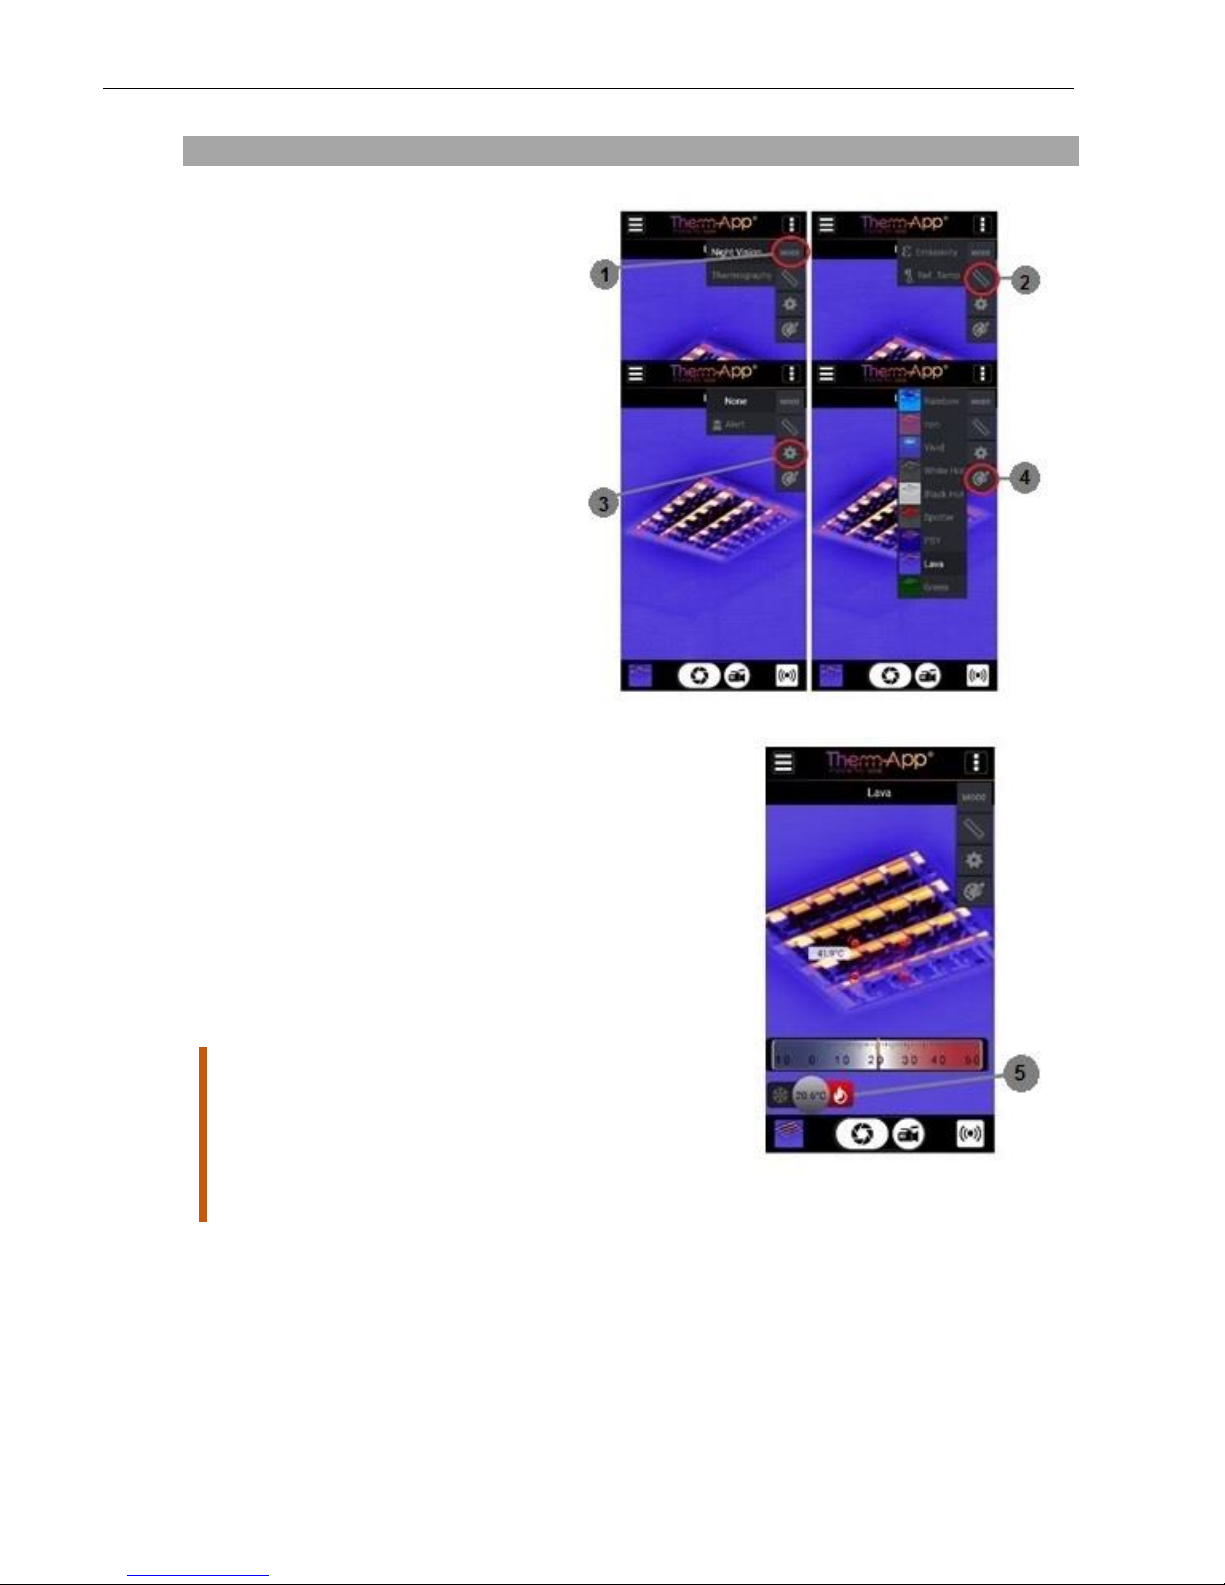
Inside the Quick Menu
This menu allows you to quickly select:
[1] Imaging Mode
(Thermography or Night Vision).
[2] Emissivity and Reflected Temperatures
(see thermography settings on page 13).
[3] Turn on Temperature alerts (See # 5).
[4] Palette
[5] Configure Temperature Alerts: After you
have turned on temperature alerts [3] you can
set the Therm-App®Hz to flash a red alert when
it finds something below a certain temperature
(snowflake icon) or above a certain
temperature, (fire icon). The box flashes red
once a subject inside it crosses the preset
temperature. In the image, the temperature
alert has been set to go off for anything above
20.6°C, and the box is red because the
subject/area inside the box is 41.9°C.
Note: Temperature measurements stabilize about 3
minutes after activating the Therm-App®
Hz
device.
Thermography measurement might be influenced
by the environment of the measured objects, the
reflected temperature of the surrounding objects,
and/or the emissivity of the measured object.

Therm-App®Operation Manual
Document: D03101_05 Page 12 of 19
Main Therm-App®Hz Settings Menu
Tap the Settings button located on the upper
toolbar. The settings screen includes:
Imaging Mode –Switches between "Night
Vision" and "Thermography" modes.
Thermography Settings –Enables
selection of temperature units, emissivity,
reflected temperature, and camera output
options (available only when in
"Thermography mode").
General Settings –See page 16 for full
menu description.
Export/Save Option –Select how photos
and videos will be saved. (See page 16 for
full walkthrough).
Maintenance –Performs bad pixel repair
and resets all parameters to default.
Help –Link to User Manual, Therm-App®
Support, and Terms of Use.
About –General application and device
version information.
Main Menu Options In Detail
Imaging Mode
Night Vision –This mode maximizes the
difference between hot objects and their
surrounding and is used for night-time detection
of various targets.
Thermography –Image pixels are colored in
relation to their temperature. On the default
rainbow palette, blue indicates the coldest
measured temperature and red represents the
hottest temperature measured. This mode is
used for searching for temperature differences
on the scanned scene.
Therm-App®Operation Manual
Document: D03101_05 Page 13 of 19
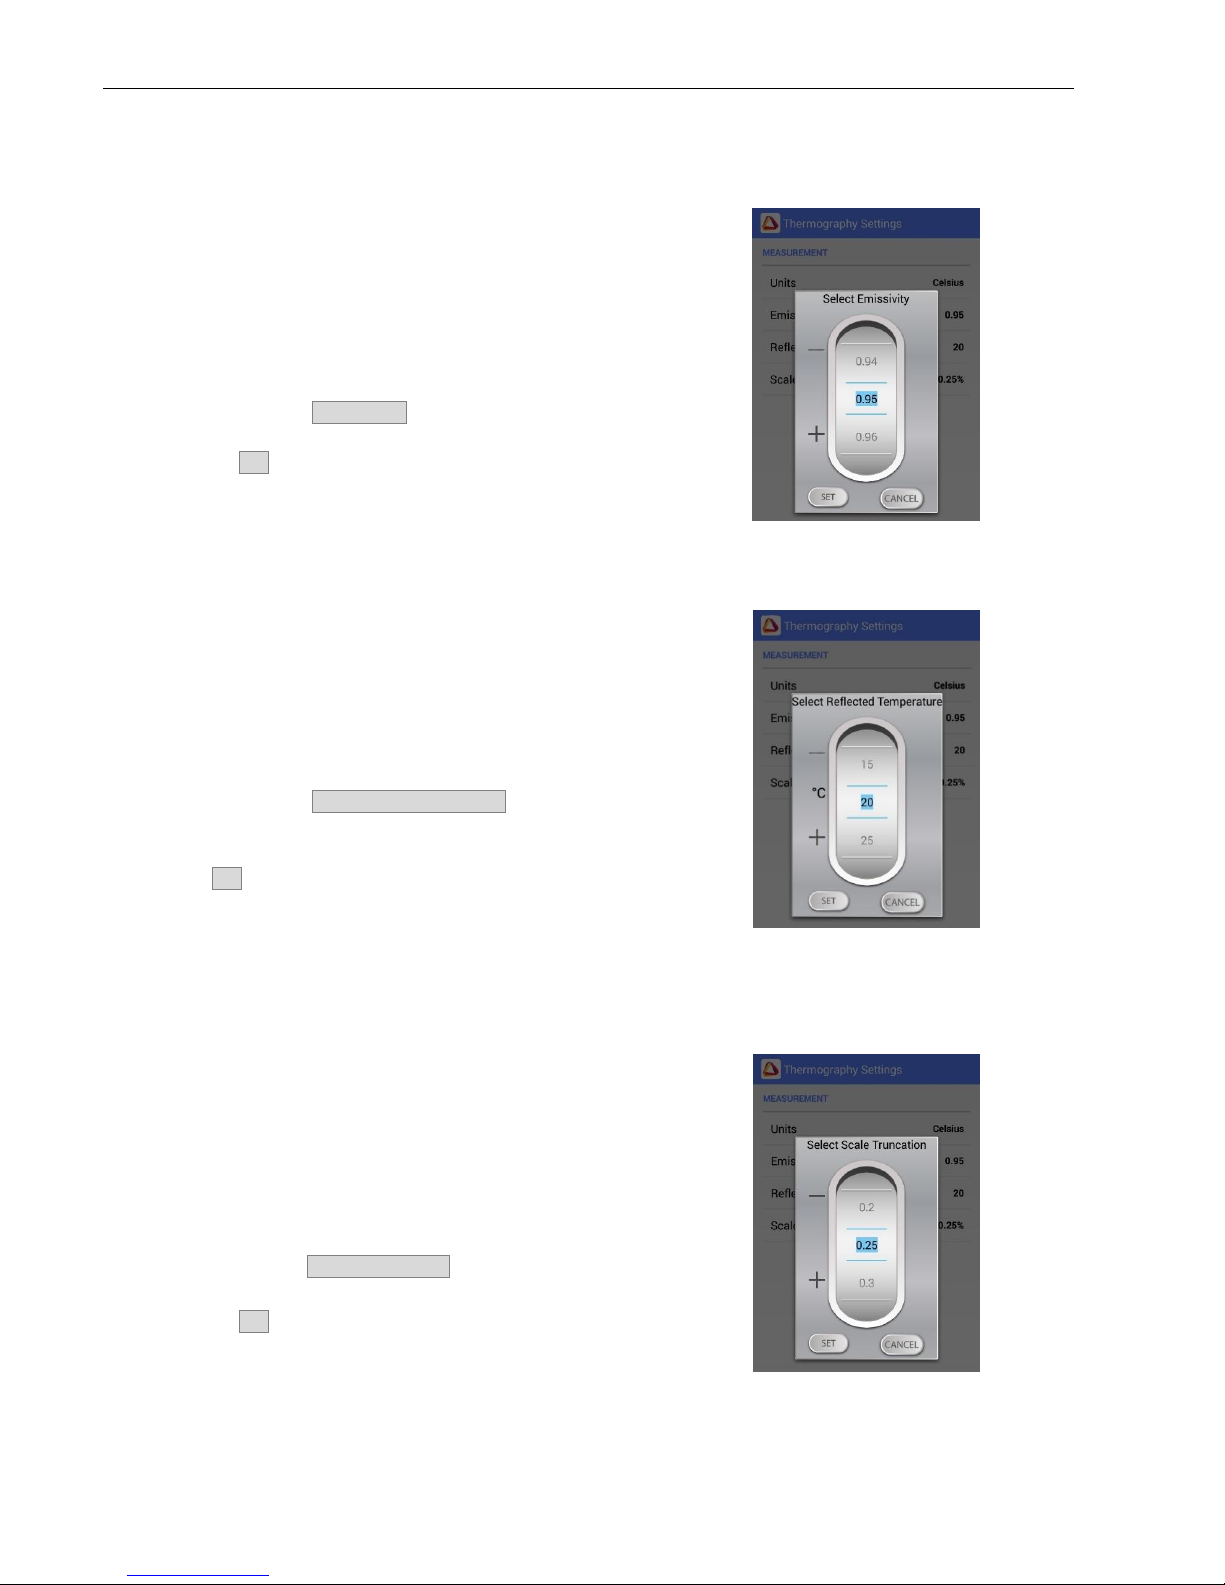
Thermography Settings
Adjusting Emissivity –Emissivity is the ability of
the surface of a material to emit energy as thermal
radiation. The emissivity value (0 –1) represents
the ratio of energy radiated by the observed
material to the energy radiated by a black body at
the same temperature.
To adjust the emissivity ratio:
–Tap the Emissivity option on the screen.
–Scroll to the correct emissivity ratio and tap the
Set button.
Adjusting the Reflected Temperature –Reflected
temperature represents the energy emitted by the
surrounding objects and reflected by the measured
surface. Setting this value accurately is important if
the emissivity value is low.
To adjust the reflected temperature:
–Tap the Reflected Temperature option on the
screen.
–Scroll to the correct temperature and tap the
Set button.
Adjusting the Scale Truncation –Within every
image frame, the temperature span is calculated
and displayed on the top of the thermography
image. Use this parameter to define the minimum
number of pixels (defined by percentage) required
to affect the temperature span calculation.
To adjust the truncation value:
–Tap the Scale Truncation option on the screen.
–Scroll to the correct temperature and tap the
Set button.

Therm-App®Operation Manual
Document: D03101_05 Page 14 of 19
General Settings
Disable Screen Timeout –Allows the device’s default
screen timeout to be disabled to enable ongoing use of
Therm-App®Hz (only valid when Therm-App®Hz is
connected and image is shown).
Time Lapse –Therm-App®Hz will take an image capture
at set intervals. Once enabled, activate by holding down
the snapshot icon for a few seconds. Hit the snapshot
icon again once to stop the process.
VR Mode –Use this mode when Therm-App®Hz is
connected to virtual reality (VR) goggles (not included,
and available in full screen mode only).
Gain Limit Mode –This mode will allow you to reduce the
background noise when viewing an environment with low
temperature contrast (such as a forest or a wall).
Alert Mode Settings –Allows you to configure Alert
Mode settings.
Action
- Snapshot: A snapshot is taken every time the
preset temperature threshold is met.
- SMS: Will send an SMS to a preset phone number
every time the assigned temperature threshold is
met.
- Video Recording: Will record video for as long as
the temperature meets the preset value.
- Video Streaming: Will stream to a pre-set location
for as long as the temperature meets the assigned
value (for streaming settings see page 15).
- Vibrate: Will vibrate every time the preset
temperature threshold is met.
- Play alert.mp3: Plays an mp3 file every time the
assigned temperature threshold is met. You may
change the default file (ThermApp/alarm.mp3) per
your preference.
Advanced parameters
- Detection Duration (Seconds): Sets how long the
object needs to be in the set field to trigger the alert.
- Alert Delay (Seconds): How long Therm-App® Hz
should wait to send consecutive alerts after the first
alert is triggered (time between alerts).
- Recording Time After Detection: How long you
want to continue recording after the object leaves
the field.
- Object Size: Sets the minimum size of the object
that will trigger the alert:
(“Small”- 4x4 pixels, “Medium small”- 8x8 pixels,
“Medium big”- 16x16 pixels, or “Big”- 32x32 pixels).
Therm-App®Operation Manual
Document: D03101_05 Page 15 of 19
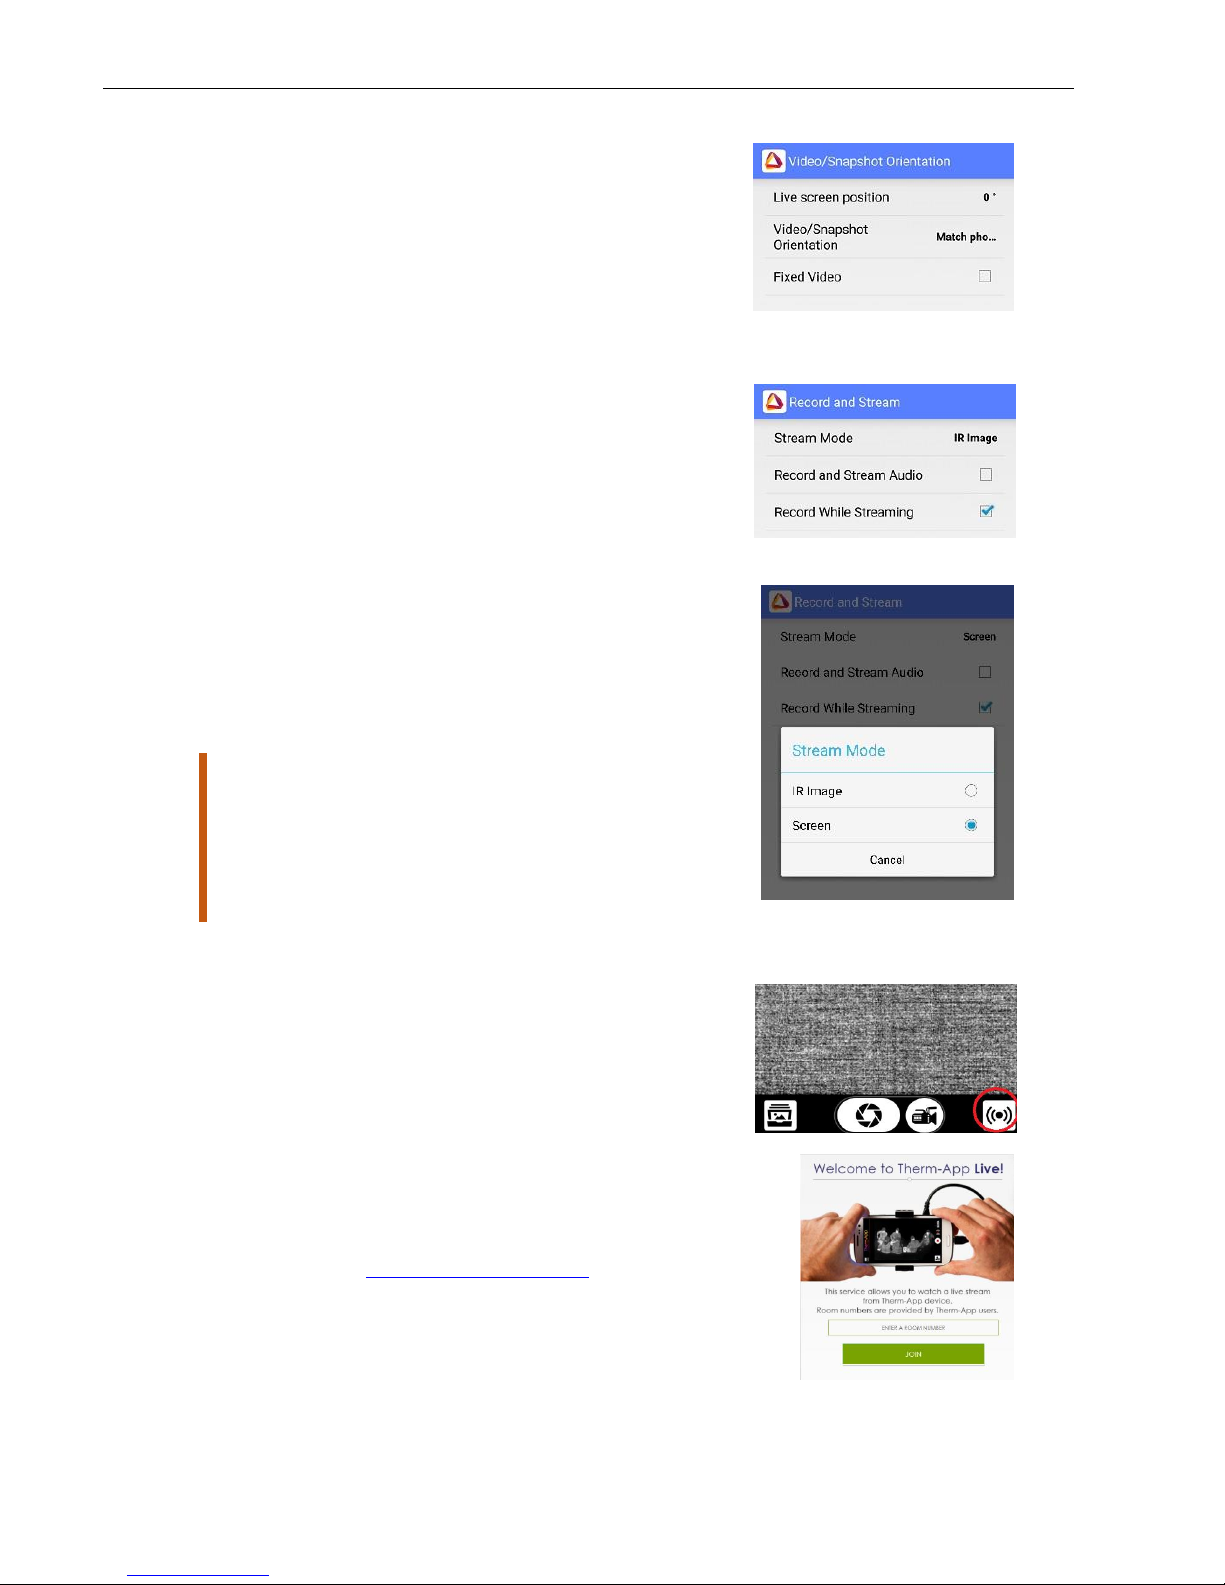
Video/Snapshot Orientation –This lets you choose
your viewing orientation, both while using the device
and while viewing onscreen (on a display).
- Live Screen Position: Allows you to set the
viewing orientation for the live screen.
- Video/Snapshot Orientation: Allows you to
set the viewing orientation for videos or
snapshots.
- Fixed Video: Blocks screen rotation.
Record and Stream
- Stream Mode: Share just the image, or your
full screen.
- Record and Stream Audio: Check box to
record audio with video.
- Record while Streaming: Check box to record
while streaming.
Stream Mode:
- IR Image (just the thermal image).
- Screen (thermal video, app screen details, and
temperature reading).
Note: Video streaming means that live video will be sent
over an internet connection from the android device to
any other device (PC, Tablet, Smartphone) connected to
The Internet. Multiple devices can view the stream from
a single Therm-App® Hz. A solid internet connection is
required to obtain good video quality.
To activate video streaming:
1. On your Therm-App®application click the icon on
the bottom right side.
2. Choose the way(s) you wish to share your stream
with your friends. A message with a link will be
sent to them.
3. To watch the live stream on a computer, tablet, or
smartphone, click the link.
*Please note that some browsers will have problem
showing the video since an add-on is required.
4. Alternatively, go to http://live.therm-app.com and
in the room number field, enter your device serial
number (appears on the settings menu).
Therm-App®Operation Manual
Document: D03101_05 Page 16 of 19
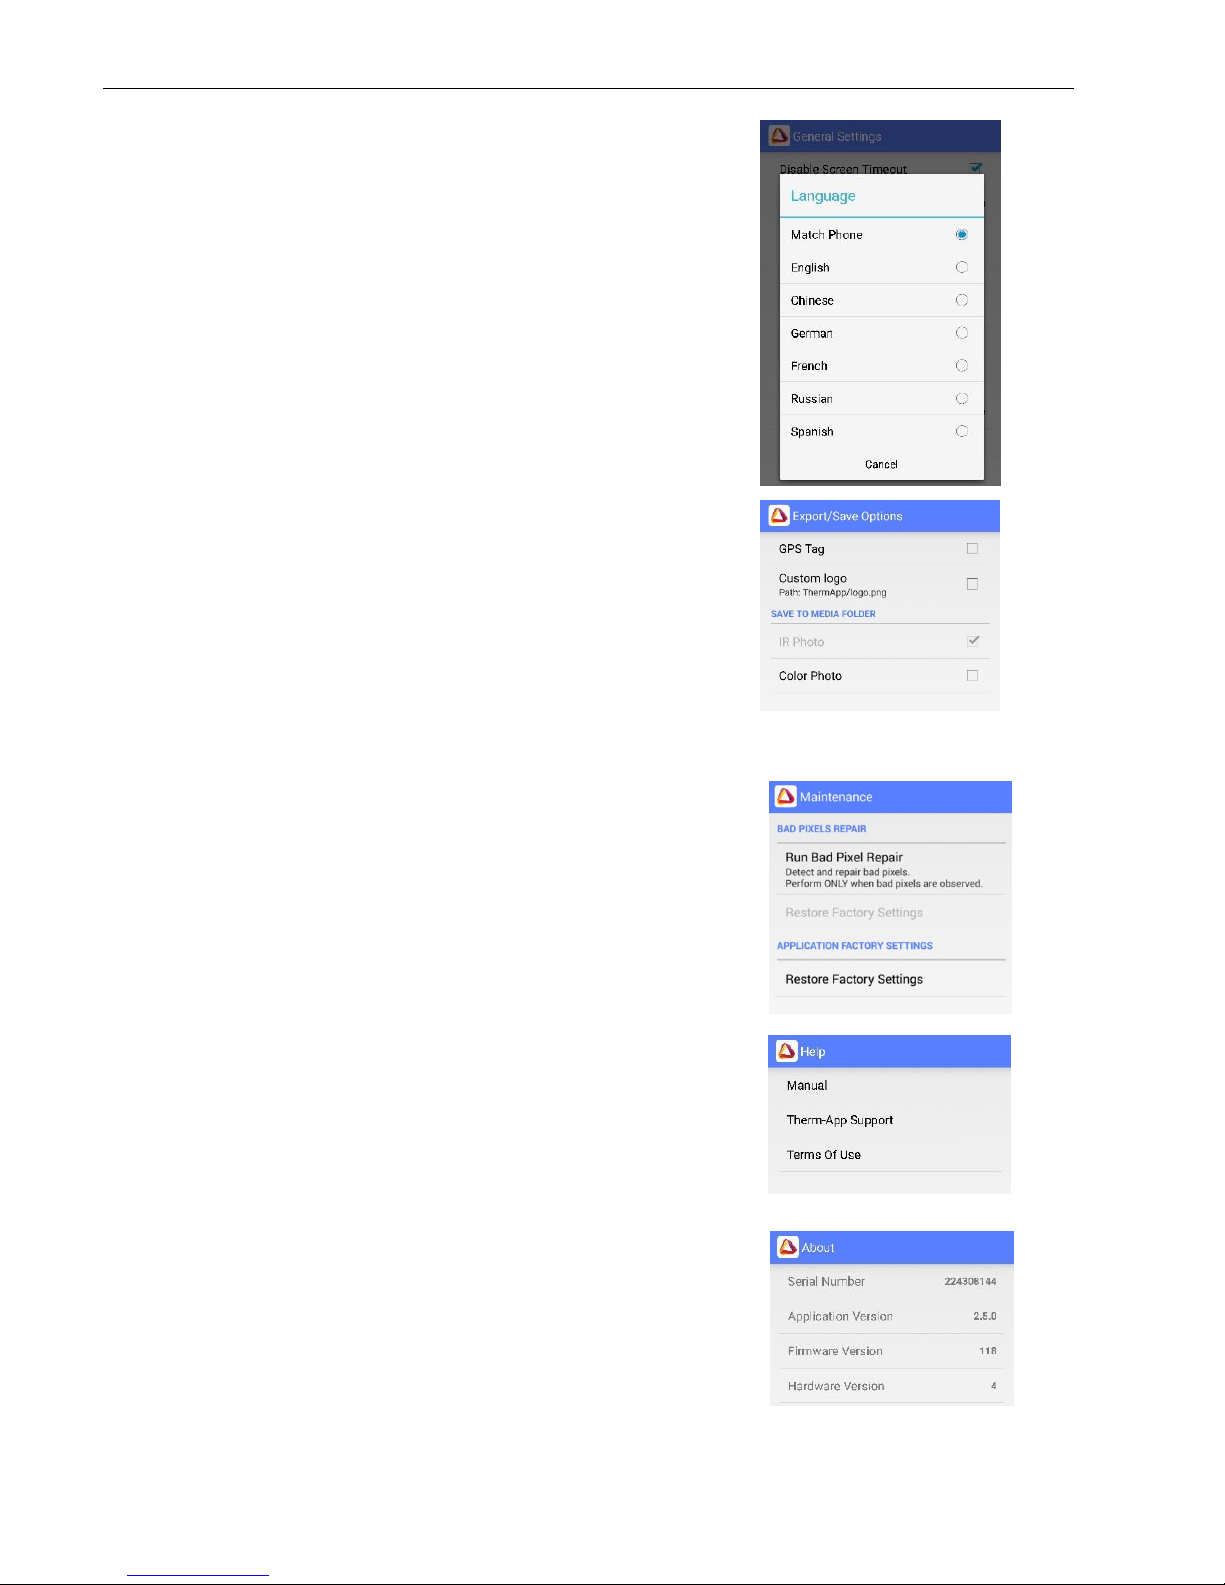
Language –Select your preferred interface
language (Match Phone, English, Chinese,
German, French, Russian, or Spanish). Match
phone is the default. If this feature is selected, the
Therm-App®application will detect the language on
your phone and attempt to match it.
Export/Save Options
GPS Tag –Adds a GPS location tag to your images.
Custom Logo –After adding your custom logo in
.PNG format to the Therm-App®folder on your
device, you can check this box to add your logo at
the bottom of each image captured (it will replace
the Therm-App®logo).
Color Photo –Saves a visual (normal) color image
in your media files next to the thermal image you
have just captured. If the Color Photo option is
disabled, it means that either the device doesn't
have a camera or the camera is being used by
another application.
Maintenance
Following extensive operation of the thermal sensor, or due
to mechanical shock, some pixels may need digital repair.
Bad pixels are observed as pixels that are darker or
brighter than their surroundings. To eliminate these "bad
pixels" press Run Bad Pixel Repair > Start, and follow the
onscreen instructions.
Help
In the Help heading you will find options for:
1. Manual
2. Therm-App®support
3. Terms of use
About
In the About section you will find information about
the device, including serial number, application
version, firmware version, and hardware version.
Therm-App®Operation Manual
Document: D03101_05 Page 17 of 19
Specifications
Smartphone
Minimal Requirements
Android 4.1 and above, supporting USB OTG (a.k.a USB Host)
Hardware
Imager
384 x 288 microbolometer LWIR 7.5 -14µm
Optics
6.8mm lens (55° x 41°)
13mm lens (29° x 22°)
19mm lens (19° x 14°) - Default
35mm lens (11° x 8°)
Focus
Manual, 0.2m to infinity
Frame Rate
25Hz
Weight
138 grams / 4.86 ounces
Size
55 x 65 x 40mm (2.16 x 2.55 x 1.57in)
Operating Temperature
-10°C to +50°C (14°F to +122°F)
Storage Temperature
-20°C to +50°C (-4°F to +122°F)
Power Supply
No battery, 5V over USB OTG cable, power consumption < 0.5W
Certifications
CE, FCC, RoHS
Encapsulation
IP54
Mount/Handle
Ergonomic handle, using 1/4"-20 standard tripod mount
Device Attachment
Clip-on for smartphone (5 -10cm span)
Measurement
Resolution
384 x 288 pixels (>110,000 pixels)
Accuracy
+/- 3°C or 3% (@25°C)
Sensitivity
NEDT < 0.07°C
Scene Temperature
+5°C to +90°C
Outside this range measurement may be considerably inaccurate
Software
Viewing Modes
• Night Vision
• Thermography
Output
Video & Audio (h.264), Snapshot
Android Share
Via media gallery
Color Palettes
Hot White / Hot Black / Iron / Rainbow / Vivid / Spotter / PSY /
Lava / Green Light
Zoom
Continuous digital zoom using touchscreen
Software and Feature Updates
Yes (via Google Play)
Maintenance
Bad pixel repair utility

Therm-App®Operation Manual
Document: D03101_05 Page 18 of 19
Troubleshooting
Before starting any troubleshooting procedure, make sure that:
The Android device is compatible with Therm-App® Hz. Refer to list of compatible devices
using the link on page 7.
The Therm-App®application is installed on the device. If it is not installed, download it from
Google Play.
Therm-App®Hz and the Android device are connected properly via a USB-OTG cable.
To verify that your cable is OTG compatible:
1. Plug the USB OTG cable into the Android device USB port.
2. Verify that the USB connector connected message appears on top of the screen.
3. Replace the cable if this message does not appear.
Table 1: Troubleshooting List
#
Problem /
System Failure
Indication
Solution
1
Application does
not start
App is not initiated after
connecting to Therm-App®Hz
Ensure that the USB OTG cable is properly
connected between the Android device and
Therm-App®Hz device.
Try using a different cable, from the three
cables supplied.
Ensure that the Therm-App®application has
been installed from Google Play.
Try installing the app on a different device to
find out if this is an Android Device or Therm-
App®Hz device problem.
In rare cases, there might be compatibility
issues between the Android device and the
Therm-App®Hz device.
2
Application
shuts down
Application stops operating and
shuts down
Ensure that the USB OTG cable is properly
connected between the Android device and the
Therm-App®Hz device.
Verify that you are using a USB-OTG cable.
3
Repeated
initialization
Upon each startup, Therm-App®
performs the initialization
process
From the apps menu, select My files > All files >
Therm-App.
Delete folder with a serial number tag.
Uninstall and then install Therm-App®
application again.
Unplug and then plug in the Therm-App®Hz
device again.
4
Battery saver
interrupts
Therm-App®
Android device switches to
sleep mode
Select the Disable screen timeout check-box on
the screen.
5
Therm-App®
application is
not found
The Android device switches to
safe mode
Unplug the USB-OTG cable.
Restart the Android device.
Connect the Therm-App®device with the
Android device.
6
Application
screen is not
displayed
A message screen appears on
app startup
Press the Android Home button to exit the app
and reconnect Therm-App®Hz and the Android
device.

Therm-App®Operation Manual
Document: D03101_05 Page 19 of 19
#
Problem /
System Failure
Indication
Solution
7
No active view
Camera view is not displayed
after completing app initial
setup
From the apps menu, select My files > All files >
Therm-app.
Delete folder with a serial number tag.
Re-install Therm-App®application.
Unplug and then plug in the Therm-App®Hz
device again.
8
Video not
displayed on the
Android device
Blank screen
Ensure that the Android device is turned on.
Ensure that the Therm-App®Hz device lens is
not covered or blocked.
Ensure that the USB OTG cable is properly
connected between the Android device and
Therm-App®Hz device.
9
Image noise
Screen image appears full of
static
Ensure that the USB OTG cable is properly
connected between the Android device and the
Therm-App®Hz device.
Ensure that nothing is obstructing the view of
the Therm-App®Hz device and that the line of
sight is not blocked by glass or other
transparent materials.
Check that the camera lens is clean.
10
Unfocused
image
Image blurred
Turn the lens focus ring while pointing the
Therm-App®Hz device at a sharp-edged object.
Do not turn the lens focus ring too far as the
lens could slip out of place.
11
Inaccurate
temperature
readings
Temperature readings are not
as expected
If device has just been turned on, or the
environmental temperature has changed, wait
for a few minutes until device temperature
stabilizes.
12
Battery
discharge
Android device battery
discharges quickly
Disconnect the USB-OTG cable when Therm-
App®Hz is not in use.
13
Bright or dark
pixels appear on
pictures and
videos
Little dots appear on all images
and videos in exactly the same
spot
“Bad Pixel Repair” procedure Settings >
Maintenance > Run Bad Pixel Repair
14
Android device
overheats
Android device overheats while
connected to Therm-App® Hz
Overheating occurs when an Android device is
not fully USB-OTG compatible and power
consumption exceeds normal use.
Connect Therm-App®Hz to a different
supported Android device.
Table of contents
Other Therm-App Thermal Camera manuals


