therM-X Home User manual

1
IFU-011, Rev. 3
1
IFU-011, Rev. 3

2
IFU-011, Rev. 3
Welcome to the Team.
We're glad you're with us.

3
IFU-011, Rev. 3
QUICK START

4
IFU-011, Rev. 3
CONTENTS
1 Indications for Use................................................................5
2 Therm-X Features..................................................................5
3 System Components ............................................................6
4 Garments...............................................................................7
5 Icons......................................................................................7
6 Preparing your Therm-X System for use..............................8
7 Operating Instructions .........................................................9
8 Programming a Therapy..................................................... 10
9 Making Changes to a Running Treatment..........................12
10 System Tools....................................................................... 14
11 Caring for your Therm-X System.........................................17
12 Alerts................................................................................... 18
13 Accessories and Replacement Parts..................................20
14 Acronyms and Definitions ...................................................21
15 Symbols and Abbreviations on Product and Packaging ....21
16 Product Specifications and Technical Data ....................... 23
17 Contraindications ...............................................................26
18 General Precautions and Warnings.................................... 27
19 Service and Customer Support ..........................................33
20 Master Product Warranty ..................................................33

5
IFU-011, Rev. 3
1INDICATIONS FOR USE
Therm-X (Therm-X Home and Therm-X AT) combines cold, heat, contrast, and compression therapy.
Therm-X is intended to treat post-surgical and acute injuries to reduce edema, swelling, and pain for
which cold and compression are indicated. It is intended to treat post traumatic and post-surgical
medical and/or surgical conditions for which localized thermal therapy (hot or cold) are indicated.
Therm-X Home systems also provide DVT therapy. Therm-X Home systems with DVT therapy are
intended to reduce the risk of the formation of deep venous thrombosis (DVT) by aiding blood flow
back to the heart via lower extremity limb compression.
Therm-X (Therm-X Home and Therm-X AT) is intended to be used by, or on the order of, licensed health
care professionals in rehabilitation facilities, outpatient clinics, athletic training settings, and home
settings.
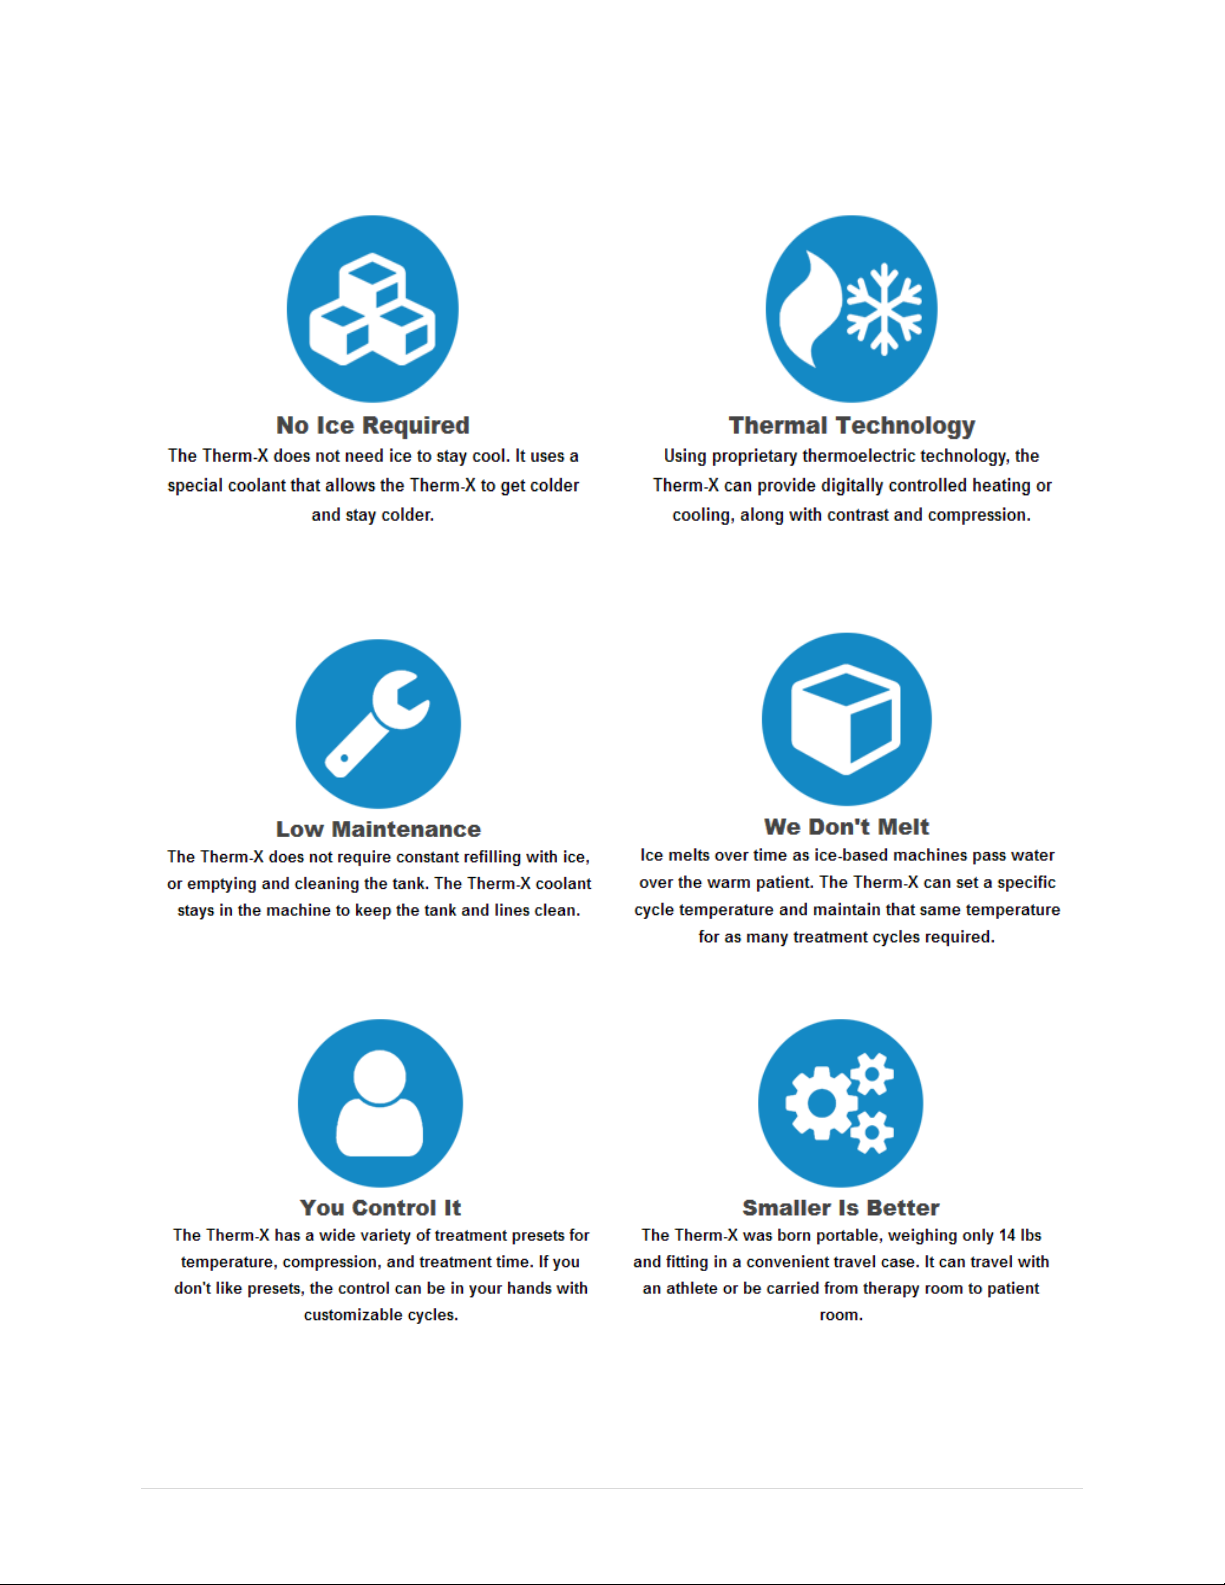
2THERM-X FEATURES
Please read the entire User Manual before operating the Therm-X. There are no user-serviceable
components inside the Therm-X.
Features
•Easy to use and read touch screen display
•Quiet operation
•Coolant temperature range between 34℉-55℉and 105℉-110℉
•Treatment of edema and lymphedema with compressions of Lite (5 mmHg), Low (20 mmHg),
Medium (45 mmHg), and High (70 mmHg)
•Programmable therapies, including the ability to have two different treatments stored at once,
one to start at a later date.
•USB port for charging handheld devices
•The option for password protection for the stored treatment to increase patient compliance to
the prescribed treatment
•100 V AC –240 V AC, 50/60 Hz operation
•Conveniently preloaded quick pick treatment cycles
informed by commonly-prescribed treatment
therapies

6
IFU-011, Rev. 3
3SYSTEM COMPONENTS
What’s in the Box?
Main Unit
Instruction
Manual
Coolant
Dispenser
Power Supply
Power Cord
Umbilical Hose
Tank Cap
Power Supply Connector
Touchscreen
USB Charging Port
Umbilical Hose Connector
7
IFU-011, Rev. 3
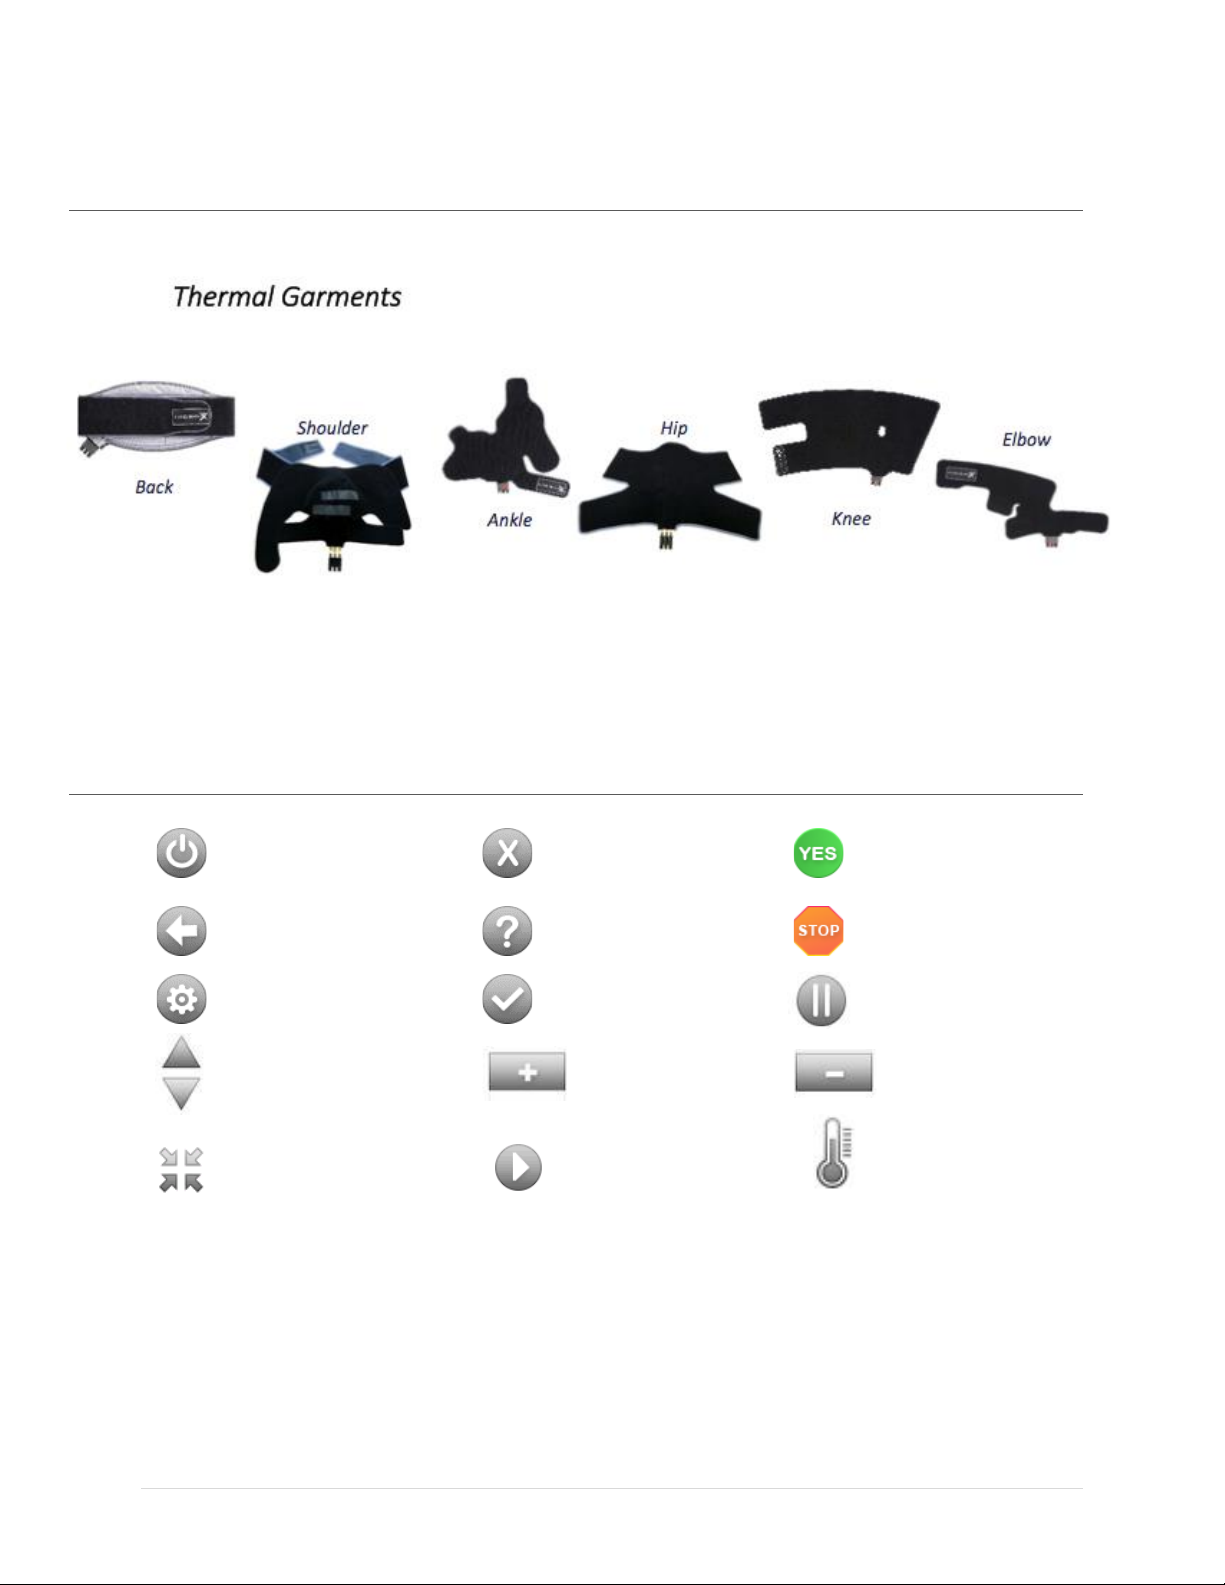
4GARMENTS
Instructions for use are provided with each accessory garment.
5ICONS
Power Off
Exit
Yes
Back
Help
Stop Treatment
Select Tool
Confirm
Pause Treatment
Scroll
Increase Value
Decrease Value
Compression
Resume
Temperature

8
IFU-011, Rev. 3
6PREPARING YOUR THERM-X SYSTEM FOR USE
These instructions are supplemented by the Quick Start Guide available from the Therm-X AT home
screen.
Unpacking your System
Your Therm-X package will include a Therm-X unit, a power supply, a power cord, an empty 16 oz.
coolant bottle, a Therm-X umbilical hose, and a user manual. Ensure you have all parts of the Therm-X
system before proceeding. Please reference the figure in Section 3 for device and component images.
Additionally, you will need a Therm-X garment (sold separately) to operate Therm-X.
Filling the Device
For optimal device performance, purchase Therm-X coolant from
your distributor. If you have no coolant available, the easiest way
to make it is by purchasing the 91% isopropyl alcohol solution
available at most drug stores. Mix 1 gallon (128 ounces) of distilled
water with 1 pint (16 ounces) of 91% isopropyl alcohol to create the
Therm-X coolant; it is recommended to use the Therm-X coolant
sold by Zenith Technical Innovations, LLC.
Once you have prepared the coolant mixture, open the tank
located at the back of the Therm-X and fill the tank to the red line
inside the tank filler neck. It is important whenever filling the
Therm-X to fill to the red line.
Attaching the Hoses
Press the 3-in-1 connector into place until you hear a click.
If you are unable to attach the connector in, try pressing
and releasing the red button on the side of the hose
connector and then trying again.
Arr
Attaching the Garments
To attach the garments, align the red button on the
garment with the red button on the hose and press
together until an audible 'click' is heard. For further
instruction, please reference individual garment guides,
available with the garment or for download at
thermxtherapy.com.

9
IFU-011, Rev. 3
7OPERATING INSTRUCTIONS
Before use, please read Section 17 “Contraindications”, and Section 18 “General
Precautions and Warnings”
Connect the power supply to the Therm-X main unit and an AC outlet. When the unit initiates it will
beep briefly and the Therm-X logo and model type will briefly appear followed by the Home Screen.
Once a selection has been made, press the touchscreen directly over the button or icon. An audible
beep will confirm the selection.
If you have already programmed the therapy treatment, follow all instructions in the 'Preparing the
Therm-X for Use', including unpacking the machine, filling the coolant tank, and attaching the hose
and garment. Then select the “Start Treatment” button from the Home screen.
Once the cycle has been initiated you will feel the garment inflate and fluid flow. The 'Treatment
Running' screen will appear and will show the current cycle settings, a progress bar, timer, and 'Stop'
and 'Pause' buttons. The unit will run through the end of the prescribed cycle automatically.
You may stop the cycle and return to the 'Home' screen at any time by selecting the “Stop”
icon. You may pause the cycle at any time by selecting the 'Pause' icon, and resume the cycle
by again pressing 'Resume.’
Once the prescribed treatment is complete, the machine
will beep three times, and the prescribed Rest Timer will
begin. The amount of time remaining in the rest cycle will
display to the right of the progress bar.

10
IFU-011, Rev. 3
8PROGRAMMING A THERAPY
From the Home screen, select Program Treatment.
If the password is enabled, you must enter it before
proceeding. For more information regarding your
password, please see Section 10 System Tools. The
Select Treatment Cycle screen will then appear. This
screen will have a variety of “Quick Picks” available
for selection including “Acute Injury”, “Post-Acute
Edema”, “Analgesic Contrast”, and “Favorite”.
There will also be a “Custom” button, and a “Back”
button which will return you to the previous screen.
Upon selecting a Quick Pick, the temperature,
compression level, and time of the cycle will be
preloaded. On this screen, you will be able to select
buttons for “Add 2nd Treatment” (if available),
“Confirm”, or “Back” to return to the Select
Treatment Cycle screen. The “Confirm” button will
enter the chosen cycle into the system’s memory.
See Section 9 for more information about Quick
Picks.
The purpose of a 2nd program cycle is to build an additional treatment that will initiate on a future
date. When the “Add 2nd Treatment” button is selected, you will be guided through a series of
program screens to select both the temperature and the duration of the programmed cycle. The level
and type of compression (constant or intermittent) will mirror that of the 1st cycle. After programming
the treatment specifics, you will be asked to identify a 2nd program start date. This is the date at which
the prescribed cycle in the machine will switch from the 1st programmed cycle to the 2nd. Use the “+”
and “-“ buttons to change the date, the “Confirm” icon to save the cycles, and the “Back” icon to
return to the 2nd cycle selection screens.

11
IFU-011, Rev. 3
Customizing A Cycle
If a cycle other than the Quick Picks is desired, you will be able to
customize a cycle from the “Custom” button on the Select Treatment
Program screen.
Once the “Custom” button is chosen, you will be
taken to the Select Temperature screen. This will
allow the choice of a variety of pre-chosen
temperatures, as well as a “Custom Temp” and
“Contrast” option. “Custom” will allow a choice
from the range of either 34-55°F or 105-110°F.
“Contrast” will set a cycle that alternates between
temperatures of 38°F and 105°F. (You can set which
temperature is initiated and the durations.)
After the temperature cycle is chosen, the Therm-X
will prompt you to select a pressure value on the
Select Compression Level screen. There will be 4
levels of compression available to select. To the
right is a toggle button that will allow you to choose
either constant or intermittent compression. There
will also be a “Back” button to return to the Select
Temperature screen.
After the compression level is chosen, Therm-X will
prompt you to select a cycle’s duration on the Select
Cycle Length screen. There will be 2 lengths of time
available to select, as well as the option to create a
custom length. The “Back” button will return you to
the Select Compression Level screen.
After the cycle length is chosen, a complete cycle will
have been created. On the Finish 1st Programmed
Cycle screen you will then have the option to
“Confirm” to lock in the treatment and return to the
Home screen, or “Back” to return to the Select Cycle
Length screen.

12
IFU-011, Rev. 3
If you chose the “Contrast” button on the original Select Temperature screen, the Therm-X will ask
you to choose a compression level, separate contrast durations for heat and cold, which temperature
(heat or cold) to start the treatment with, and total treatment time (I.E. number of heat/cold cycles).
9MAKING CHANGES TO A RUNNING TREATMENT
You may make changes during a running treatment for garment
temperature and compression. You may access the “Change
Temperature” or “Change Compression” screen (during a
running treatment only) by selecting the 'Compression' or
'Temperature' icons (see figure to the left). Changes may not
exceed the limits set by the prescribed or programmed
treatments.
Temperature
To change the temperature of a treatment, select the
'Temperature' symbol, then select one of the available
temperatures. You may adjust the temperature as many
times as needed during a cycle. Select the “Confirm” icon
to lock in new temperature.
Password Disabled
Any cold temperature adjustment will be allowed for a cold
treatment, within the range of 34°F to 55°F. Your Therm-X
AT will allow any temperature change for a warm treatment
from 105°F to 110°F.
Password Enabled
Only conservative temperature adjustments will be
allowed, and are relative to the originally programmed treatment. For example, if the COLD treatment
was programmed to 45°F, you may select a temperature between 45°F and 55°F.
If the treatment program for WARM therapy was 107°F, you can select a temperature from 105°F to
107°F.

13
IFU-011, Rev. 3
Pressure
To change the compression level, select the 'Compression' symbol then select one of the available
compression levels. You may adjust the 'Compression' level as many times as needed during a cycle.
Select the “Confirm” icon to lock in new compression level.
Password Disabled
Any compression level will be allowed. Your Therm-X
AT will allow Lite, Low, Medium, and High.
Password Enabled
Only conservative compression level adjustments are
allowed, and are relative to the originally
programmed treatment. For example, if the
prescribed treatment was Medium, you may select
Lite, Low and Medium. If the originally programmed
treatment was Low, you may select Lite or Low.
Favorite Quick Picks for Programming a Treatment
You may program the “Favorite” quick pick button with a preferred treatment that you use regularly.
To do this, press the “Favorite” button and it will lead you through the custom programming choices
and lock them in when you press the “Confirm” icon. To reprogram the favorite quick pick button,
simply press the button and on the next screen press “Reset Favorite”.
14
IFU-011, Rev. 3
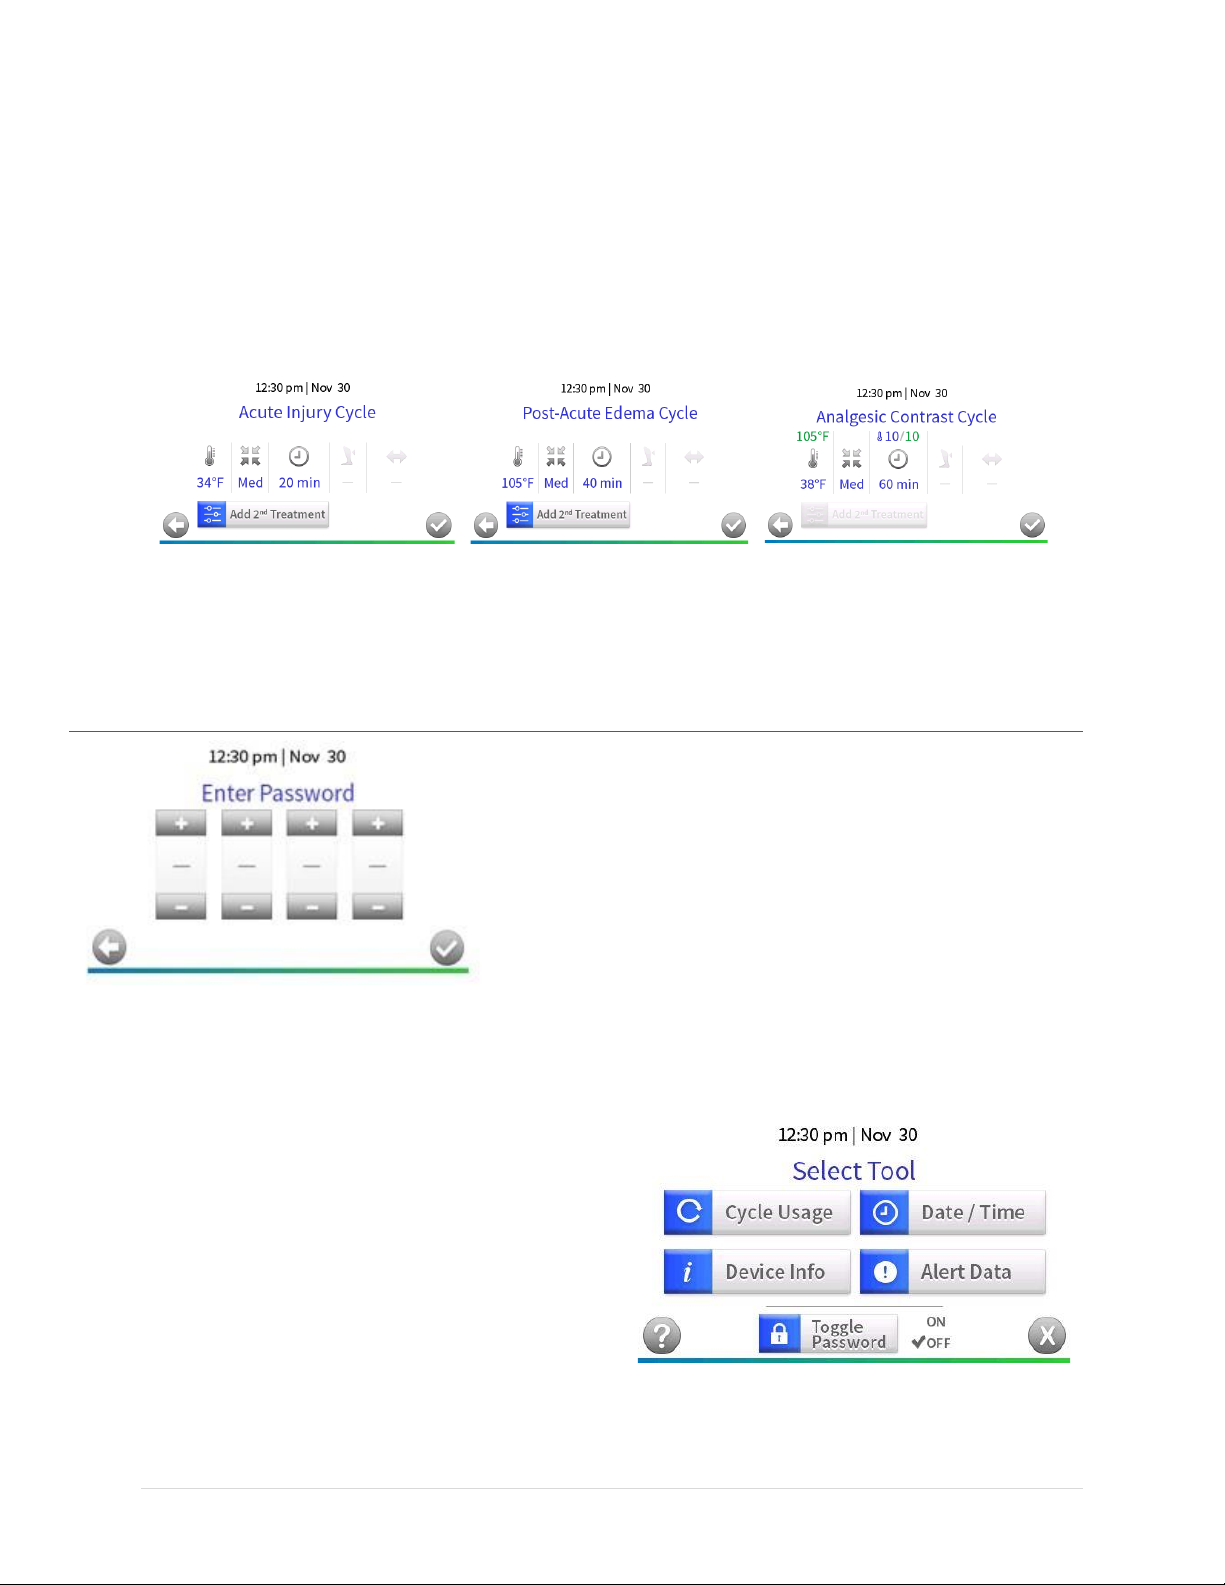
Selecting from pre-programmed quick picks
Three commonly prescribed treatment options will come pre-programmed on your Therm-X AT. If the
cycle allows for you to add a 2nd treatment, the icon will appear in full color.
•Acute Injury Cycle: 20 minute treatment, 34° F, medium compression, no rest period.
•Post-Acute Edema Cycle: 40 minute treatment, 105° F, medium compression.
•Analgesic Contrast Cycle: 60 minute treatment, medium compression, 6 cycles of contrasting
temperatures alternating between 105° F and 38° F.
10 SYSTEM TOOLS
To navigate to the System Tools screen from the Home screen
you must first select the “Settings” button in the lower left
corner of your Therm-X touchscreen. A password screen will
appear if the password is enabled. Use the password that you
received with your machine. You will have a maximum of 5
attempts to input the correct password. If too many incorrect
attempts are made, the machine will display an error and you
must restart before you resume use of your Therm-X. The
Settings screen will display immediately if the password is
disabled. The password may be toggled on and off by selecting the “Toggle Password” button. By
enabling the password, you will be able to ensure that unauthorized users are unable to change the
stored cycle.
Once you reach the Select Tool screen you may
access “Cycle Usage”, “Date/Time”, “Device Info”,
“Alert Data”, “Toggle Password”, “Help”, and
“Cancel”.
15
IFU-011, Rev. 3
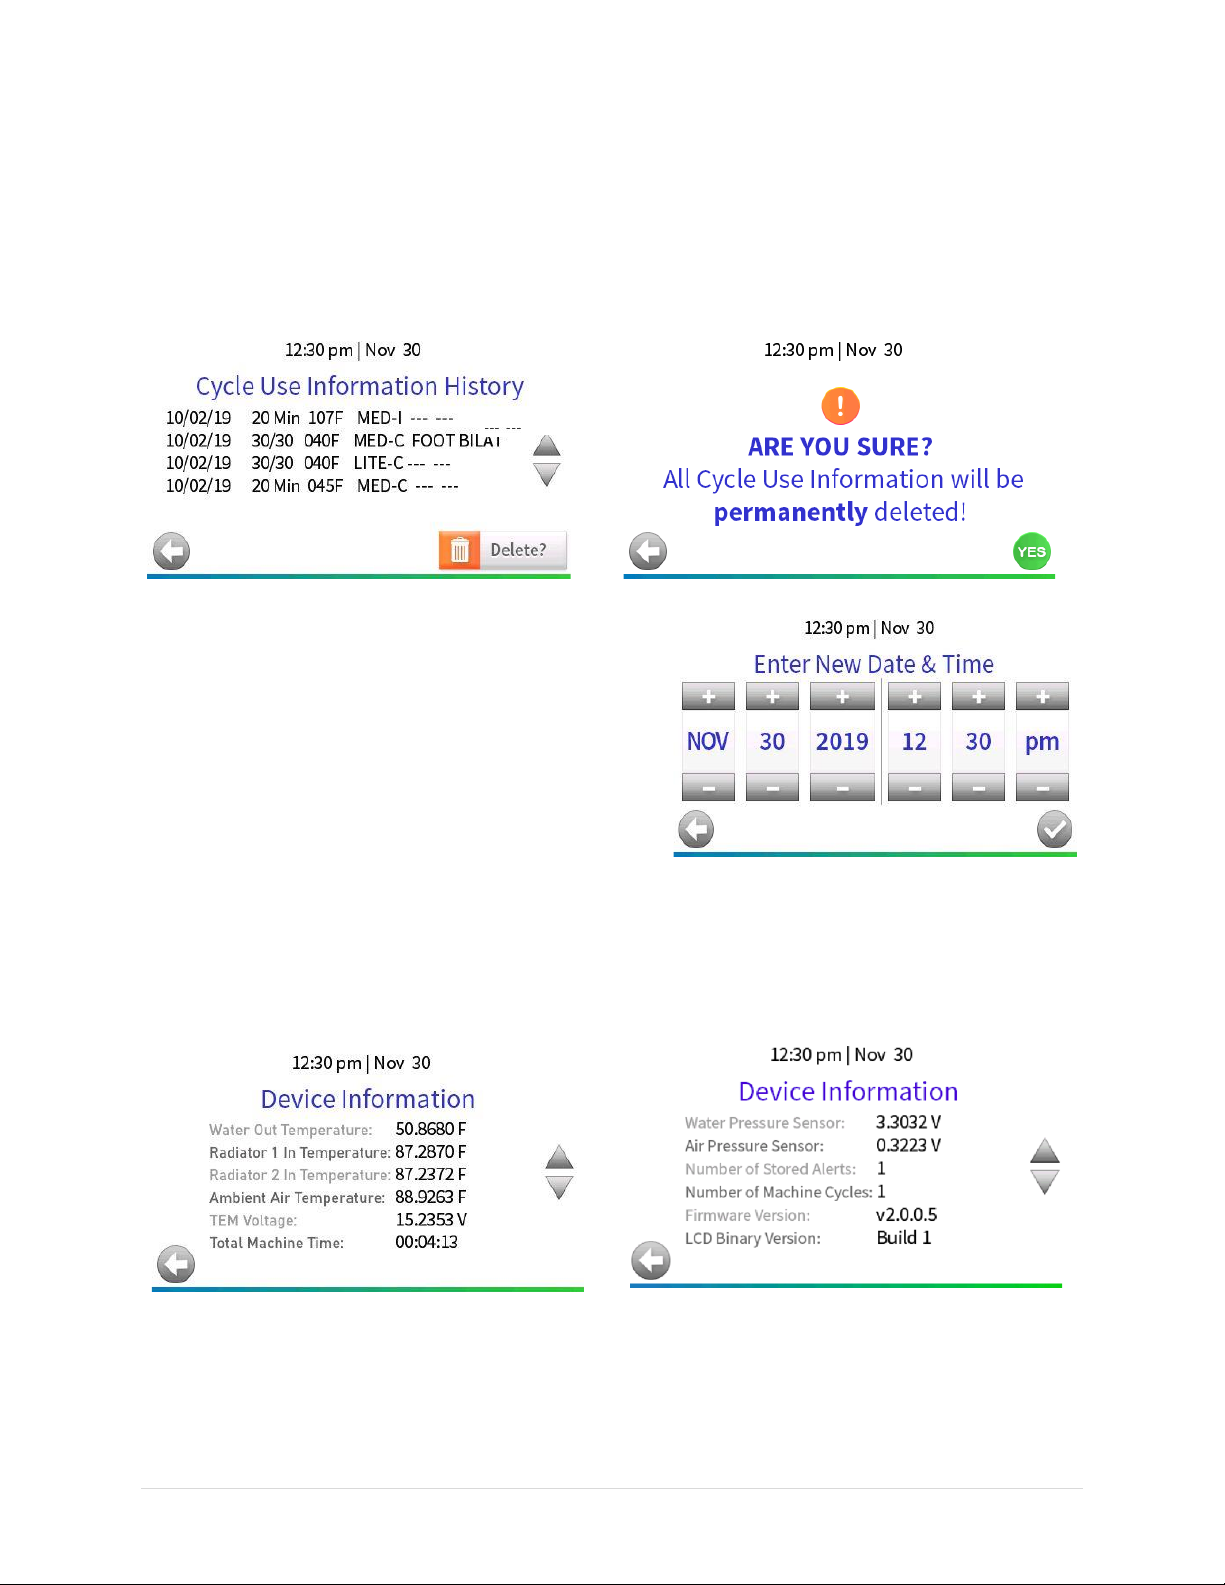
The Cycle Use Information History screen can be reached by selecting the “Cycle Usage” button. It will
display the past cycles run on the unit which may be scrolled through using the arrows on the right of
the screen. Additionally, there will be a “Back” button to return you to the Select Tool screen and a
“Delete?” button. The “Delete?” button will prompt an alert to confirm the previous cycle’s
information is deleted.
The Enter New Date & Time screen can be reached by
selecting the “Date/Time” button. On this screen you
may select the date and time by using the “+” or “-”
buttons to change the displayed values to the correct
values. There will also be a “Back” button to return to
the Select Tool screen and a “Confirm” button to store
the date and time you have chosen.
The Device Information screen can be reached by selecting the “Device Info” button. This screen will
display a variety of metrics about the unit and its environment. You may navigate through these
metrics using the “Up” and “Down” arrow buttons on the right of the screen. There will also be a
“Back” button to return to the Select Tool screen.

16
IFU-011, Rev. 3
The “Alert Data” button navigates to the historical Alert
data screen. This screen will display the alerts that have
occurred for this unit. You may navigate through these
past alerts using the “Up” and “Down” arrow buttons
on the right of the screen. There will also be a “Back”
button to return to the Select Tool screen.
If you press the “Help” icon, you will reach the
Assistance Screen. The Assistance screen will have
contact information for Therm-X manufacturers and
distributors. It will also have a “Back” button to return
you to Select Tool screen.

17
IFU-011, Rev. 3
11 CARING FOR YOUR THERM-X SYSTEM
Cleaning
Therm-X Device
The interior of the Therm-X does not need to be cleaned; there is no need to empty and replace
the coolant in the tank.
To clean the exterior of the device, wipe down the exterior with an alcohol cleaning pad or
equivalent soft cloth with a mild cleaning product. The device should be cleaned whenever it
encounters bodily fluids or between patients. Do not use solvent based cleaners or abrasive
materials.
Use compressed air to ensure the radiator grill of the Therm-X device remains clear of dust and
debris as needed.
Garments
Please refer to the individual Garment Manual that came with your garment for cleaning
instructions.
Umbilical Hose
Between uses, the umbilical hose may be wiped down with an alcohol cleaning pad or equivalent
soft cloth with a mild cleaning product. Do not use solvent based cleaners or abrasive materials
to clean the umbilical hose.
Storage
Therm-X Device
The device should be stored without coolant in a temperature range of +33°F to +122°F in below
60% non-condensing humidity. Devices with coolant content must be stored above +32°F (0°C).
To drain the unit, first turn the unit off and unplug it from its electrical source. Disconnect all
hoses from the unit. Remove the coolant reservoir cap from the unit by twisting it counter-
clockwise. Lift the unit with both hands and tip it backwards to empty the coolant into a bucket
or sink. Continue to tip the unit until the reservoir is completely empty.
Garments
Garments without coolant contents may be stored in the same environment as the device, in a
temperature range of +33°F to +122°F in below 60% non-condensing humidity. Garments with
coolant content must be stored above +32°F (0°C).
Disposal
Therm-X Device
The device and device components can be disposed in accordance with local regulations.
Garments
Garments may be disposed as regular waste.
18
IFU-011, Rev. 3
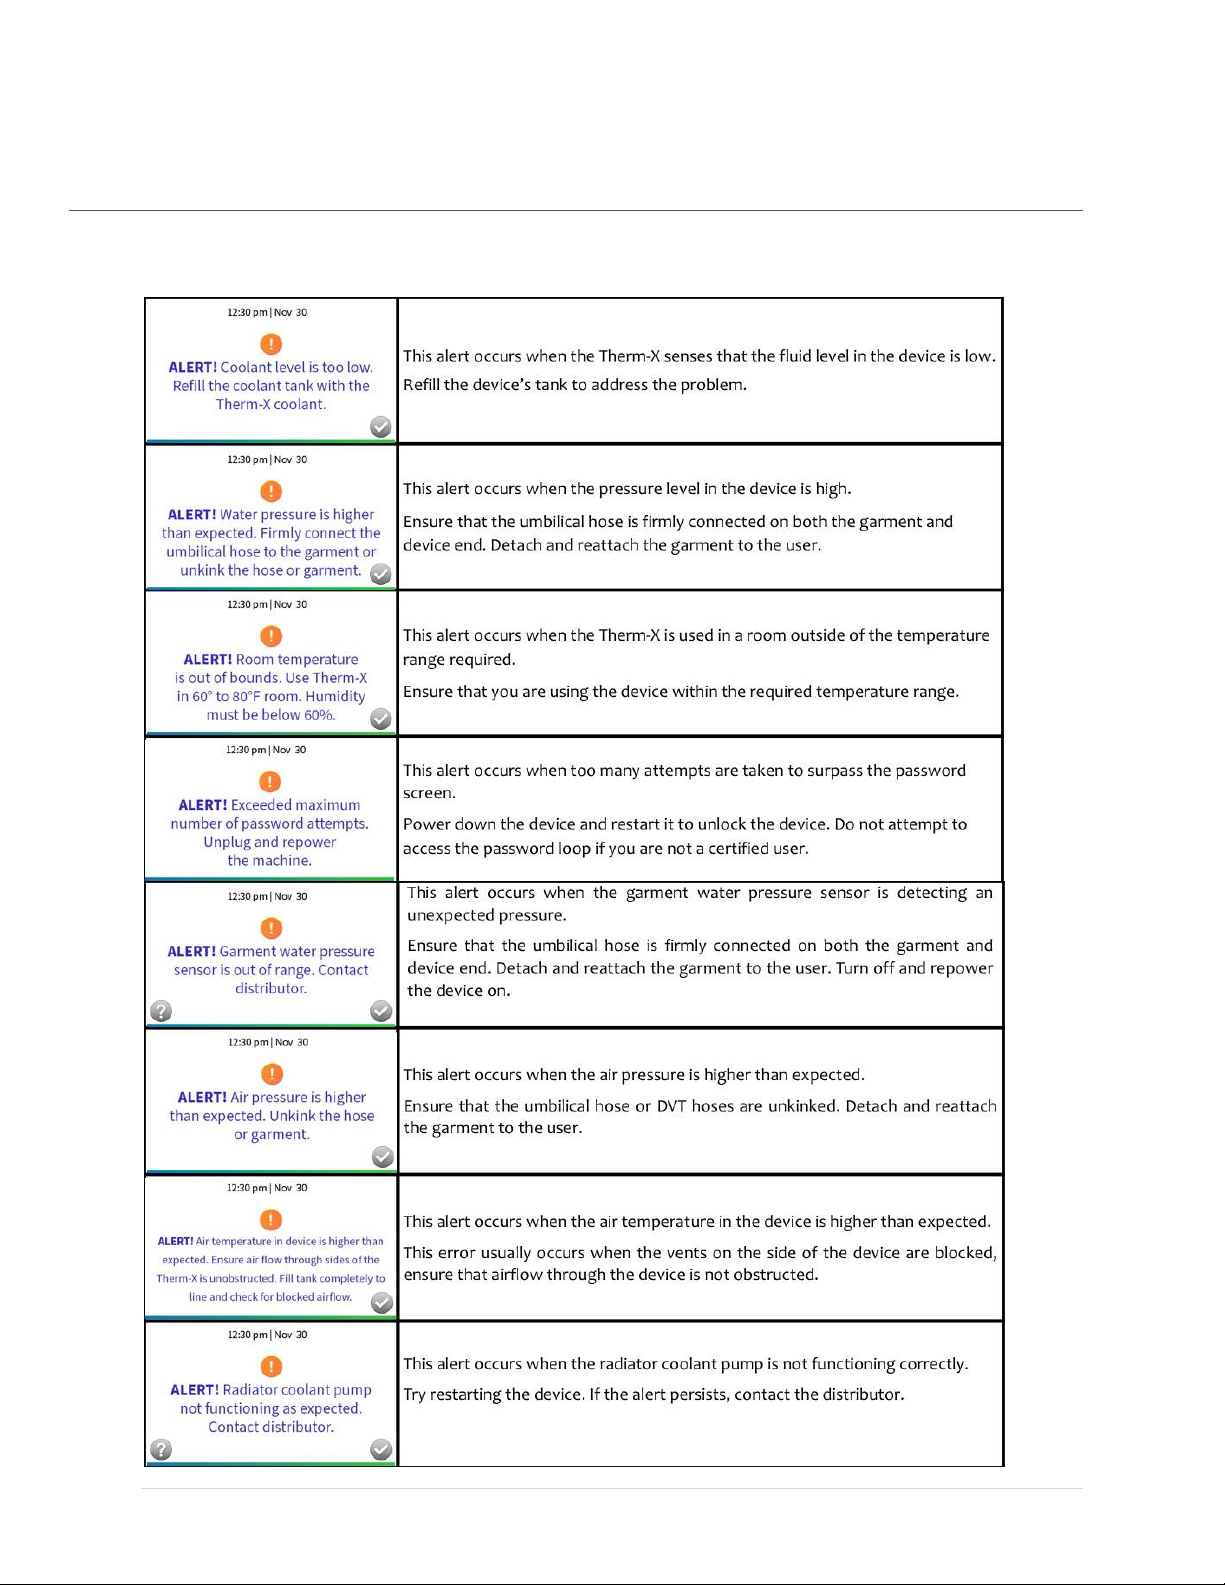
12 ALERTS
The table below can guide you through possible alerts you may observe while using your
Therm-X device.

19
IFU-011, Rev. 3
This manual suits for next models
1
Table of contents
Popular Medical Equipment manuals by other brands


Getinge
Getinge Arjohuntleigh Nimbus 3 Professional Instructions for use

Mettler Electronics
Mettler Electronics Sonicator 730 Maintenance manual

Pressalit Care
Pressalit Care R1100 Mounting instruction

Denas MS
Denas MS DENAS-T operating manual

bort medical
bort medical ActiveColor quick guide

AccuVein
AccuVein AV400 user manual


