ThermaCor Thermax Therminator DV12 Owner's manual

PROFESSIONAL HOT WATER EXTRACTION CLEANING SYSTEM
OWNER/
OPERATOR
MANUAL
DV12
ThermaCor
Incorporated
#1 Carpet and Upholstery Cleaning Systems
Thermacorinc.com
1-877-483-1049

TABLE OF CONTENTS
Message from the Corporate Oce.................................................................................................... 2
Identifying Features and Additional Commercial Units................................................................ 3
Inspection Upon Delivery ....................................................................................................................... 4
Important Safety Information................................................................................................................ 4
Set-Up Procedure ....................................................................................................................................... 5
Extraction Cleaning Procedure.............................................................................................................. 5
System Clean-Up ........................................................................................................................................ 6
General System Maintenance................................................................................................................ 6
Optional Package and Accessories ..................................................................................................7, 8
Cleaning Solutions..................................................................................................................................... 9
DV12 Specifications..... .............................................................................................................................10
DV12 Wiring Diagram .............................................................................................................................10
Troubleshooting .......................................................................................................................................11
DV12 Base Unit Schematic....................................................................................................................12
DV12 Base Unit Parts List.......................................................................................................................13
Auto Detail Package Parts List & Schematic ...................................................................................14
Thermax Warranty....................................................................................................................................15
1

Congratulations on the purchase of your new Thermax DV12
Professional Hot Water Extraction Cleaning System! In 1971,
Thermax founder Carl Parise developed the world’s rst UL
approved carpet steam cleaner for the U.S. market, and has
since produced over 500,000 units sold worldwide. We have
adopted our own brand name, Thermax, which is rapidly
becoming a household name, synonymous with the industry.
In an industry full of competition and choices, we at Thermax
are grateful for your wise choice of the Thermax DV12, and
we look forward to a lasting relationship as we service all
your business needs.
Your new DV12 is a high performance workhorse. When
maintained and operated in accordance with this owner/
operator manual, it will give you years of quality service.
For over four decades, Thermax has produced nequality,
portable, hot water extraction cleaning systems for the home,
hotel/motel, auto detail, janitorial, as well as other commercial
markets.
Our company and staff subscribe to the philosophy that our
relationship with you the customer doesn’t end with the sale, it
only begins. If there is any area in which we can be of service,
please call the Thermax Customer Support Center
at 1-877-483-1049.
Thank you for joining the ever-growing family of Thermax
owners. Here’s to many years of use and, most importantly,
here’s to a healthier indoor environment.
Sincerely,
Michael Johnson
President
ThermaCor, Inc.
*Steam cleaning is the generic technology used to describe the
hot water extraction process of cleaning carpet.
MESSAGE FROM THE CORPORATE OFFICE
2

IDENTIFYING FEATURES
1
3
4
5
6
8
9
2
1) Clean Solution Tank
2) Lid, Solution Tank Fill Hole
3) RecoveryWasteTank
4) Recovery Tank Dome and Vacuum Seal
5) Power Cord
6) Preheat Switch with Indicator Light
7) Single/Dual Vacuum Switch
8) Pump Switch
9) Brass Female Quick Connect Coupling for the
Solution Hose
10) Vacuum Inlet/Vacuum Hose Connector
11) Recovery Waste Tank, Drain
12) Batches for Upper and Lower Case
13) Built-In Push/Pull Handle
14) 8” Non-Marking Wheels
7
10
11
12
13
14
3
THERMAX CP5
e ermax CP5 is an industry proven
performer, built to endure the most
demanding carpet and upholstery
extraction cleaning applications.
Constructed in a portable footprint
easily operated by one individual, the
CP5 is designed to attain the highest
level of professional cleaning results!
• Powerful two-stage vacuum motor for
increased recovery speed and quicker
drying time (112” water lift).
• Built-in 1800-watt solution heating
system for uniform temperature
control (up to 175°).
• 5-Gallon hygienic stainless steel
solution and recovery tanks.
• High-impact, chemical resistant
housing—virtually indestructible.
• 100 psi high-eciency demand
solution pump.
• Multi-option wand and hose packages
for vacuum and extraction versatility
are available.
ADDITIONAL COMMERCIAL UNITS
Also available to make your job easier, the
Thermax CP5 gives you the power and
efficiencyto clean carpets and upholstery in
both commercial and residential settings.

INSPECTION UPON DELIVERY
Carefully unpack and inspect the Thermax DV12 and be sure all components
ordered are included. Orders might be packed in more than one box.
NOTE: Contact the carrier immediately regarding any damage incurred
during shipping as it is your responsibility to le a damage claim with the
carrier.
IMPORTANT SAFETY INFORMATION
1) Do not leave plugged in while unattended.
2) Do not operate heater while solution tank is empty.
3) To prevent the possibility of electrical shock, always unplug the system from
the main power source before physically inspecting or attempting to repair
the system.
4) Inspect system daily, especially when used by someone else. Inspect for
damaged components such as loose wires, frayed cords, missing ground
pin, etc.
5) Only operate system when it is properly grounded. Improper grounding could
result in serious or fatal shock!
6) When operating the system around water, during ood restoration, etc.,
always outt yourself properly with rubber-soled shoes or rubber boots and
do not set system in standing water.
7) To keep from voiding your warranty, use only those cleaning solutions
manufactured by Thermax and never use solvent based products.
8) After use, always thoroughly rinse and clean both recovery and solution
tanks. If using recovery tank to store hoses, or other miscellaneous items,
always clean items before storing them in tanks.
9) Do not operate solution pump dry.
10) Do not store where temperatures drop below freezing, as this may damage
the pump.
11) Always use defoamer in recovery tank to prevent the motor from being
damaged from overfoaming.
12) Extension cord should have a minimum rating of 12/3 (#12 cord). Extension
cord should not exceed 50 feet.
13) Never open up the system when there is water in either the solution or
recovery tank, remove the solution and waste water rst.
4

SETUP PROCEDURE
1) Pre-mix cleaning solution as required for specic application in a ve gallon (19 liter) pail. Pour pre-mixed solution through solution ll hole of
system.
NOTE: This system has a built-in solution heat maintenance feature, start with hot water if possible. Hot water is hygienic and maximizes
cleaning potential.
2) Add appropriate amount of defoamer to the recovery tank (page 3, #3).
3) Connect end of the vacuum hose to the vacuum inlet connector (page 3, #10).
4) Connect male end of the solution hose to female quick-connect coupling (page 3, #9), and female end of solution hose to the male end
of the cleaning wand.
5) With solution tank full and vacuum and solution hoses properly connected, plug main power cord (page 3, #5) into properly grounded
outlet.
NOTE: Plug the cord into an outlet that will be out of the way of the cleaning path, ideally a 20 amp circuit when available.
6) Your system is now ready for operation.
NOTE: The preheat setting can be activated by switching to the “ON”position. This setting activates 1800 watts of heating power. When
the solution reaches approximately 175° F, it will automatically shut o as indicated by the preheat indicator light turning o on the switch
panel. The preheat system will turn on and o as necessary to maintain 175° while preheat is in the“ON”position.
7) Once pre-spray, furniture removal and other carpet preparation is complete, proceed to clean carpet and/or upholstery.
NOTE: Preheat switch can now be activated to“OFF”position. The system is designed so the vacuum or pump switch will not function
unless the preheat switch is in“OFF”position. Pump and vacuum switches may be activated independently or in tandem when preheat
switch is in “OFF” position.
EXTRACTION CLEANING PROCEDURE
1) With solution up to temperature and all hoses attached appropriately, set the preheat switch to“OFF”position, then activate the pump
switch to “ON” position.
2) Turn the vacuum switch to “Single Vac” or “Dual Vac” position.
3) Start in area of the room opposite from where you want to end.
4) Place wand about 4 feet in front of you.
5) Activate the solution spray trigger of wand.
6) Laying down an even spray of solution, pull the wand back towards you slowly.
7) Release the solution spray trigger and move the wand slowly forward over the same area just cleaned to recover additional solution left
behind. Repeat this process several times depending on the degree of carpet soiling then move over the width of the wand, overlapping
slightly to prevent streaking. For best results, work in approximately 4 foot wide sections and always be sure to remove as much solution
from the carpet as possible as this will minimize drying time.
8) When solution tank is empty and needs relling, shut system down and repeat step 1 of“Set Up Procedure”.
9) Using a 5-gallon bucket, empty recovery holding tank (page 3, #3) by placing the bucket under the drain gate (page 3, #11), lifting the
gate up and shutting the gate when bucket is full. Repeat this process until recovery holding tank is empty.
NOTE: Although the recovery tank will hold approximately 12 gallons and is equipped with an automatic full shut-o feature, empty the
recovery tank at the same time you rell the solution tank.
10) Add more defoamer into the recovery holding tank (step 2 of “Set Up Procedure”).
NOTE: With solution tank full and recovery tank empty, the system is now ready to continue cleaning. Continue the process until cleaning
is complete.
5

SYSTEM CLEANUP
When the carpet cleaning process is complete, it’s time to clean the system. De-activate all switches to “OFF” position.
1) Empty and rinse recovery tank.
2) Empty solution tank.
a. To empty solution tank set the preheat witch to“OFF”position. Now activate“VACUUM”switch to“Single Vac” position.
b.With vacuum hose still connected to the inlet and vacuum running, drop the end of the vacuum hose (opposite the end plugged
into the vacuum inlet) down through the solution tank ll hole (page 3, #2) and SLOWLY remove the unused solution from
the solution tank until empty. The system will transfer the solution to the recovery waste tank for disposal. In the process, the
solution cleans out the inside of the vacuum hose.
NOTE: Take caution to remove the solution SLOWLY! Make sure to rinse solution tank with the plain hot water to minimize
chemical build-up. After rinsing solution tank, transfer rinse water in the same manner mentioned above.
c. Deactivate and unplug the system
d. Empty the recovery tank and clean.
e. Remove vacuum and solution hose from system. Wipe down all exterior areas of the system.
3) Your DV12 system is now ready for storage until the next job!
GENERAL SYSTEM MAINTENANCE
DAILY (At the conclusion of each work day)
1) Empty, rinse and clean solution and recovery tanks with plain hot water thoroughly cleaning dirt and obstructions from inside the
tanks.
2) Clean vacuum and solution hoses thoroughly.
3) Run plain hot water through solution tank and pump to prevent any chemical build-up.
4) Wipe down all exterior surfaces with an all-purpose type cleaner, then apply a light coat of vinyl protectant to all exterior surfaces.
5) Lubricate couplings, hinges and wheels with silicone-type spray.
6) Inspect the solution tank lter and recovery tank dome lter for hair and debris. The lter should always be kept clean and
unobstructed.
7) Inspect electrical cord for damage or fraying and repair as necessary.
8) Store unit away from direct sunlight and freezing temperature.
MONTHLY
1)Inspectinternally for:
a. Loose nuts and/or screws
b. Leaking hoses
c. Loose wiring
d. Anything that doesn’t appear correct
2) Flush the system with 2 cups white vinegar per gallon of hot water solution. Follow by circulating plain hot water through the
system via the solution tank. This helps reduce and neutralize any alkalai and chemical build-up.
NOTE: To prevent shock hazard, remember to unplug main power source before inspection or repair of the system.
ANNUALLY
We recommend that your system be inspected once a year by an authorized Thermax service technician. For the location of your nearest
Service Center, call 1-877-483-1049 or go to www.thermacorinc.com.
6

OPTIONAL PACKAGES & ACCESSORIES
The following optional packages and accessories do not come standard with your DV12. Contact
your local distributor or the Corporate Oce to receive details on how to purchase these items.
7
SWIVEL HEAD SQUEEGEE
PART # 12-SQU-12
STAINLESS STEEL
FLOOR WAND
PART # SS-FW-12
STAINLESS STEEL
UPHOLSTERY WAND
PART # SS-UW-12
30 HIDE-A-HOSE
PART # 30-HAH-12
DELUXE CONTRACTOR PACKAGE
PART # D-CONTR-12
Includes: 30’ Hide-A-Hose, Stainless Steel
Floor Wand & Upholstery Wand
CLEAR VIEW FLOOR WAND
PART # 29-771-00 (SPECIAL ORDER ONLY)
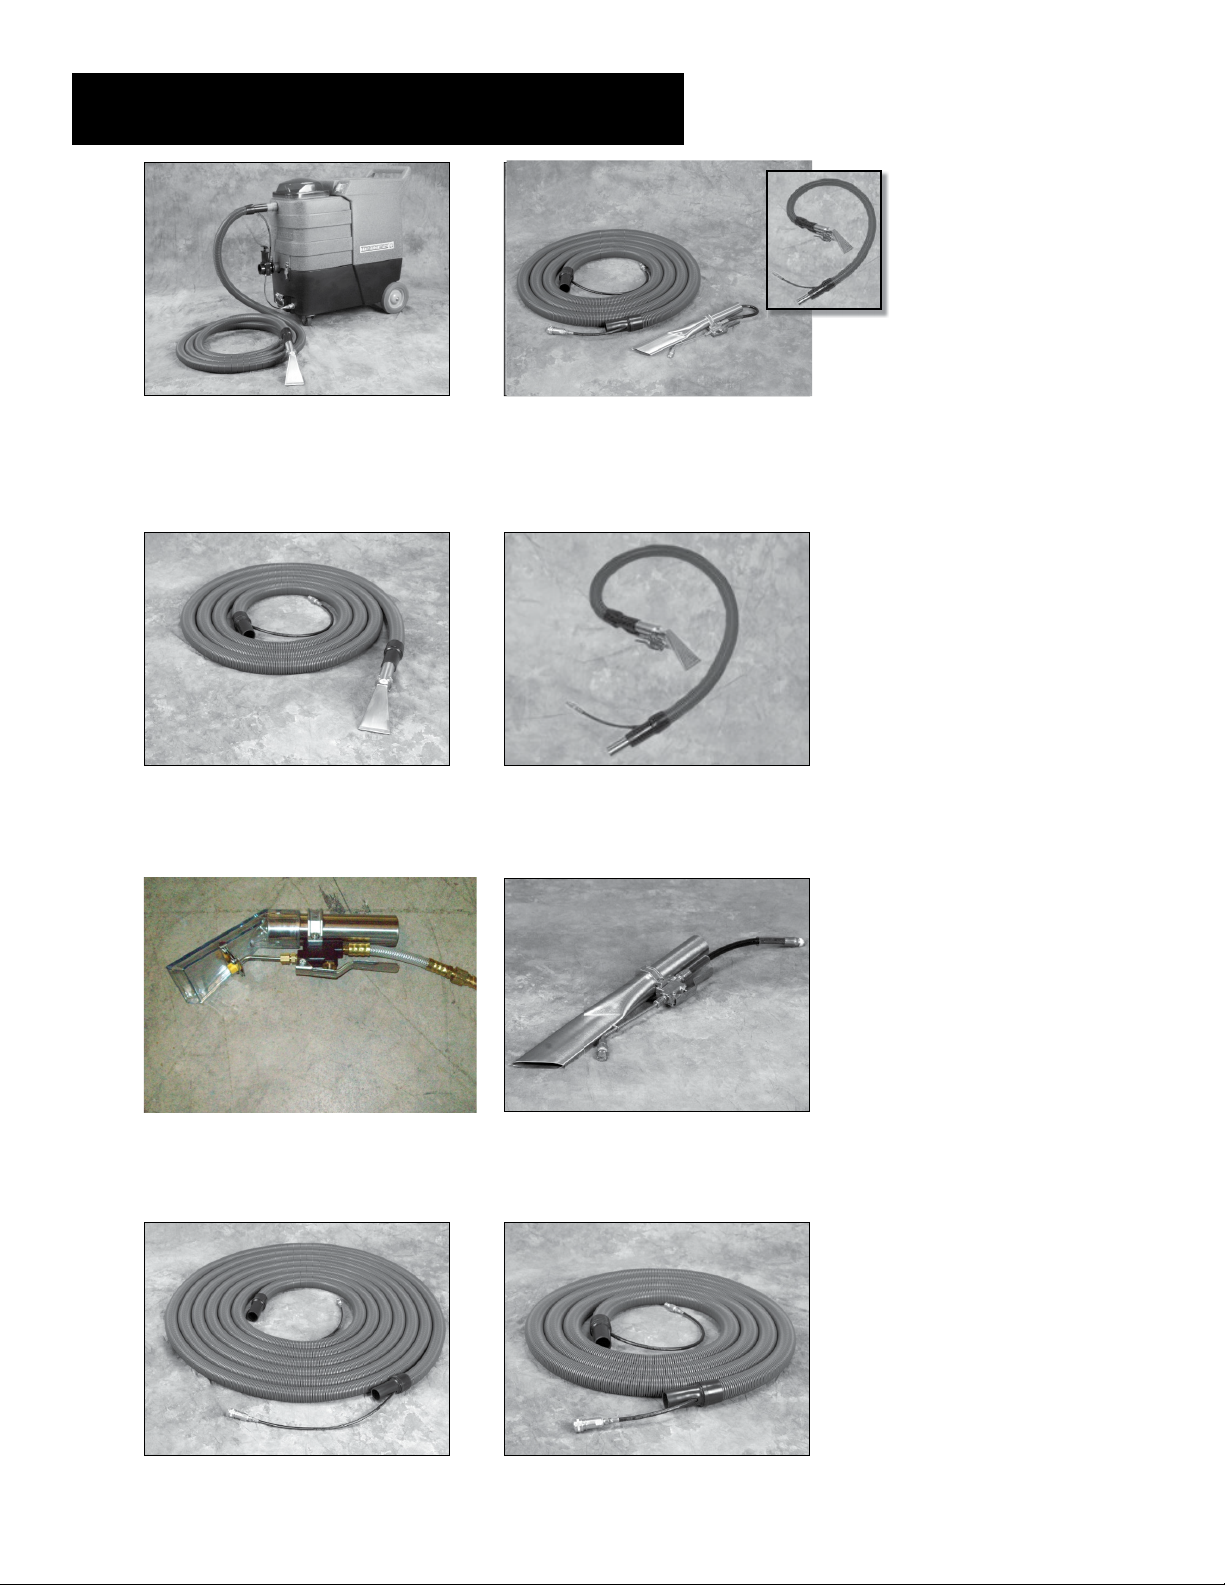
8
OPTIONAL ACCESSORIES CONTINUED
DV12 W/20 FT. HIDE-A-HOSE
& BUILT-ON STAINLESS
STEEL DETAILER
PART # DV12-20D-HAH
DELUXE AUTO DETAIL PACKAGE
PART # D-AUTO-12
INCLUDES: 6’ HAH W/BUILT-ON SS
DETAILER, SS CREVICE TOOL, 20’ HAH
20 FT. HIDE-A-HOSE W/
BUILT-ON SS DETAILER
PART # U1570-20-DV12
6’ HAH W/BUILT-ON SS DETAILER
PART # 29-767-00-1
CLEARVIEW UPHOLSTERY
TOOL (SPECIAL ORDER ONLY)
PART # 35-255-005
SS CREVICE TOOL
PART # 29-765-00-1
50’ HIDE-A-HOSE
PART # 50-HAH-12
20’ HIDE-A-HOSE
PART # 20-HAH-12
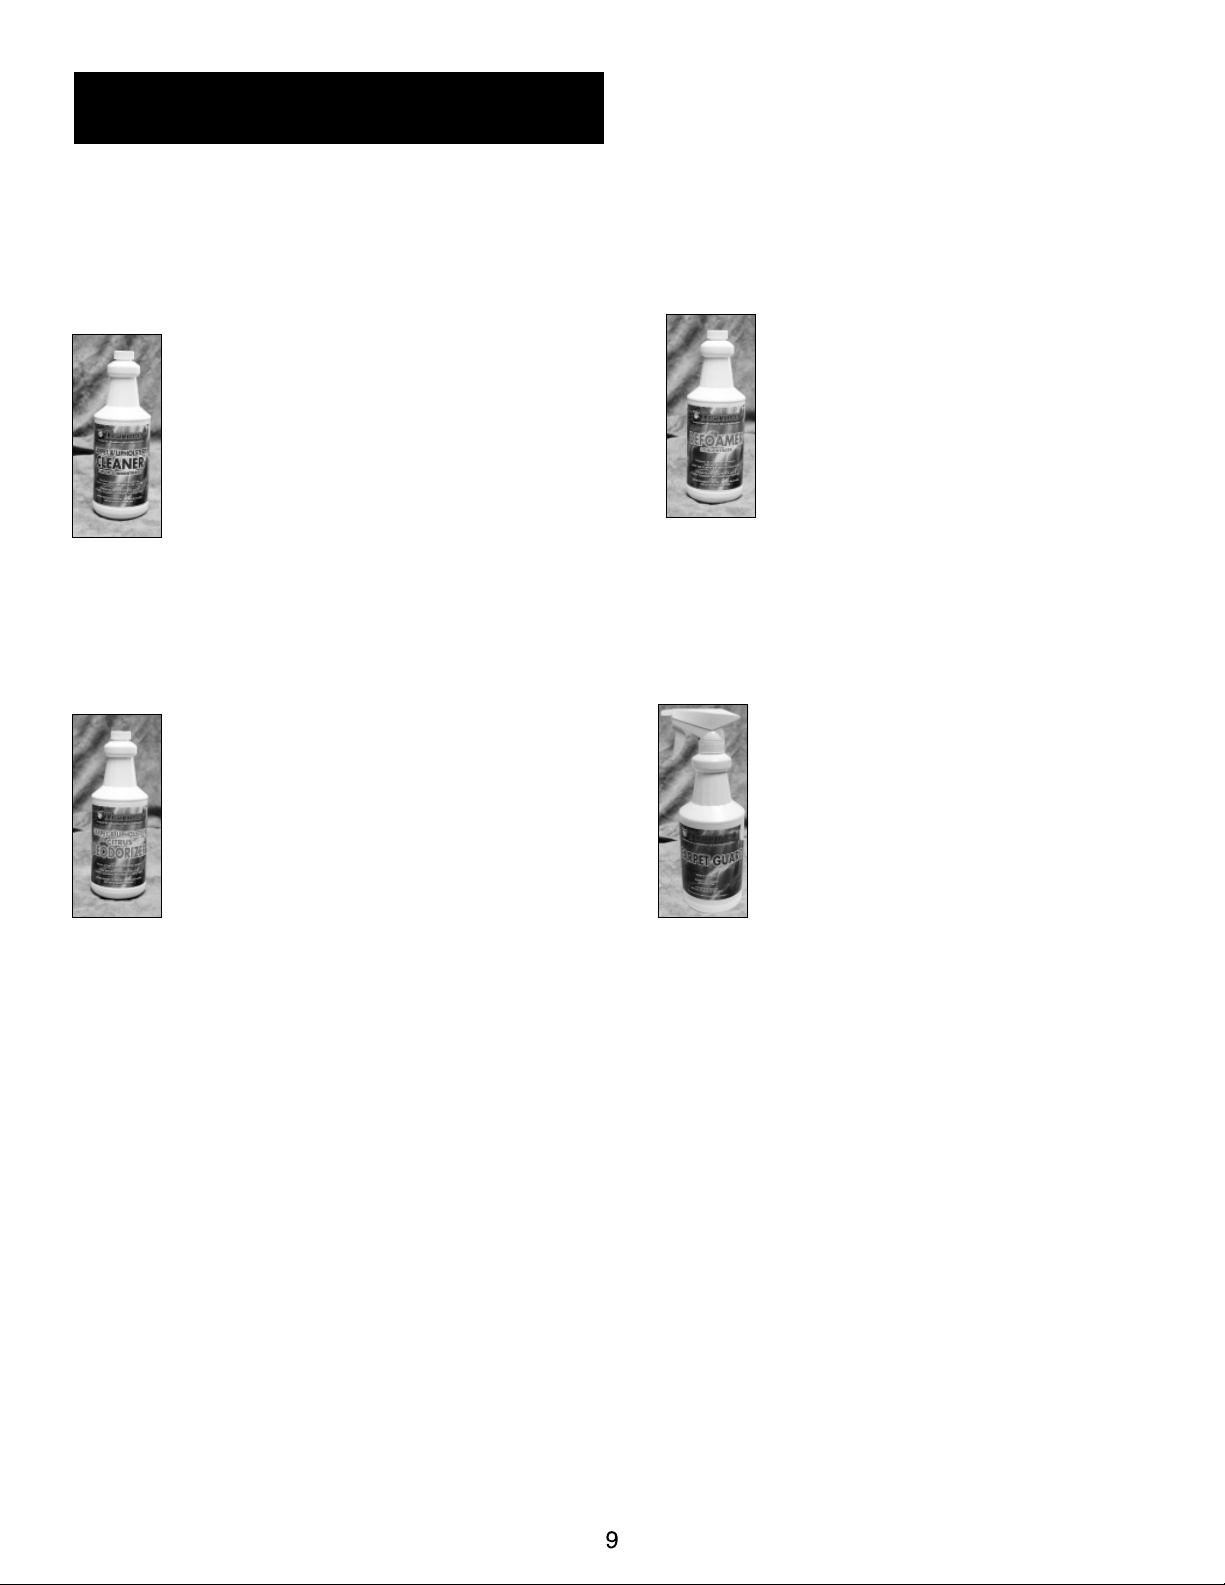
TRIAD CARPET & UPHOLSTERY CLEANER
6060: Available in 1 gal., 1 gal. case of 4, Special
order only 30 gal. and 55 gal drum. Designed to
liftand oils, stains, and deeply embedded soils from
carpet & upholstery for easy extraction. Professionally
formulated to dispense
a perfect blend of gentle yet effective cleansing agents
for cleaning carpets. Cleans and brightens leaving
carpets soft to the touch with no “soapy” residue.
CITRUS DEODORIZER 5080:
Available in 32oz individual, 32 oz case of 12. While
steam cleaning, it neutralizes and removes offensive
odors from carpet & upholstery at their source,
especially pet urine, smoke and other organic matters.
Leaves a fresh, pleasant scent.
STEAM CLEANING SOLUTIONS
DEFOAMER 6070:
Available in 1 gal., 1 gal. case of 4,
Special order only 55 gal drum.
Defoamer is used in the solution
recovery tank to control potentially
damaging foam build-up within the
tank. Every carpet being cleaned
contains foreign matter within its bers
which has a tendency to excessively foam
when extracted into the recovery tank.
CARPET GUARD 6110:
Available in gal., 1 gal. case of 4, Special
order only 55 gal drum. Protects against
stains and makes your carpet an upholstery
much easier to clean keeping it looking
newer longer. is product is a non-
staining liquid which provides soil and
water resistance to fabrics. By partially
inhibiting fabric friction, it also increases
the life of the fabric and carpeting.
Also available :
TLC Spot & Stain (6030):
Available in 32 oz. , 32 oz case of 12, 1
gal., 1 gal. case of 12, and special order
only 55 gal.drum. Use this dual purpose
cleaner for carpet, rug, and upholstery
spotting. Formulated to remove a wide
variety of both water and oil based soils.
Powerhouse All-in-one (7000):
Available in 1 gal. , 1 gal. case of 4 and
special order 55 gal. drum. A combination
of wetting agents, powerful emulsiers,
soil penetrants and built in soil retardants
make this the ideal carpet extraction
cleaner.
10
THERMAX DV12 SPECIFICATIONS
DIMENSIONS:
• Length. . . . . . . . . . . . . . . . . . . . . 34”
• Width 19”
• Height . . . . . . . . . . . . . . . . . . . . . 36”
• Weight. . . . . . . . . . . . . . . . . . 99 lbs.
ELECTRICAL:
• 120 Volt AC
• 15 AMP
• 50/60 HZ
RECOVERY TANK:
• High-Density Polyethylene
• Automatic Overow Shut-O
• 12 U.S. Gallons
VACUUM MOTOR:
• (2) 2-Stage By-Pass
• 165”Water Lift
SOLUTION TANK:
• Hygienic Stainless Steel
• 11 U.S. Gallons
• 1800 Watt Heating Element
PUMP:
• 100 P.S.I.
• Diaphragm Demand
with Bypass
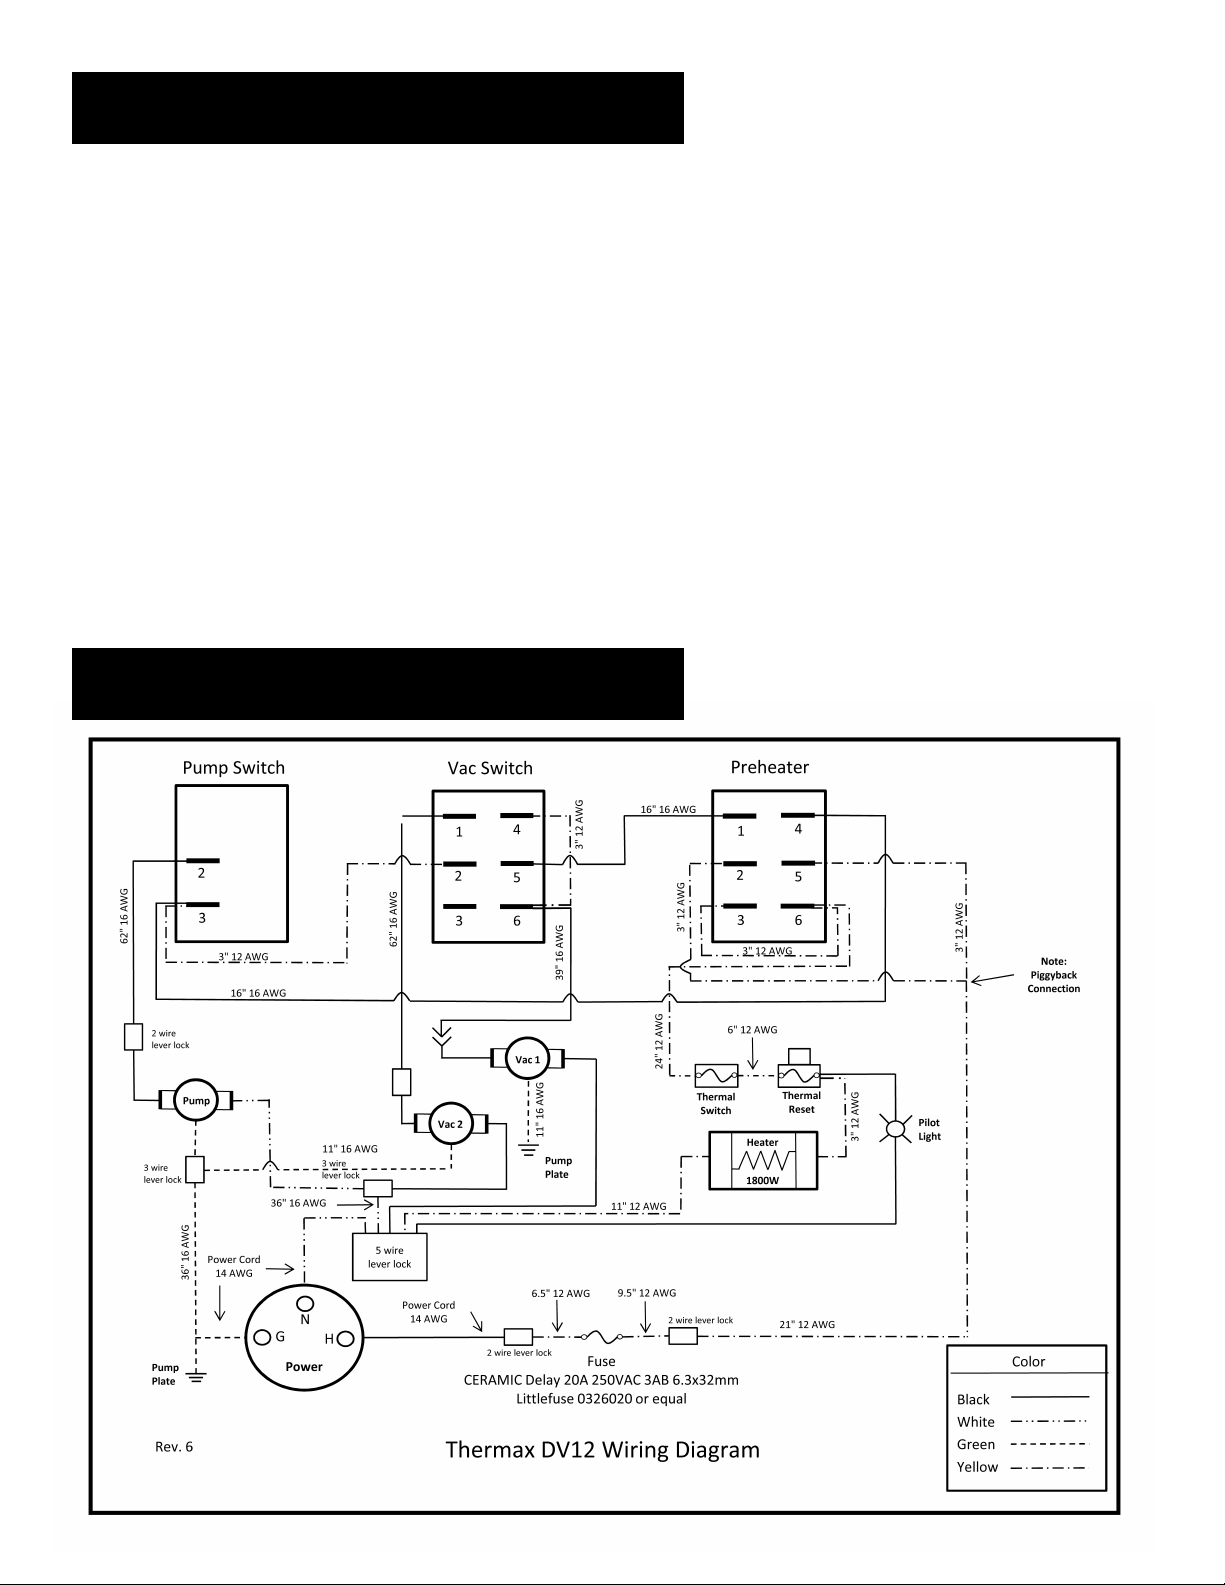
THERMAX DV12 WIRING DIAGRAM

11
TROUBLESHOOTING
System Will Not Operate 1) Plugged into dead outlet
2) Blown fuse or breaker
3) Defective power cord
4) Defective switch
5) Loose wiring
6) Improper connection
1) Plug into live grounded outlet
2) Replace fuse or breaker
3) Replace power cord
4) Replace switch
5) Properly connect wiring
6) Press tightly into outlet
CONDITION CAUSE CORRECTION
Vacuum Motor Will Not Run 1) Preheat switch in“ON”position
2) Loose wiring
3) Defective vacuum switch
4) Defective vacuum motor
1) Set switch to “OFF” position
2) Tighten and connect wiring
3) Replace vacuum switch
4) Replace vacuum motor
Pump Will Not Run 1) Preheat switch in“ON”position
2) Defective pump switch
3) Loose wiring
4) Clogged spray jet
5) Lint buildup in hose coupling
6) Kink in solution hose
7) Defective pump
8) Defective pressure switch
1) Set switch to “OFF” position
2) Replace pump switch
3) Tighten and connect wiring
4) Remove blockage
5) Disassemble and remove lint
6) Straighten hose
7) Replace pump
8) Replace pressure switch
Pump Runs But Will Not
Spray/Weak Spray
1) Solution tank empty
2) Obstructed spray jet
3) Obstructed hose coupling
4) Obstructed solution lter
5) Hose damage
6) Pump components
wearing out
1) Rell solution tank
2) Remove blockage
3) Remove obstruction
4) Clean lter
5) Replace necessary hose
6) Replace pump
Loss of Vacuum Suction 1) Recovery dome not seated
2) Obstruction in vac hose
3) Obstruction in wand
4) Screen lter clogged
5) Recovery dome needs gasket
1) Re-seat for better seal
2) Remove obstruction
3) Remove obstruction
4) Remove debris
5) Replace dome gasket
Water will not heat 1) Thermo reset switch tripped
2) Heater element damaged
3) Defective thermo disk
4) Defective preheat switch
5) Heater not activated
1) Reset thermo reset switch
2) Replace heater
3) Replace thermo disk
4) Replace preheat switch
5) Switch Preheat to
“ON” position
No indicator light on 1) Faulty indicator light
2) Solution up to temperature
1) Replace indicator lamp
2) No action required
THERMAX DV12 SCHEMATIC
12
46
THERMINATOR - DV12
26
14
45
45
78
38
38
33 33
96
9999
100

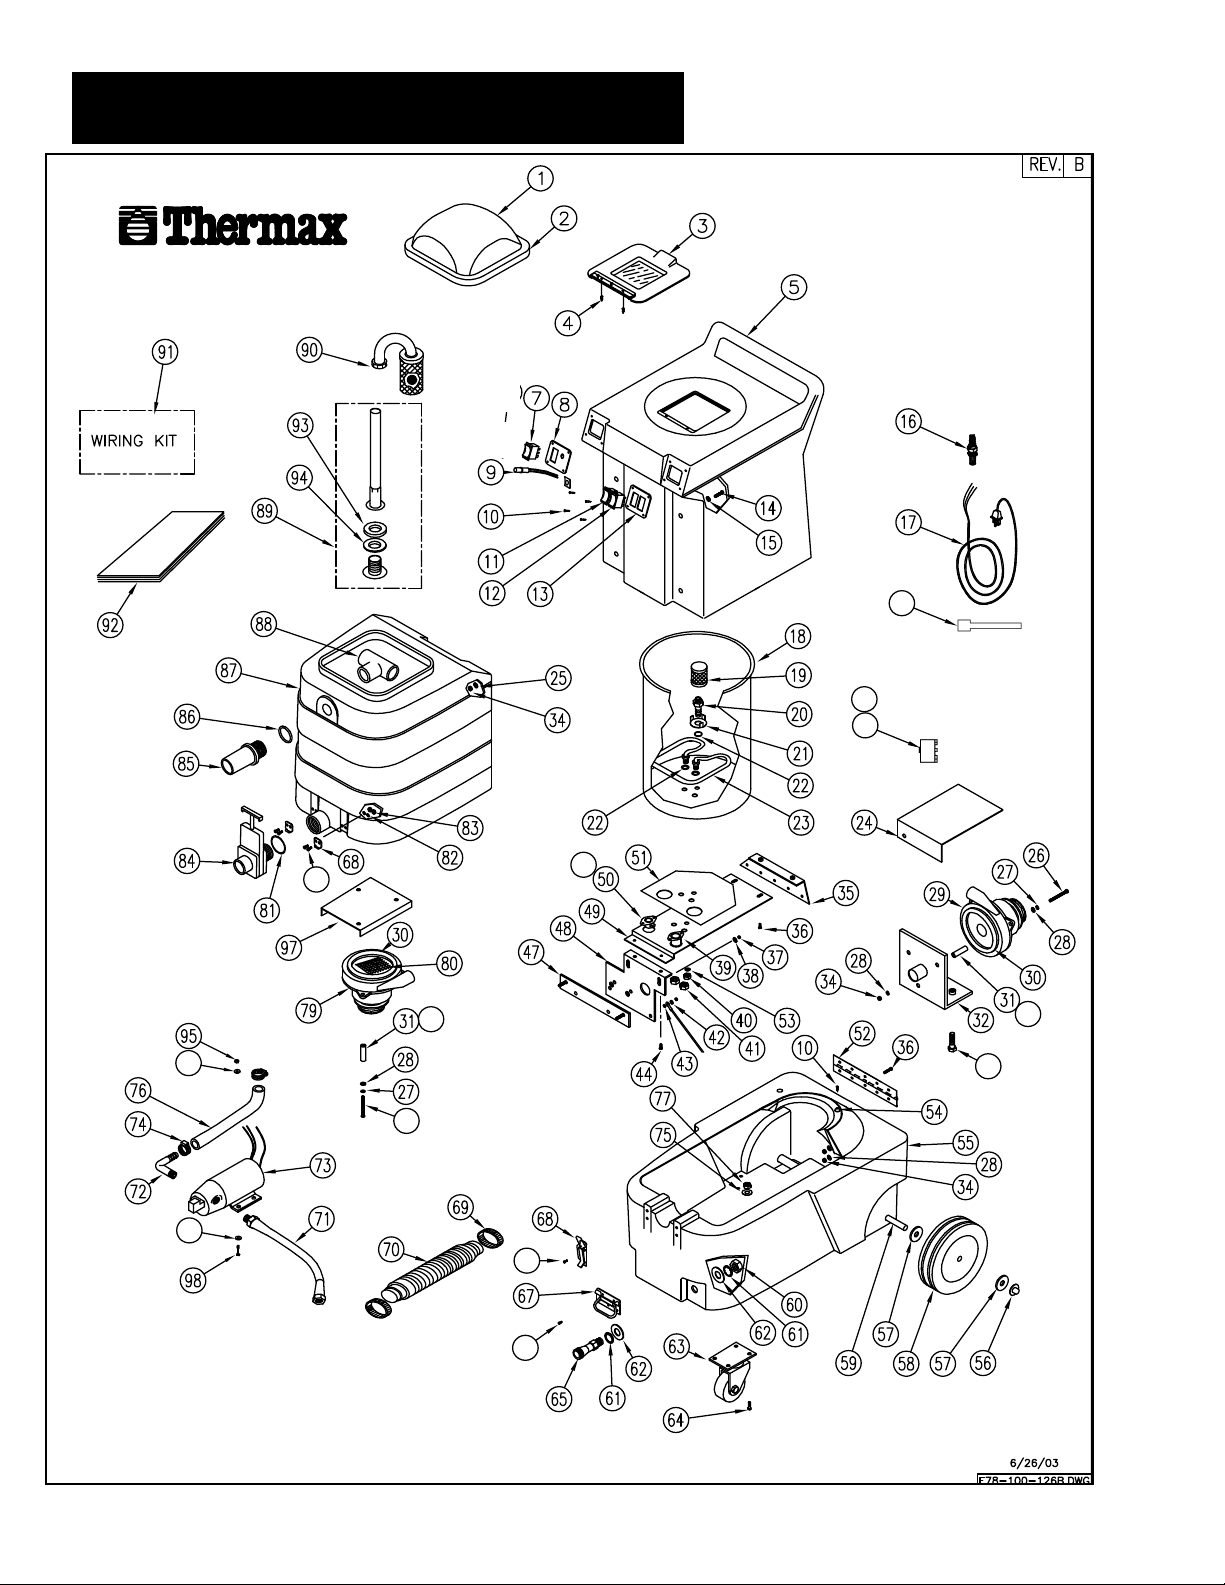
THERMAX DV12 PARTS LIST
ITEM NO. THERMAX NO.
1 24-005-01
2 23-005-005
3 24-007-01
4 04-058-00
5 01-295-103
7 02-511-00
8 06-483-01
9 32-578-122
10 04-054-01
11 02-502-00
12 02-503-00
13 06-483-00
14 04-138-00
15 04-232-00
16 27-274-003
17 27-012-120
18 03-213-00
19 37-706-000
20 03-464-01
21 03-043-01
22 05-264-00
23 25-303-120
24 03-020-00
25 04-282-00
26 04-021-00
27 04-256-00
28 04-216-00
29 30-100-01
30 05-204-01
31 01-365-02
32
34
03-063-00
01-365-04
04-322-02
35 03-027-00
36 04-148-00
37 04-321-01
38 04-204-00
39 02-677-00
40 04-306-00
41 04-309-00
42 04-302-00
43 04-253-00
44 04-048-00
45 04-041-02
46 04-042-00
47 03-024-00
48
49 03-026-00
DESCRIPTION
ASSY, DOME, SMOKE, DV12
GASKET, DOME, DV12
ASSY, LID, DV12
SCREW #6 X 5, PHIL, WOOD, SS HOUSING
SOLUTION, DV12
SWITCH, DPDT, DV12
PLATE, SWITCH, PREHEAT, DV12
KIT, PILOT LIGHT, 120V, 31” DV12 SCREW,
#8 X .5”, PH, PHIL, ZINC
SWITCH, DPDT CENTER OFF DV12
SWITCH, SPST, DV12
PLATE, SWITCH, PUMP VAC, DV12 SCREW,
1/4-20 X 1.25, TRUSS, PHIL, SS WASHER,
FLAT, .25 X 1, SS
ASSY, STRAIN RELIEF
ASSY, PWR CORD, DV12
TANK, STAINLESS, DV12, #967755-0 ASSY,
SOL FILTER, COM’L
FITTING, SOLUTION TANK, INLET
RETAINER, LINT FILTER, CP5/DV12
O-RING, .546 ID, OUT & HEATER SEAL
ASSY, HEATER, 120V,1800W, DV12
COVER, VAC MOTOR, DV12
WASHER .25, SEALING, SS, NEO
SCREW 1/4-2 X 3.5, RH, PHIL, SS
WASHER, .25”, INT LOCK
WASHER, FLAT, .25 X .75, SS
VAC MOTOR , W/O SCREEN, DV12
GASKET, .25”THK, NEO, 5.7 VAC MOTOR
SPACER 0.75"
BRACKET, VAC MOTOR DV12
SPACER 1.5"
NUT, 1/4-20, NYLOCK, 18-8 SS
TIE BAR, REAR, CP12/DV12
SCREW, 1/4-20X1, TRUSS, PHIL, ZINC NUT,
#10-32, NYLON SS
WASHER, FLAT, SAE #10
SWITCH, THERMAL, 15A, 1.5”
NUT, 9/16 -18, HEX JAM
NUT, 5/18, HEX,BRASS
NUT, 8-32, HEX CAD
WASHER, #8, INT LOCK
SCREW, 10-32 X .375, PH, PHIL, W/W, ZINC
SCREW, 8-32 X. 75, RH, PHIL, SS
SCREW 8-32 x .1.00, PPH, MS, SS
TIE BAR, DV12
PLATE, PUMP, DV12
PLATE, HEATER, DV12
ITEM NO. THERMAX NO.
50 02-680-00
51 05-355-00
52 04-573-00
53 04-276-00
54 04-560-00
55 01-138-00
56 04-311-00
57 04-211-00
58 03-601-01
59 03-816-00
60 04-312-00
61 04-254-00
62 04-213-00
63
64
03-600-01
04-140-0 2
65 03-453-00
67 04-575-00
68 04-574-00
69 04-373-00
70 21-153-001
71 20-160-000
72 03-468-00
73 31-178-00
DESCRIPTION
SWITCH, THERMAL RESET
SHEILD, HEAT, DV12
HINGE,CASE,SS, DV12
WASHER, WAVE SPRING, .760 OD
BUMPER, RECESSED, DV12
CASE, BOTTOM, DV12
NUT, .5 PUSH, ZINC
WASHER, FLAT .5 X 1 X .09
WHEEL REAR DV12
SHAFT, AXLE, DV12
NUT, 3/4-16, HEX JAM, ZINC
WASHER .75, INT TOOTH ZINC
WASHER, FLAT, .75, SAE, ZINC
CASTER, FRONT, GRAY, DV12
BOLT, 5/16-18 X0.75, HEX HD, ZINC
COUPLER, F60, .75 MPT X .25, DV12
HANDLE, DV12
LATCH, DV12
CLAMP,WORM GEAR, 2.5”
VAC HOSE, 2 X 40, WIRE W/2” CUFFS
ASSY, SOLUTION HOSE,DV12
FITTING, 3/8 NPT X 3/8 BARB, BRASS
ASSY, PUMP, 120V, 100PSI, CP5/DV12
74 04-371-00 CLAMP, WORM, .312”
75 04-210-00
76 05-018-00
77 04-310-00
79 30-022-120
WASHER, FLAT .312, SAE, ZINC
HOSE .375”, PVC, - PRICE/FOOT
NUT, 5/16-18, NYLOCK, ZINC
DOW THERMAL PASTE
ASSY. VAC MOTOR, 120V, W/SCREEN,. DV12
80 23-004-01 SCREEN, VAC MOTOR 2.5” X 2.5” DV12
81 05-213-00
82 04-281-00
83 04-323-00
84 01-600-00
85 01-360-00
86 05-256-00
87 01-282-00
88 01-362-00
89 22-795-000
90 37-752-00
91
33- 720-500
92 06-376-00
93 05-212-00
94 05-211-01
95 04-321-00
97 03-025-00
98 04-028-00
99
03-303-00
GASKET 1.5, RUBBER, GATE VALVE
WASHER #8, SEALING, SS, NEO
NUT, 8-32, NYLOCK
VALVE, GATE, DV12
FITTING, PVC,INLET,DV12
O-RING, 1.421 ID INLET,DV12
TANK, RECOVERY, DV12
FITTING, PVC, “T”, 1.25, DV12
ASSY, RISER TUBE, DV12
ASSY, SHUT OFF, DV12
WIRING KIT, DV12
MANUAL, OWNERS DV12
GASKET, 2.12 OD X .3 , NEO, RISER TUBE
GASKET, 2.4 OD X .06, NEO, VAC SEAL
NUT, 10-32, NYLOCK
STRAP LOOP
PLATE, RECOVERY TANK DV12 SCREW,
10-32 x1 1/4”, PH, PHIL, ZINC CP5/DV12
WAGO MOUNTING CARRIER
WAGO STRAIN RELIEF
See your local distributor
for any other items, solutions, and spare parts or visit www.thermacoinc.com.
13
04-371-01 Single earclamp, SS, 23/32
03-705-02 Screen, Vacuum Motor, 4.0 dia
03- 022-00
06-376-02
06-376-02 2016
78 05- 105-00
96
04- 584-00
33
100 03-304-00

DV12 WARRANTY
The Thermax DV12 is warranted to be free from Manufacturers defect for a period of three (3) years on
all electrical components such as the pump, heater, and vacuum motors. However once the part has
been replaced it then becomes a limited 90 day warranty
1) Warranty extended only to original owner. Proof of purchase required.
Brass quick-disconnects, “O” rings, diaphragms, seals, grommets, gaskets, or any rubber or
synthetic rubber or rubber-like parts are considered expendable in normal use and service,
therefore are not included in this warranty.
The Manufacturer’s obligation under this warranty is limited to repairing or replacing with
Manufacturer’s specied replacement parts, free of charge and without charge for installation,
and parts that prove, in the judgement of the Manufacturer or its authorized service center, to be
defective in material or workmanship.
WARNING ON CLEANING SOLUTIONS: Use of cleaning solutions other than Thermax will
void warranty. Must use defoamer in recovery tank of DV12.
This warranty shall not apply: (1) to normal maintenance services or adjustments, including, but
not limited to, cleaning of the system as recommended by the Manufacturer; nor (2) to systems
which shall have been altered or used in any way which, in the opinion of the Manufacturer
or its service center, adversely aects the performance; nor (3) shall this warranty apply if the
serial number is missing, altered, or defaced, or in the case of a defect or damages resulting
from inadequate voltage, blown fuses, damage due to freezing, accidental damage to nish or
components, abuse, misuse or act of God.
We request that the original owner write or call for authorization to return any items under
warranty. Defective parts under warranty must be returned to Manufacturer for inspection unless
otherwise authorized by Manufacturer. Upon inspection and Manufacturer determination, proper
action regarding warranty will be taken, including an appropriate refund, credit on parts, labor
or shipping. This warranty also excludes any rental equipment expenses incurred or loss of
business claims of any nature due to break down of the system.
There are no warranties which extend beyond the description on the face hereof, and this
warranty is in lieu of any other warranty, expressed or implied, and expressly limits the term of
this warranty, any implied warranty of merchantability or tness for a particular purpose. This
warranty constitutes the sole and exclusive remedy for any defect in or non-performance of or
use of the Thermax DV12 cleaning system and under no circumstances shall the Manufacturer
be liable for any claimed or consequential damages arising there from.
NOTICE: Failure to complete and return the attached warranty card
within th ir t y (30) days from d ate of purchase sha ll render t his war rant y
null and void. Warranty card must be returned to Manufacturer!
Staple your copy of the warranty card to this manual.
14
____________________________________________________________________________________________
Name of Distributor
____________________________________________________________________________________________
Distributor Phone Number
____________________________________________________________________________________________
Date of Purchase
____________________________________________________________________________________________
Serial Number
PLEASE NOTE: Retain this owner’s manual along with your copy of the Warranty Registration
Form. Proof of purchase must also accompany all warranty claims.
2219 Eagle Dr
Middleton, WI 53562
1-877-483-1049
Website: www.thermacorinc.com
Email: [email protected]
06-376-02 rev 09-22
Table of contents


