Thermador T18IW800SP User manual

USE & CARE GUIDE
GUIDE
D’UTILISATION
ET D’ENTRETIEN
MANUAL DE USO
Y CUIDADO
Model/Modele/Modelo
T18IW..
T24IW..
Wine storage
compartment
Conservador de vinos
Cave à vin

2
en-us Table of Contents 3
fr-ca Table des matières 16
es-mx Índice 29

en-us
3
en-us Table of Contents
enOperatinginstructions
Safety and warning information........................................ 4
Definition .......................................................................... 4
Before you switch ON the appliance.......................... 4
Technical safety.............................................................. 4
Important information when using the appliance..... 4
Children in the household ............................................ 4
General regulations........................................................ 4
Installing the appliance ...................................................... 5
Transporting .................................................................... 5
Installation location ........................................................ 5
Ventilation ............................................................................. 5
Scope of delivery ................................................................ 5
Connecting the appliance ................................................. 5
Electrical connection...................................................... 5
Getting to know your appliance ....................................... 6
Controls............................................................................ 7
Switching the appliance on............................................... 7
Operating tips.................................................................. 7
Set the language................................................................. 8
Setting the temperature ..................................................... 8
Special functions................................................................. 8
Setup mode..................................................................... 8
Vacation mode................................................................ 9
Sabbath mode ................................................................ 9
Humidity function............................................................ 9
Alarm function...................................................................... 9
Placing bottles in the refrigerator................................... 10
Storage example .......................................................... 10
Practical tips for storing wine ......................................... 10
Drinking temperatures...................................................... 10
Interior fittings .................................................................... 11
Removing the shelves................................................. 11
Presentation attachment ............................................. 11
Switching off and disconnecting the appliance .......... 11
Switching the appliance off ........................................ 11
Disconnecting the appliance ..................................... 11
Defrosting ........................................................................... 11
Cleaning the appliance.................................................... 11
Interior fittings ............................................................... 11
Odors .................................................................................. 11
Changing the activated-carbon filter ............................. 12
Light (LED) ......................................................................... 12
Presentation light.......................................................... 12
Tips for saving energy...................................................... 12
Operating noises............................................................... 12
Quite normal noises..................................................... 12
Preventing noises......................................................... 12
Eliminating minor faults yourself .................................... 13
Appliance....................................................................... 13
Customer service.............................................................. 13
Warranty.............................................................................. 14

,Safety and warning information
en-us
4
Safety and warning information
Definition
WARNING:
This indicates that death or serious injury may result
due to non-observance of this warning.
CAUTION:
This indicates that minor or moderately severe
injury may result due to non-observance of this
warning.
Before you switch ON the appliance
Please read the operating and installation instructions
carefully. They contain important information on how to
install, use and maintain the appliance.
The manufacturer is not liable if you fail to comply with
the instructions and warnings. Retain all documents for
subsequent use or for the next owner.
Technical safety
If the power cord of this appliance is damaged, it must
be replaced by the manufacturer, customer service
or a similarly qualified person. Improper installations
and repairs may put the user at considerable risk.
Repairs may be performed by the manufacturer,
customer service or a similarly qualified person only.
Only original parts supplied by the manufacturer may
be used. The manufacturer guarantees that only these
parts satisfy the safety requirements.
A power cable extension may be purchased from
customer service only.
The appliance comes with a UL registered 3-wire power
cord.
Never sever or remove the third (earth) conductor from
the power cord.
The appliance requires a 3-pole socket. The socket
may be connected by an electrician only.
Where there is a 2-pole standard wall socket, it is the
personal responsibility and duty of the customer to
have this socket replaced with a correctly earthed 3-
pole wall socket. Do not use any adapter plugs.
Important information when using
the appliance
■Never use electrical appliances inside the appliance
(e.g. heater, electric ice maker, etc.). Risk
of explosion!
■Never use a steam cleaner to defrost or clean
the appliance! The steam may penetrate electrical
parts and cause a short-circuit. Risk of electric
shock!
■Do not use pointed or sharp-edged implements
to remove frost or layers of ice. You could damage
the refrigerant tubes. Leaking refrigerant may ignite
or cause eye injuries.
■Do not store products which contain flammable
propellants (e.g. spray cans) or explosive
substances in the appliance. Risk of explosion!
■Do not stand on or lean heavily against base
of appliance, drawers or doors, etc.
■Before defrosting and cleaning the appliance, pull
out the mains plug or switch off the fuse. Do not pull
out the mains plug by tugging the cable.
■Bottles which contain a high percentage of alcohol
must be sealed and stored in an upright position.
■Keep plastic parts and the door seal free of oil
and grease. Otherwise, parts and door seal will
become porous.
■Never cover or block the ventilation openings for
the appliance.
■People (children incl.) who have limited physical,
sensory or mental abilities or inadequate knowledge
must not use this appliance unless they are
supervised or given meticulous instructions.
Children in the household
■Keep children away from packaging and its parts.
Danger of suffocation from folding cartons and cling
wrap!
■Do not allow children to play with the appliance!
■If the appliance features a lock:
keep the key out of the reach of children!
General regulations
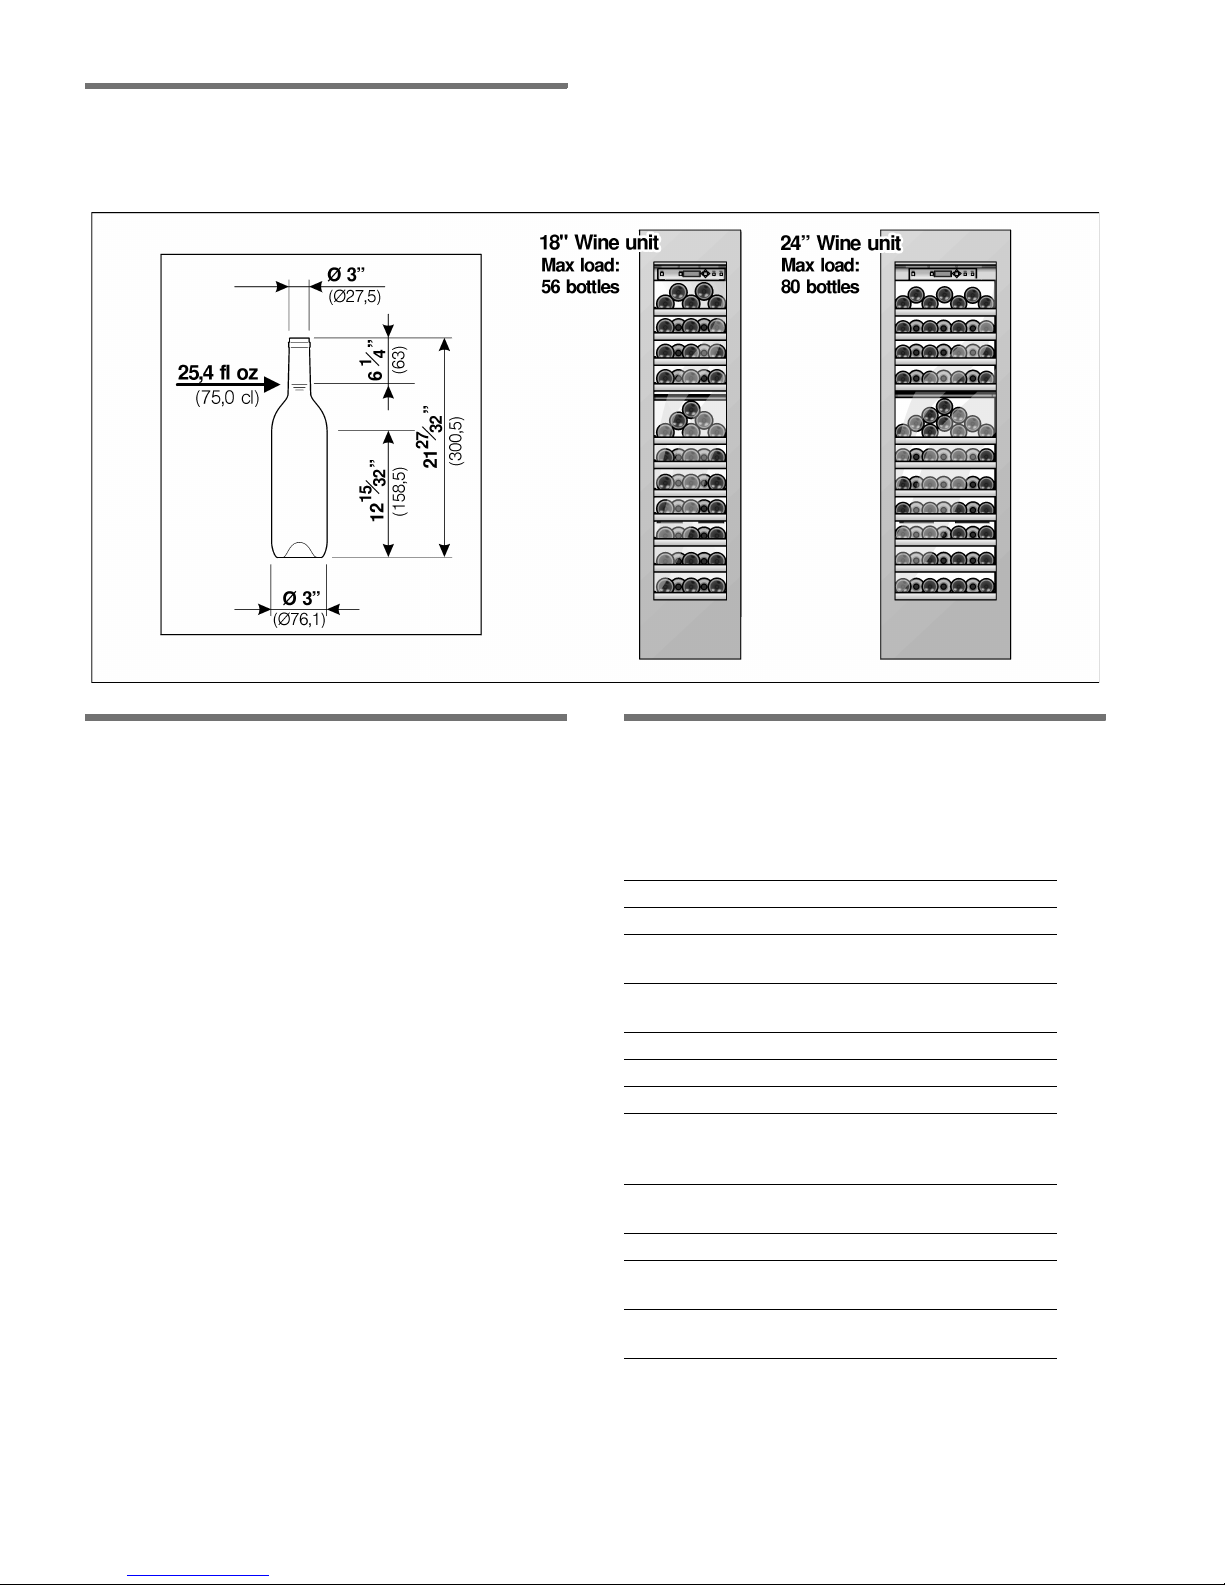
This appliance is designed exclusively for the storage
of wine.
This appliance is intended for use in the home
and the home environment.
The refrigeration circuit has been checked for leaks.

en-us
5
Installing the appliance
Have a technician install and connect the appliance
according to the enclosed installation instructions.
,WARNING:
Do not install this appliance:
■outdoors,
■in an environment with dripping water,
■in rooms where there is a risk of frost.
Transporting
The appliances are heavy and must be secured during
transportation and installation.
Because of the weight/dimensions of the appliance
and to minimise the risk of injuries and damage
to the appliance at least two persons are necessary
to set-up the appliance securely.
Installation location
A dry, well ventilated room is suitable as an installation
location. The installation location should not be
exposed to direct sunlight and not placed near a heat
source, e.g. a cooker, radiator, etc. If installation next to
a heat source is unavoidable, use a suitable insulating
plate or observe the following minimum distances from
the heat source:
■to electric or gas cookers 11/4”(3cm).
■to an oil or coal-fired cooker 1113/16”(30cm).
The floor of the installation location must not give way;
if required, reinforce floor. To ensure that the ice maker
functions correctly, the appliance must be upright.
Ventilation
The refrigeration unit is ventilated only via
the ventilation grille in the base. Never cover
the ventilation grille or place anything in front of it.
Otherwise the refrigeration unit must work harder,
increasing the power consumption.
Connecting the appliance
After installing the appliance, wait at least 1 hour until
the appliance starts up. During transportation the oil in
the compressor may have flowed into the refrigeration
system.
Before switching on the appliance for the first time,
clean the interior of the appliance (see chapter
“Cleaning the appliance”).
Electrical connection
,WARNING:
Avoid the risk of an electric shock!
,WARNING:
Insert into a grounded 3-phase socket. Never
remove grounding phase. Do not use any
adapters. Do not use any extension cables.
,WARNING:
Non-compliance with these instructions may
result in death, fire or an electric shock.
Improper connection of the protective conductor
may result in an electric shock. If you are in
doubt whether the appliance has been grounded
properly, have the appliance tested by
a qualified electrician or service technician.
The socket must be near the appliance and also freely
accessible following installation of the appliance.
The appliance complies with protection class I.
Connect the appliance to 115 V/60 Hz alternating
current via a correctly installed socket with protective
conductor. The socket must be fused with a 10 to 16 A
fuse.
The appliance comes with a UL registered 3-wire power
cord. The appliance requires a 3-pole socket.
Please observe the following table with regard to this:
Check on the rating plate whether the indicated voltage
and current type correspond with the values of your
power supply. The location of the rating plate can be
found in the chapter entitled Customer service.
,WARNING:
Never connect the appliance to electronic
energy saver plugs.
Our appliances can be used with mains and
sine-controlled inverters. Mains-controlled
inverters are used for photovoltaic systems
which are connected directly to the national grid.
Sine-controlled inverters must be used for
isolated applications (e.g. on ships or
in mountain lodges) which are not connected
directly to the national grid.
Appliance Maximum simulta-
neous load
Wine refrig-
erator
2amps

en-us
6
Getting to know your appliance
These operating instructions refer to several models.
The diagrams may differ.
1 Light switch
2 Controls
3 Light (LED)
4 Rack for wine bottles
5Partition
6 Light (presentation light)
7 Presentation attachment
8 Glass door
9 Ventilation

en-us
7
Controls
Note:
A sound can be heard every time a button is actuated
if this function is activated in the sound menu during
the setup mode.
Symbols in the display field
Switching the appliance on
Switch on the appliance with the On/Off button.
The appliance begins to cool. Light is switched on
when the door is open.
,CAUTION:
Keep hands and fingers away from front and rear
openings of the refrigerator door when closing.
Risk of injury to hands or fingers.
Never allow children to climb on or play with
the refrigerator door.
Operating tips
When the appliance has been switched on, take several
hours until the set temperature been reached.
AOn/Off button
Serves to switch the whole appliance on and off.
BAlarm button
Used to switch off the warning signal, see chapter
“Alarm function”.
CDisplay panel
The temperatures in the refrigerator compartment
are shown in the display panel. Activated special
functions are shown via “symbol”.
The menus and setting options which are available
are represented on the display panel in the setup
mode, see chapter “Setup mode”.
DSelection buttons
The temperature setting is activated using
the selection buttons, see chapter “Setting
the temperature”.
For selecting a menu in the setup mode,
see chapter “Special functions”.
ESetting buttons
The temperature can be changed using the setting
buttons, see chapter “Setting the temperature”.
More settings can be selected in the setup mode,
see chapter “Special functions”.
F“setup” button
This button starts and ends the setup mode.
If the setup mode is ended using the setup button,
the changes which have been made are stored.
GVacation button
Is used to switch vacation mode on and off,
see chapter “Special functions”, section “Vacation
mode”.
Display for the upper climatic zone.
Display for the lower climatic zone
“Humidity” function is activated, see chapter
“Setup mode”.
Holiday mode is activated, see chapter
Special functions.
For the setting options in the set up mode,
see chapter Special functions.
A warning message is displayed,
see chapter Alarm function.

en-us
8
Set the language
The display languages can be changed according
to the table in the chapter Setup mode.
In order to change the display language:
1.
Press setup button.
2.
Press the ¾or ¿setting button, until the set
language is displayed.
3.
Press the @or A setting button, until the desired
language is displayed.
4.
Press the setup button, in order to store the settings.
The set temperature is displayed again in the fascia.
Setting the temperature
The temperatures in both climatic zones can be set
independently of each other from +41 °F to +64 °F.
We recommend a setting of 51 °F.
1.
Activate setup mode with the selection button ¿.
2.
Select the required climatic zone.
3.
Set the temperature with the @(warmer) or A
(cooler) selection buttons.
Special functions
The following special functions can be selected
or displayed:
Setup mode
In Setup mode you can make your personal settings.
Switching on
Press setup button.
The first menu (temperature unit) is displayed
in the fascia.
Making settings
1.
Switch on setup mode.
2.
Press the selection button ¾ or ¿.
The next menu is displayed and its current setting
(mostly ON or OFF).
3.
Press the setting button @or A.
The setting is stored, if the next menu is selected
using ¾or ¿.
Switching off
Press setup button.
All of the changed settings are stored.
Note:
If no button is selected within 20 seconds, the setup
mode ends automatically. All of the changed settings
are stored. The set temperature is displayed again
in the fascia.
Menus in the setup mode
The following settings can be made.
Menu Possible setting
Temperature unit °C (degrees Celsius)
°F (degrees Fahrenheit)
Language English
French
Spanish
Sound On
Off

en-us
9
Vacation mode
If leaving the appliance for a long period of time, you
can switch the appliance over to the energy-saving
vacation mode.
When Vacation mode is switched on, the following
settings are made:
■The appliance operates in energy-saving mode.
■The light is switched off.
Switching on
Press Vacation button.
VACATION is displayed in the display panel.
Switching off
Press Vacation button.
The previous settings and temperature values are once
again activated.
Sabbath mode
When Sabbath mode is switched on, the following
settings are switched off:
■Acoustic signal when a button is pressed
■Interior light
■Background illumination of the display panel
Switching on
1.
Press and hold down the setting button @.
2.
Press Vacation button.
3.
Press setting button @and hold down for a further
3seconds.
The VACATION symbol flashes on the display panel
and SABBATH is displayed.
Switching off
Press Vacation button.
The previous settings and temperature values are once
again activated.
Humidity function
The air humidity in both climatic zones can be
increased independently of each other.
Alarm function
Note:
As long as a warning is displayed, no buttons can be
pressed.
Cause
One door of the appliance has not been closed
correctly or has been open too long.
Remedial action
Press the alarm button and close the door. The display
goes out.

en-us
10
Placing bottles in the refrigerator
Storage example
Practical tips for storing wine
■Unpack bottles of wine – do not leave in crates
or cardboard boxes – before storing
in the refrigerator compartment.
■Place old bottles so that the cork is always wet.
There should never be an air gap between the wine
and the cork.
■The open bottle shelves are especially suitable
because they do not interrupt the air circulation. As
a result, the atmospheric humidity which condenses
on the bottles quickly dries again.
■Before drinking your wine, let it stand until it reaches
room temperature: For example rosé takes about
two to five hours and red wine four to five hours
before they reach the right drinking temperature.
The wine will then be at the correct drinking
temperature. Sparkling wine and Champagne should
be cooled in the refrigerator shortly before drinking.
■Remember that wine should always be cooled
slightly lower than the ideal serving temperature, as
its temperature increases as soon as it is poured
into a glass!
Drinking temperatures
The correct serving temperature is crucial for the taste
and therefore your enjoyment of the wine.
We recommend serving wine at the following drinking
temperatures:
Type of wine Drinking temperature
Bordeaux red 65 °F (18 °C)
Côtes du Rhône red/
Barolo
64 °F (17 °C)
Burgundy red/ Bor-
deaux red
61 °F (16 °C)
Port 59 °F (15 °C)
Young Burgundy red 57 °F (14 °C)
Young red wine 54 °F (12 °C)
Young Beaujolais/all
white wines with little
residual sugar
52 °F (11 °C)
Old white wines/ Char-
donnay
50 °F (10 °C)
Sherry 49 °F (9 °C)
Young white wines from
late vintage
46 °F (8 °C)
White wines Loire/Entre-
deux-Mers
45 °F (7 °C)

en-us
11
Interior fittings
Removing the shelves
You can take out and vary the shelves inside
the appliance.
Presentation attachment
You can take out or vary the attachment to suit your
requirements.
Switching off
and disconnecting
the appliance
Switching the appliance off
Press the On/Off button.
Refrigeration unit and light switch off.
Disconnecting the appliance
If you do not use the appliance for a prolonged period:
1.
Switch the appliance off.
2.
Pull out mains plug or switch off fuse.
3.
Clean the appliance.
4.
Leave the appliance door open.
Defrosting
Defrosting is actuated automatically.
Cleaning the appliance
,WARNING:
Never clean the appliance with a steam cleaner!
,CAUTION:
■Do not use abrasive or acidic cleaning agents
and solvents.
■Do not use scouring or abrasive sponges.
The metallic surfaces could corrode.
■Never clean shelves and containers in
the dishwasher. The parts may become
deformed!
Proceed as follows:
1.
Before cleaning: Switch the appliance off.
2.
Pull out the mains plug or switch off the fuse.
3.
Clean the appliance with a soft cloth, lukewarm
water and a little pH neutral washing-up liquid.
The rinsing water must not run into the light.
4.
Wipe the door seal with clear water only and then
wipe dry thoroughly.
5.
After cleaning reconnect and switch the appliance
back on.
Interior fittings
All variable parts of the appliance can be taken out for
cleaning (see chapter “Interior fittings”).
Odors
If the appliance is emitting unpleasant odors:
1.
Switch off the appliance with the POWER button!
2.
Pull out the mains plug or switch off the fuse.
3.
Clean the interior.
See section on “Cleaning the appliance”.
4.
Clean all packages.
5.
Switch on the appliance again with the POWER
button.
After 24 hours check whether the odors have been
eliminated.
6.
Change the odor filter.
See section on “Changing the odor filter”.

en-us
12
Changing the activated-carbon
filter
Spare filters are available from your dealer.
1.
Open the filter holder.
2.
Remove the used filter and replace with a new one.
3.
Open the filter holder.
Light (LED)
Your appliance features a maintenance-free LED light.
These lights may be repaired by customer service
or authorized technicians only.
Presentation light
The interior lighting can be switched on permanently
for presentation purposes. The light inside
the appliance is lit at a reduced luminosity. To activate
constant lighting, turn the light switch to position 2.
To deactivate constant lighting, turn the light switch
to position 1.
Tips for saving energy
■Install the appliance in a dry, well ventilated room!
The appliance should not be installed in direct
sunlight or near a heat source (e.g. radiator, cooker).
If required, use an insulating plate.
■Do not block the ventilation openings
in the appliance.
■Allow warm food and drinks to cool down before
placing in the appliance!
■Open the appliance as briefly as possible!
Operating noises
Quite normal noises
Droning
Motors are running (e.g. refrigeration units, fan).
Bubbling, humming or gurgling noises
Refrigerant is flowing through the tubing.
Clicking
Motor, switches or solenoid valves are switching On/
Off.
Preventing noises
The appliance is not level
Please align the appliance with a spirit level. Use the
height-adjustable feet or place packing underneath
them.
The appliance is not free-standing
Please move the appliance away from adjacent units or
appliances.
Containers or storage areas wobble or stick
Please check the removable parts and re-insert them
correctly, if required.
Bottles or receptacles are touching each other
Move the bottles or receptacles slightly away from each
other.
Position 1 Interior light is lit when the door is open
Position 2 Interior light is lit when the door is open
and closed

en-us
13
Eliminating minor faults yourself
Before you call customer service:
Please check whether you can eliminate the fault yourself based on the following information.
Customer service will charge you for advice even if the appliance is still under guarantee!
Appliance
Customer service
Before you call customer service, see the chapter
entitled "Rectifying minor faults yourself".
After checking according to the chapter entitled
"Rectifying minor faults yourself", additional help can be
requested by calling the Thermador Customer
Interaction Center, 1-800-735-4328 (toll-free), from
anywhere in the USA.
In Canada contact your Thermador customer service or
call 1-800-735-4328.
Note down the following information about your fridge-
freezer so that you have it ready and can be better
assisted if you require help or customer service.
Fault Possible cause Remedial action
Appliance has no refrigeration
capacity.
The light does not work.
The display does not illumi-
nate.
Appliance has been switched off. Press the On/Off button.
Power failure. Check whether the power is on.
The fuse has been switched off. Check the fuse.
The mains plug has not been inserted
properly.
Check whether the mains plug is secure.
The refrigeration unit
is switching on more fre-
quently and for longer.
Appliance opened frequently. Do not open the appliance unnecessarily.
The ventilation openings have been
covered.
Remove obstacles.
The light (LED) does not work. The LED lamp is defective. Call customer service.
Light switch is jammed. Check whether it can be moved.
Display indicates “E..”. Electronics have detected a fault. Call customer service.
Display indicates “LOW-
POWER”.
The mains voltage falls below
the permitted limiting value.
When the mains voltage reaches
the stipulated value again, the warning mes-
sage goes out. If the warning message lasts
for longer, inform the energy supply com-
pany.
Dealer’s name:
Address:
Telephone number:
Purchase date:
Model number:
FD Nr.:
Serial number
Type

en-us
14
Warranty
The limited warranty from BSH Home Appliances in this
limited product guarantee applies only
to the Thermador fridge-freezers (the “Product”) which
you, as first purchaser have bought, if the product: (1)
was purchased for normal (not commercial) use in
the household and was always and exclusively used for
normal household purposes; (2) was purchased as
a new appliance in a shop (not as an exhibit, “as is”
or as a return) and not for resale or for commercial use;
and (3) was purchased in the United States or Canada
and has never left the country in which it was originally
purchased.The warranties listed here apply only
to the first purchaser of the product and are not
transferable.
Remember to return your registration card; although it
is not required for services within the scope of
the warranty, it provides Thermador with the best
means of contacting you in the unlikely event of
a safety warning or a product recall.
Period of validity of the warranty: Thermador
guarantees that the product is free of material and
production faults for a period of 365 days from
the date of purchase.This period starts on the day of
purchase and will not be postponed, suspended,
extended or replaced for any reason. Repair/
replacement as exclusive remedy: During this
warranty period Thermador or one of its authorized
customer service providers will repair your product free
of charge (subject to certain restrictions listed here) if it
turns out that your product has a material or production
fault. If an appropriate number of attempts have been
made to repair your product, Thermador will replace
your product (later models may be made available
to you for an additional fee at the sole discretion of
Thermador). All removed parts and components are
the property of Thermador at its sole discretion. For
the purpose of this warranty all replaced and/or
repaired parts will receive the identity of the original
parts, and this warranty will not be extended with
regard to these parts.
Thermador’s sole liability and responsibility, based on
this warranty, consists of repairing the factory-defective
product involving a customer service provider
authorized by Thermador during normal business
hours. For reasons of safety and with regard
to damage, Thermador strongly recommends that you
do not attempt to repair the product yourself or have it
repaired by a non-authorized customer service;
Thermador is not liable for repairs or work performed
by a non-authorized customer service. If you decide
to have the product repaired by somebody other than
an authorized customer service, THIS WARRANTY WILL
BE AUTOMATICALLY VOIDED. Authorized customer
service providers are those persons or companies
which have been specially trained on Thermador
products and which, in the opinion of Thermador, have
an excellent reputation concerning their customer
service and their technical skills (note: these are
independent persons/companies, there are no agents,
partners, subsidiary companies or representatives of
Thermador).
Irrespective of this, Thermador accepts no liability or
responsibility for the product if it is in a remote location
(more than 160 km from an authorized customer
service) or in an inaccessible, dangerous, threatening
or insidious place, in such surroundings or such an
environment; in such a case Thermador would, if you
so wish, bear the costs for labor and materials as well
as for transportation to the nearest authorized customer
service, but you would have to bear the costs for
transportation or other extra charges of the customer
service company if the latter has already expressed its
willingness to accept the order.
Extension of the limited warranty:
Thermador also offers the following, limited warranties:
■2-year limited warranty: Thermador will repair or
replace all components which have proven material
or production faults (without labor costs).
■5-year limited warranty on electronics: Thermador will
repair or replace all microprocessors or PCBs which
have proven material or production faults (without
labor costs).
■Lifetime warranty against rusting of stainless steel
parts: Thermador will repair or replace all
components which have proven material or
production faults (without labor costs).
Expired warranty: Thermador is neither legally nor in
any other way obliged to make concessions of any kind
after the warranty period has elapsed, this also applies
to repairs, pro-rata charging or product replacement.
Exclusion of warranty: The warranty described here
excludes all defects and damage which are not based
directly on faults on the part of Thermador; this also
includes the following cases: (1) Use of the product in
other than the normal, usual and designated way
(including inter alia any form of commercial utilization,
use or storage of a domestic appliance outdoors, use
of the product in conjunction with aircraft or watercraft);
(2) Conscious misconduct, negligence, misuse,
carelessness, disregard, improper handling,
inadequate maintenance, faulty or negligent installation,
tampering, non-observance of the instructions for use,
incorrect operation, work performed by unauthorized
customer service (including in-house repairs or testing
the inner life of the appliance); (3) Adjustments,
changes or modifications of any type; (4) Non-
observance of electrical, sanitary or building
regulations, provisions or laws of the state, country,
region, city or district, including installation of
the product not in accordance with local fire protection
and building provisions and regulations; (5) Normal
wear, spilled food, liquids, accumulation of grease or
other substances which collect on, in or around
the product; and (6) External, natural and/or
environmental forces and factors, e.g. rain, wind, sand,
floods, fires, mudslides, frost, excessively high humidity
or prolonged load due to humidity, lightning, power
failures, structural failure of the appliance environment,
as well as cases of force majeure. Thermador is not at
all liable for environmental damage, e.g. to cupboards,
floors, ceilings and other structures or objects near
the product. Also excluded from the warranty are
scratches, kinks, minor dents und cosmetic damage
to outer surfaces and exposed parts, products on
which the serial number was changed, disguised or

en-us
15
removed; customer service requests to train
the customer in the use of the product, or requests
when the product is in working order; correction of
installation problems (you alone are responsible for all
structural conditions and equipment for the product,
inter alia for the power connection, the pipe
connections and other connections, the proper ground/
floor and for modifications, e.g. installation in furniture,
walls, floors, shelves, etc.); resetting of circuit-breakers
or fuses.
THIS WARRANTY SPECIFIES YOUR EXCLUSIVE
REMEDY PERMITTED BY LAW FOR THE PRODUCT,
REGARDLESS OF WHETHER A CLAIM IS GIVEN
BASED ON THE CONTRACT OR DUE TO ILLICIT
HANDLING (INCLUDING LIABILITY OR NEGLIGENCE
IRRESPECTIVE OF CULPABILITY). THIS WARRANTY
REPLACES ALL OTHER REPRESENTATIONS
EXPRESSED OR IMPLIED. ALL REPRESENTATIONS
IMPLIED ACCORDING TO THE LAW, WHETHER WITH
REGARD TO MARKETABILTY OR SUITABILITY FOR
A SPECIFIC PURPOSE, OR ON ANOTHER BASIS, ARE
VALID ONLY FOR THE PERIOD IN WHICH THIS
EXPRESS, LIMITED WARRANTY HAS VALIDITY. THE
MANUFACTURER IS NOT AT ALL LIABLE FOR
CONSEQUENTIAL DAMAGE, SPECIAL, ADDITIONAL,
INDIRECT LOSSES OR “BUSINESS LOSSES” AND/OR
FOR PUNITIVE DAMAGES, LOSSES OR EXPENSES,
INCLUDING INTER ALIA TIME OFF FROM WORK,
MEALS IN HOTELS AND/OR RESTAURANTS,
CONVERSION COSTS ABOVE AND BEYOND DIRECT
DAMAGE CAUSED EXCLUSIVELY BY THERMADOR
OR OTHERS. IN SOME COUNTRIES THE EXCLUSION
OR THE RESTRICTION OF INCIDENTAL OR
CONSEQUENTIAL DAMAGE IS NOT PERMITTED, AND
AS SOME COUNTRIES DO NOT ALLOW ANY
LIMITATION CONCERNING HOW LONG AN IMPLICIT
WARRANTY IS TO BE VALID, THE LISTED
LIMITATIONS MAY NOT APPLY TO THEM. THIS
WARRANTY GRANTS YOU PARTICULAR RIGHTS,
ALTHOUGH YOU MAY BE ENTITLED TO OTHER
RIGHTS WHICH CAN VARY FROM COUNTRY TO
COUNTRY.
Any attempt to change, modify or extend this warranty
requires the prior written consent of a senior employee
at BSH.
Obtaining warranty service: To obtain warranty service
for your product, you should contact an authorized
Thermador customer service center in your vicinity.
BSH Home Appliances
5551 McFadden Avenue, Huntington Beach, CA 92649
/ 800-944-2904

fr-ca
16
fr-ca Table des matières
frNoticed’utilisation
Consignes de sécurité et avertissements ................... 17
Définition ....................................................................... 17
Avant de mettre l’appareil en service...................... 17
Sécurité technique ...................................................... 17
Pendant l’utilisation ..................................................... 17
Les enfants et l’appareil............................................. 17
Dispositions générales............................................... 17
Installation de l’appareil.................................................. 18
Transport....................................................................... 18
Lieu d’installation......................................................... 18
Aération.............................................................................. 18
Étendue des fournitures.................................................. 18
Branchement de l’appareil ............................................. 18
Connexion électrique.................................................. 18
Présentation de l’appareil............................................... 19
Éléments de commande............................................ 20
Enclenchement de l’appareil ......................................... 20
Remarques concernant le fonctionnement
de I’appareil.................................................................. 20
Réglage de la langue...................................................... 21
Réglage de la température ............................................ 21
Fonctions spéciales......................................................... 21
Mode Configuration .................................................... 21
Mode Vacances........................................................... 22
Mode Sabbat................................................................ 22
Fonction Humidité ....................................................... 22
Fonction alarme................................................................ 22
Rangement des bouteilles .............................................. 23
Exemple de rangement............................................... 23
Conseils pratique de stockage des vins ...................... 23
Températures de dégustation ........................................ 23
Equipement ........................................................................ 24
Retirer les clayettes ..................................................... 24
Accessoire de présentation ....................................... 24
Arrêt et remisage de l’appareil....................................... 24
Coupure de l’appareil.................................................. 24
Remisage de l’appareil ............................................... 24
Dégivrer l’appareil............................................................. 24
Nettoyage de l’appareil.................................................... 24
Equipement ................................................................... 24
Odeurs ................................................................................ 25
Changer le filtre à charbon actif .................................... 25
Éclairage (LED) ................................................................. 25
Éclairage de présentation........................................... 25
Economies d’énergie ....................................................... 25
Bruits de fonctionnement ................................................ 25
Bruits parfaitement normaux...................................... 25
Éviter la génération de bruits..................................... 25
Remédier soi même aux petites pannes ..................... 26
Appareil.......................................................................... 26
Service après-vente .......................................................... 26
Garantie .............................................................................. 27

,Consignes de sécurité et avertissements
fr-ca
17
Consignes de sécurité et avertissements
Définition
AVERTISSEMENT :
Ceci signifie qu’un danger de mort ou de blessure
grave peut surgir si cet avertissement n’est pas
respecté.
ATTENTION :
Ceci signifie qu’un risque de blessures légères
à moyennement graves peut surgir si cet
avertissement n’est pas respecté.
Avant de mettre l’appareil en service
Veuillez lire attentivement et entièrement les
informations figurant dans les notices d’utilisation et de
montage. Elle contiennent des remarques importantes
concernant l’installation, l’utilisation et l’entretien
de l’appareil.
Le fabricant décline toute responsabilité si les
consignes et mises en garde contenues dans la notice
d’utilisation ne sont pas respectées. Conservez toute
la documentation pour pouvoir la consulter à nouveau
ultérieurement ou si l’appareil doit changer un jour
de propriétaire.
Sécurité technique
Si le cordon d’alimentation électrique de cet appareil a
été endommagé, il faut confier son remplacement au
fabricant, au service après-vente ou à une personne
détenant des qualifications similaires. Les installations
et réparations inexpertes peuvent engendrer des
risques considérables pour l’utilisateur.
Les réparations ne pourront être réalisées que par
le fabricant, le service après-vente ou une personne
détenant des qualifications similaires.
Il ne faut utiliser que les pièces d’origine du fabricant.
Le fabricant ne garantit que les pièces d’origine car
elles seules remplissent les exigences de sécurité.
S’il faut allonger le cordon de raccordement au secteur
avec un prolongateur, procurez-vous-le exclusivement
auprès du service après-vente.
L’appareil est livré équipé d’un cordon de
raccordement au réseau à trois fils homologué UL.
Il ne faut en aucun cas couper le troisième fil
(fil de terre) équipant le cordon de raccordement, et ne
pas l’enlever non plus.
L’appareil requiert une prise à trois pôles. Le
branchement de la prise est une opération
exclusivement réservée à un électricien qualifié.
En présence d’une prise murale standard bipolaire,
le client a la responsabilité et se trouve dans
l’obligation personnelles de la faire remplacer par une
prise murale tripolaire réglementairement reliée
à la terre. N’utilisez pas de connecteur adaptateur.
Pendant l’utilisation
■N’utilisez pas d’appareils électriques à l’intérieur
de l’appareil (par ex. appareils de chauffage,
machine à glaçons, etc.). Risque d’explosion !
■Ne dégivrez et ne nettoyez jamais l’appareil avec
un nettoyeur à vapeur ! La vapeur risque d’atteindre
des pièces électriques et de provoquer un court-
circuit. Risque de choc électrique !
■
Pour détacher le givre ou les couches de glace,
n’utilisez jamais d’objets pointus ou présentant des
arêtes vives. Vous risqueriez d’endommager
les tubulures dans lesquelles circule le produit
réfrigérant. Le fluide réfrigérant en train de jaillir risque
de s’enflammer ou de provoquer des lésions oculaires.
■Ne stockez dans l’appareil ni produits contenant des
gaz propulseurs inflammables (par ex. bombes
aérosols) ni produits explosifs. Risque d’explosion !
■Ne vous servez pas des socles, clayettes et portes
comme marchepieds ou pour vous appuyer.
■Pour dégivrer et nettoyer l’appareil, déconnectez
la fiche mâle de la prise de courant ou retirez
le fusible / désarmez le disjoncteur.
Pour déconnecter l’appareil, tirez sur la fiche mâle
et non pas sur son cordon.
■
Stockez les boissons fortement alcoolisées en position
verticale dans des récipients bien fermés.
■L’huile et la graisse ne doivent pas entrer en contact
avec les parties en matières plastiques et le joint
de porte. Ces derniers pourraient sinon devenir
poreux.
■Ne recouvrez et n’obstruez jamais les orifices
de ventilation de l’appareil.
■Cet appareil ne pourra être utilisé par des personnes
(enfants compris) présentant des capacités physi-
ques, sensorielles ou psychiques restreintes ou
manquant de connaissances que sous
la surveillance d’une personne chargée de leur
sécurité ou après que cette dernière leur aura
enseigné à utiliser l’appareil.
Les enfants et l’appareil
■Ne confiez jamais l’emballage et ses pièces
constitutives aux enfants.
Ils risquent de s’étouffer avec les cartons pliants
et les feuilles de plastique !
■L’appareil n’est pas un jouet, éloignez les enfants !
■Appareils équipés d’une serrure :
rangez la clé hors de portée des enfants !
Dispositions générales
Cet appareil est exclusivement destiné à stocker
du vin.
Cet appareil est destiné à un usage domestique
dans un foyer privé, et à l’environnement domestique.
Le circuit frigorifique a subi un contrôle d’étanchéité.

fr-ca
18
Installation de l’appareil
Faites installer l’appareil par un spécialiste qui
respectera le contenu de la notice de montage ci-
jointe.
,AVERTISSEMENT :
N’installez pas cet appareil :
■En plein air
■Dans un environnement où de l’eau goutte,
■Dans des locaux à risque de gel.
Transport
Les appareils sont lourds. Il faut les sécuriser en vue du
transport et pendant le montage.
En raison du poids et des dimensions de l’appareil,
pour réduire au maximum le risque de blessures
ou d’endommager l’appareil, il faudra au moins deux
personnes pour installer l’appareil de manière sûre.
Lieu d’installation
Un local sec et aérable convient comme lieu
d’installation. Il faudrait que le lieu d’installation ne soit
pas directement exposé aux rayons solaires et pas
à proximité d’une source de chaleur (cuisinière,
radiateur, etc.). Si l’installation à côté d’une source
de chaleur est inévitable, veuillez utiliser un panneau
isolant approprié ou respecter les écarts minimums
suivants par rapport à la source de chaleur :
■1/4” (3 cm) par rapport aux cuisinières électriques
ou à gaz.
■11 13/16” (30 cm) par rapport à un appareil
de chauffage au fuel ou au charbon.
Sur l’emplacement, le sol ne doit pas s’affaisser.
Renforcez-le le cas échéant. Afin que le distributeur
de glaçons fonctionne impeccablement, l’appareil doit
se trouver parfaitement à la verticale.
Aération
L’air destiné au groupe frigorifique rentre et sort par
la grille d’aération située dans le socle. Ne recouvrez
en aucun cas la grille d’aération et ne placez rien
devant. Le groupe frigorifique se trouverait sinon
sollicité plus fortement, ce qui augmenterait la
consommation de courant.
Étendue des fournitures
Après avoir déballé, vérifiez toutes les pièces pour
détecter d’éventuels dégâts dus au transport.
En cas de réclamation, veuillez vous adresser au
revendeur auprès duquel vous avez acquis l’appareil
ou auprès de notre service après-vente.
La livraison comprend les pièces suivantes :
■Appareil encastrable
■Notice d’utilisation
■Notice de montage
■Pièce annexe de la garantie
■Informations relatives à la consommation d’énergie
et aux bruits
■Sachet avec quincaillerie de montage
Branchement de l’appareil
Après l’installation de l’appareil en position verticale,
attendez au moins une heure avant de le mettre
en service. Il peut en effet arriver, pendant le transport,
que l’huile présente dans le compresseur se déplace
vers le circuit frigorifique.
Avant la première mise en service, nettoyez
le compartiment intérieur de l’appareil. (Voir le chapitre
« Nettoyage de l’appareil ».)
Connexion électrique
,AVERTISSEMENT :
Évitez le risque de choc électrique !
,AVERTISSEMENT :
Connectez avec une prise femelle tripolaire
reliée à la terre. N’enlevez jamais la phase
de terre. N’utilisez aucun adaptateur. N’utilisez
aucun prolongateur.
,AVERTISSEMENT :
Une erreur dans l’exécution de ces instructions
peut entraîner la mort, un incendie ou un choc
électrique. La connexion incorrecte du fil de terre
peut entraîner un choc électrique. Si vous n’êtes
pas certain(e) que l’appareil a été correctement
connecté à la terre, faites-le vérifier
par un électricien qualifié ou par un technicien
du service après-vente.
La prise doit être proche de l’appareil et demeurer
librement accessibles même après avoir installé ce
dernier.
L’appareil est conforme à la classe de protection I.
Connectez l’appareil au courant alternatif 115 Hz /
60 Hz, via une prise femelle installée
réglementairement et comportant un fil de terre.
La prise doit être protégée par un fusible supportant
un ampérage de 10 A à 16 A.
L’appareil est livré équipé d’un cordon de
raccordement au réseau à trois fils homologué UL.
L’appareil requiert une prise à trois pôles.
Veuillez dans ce contexte tenir compte du tableau
suivant :
Vérifiez sur la plaque signalétique si la tension indiquée
et le type de courant correspondent au paramétrage de
votre réseau électrique. La position de la plaque
signalétique est indiquée au chapitre Service après-
vente.
Appareil Charge maximale
simultanée
Réfrigérateur à vin 2 ampères

fr-ca
19
,AVERTISSEMENT :
Il ne faut en aucun cas raccorder l’appareil
à des fiches électroniques d’économie
d’énergie.
Nos appareils peuvent être alimentés via des
onduleurs pilotés par le secteur ou à pilotage
sinusoïdal. Directement raccordées au secteur
public, les installations photovoltaïques font
appel à des onduleurs pilotés par le secteur.
Dans les solutions en îlots (p. ex. sur les bateaux
ou les refuges de montagne), ne disposant pas
d’un raccordement direct au secteur électrique
public, il faut utiliser des onduleurs à pilotage
sinusoïdal.
Présentation de l’appareil
La présente notice d’utilisation vaut pour plusieurs modèles.
Selon le modèle, l’appareil peut différer du contenu des illustrations.
1 Interrupteur d’éclairage
2 Éléments de commande
3 Éclairage (LED)
4 Balconnet à bouteilles de vin
5 Cloison séparatrice
6 Éclairage (Éclairage de présentation)
7 Accessoire de présentation
8 Porte en verre
9 Aération

fr-ca
20
Éléments de commande
Remarque :
Chaque actionnement d’une touche est signalé par
un bip si, en mode Configuration, vous avez activé
cette fonction dans le menu SON.
Les symboles sur le bandeau d’affichage
Enclenchement de l’appareil
Allumez l’appareil par la touche Marche / Arrêt.
L’appareil commence à réfrigérer. Porte en position
ouverte, l’éclairage est allumé.
,ATTENTION :
Lors de la fermeture, éloignez les mains et les
doigts des orifices avant et arrière de la porte du
compartiment réfrigérateur. Risque de blessures
aux mains et aux doigts.
Ne permettez jamais aux enfants de grimper
sur la porte du centre de réfrigération,
ou de jouer avec elle.
Remarques concernant le fonctionnement
de I’appareil
Après son allumage, I’appareil peut avoir besoin de
plusieurs heures pour atteindre la température réglée.
ATouche Marche / Arrêt
Sert à allumer et éteindre l’ensemble de l’appareil.
BTouche d’alarme
Sert à désactiver l’alarme sonore (voir le chapitre
« Fonction alarme »).
CBandeau d’affichage
Les températures régnant dans le compartiment
réfrigérateur s’affichent. Les fonctions spéciales
activées sont représentées par des symboles.
En mode Configuration, les menus disponibles
et les options de réglage s’affichent, voir le
chapitre « Mode Configuration ».
DTouches de sélection
Le réglage de la température s’active par les
touches de sélection, voir le chapitre « Réglage
de la température ».
Pour sélectionner un menu en mode Configuration
(voir la section « Fonctions spéciales »).
ETouches de réglage
Les touches de réglage permettent de modifier le
réglage de la température. Voir le chapitre
« Réglage de la température ».
Il est possible d’effectuer autres réglages en mode
Configuration, voir la section « Fonctions
spéciales ».
FTouche « setup »
Cette touche active le mode Configuration et y met
fin. Si vous mettez fin au mode Configuration par
la touche de configuration, l’appareil mémorise les
modifications accomplies.
GTouche Holiday
Elle sert à activer et désactiver le mode
Vacances ; voir le chapitre «Fonctions spéciales»,
section «Mode Vacances».
Affichage de la zone climatique supérieure
Affichage de la zone climatique inférieure
La fonction Humidité est activée, voir
la section « Mode Configuration ».
Le mode Vacances est activé,voir la section
«Fonctionsspéciales».
Possibilités de réglage en mode
Configuration, voir la section « Fonctions
spéciales ».
Un message d’avertissement s’affiche, voir
le chapitre « Fonction alarme ».
This manual suits for next models
4
Table of contents
Languages:
Other Thermador Wine Cooler manuals

Thermador
Thermador T24UW820RS User manual

Thermador
Thermador T24IW901SP User manual

Thermador
Thermador T24UW925LS User manual

Thermador
Thermador T18IW900SP User manual

Thermador
Thermador T18IW Series User manual

Thermador
Thermador T18IW900SP User manual

Thermador
Thermador T24UW925LS User manual

Thermador
Thermador T18IW Series User manual

Thermador
Thermador T24UW925LS User manual

Thermador
Thermador T18IW905SP User manual