Measurement
The read type selected for each channel will determine
how measurements are displayed and saved (data log
must be on in the Instrument Settings setup menu).
Auto-Read – Press the measure (esc) key to start a
measurement. When the measurement is stable, the
AR icon will stop flashing and the measurement will be
locked on the display and saved to the data log. Press the
measure (esc) key to take a new measurement.
Timed – Measurements are continuously updated on
the display and saved to the data log at the pre-set time
interval until the measurement mode is exited.
Single-Shot – Press the measure (esc) key to start a
measurement. When the pre-set wait time is reached,
the measurement is locked on the display and saved to
the data log. Press the measure (esc) key to take a new
measurement.
Continuous – Measurements are continuously updated
on the display. Press the log/print key to save the
measurement to the data log.
Press the channel key until the desired combination of
measurement channels are shown.
1. Rinse the electrodes with distilled water or appropriate
solution, blot dry with a lint-free tissue and place into
the sample.
2. Start the measurement and wait for the reading to
stabilize or reach the set time.
a. When using the Auto-Read or Single-Shot read
type, press the measure (esc) key to start the
measurement and stirrer probe.
b. When using the Timed or Continuous read type,
measurements will start immediately; press the
stirrer key to start and stop the stirrer probe.
3. Once the measurement is stable or reaches the set
time, record all applicable parameters.
4. Remove the electrodes from the sample, rinse, dry and
place into the next sample.
5. Repeat steps 2 through 4 for all samples. When all
samples have been measured, store the electrodes as
instructed in the electrode user manuals.
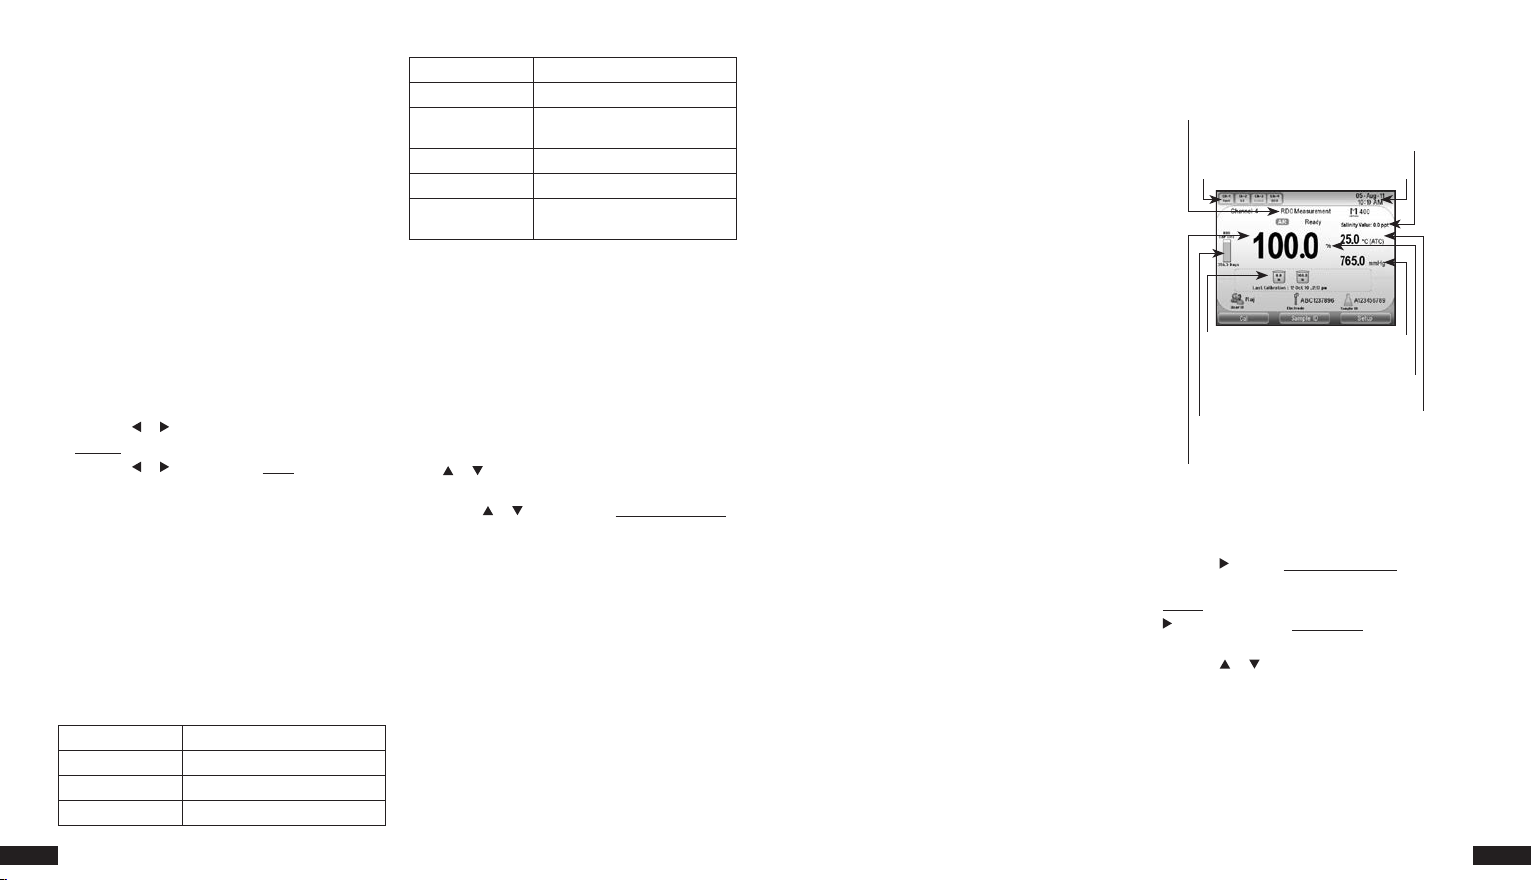
Example DO Measurement –
Single Channel Display
Customizing the Display
Select the information shown in the measurement mode.
1. In the measurement mode, press the setup key.
2. Press the key until Instrument Settings is highlighted
and press the f3 (Select) key.
3. Display will be highlighted in the left column. Press the
key to also highlight Display View and press the f3
(Select) key.
4. Press the or key to highlight an item and press
the f3 (Select) key to check (display) or uncheck (hide).
5. Press the f1 (Done) key. Press the measure (esc) key
to return to the measurement mode.
4. If using the Thermo Scientific™Orion™Star™stirrer
probe, attach the stirrer probe cable to the STIRRER 1
input (default input for channels 3 & 4) or STIRRER 2
input (default input for channels 1 & 2) on the meter.
5. Set up the work area with calibration equipment, rinse
water, samples and other supplies.
6. If applicable, connect the meter to an external device
using the appropriate cable. A USB cable is included
with the meter for computer interfacing.
7. Power on the meter by connecting the universal power
adapter to the meter and power outlet.
RDO/DO Mode Setup Menu
Within the Channel 1, 2, 3 & 4 setup menus are Method,
Mode and Temperature submenus, which can be used to
customize measurement settings and parameters for the
selected channel.
1. In the measurement mode, press the setup key.
2. Press the or key to highlight the appropriate
Channel setup menu and press the f3 (Select) key.
3. Press the or key to highlight Mode and press the
f3 (Select) key.
4. View and update the displayed menu options.
RDO/DO Setup Menu
Default values are in bold. For automatic pressure
compensation of dissolved oxygen measurements, the
meter-integrated barometer is used. For automatic
salinity correction of dissolved oxygen measurements,
install conductivity and RDO/DO modules on the meter,
prepare a conductivity probe and DO probe, and
ensure both probes are in the same sample during
measurement.
Electrode SI No - - - - (no value)
Sample ID Off, Manual, Auto Increment
Measurement Unit mg/L, %
Resolution 1, 0.1 (0.1, 0.01 for mg/L)
Stability Smart, Fast, Medium, Slow
Averaging Off, Automatic Smart
Read Type AutoRead, Timed, Single-Shot,
Continuous
Pressure Comp. Auto, Manual
Salinity Correction Auto, Manual
Alarm Limit (Off), CalDue (Off), Set
Point (Off)
RDO/DO Calibration
A water saturated air calibration is described below. Air
saturated water, manual (Winkler) and set zero calibration
options are also available.
1. Rinse the DO probe with distilled water, moisten the
sponge in the calibration sleeve with distilled water
and insert the probe into the sleeve.
2. In the measurement mode, press the f1 (Cal) key to
start the calibration.
a. When measuring more than one channel, press the
or key to highlight the channel to be calibrated
and press the f3 (Select) key.
3. Press the or key to highlight Water Saturated Air
and press the f3 (Select) key.
4. When the DO probe and calibration sleeve reach
equilibrium, press the f3 (Start) key.
5. Wait for the dissolved oxygen value on the meter to
stabilize and press the f2 (Accept) key.
a. With a polarographic DO probe, 102.3 % will be
displayed when the reading stabilizes.
b. With an RDO optical DO probe, 100.0 % will be
displayed when the reading stabilizes.
6. Press the f3 (Cal Done) key to save and end the
calibration.
7. The meter will display the calibration summary and
export the data to the calibration log. Press the
measure (esc) key to proceed to the measurement
mode.
2 | Versa star RDO/Dissolved Oxygen/Temperature Module Versa star RDO/Dissolved Oxygen/Temperature Module | 3
Date and time
Salinity value
Temperature
and source
Main measurement units
Channel ID for
measurement modules
connected to meter
Barometric pressure
Main measurement mode
Main measurement value
RDO optical cap
information
Calibration
information with
calibration points,
date and time of
active calibration


