Thermofilm HEATSTRIP ELEGANCE THE RA Series User manual

HEATSTRIP® ELEGANCE with
Remote and App control
(THE-RA Range)
Superior Technology. Superior Style.
Product Manual
2
After many years of developing, researching and working in
partnership with coating technology experts, Thermofilm, a
world leader in electric heaters, has produced a unique
composition to produce the new generation of outdoor heaters.
HEATSTRIP® Elegance with Remote and App Control comes in
an “off-white” colour which blends
in seamlessly with most white ceilings in alfresco areas.
• Electric radiant heater perfect for your protected alfresco
area, pergola, verandah or café
• The elegant, slimline design and “off-white” colour blends in
seamlessly with most white ceilings
• World leading element design produces a more compact
and higher output heater
• Significantly more cost-effective than bottled gas heaters
• Corrosion-resistant to handle the toughest outdoor environments
• Convenient DIY installation on 2400W models,
3200W model must be hard wired
• Optional mounting brackets
• 2 year residential warranty and 1 year commercial warranty
HEATSTRIP® Elegance with Remote and App
Control. Superior Technology. Superior Style
Rev B MAR 21
3
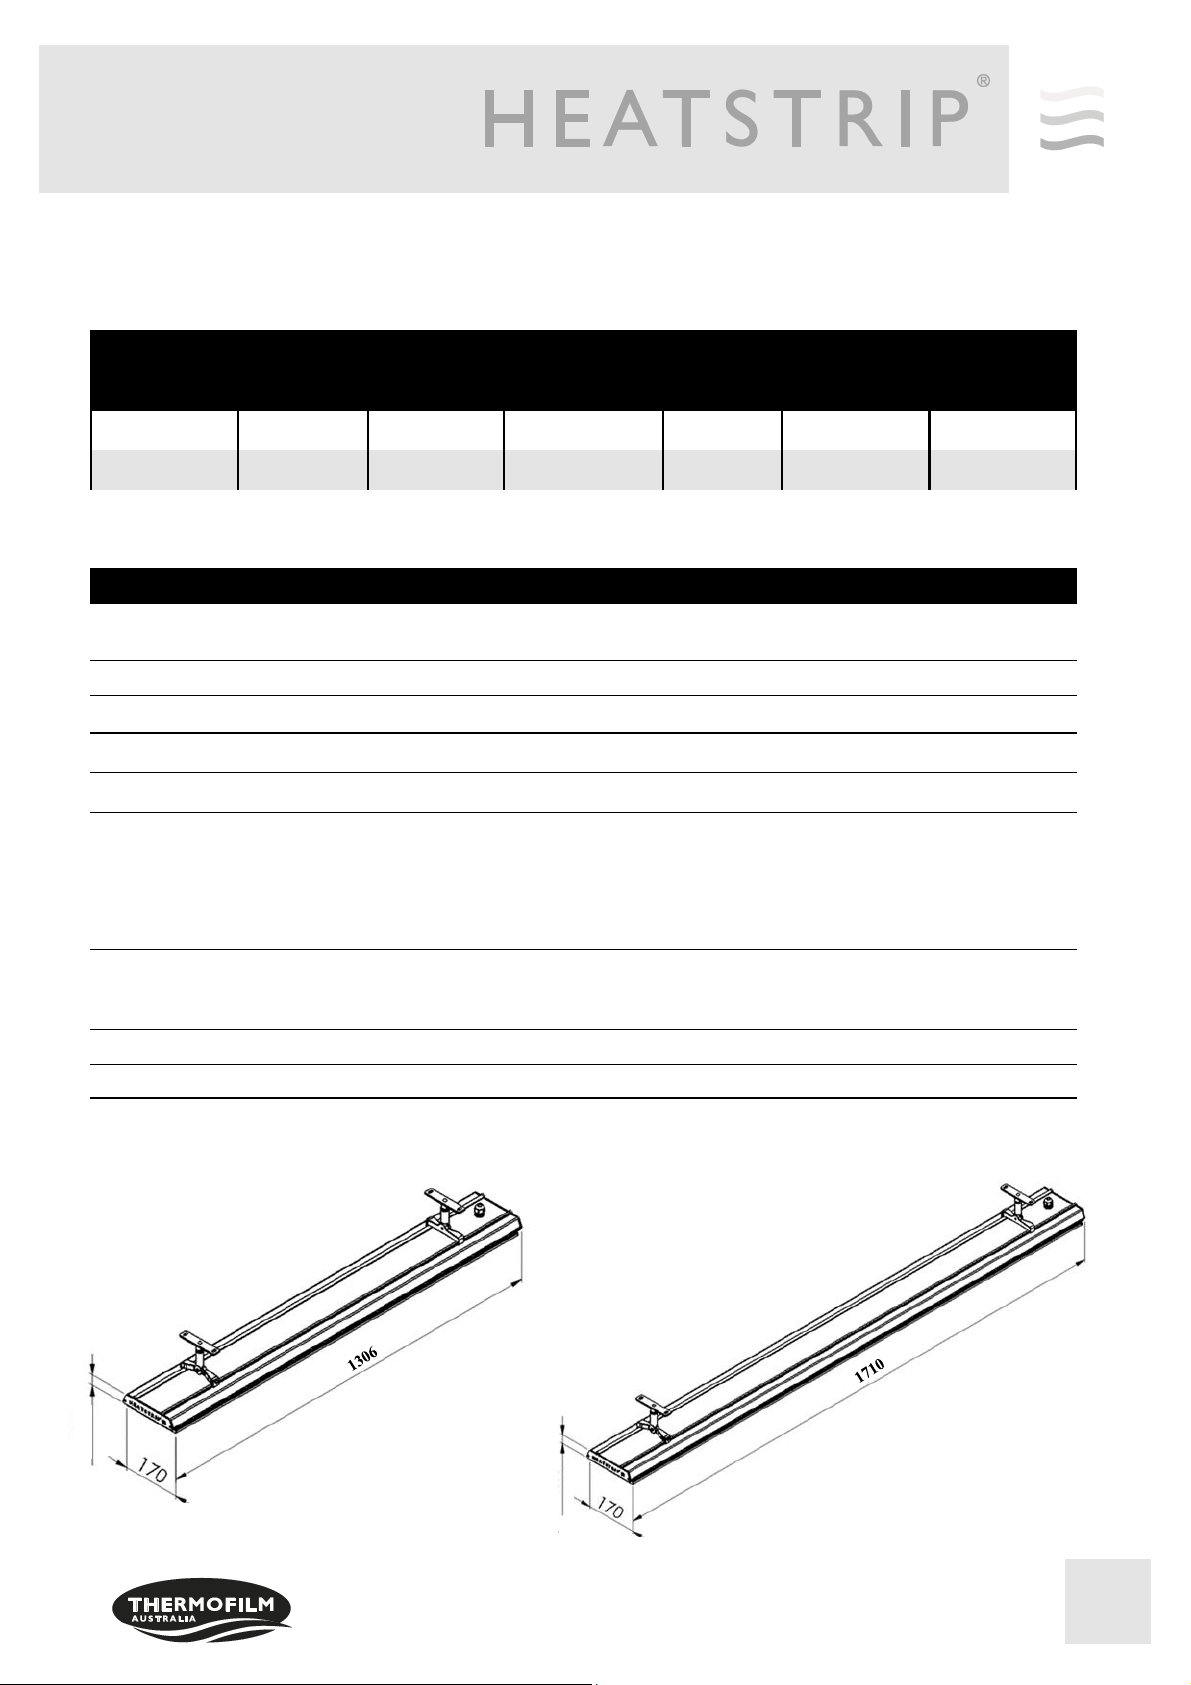
Specifications - Australia
MODEL POWER
(WATTS) CURRENT
(AMPS) DIMENSIONS
(mm) WEIGHT
(Kg) LEAD
LENGTH
(mm)
PLUG
THE2400RA 2400 10 1306 x 170 x 42.7 61000 YES
THE3200RA 3200 13 1710 x 170 x 42.7 91000 NO
MODEL
HEATER TYPE High intensity electric radiant overhead heater with high surface area
profiled alloy
OUTPUT Refer to model code chart above
POWER 240 Volts Nominal at 50 Hertz, Single Phase
CONNECTION 3 Core Cable 2.5mm2
APPROVALS AUSTRALIA/NZ
MOUNTING HEIGHT MINIMUM
RECOMMENDED
MAXIMUM
2.1 m
2.3 m to 2.5 m
2.7 m in a fully enclosed outdoor area (For higher
ceiling heights, units can be lowered using optional
bracket kits or refer to the HEATSTRIP Max range)
MOUNTING OPTIONS Suitable for ceiling, wall, beam, fixed umbrella and recess mounting. Also
available for extension mount using rigid fixing poles and chains / wire
suspension.
PROTECTION RATING IP55 Protection from water ingress from all directions
MATERIALS OF CONSTRUCTION High temperature coated aluminium alloy
THE1800R
THE2400RA
42.7
42.7
THE3200RA
42.7
42.7

4
Operating cost comparison
In many instances, patio heaters powered by gas bottles are used as an outdoor heating source. The below
table shows the operational cost comparison between HEATSTRIP® and a bottled gas outdoor heater. Not only
are the hourly running costs considerably less with HEATSTRIP®, but you never have to worry about running out
of gas, no refilling, no unattractive gas bottle to waste space; and HEATSTRIP® actually improves the value of
your property.
Notes:
1. Calculations of hourly running cost for outdoor gas heater is based on $25.00 average to fill a 9kg gas bottle and
average running time of 9 hours. $25.00 / 9 hours = $2.78 per
hour
2. Electricity rate of 25.0 cents/kWh
3. All calculations are excluding GST.
1.8kW x 0.25 cents = $0.45 or 45 cents per hour
2.4kW x 0.25 cents = $0.60 or 60 cents per hour
3.2kW x 0.25 cents = $0.80 or 90 cents per hour
Calculations of yearly running cost are based on 180 hours
usage
180 hours x $2.78 = $500.40 yearly running cost for outdoor gas heater
180 hours x $0.60 = $108.00 yearly running cost for 2400W HEATSTRIP Elegance
180 hours x $0.80 cents = $144.00 yearly running cost for 3200W HEATSTRIP Elegance
RUNNING
COST OUTDOOR GAS
HEATER HEATSTRIP ELEGANCE ELECTRIC RADIANT
HEATER
THE2400R THE3200R
PER HOUR $2.78/hr $0.60/hr $0.80/hr
PER YEAR $500.40 $108.00 $162.00

5
BAR
BAR STOOLS
DINING TABLE
LOUNGE
BBQ
2 x THH24006 x THH2400
Spot heating principle
In most outdoor or difficult-to-heat indoor applications, there are 2 options when calculating the size and quantity
of the heaters required.
Option 1 is to comfort heat the entire area based on the total dimensions of the space, regardless of whether the
entire area is being fully occupied.
Option 2 is to spot heat the high use areas, such as over outdoor tables, BBQ’s, lounges, assembly lines or in-
door workstations.
Often it is more practical and efficient to spot heat high use areas. Spot heating will reduce both the initial capital
cost as well as the ongoing running costs. Spot heating will allow the area to be “zoned”, meaning only the areas
that are being used are heated, such as tables in a restaurant or outdoor alfresco area.
Option 1 and 2 show a comparison between heating an entire area or spot heating over a table.
The bottom layout shows the flexibility of using HEATSTRIP® to provide a comfortable environment, even when
the layout of the area is very unusual.
Option 1: 6 x THE2400RA Option 2: 2 x THE2400RA

6
Radiant footprint
HEATSTRIP® electric heaters produce radiant heat which heats objects rather than the air. Therefore, it is imperative that
objects to be heated (ie. people), are within
the direct radiant footprint of the heater.
The diagram to the right shows the radiant
footprint of HEATSTRIP® Elegance with
Remote and App control and is an
approximate guide based on a fully enclosed
outdoor environment.
This diagram shows that the maximum heat
output is found directly under the heater, and
the temperature decreases as you move
away from the heater.
It highlights the importance of maintaining
recommended mounting heights, and if
possible, positioning the heater directly
above the area to be heated.
Note that the temperature is similar for all 3
models, regardless of the wattage however,
as the size increases and the length of the
unit increases, the radiant footprint will be
longer.
The below diagrams show the approximate heating area for each model, based on both an indoor and outdoor enclosed
environment, with direct overhead mounting.
The radiant footprint is reduced in angled and wall mounted installations.
THE2400RA THE3200RA
THE2400RA THE3200RA
3500
2700
7
Selection guide
General recommendations for HEATSTRIP® Elegance with Remote and App Control:
• Ideal mounting height: 2.3m to 2.5m. Maximum is 2.7m in a fully protected/enclosed outdoor environment.
• Ideal mounting location: ceiling mounted, directly above area to be heated (eg. above a table)
• Minimum recommended heating capacity for various installations are: 400W/m2 for indoor spot heating; 500W/m2
for protected outdoor areas, and 600W/m2 for exposed outdoor areas. To ensure the HEATSTRIP® Elegance pro-
vides satisfactory performance, Thermofilm strongly recommends using conservative coverage areas when speci-
fying how many heaters are required for each installation.
The table below outlines the maximum coverage of each HEATSTRIP® Elegance with Remote and App control model
based on 2 different scenarios with direct overhead mounting at minimum installation height. For example, for an outdoor
area that is protected from prevailing winds by walls, café blinds etc, Model THE2400R will cover a maximum of 4.8m2 and
Model THE3200R will cover a maximum of 6.4m2.
For angled wall mounting applications, the coverage is reduced by up to 40%.
MODEL INDOOR PROTECTED (m2)OUTDOOR ENCLOSED (m2)OUTDOOR EXPOSED (m2)
THE2400RA 64.8 4
THE3200RA 86.4 5.3
8
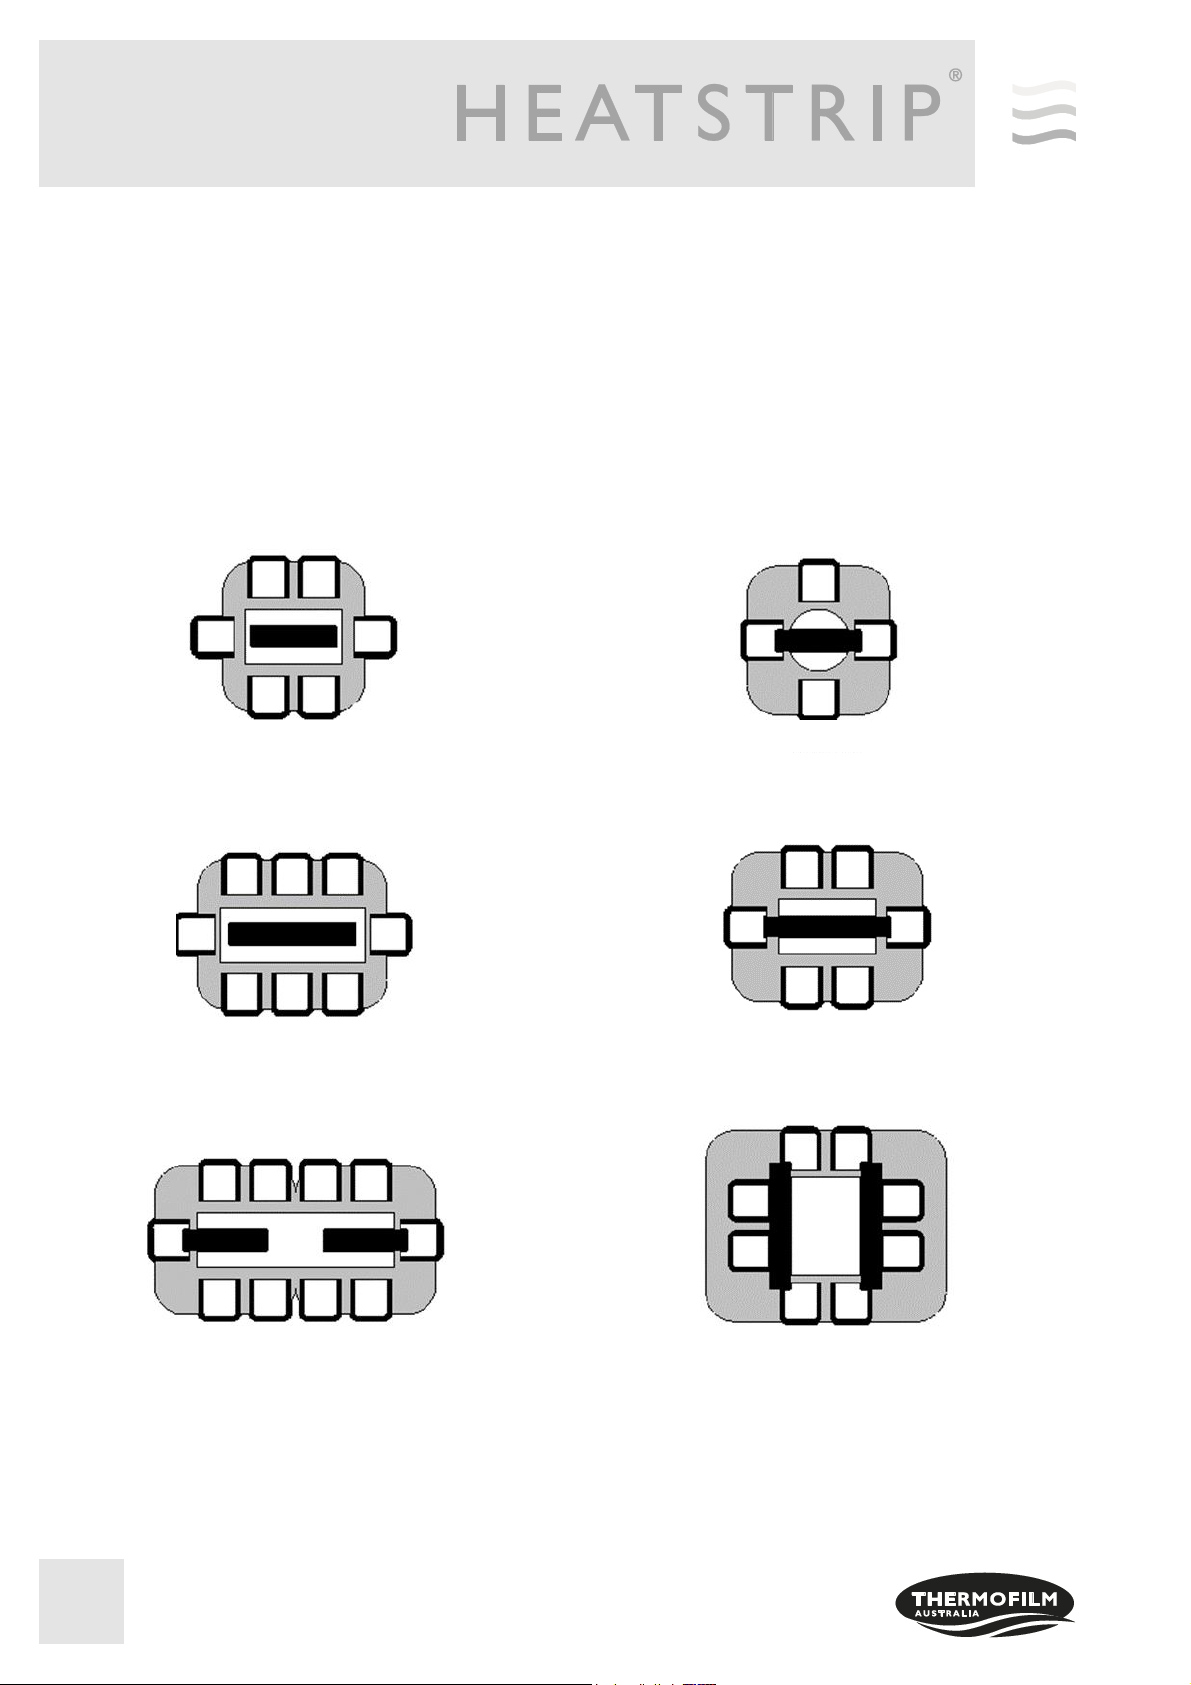
Table layout
For the majority of outdoor applications, the most effective method is to spot heat a table or similar area. The diagrams
below provide an easy selection guide for the approximate model and quantity of heaters required to heat common resi-
dential table settings.
Selections are based on HEATSTRIP® Elegance with Remote and App Control being mounted at 2.4m from the floor in a
fully enclosed undercover outdoor area.
THE2400R
THE2400RA THE2400RA
THE3200RA THE3200RA
2x THE2400RA 2x THE3200RA

9
Installation Requirements
The ideal mounting position for the HEATSTRIP® Elegance with Remote and App control is on the ceiling directly above
the area to be heated. If this is not possible, HEATSTRIP® can be mounted on a wall and angled downwards. In this
situation, ensure the mounting height is in the range of 2.1m to 2.7m and the table is close to the wall.
For mounting heights more than 2.7m, we recommend the use of the optional accessories to reduce the height of the
heater to 2.3m—2.5 m. This will increase the effectiveness of your HEATSTRIP®. Refer to the Mounting Accessory section
for more information.
Electrical connections/GPO’s should not be located at the back of the heater. They should be located outside the physical
footprint of the units to minimize heat build-up behind the units.
If the heater is to be mounted on an incline (e.g. vaulted ceiling), ensure the electrical connection is located at the lowest
point of the heater.
Incorrect Installation Correct Installation
The heating surface must never be directed toward the ceiling
10
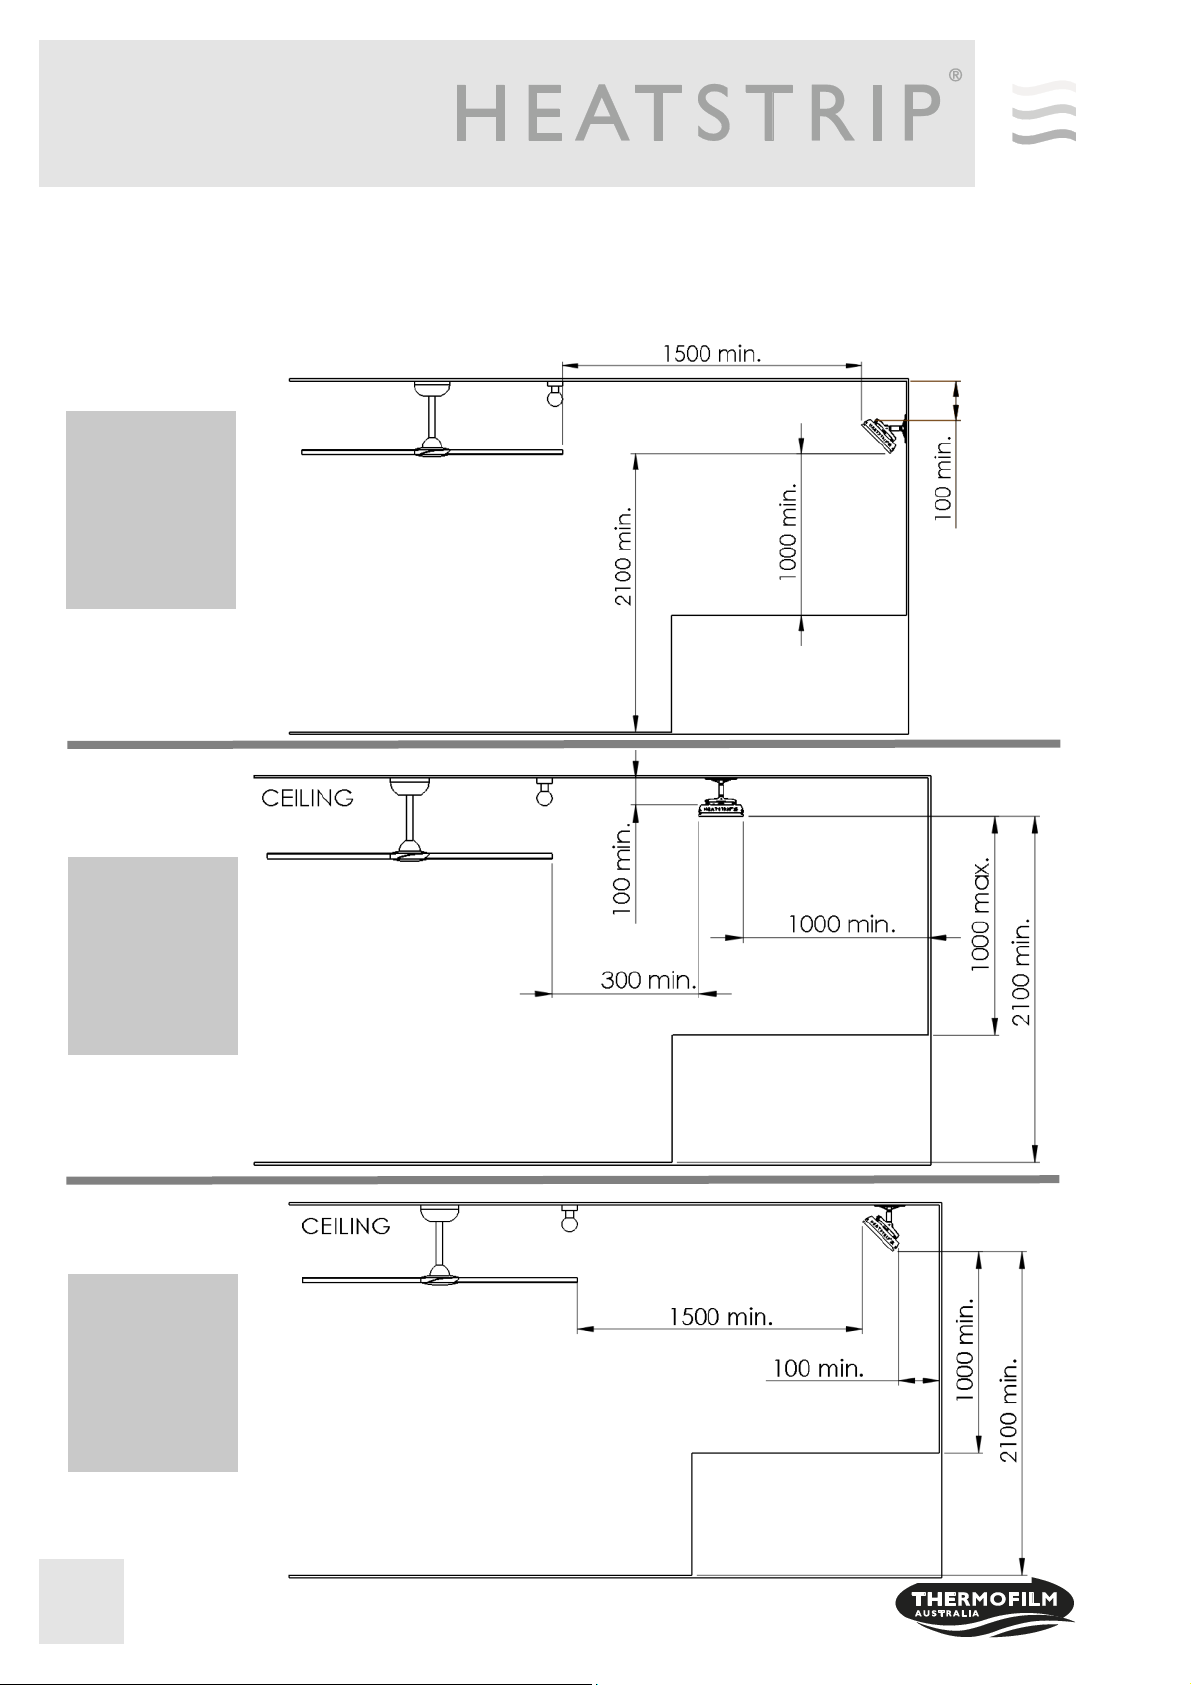
Installation location —the diagrams below provide the minimum recommended clearances in (mm).
WARNING: This heater is not equipped with a device to control the room temperature. Do not use this
heater in small rooms when they are occupied by persons not capable of leaving the room on their own,
unless constant supervision is provided.
Angled
Ceiling
Installation
Ceiling
Installation
Angled
Wall
Installation LIGHT, FAN OR SPRINKLER
MUST NOT BE BELOW HEATER
LIGHT, FAN OR SPRINKLER
MUST NOT BE BELOW HEATER
LIGHT, FAN OR SPRINKLER
MUST NOT BE BELOW HEATER
SURFACE
BELOW
HEATER
SURFACE
BELOW
HEATER
SURFACE
BELOW
HEATER

11
STANDARD
BRACKET
STANDARD
BRACKET
CEILING
FLUSH
MOUNT
ENCLOUSURE
STANDARD
BRACKET
POLE / BEAM
MOUNTING
Mounting options
Installing the HEATSTRIP® Elegance with Remote and App Control is simple and easy using the standard mounting brackets
supplied. For other irregular locations there are range of mounting options available - refer to diagrams below
The HEATSTRIP® Elegance with Remote and App Control can be mounted directly to the ceiling, angled downwards on a wall,
fitted flush with the ceiling, attached to beams or poles or suspended by rods, wires or chain .
CHAIN / WIRE
MOUNTING
EXTENSION
MOUNTING
BRACKET

12
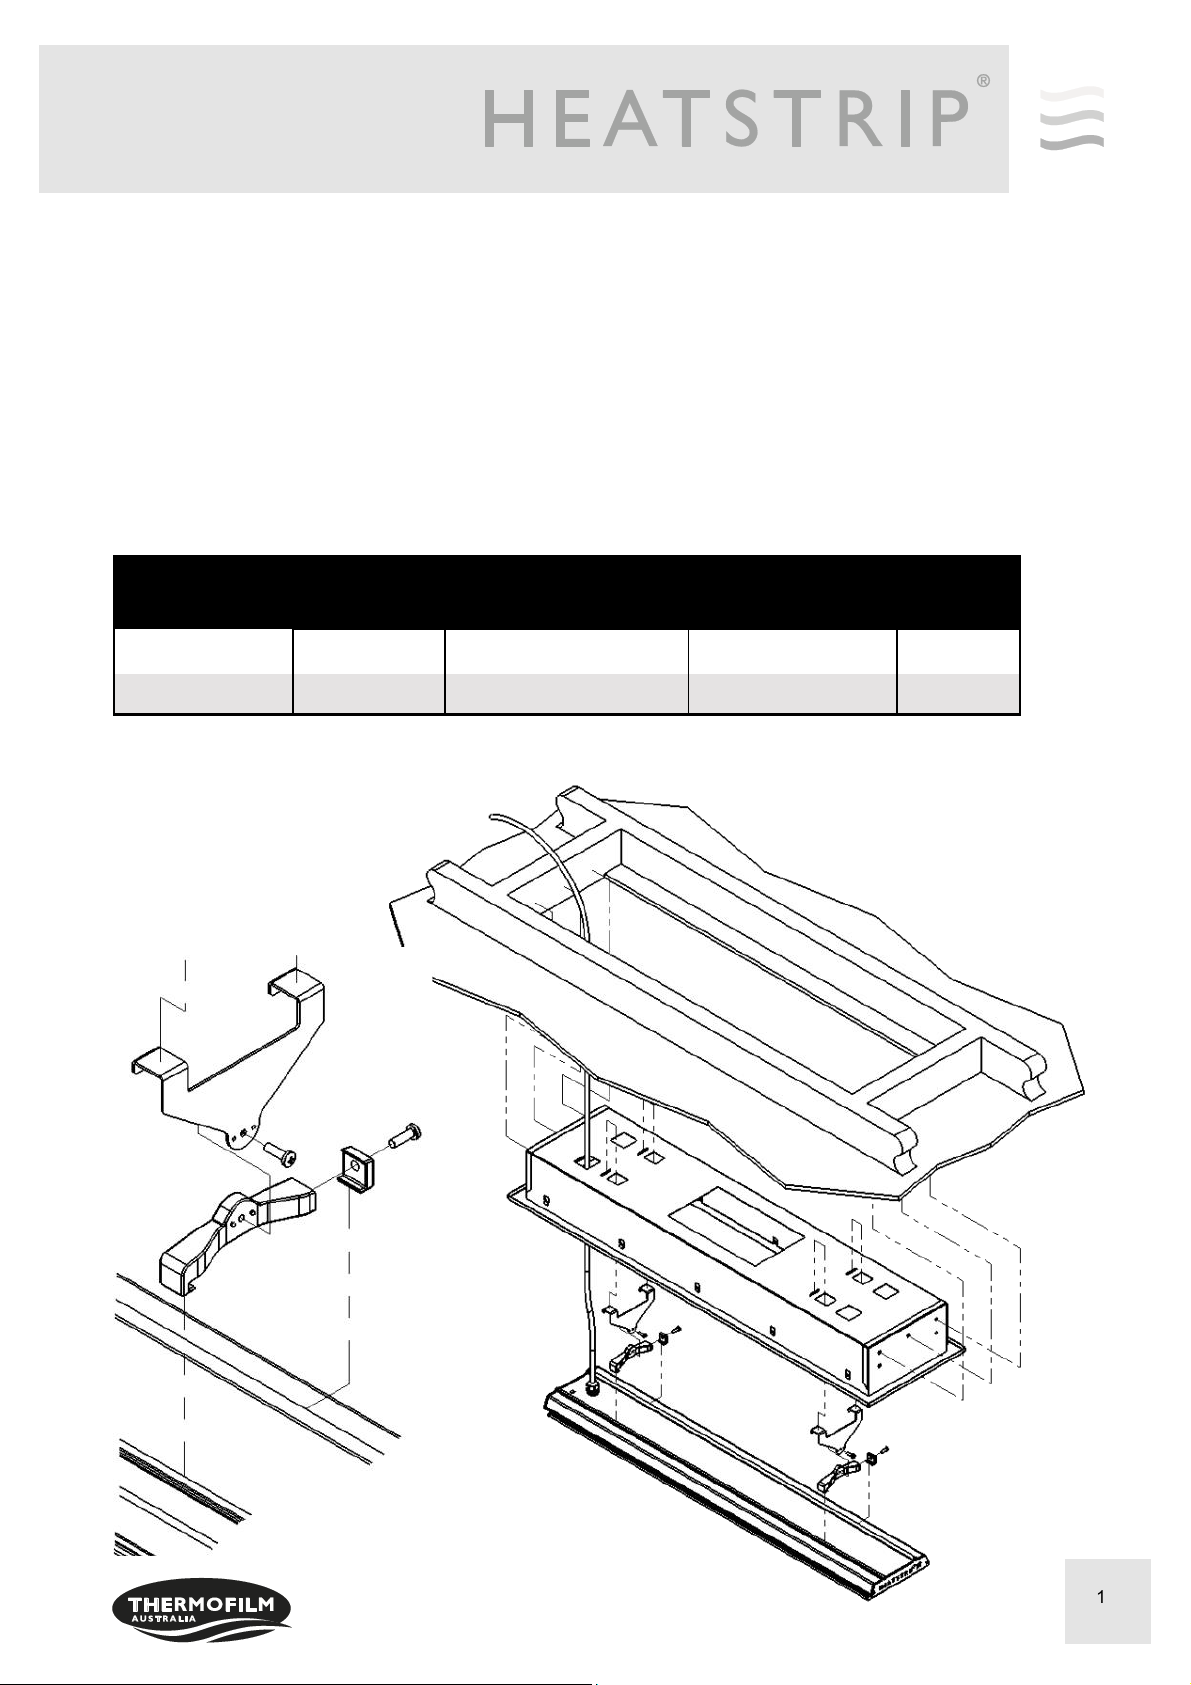
Standard mounting brackets
The HEATSTRIP® Elegance with Remote and App Control comes with a pair of standard mounting brackets. These
adjustable brackets allow direct ceiling, wall or pole/beam mounting, and come with pre-set angle options of parallel, 22.5°
and 45°.
PART No PACKAGED
DIMENSIONS (mm) WEIGHT (kg) MATERIALS
ZBRAK-113W 125 x 150 x 40 0.2 ALLOY
CEILING
WALL
MODEL “X”
MINIMUM DISTANCE (mm)
THE2400RA 700
THE3200RA 1000
13
Flush mount enclosure
The Flush Mount Enclosure is an ideal way to neatly install the HEATSTRIP® into a ceiling. They are available for all
HEATSTRIP® Elegance with Remote and App Control models, and are supplied as a one-piece unit suitable for
mounting individual heaters. Flush mounting can be used with plaster or timber lined ceiling materials.
An ideal mounting height is 2.3m-2.5m, with a maximum ceiling height of 2.7m in an outdoor enclosed environment.
Maximum mounting heights should be strictly followed, otherwise the performance of the units may be reduced.
A minimum clearance of 150mm behind the enclosure must be provided.
The enclosure is manufactured from powder coated steel.
Please refer to the Flush Mount Enclosure Installation Manual for more detailed installation information.
SUITABLE FOR
MODEL PART No HOLE CUTOUT
DIMENSIONS (mm) OVERALL
DIMENSIONS (mm) WEIGHT
(kg)
THE2400RA THERAC-056 170 x 1312 230W x 1382 L x 125 D 8
THE3200RA THERAC-057 170 x 1710 230 W x 1780 L x 125D 9

14
The Extension Mount bracket allows HEATSTRIP® Elegance units to be lowered from high ceilings using rigid connec-
tions. The standard length options as part of the kit are 300mm, 600mm, 900mm and 1200mm.
The kits include all brackets, poles and screws necessary for connection to the heaters, however it does not include
screws for attachment to the ceiling.
The extension mount bracket utilises component from the standard bracket kit which is supplied with each heater.
For minimum distance requirements between poles please refer to page 14.
Extension Mount Bracket
PART No PACKAGED
DIMENSIONS (mm) WEIGHT
(kg) MATERIALS NOTES
THEAC-043 300 x 150 x 50 0.21 Aluminium Kit includes 2x300mm extension pole
THEAC-044 600 x 150 x 50 0.38 Aluminium Kit includes 2x600mm extension pole
THEAC-045 900 x 150 x 50 0.55 Aluminium Kit includes 2x900mm extension pole
THEAC-046 1200 x 150 x 50 0.71 Aluminium Kit includes 2x1200mm extension pole

15
Chain / Wire Suspension Mount
HEATSTRIP® Elegance with Remote and App Control can by suspended using chain or wire to lower the installation
height from high outdoor or indoor roofs of ceilings.
Thermofilm does not provide any dedicated installation kit for this type of mounting, however the following information may
be used to assist in safely installing the HEATSTRIP® Elegance with Remote and App Control.
Any chain or wire must be suitably rated to withstand the weight of the heater.
The use of chain or wire mounting is NOT recommended for unprotected outdoor installations.
It is recommended to use a the component from the standard bracket kit (shown below) which is supplied with each heater
to attach any chain or wire to the heater.
For minimum distance requirements between poles please refer to page 14.
Diagram above shows one potential means
of installation using chain or wire
16
THE-RA Operation Control with Remote
The THE-R is a custom designed and manufactured heater. It has been designed for ease of use and provide low running
cost of your heater. It provides both temperature control (allowing the user to turn the heater output up or down depending
on the ambient temperature and conditions) and a timer for automatic heater shut– off operation
When the heater is plugged in, press “power” on the remote, the power indicator light on the unit is lit, and then press the
function button. It provides both temperature control allowing the user to turn the heat output High or Low and a timer for
automatic heater operation, either 1, 2 or 4 hours.
The heater allows a combination of the multiple timer (1/2/4 hour) and heat outputs (High/Low). The default operation is
continuous operation at full temperature.
The timer function has four settings: 1 hour, 2 hours, 4 hours or constantly ON. This feature is ideal for applications such as
alfresco areas, restaurant dining, assembly line production etc. when continuous heat is not required. The timer also reduces
the likelihood of heaters being inadvertently left turned on.
Depending on the ambient temperature, there may be a requirement to adjust the heat. The controller has 2 settings: they are
High and Low.
THE-RA Functions
Remote pairing
All units operate using the same remote control frequency, therefore, multiple heaters can be operated using a single
remote control.
The remote will function at distance of over 8m when used in a straight line. This distance reduces when used at an
angle.
Controller functionality, please refer to page 17.

17
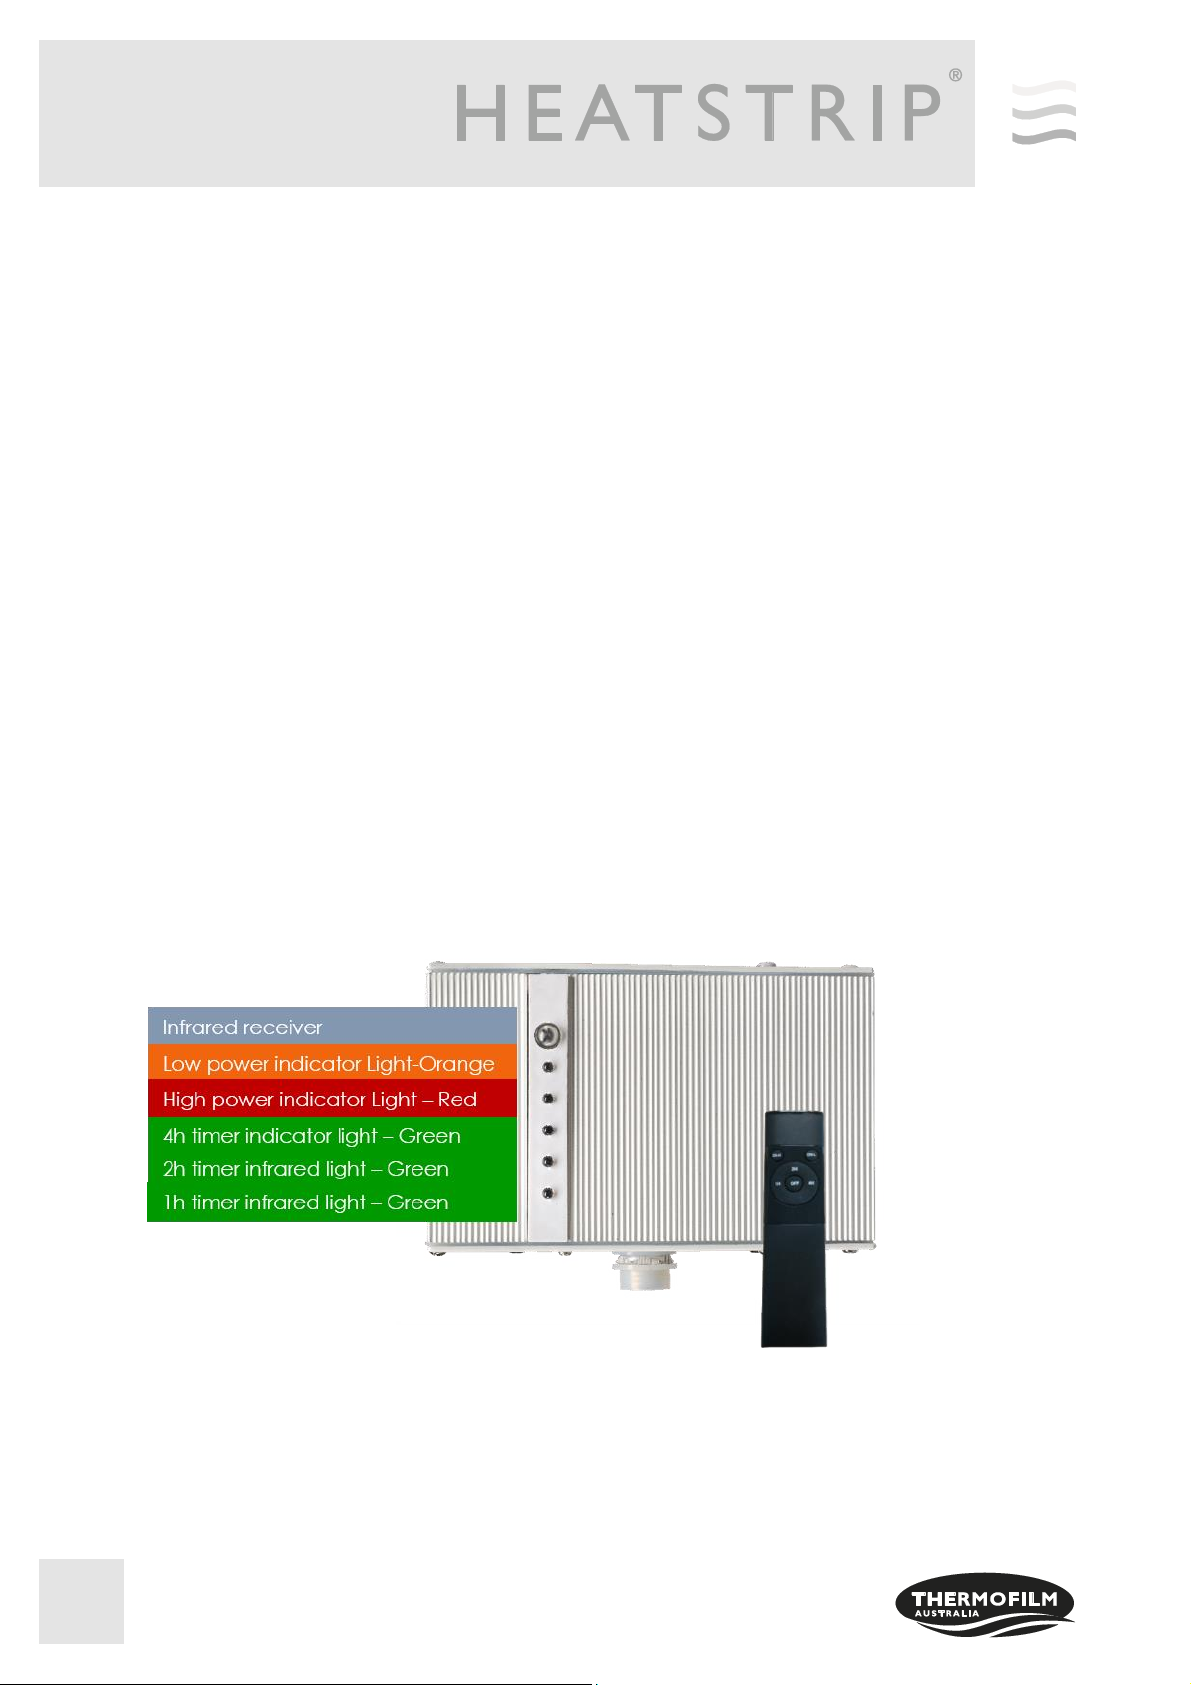
Remote Control Operation
REMOTE FUNCTIONS
ON-HTemperature High
ON-LTemperature Low
OFF Unit Off
1H 1H Automatic Timer
2H 2H Automatic Timer
4H 4H Automatic Timer
Signal Transmitter
• To use the remote controller, aim the
transmitter to the heater. A line of sight
transmission is required for the unit to
function.
• The controller does not have a protection
rating. The controller must be kept away
from wet applications.
• The remote will function at distances of
over 8m when used in a straight line. This
distance reduces when used at an angle.
Temperature Control Button
• Press ON-H temperature will be
adjusted to HIGH.
• Press ON-L temperature will be
adjusted to LOW.
OFF Button
• Press this button once to turn OFF
operation.
Battery
• AAA Battery required for operation.
Automated Countdown Timer
• Press 1H to begin 1 hour automatic
shutdown.
• Press 2H to begin 2 hour automat-
ic shutdown.
• Press 4H to begin 4 hour automat-
ic shutdown.
Receiver
• Receiver is
located on
the heater.

THE-RA Setup Instructions
1. Visit the Apple App
Store or Google
Play and download
TuyaSmart App.
Open the App and
select “Add Device”. Select Device Type
“Small Appliances”.
Select “Heater”. Select “Next” (Wi-Fi
must be connected).
Register and login
into TuyaSmart App.
(Make sure Wi-Fi is
enabled).
Connect the HEATSTRIP Heater to Power.
(Either Plug-In or Hardwired) Once the power is switched on, hold the 2H
button on the remote until all the lights are
flashing green.
1
3
5
7
2
4
6
8
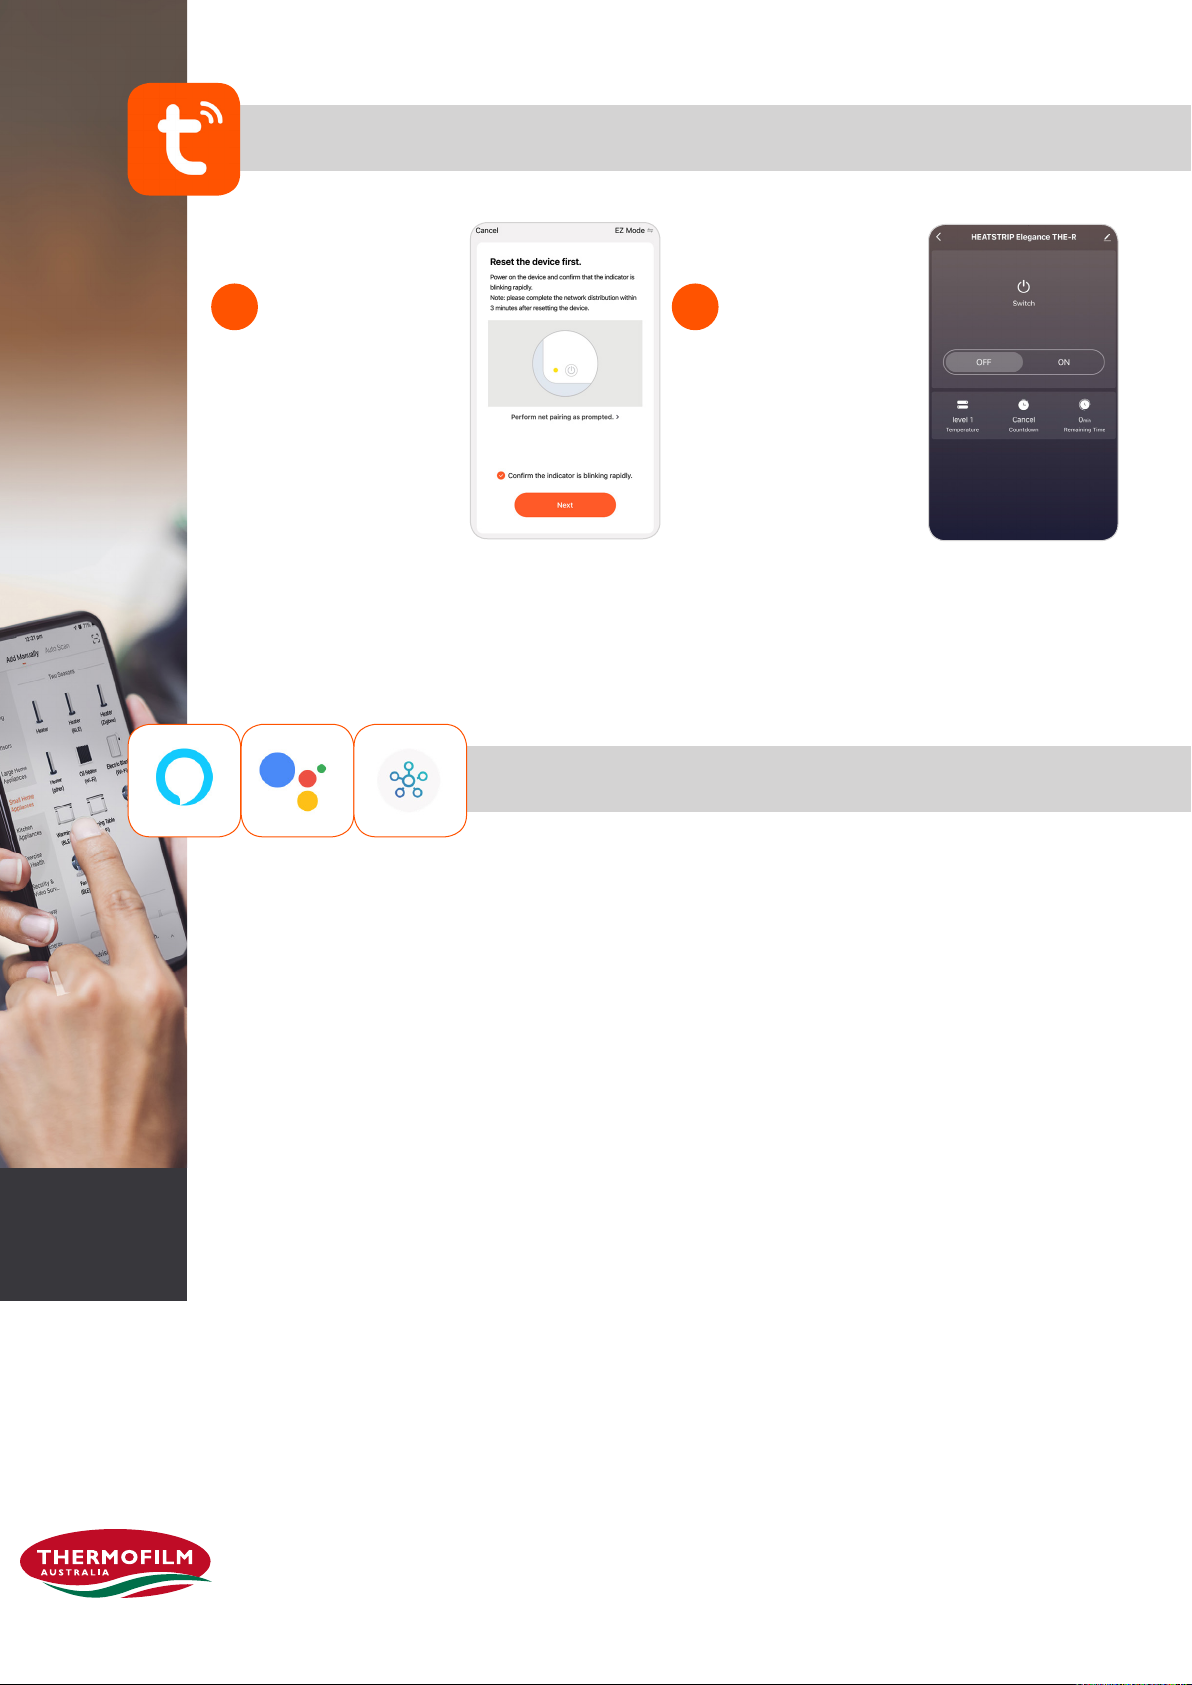
THE-RA Setup Instructions
Pairing with Google Assistant
Once the pairing cycle
has been completed,
the App and
HEATSTRIP Heater
should be paired
together.
Confirm the 3
indicator is blinking
rapidly on the heater
and select “Next”
(If the LED lights are
not blinking on the
heater, you will need
to hold down the 2H
button on the remote
until the 3 indicators
are blinking).
1. Download the Google Home app on the app store or Google Play
2. Pair the Google device to the Google Home App
3. Once paired, click on the TuyaSmart App.
4. Select “Me”
5. Select “Google Assistant”
6. Select “Link with Google Assistant”
7. Select “Agree and link”
8. Choose device “ Select HEATSTRIP Elegance”
9. Pairing completed
7 8
18
Safety
HEATSTRIP® Elegance with Remote and App Control has an IP rating of 55. This means it is safe for water ingress from
all directions. The HEATSTRIP® can be safely hosed down.
HEATSTRIP® has undergone extensive testing both in laboratory conditions, in Thermofilm’s manufacturing facility in
Melbourne and field trials in Australia and overseas. It is this testing that gives the purchaser the confidence of a high
quality product. Independent laboratory testing has confirmed Thermofilm’s full compliance with Australian and other
International Standards including CE, AS/ANZ, UL/CSA
HEATSTRIP® is Class 1 equipment and must be earthed.
In operation, this heater is VERY HOT— do not touch any part of the heater while it is turned on. Do not touch any part
until 30 minutes after it is turned off.
This appliance is not intended for use by persons (including children) with reduced physical, sensory or intellectual
capabilities, or lack of experience and knowledge, unless they have been given supervision or instruction concerning use
of the appliance by a person responsible for their safety. Children should be supervised to ensure they do not play with the
appliance.
WARNING: This heater is not equipped with a device to control the room temperature. Do not use this heater in small
rooms when they are occupied by persons not capable of leaving the room on their own, unless constant supervision is
provided.
Do not allow any cables, furnishings, flammable materials or other items come in contact with any surface of the heater.
If installed in wet areas, the heater switches or controls must be located so that they cannot be touched by persons in the
bath or shower.
The heater needs to be installed as per the installation instructions paying special attention to the minimum clearances.
The heater needs to be mounted on a rigid bracket or fixing.
The heater must not be mounted immediately below or in front of a socket outlet.
The heater comes in plug (2400W) and hardwired (3200W) versions. In both cases the fixed wiring must be installed by a
licensed electrician in accordance with the relevant wiring regulations. Provision for disconnection must be incorporated
into any fixed wired heater installation.
The supply cord can not be replaced. If the supply cord is damaged the appliance shall be scrapped or returned to the
point of purchase for return to Thermofilm.
Maintenance
The HEATSTRIP® Elegance with Remote and App Control is made from durable materials, however regular care and
maintenance of your heater will help prolong the life of the heater.
It is recommended that you clean the heater with a soft cloth gently wipe the surfaces of the heater with a mild detergent
to remove the built up contaminants from the environment. Then rinse all detergent off the heater.
All chemicals in the atmosphere including cigarette smoke, pollution etc. will tarnish the surface of the heater. In this case,
additional cleaning and maintenance may be required. Carrying out the cleaning process at least every three months will
reduce the amount of build up and keep the HEATSTRIP® in good condition. If the heater is in a corrosive environment eg.
salt spray, we recommend that you clean your heater with a light spray of fresh water every week. After cleaning, turn the
heater on for 20 minutes to dry any water residue and prevent water staining.
Before cleaning or inspection activity, the heater must be switched off and cooled down completely.
Do not use any abrasive materials or products to clean the heater, this includes solvents, citrus based cleaners or other
harsh cleaning products.
When handling the heater, ensure that your hands are clean or that you use clean gloves as grease or dirt can mark the
surface of the heater.
Do not use high pressure water to clean heaters.
This manual suits for next models
2
Table of contents
Other Thermofilm Heater manuals


Popular Heater manuals by other brands


Hornbach
Hornbach 10530792 operating manual

Somogyi Elektronic
Somogyi Elektronic Home FK 410 WIFI instruction manual

Clarke
Clarke XR55 Operating & maintenance instructions

iGenix
iGenix IG9508 Instructions for use

RUBY HEAT
RUBY HEAT RP-2000 PLUS instructions

Vortice
Vortice THERMOLOGIKA DESIGN Instruction booklet