Thermomax SA132 Manual

AUTODIALLER /
QUICKDIALLER
- SA132
INSTRUCTION LEAFLET
ENGLISH
www.Thermomax-Group.com

CONTENTS
1SETUPATAGLANCE ................................................................................ 2
2FOREWORD …………………………………..........……………...……. 3
3INSTALLATION ……………………………………….......…………....… 4
4KEYPADANDINDICATORS ................................…………………….... 6
5SETTINGUPTHEUNIT ..............…………………………………….... 7
6TROUBLESHOOTINGGUIDE .............................................................. 12
1

1. SETUP AT A GLANCE
How to... Steps
Record
Emergency
Messages
Play Back
Emergency
Messages
Record
Telephone
Numbers
Send a
Test Call
Select Auto
Dialing Times
Select
Message
Playing
Duration
Reset the
System
(Speak into microphone
for 20 seconds max.)
5
!0
1
2
3
4
= 50 sec.
= 70 sec.
= 90 sec.
= 110 sec.
8
1 2
3
4
Duration
(Select only one key)
8
1 2
3
4
Sequence of telephone number
(Select only one key)
5
6
!
1
2
3
4
5
7
6
8
9
0
*
Telephone Number
1 2 3 4
5
6
1
Sequence of telephone number
(Select only one key)
1
2
3
4
5
7
6
8
9
Select one key
60
2

3
2. FOREWORD
The SA132 Autodialer / QuickDialer is an intelligent device designed to
connect to any security alarm control panel, and it is compatible with any of
the following Thermomax units - SM12, SM UNO, SM DUE, SM QUATTRO,
LCT-2, SMX 100, etc.). The Autodialer / QuickDialer enables the dialer to call
any phone numbers programmed to it when an emergency occurs. The
recorded messages played during the phone calls will alert either the
homeowner or a second party to take action.
The Autodialer / QuickDialer can memorize up to 6 telephone numbers of up
to 32 digits each, and you can record emergeny messages of up to 20
seconds on the system to be played during the phone calls.
The Autodialer / QuickDialer can be programmed to call telephone units,
mobile phones, pager and DISA (Direct Inward System Access) facilities.
Features:
•Built-in terminal block to connect to the alarm control panel for emergency
alert.
•All phone numbers, emergency messages, and settings are stored in Non-
Volatile Memory (NVM) permanently in case of power failure.
•Stores up to 6 telephone numbers (T1 - T6) with a maximum of 32 digits
each.
•20-second recording time for emergeny messages.
•In case of an emergency, press the
!
button on the Autodialer /
QuickDialer, which will immediately start dialing the phone numbers for
help.
•Detects dial tone, busy tone and ring back tone so as to perform auto dialing
or auto redialing when the line is busy. Each phone number will be dialed
for a maximum of 9 times.
•Alarm memory facility.

4
3. INSTALLATION
MOUNTINGTHEUNIT
To mount the unit on the wall, drill two holes for the 2 screws provided into
the wall, leaving a 5cm space between them, and hang the unit on the
screws as shown in Fig. 1.
Fig. 1
CONNECTINGTO TELEPHONELINE (PARALLELCONNECTION)
Insert the telephone line RJ11 jack to the Autodialer / QuickDialer’s phone
line socket. Connect the other end of the telephone line to the phone line
socket on the wall. See Fig. 2.
Fig. 2
CONNECTINGTOPOWER SOURCES
The Operating Voltage of the Autodialer / QuickDialer is 12V DC. Open the
cover as shown in Fig. 3, and connect the Autodialer / QuickDialer to the 12V
DC output of an alarm panel or 1 12V battery.
The QuickDialer is equipped with power input protection. When the +/-
battery polarity is connected wrongly, the red LED on the QuickDialer will not
illuminate.
Fig. 3
PRESS

CONNECTINGTO ATHERMOMAX UNIT
1. Connect the Autodialer / QuickDialer Connecting Wire, A7068, from the
terminals labelled BATTERY on the Battery Backup System to the Autodialer
/ QuickDialer input, (as illustrated in the diagram below).
2. Now connect the N.O. trigger input of the Autodialer / QuickDialer to the
alarm common (C) input of the Thermomax unit.
3. Connect the Autodialer / Quickdialer N.C. trigger input to the alarm N.C.
output of the Thermomax unit.
4. Connect the Battery Backup System to the mains and switch on.
Please refer to the set up instructions supplied with the Battery Backup
System.
Fig. 4
On initial power up, the red LED will be lit and the yellow LED will flash
indicating that the recorded message and telephone number have been
erased. The yellow LED will extinguish when set-up is complete.
5
THERMOMAX
C0329 - BATTERY BACKUP SYSTEM
+ TO + OF AUTODIALER
DCAC ++
BATTERY
- TO - OF AUTODIALER
RED WIRE TO + TERMINAL OF BATTERY
BLACK WIRE TO - TERMINAL OF BATTERY
PRESS
6
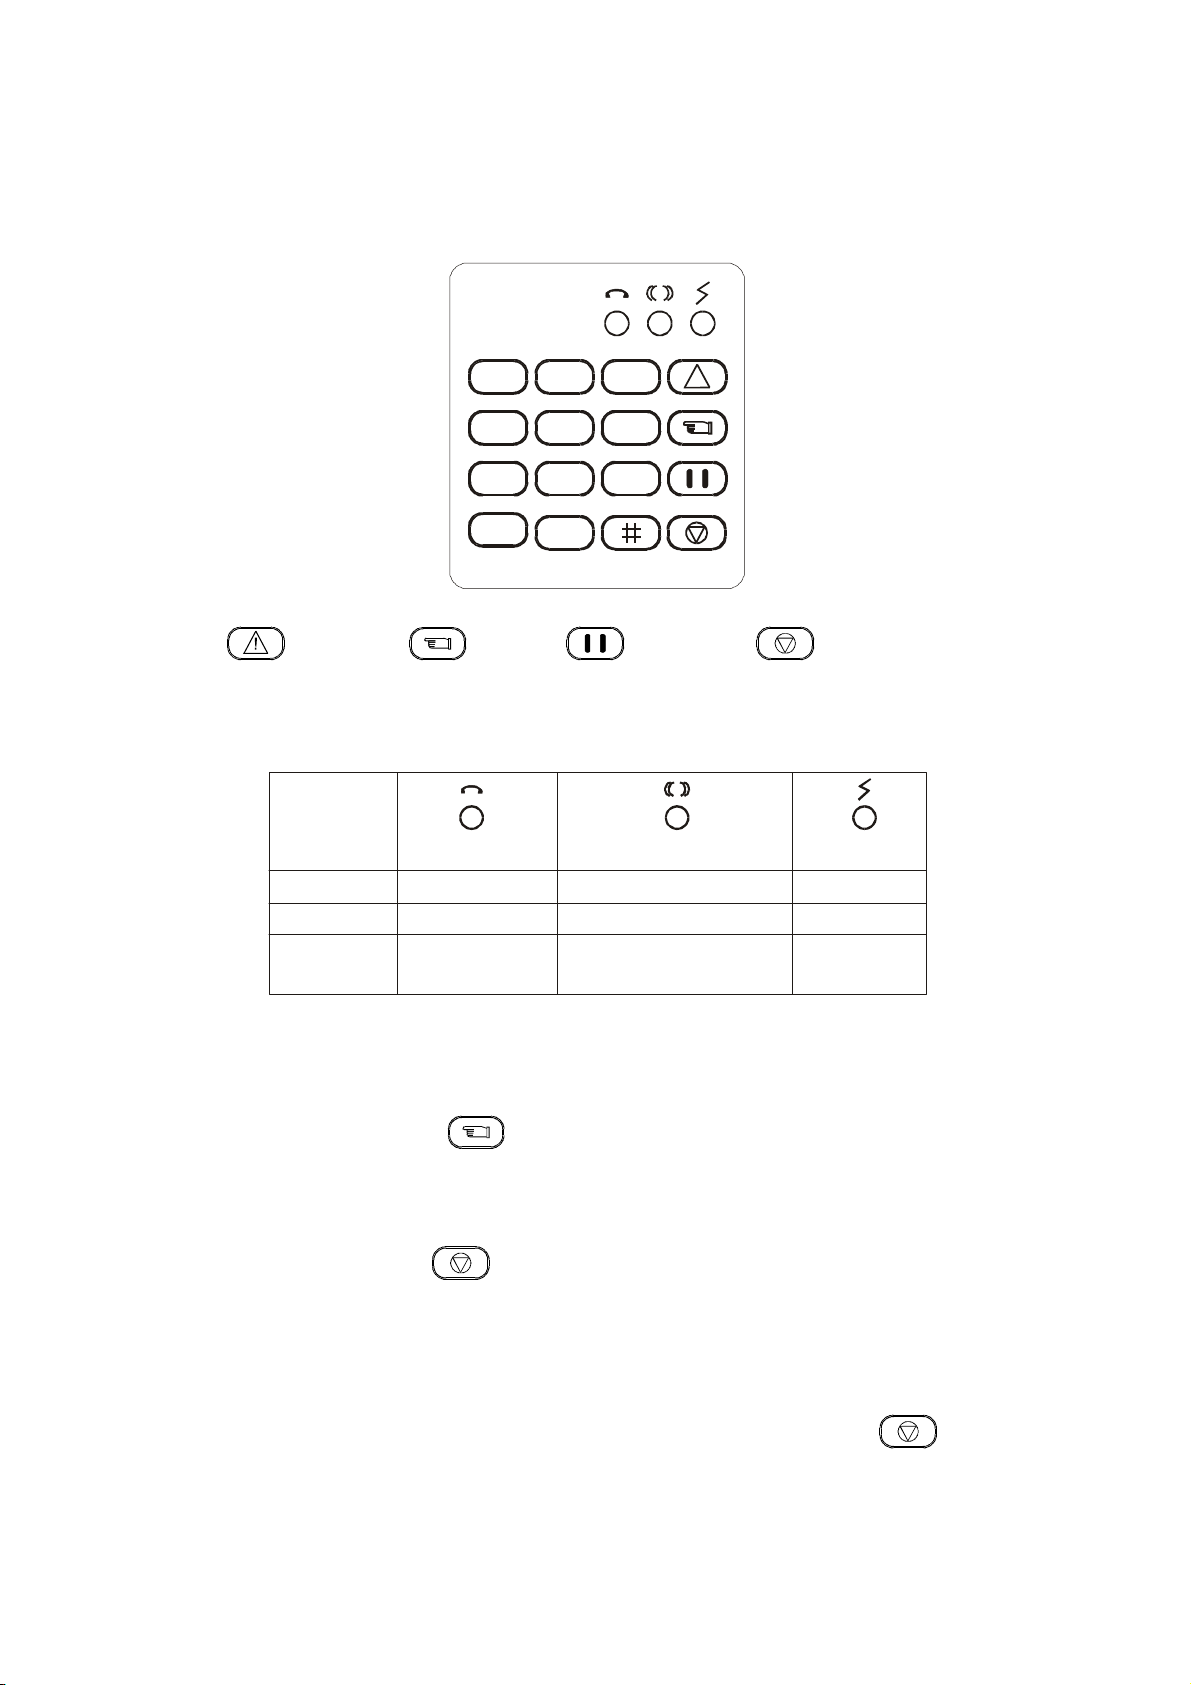
4. KEYPAD AND INDICATORS
KEYPAD
!
1 2
3
4 5
7
6
8
9
0
*
<PANIC> <SET> <PAUSE> <CLEAR>
LEDINDICATORS
LED
STATUS
OFF
ON
FLASH
GREEN
OFF-LINE
ON-LINE
DIALLING
YELLOW
STANDBY
REC / PLAY
INCOMPLETE SETTING OF
RECORDED MESSAGE
AND PHONE NUMBER
RED
POWER OFF
POWER ON
ALARM MEMORY
LEDINDICATION DURINGPROGRAMMING
•Each time any button is pressed, the Yellow LED will flash once to confirm
the input.
•When you press the once,the Yellow LED will flash once, on the
second press of this key, the Yellow LED will flash twice, and on the third
press of this key, the Yellow LED will be on for 1.5 second, indicating the
completion of a programming procedure.
•When pressing the key or if the next sequent key is not pressed over
an interval of 10 seconds or there is an incorrect input, the Yellow LED will
flash four times, indicating ans incorrect operation.
•When the red LED is flashing, the user cannot proceed with the
programming. To reset the Autodialer / QuickDialer press the key, (the
Red LED will illuminate continuously), you can then proceed with the
settings.

7
5. SETTING UP THE UNIT
EMERGENCYMESSAGES
1. Recording Message
The Autodialer / QuickDialer has a built-in microphone enabling you to
record the message phrases directly into the unit. As an example, the
following phrases can be recorded as the emergency message:
“This is Mr. Smith, at 10 The Strand, East Fincham. The house alarm has
been triggered, please send for help.”
To record the message, press the keys →→→and
start speaking directly into the microphone. As the message ends, press
the key to stop recording.
→→−−−−−−−−−−−−−−−−−−−−−
2. Playing Back Message
Once the phrases have been recorded by the Autodialer / QuickDialer, they
can be played back through the loudspeaker of a parallel connection
telephone unit so that you can check the recorded messages. To play the
recorded messages, do as follows:
→ → −−−−−−−−−−−−−−−−−−−−−
•While playing the message, the Yellow LED will illuminate simultaneously.
•To stop playing the message, simply press the key on the Autodialer /
QuickDialer.
NUMBERSTODIAL
Up to six telephone numbers can be memorized, with a maximum of 32
digits each.
1. Telephone Number
!
1
2
3
4
5
7
6
8
9
0
*
Telephone Number
1 2 3 4
5 6
1
Sequence of telephone number
(Select only one key)
MICROPHONE

8
•To revise the telephone numbers, repeat the previous procedure.
•To clear a recorded telephone number, do as follows:
→→
6
→ →
Sequence of telephone number
(select only one key)
•Due to the nature of some particular phone systems, busy tone or ring back
tone cannot easily be distinguished. To overcome this problem, press the
!
key after the telephone number for deferred playing (Autodialer /
QuickDialer will start playing messages 3.6 seconds after dialing the phone
number) :
→→
6
→
Sequence of telephone number
(select only one key)
→
7
6
→
!
→
Telephone Number Deferred
Playing
•For a telephone number without the “deferred playing”setting, the Autodialer
/ QuickDialer will try to determine the tone within 7 seconds after dialing the
number. If it is ring back tone, the Autodialer / QuickDialer will start playing
the messages; otherwise, it will hang up and dial the next number 5.5
seconds later or redial the same number 30 seconds later.
2. Pager Numbers
If the Autodialer / QuickDialer is dialing a pager, it may need to wait a while
before sending the paging message. This is achieved by entering one or
more after the pager number. (Each delays the system
operation for 3.6 seconds). In order to determine how many to enter
after the pager number, preliminary trial is absolutely required.
→→
6
→
Sequence of telephone number
(select only one key)
→
0
7
0
0
7
6
→
Pager Number
→ --------------- →
Waiting for transferring Prefix
→
7
6
→ →
Display Number Prefix

9
3. Programming an internal PABX telephone exchange through Direct Inward
System Access (DISA) facility
→→
6
→
Sequence of telephone number
(Select only one key)
→
7
−−− → --------------------
Telephone Number Waiting for transfer
→→
!
→
Extension Deferred
Number Playing
4. Connected to PABX system or ISDN switcher
If the Autodialer / QuickDialer is connected to an internal PABX telephone
exchange or ISDN switcher, a prefix digit (e.g. 9) is normally required before
an outside line can be obtained.
If the prefix dialing function is activated, the Autodialer / QuickDialer will dial
the first digit (prefix) entered for every telephone number, and then start dial
tone detecting function. To activate this function, enter
0
. To disable the
function, enter . The setting is done as follows:
→
9
→ →
0
→
Prefix (select only one key)
Before entering the telephone number (“27654321” for the example below),
press “9” for the dial output prefix.
→→
6
→
Sequence of telephone number
(select only one key)
→
9
→
7
6
→
Prefix Telephone Number
SENDINGATESTCALL
It is possible to send one test call by selecting one of the telephone
numbers to call.
→→
6
→
Sequence of telephone number
(select only one key)
The telephone number of the test call will be dialed only once whether the
line is busy or not.

10
ALARMSYSTEMTRIGGERSETTINGS
Upon receiving an input signal from the connected alarm control panel, the
Autodialer / QuickDialer will react accordingly. For the Autodialer /
QuickDialer to function correctly, it should memorize each zone’s different
alarm system “trigger type” and “trigger duration”.
Alarm system Trigger Type:
Factory Default: = Normal Open / Normal Low
Trigger Duration:
Factory Default: = 10 seconds duration
•Durations and are suitable for “pulse triggers”, i.e. magnetic
reed sensors, shock sensors and glass breaking sensors.
•For and duration, as long as the alarm control panel has been
disarmed within 10 or 15 seconds respectively, the Autodialer / QuickDialer
will stop operating right away and the alarm memory will be erased (red
LED stays on accordingly).
If you want the settings different from the factory default, do as follows:
→→→→→
Type Duration
(Select one key) (Select one key)
•If a new trigger occurs while the previous dialing procedure has not been
completed, the Autodialer / QuickDialer will regard it as the same activation.
•If the triggered zone remains in its triggered state after the dialing procedure
is completed, the autodialer / QuickDialer will regard it as the same
activation and will not dial the numbers again. The previous trigger has to
be cleared for at least 2 seconds before another trigger from the same zone
will be regarded as a new activation.
•After being triggered 3 times in a row, the Autodialer / QuickDialer will enter
the “sleep mode” for 1 hour, during which it will not accept any more new
triggers. During the 1-hour period, you may press the key at any time
to reset the alarm memory to zero for the Autodialer / QuickDialer to be on
alert again.
•The panic key trigger is not limited by any of the alarm memory facilities
mentioned above. You may press the
!
key at any time to activate the
Autodialer / QuickDialer.
BUTTON
NORMAL OPEN (N.O.)
NORMAL LOW NORMAL CLOSE (N.C.)
NORMAL HI
TYPE
1
0
BUTTON
0.06
SECONDS
0.2
SECONDS
DURATION
1
2
3
4
10
SECONDS
15
SECONDS
11
AUTODIALING SET-UP
Each telephone number can be dialed for a maximum of 9 times. The
factory default is to dial each phone number 3 times.
When setting up, by pressing the
4
key for instance, each telephone
number will be dialed four times upon activation.
To select an Auto Dialing setting different from the factory default, do as
follows:
Note: The maximum number of times the Autodialer / QuickDialer will dial is
15 times. For example, if you stored 3 sets of telephone numbers in the
memory, each telephone number can be dialed for a maximum of 5 times,
even if you select an Auto Dialing setting greater than 5.
When only one number is stored and that number is engaged, the
Autodialer / QuickDialer will automatically redial that number with an interval
of 30 seconds between dialing attempts.
When more than one telephone number is stored, the Autodialer /
QuickDialer will dial in accordance with the order. If the number being
dialed is engaged, the Autodialer / Quickdialer will try the next number in the
sequence and so on. Each number will be tried, and the redial interval
between each number is 5.5 seconds. After a complete dialing cycle, the
Autodialer / Quickdialer will rest for 30 seconds before doing another cycle.
MESSAGEPLAYING DURATION
During each call, the recorded message will be played repeatedly for a
certain period of time (duration). There are four selectable settings of
duration, the factory default is set for
1
, i.e. 50 seconds.
To select a message playing duration different from the default, do as
follows:
→
8
→→→
Duration
(Select only one key)
RESET THE SYSTEM
To clear all settings and reset the system to the original factory default, do
as follows:
→→→
!
→
0
→
BUTTON
50
SECONDS 70
SECONDS
DURATION
1
2
3
4
90
SECONDS
110
SECONDS
1
2
3
4
5
7
6
8
9
Select one key
0
12
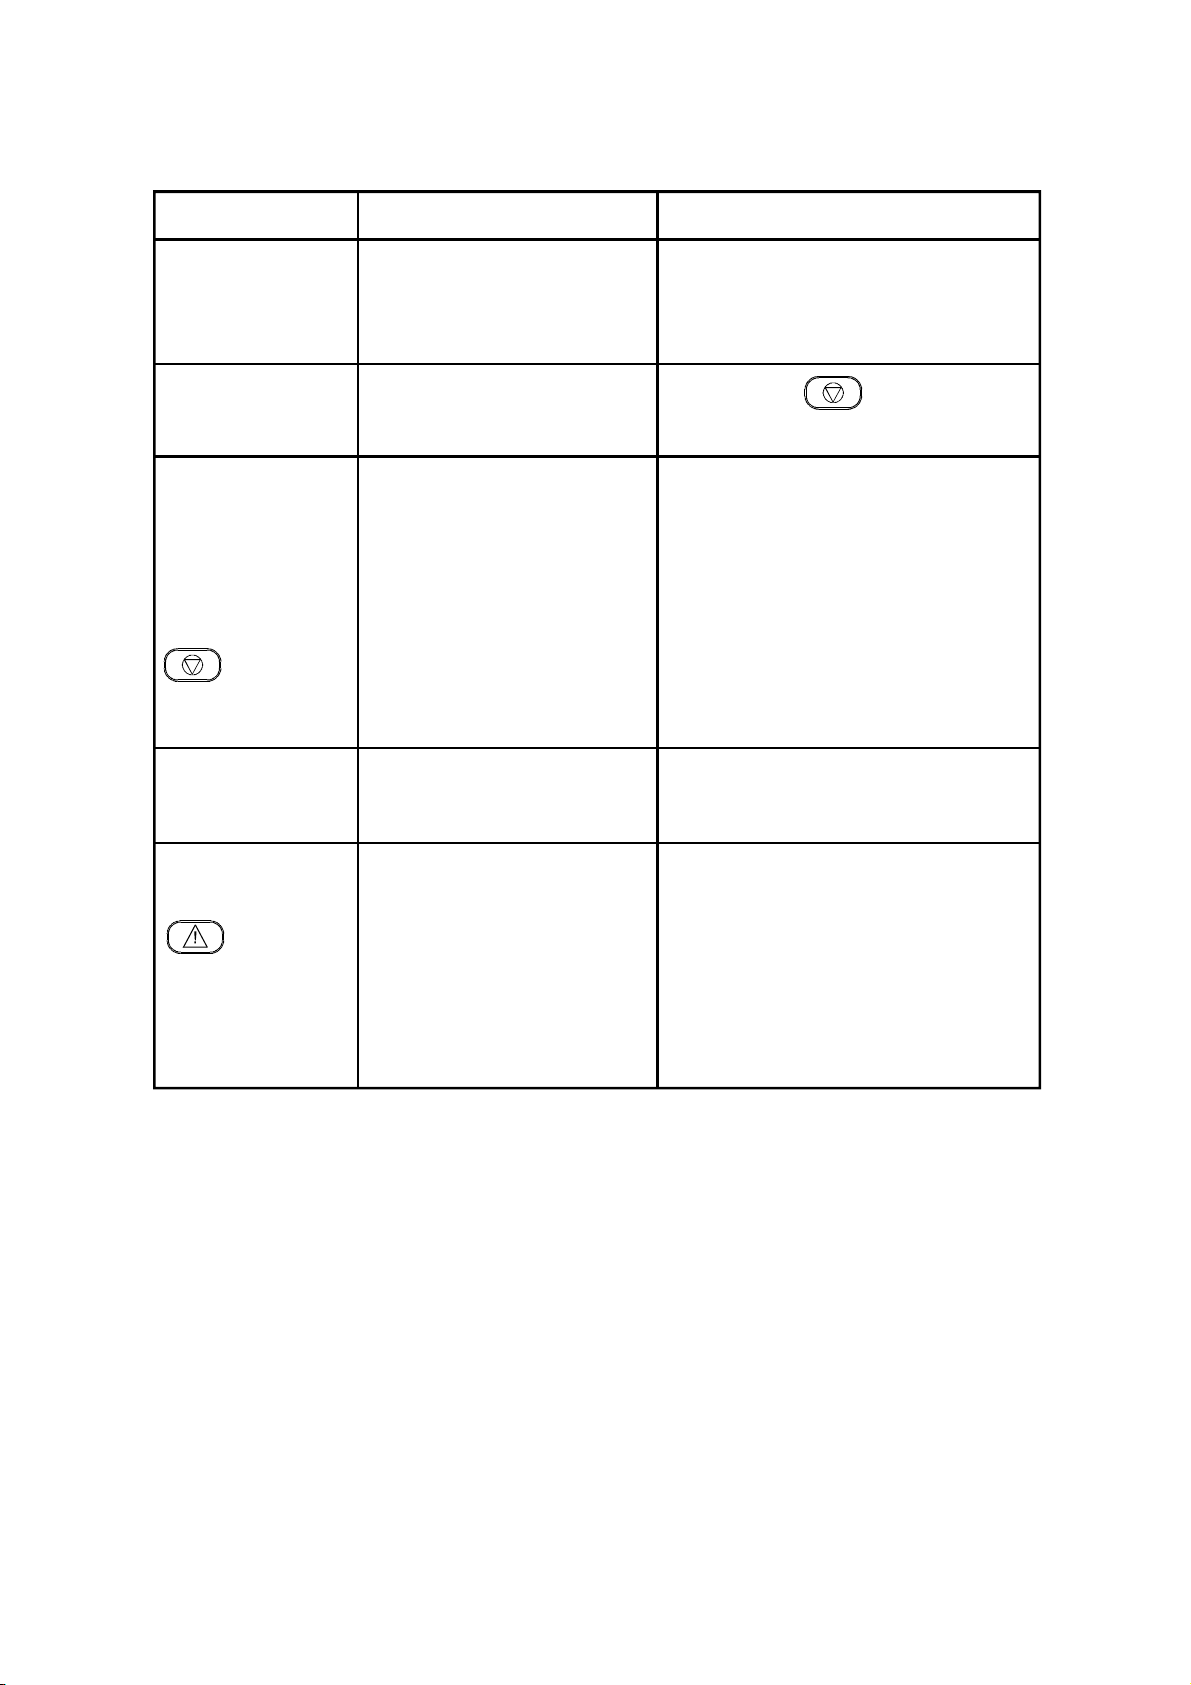
6. TROUBLE SHOOTING GUIDE
PROBLEM POSSIBLE CAUSE REMEDY
Red LED does 1. DC circuit power 1. Exchange the DC
not “flash” connected in circuit power.
reverse order.
“Light up” red 1. Has been triggered. 1. Press the key..
LED does “flash”
Red LED 1. COM / 1 still under 1. Clear the trigger on the
illuminates and trigger. control panel or wait
device could for the control panel to be
not be reverted stopped automatically.
back to stand-by
by pressing the 2. The cable, which 2. Check the cable.
key..is connected to the
control panel, is faulty.
Yellow LED will 1. Memory selected 1. Select the correct memory.
not stop flashing. incorrectly.
Green LED does 1. Telephone line is not 1. Check that the Line Jack is
not flash when not connected correctly. inserted correctly.
key is
pressed or when 2. There is a breakdown 2. Check there is a dialing tone
the wire control in the telephone line. from the extension. If there is
is triggered. no tone contact the telephone
company to repair it.
SPECIFICATION:
Operating Voltage: 7.7 to 13.8 VDC
Operating Environment: Temperature 0°C to 40°C
Stand-by Current: 17mA typically 25mA max. (at 12 VDC)
Alarm Current: 90mA typically 100mA max. (at 12 VDC)
Table of contents
Other Thermomax Control Unit manuals

Popular Control Unit manuals by other brands

ABB
ABB FENA-21 Quick installation and start-up guide

YASKAWA
YASKAWA DO-A3 installation manual

Siemens
Siemens SIMATIC ET 200SP IM 155-6 PN/2 HF manual

Pentair
Pentair Anderson Greenwood 93 Series Installation and maintenance instructions

Bosch
Bosch FLM-420-NAC-D installation guide

Regulus
Regulus VZK S 3 230-2P Series Installation and operation manual


