ThermOmegaTech THERM-O-MIX WWM Programming manual
THERM-O-MIX®WWM STATION
Troubleshooting Manual
www.ThermOmegaTech.com | 1-877-379-8258

Table of Contents
Page 1
Topic
Introduction .................................................................................................................
Denitions and Terminology .......................................................................................
Recommended Tools .................................................................................................
Checklist .................................................................................................................
Operating Sequence and Failure Modes ...........................................................................
Normal Operating Sequence For Therm-O-Mix Station ...................................................
Failure Modes .......................................................................................................
V1 Failure Mode ...............................................................................................
WWM Diaphragm Actuator Failure Mode ............................................................
V4 Failure Mode ..............................................................................................
Troubleshooting ...........................................................................................................
Troubleshooting Warning Statement ...........................................................................
Decommissioning the Therm-O-Mix Station for Troubleshooting and Repairs.....................
Analyzing Component Failure by Conditions .................................................................
Adjustments and Repairs ...............................................................................................
V1 Mixing Valve Adjustment Instructions with the Unit Running ......................................
V1 Mixing Valve Adjustment Instructions with the WWM Diaphragm Removed..................
WWM Diaphragm Actuator/VI Mixing Valve Replacement Instructions.............................
V4 Control Valve Replacement Instructions .................................................................
Appendices
Therm-O-Mix Safety Shower Station Schematic..................................................................
Therm-O-Mix Safety Shower Station Flow Chart................................................................
Station Line Drawing......................................................................................................
Therm-O-Mix WWM Safety Shower Station Checklist.........................................................
WWM Diaphragm Actuator/V1 Mixing Valve Line Drawing....................................................
WWM Diaphragm Actuator/V1 Mixing Valve Adjustment Photos...........................................
V4 Control Valve Photo...................................................................................................
Section
1.0
1.1
1.2
1.3
2.0
2.1
2.2
2.2.1
2.2.2
2.2.3
3.0
3.1
3.2
3.3
4.0
4.1
4.2
4.3
4.4
A1
A2
A3
A4
AS
A6
A7

Section 1.0: Introduction
This manual is designed to aid selected companies/qualied personnel to troubleshoot and re-
pair Therm-OmegaTech’s Therm-O-Mix WWM Safety Shower Stations. Any qualied personnel
assigned to troubleshoot or repair a Therm-O-Mix Safety Shower Station should read the entire
manual before proceeding. If you have any questions or concerns about the information found in
this manual please contact ThermOmegaTech Inc. at 1-877-379-8258.
Section 1.1: Denitions and Terminology
• System = safety shower/eyewash station
• Station = Therm-O-Mix Station tempered water unit
• Normal Range = tepid/moderately warm/lukewarm potable water not to exceed lOO°F
• Flow Pressure = gauge pressure measured during ow ( dynamic pressure)
• V1 = primary mixing valve; mixes cold inlet water with hot inlet water
• V4 = normally closed; nal safety control; senses water temperature out of mixing valve V1;
V4 opens if the outlet water temperature is too high, short circuiting the WWM Diaphragm
Actuator, closing the hot port of V1 and reducing hot water ow
• WWM Diaphragm Actuator = normally retracted for standard mixing mode; pressure
sensitive diaphragm overrides and closes hot port during over-temperature or loss of hot
water supply at V1
Page 2
Section 1.2: Recommended Tools
Section 1.3: Check List
The following is a list of recommended tools needed to properly troubleshoot and repair a
Therm-O-Mix WWM Safety
• 1/8, 3/16 Hex Keys
• Open-end wrenches including 7/16”, ½, 1”, 1-1/8”, 1½”)
• Channel lock/ Alligator Pliers
• (2) 12” or 14” Pipe wrenches
• (2) 12” or 14” Spud wrench w/ 2-5/8” Capacity
• Thermometer or Thermocouple w/ reader
• Phillips screwdriver
Review the checklist below before troubleshooting the Therm-O-Mix WWM Safety Shower
Station. See Appendix #4 for the printable checklist.
• Does the plant have adequate Hot Water Flow Pressure? (Recommended min. 45 PSIG/ max.
100 PSIG)
• Is the station’s hot water supply line properly sized? (Recommended min. 1” IPS)
• Does the plant have adequate Cold Water Flow Pressure? (Recommended min.
45 PSIG/ max. 100 PSIG)
• Is the station’s cold water supply line properly sized? (Recommended min. 1” IPS)
• Is the station supplying tempered water to anything other than the Safety Shower Station?
• Are freeze and scald protection valves installed correctly? (As required for outdoor
applications)
• Is the cold water supply line in contact with or being overheated by another source? (Steam
supply lines, solar radiation or steam tracing)

Page 3
Section 2.0: Operating Sequence and Failure Modes
The V1 mixing valve blends the cold inlet water with the hot inlet water to produce the set-point
outlet water temperature. If the water temperature out of V1 is high, V4 opens which short
circuits the WWM Diaphragm Actuator reducing the hot water ow to the mixing valve outlet.
If the outlet water temperature is above 95°F prior to activating the system the V4 will short
circuit the WWM Diaphragm Actuator holding the hot water port closed until the outlet water
temperature falls below 85°F. The water supply lines should have pressure regulators installed
as per the factory’s installation instructions. The hot water ow pressure should be slightly
higher than the cold water ow pressure but not more than 10 PSIG higher. Refer to Appendix
#1 for the Station Schematic and Appendix #2 for the Station Flow Chart.
If Vl failed with cold port closed (hot port open): only hot water ows to mixing valve outlet.
V4 will open and short circuit the WWM Diaphragm Actuator when the Station outlet exceeds
approximately 95°F, thus closing the hot inlet port on the mixing valve. With the hot port
closed, no hot water can ow to the mixing valve, so the Station outlet is cold water only.
Station will start to cycle hot - cold as the V4 sees cold water.
If V1 failed with hot port closed (cold port open): no hot water can ow to V1 mixing valve;
system supplied with cold water only. V1 is probably jammed open with debris.
If Diaphragm Actuator failed retracted (normal mixing mode): will not be noticed unless there is
an over-temperature situation or loss of hot water supply to the Station.
If Diaphragm Actuator failed extended (override mode): no hot water can ow to V1 mixing
valve; system supplied with cold water only.
If V4 failed closed: no signicance unless V1 also fails or outlet temperature is over 95°F for
more than 15 seconds.
If V 4 failed open: mixing valve hot port will be closed, so only cold water ows from the
Station. Debris may be stuck to the seat area inside the V 4 not allowing a good seal.
Section 2.1: Normal Operating Sequence For Therm-O-Mix Station
Section 2.2: Failure Modes
Section 2.2.1: V1 Failure Mode
Section 2.2.2: WWM Diaphragm Actuator Failure Mode
Section 2.2.3: V4 Failure Mode

Page 4
Troubleshooting a Therm-O-Mix Station in the eld may require turning off the hot and cold
water supply to the emergency safety shower/eyewash system. As such, please contact the
plant safety manager/supervisor and follow proper procedures for tagging, locking out, and other
possible issues relating to servicing and temporarily rendering the safety equipment unusable.
Notify all personnel working in the area that the emergency safety shower/eyewash equipment
will be temporarily disabled.
Follow the steps listed below to properly decommission the Therm-O-Mix Station for
troubleshooting and repairs:
1. Close the hot water supply line valve to the station.
2. Activate the shower and eyewash system for a minimum of two minutes to deplete the hot
water pressure trapped between the supply shutoff valve and the station. A longer period of
time may be needed, depending on the size and length of supply piping.
3. With the system activated close the cold water supply valve to the station.
4. See Section 4.0, for individual valve adjustment and/or replacement.
5. Once Therm-O-Mix has been repaired, open the hot and cold water supply valves to the
station. Allow station to run for at least one minute to purge the system.
6. Insert the temperature-reading device into the eyewash nozzle. Activate the eyewash and
record the temperature several times over a 5-10 minute cycle. Repeat this step for the
shower, attaching the temperature-reading device to the shower head. Record temperatures
on the Unit Checklist (see Appendix# 4).
CAUTION: THERM-O-MIX PIPING MAY BE HOT AND CARE SHOULD BE TAKEN
DURING REPAIRS. BE CAREFUL WHEN REMOVING PARTS FOR REPAIR OR
REPLACEMENT; HOT WATER MAY BE TRAPPED IN THE STATION.
Section 3.1: Trouble Shooting/Repair Warning Statement
Section 3.2: Decommissioning the Therm-O-Mix Station For Troubleshooting
and Repairs
Section 3.0: Trouble Shooting and Repairs

Page 5
Section 3.4: Analyzing Component Failure by Conditions
Section 4.0: Adjustments and Repairs
Section 4.1: V1 Mixing Valve Adjustment Instructions with the Unit Running
CONDITION COMPONENT FAILURE
If the outlet temperature remains above the
normal range for long periods of time
without uctuation in the outlet temperature.
Follow Section 3.1 & 3.2 to decommission the
station for repair. Follow Section 4.2 to adjust
the V1 Mixing Valve outside the unit. If the valve
cannot be adjusted correctly a replacement WWM
Diaphragm Actuator is required. If the outlet
temperature is above 95°F, replacement of the V4
Control Valve is required. (See section 4.3 &4.4 for
replacement instructions)
If the outlet temperature uctuates, rising
above the normal range and then drops
below the normal range.
Follow Section 3.1 & 3.2 to decommission the
station for repair. Follow Section 4.2 to adjust
the V1 Mixing Valve outside the unit. If the valve
cannot be adjusted correctly a replacement WWM
Diaphragm Actuator is required. (See section 4.3 for
replacement instructions)
Cold Water Only
Verify that the hot water ow pressure is adjusted
slightly high than the cold water ow pressure as
per the factory’s installation instructions. Follow
Section 3.1 & 3.2 to decommission the station for
repair. Remove the V4 Control Valve for testing
(See section 4.4). If the V4 tests correctly Follow
Section 4.2 to adjust the V1 Mixing Valve outside
the unit. If the valve cannot be adjusted correctly a
replacement WWM Diaphragm Actuator is required.
If the V1 Mixing Valve is properly adjusted verify
that the hot water supply is not blocked before
replacing the WWM Diaphragm Actuator by slowing
opening the hot water supply valve.
Unit Runs Slightly Off Set-Point Minor adjustments can be made to the V1. (See
section 4.1)
1. Remove the cap nut located on the top of the diaphragm head with a 1” wrench.
2. Loosen calibration lock nut with a 7/16” wrench.
3. Use a marking pen to make a reference mark so that the calibration screw can be reset to
the original location if needed.
4. Use a 1/8” hex key to adjust the calibration screw while the unit is running. Turning the
screw counter clock-wise will raise the temperature and turning the screw clock-wise will
lower the temperature. The calibration screw should only be adjusted a ½ turn at a time.
Allow the unit to stabilize for at least one minute after adjustment before trying to make
other adjustments.
5. Once the necessary adjustments are made tighten the lock nut onto the calibration screw.
6. Re-install the cap nut making sure the face seal does not get pinched. Snug the acorn nut
with a 1” wrench.
Before beginning repairs read and understand Section 3.1. The Station should be tested after all
adjustments are completed.

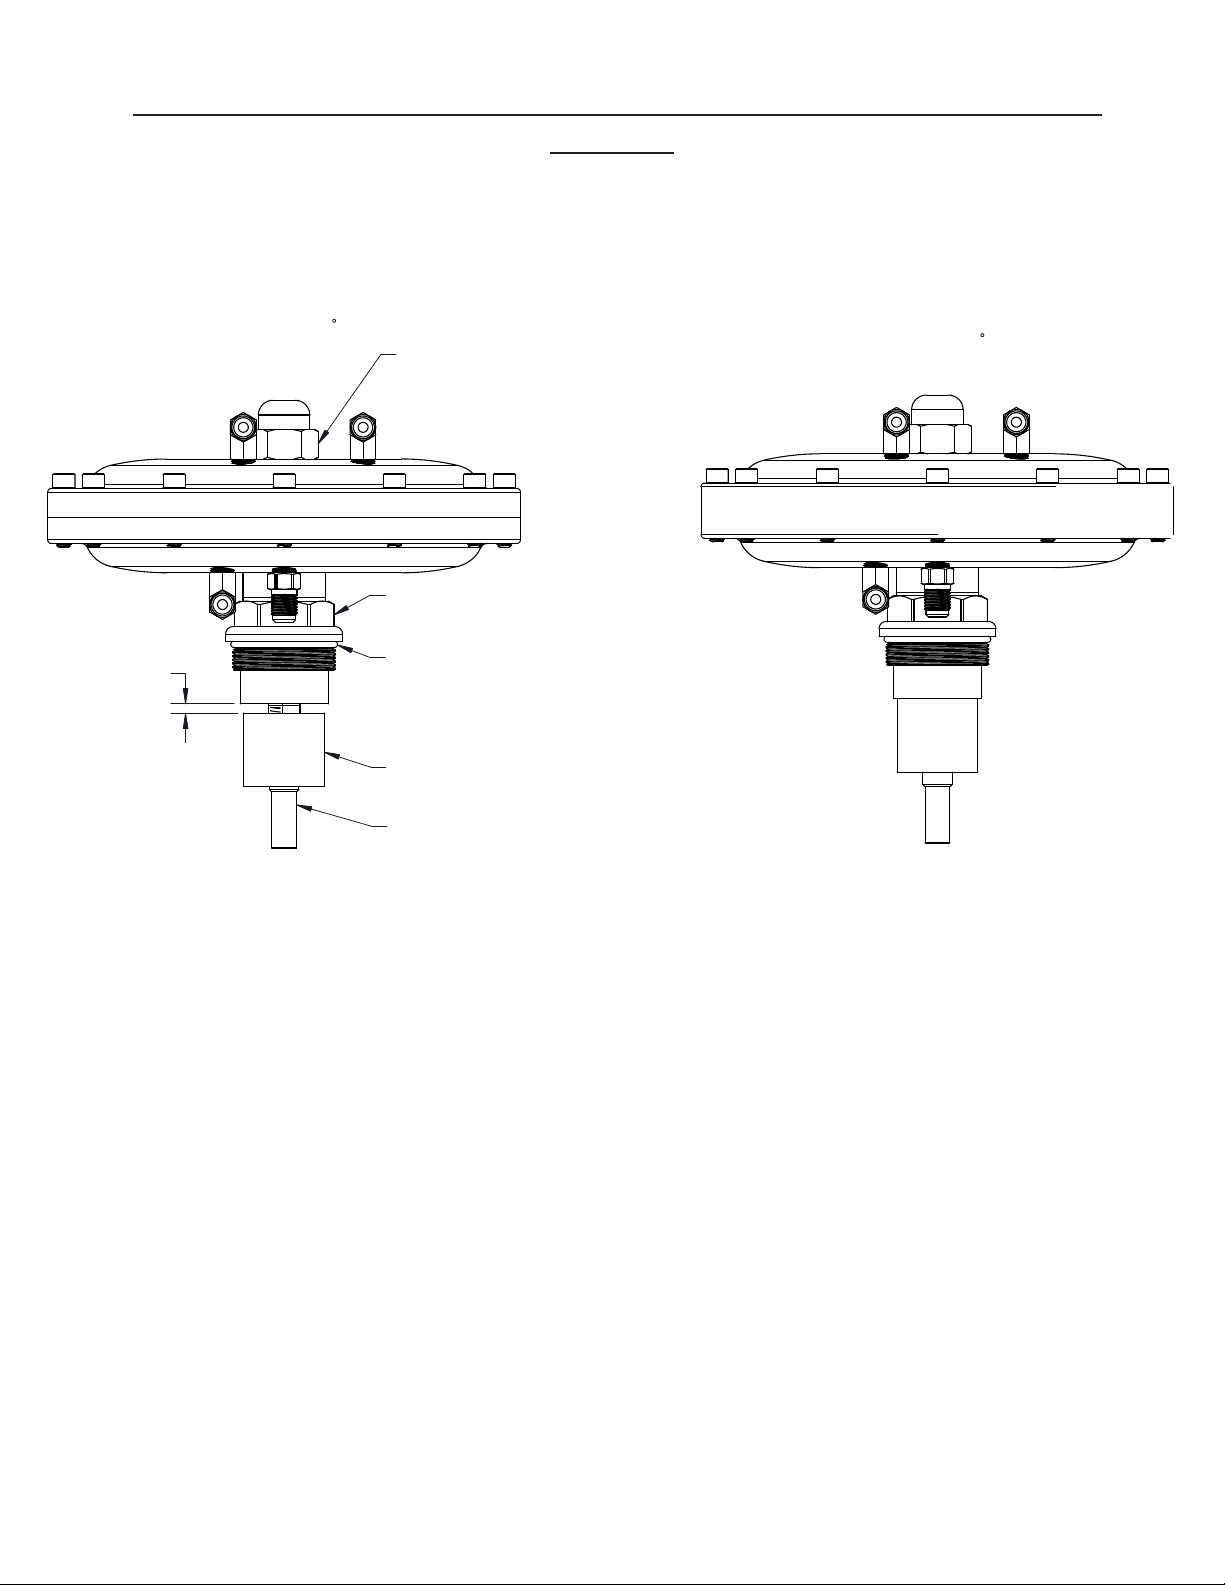
Section 4.2: V1 Mixing Valve Adjustment Instructions with the WWM
Diaphragm Removed
Before beginning repairs read and understand Section 3.1 and follow the steps in Section 3.2
to decommission the Therm-O-Mix Station. The Station should be tested after all repairs are
completed.
1. Label each hose connection going to the diaphragm housing for easy re-installation. (See
Appendix #3)
2. Disconnect hoses from the diaphragm housing only.
3. Use a 1-1/2” wrench or spud wrench to loosen diaphragm valve assembly. Once unthreaded,
pull diaphragm valve out. Some resistance may be felt due to O-ring seal.
4. Remove cap nut and loosen calibration lock nut with a 7/16” wrench.
5. Place the stainless steel sensor into a water bath with a temperature 5F over the set point
for ve minutes. *Note: The sensor should be at or below 75F prior to being placed into the
water bath for proper calibration. Use calibration screw to adjust the valve spool so that the
opening between the spool and the cap is .160-.175 in. (See Appendix #5 & #6).
6. Place stainless steel sensor into a water bath with a temperature 5°F below the set point for
ve minutes. Verify that the top of the spool is sitting on the bottom of the cap.
7. Once properly adjusted, tighten the calibration lock nut and replace cap nut.
8. Thread WWM Diaphragm Actuator back into the V1 Mixing Valve Tee assembly and tighten
with 1-1/2” wrench.
9. Position the diaphragm housing so that the adaptor ttings are pointing to the side of the
body with the braided hoses. *Note: To position the diaphragm housing, rotate clockwise
when looking down on the Therm-O-Mix® Station/WWM to prevent the valve internals from
loosening.
10. Reconnect the braided hose lines by hand tightening the hose swivel ttings onto the
adaptor ttings. Use a 9/16” open end wrench to tighten the swivel nut 1 to 1-1/2 hex
ats or 60 to 90 past hand tight. *Use second 1/2” wrench as a back-up wrench to
prevent hose from twisting.
*If braided hose connections containing orice plates are opened, the orice plate must be
replaced. Orice plates have been included in the replacement kit in case they are needed.
(See Appendix #3)

Page 7
Before beginning repairs read and understand Section 3.1 and follow the steps in Section 3.2
to decommission the Therm-O-Mix Station. The Station should be tested after all repairs are
completed.
1. Label each hose connection going to the diaphragm housing for easy re-installation.
(See Appendix #3)
2. Disconnect hoses from the diaphragm housing only.
3. Use a 1-1/2” wrench or spud wrench to loosen diaphragm valve assembly. Once unthreaded
pull diaphragm valve out. Some resistance may be felt due to O-ring seal.
4. Remove old body O-ring.
5. Install new #221 Quad O-ring supplied with replacement kit.
6. Install new diaphragm valve assembly and tighten with 1-1/2” wrench.
7. Position the diaphragm housing so that the adaptor ttings are pointing to the side of the
body with the braided hoses. *Note: To position the diaphragm housing, rotate clockwise
when looking down on the Therm-O-Mix® Station/WWM to prevent the valve internals from
loosening.
8. Reconnect the braided hose lines by hand tightening the hose swivel ttings onto the adaptor
ttings. Use a 9/16” open end wrench to tighten the swivel nut 1 to 1-1/2 hex ats or 60
to 90 past hand tight. *Use second 1/2” wrench as a back-up wrench to prevent hose from
twisting.
*If braided hose connections containing orice plates are opened, the orice plate must be
replaced. Orice plates have been included in the replacement kit in case they are needed.
(See Appendix #3)
Section 4.3: V1 Mixing Valve Replacement Instructions

Page 8
Before beginning repairs read and understand Section 3.1 and follow the steps in Section 3.2
to decommission the Therm-O-Mix Station. The Station should be tested after all repairs are
completed.
1. Label each hose going to the V4 Control Valve to ensure proper orientation during
re-assembly.
2. Using a 9/16” wrench disconnect the 3 hose connections on the V4 Control Valve.
*Note: two orice plates will drop out of the upper and lower hose connections.
3. Unthread the V4 Control Valve from the V1 Valve Mixing Tee assembly using a 1-1/8”
wrench.
4. Place V4 Control Valve stainless steel sensor into a water bath at 98F or above for ve
minutes.
5. Using a compressed air nozzle, blow air into the upper angled hose tting. (See Appendix #8)
If air can be felt coming from the center hose tting, the V4 Control Valve has failed and must
be replaced. If not, continue to the next step.
6. Place V4 Control Valve stainless steel sensor into a water bath at 85F or below for ve
minutes.
7. Using a compressed air nozzle, blow air into the lower straight hose tting. (See Appendix #8)
If air can be felt coming from the center hose tting, the V4 Control Valve has failed and must
be replaced. If not, continue to the next step.
8. If the V4 Control Valve is working correctly, thread the valve back into the 3/8 NPT port. Use
teon tape or equal pipe thread sealant on all NPT threads.
9. The 2 outside connections on the V4 Control Valve require orice plates to be installed. Place
an orice plate in the female end of the hose and carefully thread the hose on to the proper
male tting. *Note: the middle connection of the V4 Valve does not receive an orice plate.
1. Label each hose going to the V4 Valve to ensure proper orientation during re-assembly.
2. Using a 9/16” wrench disconnect the 3 hose connections on the V4 Valve.
3. Unthread the V4 Valve from the V1 Valve Mixing Tee assembly using a 1-1/8” wrench.
4. Thread the replacement V4 Valve into the 3/8 NPT port. Use teon tape or equal pipe thread
sealant on all NPT threads.
5. The 2 outside connections on the V4 Valve require orice plates to be installed. Place an
orice plate in the female end of the hose and carefully thread the hose on to the proper male
tting. *Note: the middle connection of the V4 Valve does not receive an orice plate.
6. Thread tting until hand tight. Use a 9/16” wrench to tighten the swivel nut 1 full revolution
to crush the orice plate. Now turn swivel nut 1 to 1-1/2 hex ats or 60 to 90 to complete
tightening the hose.
*Use a second 1/2” wrench as a backup wrench to prevent hose from twisting.
Section 4.4: V4 Control Valve Replacement Instructions
V4 Control Valve Test
V4 Control Valve Replacement
10. Thread tting until hand tight. Use a 9/16” wrench to tighten the swivel nut 1 full
revolution to crush the orice plate. Now turn swivel nut 1 to 1-1/2 hex ats or 60 to 90
to complete tightening the hose.
*Use a second 1/2” wrench as a backup wrench to prevent hose from twisting.

Page 9
Appendices
Appendix #1
The Station schematic shows related valves and ow directions.
Appendix #2
The station ow chart shows the standard operating conditions and their relation to the Station
as a unit.
Appendix #3
The Station line drawing shows the unit with callouts for each valve or referenced part.
Appendix #4
The Station checklist should be used whenever troubleshooting or repair work is done on a
unit. The Station Serial Number is located on the V1 Mixing Body. The checklist can be sent to
[email protected] or faxed to # 215-674-8594, Attn: Engineering, if any additional
troubleshooting is required.
Appendix #5
Line drawing for WWM Diaphragm Actuator/V1 Mixing Valve adjustment.
Appendix #6
V1 Mixing Valve adjustment photos.
Appendix #7
V4 Control Valve test photo.

PORT A
TEPID WATER
OUTLET
DIAPHRAGM DRAIN HOSE
1-1/4" NPT
FEMALE
DIAPHRAGM
DRAIN HOSE
V4 DRAIN HOSE
DIAPHRAGM HEAD
V1 VALVE
PORT C
COLD WATER
INLET
1" NPT
FEMALE
V4 VALVE
COLD WATER
TEPID WATER
HOT WATER
DIAPHRAGM SUPPLY WATER
DIAPHRAGM DRAIN WATER
THERMAL SENSING LINE
DIAPHRAGM SUPPLY HOSE
B
DIAPHRAGM
SUPPLY HOSE
PORT
HOT WATER
INLET
1" NPT
FEMALE
Page 10
APPENDIX #1: Therm-O-Mix Safety Shower Station Schematic

Page 11
APPENDIX #2: Therm-O-Mix Safety Shower Station Flow Chart
IS HOT
WATER
AVAILIBLE?
IS
MIXING VALVE
OUTLET
ABOVE 95 F?
V4 OPEN,
DIAPHRAGM ACT.
OVERRIDE
MIXING VALVE (V1)
BLENDS HOT &
COLD WATER
TO SET POINT
IS COLD
WATER SUPPLY
ABOVE 95 F?
V4 OPEN,
DIAPHRAGM ACT.
OVERRIDE
DIAPHRAGM ACT.
OVERRIDE
TEPID WATER
TO EYEWASH/
SAFETY SHOWER
END
START

Page 12
APPENDIX #3: Station Line Drawing
ORIFICE
HOSE ASSEMBLY 7.5"
ORIFICE
ORIFICE
ORIFICE
V4, CONTROL VALVE
V1, MIXING VALVE
CAP NUT
DIAPHRAGM HEAD
PORT B
HOT WATERINLET
1" NPT
FEMALE
FEMALE
1-1/4" NPT
HOSE ASSEMBLY 7.5"
PORT C
COLD WATER
INLET
1" NPT
FEMALE
PORT A
TEPID WATER
OUTLET
HOSE ASSEMBLY 15" HOSE ASSEMBLY 9"
HOSE ASSEMBLY 9"

Page 13
APPENDIX #4: Therm-O-Mix WWM Safety Shower Station Checklist
Run #1
Run #2
Company_________________________________
Plant Location_____________________________
Serviceman/Company_______________________
Station/Serial Number_______________________
Contact___________________________________
Phone____________________________________
Date_____________________________________
Unit Location______________________________
Eyewash Temperature:_________________ F / C
Shower Temperature:__________________ F / C
Eyewash Start-up Spike:________________ F / C
Shower Start-up Spike:_________________ F / C
Eyewash Temperature:_________________ F / C
Shower Temperature:__________________ F / C
Eyewash Start-up Spike:________________ F / C
Shower Start-up Spike:_________________ F / C
Does the plant have adequate hot water ow pressure? (Recommended min. 45 PSIG/
max. 100 PSIG________________
Is the stations hot water supply line properly sized? (Recommended min. 1” IPS)_______________
Does the plant have adequate cold water ow pressure? (Recommended min. 45 PSIG/
max. 100 PSIG________________
Is the stations cold water supply line properly sized? (Recommended min. 1” IPS)______________
Is the station supplying tempered water to anything other than the Safety Shower Station?
YES/NO
If “YES,” explain:__________________________________________________________________________
__________________________________________________________________________________________
Are freeze and scald protection valves installed correctly? YES/NO
If “NO,” please explain:____________________________________________________________________
__________________________________________________________________________________________
Is the cold water supply line or the tempered water outlet in contact with or being overheated
by another source? (Steam supply lines, steam tracing or solar radiation) YES/NO
If “YES,” please explain:___________________________________________________________________
__________________________________________________________________________________________
Comments:_______________________________________________________________________
___________________________________________________________________________________
___________________________________________________________________________________
___________________________________________________________________________________
___________________________________________________________________________________
___________________________________________________________________________________
Page 14
APPENDIX #5: WWM Diaphragm Actuator/V1 Mixing Valve Line
Drawing
SET POINT -5 F
CARTRIDGE CAP
O-RING
SPOOL
THERMOSTATIC
ACTUATOR
CAP NUT FOR
ADJUSTMNET
SET SCREW
1" HEX
1-1/2 HEX
SET POINT +5 F
.160
.175

Page 15
APPENDIX #6: WWM Diaphragm Actuator/V1 Mixing Valve Adjustment
Photo
Loosen lock nut.
Adjust calibration screw.

Page 16
APPENDIX #7: V4 Control Valve Test Photo
Middle Hose
Adaptor, Dumps
to Outlet
Upper Hose
Adaptor, From
Outsie WWM
Diaphraghm
Actuator
Lower Hose
Adaptor, From
Inside WWM
Diaphragm
Actuator
WARNING: This product can expose you to chemicals, for example lead, nickel, acrylonitrile, which are known to the
State of CA to cause cancer, birth defects, or reproductive harm. For more information, go to www.P65Warnings.ca.gov
ThermOmegaTech®, Inc.
353 Ivyland Road 1-877-379-8258
Warminster, PA 18974 www.ThermOmegaTech.com
TOMix WWM
Rev: 10/2/20
Table of contents
Popular Safety Equipment manuals by other brands


Pressalit
Pressalit PLUS R360070 Operation and maintenance manual

Honeywell
Honeywell Howard Leight VERISHIELD VS 321 User instructions

ECOSAFE
ECOSAFE DLI92 instruction manual

Dupont
Dupont Tychem 6000 F Cat.III CHA5 Instructions for use

Apollo
Apollo Bio-Full Face Mask instruction manual

Argos
Argos 653/2651 manual

bolle SAFETY
bolle SAFETY OMF167 quick start guide

HELLY HANSEN
HELLY HANSEN HH Safe 150N user manual

Thiele
Thiele TWN 0812 Mounting instructions

RITE-HITE
RITE-HITE Dok-Lok STR-4000 installation manual

CMC Rescue
CMC Rescue 3D Important information

Guardian Fall Protection
Guardian Fall Protection CB-18 Anchor instruction manual