manuals.online logo
Brands
  1. Home
  2. •
  3. Brands
  4. •
  5. THERMORY
  6. •
  7. Plumbing Product
  8. •
  9. THERMORY Barrels 63 User manual

THERMORY Barrels 63 User manual

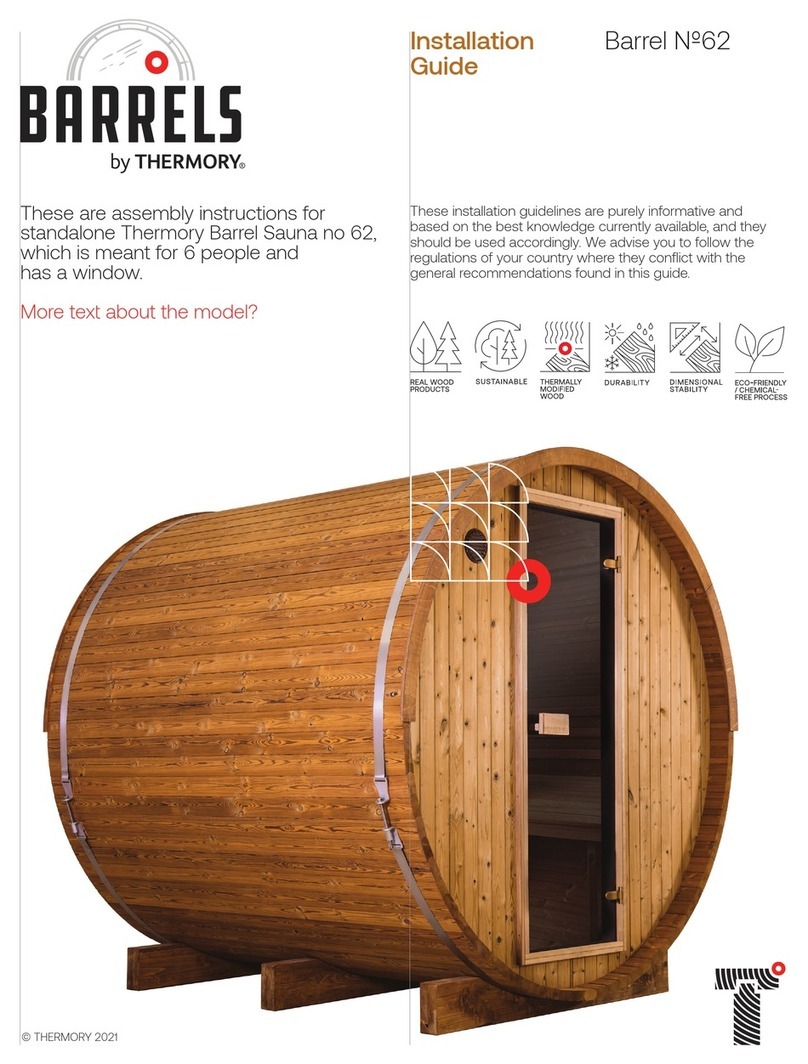
Installation guide Barrel Nº63
BARRELS
© THERMORY 2021
Installation
Guide
These are assembly instructions for
standalone Thermory Barrel Sauna no 63,
which is meant for 6 people
has a window.

Barrel Nº63
These installation guidelines are purely informative and
based on the best knowledge currently available, and they
should be used accordingly. We advise you to follow the
regulations of your country where they conflict with the
general recommendations found in this guide.
Installation guide Installation guideBarrel Nº63 Barrel Nº63
BARRELS BARRELS
PARTS 1
x3 x2
x2
x1
x1
x2 x4
x1
x6
x2
x1
x2
x1
*if needed for
heater installation.
AH
J
B
D
F1
J1 V
C
O
J2
I
E
L
R
CRADLES 
TOP STAVE
INTERIOR
BENCHES
FRONT
PANEL
RIGHT
PANEL
SECTION

BENCH
SUPPORTING
LEGS
WIRE

ASPEN
ROOF
BOARD

STAVES
METAL
BANDS
LEFT PANEL
SECTION

FLOORING

ADHESIVE
ROOF TAPE
x1
CENTER
STAVE x80 (+1
reserve)
RIGHT

STAVES
PARTS 2
+ +
x10 W
DECORATIVE
ROOF NISHING
BOARDS
x8 x70
x2 x2 x4x24
x120 x24
MP
UP1
NN1
SCREW
5.0X120
SCREW
4.0X50
Ø BOLT
16X140
HEX NUT

FLAT
WASHER
STAINLESS
STEEL SCREW
4.0X50
SCREW
4.2X70
STAINLESS
STEEL SCREW
4.2X70
TOOLS

x2 x2x2
x2 x2
24mm
Rubber
x3 x3
3 People
Recommended
x26´
STEP ZERO
Before you begin, be sure the

location.
Approximately 8’ x 8’ is ideal.
Overall dimensions are shown here.
Be sure the site is level and free of

Concrete, pavers or crushed stone
is preferred.
7´´6´
7´´4´
x1 x2
ZZ1
WATERPROOF
ROOF COVER
WOODEN SLAT
FOR ROOF
COVER
x1 D1
REAR
PANEL
x1 E1
LEFT PANEL
SECTION

x1 F
RIGHT
PANEL
SECTION

Installation guide Installation guideBarrel Nº63 Barrel Nº63
BARRELS BARRELS
STEP ONE


will have no dowel. Carefully level for

Place the center stave (B)
on wooden dowels embedded

Fix the center stave (B)
with screw 4.2 x 70 (N).
STEP THREE
Place 6 sauna body staves (C, C1)
to each side of the center stave (B)

Body staves (C)

Be sure to align the panel

STEP TWO

from corner to corner.
Measurements “a” and “b” should be
equal to ensure the cradles are square.
Be sure cradles remain level.
STEP FOUR
Place front panel with sauna doors
(D) and rear panel (D1) into the
trimmed grooves. Be sure each panel
is centered, leveled, and completely
seated into the floor panel.
Bind these panels together by
temporarily placing one or two
body stave (C) on top of them.
STEP FIVE
Two front side panels (E, F)

back side panels (E1, F1)

by 4 screws 5.0 x 120 (M) and
4 stainless steel screws 4.20 x 70 (N1).

interior of the sauna.

of the rear wall (E1, D1, F1)

the front wall (E, D, F).
A
B
A=B
N
A
B
Centered
Back
Front
C
M
M
E
M
M
M
M
M
E1
N1
F1
F
N1
N1
N1
B
C1
N
x6 pcs x6 pcs
C
D
D1
M
Installation guide Installation guideBarrel Nº63 Barrel Nº63
BARRELS BARRELS
STEP SEVEN
Measure steel bands (I) to ensure
correct length of 276,” +/- 1/2” is
acceptable.
Install steel bands (I) by wrapping
bands around barrel prior to

Place steel bands evenly around
barrel, covering screw heads.
Measure from steel band to barrel
edge to ensure the steel band is
even.
Cover roof with roof tape.
Rub and smooth with pressure to
ensure adhesion.
Install interior aspen roof trim (O)
with 4.0 x 50 (P1) stainless steel
screws.
STEP EIGHT


benches on wall mounts using
stainless steel screws 4.2 x 70 (N1).
Hold the seat and leg assembly tight to

the bench seat is level from front
to back. This will ensure proper
placement.

height using stainless steel screw
4.0 x 50 (P1).
STEP NINE
Wire raceways (V) and flooring
duckboards (L) can be used for wiring

needed for chosen stove.
STEP SIX
Continue placing body staves (C)
tightly on both sides of the sauna

body staves on the front panel with
4.2 x 70 screws and rear window
panel with 4.0 x 50 screws to
prevent glass breakage.



N
H
R
I
O
P1


I

P1
N1



N1


N1
N1
C
.4” .6” .8”
Vent
1” 1.2”
Roof tape
Aspen
roof board
3-15/16´´
C
L
Installation guide Barrel Nº63
BARRELS
WATCH THE VIDEO
Thermory USA - Denver
537 W. Highlands Ranch Pkwy, Ste. 114
Highlands Ranch, CO 80129
720.759.7268


56 Harvester Ave, Ste. 1-201
Batavia, NY 14020
585.591.6590

thermoryusa.com
STEP TEN
Place waterproof roof cover (Z)

and screws 4.0 x 50 (P).
Install front and rear decorative



HERE.
W
P
P
Z1
W
Z
P

Other THERMORY Plumbing Product manuals

THERMORY BARRELS 62 User manual

THERMORY

THERMORY BARRELS 62 User manual

THERMORY Barrel 60 User manual

THERMORY

THERMORY Barrel 60 User manual

Popular Plumbing Product manuals by other brands
Viega Visign for Style 20 8610.1 Instructions for use

Viega

Viega Visign for Style 20 8610.1 Instructions for use

American Standard Roselyn Countertop Sink 0498.001 Specifications

American Standard

American Standard Roselyn Countertop Sink 0498.001 Specifications

Teka Clivo Instruction on Installation and Maintenance

Teka

Teka Clivo Instruction on Installation and Maintenance

BELLOSTA n-joy 0100/1/A installation instructions

BELLOSTA

BELLOSTA n-joy 0100/1/A installation instructions

Kohler K-352 installation guide

Kohler

Kohler K-352 installation guide

ZURN AQUASPEC Z82500 SERIES installation instructions

ZURN

ZURN AQUASPEC Z82500 SERIES installation instructions

American Standard Hampton 4751.732F15 installation instructions

American Standard

American Standard Hampton 4751.732F15 installation instructions

Tres Tres-Clasic 24210601LV instructions

Tres

Tres Tres-Clasic 24210601LV instructions

Voda Plumbingware Olympia VOP91BG manual

Voda Plumbingware

Voda Plumbingware Olympia VOP91BG manual

Adjust-a-Sink E140 Series installation instructions

Adjust-a-Sink

Adjust-a-Sink E140 Series installation instructions

Tylo Panacea 1309 t user guide

Tylo

Tylo Panacea 1309 t user guide

Svedbergs Orion 150 cc manual

Svedbergs

Svedbergs Orion 150 cc manual

resideo Braukmann MiniPlus FF06 installation instructions

resideo

resideo Braukmann MiniPlus FF06 installation instructions

Billi Alpine 060 user guide

Billi

Billi Alpine 060 user guide

FM Mattsson FMM 4290 Instruction

FM Mattsson

FM Mattsson FMM 4290 Instruction

Kohler K-6502 installation guide

Kohler

Kohler K-6502 installation guide

Clou Minisuk CL/06.53011.29 installation instructions

Clou

Clou Minisuk CL/06.53011.29 installation instructions

Kohler K-14620 Homeowner's guide

Kohler

Kohler K-14620 Homeowner's guide

manuals.online logo
manuals.online logoBrands
  • About & Mission
  • Contact us
  • Privacy Policy
  • Terms and Conditions

Copyright 2025 Manuals.Online. All Rights Reserved.