manuals.online logo
Brands
  1. Home
  2. •
  3. Brands
  4. •
  5. Thetford
  6. •
  7. Oven
  8. •
  9. Thetford 63947 User manual

Thetford 63947 User manual

Other Thetford Oven manuals

Thetford 420 Series User manual

Thetford

Thetford 420 Series User manual

Thetford S OG72000Z SD Operating instructions

Thetford

Thetford S OG72000Z SD Operating instructions

Thetford S~OH70000Z Operating instructions

Thetford

Thetford S~OH70000Z Operating instructions

Thetford S-OG72000 Operating instructions

Thetford

Thetford S-OG72000 Operating instructions

Thetford S~OG70000 Operating instructions

Thetford

Thetford S~OG70000 Operating instructions

Thetford SPINFLO S-OV3500 Operating instructions

Thetford

Thetford SPINFLO S-OV3500 Operating instructions

Thetford SCK12 Series Operating instructions

Thetford

Thetford SCK12 Series Operating instructions

Thetford S~OH72000 Operating instructions

Thetford

Thetford S~OH72000 Operating instructions

Thetford S-OH70000 Operating instructions

Thetford

Thetford S-OH70000 Operating instructions

Thetford Duplex 700 Series User manual

Thetford

Thetford Duplex 700 Series User manual

Thetford Mk4 Midi Prima Operating instructions

Thetford

Thetford Mk4 Midi Prima Operating instructions

Thetford S~OG70000Z Operating instructions

Thetford

Thetford S~OG70000Z Operating instructions

Popular Oven manuals by other brands

Brandt FC 222 user manual

Brandt

Brandt FC 222 user manual

aumate TOA20M04N-1E instruction manual

aumate

aumate TOA20M04N-1E instruction manual

Maytag CWE4100AC - 24" Single Electric Wall Oven Dimension Guide

Maytag

Maytag CWE4100AC - 24" Single Electric Wall Oven Dimension Guide

Kernau KBO 1076 S PT B instruction manual

Kernau

Kernau KBO 1076 S PT B instruction manual

Bosch HB 37 N Series User manual and installation instructions

Bosch

Bosch HB 37 N Series User manual and installation instructions

Electrolux EOD5420AA user manual

Electrolux

Electrolux EOD5420AA user manual

Mx Onda MX-HC2183 instruction manual

Mx Onda

Mx Onda MX-HC2183 instruction manual

Daewoo F6EV19SM2 Service manual

Daewoo

Daewoo F6EV19SM2 Service manual

Blodgett MT3870 Specifications

Blodgett

Blodgett MT3870 Specifications

GE ZET2F owner's manual

GE

GE ZET2F owner's manual

GE JK3000DF3WW owner's manual

GE

GE JK3000DF3WW owner's manual

eka EKF 523 NT Operating and instruction manual

eka

eka EKF 523 NT Operating and instruction manual

AEG Electrolux E3191-5 user manual

AEG Electrolux

AEG Electrolux E3191-5 user manual

Pratica Rocket Express quick start guide

Pratica

Pratica Rocket Express quick start guide

Viking Professional VGSO260T user guide

Viking

Viking Professional VGSO260T user guide

FM RX203 instruction manual

FM

FM RX203 instruction manual

Bosch HBN331 9B Series instruction manual

Bosch

Bosch HBN331 9B Series instruction manual

NEFF B95M42N0MK Instructions for use

NEFF

NEFF B95M42N0MK Instructions for use

manuals.online logo
manuals.online logoBrands
  • About & Mission
  • Contact us
  • Privacy Policy
  • Terms and Conditions

Copyright 2025 Manuals.Online. All Rights Reserved.

Part No. /N° de pièce/Pieza n.º 639446A(03.14.2017)
Printed in U.S.A./Imprimé aux É.-U./Impreso en EE. UU.
Thetford Corporation
7101 Jackson Road
Ann Arbor, MI 48103
1-800-543-1219 www.thetford.com
Service Kit
Ensemble deréparation
Juegode servicio 639447
XR17200 and XC200
Top Cover
KitContents:K1
ToolsNeeded:
■#2 Phillips Screwdriver
■6 inchAdjustable Wrench
■Installation / Owner’s Manual
This procedure is to be performed by authorized service
personnel only. Improper installation, adjustment, altera-
tion, service or maintenance can cause injury or property
damage.
Replace Part
Be sure the appliance has been isolated from the pro-
pane gas supply before starting!
1. Remove
B; set aside.
2. Remove
C(4x); set aside.
3. Remove
A1 (3x); set aside.
4. Remove
A; discard.
5. Remove
D1 (4x) from bottom of A; set D1 aside.
6. Remove
D (2x) from A; set aside.
Using new part, reverse steps 5 through 1 to replace and reinstall.
ATTENTION
!
WARNING
ATTENTION
!
WARNING
New Ref. Description
K1 A/A1 Top Cover / Screws
NI B Burner Grate
NI C Grommets
NI D/D1 BurnerAssembly / Nuts
NI Not Included: Reference Only
NOR000653A
NOR000656A-2
CAK1
NOR000652A
A1
D
B
AD1
A
D
Fig. A
Thetford Corporation
7101 Jackson Road
Ann Arbor, MI 48103
1-800-543-1219 www.thetford.com
Service Kit
Ensemble deréparation
Juegode servicio 639447
Part No. /N° de pièce/Pieza n.º 639446A(03.14.2017)
Printed in U.S.A./Imprimé aux É.-U./Impreso en EE. UU.
L’ensemble contient : K1 Contenido del juego: K1
Capot supérieur
XR17200 et XC200 Cubierta superior
XR17200 y XC200
Outilsrequis:
■Tournevis cruciforme n° 2
■Clé à molette de 15 cm (6 po)
■Manuel d’installation/du propriétaire
Cette procédure ne doit être exécutée que par un
technicien autorisé. Une installation, un ajustement, une
modification, une réparation ou un entretien incorrect
peut causer des blessures ou des dommages matériels.
Remplacement de la pièce
Assurez-vous que l’appareil est isolé de l’alimentation de
gaz avant de commencer!
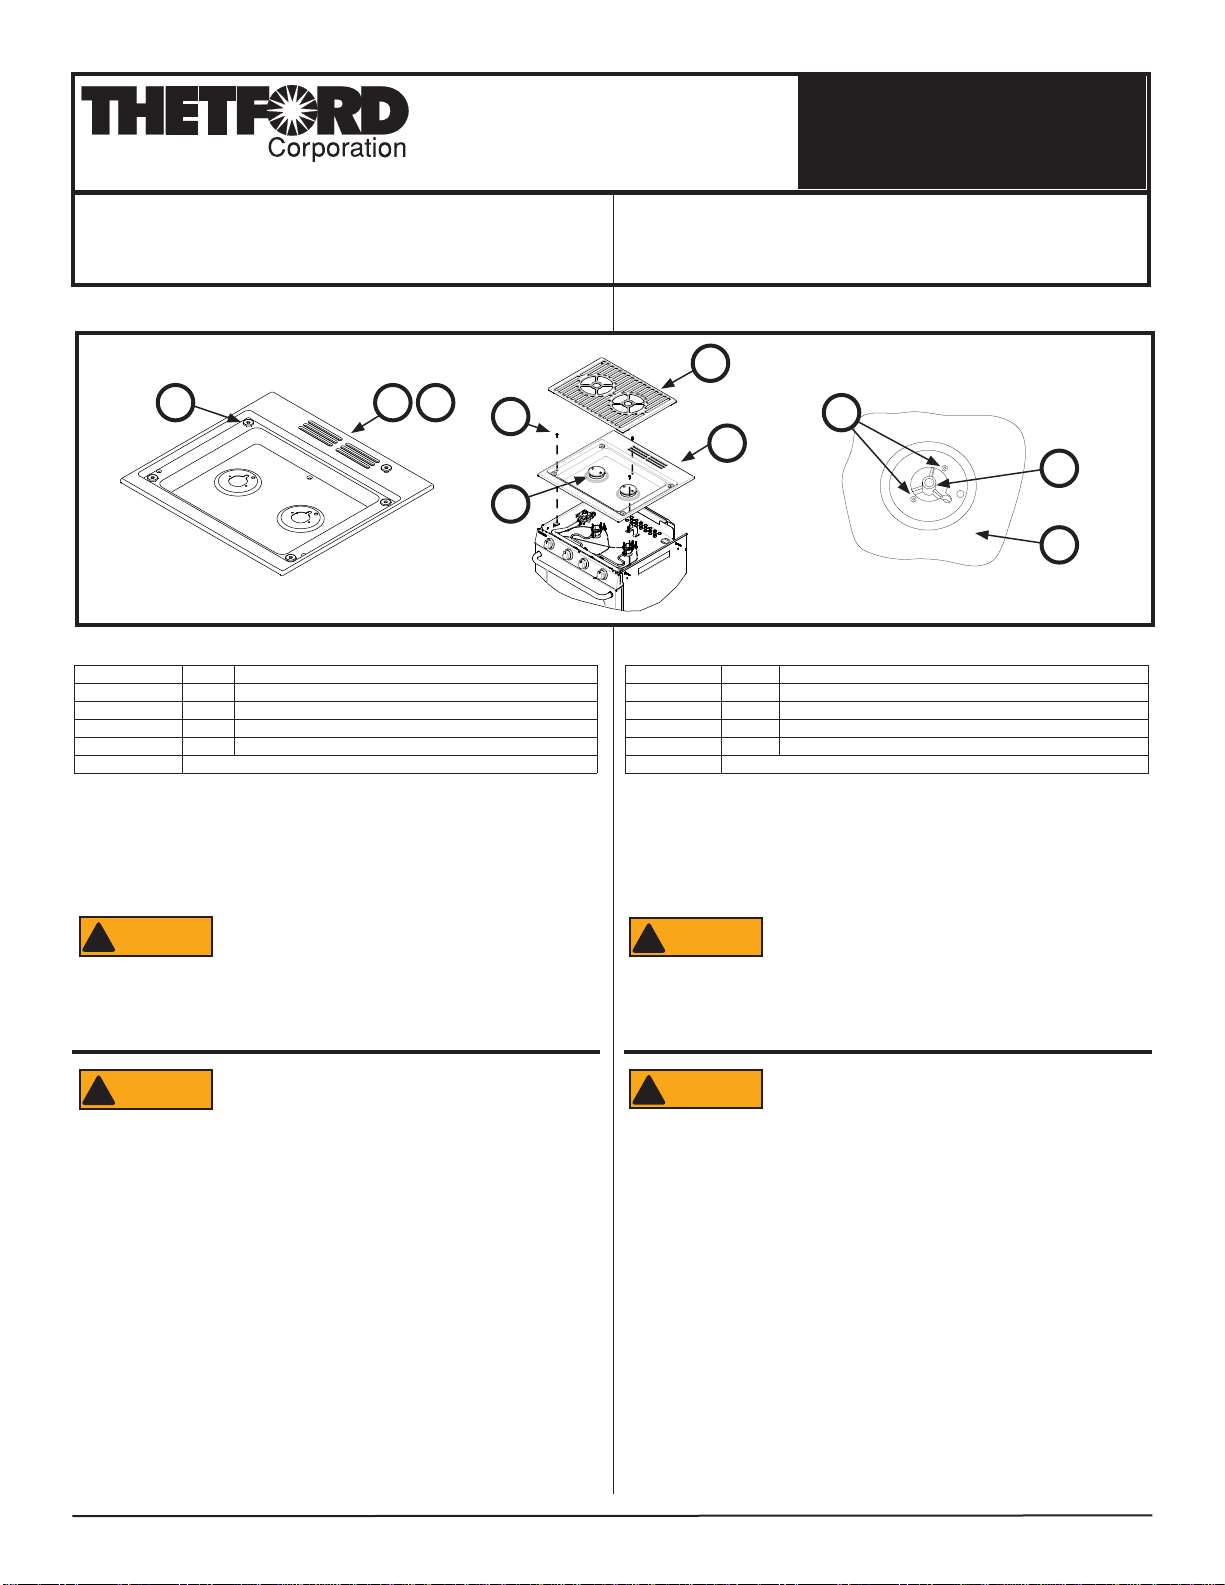
1. Enlevez
B; mettez de côté.
2. Enlevez
C(4x); mettez de côté.
3. Enlevez
A1(3x); mettez de côté.
4. Enlevez
A; jetez.
5. Enlevez
D1(4x) du fond de A; mettez D1de côté.
6. Enlevez
D(2x) de A; mettez de côté.
Avec la pièce neuve, inversez les étapes 5 à 1 pour effectuer le remplacement et
terminer l’installation.
Nouvelle pièce Réf. Description
K1 A/A1 Capot supérieur / vis
NI B Grille du brûleur
NI C Bagues
NI D/D1 Ensemble de brûleur / écrous
NI Non inclus : Pour référence seulement
ATTENTION
!
WARNING
ATTENTION
!
AVERTISSEMENT
ATTENTION
!
WARNING
ATTENTION
!
AVERTISSEMENT
NOR000653A
NOR000656A-2
CAK1
NOR000652A
A1
D
B
AD1
A
D
Fig. A
Herramientasnecesarias:
■Destornillador Phillips n.º 2
■Llave ajustable de 6 pulg.
■Manual del instalación / propietario
Este procedimientodebe estar acargo exclusivode
personal deservicio autorizado. Lasalteraciones olos
procedimientos incorrectosde instalación, ajuste,servicio o
mantenimientopuedencausar lesioneso dañosmateriales.
Cambiar la pieza
¡Antes de comenzar, se debe comprobar que el
electrodoméstico esté aislado del suministro de gas
propano!
1. Sacar
B; poner aparte.
2. Sacar
C(4x); poner aparte.
3. Sacar
A1 (3x); poner aparte.
4. Sacar
A; desechar.
5. Sacar
D1 (4x) del fondo de A; poner D1 aparte.
6. Sacar
D (2x) de A; poner aparte.
Con la pieza nueva, realizar los pasos en orden inverso (5 al 1) para hacer el
cambio y reinstalarla.
Nueva pieza Ref. Descripción
K1 A/A1 Cubierta superior / tornillos
NI B Rejilla del quemador
NI C Anillos
NI D/D1 Conjunto del quemador / tuercas
NI No se incluye: Solo como referencia
ATTENTION
!
WARNING
ATTENTION
!
AVERTISSEMENT
ATTENTION
!
ADVERTENCIA
ATTENTION
!
WARNING
ATTENTION
!
AVERTISSEMENT
ATTENTION
!
ADVERTENCIA