Thomashilfen Octopus User manual

Octopus positioning harness
Assembly and instructions for use
Octopus Reha-Gurtsystem
Montage- und Gebrauchsanleitung
Octopus
(1) (2)
(3) (4)
(5) (6)
2
Octopus

(7) (8)
(9) (10)
3
Octopus
4
Montage- und Gebrauchsanleitung – Octopus
Sehr geehrter Octopus-Nutzer,
mit Ihrem Octopus Reha-Gurtsystem haben Sie ein innovatives Produkt aus dem
Hause Thomashilfen erworben. Damit die Handhabung des Gurtsystems in Ihrem
Auto für Sie und besonders auch für das Kind sicher, praktisch und komfortabel ist,
lesen Sie bitte zuerst diese Gebrauchsanleitung.
Sollten Sie trotzdem noch Fragen oder Probleme haben, wenden Sie sich bitte an
Ihren zuständigen Fachhandel oder direkt an uns.
Wir möchten Sie in diesem Zusammenhang auch auf unsere Internet-Seite
www.thomashilfen.de aufmerksam machen, auf der Sie aktuelle Informationen abru-
fen können und wichtige Produktsicherheitshinweise oder Informationen zu etwaigen
Produktrückrufen erhalten.
Unsere Adresse: Thomas Hilfen für Körperbehinderte
GmbH & Co. Medico KG
Walkmühlenstraße 1
D - 27432 Bremervörde
Telefon: 04761 8860
www.thomashilfen.de
Inhalt Seite
Allgemeine Hinweise ............................................................................... 5
Zweckbestimmung und Indikation............................................................ 5
Anwendungsrisiken / Kontraindikationen .................................................. 5
Symbole und Warnschilder ...................................................................... 6
Technische Daten ................................................................................... 6
Lieferumfang............................................................................................ 7
Anbringen des Basis-Rückens................................................................... 7
Anbringen und Einstellen der 7-Punkt-Sitzweste ....................................... 8
Montage der Gurtverlängerung (Zubehör) ................................................ 8
Reinigung ................................................................................................ 9
Nutzungsdauer ........................................................................................ 9
Wiedereinsatz.......................................................................................... 9
Garantiebedingungen............................................................................... 9
Wartungsplan – jährliche Inspektion......................................................... 10

5
Montage- und Gebrauchsanleitung – Octopus
Allgemeine Hinweise
Bitte beachten Sie:
• Sichern Sie Ihr Kind IMMER mit dem im Fahrzeug befindlichen 3-Punkt-Sicher-
heitsgurt. Das verwendete Gurtsystem ist NICHT sicherheitsrelevant und dient
nur der Positionierung.
• Dieses Gurtsystem ist als medizinisches Produkt mit geringem Risiko eingestuft,
trägt das CE-Zeichen und erfüllt die Anforderungen der MDD 93/42 EEC.
• Verschließen Sie die Schnallen der Weste nur, wenn dies unbedingt notwendig ist.
• Kontrollieren Sie vor jeder Fahrt, ob das Gurtsystem richtig eingestellt ist.
• Bis zu einer Körpergröße von 150 cm oder bis zu Vollendung des zwölften Le-
bensjahres muss das Gurtsystem in Verbindung mit einem Sitzkissen verwendet
werden.
• Stellen Sie sicher, dass der mitgelieferte Rettungshammer mit eingebautem
Gurtschneider in Reichweite des Fahrers und/oder Betreuers ist!
• Das Octopus Gurtsystem kann in Verbindung mit einer Sitzschale ohne Rücken-
lehne verwendet werden. Achten Sie dabei darauf, dass das Gurtsystem immer an
dem richtigen Autositz befestigt wird. Legen Sie die Sitzschale daher erst auf den
Autositz, nachdem der Octopus montiert wurde!
Zweckbestimmung und Indikation
Das Gurtsystem Octopus ist konzipiert für den Transport von behinderten Kindern in
Kraftfahrzeugen mit u.a. folgenden Krankheitsbildern:
• Funktionseinschränkungen
• Spastiken
• Hyperaktivität
• Wahrnehmungsstörungen
Es wird zusätzliche Unterstützung beim sicheren Sitzen, Stabilisieren des Ober-
körpers und stabilen Sitz im Beckenbereich geboten.
Anwendungsrisiken / Kontraindikationen
Es sind keine Anwendungsrisiken / Kontraindikationen bekannt.

6
Montage- und Gebrauchsanleitung – Octopus
Symbole und Warnschilder
Aufkleber/Etikett Bedeutung
CE-Kennzeichen
Das Etikett des Gurtsystems ist auf der
Rückseite im Kopfbereich angebracht.
Auf dem Etikett befindet sich die
Angabe des Herstellers inkl. Anschrift
und das CE-Kennzeichen.
69358
539067-2-1
2020-08-03
Polster für Gurtsystem (Octopus)
9700693580000Article no:
1896371
Made in POLAND
Thomashilfen
SN
LOT
(01)04034089025810(21)001896371
Strichcode-Label
Auf dem Strichcode-Label sind folgen-
de Produkt-Informationen angegeben:
Bezeichnung des Polsters
Artikelnummer
Seriennummer
Herstellungsdatum
Technische Daten
Octopus Reha-Gurtsystem
Polster 7-Punkt-Sitzweste (B x H) 34 x 42 cm
Polster Basisrücken (B x H) 34 x 84 cm
Körpergröße Nutzer 130 – 185 cm
max. Nutzergewicht 30 – 80 kg

7
Montage- und Gebrauchsanleitung – Octopus
Lieferumfang
Das Octopus Reha-Gurtsystem wird vormontiert geliefert. Im Lieferumfang des Gurt-
systems befinden sich der Basisrücken, eine 7-Punkt-Sitzweste mit abschließbaren
Gurtschnallen, der dazugehörige Schlüssel in mehrfacher Ausführung, zwei Schulter-
gurte, vier Beckengurte und ein Schrittgurt. Darüber hinaus liegen dem Produkt eine
Gebrauchsanleitung und ein Rettungshammer mit integriertem Gurtschneider bei.
Das Octopus Gurtsystem (9800006900003) besteht aus folgenden Teilen:
Artikelnummer Bezeichnung
9700693580000 Polster für Gurtsystem (Octopus)
9700693570000 Sicherheitshammer (Octopus)
9800956020000 Bedienungsanleitung (Octopus)
Montage des Octopus
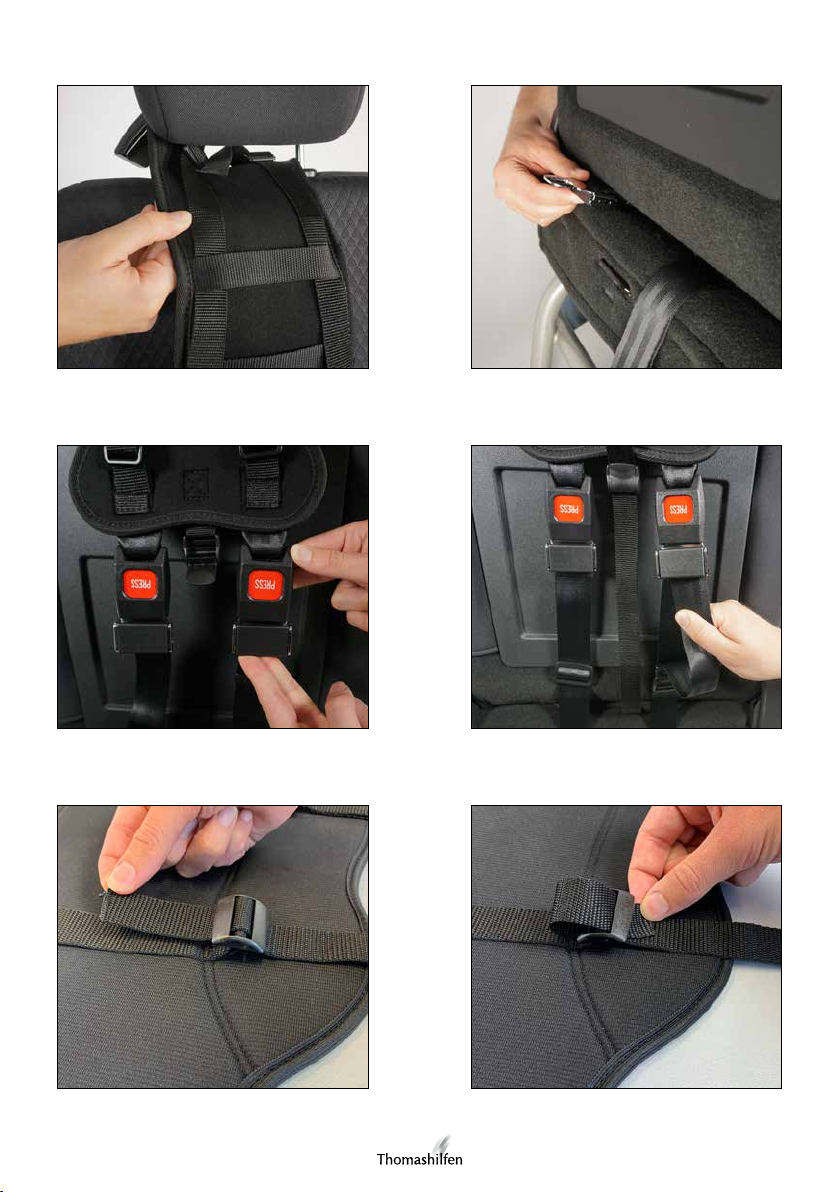
Anbringen des Basis-Rückens
Legen Sie den Basis-Rücken, mit dem Thomashilfen-Logo lesbar, auf die Rückenlehne
des Autositzes. Stellen Sie zur leichteren Montage des Gurtsystems die Kopfstütze
des Autositzes hoch. Anschließend fädeln Sie die beiden Schnallen mit der Aufschrift
„Press“ durch die Stangen der Kopfstütze. Danach passen Sie die Kopfstütze wieder
an.
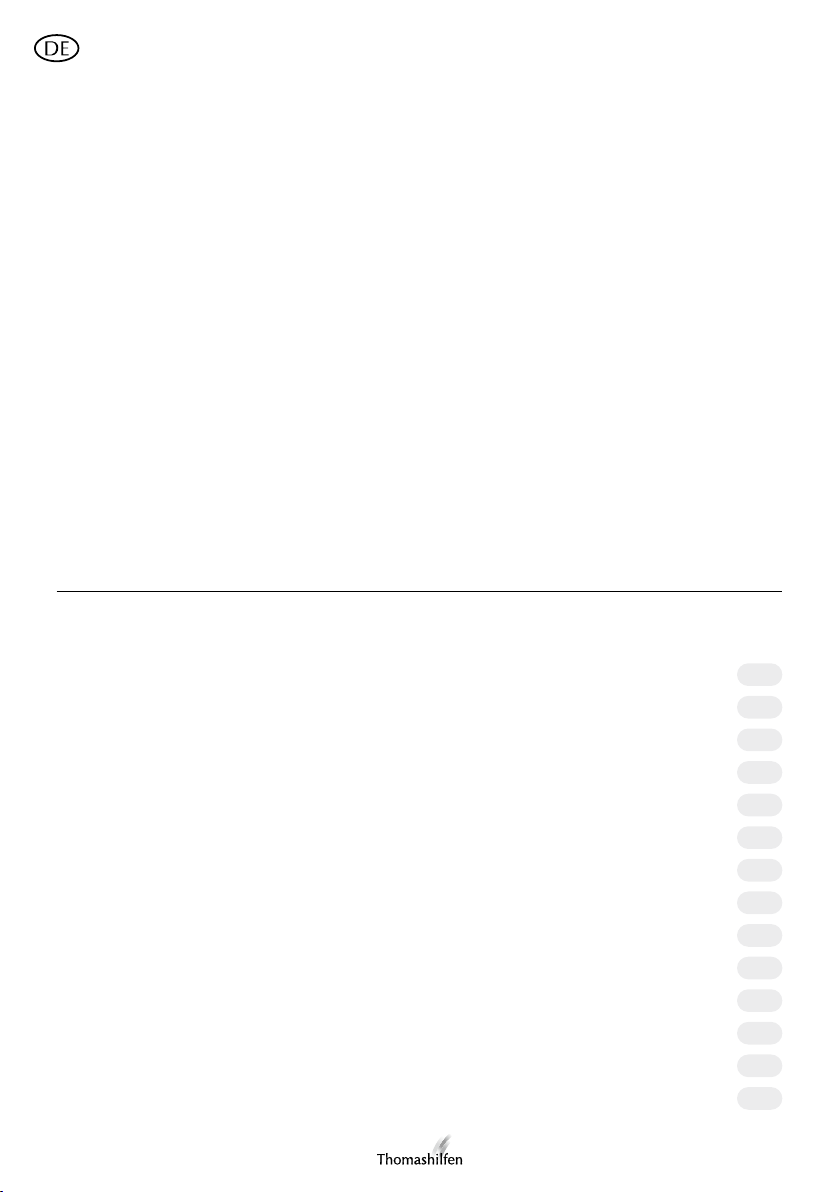
Als nächstes werden die unteren Metallschnallen und der Schrittgurt zwischen Rü-
cken- und Sitzfläche des Autositzes gefädelt. Eventuell erleichtert das Umklappen der
Rückenlehne die Montage.
Abschließend werden die Metallschnallen am Rücken eingeklickt. Dann wird der Ba-
sis-Rücken durch das Festziehen des Gurtbandes unterhalb der Schnallen gesichert.
Der Schrittgurt wird durch die Klappschnalle gefädelt.
ACHTUNG: Sollte ihr Autositz keine Lücke zwischen der Rücken- und Sitzfläche
aufweisen, benötigen Sie das Zubehör „Art.-Nr. 691 Gurtverlängerung“, damit das
Produkt sicher verwendet werden kann.
Abb. 1: Einfädeln des Kopfteils
Abb. 2: Einfädeln des Fußteils
Abb. 3: Einklicken Metallschnallen
Abb. 4: Festziehen der Metallschnallen

8
Montage- und Gebrauchsanleitung – Octopus
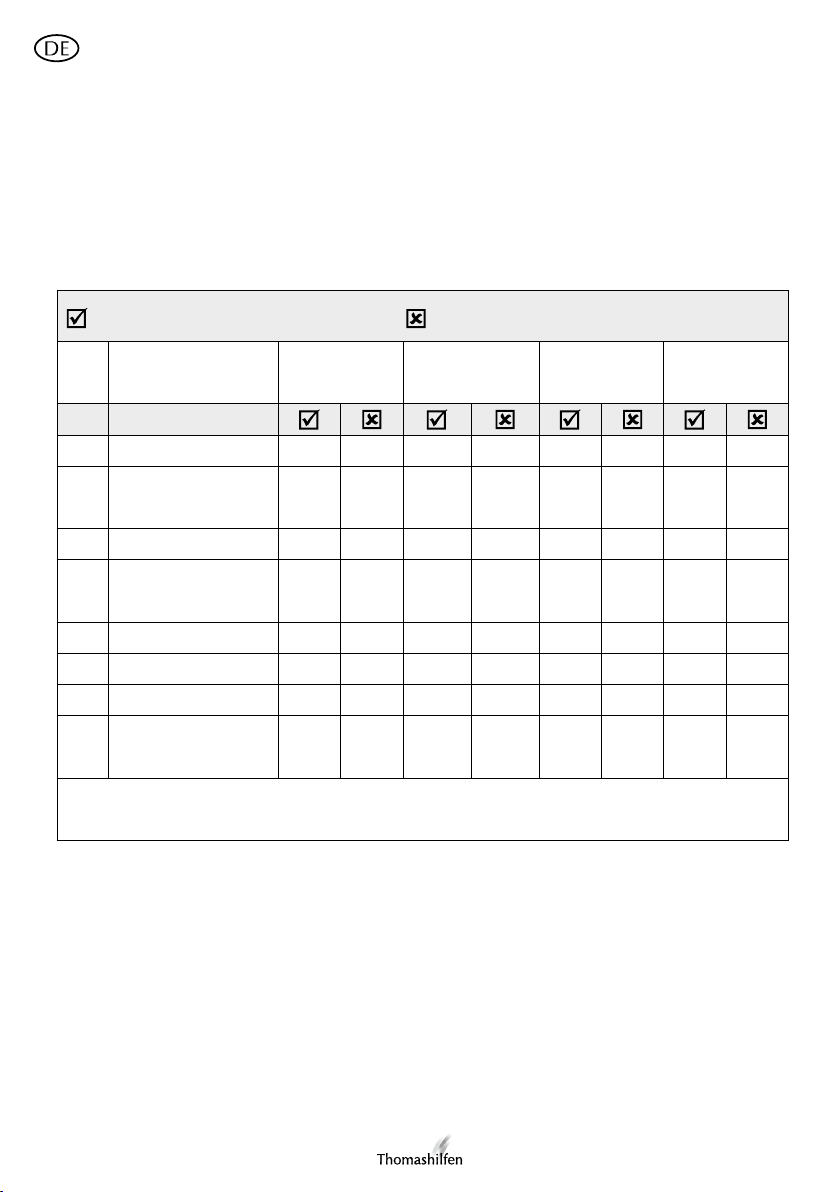
Anbringen und Einstellen der 7-Punkt-Sitzweste
Die 7-Punkt-Sitzweste wird mit dem Basis-Rücken verbunden.
Die Bänder werden durch die Schnallen an der Rückseite des Basis-Rücken eingefä-
delt. Anschließend wird der Brustumfang der Weste durch diese Bänder verkleinert
bzw. vergrößert.
Abb. 5: Einfädeln eines Bands
Abb. 6: Festziehen des Bands
WARNUNG: Für den sicheren und gesetzlich erlaubten Personentransport im Auto
muss immer der Standard-Dreipunkt-Sicherheitsgurt verwendet werden!
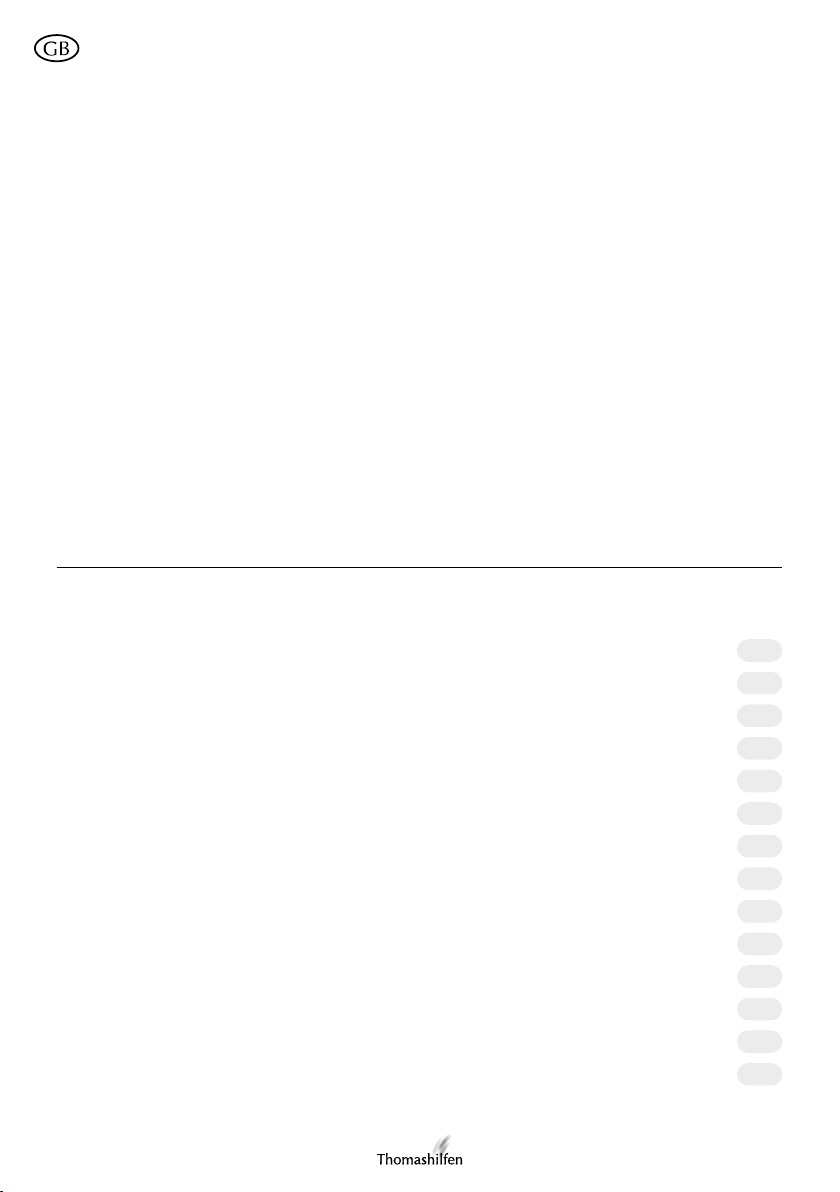
Montage der Gurtverlängerung (Zubehör)
Die Gurtverlängerung besteht aus einem Gurt für die horizontale Fixierung des
Systems (eine Schnalle) und einem Gurt für die Verlängerung der Schnallen (zwei
Schnallen).
Die unteren Schnallen des Basis-Rücken werden auf die maximale Länge eingestellt
und auf die Sitzfläche gelegt. Die beiden Schnallen werden nun mit dem entspre-
chenden Gegenpart der Gurtverlängerung verbunden. Danach werden die Schnallen,
mit dem Schrittgurt, unter den kompletten Autositz gezogen und auf der Rückseite
mit den Schnallen des Kopfteils eingeklickt.
Jetzt wird der kleine Gurt (eine Schnalle) vor den Basis-Rücken und den Schrittgurt
gelegt. Der Gurt wird auf der Rückseite des Autositzes verbunden. Der Gurt wird
dann möglichst tief an der Rückenlehne festgezogen.
Abschließend wird der Basis-Rücken festgezogen und der Schrittgurt eingestellt.
(Abb. 4)
HINWEIS: Achten Sie darauf, dass die Bänder sich nicht kreuzen oder verdrehen.
Abb. 7: Verbinden der Gurtverlängerung
Abb. 8: Führung der Gurte unter dem Sitz
Abb. 9: Montage des seitlichen Gurtes
Abb. 10 : Führung des Schrittgurtes

9
Montage- und Gebrauchsanleitung – Octopus
Reinigung
Die wasserabweisenden Polster und Kunststoffschnallen können mit einem
Schwamm und warmen Wasser gereinigt werden. Anschließend mit einem Handtuch
abtrocknen.
Verwenden Sie keine Waschmaschine! Hierbei kann das Produkt und die Waschma-
schine beschädigt werden.
Nutzungsdauer
Die empfohlene Nutzungsdauer dieses Produktes entspricht 6 Jahre. Die Nutzungs-
dauer wird durch die max. Körpergröße (185 cm) und das max. Nutzergewicht
(80 kg) beschränkt.
Wiedereinsatz
Das Produkt ist vom Wiedereinsatz ausgeschlossen.
Garantiebedingungen
Thomashilfen bietet Ihnen eine Garantie von 24 Monaten. Bitte bewahren Sie deshalb
alle im Zusammenhang mit dem Produkt ausgehändigten Belege sorgfältig auf. Die
Garantie umfasst alle Ansprüche aufgrund von Arbeits- und Materialfehlern, welche
die Funktion beeinträchtigen. Ausgenommen sind Schäden, die durch unsachgemäße
Behandlung sowie natürlichen Verschleiß entstehen.
10
Wartungsplan – jährliche Inspektion
Eine Gebrauchsanleitung muss dem Produkt beiliegen. Sollte keine Verfügbar sein,
fordern Sie diese beim Hersteller an. Machen Sie sich mit den Funktionen des Pro-
duktes vertraut. Sollte Sie das Produkt nicht kennen, studieren Sie vor der Prüfung
die Bedienungsanleitung. Beachten Sie ggf. in der Gebrauchsanleitung enthaltene
Pflegeanweisungen und produktspezifische Prüfanweisungen.
= Inspektion bestanden / erledigt = Inspektion NICHT bestanden / erledigt
Inspektionsart: Funktion Beschädigung Verformung Ersetzen
Pos. Area
1 Basisrücken
2Metallschnallen
am Basisrücken
3 7-Punkt-Sitzweste
4Gurtschnallen der
Weste
5 Schrittgurt
6 Beckengurte
7 Schultergurte
8Rettungshammer
mit Gurtschneider
Die Wartung wurde
durchgeführt von:
am:
Der Benutzer dieses Reha-Hilfsmittels hat darauf zu achten, dass die vorgeschriebene
Inspektion/Wartung regelmäßig und rechtzeitig erfolgt.
Für Reparaturen dürfen ausschließlich Original-Ersatzteile verwendet werden (die
Liste der Austausch-/Ersatzteile finden Sie im Download-Bereich auf unserer Internet-
seite www.thomashilfen.de)
Montage- und Gebrauchsanleitung – Octopus

12
Dear Octopus user,
With your Octopus positioning harness you have acquired an innovative product
from Thomashilfen. In order to ensure that the handling of the positioning harness
in your car is safe, practical and comfortable for you and especially for your child,
please read these operating instructions first.
Should you still have questions or problems, please contact your local dealer or us
directly.
In this context, we would also like to draw your attention to our Internet site
www.thomashilfen.de, where you can access up-to-date information and receive
important product safety instructions or information on possible product recalls.
Our address: Thomas Hilfen für Körperbehinderte
GmbH & Co. Medico KG
Walkmühlenstraße 1
D - 27432 Bremervörde
Phone: +49 (0) 4761 8860
www.thomashilfen.com
Table of Contents Page
General information ................................................................................ 13
Purpose and indication ........................................................................... 13
Application risks / Contraindications ....................................................... 13
Symbols and warning signs ...................................................................... 14
Specifications ......................................................................................... 14
Scope of delivery .................................................................................... 15
Attaching the base back part ................................................................... 15
Attaching and adjusting the 7-point seat vest ............................................ 16
Mounting the belt extension (accessory)................................................... 16
Cleaning .................................................................................................. 17
Lifetime ................................................................................................... 17
Reuse ...................................................................................................... 17
Warranty terms ........................................................................................ 17
Maintenance schedule – annual inspection .............................................. 18
Assembly and instructions for use – Octopus

13
General information
Please note:
• ALWAYS secure your child with the 3-point safety harness located in the vehi-
cle. The harness used is NOT safety relevant and is only used for positioning.
• This vehicle harness is classed as a low risk medical device and carries the CE
mark and complies with the requirements of MDD 93/42 EEC.
• Only close the buckles of the vest if absolutely necessary.
• Before each journey check that the Octopus is correctly adjusted.
• Up to a height of 150 cm / 59.1" or up to the age of 12, the positioning harness
must be used in conjunction with a booster seat.
• Make sure that the supplied safety hammer with built-in belt cutter is within reach
of the rider and/or caretaker!
• The Octopus positioning harness can be used in conjunction with a booster seat
without backrest. Make sure that the harness is always attached to the vehicle
seat. Therefore, only place the booster seat on the car seat after the Octopus has
been mounted!
Purpose and indication
The Octopus positioning harness is designed for the transport of disabled children in
motor vehicles with the following clinical pictures, among others:
• Functional restrictions
• Spasms
• Hyperactivity
• Perceptual disorders
Additional support is provided for safe sitting, stabilisation of the upper body and
stable seating in the pelvic area.
Application risks / Contraindications
No application risks / contraindications are known.
Assembly and instructions for use – Octopus
14
Symbols and warning signs
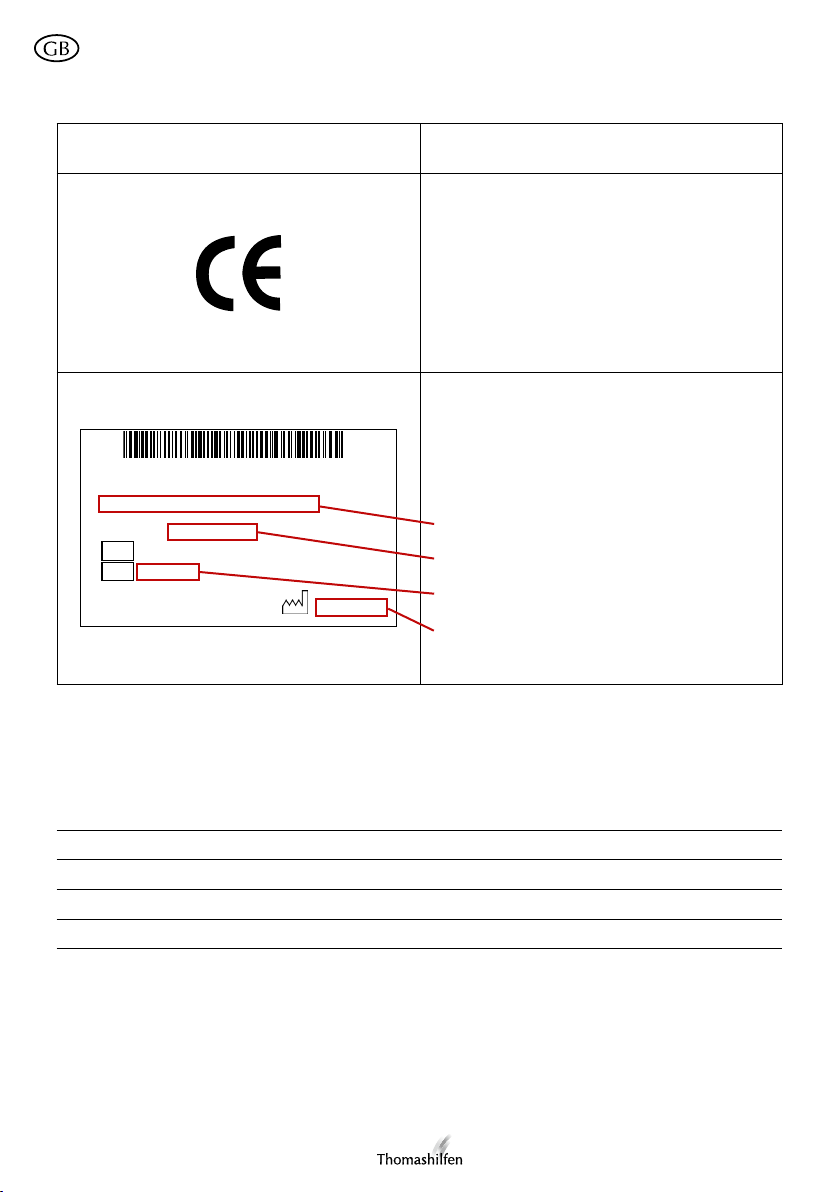
Sticker/label Meaning
CE-marking
The label of the harness is attached to
the back in the head area.
On the label you will find the infor-
mation of the manufacturer including
address and the CE-marking.
69358
539067-2-1
2020-08-03
Polster für Gurtsystem (Octopus)
9700693580000Article no:
1896371
Made in POLAND
Thomashilfen
SN
LOT
(01)04034089025810(21)001896371
Bar code label
The barcode label contains the follow-
ing product information:
designation of the padding
article number
serial number
date of manufacture
Specifications
Octopus positioning harness
Cushion 7-point seat vest (W x H) 34 x 42 cm / 13.4 x 16.5"
Cushion base back part (W x H) 34 x 84 cm / 13.4 x 33.1"
Body height user 130 – 185 cm / 51.2 – 72.8"
max. body weight user 30 – 80 kg / 66.1 – 176.4 lb
Assembly and instructions for use – Octopus

15
Scope of delivery
The Octopus positioning harness is delivered pre-assembled. The scope of delivery
of the harness includes the base back, a 7-point seat vest with lockable belt buckles,
the corresponding key in multiple versions, two shoulder belts, four lap belts and a
crotch belt. In addition, the product comes with an instruction manual and a rescue
hammer with integrated belt cutter.
The Octopus positioning harness (9800006900003) consists of the following
parts:
Item No. Designation
9700693580000 Cushion for positioning harness (Octopus)
9700693570000 Safety hammer (Octopus)
9800956020000 Instruction manual (Octopus)
Assembly of Octopus
Attaching the base back part
Place the base back part, with the Thomashilfen logo readable, on the backrest of the
car seat. Put the headrest of the car seat in a high position for easier installation of the
harness. Then thread the two buckles with the inscription “Press” through the bars of
the headrest. Then adjust the headrest again.
Next, the lower metal buckles and the crotch belt are threaded between the back
and seat of the car seat. If necessary, folding the backrest down will make assembly
easier.
Finally, the metal buckles on the back are clicked in. Then the base back part is
secured by tightening the strap underneath the buckles. The crotch strap is threaded
through the hinged buckle.
CAUTION: If your car seat does not have a gap between the backrest and the seat
area, you will need the “691” belt extension accessory to use the product safely.
Fig. 1: Threading the head section
Fig. 2: Threading the foot section
Fig. 3: Clicking in metal buckles
Fig. 4: Tightening the metal buckles
Assembly and instructions for use – Octopus

16
Assembly and instructions for use – Octopus
Attaching and adjusting the 7-point seat vest
The 7-point seat vest is connected to the basic back part.
The straps are threaded through the buckles on the back of the basic back part. Then
the chest size of the vest is reduced or increased by these straps..
Fig. 5: Threading a strap
Fig. 6: Tightening the strap
WARNING: The standard three-point safety belt must always be used for the safe
and legally permitted transport of persons in the car!
Mounting the belt extension (accessory)
The belt extension consists of a belt for the horizontal fixation of the system (one
buckle) and a belt for the extension of the buckles (two buckles).
The lower buckles of the base back are adjusted to the maximum length and placed
on the seat. The two buckles are now connected to the corresponding counterpart of
the belt extension. Then the buckles, with the crotch strap, are pulled under the com-
plete car seat and clicked into place on the back with the buckles of the headrest.
Now the small belt (one buckle) is placed in front of the base back and the crotch
belt. The belt is connected to the back of the car seat. The belt is then tightened as
deeply as possible on the backrest.
Finally, the basic back is tightened and the crotch strap is adjusted. (Fig.4)
NOTE: Make sure that the straps do not cross or twist.
Fig. 7: Connecting the belt extension
Fig. 8: Guide of the belts under the seat
Fig. 9: Mounting the side belt
Fig. 10: Guide of the crotch belt

17
Assembly and instructions for use – Octopus
Cleaning
The water-repellent padding and plastic buckles can be cleaned with a sponge and
warm water. Then dry them with a towel.
Do not use a washing machine! This can damage the product and the washing ma-
chine.
Lifetime
The recommended service life of this product is 6 years. The service life is limited by
the max. height (185 cm / 72.8") and the max. user weight (80 kg / 176.4 lb).
Reuse
The product is excluded from reuse.
Warranty terms
Thomashilfen offers you a guarantee of 24 months. Therefore please keep all receipts
handed out in connection with the product carefully. The warranty covers all claims
due to work and material defects that impair the function. Excluded are damages
caused by improper handling and natural wear and tear.

18
Maintenance schedule – annual inspection
An instruction manual must accompany the product. If they are not available, ask the
manufacturer for them. Make yourself familiar with the functions of the product. If
you are not familiar with the product, study the operating instructions before testing.
Observe any care instructions and product-specific test instructions contained in the
operating instructions.
= Inspection passed / done = Inspection NOT passed / done
Type of Inspection: Function Damage Warping Replace
Pos. Area
1 Basic back part
2Metal buckles of
the base back
3 7-point-seat vest
4Belt buckles of the
vest
5 Crotch strap
6 Pelvis belts
7 Shoulder straps
8Emergency hammer
with belt cutter
Maintenance was
carried out by:
on:
The user of this rehabilitation device must ensure that the prescribed inspection/
maintenance is carried out regularly and in good time.
Only original spare parts may be used for repairs (the list of exchange/spare parts can
be found in the download area on our website www.thomashilfen.com)
Assembly and instructions for use – Octopus


Thomas Hilfen für Körperbehinderte GmbH & Co. Medico KG · Walkmühlenstr. 1 · D - 27432 Bremervörde · Germany
Mitglied in der Internationalen
Fördergemeinschaft für Kinder-
und Jugendrehabilitation e.V.
Art.-Nr. / Item code: 95602, Stand / status: 2020-08, technische Änderungen vorbehalten / subject to technical alterations
Other manuals for Octopus
1
This manual suits for next models
1
Table of contents
Languages:
Popular Safety Equipment manuals by other brands


Guardian
Guardian FABXR instruction manual

Maximex
Maximex Secura Premium 23740 Assembly instructions

Gigasense
Gigasense PIAB LKVE Assembly instructions

Dräger
Dräger HPS SafeGuard Instructions for use

ROTHOBLAAS
ROTHOBLAAS Wing installation manual

TEUFELBERGER
TEUFELBERGER OD LOOP 7 MM Manufacturer's information and instructions for use


