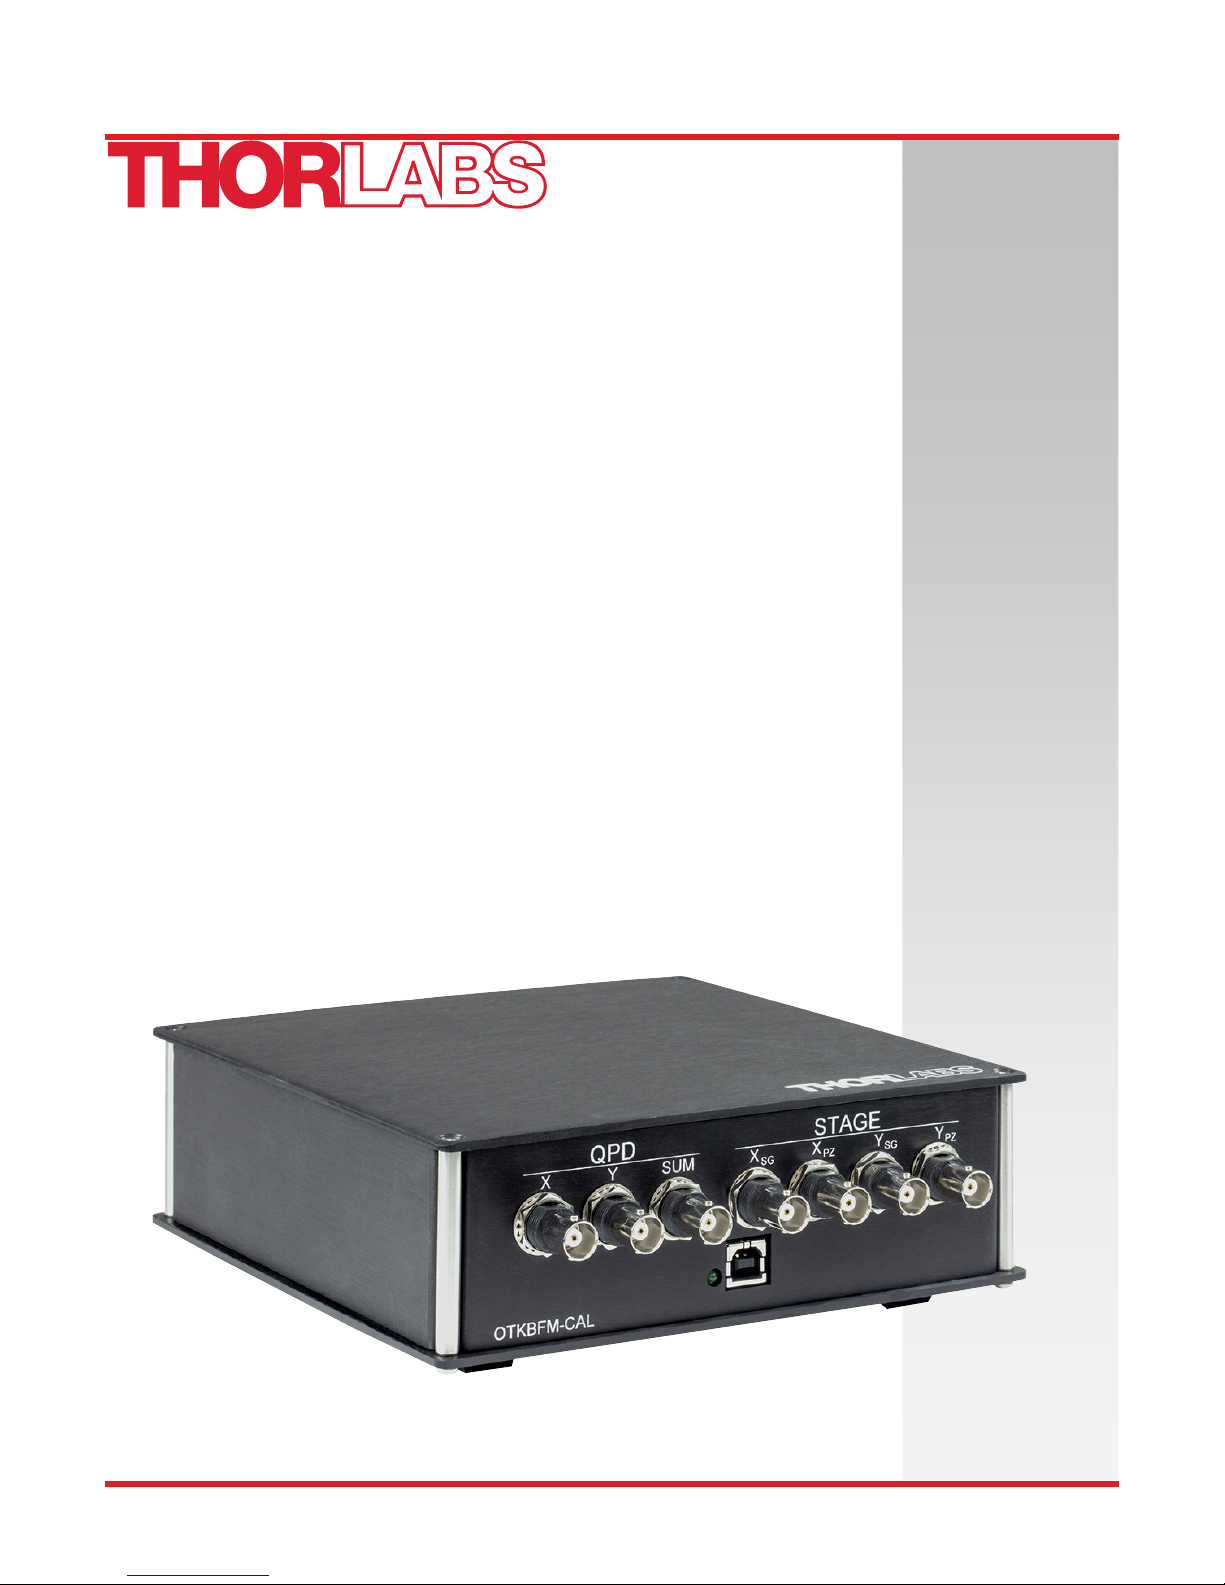
THORLABS OTKBFM-CAL User manual

OTKBFM-CAL
Calibration and
Measurement Module for
OTKB with OTKBFM
User Guide

Calibration & Measurement Module for OTKB/OTKBFM
Table of Contents
Chapter 1Warning Symbol Definitions..............................................................................................1
Chapter 2Safety....................................................................................................................................2
2.1.Safety Information...........................................................................................................2
2.2.General Warnings............................................................................................................ 2
Chapter 3Introduction..........................................................................................................................3
3.1.Position Calibration ........................................................................................................4
3.2.Stiffness Calibration .......................................................................................................5
3.2.1.Equipartition Method .............................................................................................................5
3.2.2.PSD Roll-Off Method.............................................................................................................5
Chapter 4Setup.....................................................................................................................................6
Chapter 5Operation.............................................................................................................................10
5.1.Position Calibration ......................................................................................................10
5.2.Stiffness Calibration .....................................................................................................12
5.3.Sample Preparation....................................................................................................... 13
5.4.Saving Data....................................................................................................................13
Chapter 6Frequently Asked Questions............................................................................................14
Chapter 7Specifications.....................................................................................................................16
7.1.Shipping List..................................................................................................................16
7.2.Specifications ................................................................................................................16
7.3.Pin Diagrams .................................................................................................................16
Chapter 8CE compliance....................................................................................................................17
Chapter 9Regulatory...........................................................................................................................18
9.1.Waste Treatment is Your Own Responsibility............................................................ 18
9.2.Ecological Background ................................................................................................18
Chapter 10Thorlabs Worldwide Contacts..........................................................................................19

Calibration & Measurement Module for OTKB/OTKBFM Chapter 1: Warning Symbol Definitions
Page 1 Rev C, August 2, 2018
Chapter 1 Warning Symbol Definitions
Below is a list of warning symbols you may encounter in this manual or on your device.
Symbol Description
Direct Current
Alternating Current
Both Direct and Alternating Current
Earth Ground Terminal
Protective Conductor Terminal
Frame or Chassis Terminal
Equipotentiality
On (Supply)
Off (Supply)
In Position of a Bi-Stable Push Control
Out Position of a Bi-Stable Push Control
Caution: Risk of Electric Shock
Caution: Hot Surface
Caution: Risk of Danger
Warning: Laser Radiation
Caution: Spinning Blades May Cause Harm

Calibration & Measurement Module for OTKB/OTKBFM Chapter 2: Safety
TTN030035-D02 Page 2
Chapter 2 Safety
2.1. Safety Information
For the continuing safety of the operators of this equipment and the protection of the equipment itself, the
operator should take note of the warnings, cautions, and notes throughout this user guide, and where visible, on
the product itself.
The following safety symbols may be used throughout the user guide and on the equipment.
SHOCK WARNING
Given when there is a risk of injury from electrical shock.
CAUTION
Caution is given when there is a possibility of damage to the product.
WARNING
Given when there is danger of injury to users.
2.2. General Warnings
WARNING
If the product is used in a manner not specified in this user guide, the equipment may be damaged.
Specific care must be taken to ensure that the applied input voltage levels do not exceed the
product specifications and that any equipment connected to the output ports of the device is
compatible with the supplied output voltage levels.
WARNING
Before connecting the included power supply to the AC mains, make sure the correct line input
voltage for your region is selected. The selector is located on the back of the power supply housing.
! !

Calibration & Measurement Module for OTKB/OTKBFM Chapter 3: Introduction
Page 3 Rev C, August 2, 2018
Chapter 3 Introduction
The capability of optical tweezers to exert measurable forces on micron-scale, dielectric particles offers a unique
and valuable tool for studying cell components, such as biological polymers and molecular motors. In many
investigations, optical tweezers need to apply precise force to functionalized microspheres that have been
attached to molecules of interest. For small displacements from the center of the trap, optical tweezers apply a
force toward the focus of the trapping laser beam with a magnitude proportional to the distance of the particle
from the focus. This allows the optical tweezers to be modeled by Hooke’s law, Fi = -kixi, where kIis the spring
constant and xiis the displacement from the center of the trap.
In order to allow quantitative measurements the optical tweezers system needs to be calibrated. While there are a
couple of different approaches, the most common technique is based on back focal plane detection.
As the laser beam passes through the sample plane interference occurs between the light which is transmitted
through the trapped particle and the remainder of the light. As a consequence the interference pattern at the back
focal plane of the condenser depends on the distance of the trapped particle to the trap center. The deflection is
converted to an electrical signal by a quadrant photodiode, which produces a voltage proportional to particle
position for small displacements from the center of the trap. Accurate force measurements depend on precise
calibration of the spring constant (also called stiffness), ki, and the sensitivity of the particle position detector,
which vary with laser power and particle properties.
Figure 1 Schematic of the optical train of a tweezers setup with back focal plane detection. The
inset illustrates how the X, Y, and SUM (Sx,Sy,Sz) signals are calculated.
In the following sections, two methods to determine the trap stiffness are described. Since each method relies on
a different physical principle, the combined results provide a convenient way to verify the calibration.

Calibration & Measurement Module for OTKB/OTKBFM Chapter 3: Introduction
TTN030035-D02 Page 4
3.1. Position Calibration
The data acquired from the QPD detector is given in volts. For quantitative force and position measurements it is
necessary to determine the detector responsivity factor. The method used with the OTKBFM-Cal requires a stuck
bead to be moved across the location of the trap while recording the detector voltage. Using the sample stage,
steps of known size are used which then allow plotting of the position signal in volts versus the position signal in
microns. When the bead moves across the trap position an S-shaped curved is formed as shown in Figure 2.
Note that the conversion factor only applies if the distance of the trapped particle to the trap center lies within the
linear range.
Figure 2 Typical position calibration curve. QPD voltage data is acquired while a stuck bead is
moved across the focal spot / trap position.

Calibration & Measurement Module for OTKB/OTKBFM Chapter 3: Introduction
Page 5 Rev C, August 2, 2018
3.2. Stiffness Calibration
The OTKBFM-CAL software determines the trap stiffness using two approaches: the so called PSD Roll-Off
method and the equipartition theorem. The first approach is based on the frequency analysis of the thermal
fluctuations of a trapped bead with a known damping. The equipartition theorem calibration on the other hand
equates the known thermal energy per degree of freedom with the energy associated with the fluctuations of the
particle.
This method requires the hydrodynamic drag coefficient to be known. On the other hand it does not require a
position calibrated detector.
3.2.1. Equipartition Method
The equipartition theorem states, that each degree of freedom in a physica system at thermal equilibrium will
have an energy of
1
21
2k〈
〉
Where kiis the trap stiffness, kBis the Boltzmann constant and <xi2> is the statistical variance of the particle
position. By recording the particle position and with kBand the temperature known, it allows the stiffness factor to
be determined. It should be noted that for this approach it is necessary to first determine the position calibration
for the detector.
3.2.2. PSD Roll-Off Method
While the Roll-Off method also makes use of the Brownian Motion, it uses a frequency analysis of the fluctuations
to determine the stiffness calibration factor. In the low Reynolds number regime, where most optical tweezers are
operated, a microscopic bead in an optical trap can be described by the equation of motion of a damped oscillator
with Brownian motion in the xdirection with a corresponding velocity x :
βxtk
xtF
t,
where
β6πηa
is the drag coefficient, ηis the fluid viscosity, a is the radius of the bead, kiis trap stiffness, and F(t) is thermal
fluctuation induced force. If the fluid is water then we can take: = 8.90 x 10 - 4Pa sat room temperature. The
power spectrum of the position fluctuations in this case is a Lorentzian
with a Roll-Off frequency fcof
k
2
By fitting the power spectrum the Roll-Off frequency (also called corner frequency) can be calculated and hence
the stiffness ki is found. Note that it is not necessary to convert the detector data from voltage to distance, hence
no position calibration is required and the PSD plot typically is expressed as Volt2 • s versus frequency. The
approach does however require the drag coefficient to be known.
Calibration & Measurement Module for OTKB/OTKBFM Chapter 4: Setup
TTN030035-D02 Page 6
Chapter 4 Setup
The OTKBFM-CAL is used in combination with Thorlabs force measurement module OTKBFM. The following
installation procedure assumes that you have already completed the setup of the force module and that it is
working in combination with your optical tweezers setup.
1. Use the included CD/DVD to install the OTKBFM-CAL software on your PC or download the latest version
from the Thorlabs web page www.thorlabs.com/manuals. Make sure you are logged in with
administrative user rights for the installation.
2. The Thorlabs APT software should already have been installed on your PC during the installation of the
OTKBFM force module. If not, please download the APT software from our web page and install it.
3. Use the SMA-to-BNC cables (included) to connect the OTKBFM-CAL to the K-Cube piezo and strain
gauge controllers. See Figure 3 below for details.
4. Connect the OTKBFM-CAL module via the USB cable to the PC and connect the power supply to the
OTKBFM-CAL module. Ensure that the power supply is set to the correct voltage level for your region and
connect the power supply to the OTKBFM-CAL control box. Switch on the power supply.
Figure 3 Connections Between OTKBFM-CAL Control Box and Piezo/Strain Gauge Controllers

Calibration & Measurement Module for OTKB/OTKBFM Chapter 4: Setup
Page 7 Rev C, August 2, 2018
5. Start the “APT User” software to configure the controller set. The program should show you a window for
each of the K-Cube controllers. The OTKBFM-CAL module requires two piezo controllers, two strain
gauge controllers and the PSD controller cube.
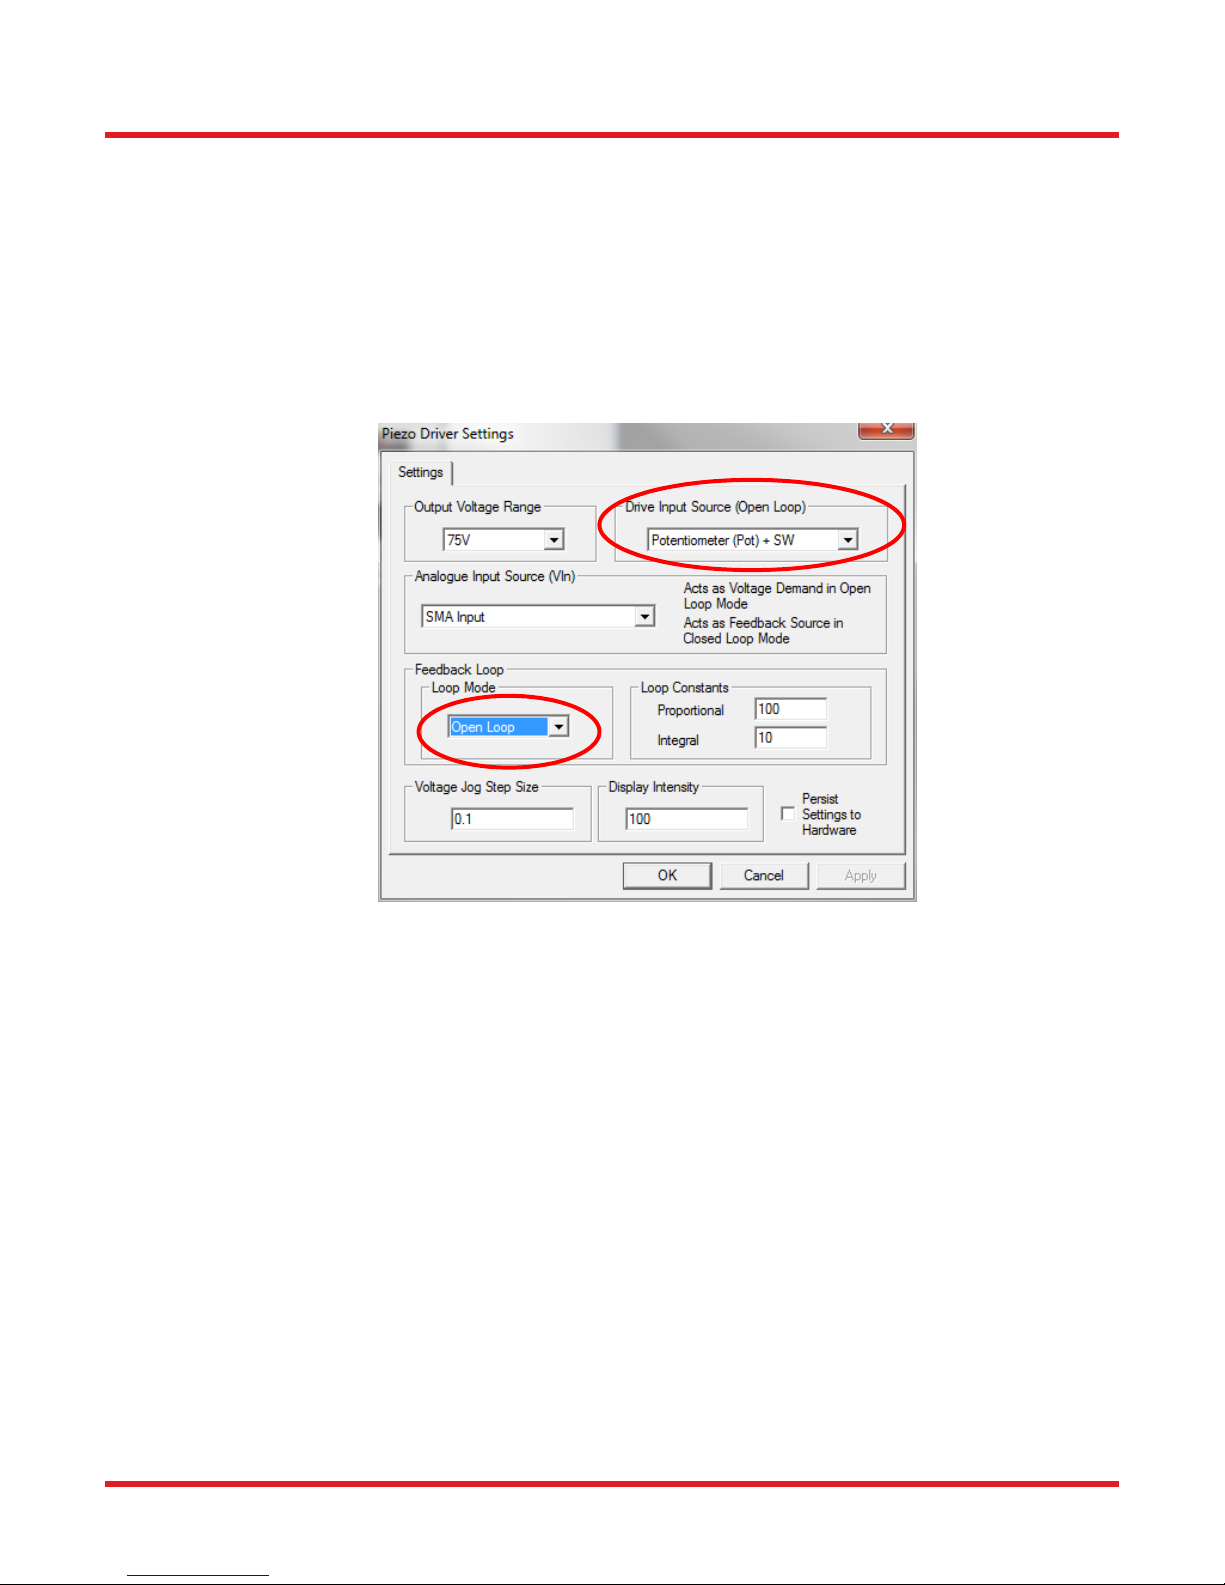
6. Select “Settings” in one of the piezo controller windows and adjust the settings as shown in Figure 4.
Close the window and do the same for the second piezo controller.
7. Click “Zero” on the strain gauge readers control windows. Alternatively, you can press the control button
on the strain gauge K-Cube for at least two seconds to start the zeroing process. The cube will count
down to zero on the K-Cube display to indicate the duration of the procedure.
Figure 4 Piezo Controller Panel, Settings Required During Zeroing of Strain Gauge Controllers

Calibration & Measurement Module for OTKB/OTKBFM Chapter 4: Setup
TTN030035-D02 Page 8
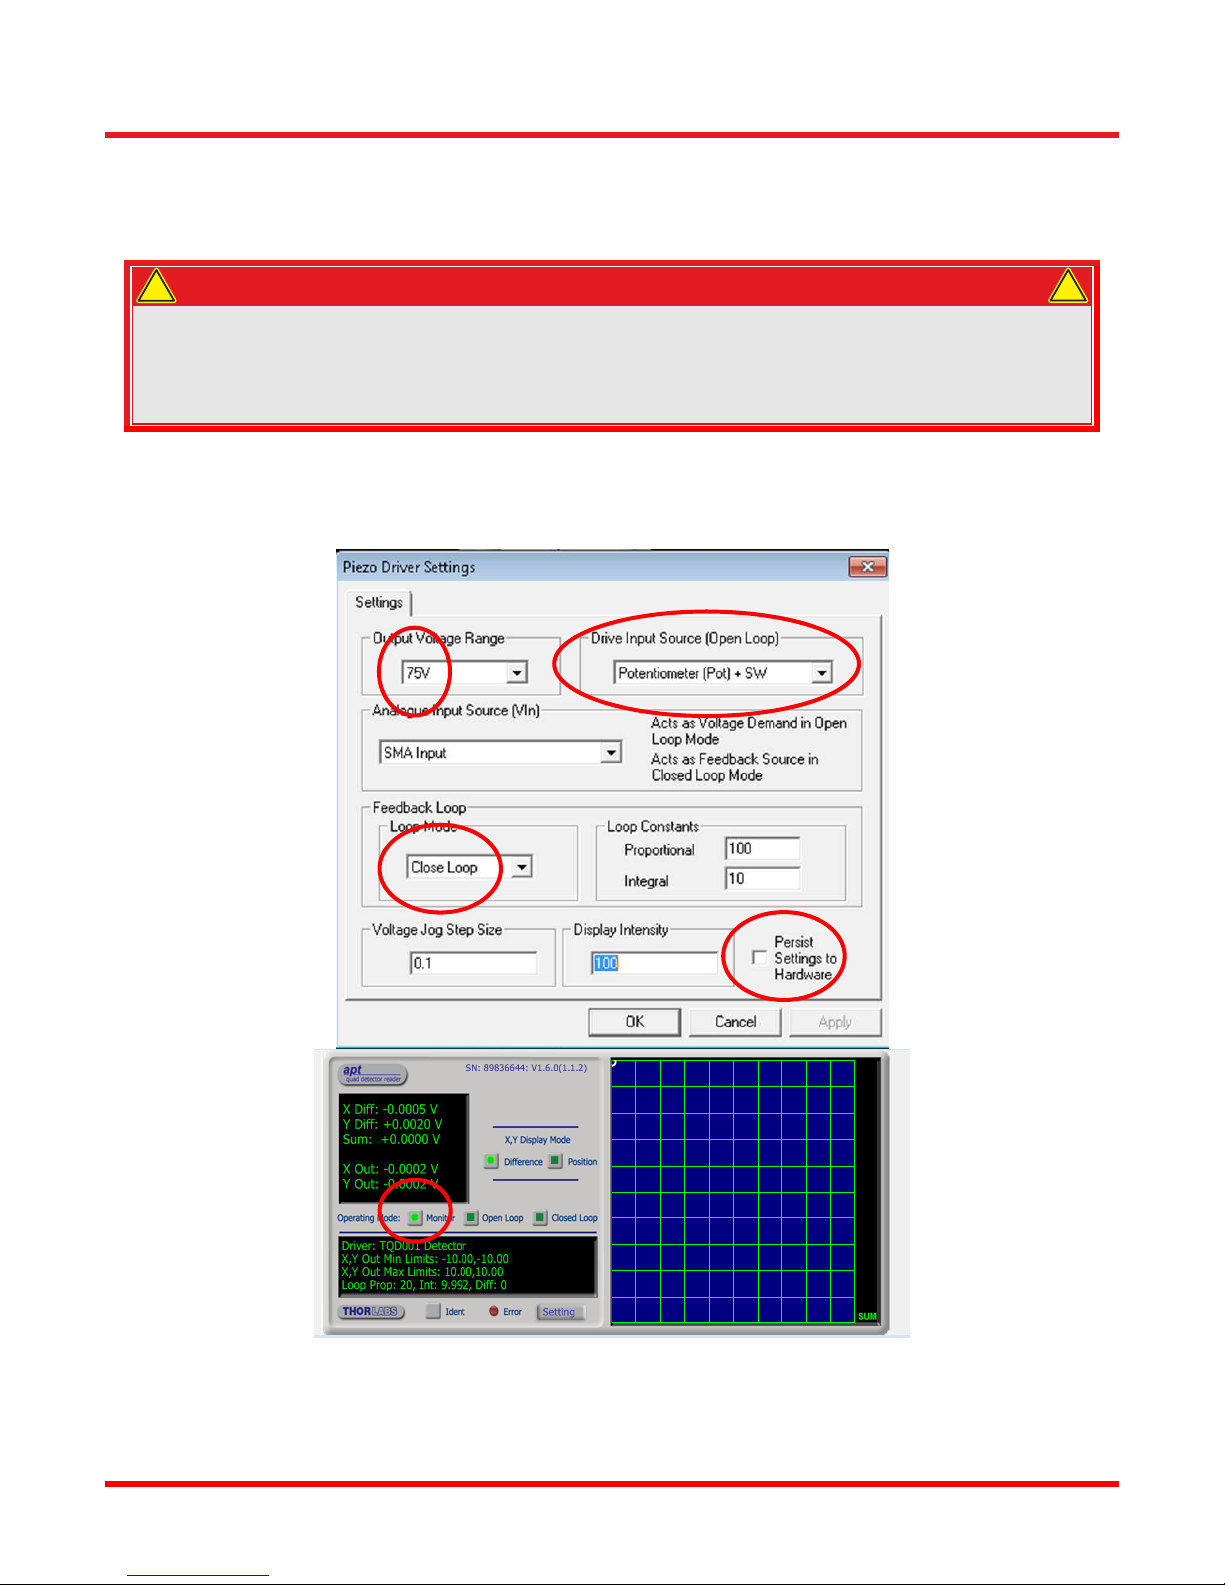
8. After the strain gauge controllers have been set to zero, you can set the piezo controllers to closed loop
mode. Select each of the piezo controller Setting windows and adjust the settings as shown in Figure 5.
Make sure that the “Persist Settings to Hardware” flag is set; this will save the configuration to the
controller’s EEPROM.
WARNING
If the Piezo Driver is switched to closed loop mode without a feedback signal applied, the piezo
drive voltage will ramp up to the maximum limit. If the limit is set to 75 V, a protective circuit limits
the voltage to 75 V. If 100 V or 150 V is selected, the output will ramp to 150 V. Using the standard
piezo stage supplied with the OTKB, the output voltage may not exceed 75 V. Higher voltages will
damage the stage.
9. For the PSD controller cube remember to set the operation mode to ‘Monitor’.
10. Close the APT User software.
Figure 5 Piezo Controller (KPZ101) Settings Window and PSD Aligner (KPA101) Settings Window
!
!

Calibration & Measurement Module for OTKB/OTKBFM Chapter 4: Setup
Page 9 Rev C, August 2, 2018
11. During the OTKBFM-CAL software installation the necessary National Instruments software had been
automatically added to your PC (if it was not present already). Start the “NI MAX” tool, typically a link is
found in your windows “All Program” list. Right click on the “NI USB-6212” device and rename it to
“OTKB”. See figure 6. Close “NI MAX.”
12. Start the OTKBFM-CAL software. You are now ready to calibrate your system and run force
measurements.
Figure 6 Configuration Window for DAQ Hardware using NI MAX

Calibration & Measurement Module for OTKB/OTKBFM Chapter 5: Operation
TTN030035-D02 Page 10
Chapter 5 Operation
Before quantitative measurements can be performed with the optical tweezers system, it is necessary to
determine the factor to convert detector voltages to distances and to find the trap stiffness. Changing the trapping
laser power during this procedure will affect the calibration parameters. Therefore it often makes sense to run the
calibration sequence described below for various laser power settings. Further on, the distance of the laser trap to
the cover slip will affect the trap stiffness significantly. Again you can determine the calibration for different z-
positions using the positioning system of the stage. During an initial calibration make sure that your trap is located
several microns above the cover glass. This can be achieved by moving a trapped bead towards the cover glass
until it contacts the glass and goes out of focus. The z-axis adjustment knob on the stage has micrometer
markings, which you can then use to move the trap away from the cover glass surface. If the bead is too close to
the wall, hydrodynamics effects or physical constraints with the coverslip will restrict the Brownian motion, while at
heights above 5 µm the optical trap loses its tight focus.
We assume that you have setup your tweezers system and aligned the detector to monitor the back focal plane of
the condenser. Further on you need to load a sample with a combination of stuck and freely diffusing
microspheres. See Section 5.3 for details.
5.1. Position Calibration
When a bead is located close to the trap center a linear relationship exists between the quadrant detector voltage
and the distance of the bead to the trap center. To find the corresponding conversion factor we use a stuck bead
and move it across the trap at a constant speed. Plotting the detector voltage versus stage position a curve can
be fitted to the linear range, providing the conversion factor. A sample plot is shown in Figure 7 below.
1. Move the sample stage until you see a free bead on your camera image. Enable the trapping laser and
trap the bead. Mark the position on your monitor, e.g. using a small piece of tape. Disable the laser to
release the bead.
Figure 7 Example Position Calibration Plot Showing Fit to the Linear Range
2. Find a stuck bead and move it to the position marked as the trap position on the screen.
3. Select the “Data Recording” Tab and click on “Start Tracking”. You will see a curve similar to the example
shown in Figure 8 on Page 13.

Calibration & Measurement Module for OTKB/OTKBFM Chapter 5: Operation
Page 11 Rev C, August 2, 2018
4. Start the Stage Oscillation in the OTKBFM-CAL software, use an amplitude appropriate for the bead size,
e.g. 3 µm for a 1 µm bead, and set the frequency to 1 Hz.
Figure 8 Example Trace of Detector Voltage Signals
5. Use the “Stage Position” adjusters to change the bead position relative to the trap position until you see a
significant change in the voltage signals during the state oscillation. (Hint: The stuck bead is aligned with
the optical trap center when the voltage signal changes most significantly for Vx and Vy.)
6. Stop the stage oscillation and select the “Position Calibration” tab in the software. Click “Calibration”.
7. If the X and Y plot versus position show the crossing of the bead through the trap, click on the left and
right side of the graph to move the limits for the automatic linear fit. The beta value is shown on the right
hand side in the box labeled “Slope”.

Calibration & Measurement Module for OTKB/OTKBFM Chapter 5: Operation
TTN030035-D02 Page 12
5.2. Stiffness Calibration
The OTKBFM-CAL software provides two stiffness calibration methods, the so-called PSD Roll-Off and
Equipartition calibration. The first approach uses the fact that the thermal motion of a spherical bead of known
size suspended in water is well characterized. As the laser power is increased, the Brownian motion of the bead
is constrained more and more by the increasing trap force restoring the bead to the center of the trap. A
frequency analysis of the particle position can therefore be used to extract the stiffness parameter. The second
approach is based on the equipartition theorem, which relates the energy of the particle to the temperature at
which the experiment is conducted. Both methods are applied to the data collected from the detector during a
force calibration allowing the user to verify the result.
1. Find a free bead and trap it.
2. Use the data recording tool to verify that the X and Y voltages of the quadrant detector are close to zero. If
this is not the case then adjust the detector to minimize the voltages.
3. Select the “Force Calibration” tab and run the calibration. Depending on the calibration length and the number
of averages which are set, this measurement can take several seconds. The Fourier Transform of the data is
displayed and you can click on the graph to set the lower/upper limit for the fit routine. Each time you change
a limit, the fit is automatically recalculated and the stiffness determined.
4. It is possible to adjust the scale of the plots by holding down the CTRL key and clicking the left mouse button
on the graph to draw a rectangle which defines the new range. In order to zoom out again, hold the CTRL key
and press the right mouse button on the graph surface.
Figure 9 Example PSD Curve Acquired During Force Calibration

Calibration & Measurement Module for OTKB/OTKBFM Chapter 5: Operation
Page 13 Rev C, August 2, 2018
5.3. Sample Preparation
Follow the steps below to prepare a sample for measurement.
1. Using the OTKBTK, prepare a sample with 1 um or 2 um beads. In most experiments, the trapped objects
are typically microspheres because of their symmetry and standardized characteristics, such as refractive
index, size, shape, etc. In this case, the QPD’s calibration is done with silica beads of 1 or 2 um in
diameter.
2. The sample solution can be loaded into the channel using a microscopy slide with built-in channel
(offered via our optical trapping accessories kit, Thorlabs item number OTKBTK, sold separately), or you
can build a simple channel by placing double-sided tape on a standard slide, and adding a cover glass on
top. Liquid can be pipetted in-between. The two open sides can be sealed off with nail polish, to prevent
the sample from drying out. (Hint: To obtain a sample with many stuck beads, add a high concentration of
NaCl (table salt) to the solution. Salt will reduce the Debye screening length between the beads and the
glass surface, thereby increasing the probability of beads sticking onto the glass surface.)
3. Place the slide onto the sample holder and carefully place the slide between objective and condenser.
Make sure to either use immersion oil on the bottom of the slide or to apply it to the objective before trying
to image the sample.
4. Assess the quality of the sample. There should be a small number of stuck beads in most fields of view. It
should take at least a minute to find a free bead. Too many free microspheres will make it difficult to trap
only one sphere for the duration of a measurement.
5.4. Saving Data
If the “Stream to Disk” flag is set on the Data Tracking screen, a set of files will be saved. Files can be named
automatically using a time stamp or the user can provide a file name. The file will include the data acquisition rate
used during the measurement, followed by the raw detector voltage data X,Y and SUM.
On the calibration tab it is further on possible to save the data acquired during the PSD Roll-Off Calibration. Three
sets of files are saved and can be identified by their file extension:
“.TDdat”: Time domain data file. It includes in the header the sample rate, number of samples, number
of averages. After the header four columns include the acquired data. Column 1 is time in
seconds, Column 2 to Column4 are X, Y and SUM detector voltage data. The X and Y
detector voltage signals are normalized by the SUM before saving to the file.
“.FDdat”: Fourier domain data file. It includes in the header the number of frequencies and the
measurement time used during the calibration. After the header four columns include the data.
Column1 is the frequency in Hertz, Column 2 to Column 4 are power spectral data based on
the detector’s X, Y and SUM signal. The data is derived from the time domain data using a
discrete FFT transformation. The raw FFT data is converted to absolute squared values and
devided by the measurement time. For background details please refer to publications, such
as “K. Berg-Sorensen et al., Rev.Sci.Instrum., Vol75, N0. 3, March 2004”
“.LSdat”: Line Scan data file. It includes in the header the number of samples and the number of
averages acquired. After the header four columns include the data. Column 1 is the stage
position in μm, Column 2 to Column 4 includes the detector X, Y and SUM voltage data. X and
Y detector voltage signals are normalized by the SUM before saving to the file.

Calibration & Measurement Module for OTKB/OTKBFM Chapter 6: Frequently Asked Questions
TTN030035-D02 Page 14
Chapter 6 Frequently Asked Questions
1. The OTKBFM-CAL software will not start. What should I do?
a. Check that the system is connected to the power source and the computer through the provided
power supply and the USB cables respectively.
b. Check that you have changed the default name of the DAQ card through NI MAX software. The
default name the USB-6212 card used is “OTKB”.
2. How come I cannot control the NanoMax stage with OTKBFM-CAL software?
a. Make sure that all cable connections are correct. Check the connection between calibration
module and the K-Cube controllers. Make sure the piezo and strain gauge cables connect to the
corresponding axis on the stage. Check the USB connection between the calibration module and
the PC.
b. Using the APT software, make sure that the K-cubes are functional, i.e. they show up
automatically after starting APT User. If the APT User software cannot identify any of the K-cubes
in the hub, power cycle the K-cube hub. Then identify the K-cube piezo and strain gauge
controller pairs connected to the X and Y axis on the stage. Set the piezo cubes to ‘Open Loop’
temporarily and adjust the piezo voltage to zero.
Next use the NI MAX softare and select ‘Test Panels’. Set a DC value of 0V for analog output
ao0 and ao1.
At this point you can verify that the cabeling between controller and stage is correct: temporarily
adjust the piezo voltage to some positive value and observe if the strain gauge controller shows
the position change. If the strain gauge does not show a position change check the cables to the
stage. Finally set the piezo voltage back to 0V.
Now select the ‘Zero’ button on the strain gauge controllers and wait until the controller has found
its zero setting. Afterwards switch the piezo controllers for X and Y back to closed loop.
Close the NI MAX software and start using the OTKBFM-CAL software.
3. There is an offset when I start oscilating the NanoMax stage. What is the reason?
a. This can be caused by zeroing the strain gauge while a voltage signale other than 0V is applied
to the corresponding external input of the piezo controller. Please follow the setup described
under point 2 to remove any such offset.

Calibration & Measurement Module for OTKB/OTKBFM Chapter 6: Frequently Asked Questions
Page 15 Rev C, August 2, 2018
4. When I start data tracking in the OTKBFM-CAL software the X,Y,SUM data is zero (0 V)?
a. Check that you have switched on the laser.
b. Make sure the laser beam is aligned to the center of the QPD.
c. Check the connections of the cables from the PSD K-Cube to the OTKBFM-CAL module.
d. Check the PSD K-Cube is set to “Monitor Mode” as shown in Fig.4 . Use the Thorlabs APT User
software to access the panel shown and adjust this setting.
5. When I start data tracking in the OTKBFM-CAL software only the SUM signal changes.
Make sure that the K-Cube controller for the PSD detector is set to “Monitor Mode”. Use the APT User
software to check this setting. See Figure below with the Monitor setting marked by a red circle.
6. Why are there multiple roll off frequencies in the power spectrum plot?
a. You have more than one bead in the optical trap.

Calibration & Measurement Module for OTKB/OTKBFM Chapter 7: Specifications
TTN030035-D02 Page 16
Chapter 7 Specifications
7.1. Shipping List
The OTKBFM-Cal product includes the following items:
OTKBFM-CAL Control Box
±12 VDC Linear Power Supply
7x SMA Male Straight to BNC Male Straight Cables, 24"
Software DVD
Power Cable
User Guide
7.2. Specifications
OTKBFM-CAL Specifications
Supply Voltage ±12 V (±0.5 V)
Inputs
Input Connector Receptacle BNC Female
XY Detector Signal Inputs -10 to 10 V
SUM Detector Input 0 to 10 V
XSG , YSG Strain Gauge Inputs 0 to 10 V
DAC Resolution 16 bit
Sampling Range 400 kS / s / channel
Outputs
DAQ Manufacturer and Item Number National Instruments / USB-6212 OEM
7.3. Pin Diagrams
The following images describe the connections available on the back side of the OTKBFM-CAL unit. Name of the
pins is based on the convention used by the manufacturer of the DAQ card used in the unit, which is part number
USB-6212 from National Instruments.
Figure 10 Pin Out Description for Back Side Connector Panel of the OTKBFM-CAL Module
Pin Out of EXT output
Pin Out of SYNC output

Calibration & Measurement Module for OTKB/OTKBFM Chapter 8: CE compliance
Page 17 Rev C, August 2, 2018
Chapter 8 CE compliance

Calibration & Measurement Module for OTKB/OTKBFM Chapter 9: Regulatory
TTN030035-D02 Page 18
Chapter 9 Regulatory
As required by the WEEE (Waste Electrical and Electronic Equipment Directive) of the European Community and
the corresponding national laws, Thorlabs offers all end users in the EC the possibility to return “end of life” units
without incurring disposal charges.
This offer is valid for Thorlabs electrical and electronic equipment:
Sold after August 13, 2005
Marked correspondingly with the crossed out “wheelie bin” logo (see right)
Sold to a company or institute within the EC
Currently owned by a company or institute within the EC
Still complete, not disassembled and not contaminated
As the WEEE directive applies to self-contained operational electrical and electronic products, this end of life take
back service does not refer to other Thorlabs products, such as:
Pure OEM products, that means assemblies to be built into a unit by the user (e. g. OEM laser driver
cards)
Components
Mechanics and optics
Left over parts of units disassembled by the user (PCB’s, housings etc.).
If you wish to return a Thorlabs unit for waste recovery, please contact Thorlabs or your nearest dealer for further
information.
9.1. Waste Treatment is Your Own Responsibility
If you do not return an “end of life” unit to Thorlabs, you must hand it to a company specialized in waste recovery.
Do not dispose of the unit in a litter bin or at a public waste disposal site.
9.2. Ecological Background
It is well known that WEEE pollutes the environment by releasing toxic products during decomposition. The aim of
the European RoHS directive is to reduce the content of toxic substances in electronic products in the future.
The intent of the WEEE directive is to enforce the recycling of WEEE. A controlled recycling of end of life products
will thereby avoid negative impacts on the environment.
Wheelie Bin Logo
Table of contents
Other THORLABS Test Equipment manuals