Kett PT-2700 User manual

On-Line Grain Moisture Tester PT-2700
(Type 2751)
(Type 2752)
Operating Manual

On-Line Grain Moisture Tester Safety precautions
The On-Line Grain Moisture Tester may cause accidents (such as property damage) if safety precautions are not
followed.Also, due to it being equipped with a motor, injuries may result.
■Please follow safety precautions
Read the safety precautions in the operating manual carefully.
■Please do not use the device if it is not working properly
If the tester has been damaged or is not working properly, be sure to consult our repair service.
■What the warning signs and symbols indicate
In order to prevent accidents due to improper handling of the device, the following signs and symbols have been
used in the operating manual and on the device itself. Indications:
WARNING Indicates risk of injuries to user or damage to property if this sign is ignored and the
device is improperly handled.
PRECAUTION Indicates risk of injuries to user or damage to property if this sign is ignored and the
device is improperly handled.
CAUTION Indicates information the user needs to understand to use the device safely.
Signicant symbols Deterrent symbols Symbols for taking action
Fire Prohibited Do not get wetElectric shock Do not
disassemble
Unplug from
outlet
Being caught
in machinery
Required Connect
ground
WARNING
● Usethedevicewithonlyspeciedvoltagefromthepowersource.Excessivevoltageoverheatsthe
device,causingbreakdownorre.
● Besuretoconnectthegroundwiretothegroundatthepowersource.
● Usethespeciedcapacityandtypeoffuse.Whenreplacingit,rstunplugthepowercord.Usinga
fuseotherthanthefusespeciedcarriesariskofre,etc.
● DonotdisassembleoraltertheOn-LineGrainMoistureTester.Doingsomaydamageit,orcause
electric shocks or injuries. If it is suspected that the tester has been damaged, contact our repair
service.
● Becarefulnottogetthetesterwet.Itisnotwaterproof.Gettingwaterinsidethedevicemaycause
damage or electric shocks.
● Donotremovethemoisturesensorwhilemeasuring.Youmayunwittinglytouchtherotorandinjure
yourself.
PRECAUTION
● When plugging in or unplugging the power cord, hold the plug and pull instead of pulling the
cord.
● Unplugthepowercordfromtheoutletwhenthetesterisnotbeingused,orwhenthereisadanger
of a lightning strike.
● Whensignsofdangerappear(i.e.,offensivesmell,smoke,re),takeappropriateaction(unplugging
power cord, etc.).
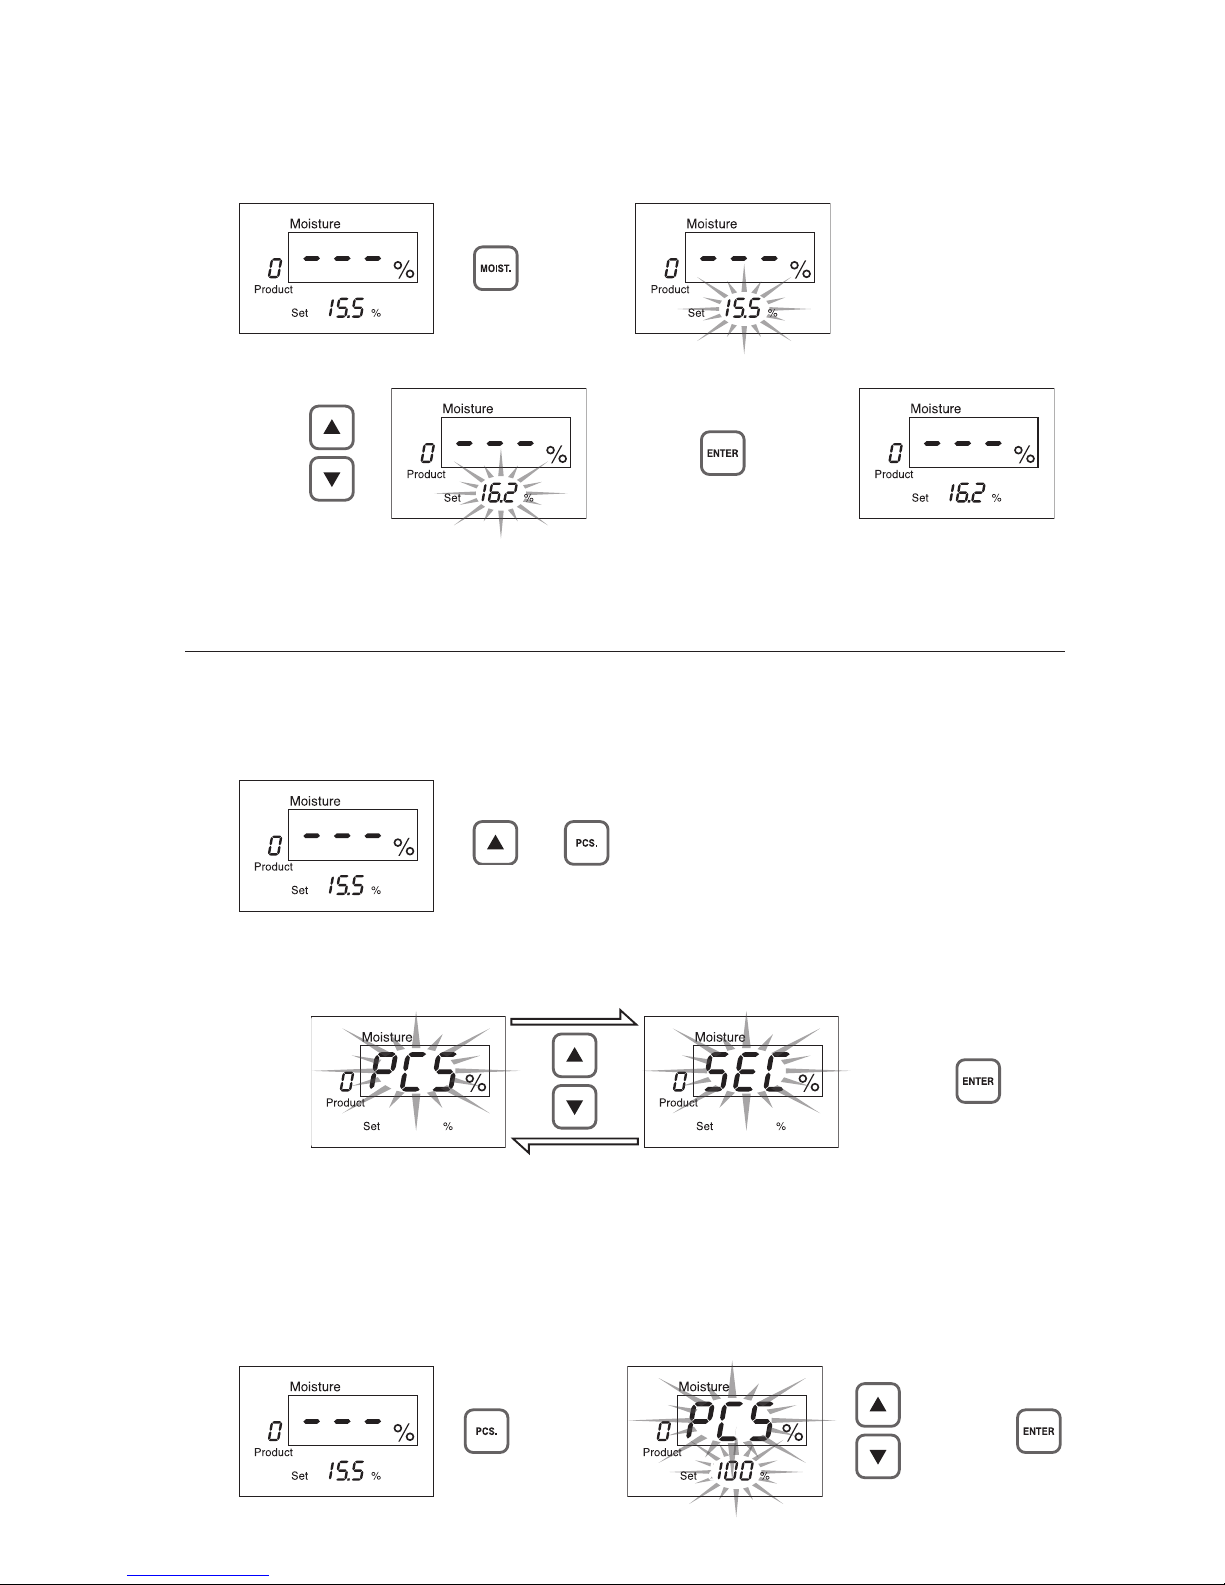
● Donotturnonthepowerwhilepressingthecontrolkeys.
● Pressonlythespeciedkey(s),anddonotpressanyotherkeycombinations.

1. Features,IdenticationviewandAccessories.................................... 4
2.ConnectingthePT-2700,PU-356,andexternaldevices .................... 5
3. Display and key functions ................................................................... 6
3-1. Display......................................................................................... 6
3-2. Key functions............................................................................... 7
4.Specications ..................................................................................... 8
5. Preparing for measurement ................................................................ 9
5-1. Turning on the power................................................................... 9
5-2. Settings ....................................................................................... 9
5-2-1. Selecting measureing product to be measured ................. 9
(applies only to PT-2752)
5-2-2. Setting the moisture level for automatic stop................... 10
5-2-3. Setting the manual measurement mode ......................... 10
5-2-4. Setting the cool-down time ..............................................11
5-3. Checking PU-356 circuits...........................................................12
5-4. Installation ..................................................................................12
6. How to measure.................................................................................13
6-1. Measuring the temperature ........................................................13
6-2. Manual measurement................................................................ 14
6-3. Automatic measurement............................................................ 15
6-4. Resetting ................................................................................... 16
7. Communicating to computer ..............................................................17
8. Error display...................................................................................... 18
Contents

4
1. Features, Identication view and Accessories
1-1. Features
(1) The PT-2700 can be mounted on a dryer or on a measuring scale at a grains unloading
station, and continuously measure moisture.
(2) Quickly measure with easy operations.
(3) In “automatic” mode, the device takes measurements while controlling the dryer.
(4)Manualmeasurementcanbestartedfromaconnectedexternaldevice.
1-2. Part identication
Metalttings
(See P.12 “5-4. Installation”)
Connecting cable with temperature sensor
Moisture sensor “PU-356”
<Main unit>
<Accessories>
Display
Keyboard
Operating manual
On-Line Grain Moisture Tester PT-2700
(Type2751)
(Type2752)
Operating Manual

5
ConnectthePT-2700,PU-356andexternaldevices(e.g.,adryer)asinthegurebelow.
2.
Connecting the PT-2700, PU-356, and external devices
Pull the wires around as in the figure on
the left.
Af ter connecting the wires, attach the
cover to the terminal block.
PU-356
Yellow(24V)
Green(GND)
Black(TX)
Red(RX)
White(SG)
TUBE(SHIELD)
Connecting cable with
temperature sensor
Computer /
printer
Switch /
relay
Oil supply
unit
Power
supply /
fan unit
Dryer
*to Relay
(250VAC, 5A Normal Close)
*to Relay
(250VAC, 5A Normal Close)

6
(1) Shows a number designating the item to be measured (This applies only to the PT-2752).
(Because the PT-2751 is for paddy only, it shows “0” all the time.)
Shows“E”whenautomaticmeasurementnishes.
(2) Shows moisture content and temperature.
Also shows “AUT” when automatic measurement starts, “MAn” at the start of manual measurement,
and “CHE” when the circuits of the moisture sensor PU-356 (hereinafter described as PU-356) are
checked.
(3) Shows the moisture level selected for automatic stop.
Also shows a blinking display of preset values for the various settings.
* The moisture level set for automatic stop won’t be displayed when manual measurement has started.
It will be displayed again when automatic measurement is conducted.
3-1. Display
3. Display and key functions

7
3-2. Key functions
Key Fanctions
[PRODUCT]
Sets the item to be measured.
0. Paddy
1.Wheat
2. Barley
3. Brown Rice
4. Milled Rice (used only for PT-2752)
[MOIST.] Sets the moisture level for automatic stop in automatic measurement.
[PCS.] Sets the number of grains to be measured or measurement time in manual
measurement.
[ T E M P.] Starts the temperature measurement.
[▲]and[▼] Changes the values of various settings.
[ENTER] Conrmschangedvaluesofvarioussettings.
[M.START ] Starts manual measurement.
[CHECK] Checks the PU-356 circuits.
[STOP] Breaks off automatic / manual measurement or temperature measurement.
[A.START] Starts automatic measurement.
[RESET] Forces return to condition when power was turned on.

8
4. Specications
Applications Product No. Product Measuring range(%)
PT-2751 0Paddy 10~35%
PT-2752
0Paddy 10~35%
1Wheat 10~40%
2Barley 10~40%
3Brown Rice 10~20%
4 Milled Rice 10~17%
Measuring principle : electrical resistance (single grain)
Measured variable : moisture
Minimal display digit : 0.1% (moisture)
Measurement precision : Withrespecttodryingmethod(105ºC,5g5hr,crushed),
1σ:0.5%orless,atmoistureof20%orless
Display : 7 segment LED
Externaloutput :RS-232C
Operating temperature
and humidity ranges
:0to50ºC(however,mustbefreeofcondensationrisk)
Power supply : AC100to240V(50/60Hz)
Power consumption : Max120W
Fuse : 250V2A
Relay :Maximumallowablecurrent:5A,
Maximumswitchingvoltage:250VAC
Dimensions & weight : 170(W)×110(D)×248(H),1.2kg
Accessories : Moisture sensor (PU-356),
Connecting cable with temperature sensor,
Metalttings,
Operating manual

9
5-1. Turning on the power
Whenthepoweristurnedon,allLEDdisplayitemswillbeshown;afterthat,theinitialdisplaywill
be shown.
5. Preparing for measurement
→
→ →
* The POWER terminal and OIL terminal are on in the initial state.
5-2. Settings
Before measuring, set the following conditions as necessary.
5-2-1. Selecting measuring product (*applies only to PT-2752)
Whentheinitialdisplayisshown,pressthe[PRODUCT]key.
The number of the PRODUCT will start blinking.
Choose the number designating the item to be measured using the [PRODUCT] key. When the
correct number starts blinking, press the [ENTER] key.
The numbers that designate the items to be measured are
0.Paddy, 1.Wheat, 2.Barley, 3.Brown Rice, 4.Milled rice.
Once the item to be measured has been set, the blinking will stop and the light will become fully lit.
* Because the PT-2751 is measurable for paddy only, the number designating the item to be
measured shows “0” all the time.

10
→
→ → →
+
→ →
→→
5-2-2. Setting the moisture level for automatic stop
Sets the moisture level for automatic stop mode. The initial setting is 15.5 %. When the initial
display is shown, press the [MOIST.] key. The moisture level for automatic stop will start blinking.
Selectthenumericalvalueusingthe[▲]and[▼]keys,thenpressthe[ENTER]key.
Once the moisture level for automatic stop has been set, the blinking will stop and the light will
become fully lit. The moisture level for automatic stop can be set by tenths of a percent anywhere
from 11.0 % to 17.0 %.
5-2-3. Setting the manual measurement mode
Measurement by number of grains or by measuring time can be selected in manual measurement.
The initial setting is for measurement by number of grains.
Whentheinitialdisplayisshown,pressthe[PCS.]keywhilepressingthe[▲]key.
The current manual measurement mode will be shown (“PCS” for measurement by number of
grains, and “SEC” for measurement by time). The measurement mode can be changed by using
the[▲]and[▼]keys.Choosethecorrectmodeandpressthe[ENTER]key.
● Setting the number of grains to be measured
When the manual measurement mode is set for measurement by number of grains, number of
grainstobemeasuredisset.Whentheinitialdisplayisshown,pressthe[PCS.]key.
The “PCS” signal (indicating measurement by number of grains), together with the current setting
for the number of grains to be measured (100 in the initial setting), will start blinking.
Setthecorrectnumberusingthe[▲]and[▼]keys,thenpressthe[ENTER]key.

11
→→
The number of grains to be measured is set. The display then switches to the setting for moisture
level for automatic stop.
The number of grains to be measured can be set in whole numbers anywhere from 1 to 250.
● Setting the measuring time (seconds)
When the manual measurement mode is set for measurement by time, number of seconds of
measurementisset.Whentheinitialdisplayisshown,pressthe[PCS.]key.
The “SEC” signal (indicating measurement by time) and the current setting for the number of
seconds of measurement (20 seconds in the initial setting), will start blinking.
Setthecorrectnumberusingthe[▲]and[▼]keys,thenpressthe[ENTER]key.
The number of seconds of measurement is set. The display then switches to the setting for
moisture level for automatic stop.
The number of seconds of measurement can be set in whole seconds anywhere from 0 to 999.
5-2-4. Setting the cool-down time
Procedure for setting the interval between completion of moisture measurement (in automatic
measurement)andthePOWERterminalcutoff—hereinafterdescribedas“cool-downtime”.When
theinitialdisplayisshown,pressthe[ENTER]keywhilepressingthe[▼]key.
+
The “SAT” signal, together with the current setting for the cool-down time (60 minutes in the initial
setting),willstartblinking.Setthecorrectnumberusingthe[▲]and[▼]keys,thenpressthe[ENTER]
key.
The cool-down time is set. The cool-down time can be set in whole minutes anywhere from 0 to 90.
→→

12
5-3. Checking PU-356 circuits
Checking PU-356 circuits.
PRECAUTION : Before checking the circuits, make sure that there is no possibility that grain
will be fed into the PU-356. If grain gets fed into the PU-356 during the checking
process, it could register an error even though the circuits are normal.
(1)Whentheinitialdisplayisshown,pressthe[CHECK]key.
The display right will be shown, and checking will start.
(2) The checking will last for about 20 seconds. If results are normal,
the procedure will end and the initial display will be shown.
(3) In case of an abnormality, the display right will be shown.
(4) The error number (in this case, 101) will be shown at “SET” on the
display. See “8. Error display” on p. 18 for error numbers.
(5) Press the [STOP] key to go back to the initial display.
Binding head screw (B)
Flat head screw (A)
5-4. Installation (Example)
(1)Putajointpartofdryerbetweenthemetalttings.
(2)Tightentheatheadscrew(A).
(3)InsertthemetalttingstothemainunitofPT-2700.
(4)Tighten the binding head screw (B).

13
6-1. Measuring the temperature
The display will show the temperature detected by the temperature sensor attached to the
connecting cable.
(1)
Press the [TEMP.] key to start measurement.
The temperature will be shown at “Moisture” on the display.
(2) To stop measurement, press the [STOP] key and hold until the initial display is shown.
(3)[−oL]willbeshownwhenthetemperatureshowsfrom−20°Cto0°C.
(4)[oL]willbeshownwhenthetemperatureshowsfrom50°Cto70°C.
(5)[020] will be shown when the temperature shows less than−20°C.
[021] will be shown when the temperature shows over 70°C.
(See P.18 "8.Error display")
6. How to measure

14
6-2. Manual measurement
Measures the moisture in circulation type grain a dryer or measuring scale by either the number of
grains or by a preset number of seconds.
(1) Set the number of grains to be measured, or the number of seconds for the measurement, as
needed.
(See “5-2-3 Setting the mode for manual measurement” on p.10.)
(2) Press the [M.START] key. The display will show “MAn” and the manual measurement will start.
The moisture level set for automatic stop will disappear.
Whenmoisturemeasurementstarts,“MAn”willstartblinking.
(3)Whenthemeasuringnishes,themoisturecontentwillbeshownonthedisplay.
To discontinue the measurement, press the [STOP] key.
The initial display will reappear.
● Using the Timer terminal for manual measurement
Manual measurement can be done by switching off the Timer terminal and Signal Ground terminal.
Conversely, manual measurement can be discontinued by switching them on again. In this event,
to restart the manual measurement, wait for more than 2 seconds before switching off.
In the following cases, before starting manual measurement with the Timer terminal, rst switch
both on, then wait 0.1 seconds and switch them off again.
(1) If the terminals were both off when the power was turned on.
(2) If measurement was started by using the Timer terminal and was completed normally.
(3) If measurement was started by using the Timer terminal, and was discontinued with the [STOP]
key. Note that when both the Timer and Signal Ground terminals are on, manual measurement
won’t start with the [M.START] key.

15
6-3. Automatic measurement
The moisture content in grain that is being dried is automatically measured, and when the moisture
level is less than the level set for automatic stop, the OIL terminal will switch off. After the time set
forcool-down haspassed, the POWER terminalwillswitch off.(Ordinarily,the POWERterminal
and OIL terminal are on.)
Whenthepickupmotorisrunningduringmoisturemeasurement,the“Moisture”onthedisplaywill
start blinking.
(1) Set the moisture level for automatic stop, as needed.
(See “5-2-2 Setting the moisture level for automatic stop” on p.10.)
(2) Press the [A.START] key. The display below will be shown.
When this display is being shown, PU-356 circuits are being checked. During that time,
measurement can’t be discontinued.
If the moisture level set for automatic stop has not been shown, it will be shown again.
(3) In about 20 seconds, the “Aut” signal will start blinking and moisture measurement will start.
(4) Moisture will be measured repeatedly until the moisture level is less than the level set for auto-
matic stop.
During the moisture measurement, the “Moisture” on the display will keep blinking.
To discontinue the measurement, press the [STOP] key.
The initial display will reappear.
(Continuedonnextpage)

16
(5) The moisture measurement will end when the moisture level is less than the level set for
automatic stop.
The OIL terminal will switch off, and the dot at “Moisture” on the display will start blinking.
(6)Whenthetimesetforcool-downhaspassed,thePOWERterminalwillswitchoff;the“E”will
be shown at “Product” on the display.
(7) If the [STOP] key is pressed after either (5) or (6), the initial display will reappear.
ThePOWERterminalandOILterminalwillbeswitchedon.
● Ifanerrorhasoccurredduringmeasuring,itwillbeshownonthedisplay,andthedotat“Moisture”
will start blinking. At this time, the OIL terminal will switch off.
Whenthetimesetforcool-downhaspassed,thePOWERterminalwillswitchoff,andthe“E”will
be shown at “Product” on the display.
Ifthe[STOP]keyispressed,thedisplaywillgobacktotheinitialdisplay,andthePOWERterminal
and OIL terminal will switch on.
If the [STOP] key is pressed when the dot at “Moisture” on the display is blinking, the initial display
willreappear,andthePOWERterminalandOILterminalwillswitchon.
6- 4. Resetting
Duringmeasurement,whenanerrorhasbeenshown,orwhenmeasurementhasbecomedifcult,
the operation can be forced to shut down.
Press the [RESET] key for 2 seconds or more to stop the operation. The device will reset to initial
state when the power is turned on.

17
7. Communicating to computer
The PT-2700 can send out measurement data to a computer by using the RS232C (TX) terminal and the
SignalGroundterminal.Toconnectwithacomputer,connecttheRS232C(TX)terminaltotheRxDof
the RS-232C connecter on the computer, and the Signal Ground terminal to the GND.
7-1. Specications for RS-232C communication
Communication method : RS-232C
Communication form : start-stop synchronous communication
Baud rate : 9600bps
Data bit : 8 bits
Parity : none
Stop bit : 1 bit
7-2. Computer output format
* The number in parentheses indicates the number of bytes.
■ Moisture data
1. STX(1) + moisture data (3) + temperature data (3) + “0” (1) + ETX (1)
2. Whenmeaninmanualmeasurement,andmeanofinitialmoistureinautomaticmeasurement
STX(1) + moisture data (3) + temperature data (3) + “A” (1) + ETX (1)
■ Temperature data
1. Whenatemperaturesensorisbetween0ºCand50ºC:
STX(1) + “000” (3) + temperature data (3) + “0” (1) + ETX (1)
2. Whenatemperaturesensorisbetween−20ºCand0ºC:
STX(1) + “000” (3) + “– – –” (3) + “0” (1) + ETX (1)
3. Whenatemperaturesensorisbetween50ºCand70ºC:
STX(1) + “000” (3) + “+ + +” (3) + “0” (1) + ETX (1)
■ Error codes
1. STX(1) + “ERR” (3) + Error code (3) + “0” (1) + ETX (1)
■ Data information
1. STX(0x02) : startofdata
2. Moisture data : decimal points for moisture omitted, transmitted in ASCII code
3. Temperature data : decimal points for temperature omitted, transmitted in ASCII code
4. Error codes : transmitted in ASCII code
5. ETX(0x03) : endofdata

18
8. Error display
Error No. Problem How to resolve
001 Connecting cable is not properly
connected, or is broken.
Turn off power to PT-2700.
Check the connection of the connecting cable.
After connecting it properly, turn on the power.
If that doesn’t solve the problem, the cable
may be broken.
010
At the start of automatic measure-
ment for moisture, the number of
grains that were tested in each
of three measurements was less
than two.
Reset with the [STOP] key.
Clean the grain intake on PU-356.
011
In automatic/manual measure-
ment, there was no grain feed for
morethanveminutes.
020
The temperature of the tempera-
ture sensor shows less than –20
ºC.
Reset with the [STOP] key.
Use the device within the range of the operat-
ing temperatures of the temperature sensor
(–20ºCto70ºC).
021 The temperature of the tempera-
turesensorshowsover70ºC.
030 Abnormal data Reset with [STOP] key.
040 Abnormal memory Turn the power to the PT-2700 off and on.
101 Abnormal PU-356 circuits (1)
Reset with [STOP] key.
Clean the measurement roller of PU-356. If
that doesn’t solve the problem, PU-356 cir-
cuits are defective.
102 Abnormal PU-356 circuits (2)
103 Abnormal PU-356 circuits (3)
104 Motor lock
Whenanerrorisshown,followtherelevantinstructionstoresolve.

19

060040-01
Table of contents
Other Kett Test Equipment manuals
Popular Test Equipment manuals by other brands

Apera Instruments
Apera Instruments LabSen 833 user manual

Parallax
Parallax PropScope manual

iPA
iPA SMART MUTT X Operator's manual

Valco Instruments Co. Inc.
Valco Instruments Co. Inc. 340-0X instruction manual

NEO TOOLS
NEO TOOLS 11-984 operating instructions

Gossen MetraWatt
Gossen MetraWatt PROFITEST Series operating instructions