Thunder TDR15005 User manual
1
For your personal safety read, understand and
follow the information provided in this instruction
manual & on the solar panel.
CONGRATULATIONS ON YOUR
PURCHASE OF YOUR THUNDER
MONOCRYSTALLINE FOLDING
SOLAR PANEL!

2
CONTENTS
3. Features & Benefits
4. Components
5. Specifications
6. Installation and Connections
7. Safety Precautions
8. Choosing the Correct System
9. Troubleshooting Guide
10. Typical Battery Connections
11. Warranty Terms & Conditions
Table of Contents
3
FEATURES & BENEFITS
Features & Benefits
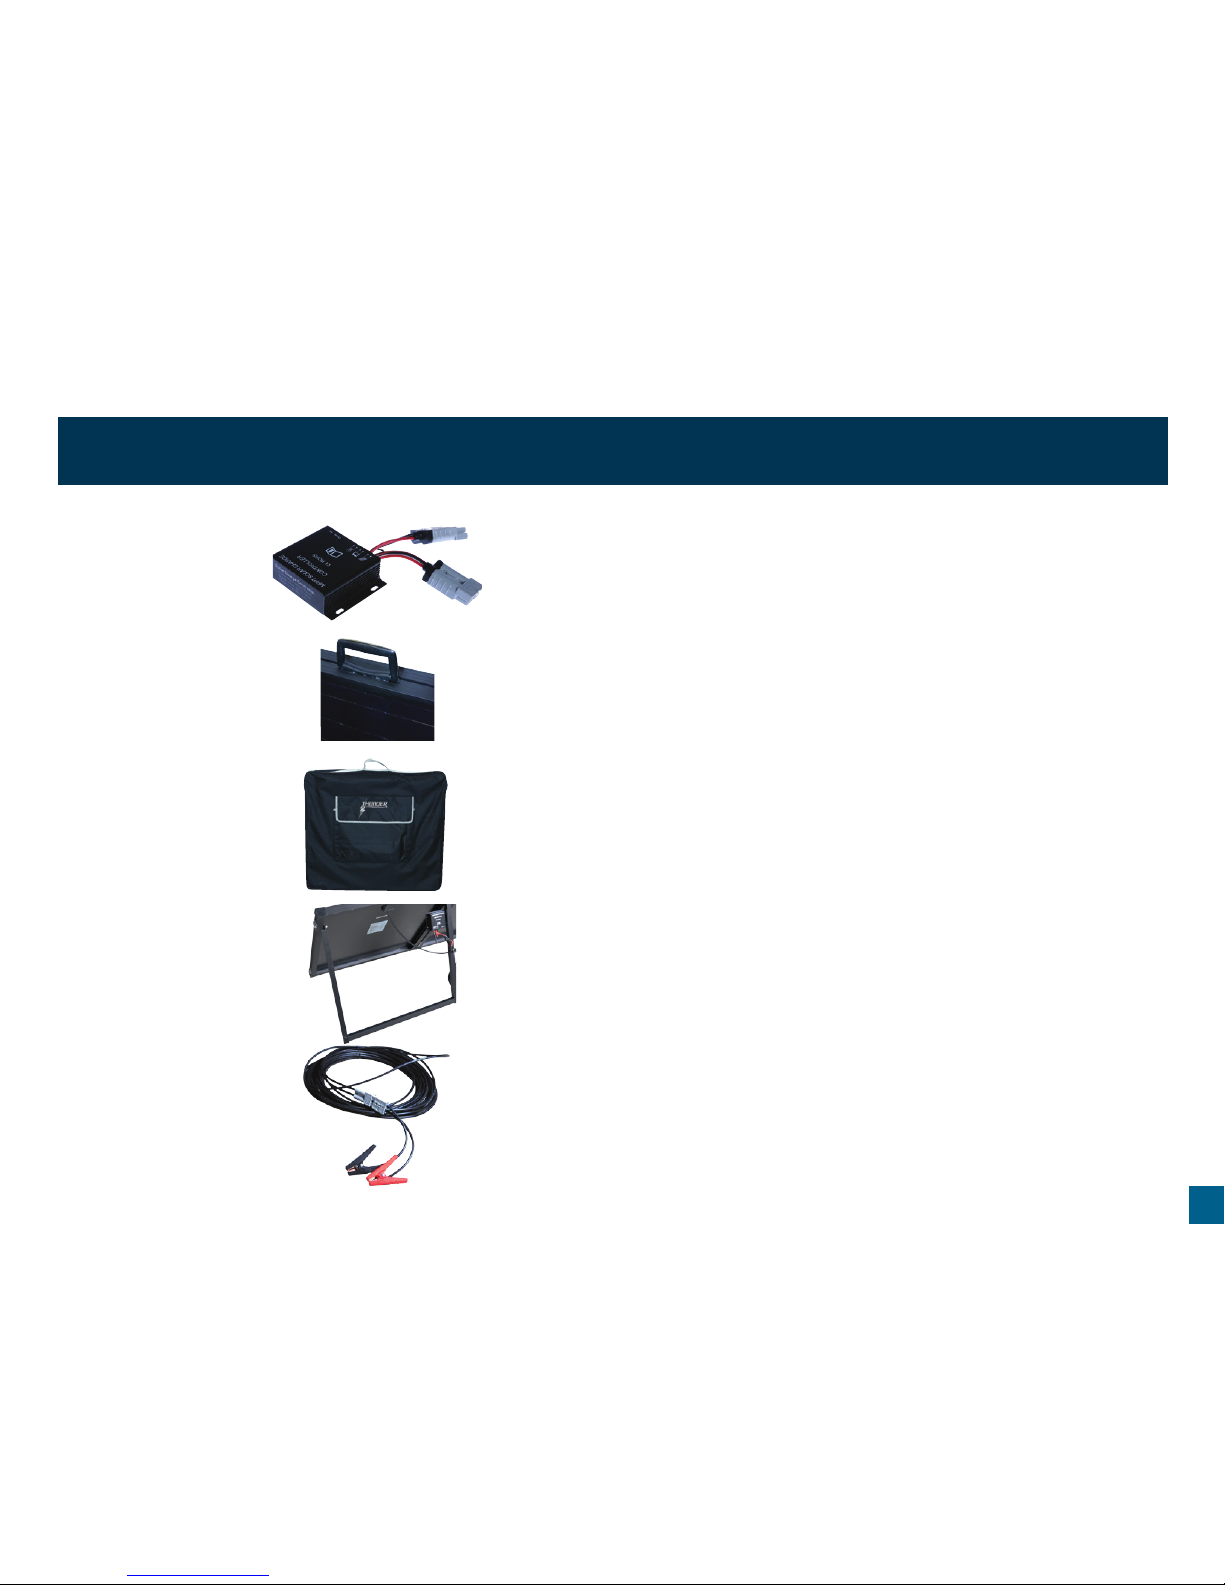
• Built-in SMART solar controller with LED indication
Mounted behind the panels, this controller ensures the safety of the panels and batteries.
This SMART controller will automatically cut out when the batteries are fully charged, during
solar panel discharge and in situations where reverse polarity may exist. The controller
features a switch allowing use with Lead Acid, AGM and GEL type batteries. Constant green
LEDs indicates fully charged.
• Easy carry handle and safety fasteners
Panels are fitted with a heavy duty handle allowing for easy handling and removal from the
protective carry bag. Two clip type safety fasteners lock the panel shut during transportation.
• Convenient carry bag
Made of high denier material (600d), this water resistant polyester bag is fully padded with
reinforced corners and protectors to maximise safe transportation and staging.
• Fold away support legs
Unique folding system which is easy to open and close, keeping the panels at the desired
angle without slipping. The angle can be easily adjusted throughout the day to ensure
maximum sun exposure and maximum power output.
• Connection cables
System comes complete with 10m cable extending from the controller.
4
3
2
1
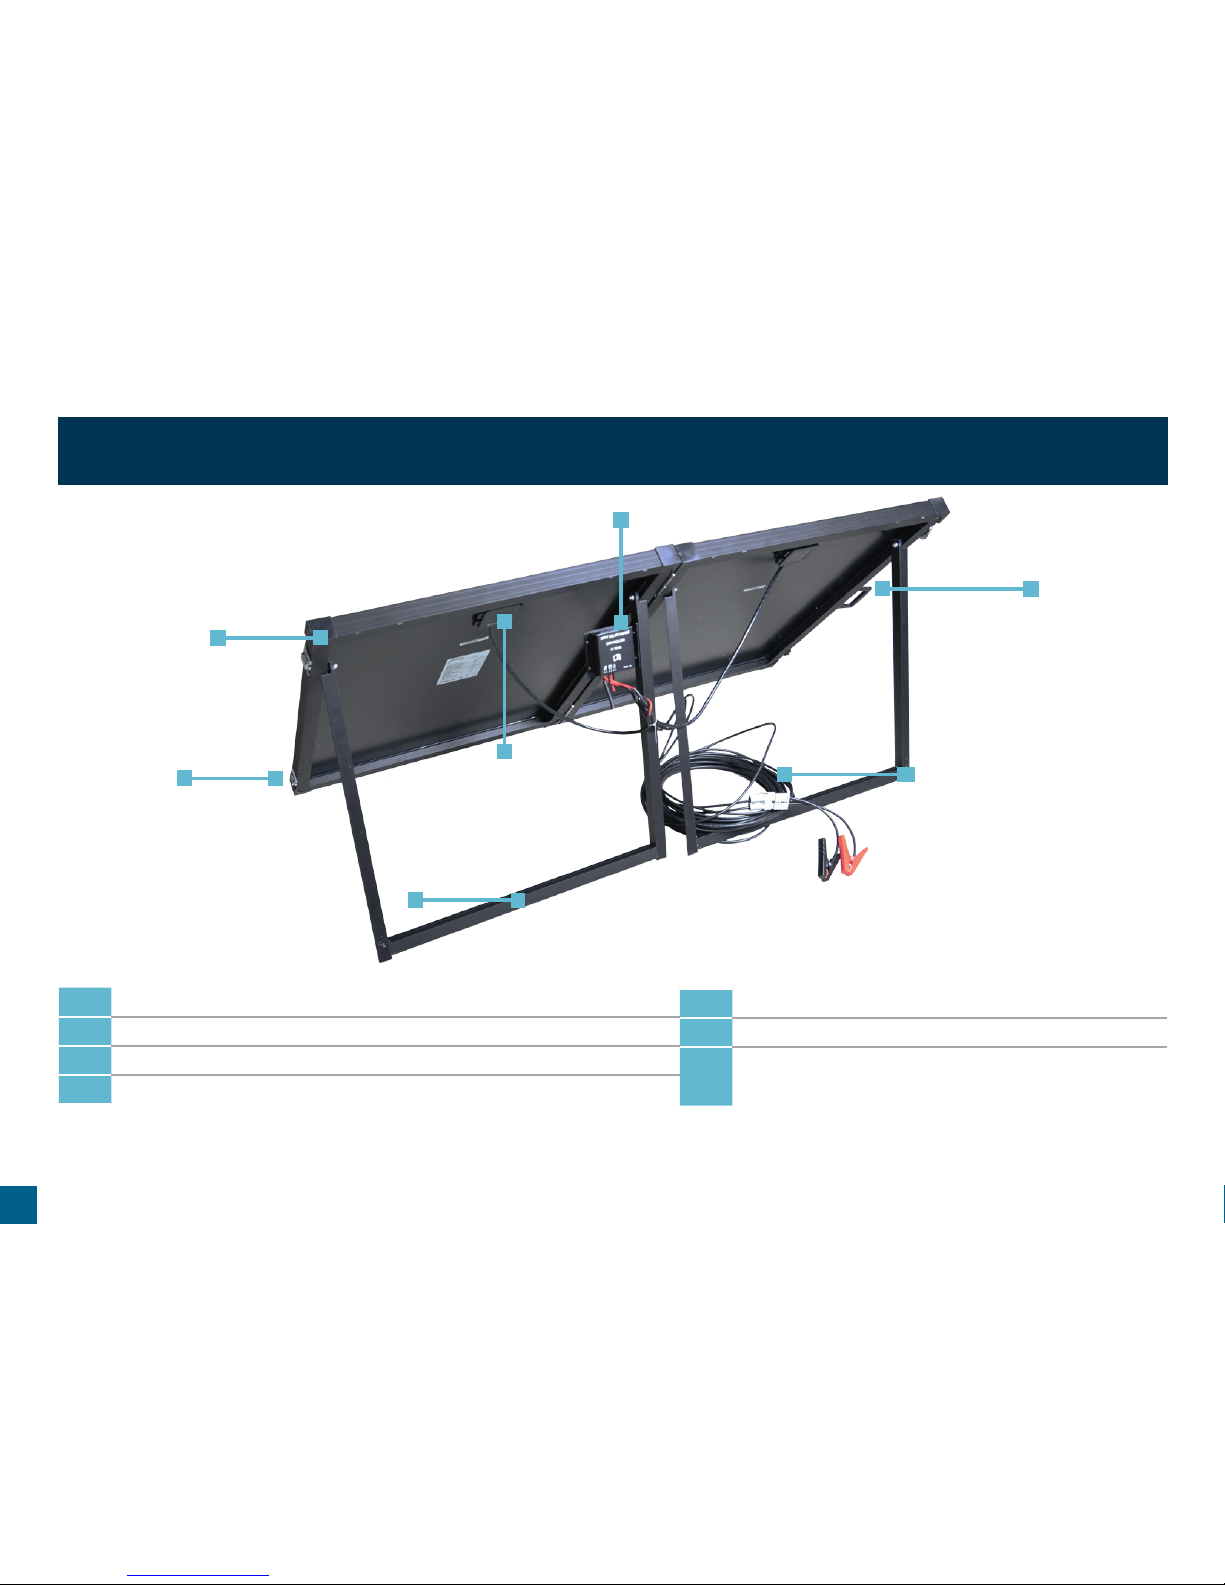
Components
COMPONENTS
4
5
7
1Monocrystalline solar panels with heavy duty anodized aluminium frame.
2Heavy duty ABS handle.
3Heavy duty steel safety fasteners.
4Heavy duty aluminium fold support legs.
5Solar panel junction box.
610m cable.
7Automatic SMART solar charge controller with LED (green/yellow)
indicators.
6

5
Specifications
SPECIFICATIONS
MODEL TDR15005 TDR15006 TDR15007
TYPE Monocrystalline Monocrystalline Monocrystalline
MAX POWER 80W (2x40W) 160W (2x80W) 240W(3x80W)
OPEN CIRCUIT VOLTAGE 23.9V 22.5V 22.5V
SHORT CIRCUIT CURRENT 4.39A 9.46A 14.2A
MAX POWER VOLTAGE 20V 18V 18V
MAX POWER CURRENT 4A 8.89A 13.3A
DIMENSIONS (CLOSED) 675mm(L) x 460mm(W) x 70mm(D) 780mm(L) x 675mm(W) x 70mm(D) 780mm(L) x 675mm(W) x 105mm(D)
DIMENSIONS (OPEN) 1350mm(L) x 460mm(W) x 35mm(D) 1350mm(L) x 780mm(W) x 35mm(D) 2340mm(L) x 675mm(W) x 35mm(D)
OPERATING TEMP -40° to 85°C -40° to 85°C -40° to 85°C
WEIGHT 8.2Kg 18.5Kg 20.5Kg
SOLAR PANEL REGULATOR
TYPE PWM
RATED VOLTAGE 12VDC/24VDC
RATED CURRENT 7A-20A
MAX INPUT VOLTAGE 25V
OPERATING VOLTAGE 8V (Regulator will not recognise a battery lower than 8V)
OPERATING TEMPERATURE -20°C to 60°C
RECOMMENDED BATTERIES (NOT INCLUDED)
TYPE 12V (60Ah - 100Ah Lead Acid or GEL type)
6Installation and Connection
INSTALLATION AND CONNECTION
Step One: Location
Identify the best location allowing for maximum sun exposure. This location
should be well ventilated. Keep away from hazards such as camp fire, water,
high traffic areas etc.
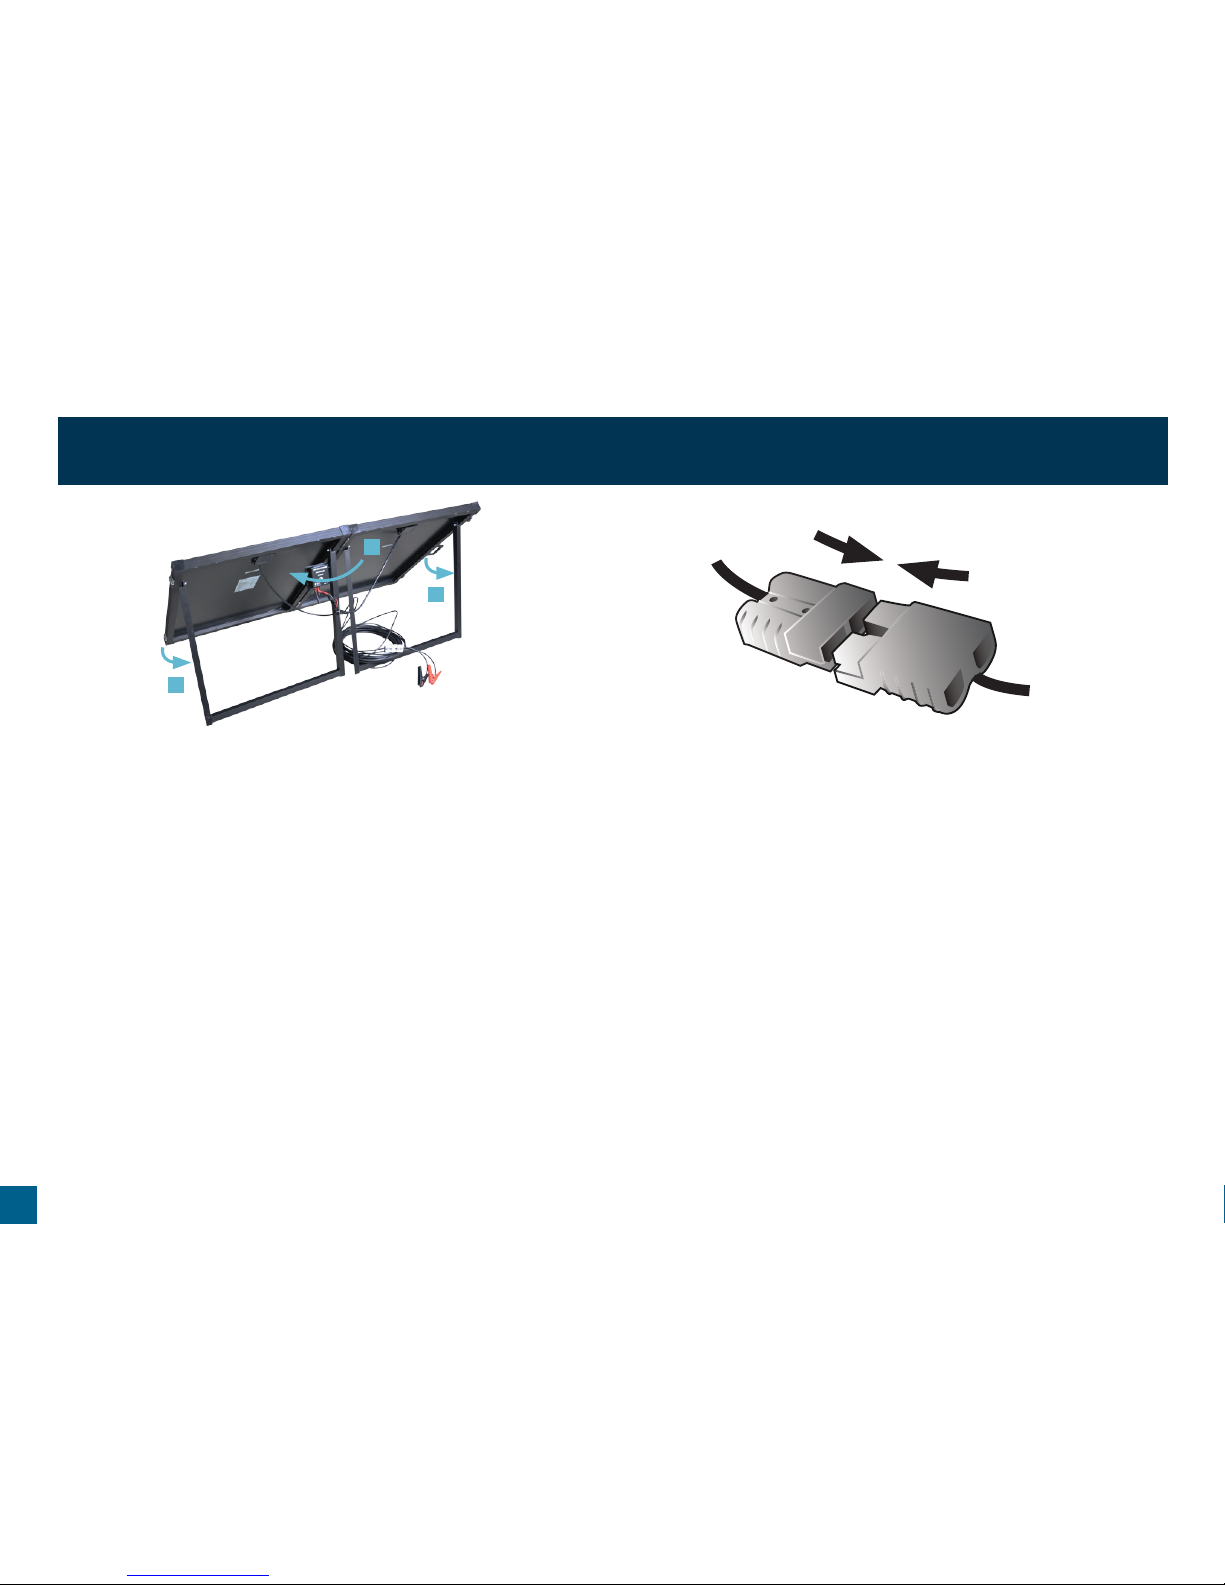
Step Two: Set-up (no tools required)
A. Remove the solar panel kit from the padded bag.
B. Open the folding solar panels and fold out the support legs.
C. Adjust the legs to provide the desired angle and direction that allows for
maximum sun exposure. Secure panels in position.
D. Direction and angle can be adjusted throughout the day for maximum power.
Step Three: Connect panels
The panel has the controller mounted on the back and is already connected, so all
you have to do is connect the other supplied leads to the battery outputs.
Step Four: Connect to the battery
Connect the battery clamp extension to the panels via the Anderson style plug.
Be sure to connect to the correct polarity (the positive red clamp to the positive
battery pole, the negative black clamp to the negative battery pole). Connecting
the clamps in reverse polarity may cause irreparable damage to the controller
and/or panel.
Please note:
There is no power output until the unit is connected to a battery. When the solar
panel kit is first connected to a battery and exposed to the sun, the charge
controller must undertake a self-check program to ensure that it is operating
correctly.
This program will take up to 3 minutes to complete and during this time the LEDs
on the charge controller will vary in display. Once the self-check is completed, the
system will engage and commence the charging process.
C
C
B
Anderson style plug

7
Safety Precautions
SAFETY PRECAUTIONS
1. We recommend that you read the manual thoroughly before use. Always keep
this manual in a convenient location. A pocket is provided in the padded bag
for the instruction manual.
2. To reduce the risk of injury, charge only 12 Volt Lead Acid, AGM and GEL type
batteries. Other types of batteries may be subject to bursting which can lead to
personal injury and property damage.
3. Always operate in a well ventilated space. Batteries emit explosive gases.
These gases can be ignited by a spark, cigarette or naked flame such as a
cigarette lighter or matches.
4. Make sure the voltage of the battery being connected is the same as the output
voltage of the solar controller.
5. Make sure to connect with the correct polarity (the positive red clamp to the
positive battery pole, the negative black clamp to the negative battery pole).
6. Keep away from explosive gases, flames, smoke and sparks.
7. Keep away from any flammable substances.
8. Always adhere to the battery manufacturers recommendations when charging
your battery.
9. Given sufficient light, solar panels always generate energy even when they are
disconnected. Accidental ‘shorting’ of the terminals or wiring can result in a
spark causing personal injury or a fire hazard.
10. This unit is not intended for use by small children without adult supervision.
11. Always avoid charging old, damaged, overly discharged or defective batteries.
12. When working around a battery, it is advisable to wear protective goggles or
eye glasses.
13. Have plenty of fresh water and soap available in case battery acid comes into
contact with skin, clothing or eyes (no soap).
14. If the battery acid comes into contact with the skin or clothing, flush
immediately with large amounts of water. In case of accidental eye contact,
flush eyes for at least 15 minutes with clean water. The eyes should be
submerged under the water and kept open. See a doctor immediately. Do not
use eye drops or other medications unless instructed by a doctor.
15. When working with a battery, be careful not to short out the battery with a metal
tool or object. Remove all personal items such as watches, rings, bracelets and
necklaces. The possibility of a short circuit exists, which can damage such items
and cause severe burns and/or personal injury.
16. Keep the surface of the solar panels clean from dust by cleaning it with a soft
cloth. Do not walk on modules.
17. Do not scratch or bend solar panels.
18. Do not disassemble or open the solar panels and controller. There are no
user-serviceable parts in this unit.
19. Do not pack heavy items on top of the solar panels when storing or
transporting.

8
Use the following equations to calculate your power needs:
Amp Hours (Ah) = Current (Amps) x Working Time (Hours).
Watts (W) = Current (Amps) x Voltage (V).
Remaining Battery Amp Hours (Ah) = Battery Capacity - Usage + Solar input.
With this configuration and a 100Ah battery, an 80W system with 8 hours of good
sunlight would give you 1 day of power (100Ah - 87.41Ah + 32Ah = 44.59Ah)
depleting the battery by 55.41Ah per day. A 160W system would comfortably
run the above for about 5 days (100Ah - 87.41Ah + 71.12Ah = 83.71Ah)
depleting the battery by 16.29Ah per day. The 240W system would be able to run
indefinitely as it will fully charge the battery each day.
This is only a guideline as many factors can influence the amount of charge, for
example less sunlight hours during winter, overcast days etc. will all lower the
amount of power generated by the solar panels. It is recommended to never fully
discharge your batteries, as this can cause permanent damage to the cells.
CHOOSING THE CORRECT SYSTEM
SYSTEM WATTS MAX AMPS HOURS OF SUNLIGHT AMP HOURS
TDR15005 80W 4A 8h 32Ah
TDR15006 120W 8.89A 8h 71.12Ah
12V RADIO 240W 13.3A 8h 106.4Ah
APPLIANCE QUANTITY WATTS VOLTS AMP HOURS OF USE AMP HOURS
FRIDGE 1 36W 12V 3A 24h 72Ah
LED LIGHTS 4 3W 12V 0.25A 5h 1.25Ah
RADIO 1 18W 12V 1.5A 5h 7.5Ah
TELEVISION 1 40W 12V 3.33A 2h 6.66Ah
TOTAL USE 87.41Ah
Choosing the Correct System

9
TROUBLESHOOTING GUIDE
Troubleshooting Guide
Please note:
• Solar panels and controller are maintenance free.
• There are no user service parts in this unit.
• If you have any problems, please contact Thunder. See back of booklet for
details.
The charge LED doesn’t glow green
• Ensure the panels are exposed to sunlight.
• Ensure all panel cables are free from damage and are connected correctly.
• Ensure the cables from the controller to the battery are free from damage
and connected correctly.
• Check the battery voltage. If the battery voltage is less than 8V, the
controller will not work.
• Check the fuse. The fuse will typically be blown for the following reasons:
- Battery poles +/- are reversed or a short circuit occurred.
- Solar controller output current over 10A.
• Inspect and test the battery. Check if the battery is in good condition.
There is no voltage output from the panel
• Check if the output cables are connected to the battery correctly.
• The panel is fitted with a SMART controller that will not allow any output if
the panel is not connected. This protects the solar panel.

10
TYPICAL BATTERY CONNECTIONS
Normal connection Parallel connection
Typical Battery Connections
Load
Chassis ground
12V
Load
Chassis ground
= 12V
12V
12V
CORRECT CORRECT

11
Warranty Terms & Conditions
When you acquire or fit a Thunder product you have the peace of mind in knowing that it is backed by a comprehensive 12 month warranty
against defects in materials and workmanship. The Thunder warranty is provided in addition to any rights you may have under the
Australian Consumer Law.
All claims under this warranty should be made by returning the product to the place of purchase at your expense, with the detail of the fault,
proof of purchase and fitment details. If we determine that a Thunder product is defective in materials or workmanship during the warranty period,
we will either repair or replace the unit.
This warranty does not apply to failure or damage to a Thunder product caused by incorrect or faulty fitment, accidental or intentional damage,
failure of other products, incorrect application, incorrect voltage, environmental damage, operation of the product outside of its environmental
and technical specifications, or repair or modification carried out by anyone other than an authorised repairer.
Our goods come with guarantees that cannot be excluded under the Australian Consumer Law. You are entitled to a replacement or refund
for a major failure and compensation for any other reasonably foreseeable loss or damage. You are also entitled to have the goods repaired or
replaced if the goods fail to be of acceptable quality and the failure does not amount to a major failure.
WARRANTY TERMS & CONDITIONS
This manual suits for next models
2
Table of contents
Popular Solar Panel manuals by other brands

Schüco
Schüco MPE 85 AL 01 manual

SOLUXTEC
SOLUXTEC PowerSlate Framed Mono Dark Blue Series user manual

Chicago Electric
Chicago Electric 66369 Installation and service instructions

Conergy
Conergy PE 245P instruction manual

Korax Solar
Korax Solar KS-90 installation guide

SolarWorld
SolarWorld Sunmodule SW xxx poly R6A User instructions


