Tiffany SMT068 User manual
4 Slice Sandwich Maker
User Manual
Model Number: SMT068
READ AND SAVE THESE INSTRUCTIONS

IMPORTANT
Read and follow the instructions in this user manual even if you feel you are familiar with the product, and find a
place to keep it handy for future reference.
For your convenience record the complete model number (located on the product identification plate) and the
date you received the product, together with your purchase receipt and attach to the warranty and service
information. Retain in the event that warranty service is required.
NOTE: The rating of this product (as marked on the product identification plate) is based on specific loading
tests. Normal use or the use of other recommended attachments may draw significantly less power.
IMPORTANT SAFEGUARDS
When using any electrically powered product, basic safety precautions should always be followed,
including the following:
PLEASE READ ALL INSTRUCTIONS CAREFULLY BEFORE USING THIS PRODUCT
WARNING!: - to reduce the risk of fire, electrical shock or injury to persons or property:
•Carefully read all instructions before operating your new product for the first time and save for future
reference.
•Remove and safely discard any packaging material and promotional labels before using the Sandwich
Maker for the first time.
•To eliminate a choking hazard for young children, remove and safely discard the protective cover fitted to
the plug of this appliance.
•Ensure the Sandwich Maker is properly assembled before use. Follow the instructions provided in this
manual.
•Do not place the Sandwich Maker near the edge of a bench or table during operation. Ensure the power
cord does not hang over the edge of the bench or table, touch hot surfaces or become knotted.
•Do not place the Sandwich Maker on or near a hot gas or electric burner, or where it could touch a
heated oven. Do not use the Sandwich maker on a sink or drain board.
•Ensure the Sandwich maker is placed at least 20cm from walls, curtains and other heat sensitive and
flammable materials. Always operate the Sandwich maker on a flat, even, heat resistant surface.
•This Sandwich Maker is not intended to be operated by means of an external timer or separate remote
control system.
•During operation, the outer surface will be hot.
•Do not place anything on top of the sandwich maker when the lid is closed, when operating or when
stored.
•This appliance is not intended for use by persons (including children) with reduced physical, sensory or
mental capabilities, or lack of experience and knowledge, unless they have been given supervision or
instruction concerning use of the appliance by a person responsible for their safety.
•Children should be supervised to ensure they do not play with the appliance.
•This appliance is for household use only. Do not use this appliance for anything other than its intended
use. Do not use in moving vehicles or boats. Do not use outdoors. Misuse may cause injury.
•The installation of a residual current device (safety switch) is recommended to provide additional safety
protection when using electrical appliances. It is advisable that a safety switch with a rated residual
operating current not exceeding 30mA be installed in the electrical circuit supplying the appliance. See
your electrician for professional advice.
•This appliance contains no user servable parts. Any maintenance other than cleaning should be
performed by a qualified person.
•Do not immerse unit, power plug or power cord in water, or any other liquid.
•Never operate any appliance with a damaged power cord or plug, should the appliance malfunction, or if
it has been damaged in any manner.
•Do not leave the appliance unattended whilst it is on.
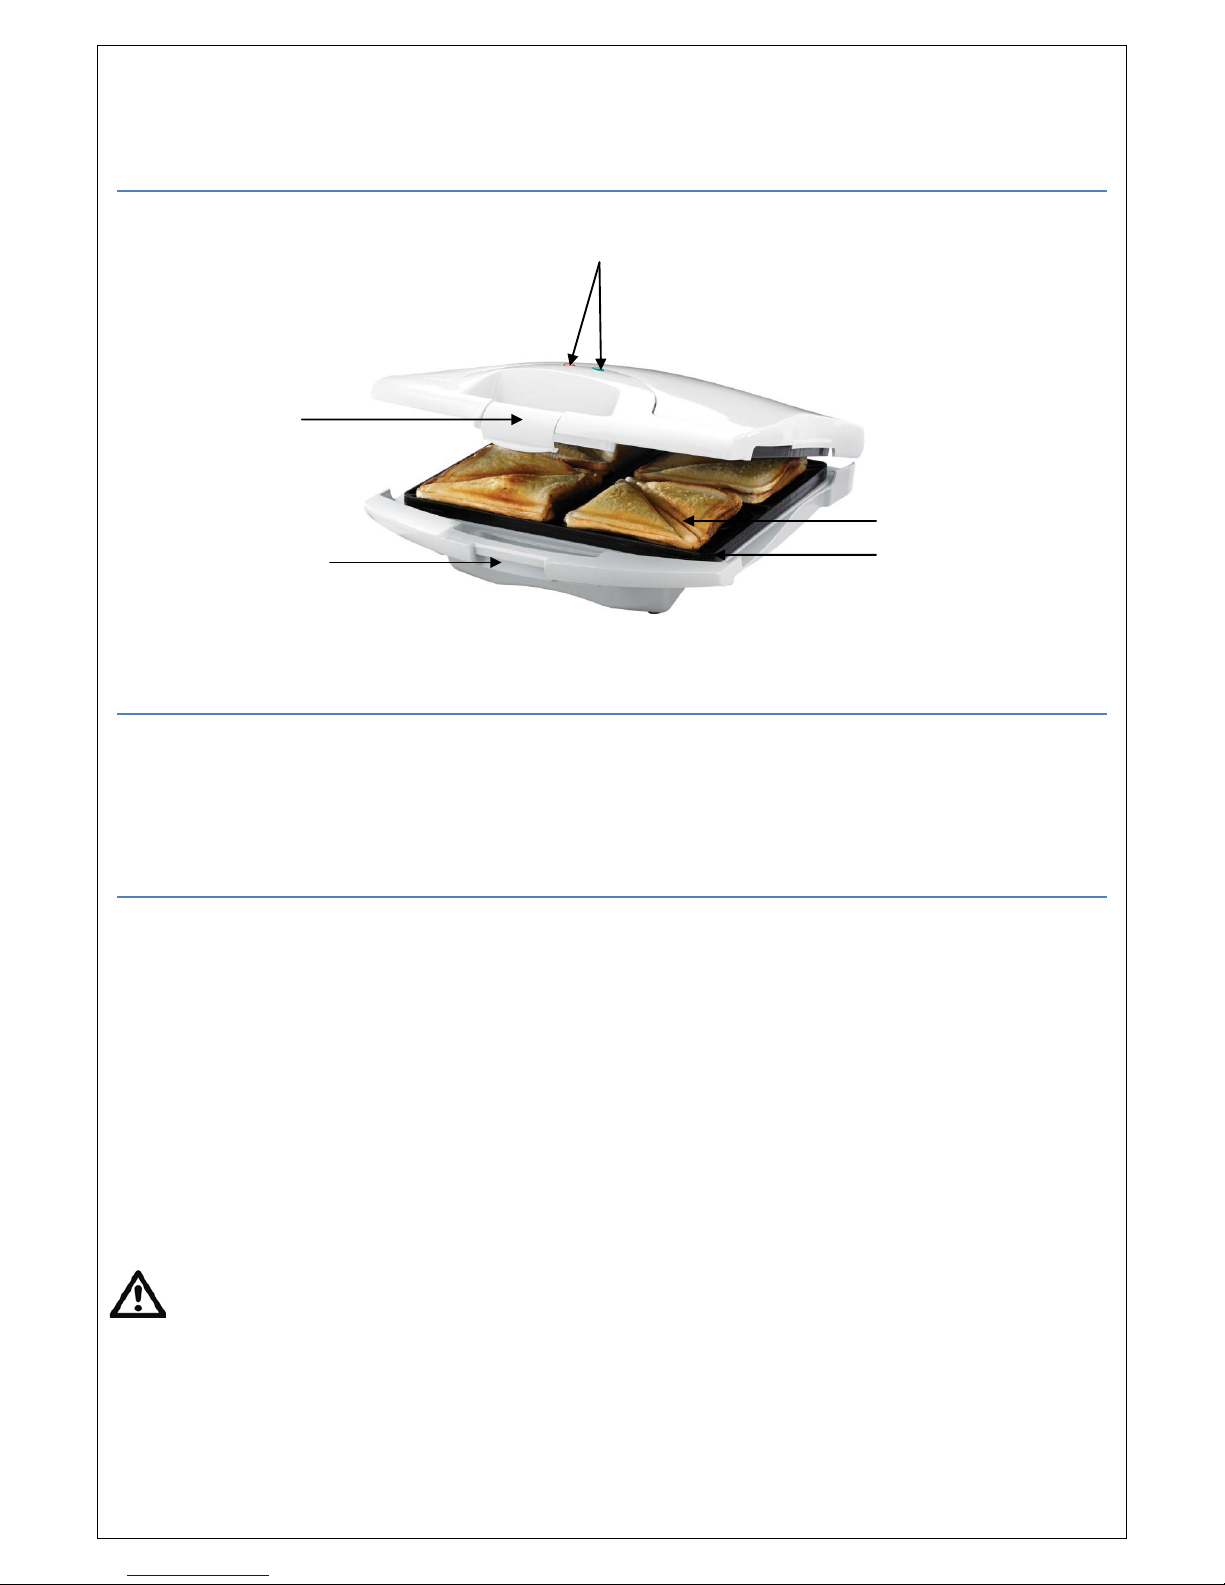
FEATURES
BEFORE FIRST USE
•Carefully remove your Sandwich Maker from the box and remove any packaging materials.
•Wipe over the cooking plates with a damp cloth or sponge.
•Fully unwind the power cord.
INSTRUCTIONS
1. Place the Sandwich Maker on a flat, level surface, with the lid closed.
2. Insert the plug into a power outlet, and turn the power on. The red ‘Warm up’ indicator light will
illuminate.
3. Allow the Sandwich Maker to preheat (keep the lid closed) until the green ‘Ready’ indicator light
illuminates.
4. While the Sandwich Maker is preheating, prepare your sandwiches by buttering up to 8 slices of
bread and prepare your desired fillings.
5. Place four slices of the bread, buttered side down, on the plates. Place your prepared fillings on top
of the bread.
6. Place the remaining slices of bread on top of the fillings, buttered side up.
7. Close the lid carefully, taking care to keep all contents inside the Sandwich Maker. Do not force the
lid down!
WARNING: When the lid is closed, steam will escape from inside the Sandwich Maker. Be careful
not to come in contact with the steam, as it can cause burns.
8. Toasting should take a few minutes, depending on personal taste and the type of bread and fillings
used. NOTE: the green ‘Ready’ indicator light will cycle on and off during toasting. This indicates
that the correct temperature is being maintained.
9. When your toasted sandwich is cooked, remove it with the help of a plastic or wooden spatula.
Never use metal utensils to remove the sandwich, as it can damage the non-stick coating.
Warm up & ready indicator
lights
Cool touch handle
Scissor action
Non-stick cooking
plates
Lock down lid
10. If you are making another toasted sandwich, keep the lid closed until you are ready, this maintains
the temperature.
HANDY HINTS
•This Sandwich Maker is designed for regular sized bread. Most types of breads can be used, but
when using sweet breads, keep in mind that they will brown faster due to the high sugar content.
•Do not overfill your toasted sandwich, and allow the sandwich to cool slightly before eating, as most
fillings retain heat and can cause burns if eaten too quickly.
•Even though the cooking plates are non-stick, we recommend using butter of margarine on the
outside of the bread, this helps prevent sticking and toasts the sandwiches nicely.
CLEANING AND STORING
1. Before commencing any cleaning, turn the power off at the outlet and remove the power plug.
2. Allow the Sandwich Maker to cool down. NOTE: The Sandwich Maker is easier to clean when it’s
still a little warm.
3. Always clean your Sandwich Maker after each and every use. This prevents the buildup of foods
that have been baked on.
4. Wipe the cooking plates with a soft damp cloth or sponge. As the cooking plates are non-stick,
avoid the use of any abrasive cleaners.
5. Wipe the exterior with a soft damp cloth.
6. Once the Sandwich Maker has cooled completely, store it either flat or upright. Keeping it in its
original box is recommended.
WARNING: Do not immerse any part of the Sandwich Maker in water or any other liquid.
CUSTOMER SERVICE
Australian Customer Service
GAF Control (Sales) Pty Ltd
P.O Box 19
Altona North Victoria 3025
Phone: 1300 659 489
Hours: 9am-5pm (EST) Mon-Fri
www.gafcontrol.com.au
*This product may vary slightly to the product illustrated due to ongoing product development.
Table of contents
Other Tiffany Kitchen Appliance manuals


