Tigersecu Super HD 1080P NVR Series User manual

Front and back panels shown are for illustration only.
Your NVR’s back panel may appear different, with the same ports in different locations.
Package Contents
Super HD 1080P Security NVR
Power Supply Wireless Mouse
Quick Start Guide (V2.4)
Super HD 1080P NVR Series
Set Up Your NVR
STEP 4:
Connect mouse
STEP 6:
Startup Wizard
STEP 5:
Connect power STEP 6: Startup Wizard
The TIGERSECU Startup Wizard will begin when you first
power up your NVR. The Startup Wizard will help you
configure core NVR settings.
Record your password below and store in a secure
place:
STEP 3: Connect router
Connect the NVR to your router using an Ethernet cable.
Router NVR
High speed internet connection and a router (not
included) are required to enable remote viewing.
Internet is not required for local viewing.
STEP 4: Connect wireless mouse
Connect the included mouse to a USB port on the NVR.
Remove the USB receiver from the mouse battery
compartment and insert it to a USB port on the back panel
of the NVR.
STEP 5: Connect power
Use the included power adapter to connect the NVR to an
electrical outlet.
The Power Supply included is designed ONLY for
use with the TIGERSECU NVR and cameras.
++
STEP 1: Connect monitor
Connect the NVR to a TV or desktop computer monitor
using an HDMI or VGA cable (not included). Multiple
monitors may be connected to the NVR at the same time.
Monitor
NVR
```
STEP 2: Connect cameras
Connect the antenna to the IP camera first.
Test your cameras prior to selecting a permanent mounting
location by powering the cameras and the system up.
TIGERSECU Wi-Fi NVR Systems come with IP cameras pre-
paired to the NVR, so manual pairing is NOT required.
Simply connect the cameras to the power adapters and
you will see the video feeds on the NVR monitor.
(Optional) Install/replace hard drive
Skip this step if you have an NVR with pre-installed hard
disk drive (HDD). Install a surveillance HDD (WD Purple
hard drive is recommended) to record video footage. Or
upgrade your HDD to add extra recording space.
Ensure NVR is powered off and power adapter is
disconnected before installing/replacing HDD.
Wi-Fi IP Camera
STEP 1:
Connect monitor
Wi-Fi IP Camera
STEP 2:
Connect cameras
STEP 3:
Connect router
Ethernet Cable
•Format HDD during STEP 6 Startup
Wizard.
•Or go to the NVR Main Menu, HDD
Menu.
See the steps below (expanded instructions on the right) to
complete the initial setup of the NVR:
Get in touch, and we’ll do our best to respond
within 12 hours, Monday to Friday, 9am-5pm PST
1Visit us
tigersecu.com/contact
2Email us
support@tigersecu.com
3Call us
323-315-0396
Need Help?
•Try a different HDMI/VGA cable
•Try a different port on the monitor (some monitors
have multiple HDMI ports)
•Try a different monitor (desktop computer monitor
is recommended)
No picture on
monitor after
connecting it
to the NVR
Solutions
Problem
Common Troubleshooting
Setting up remote connectivity allows you to view your NVR from a mobile device with Internet access.
Requirements:
•Router and high-speed internet connection with an upload speed in excess of 4Mbps. (not included)
•NVR connected to your router using an Ethernet cable.
•Compatible mobile device (iOS 10.0 or later, Android 4.4 or later)
•Sufficient signal to your mobile device (areas with intermittent coverage or low signal strength will
adversely affect playback, remote-access, and live-view streaming).
Remote Access
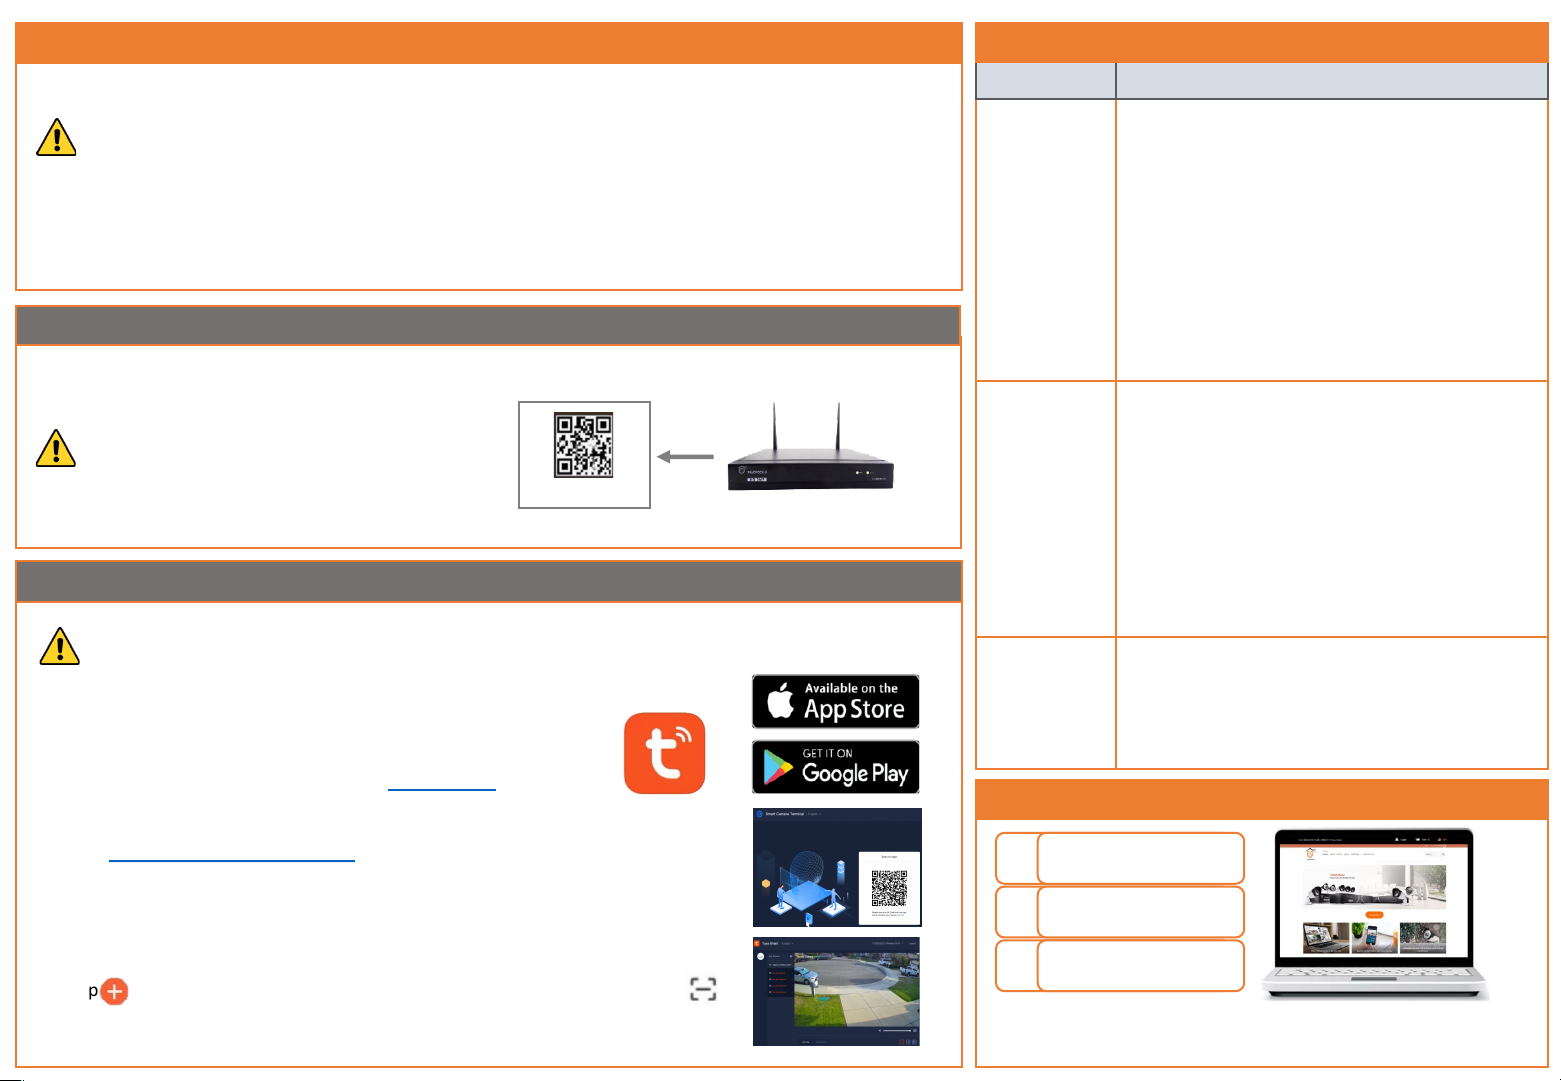
STEP 1: Find your NVR’s QR Code
Your NVR has a unique QR code (device identifier) located within the NVR’s Network Page. This code is
required to complete remote access.
Connect the NVR to a monitor in order to access
the NVR and locate the QR code in the NVR.
(See NVR Setup STEP 1 on the other side of this
quick start guide).
QR Code
NVR Main Menu > Network Menu > P2P > UUID
•At the Login Screen, click on Retrieve Password.
•If you've set up a Recovery Email, click Retrieve
Password again on the next page. A recovery key
email will be sent to your Recovery Email address.
If it's not in your inbox, check your junk or spam
folder. Enter the key at the Login Screen and click
OK.
•If you haven't set up a Recovery Email or your NVR
is not connected to a network, contact us at
support@tigersecu.com with your NVR Random
Number and your Amazon Order ID.
I forgot my
password
I need to set up
motion detection
recording
•The NVR is set by default to record continuously.
•Go to the NVR Main Menu, Record Menu, select
Event, then left-click the mouse on a particular
square to change or click and drag the mouse over
the squares corresponding to your desired time
period.
•Apply Copy To to copy the settings to other
channels. The timetable marked in green indicates
the NVR will only record when an event occurs.
STEP 2: Mobile and computer setup
You must complete initial setup of the NVR detailed in NVR Setup STEPS 1-6 on the other side of this
quick start guide before mobile setup.
Mobile device:
1. To view playback or live video on a mobile device, install the free
Tuya Smart app from the App Store or Google Play Store.
2. Follow instructions in Chapter 4 of the User Manual.
Computer:
1. Visit https://ipc.ismartlife.me/login on your Microsoft Edge (PC) or Chrome web
browser (PC and Mac).
* Internet Explorer (IE) and Safari web browser are not supported yet.
2. On your mobile device, open the Tuya Smart app. Ensure you’re logged into
your NVR via the app before proceeding.
3. Tap in the top right corner on the Tuya Smart app home page, then tap in
the top right corner to scan the QR Code on your web browser. Confirm Login.
4. On the web page, select the device and channel(s) you want to see.
Other Tigersecu DVR manuals


