Tilton 6000-Series User manual
The hydraulic release bearing assembly is self-adjusting in that the bearing stays
close to the clutch spring at all times, even though the spring changes position with
clutch wear. There is no extra return spring that pulls the piston back all the way to
the bottomed position. In this respect, the piston in the hydraulic bearing assembly
works like the piston in a disc brake caliper, returning only as far as forced. This is
why with a Tilton hydraulic release bearing assembly the clutch pedal feel does not
change with clutch wear allowing the driver to make more consistent shifts.
The piston of this assembly has .700” of total stroke. Precision measurement of clear-
ances and the correct adjustment of the pedal stop are extremely important to the
correct function of this unit.
FREE PLAY AND HEIGHT ADJUSTMENT
1. Disconnect and remove any existing meachanical clutch linakge, fork and bearing.
2. Install the ywheel, clutch and bellhousing onto the engine. Tighten all com-
ponents in place following their respective manufacturer’s instructions. Do not
install the transmission at this time.
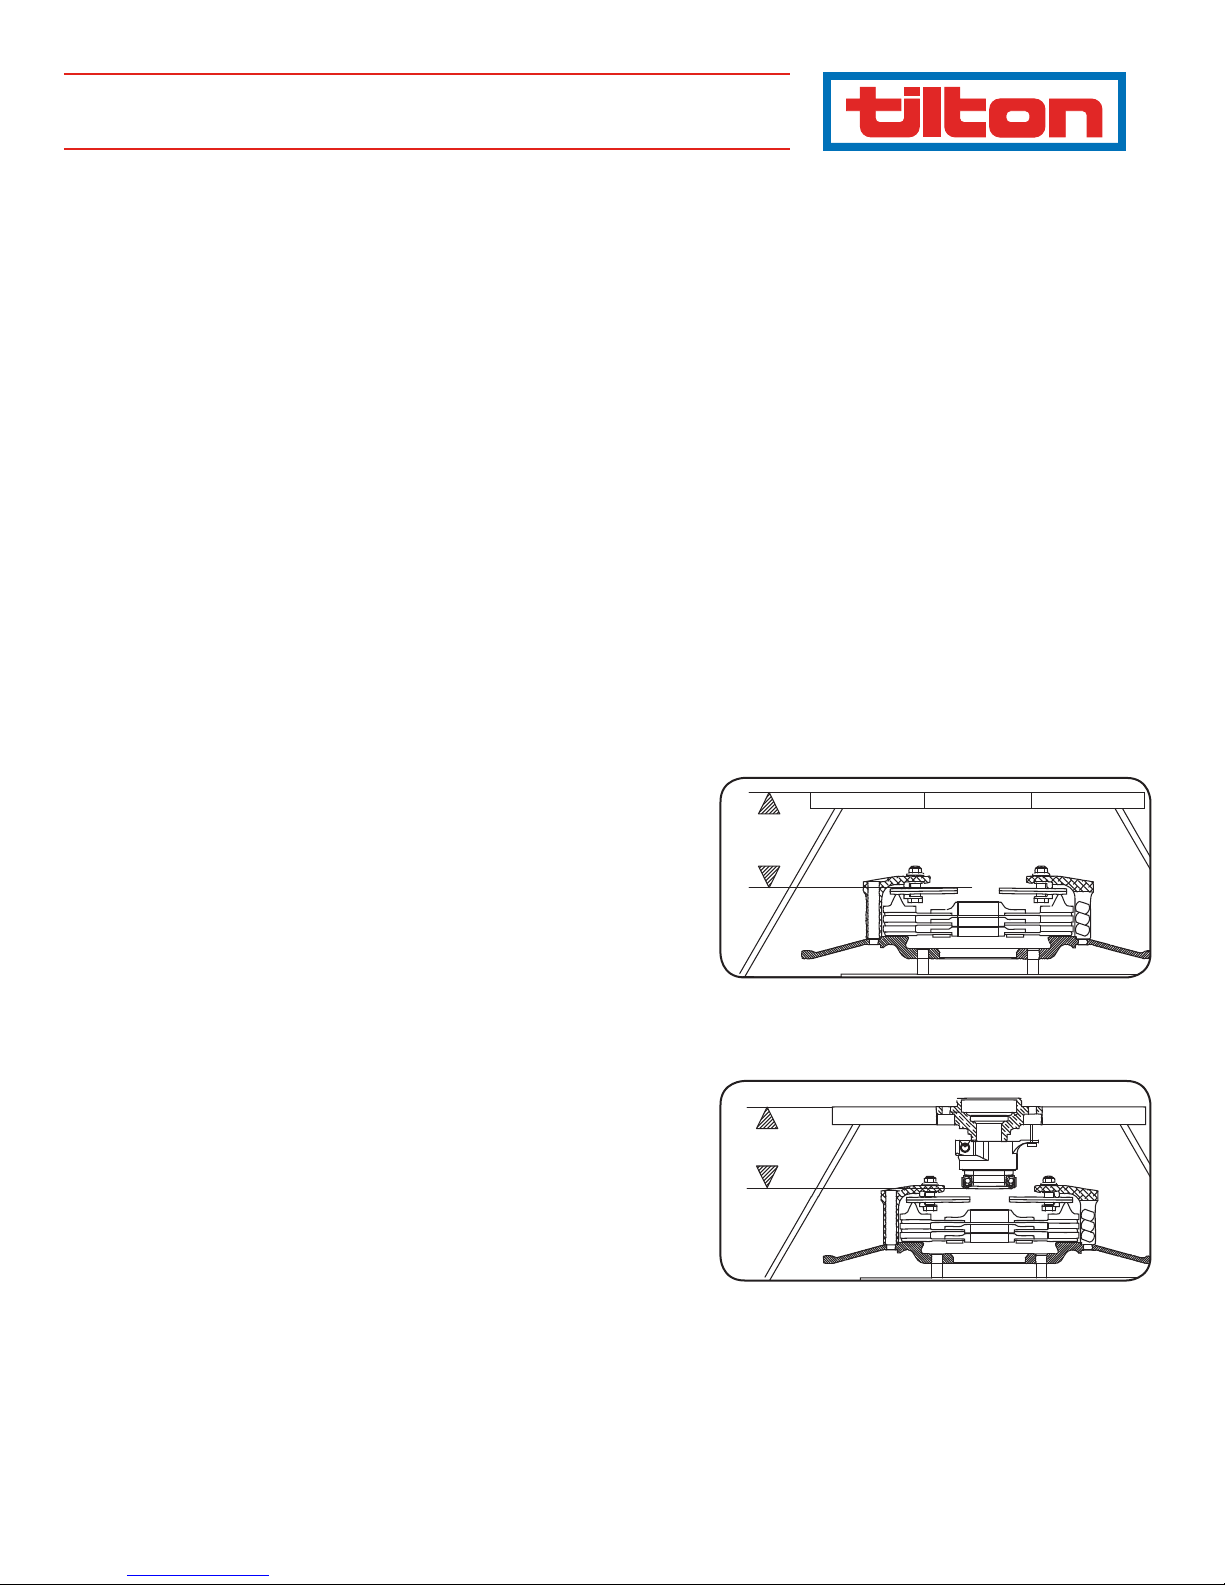
3. Using a pair of dial calipers or a depth micrometer, measure the distance from the
transmission face of the bellhousing to the bearing contact point of the clutch
spring. Record this distance as “Dimension A”. See Diagram 1.
4. Subtract .125” from Dimension A. This should be the installed distance from the
face of the release bearing to the face of the transmission (with the bearing and
piston completely compressed into the hydraulic base). See “Dimension B” in
Diagram 2.
5. Install the supplied o-ring into the supplied threaded sleeve and push these onto
the bearing retainer on the front of your transmission. A small amount of petro-
leum jelly may be used during assembly. The o-ring end of the sleeve should be
towards the transmission.
6. Thread the bearing onto the threaded sleeve until Dimension B is achieved.
7. There is a small ear and slot machined into the hydraulic base. The supplied stud
ts through this slot to prevent rotation. Once the correct height of the HRB has
been determined, locate and remove the transmission bearing retain bolt closest
to the ear. The removed bolt will be replaced by the anti-rotation stud provided.
Remove HRB and threaded sleeve from bearing retainer, being careful not to
change HRB height adjustment on the threaded sleeve. Install anti-rotation stud
through the slot on the hydraulic base and reinstall HRB and sleeve onto bearing
retainer. Using Loctite 272 (red) thread locking compound, install anti-rotation
stud into hole that original retainer bolt was removed. Torque to 16 lb-ft. DO
NOT OVERTIGHTEN.
Note: If anti-rotation stud is too long and extends past face of release
bearing, cut shorter to avoid any interference with clutch.
8. The hydraulic lines supplied have been installed at the factory using the proper
tooling and assembly lubricant. They are designed to rotate once while installed.
There is no need to remove these prior to assembly.
9. Double check that the bearing to clutch clearance is .125” (tolerance +/-.025”).
DRIVELINE ASSEMBLY
1. While installing the transmission, carefully route both lines through either the
release fork window or holes that have been drilled to accommodate the lines.
2. Ensure that the lines do not interfere with the clutch or ywheel. A string may be
used to help guide the lines around any obstacles during installation.
3. Once the transmission is seated, conrm that all parts of the release bearing clear
the clutch and ywheel. Complete the driveline installation.
6000-Series Hydraulic Release Bearing
INSTALLATION INSTRUCTIONS
98-1110
B
A
Distance from Spring Fingers to Bellhousing Face
Diagram 1
Diagram 2
Installed Distance

Tilton Engineering, Inc. 25 Easy Street • PO Box 1787 • Buellton, CA 93427 • www.tiltonracing.com
MASTER CYLINDER SELECTION
When used with a clutch pedal ratio between 5:1 and 7:1, the master cylinder bore sizes
shown in Diagram 3 are suggested for use with 6000-Series HRBs.
HYDRAULIC LINES
This bearing is supplied with two identical lines installed for the supply and bleed ports.
Both lines are sized AN-4 and should only be used with AN type ttings. It is important
that whichever line is on the bottom is used as the supply line (connected to the master
cylinder) and whichever line is on top is used as the bleeder.
1. Attach the supply line to the master cylinder using your choice of rigid or exible line.
If using a Tilton master cylinder (which have AN-3 outlets) you will need a AN-3 male to
AN-4 male adapter (such as Earl’s part number 963243).
2. Attach the supplied bleed adapter and bleed tting to the bleed line.
HYDRAULIC RELEASE BEARING BLEEDING
1. Fill the master cylinder reservoir with DOT3 or DOT 4 brake uid. Do not use DOT 5,
silicone based or high temperature resistant brake uids designed for more than 550ºF
as some will cause the seals to swell.
2. Apply light force on the clutch pedal. You want enough force to hold the bearing out
against the clutch diaphragm spring, but not enough to compress the clutch
diaphragm spring.
3. Open the bleedscrew that is attached to the bleed line on the hydraulic
release bearing.
4. Completely stroke the pedal and hold the pedal down.
5. Close the bleedscrew that is attached to the bleed line on the hydraulic release bearing.
6. Let the pedal return to its relaxed position and wait a few seconds.
Repeat Steps 2 through 6 until all air is removed from the system.
Note: Do not stroke the pedal again before the pedal stop is set.
SETTING THE CLUTCH PEDAL STOP
You MUST use a pedal stop to limit the amount of bearing travel. Failure to do this WILL
result in clutch, bearing and/or transmission damage!
1. Lift the drive wheels o the ground and support the car on jackstands.
2. With the engine o, put the transmission into 1st gear and have someone attempt to
rotate the drive wheels.
3. Depress the clutch pedal slowly until the clutch disengages and the drive wheel can be
rotated. Do not push it any further.
4. Note the clutch pedal position at this point. Adjust the pedal stop bolt to allow an ad-
ditional 1/4” of pedal travel.
MAINTENANCE
Spin the bearing race and check how it feels. If it has a higher than normal resistance or has
a slightly notchy feel, replace the bearing.
The piston can be removed and replaced without having to break the hydraulic seal or per-
forming the bleeding procedure. Remove the piston assembly and check for any scoring in
the bore or on the piston surface. Wipe the piston and orange wiper seal before installing.
You may nd that the piston is not dry. This could be the rubber grease used when install-
ing the new seal at the factory. Do not mistake this for brake uid.
If the seal needs to be replaced, the seal replacement kit is Tilton part number 62-905.
Remove the piston assembly to access the hydraulic seal. Inspect the piston and hydraulic
assembly bore for scratches. To remove the hydraulic seal from the release bearing assem-
bly, block one hydraulic port and apply 5 PSI of air pressure to the other port. Wear safety
glasses and point the seal exit path away from you! Never try to pry the seal out of the
assembly. Refer to Diagram 4 when installing the new seals and ensure that the at side of
the main hydraulic seal rides against the piston. Always use rubber grease, such as Tilton
P/N RG-17, when installing the seal. Take care not to damage the seals during installation.
Diagram 3
Clutch
Master
Cylinder
Stroke
Recommended
Master Cylinder Bore
4.5" 1.0" 5/8"
1.1"
5.5" 1.0" 5/8"
1.1"
7.25" 1.0" 3/4"
1.1"
10.5" or 11"
diaphragm-type
1.0" 13/16"
1.1"
1.4" 7/10"
10.5" or 11"
lever- type
1.0" 7/8"
1.1"
1.4" 3/4"
Table of contents
Popular Other manuals by other brands

Horse Power Ignition
Horse Power Ignition HPI 210 installation manual

Meinberg
Meinberg IMS-M1000 manual

Westinghouse
Westinghouse CV-1 Installation, operation and maintenance instructions

ShowerLux
ShowerLux AIR installation instructions

Proxy
Proxy Nano Inline User manual and installation guide

laerdal
laerdal ALS Simulator Directions for use


BERNSTEIN
BERNSTEIN EX412 Assembly instructions

HBM
HBM MGCplus operating manual

Starmobile
Starmobile Neptune B505 user manual

Hydac
Hydac FluidCleaner Mobil FCM Series Operating and Maintenance Instrutions

TEIKO
TEIKO SKPU 4/90 ASSEMBLY AND USER'S MANUAL INSTRUCTIONS

Draytek
Draytek Vigor3200 Series quick start guide