Timberline Silver User manual

INSTALLATION GUIDE
FOR ALL CABINETRY
FIRST THINGS FIRST! BEFORE proceeding with installation, please check goods carefully.
If goods are incorrect, faulty or damaged, DO NOT proceed with installation and contact
Timberline immediately. No claims for damages/defects will be accepted after installation.
Instructions Cover All Cabinetry
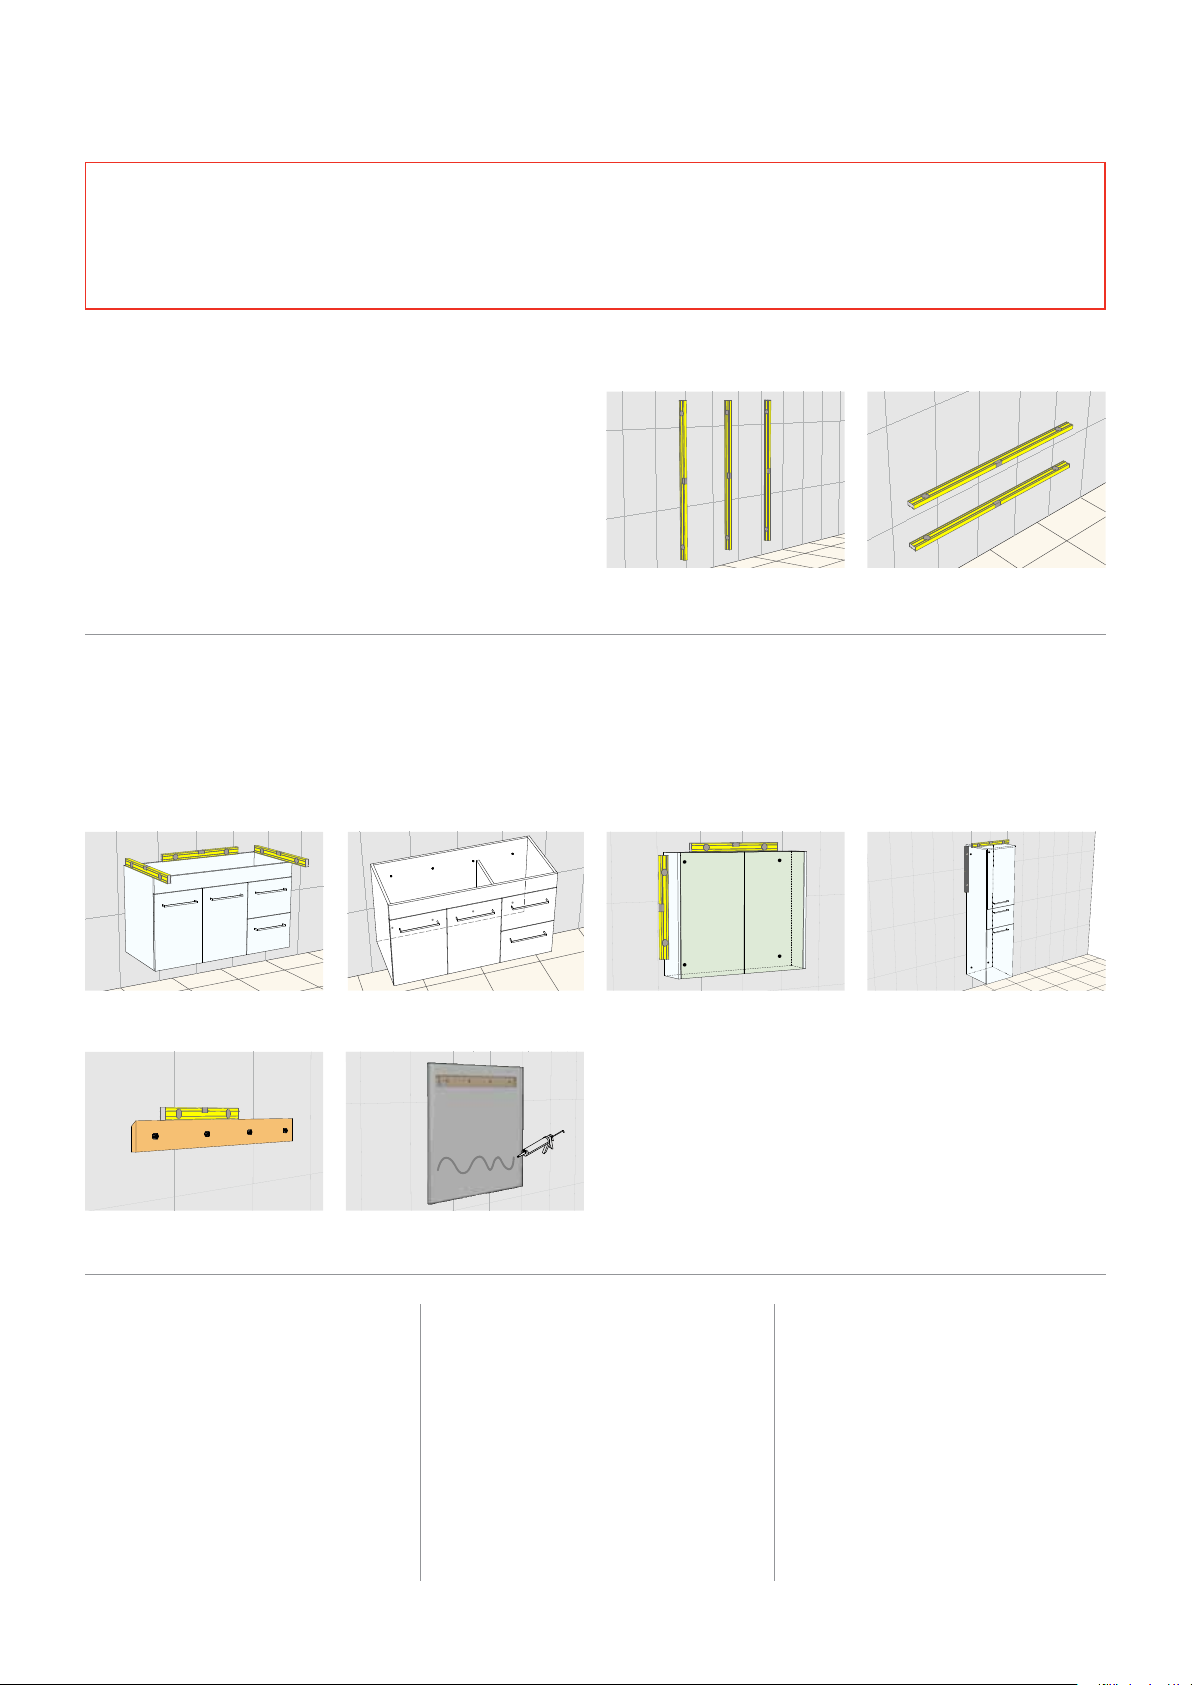
1. Ensure Your Wall Is Flat & Plumb
2. Fix Your Cabinet / Mirror, Making Sure It Is Level & Plumb
Before starting, check that your wall is plumb and at. If not, the
cabinet will need to be packed out so that it is sitting level, otherwise
the cabinet will twist, causing the doors and drawers to be out of
alignment and not function correctly.
It is recommended that you do NOT tile in your cabinets – tiles should
extend behind the cabinet and clearance allowed for doors and drawers
to open (ller panel required where cabinet is going hard against a
wall).
It is recommended that vanities are installed over 300mm from any wet
area such as baths, spas and showers. Ensure wall is plumb
Vanities: Fix as noted above
Mirrors: Fix mounting batten with suitable
screws with maximum 300mm spacing
Ensure wall is at (no gaps between wall
and level)
Vanities: Check cabinet is level and plumb Tallboys: Fix with suitable screws in each
corner and check that cabinet is level and
plumb
Shaving Cabinets: Fix with suitable screws
in each corner and check that cabinet is level
and plumb
Mirrors: Hang mirror on mounting batten and
secure with silicone
Fix your cabinet using screws through the solid back of the cabinet. The screws should be suited to the stud material and have a pan or counter
sunk head. Provide a horizontal row of screws within 100mm vertically from the top of the cabinet at a maximum of 300mm horizontal spacing.
The screws closest to the left and right edge of the cabinet should be within 100mm of each side.
For vanities, ensure that the cabinet is level and plumb in all directions, using a spirit level. If not remove the cabinet and pack or straighten the
wall accordingly. DO NOT install the top until you are sure that the cabinet is plumb and level in all directions.
Separate yers are available for the following, also downloadable from
our website timberlinebp.com.au/downloads
• Timber Top Installation
Instructions
• Splice and Milan Vanity Mounting
Instructions
• Splice Floating Shelf Mounting
Instructions
• Bluetooth Sound System
Tallboy
1:50
3D-07
Shaver
1:50
3D-08
3. Adjust The Doors &
Drawers
4. Fit The Top &
Seal Cabinet
5. Something Not Quite
Right?
After installation every cabinet will need
some adjustment as the doors and drawers
move during transport and installation. The
cabinet MUST be level before adjustments
are made. It is the responsibility of the
installer to ensure these adjustments are
done correctly. No warranty claims will be
considered until this adjustment process is
completed. Refer to the instructions below.
For vanities, t the top to the cabinet using
a thin bead of non-acidic silicone on all four
edges. Seal all cabinet edges against oor
and wall to prevent water penetration. DO
NOT silicone timber tops to cabinets - refer
to instructions on website.
Overtightening of the waste can lead to
stress and damage to the basin or top. We
recommend that the wastes be tightened by
hand only, and then silicone sealed.
If you have a problem - and have carefully
checked all the steps above to ensure it has
been done right - give us a call. We’ll be
glad to help. To make it easy for us, please
email some photos of the problem and of
the job detail label (this can be found on the
underside of a drawer base) to
photos of the levels as shown in Step 1 and
Step 2 above.
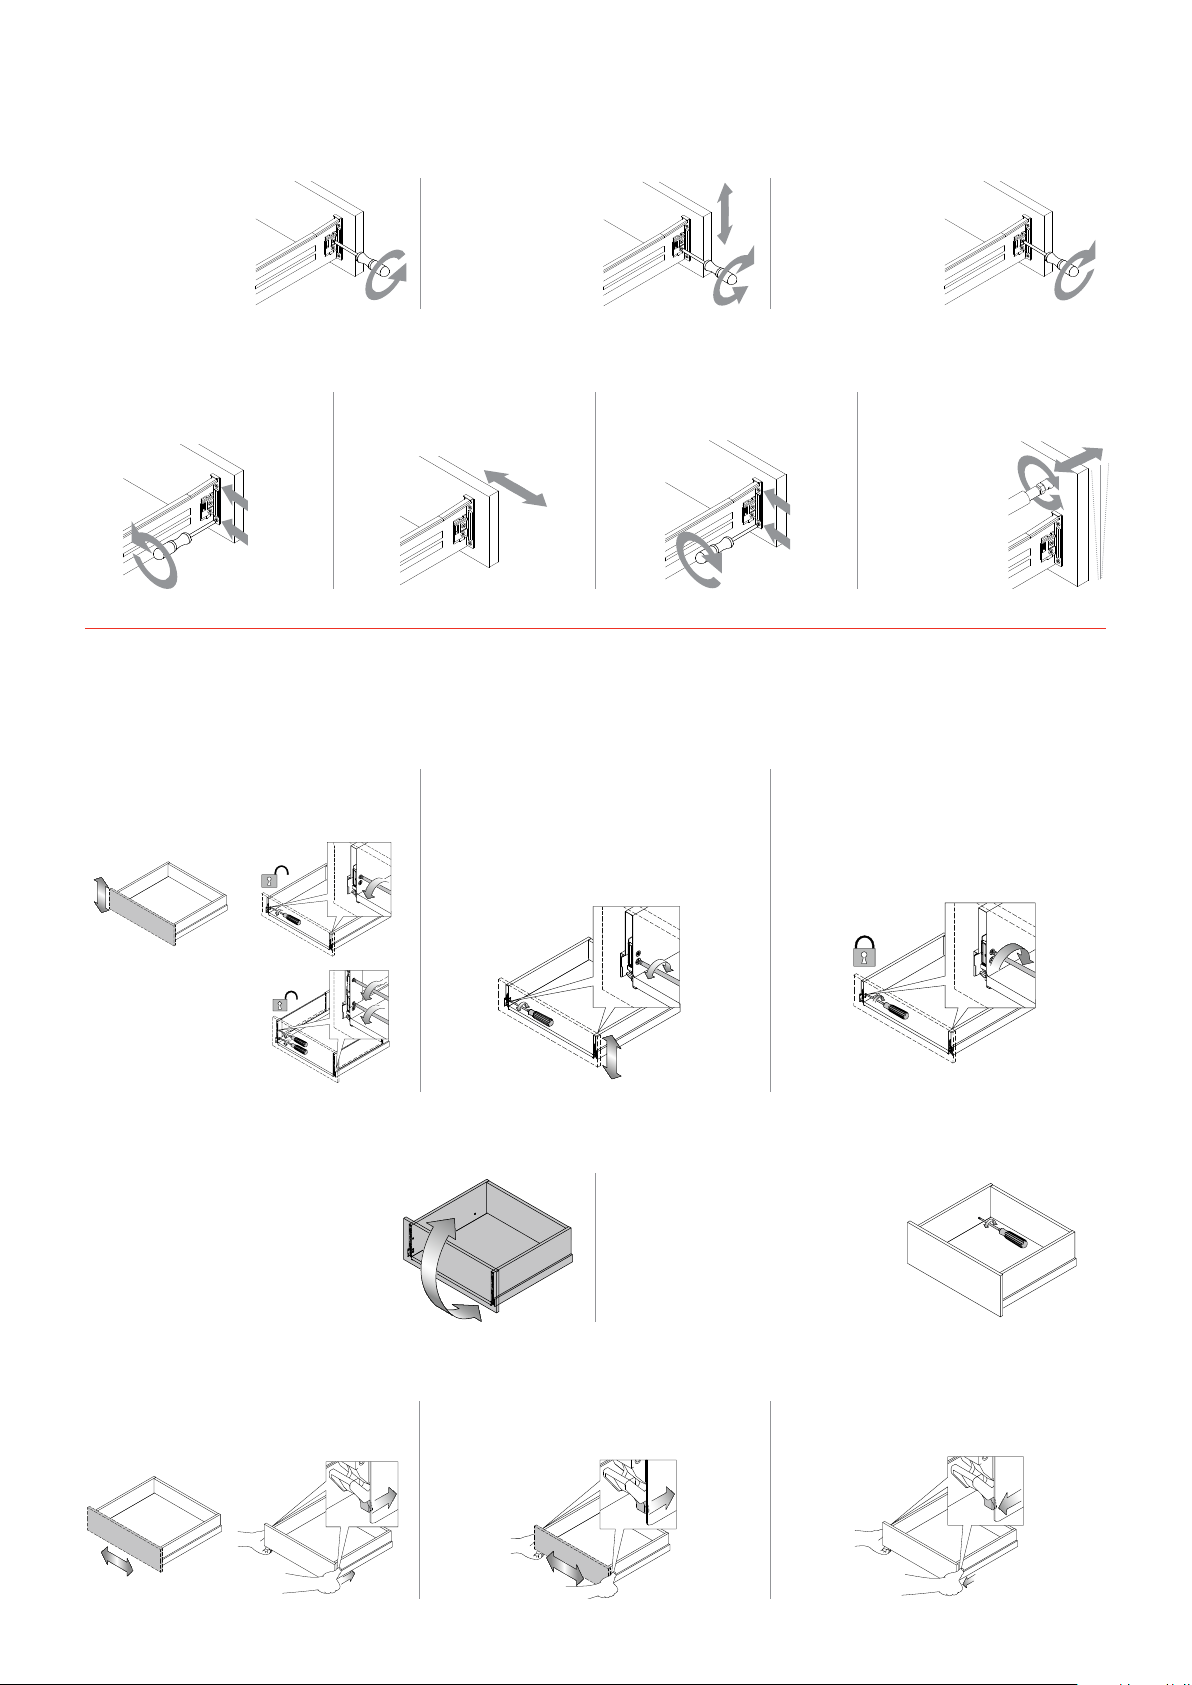
Drawer Front Height Adjustment
Steel Drawer Adjustment | Up or Down
Steel Drawer Adjustment | Left or Right
Drawer Front Tilt Adjustment
1. Turn top screws anticlockwise (quarter
turn) to unlock the drawer front on both
sides.
1. Loosen the centre
screw.
1. Loosen two drawer front
screws.
1. Locate adjustment screws at the
rear of drawer sides (for 122mm and
186mm sided drawers).
1. Push metal tabs back using index ngers.
2. Turn bottom screw using small
adjustments to adjust the drawer front up
and down. Anticlockwise adjusts down,
clockwise adjusts up. This may need to be
completed on both sides of the drawer.
3. Turn top screws clockwise (quarter turn)
to lock the drawer front back in place on
both drawer sides.
2. With tabs pushed back adjust drawer front
left or right using palms of hands.
3. Release tabs to lock drawer front position
-
+
± 2m
m
Side adjustment
L
R
± 1.5
-
+
± 2m
m
Side adjustment
-
+
± 2m
m
-
+
± 2m
m
Side adjustment
L
R
± 1.5
Side adjustment
L
R
± 1.5
-
+
± 2m
m
For 186mm sided
drawers, both top
and middle screws
need to be released.
2. Adjust using small turns – turning
towards the rear of the drawer
tilts to the rear, turning towards
the front of the drawer tilts to the
front. Please note you will hear
audible clicks when making these
adjustments.
Horizontal Drawer Front Adjustment
2. Turn bottom screw
to move drawer
front up or down.
3. Tighten centre
screw.
2. Slide drawer front left or
right.
3. Tighten two drawer front
screws.
4. Adjust angle
of tall drawer
fronts with
gallery rails
by sliding
cover back
and adjusting
plastic nut.
Silver Collection
Gold & Platinum Collections
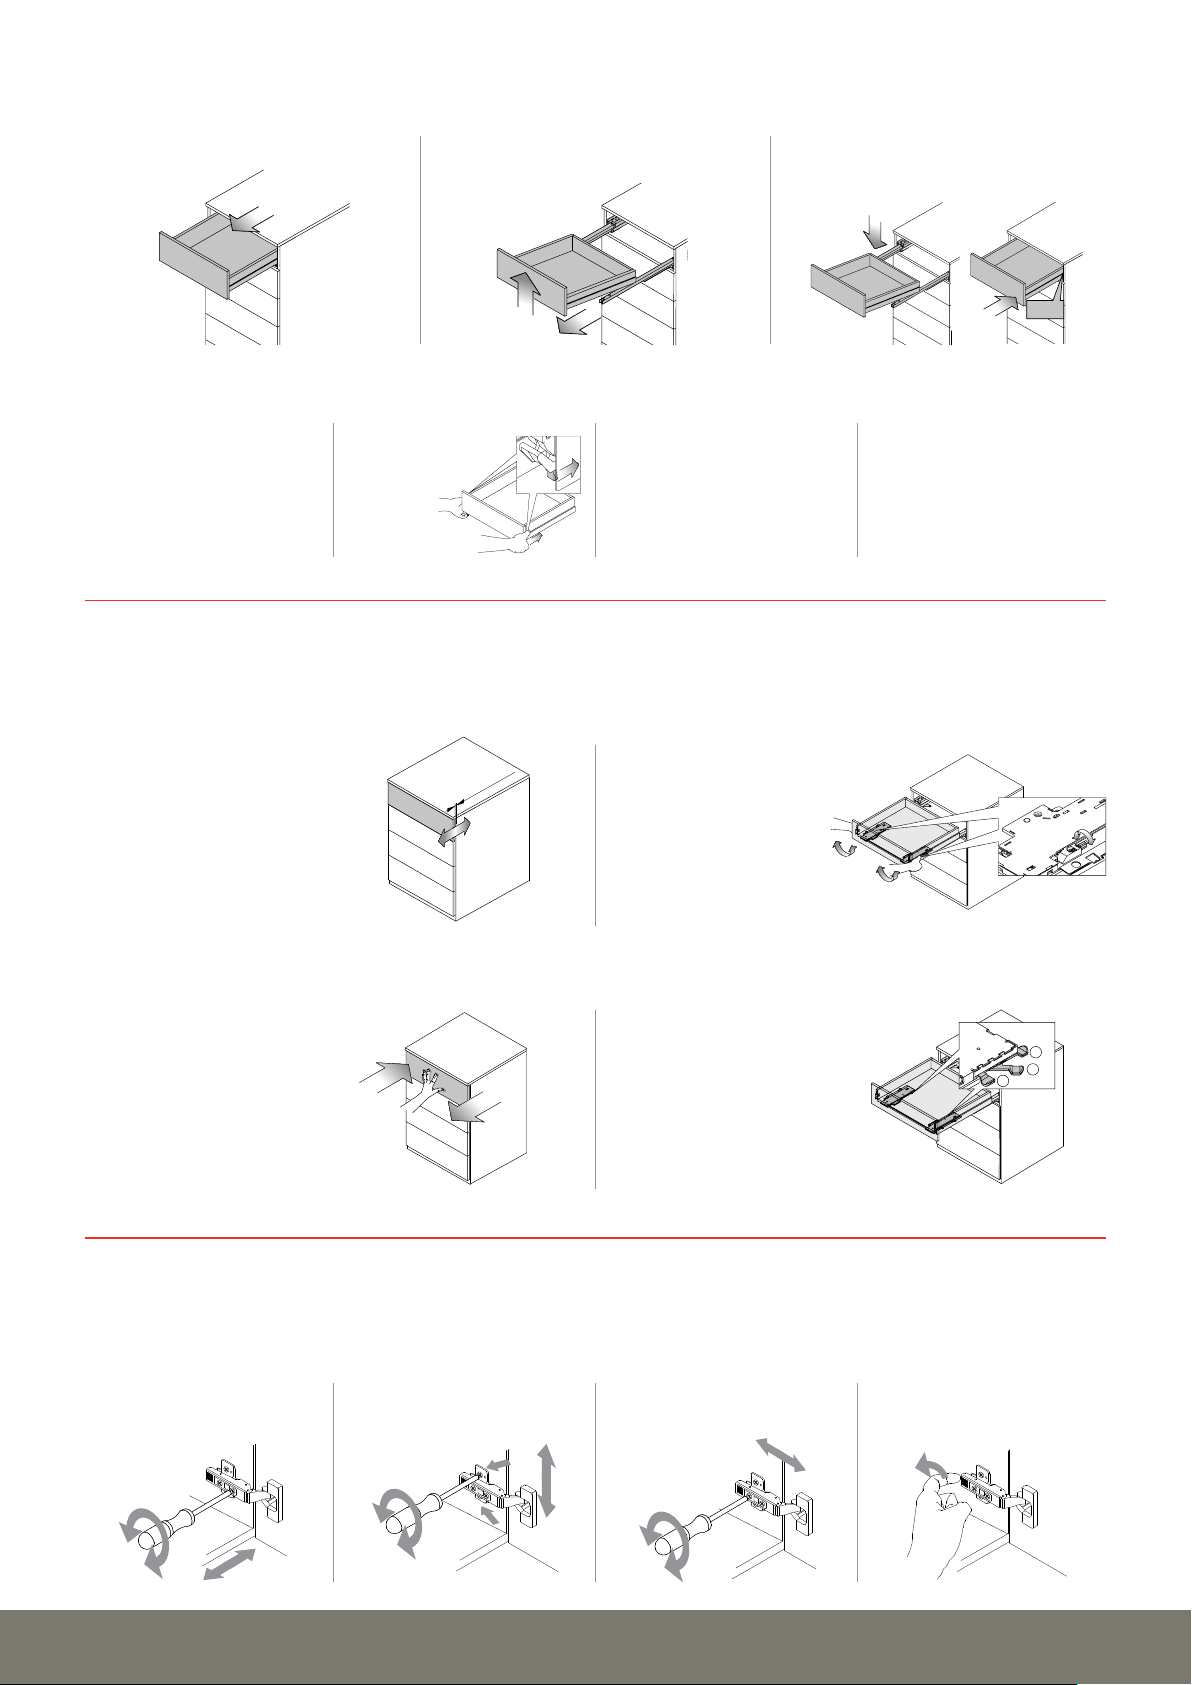
Push to Open | Front Gap Adjustment
Push to Open | Opening Force Adjustment
Adjustment of Door Hinges
1. Open drawer to full extension.
1. Open drawer to full extension.
Use the front screw for left or
right adjustment
2. Adjust the green ick switch
on both mechanisms.
Closest to front of drawer
= smallest opening force;
Closest to rear of drawer =
largest opening force.
2. Under drawer, wind green
rollers as indicated on both
mechanisms. Optimal gap
is 2.5mm between rear of
drawer front and cabinet.
+3/-1 mm
min 2.5 mm
-+
-
+
1
2
1
2
3
1
2
1
2
3
+3/-1 mm
min 2.5 mm
-+
-
+
T: 1800 642 162 www.timberline.com.au
Removing the Drawer
Removing the Drawer Fronts
clic k
1. Open drawer to full extension.
1. Open drawer to full extension.
(On any drawer over 750mm, loosen
the cam-lock screws using a quarter
turn under the drawer base.)
2. Grasp the underside of the drawer front
and lift drawer off the runner.
3. To replace, place drawer back on runner
and push fully closed. You will hear a
click as the drawer is secured.
2. Using index
ngers push
back metal
tabs.
3. Gently pull drawer front away
from drawer.
4. To replace, clip angled
brackets into bottom of
mechanism and push drawer
front back on securely, using
downward motion.
(On any drawer over 750mm, tighten
the cam-lock screws under the
drawer base.)
Loosen two bracket screws to
slide door up or down. Tighten
screws.
Use the back screw for in or out
adjustment
To remove door (if required)
pull the clip at the back of each
hinge.
Gold & Platinum Collections
Gold & Platinum Collections
This manual suits for next models
2
Other Timberline Indoor Furnishing manuals

Popular Indoor Furnishing manuals by other brands

Walker Edison
Walker Edison V42Y78B Assembly Diagram

Forte
Forte QTRK011 Assembling Instruction

Venjakob
Venjakob 6442 Assembly instructions

Liberty Furniture
Liberty Furniture 652-B200124 Assembly instruction

Homelegance
Homelegance B2013TTTDC-1 Assembly instruction

Malvern
Malvern 177948 Assembly instructions


