TimeTools ZAS User manual

1
3.06
DEVICE OPERATION MANUAL
ZAS and ZBS Clocks
Default clock configuration:
- DHCP, UTC time zone + 1: 00, DST: Europe, time display, 24h time format, no date display, no flashing colons.
- The device displays its IP address at startup. If the clock does not receive an address from DHCP for 5 minutes, it takes
the address from the pool 169.254.0.1 - 169.254.255.254. The clock can be detected using the software: RGB ClockSet or
RGB Devicer.
1. Introduction:
The devices of ZAS and ZBS series are compact clocks with various configuration options. The clocks are equipped
with a network communication module, which allows remote configuration through the “Website”and time
synchronization using the Internet time servers. Optional remote control is available and sold separately.
The clock enables:
- adjusting the time of the presentation: the clock and the date
- adjusting the date format and the time format (12-hour or 24-hour),
- automatic and manual brightness control,
- working in the ECO mode allowing you to reduce power consumption,
- automatic time change from the standard time to the daylight saving time and from the daylight saving time
to the standard time for various locations (Europe, Australia, the United States of America, Canada, Israel),
- Synchronization using the NTP Internet servers,
- Master Mode –a local time server compatible with NTP,
- Synchronization with the local “Master Mode”server,
- Configuration through the built-in “Website”,
- Display (content) synchronization in 3 modes (master, basic slave –master transmits only display
information, full slave –master transmits display information and temperature) between any types of RGB
Technology clocks equipped with a communication module
- Setting an individual clock name,
- Setting a language of WWW page (English or Polish),
- Stopwatch function, a timer counting up and a timer counting down (available only by means of remote
control)
- DHCP client function,
- DNS client function,
- Support for the NTP server pool (pool.ntp.org).
2. Power supply:
The clocks use Power over Ethernet technology and support the IEEE 802.3af (PoE) and IEEE 802.3at (PoE +)
standards. This allows you to use a single cable for energy and data transmission. The clock must be connected to a
compatible power device.
3. Connection with the device:
The connection with the device is made through the Ethernet interface, while supporting the integrated „Website”
is done via the Internet browser (recommended browser: Mozilla Firefox, version 16.0.2 or later).
To connect with the device, enter the IP address assigned to the device into the browser (default: 192.168.0.11).
Then, the device will ask you to enter: username and password (default User: admin, Password: dbps).
Device start - initial animation:
- DHCP - the clock displays the words "DHCP","IP" and address (If only DHCP is displayed, it means that there was no
active DHCP server in the network).
- Static IP address - the clock displays the word "IP" and the address,

2
3.1. Restoring the default network settings:
Table 1 shows the default network settings of the clocks. Restoring the factory settings is possible by using
the “Website”, or by holding for 3s the reset button on the back of device, or in the user menu by the remote control.
The default clock mode is DHCP.
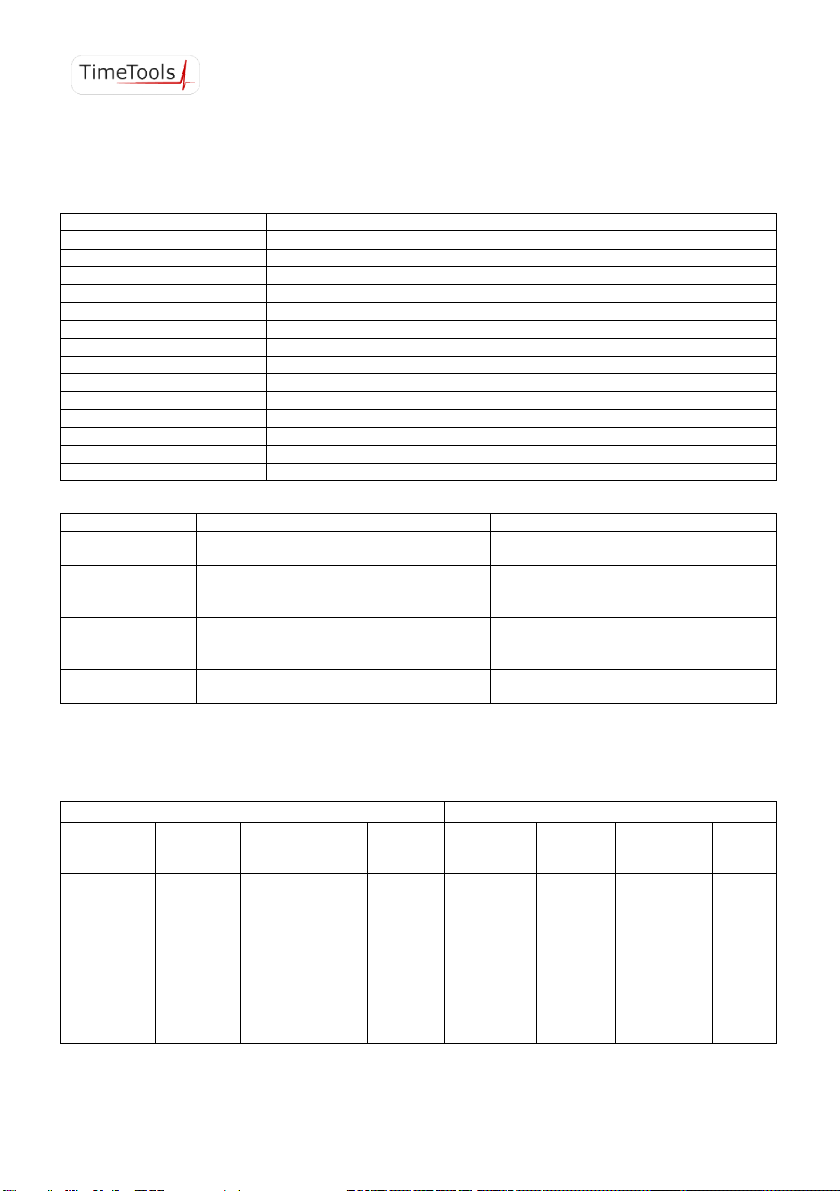
Tab. 1. Default network settings
Parameter Default value
User admin
Password dbps
4. Additional information presented on the display:
5. Supporting the “Website”:
The ZAS and ZBS clocks are equipped with the network communication module (Ethernet module) allowing
intuitive configuration through the built-in “Website”. The integrated “Website”consists of five webpages which allows
you to configure various functions of the device.
NOTE! Always confirm the changes of the settings of the device parameters with the "Save" button.
5.1. Time tab:
This tab allows you to configure the parameters connected with time.
· Local date & time –manual setting of the local time and date.
· Regional settings–configuration of the time zone, allowing for daylight saving time.
· Remote time synchronization –configuration of the remote synchronization of time and of the IP addresses
of NTP time servers.
· Local Time synchronization –configuring local time synchronization.
NOTE! To make the time synchronization using the NTP servers work, you need the proper (including local network addresses)
configuration of the following parameters: "IP Address", "Subnet mask", " Gateway" , “DNS Server”in the Advanced tab
(or they are automatically downloaded from the DHCP server) and the connection of the device to the Internet
5.2. Display tab:
This tab allows you to configure the parameters connected with the device display.
· Format –configuring the displayed functions and their duration (the clock, the date), the date format and
blinking of time colon (only ZAS clock).
· Brightness –configuring the display brightness and activating the automatic brightness control.
· Display synchronization –configuration of the display (content) synchronization, of selecting the operation
modes, and of the field of the master clock IP address (required for the Slave operation modes).
· Eco –setting the energy saving mode (the time of activating the device, the time of deactivating the device).
· Import/Export configuration - exporting or importing configuration data file
5.3. Advanced tab:
This tab allows you to configure the advanced parameters of the device.
· Clock name –an individual clock name.
3
· Network –network settings (the IP address, the subnet mask, the default gateway, DNS), activate the DHCP
function and block remote access. When the DHCP function is active, the clock enables the use of DHCP
options 42 and 230 - (Appendix 8 A - see below).
· Password –setting the user password.
· Default settings –restores the factory settings.
· Restart –power cycle the clock.
NOTE! The "Default settings" function fully restores the factory settings, including resetting the alarm and making the default
network configuration.
5.4. Status tab:
This tab allows you to read the device status.
· Date & time –reading the time and the date.
· Sensors –reading the sensors: the temperatures and the environment brightness.
· NTP client status –reading information about the communication with NTP server and time of last
synchronization.
· Network –reading the network interface configuration.
· Device –reading the software version, hardware version, an individual clock name and product name.
· Advanced DHCP options - read the status of DHCP options 42 and 230.
5.5. Firmware tab:
This tab allows you reading the firmware version information and switching the device to the update mode.
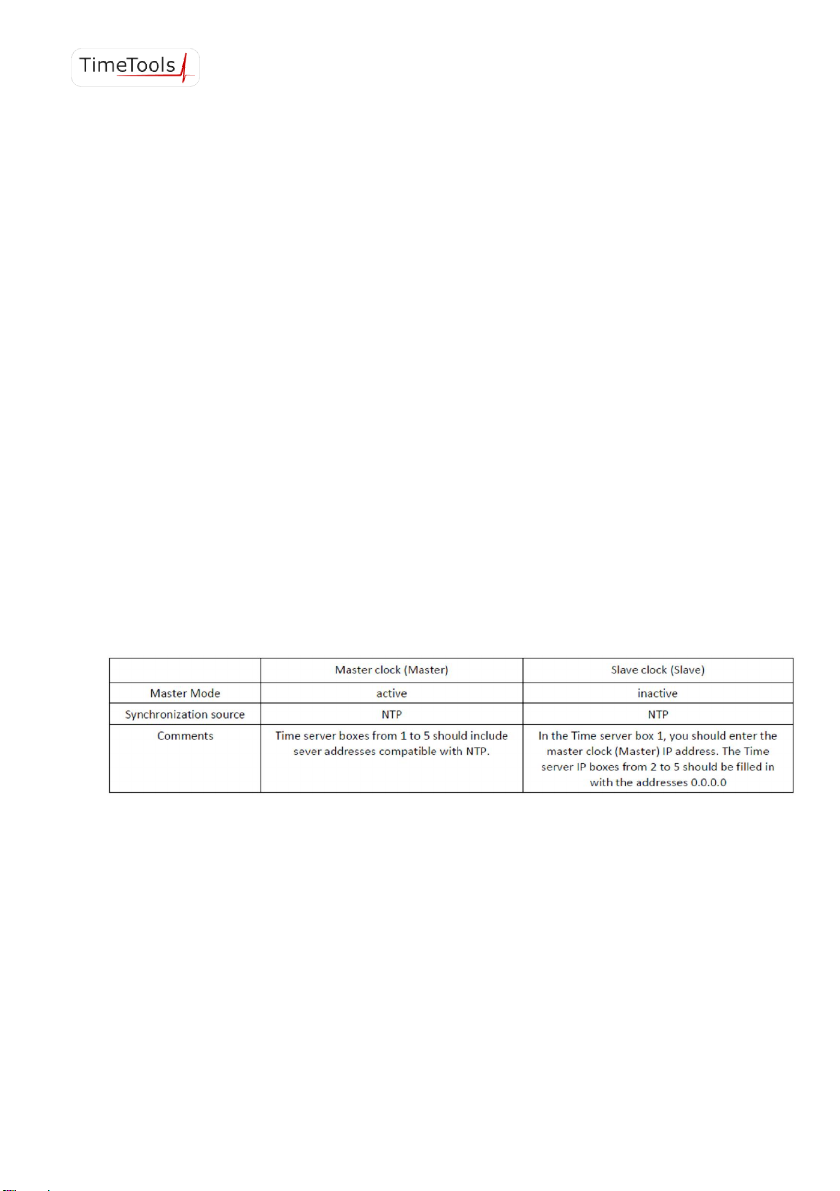
6. Master Mode configuration:
The ZAS and ZBS series clocks allow local synchronization of the slave clocks with the master clock.Table 2
shows a sample configuration of clocks. NOTE! Time server IP addresses can be entered by the user only via the
"Website".
Table 2 Master Mode configuration
7. Changing the language of web page:
To change the language, click at the bottom right corner on a flag symbolising the language. Available
languages are Polish and English (default). After clicking on the desired flag, next to it should be displayed an information
“Ustawiono język polski”or “Set english language”, which means the correct language setting in the memory clock
(feedback from the device).
8. Appendix A: Support for the DHCP 230 option - "RGB Config String":
The clock, in addition to the standard DHCP client options (e.g. 1, 3, 6, 42), supports the additional option
DHCP 230 (vendor specific DHCP option), which allows advanced users and network administrators to group configuration
of devices, using the string "RGB Config String ". Clocks when obtaining an IP address lease also get the configuration of:
time server (tse parameter), time zone (tzo parameter), daylight saving time rule (dst parameter), 12-hour time format
(tf12 parameter). These parameters are the so-called "RGB Config String", examples of configuration strings are shown in
Table 3.
4
Note: The ZAS / ZBS clock when obtaining a DHCP lease (starting the device) and also when refreshing the DHCP lease
downloads configuration data from the "RGB Config String". When the data is different from the current one, it
modifies its own settings and saves to FLASH memory.
Tab. 2. Sample "RGB Config String" - additional option DHCP 230
City „RGB Config String”- additional option DHCP 230
Los Angeles tse=pool.ntp.org;tzo=-08:00;dst=7 2 3 2 7 1 11 2;tf12=Y
Salt Lake City tse=pool.ntp.org;tzo=-07:00;dst=7 2 3 2 7 1 11 2;tf12=Y
Chicago tse=pool.ntp.org;tzo=-06:00;dst=7 2 3 2 7 1 11 2;tf12=Y
New York tse=pool.ntp.org;tzo=-05:00;dst=7 2 3 2 7 1 11 2;tf12=Y
London tse=pool.ntp.org;tzo=00:00;dst=7 -1 3 1 7 -1 10 2;tf12=N
Warsaw tse=pool.ntp.org;tzo=01:00;dst=7 -1 3 2 7 -1 10 3;tf12=N
Tallinn tse=pool.ntp.org;tzo=02:00;dst=7 -1 3 3 7 -1 10 4;tf12=N
Moscow tse=pool.ntp.org;tzo=03:00;dst=N;tf12=N
Sydney tse=pool.ntp.org;tzo=10:00;dst=7 1 10 2 7 1 4 3;tf12=N
Dubai tse=pool.ntp.org;tzo=04:00;dst=N;tf12=N
Tel Aviv tse=pool.ntp.org;tzo=02:00;dst=5 -1 3 2 7 -1 10 3;tf12=N
Ankara tse=pool.ntp.org;tzo=03:00;dst=N;tf12=N
Kuala Lumpur tse=pool.ntp.org;tzo=08:00;dst=N;tf12=N
Johannesburg tse=pool.ntp.org;tzo=02:00;dst=N;tf12=N
Tab. 3. "RGB Config String" - additional option DHCP 230
Parametr Description Examples
tse Internet (domain) address or time server IP address tse=pool.ntp.org
tse=194.146.251.100
tzo Time zone in the format:
HH: MM - zone with positive offset
-HHMM - negative offset zone
tzo=01:00
tzo=-05:00
tzo=00:00
dst
Time change rule in "RGB Custom String" format.
Details in Table 5
dst=7 -1 3 2 7 -1 10 3
dst=7 2 3 2 7 1 11 2
dst=N (disable DST time change)
tf12 Clock display mode in format
12 hours
tf12=N (24 hour format)
tf12=Y (12 hour format)
Note:
In the configuration of the "dst" parameter, individual number fields are separated by a "space". When "dst = N" time
change is disabled.
Tab. 4. The "dst" parameter value
Start of daylight saving time End of daylight saving time
Day of the
week
Week
number in
the month
Month Hour Day of the
week
Week
number in
the month
Month Hour
1 - Monday
2 - Tuesday
3 - Wednesday
4 - Thursday
5 - Friday
6 - Saturday
7 - Sunday
-1 - Last
1 - First
2 - Second
3 - Third
4 - Fourth
1 - January
2 - February
3 - March
4 - April
5 - May
6 - June
7 - July
8 - August
9 - September
10 - October
11 - November
12 - December
0 –00:00
1 –01:00
…
23 –23:00
This manual suits for next models
1


