Tippmann BOSS User manual

HAND STITCHER
OPERATOR’S MANUAL
THE TIPPMANN
“
BOSS
”
TOLL FREE: 866-286-8046
REV: 5-9-2014
www.TippmannIndustrial.com
www.PropaneHammer.com
Propane Powered Post Driving Equipment
www.TippmannClicker
Air Powered Die Cutting Presses
See our other product lines
www.TippmannIndustrial.com
saddle manufactured using a
“BOSS” HAND STITCHER

WARNING
READ THROUGH THIS MANUAL THOROUGHLYAND BECOME FAMILIAR WITH
THE TIPPMANN “BOSS” PARTS, OPERATION, AND SAFETY PRECAUTIONS
BEFORE YOU ATTEMPT TO OPERATE THIS MACHINE.
CONGRATULATIONS on your purchase of the Tippmann
“BOSS” hand stitcher sewing machine.
3518 Adams Center Road, Fort Wayne, IN 46806
260/441-9603 • 866/286-8046 • FAX: 260/441-8264
INTERNET: www.tippmannindustrial.com
1
INDEX
Index: Table of Contents....................................................................................... 1
Standard Equipment ............................................................................................ 1
Warning / Liability Statement ............................................................................... 2
Safety Is Your Responsibility ............................................................................... 2
General Description.............................................................................................. 2
Specications ...................................................................................................... 2
Setup Instructions ................................................................................................ 3
Installing the Needle ............................................................................................ 4
Installing Bobbin In Bobbin Shuttle ...................................................................... 5
Threading the Machine ........................................................................................ 6
Threading The Needle ......................................................................................... 7
Drawing Bobbin Thread Up Through Needle Plate ........................................... 7/8
How To Sew.......................................................................................................... 8
Presser Foot Adjustment ..................................................................................... 9
Stitch Length Adjustment ..................................................................................... 9
Schematic View, Detailed Illustration with part numbers ................................10/11
Recommended Thread & Needle Specications................................................ 12
Threading the bobbin...........................................................................................13
Selecting the correct needle.................................................................................13
Adjusting the Stitch (Needle & Bobbin Thread Tension) .................................... 14
Troubleshooting..............................................................................................14-17
Accessories.....................................................................................................18/19
Cleaning and Lubricating The Machine...............................................................20
Warranty & Repair................................................................................................21
• 2 Bobbins
• Assortment of 10 Needles*
• Standard Presser Foot*
• Allen Wrench Set
• Thread Stand
• Bobbin Winder - (Attaches to electric drill)
“Ready to Sew”
• 1/4 lb spool of thread
*See Additional Products & Accessories pages for options.
STANDARD EQUIPMENT

2
1. To Secure machine to existing work bench use three (3) 3/8”
bolts or lag screws of suitable length.
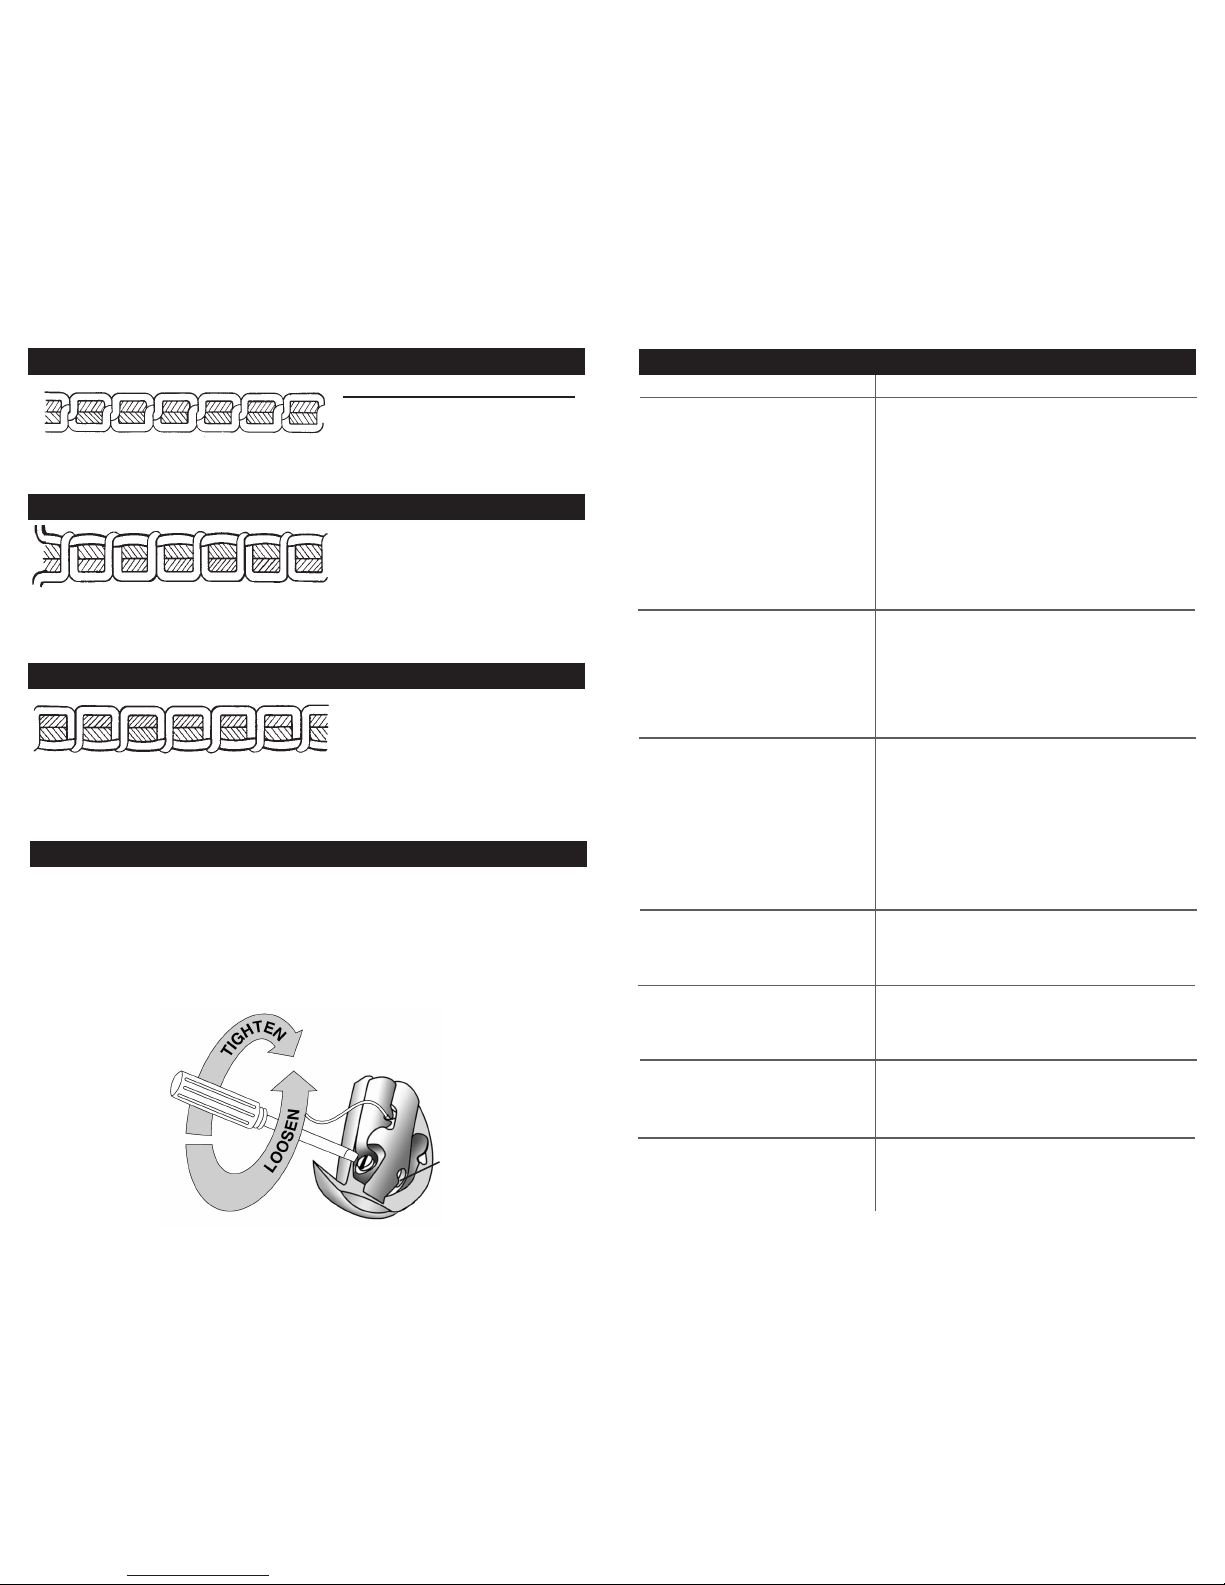
2. Attach the Stitching Handle to
the BOSS. Slide the Stitching Handle
onto the shaft & secure the handle in
position with bolt (AR-73 & 73-1)
3. Attach the Thread Stand.
1) Insert the bolt through the
bottom of the thread stand and the
thread stand post (AR-18)
2) Insert the bolt through the
thread guide and thread stand
plate and carefully start it into
the provided hole on the top of
the sewing machine. Position the
thread guide to allow the thread
to feed into thread guide B un-
obstructed and tighten the bolt to
secure.
CAUTION: Always keep your free
hand clear of presser foot and
needle foot during operation - in-
cluding during the following tests.
• To Check* the Presser Foot Lift:
(*Always be sure the presser foot path
is clear of hands, tools etc.)
With machine secured to a stable work
bench, lift the Presser Foot by
squeezing the Presser Foot Lifting Handle.
The Presser Foot should lift approximately 7/8 inch.
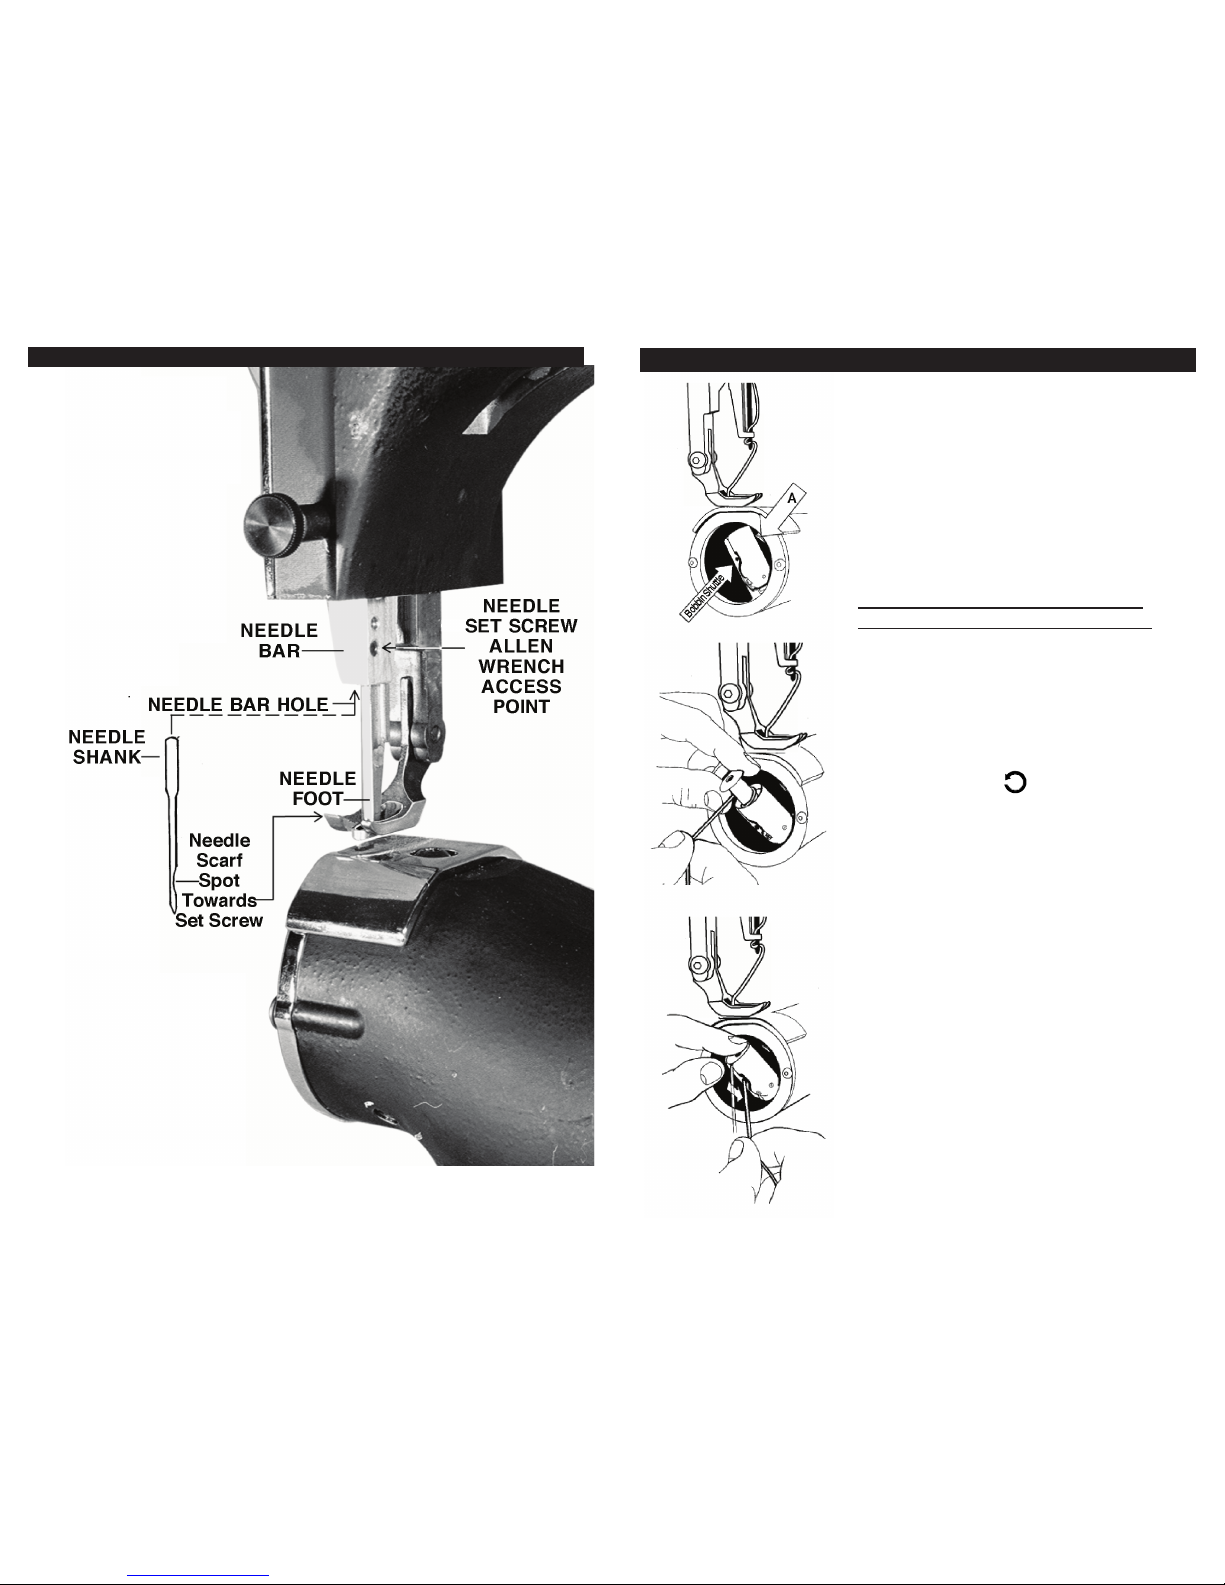
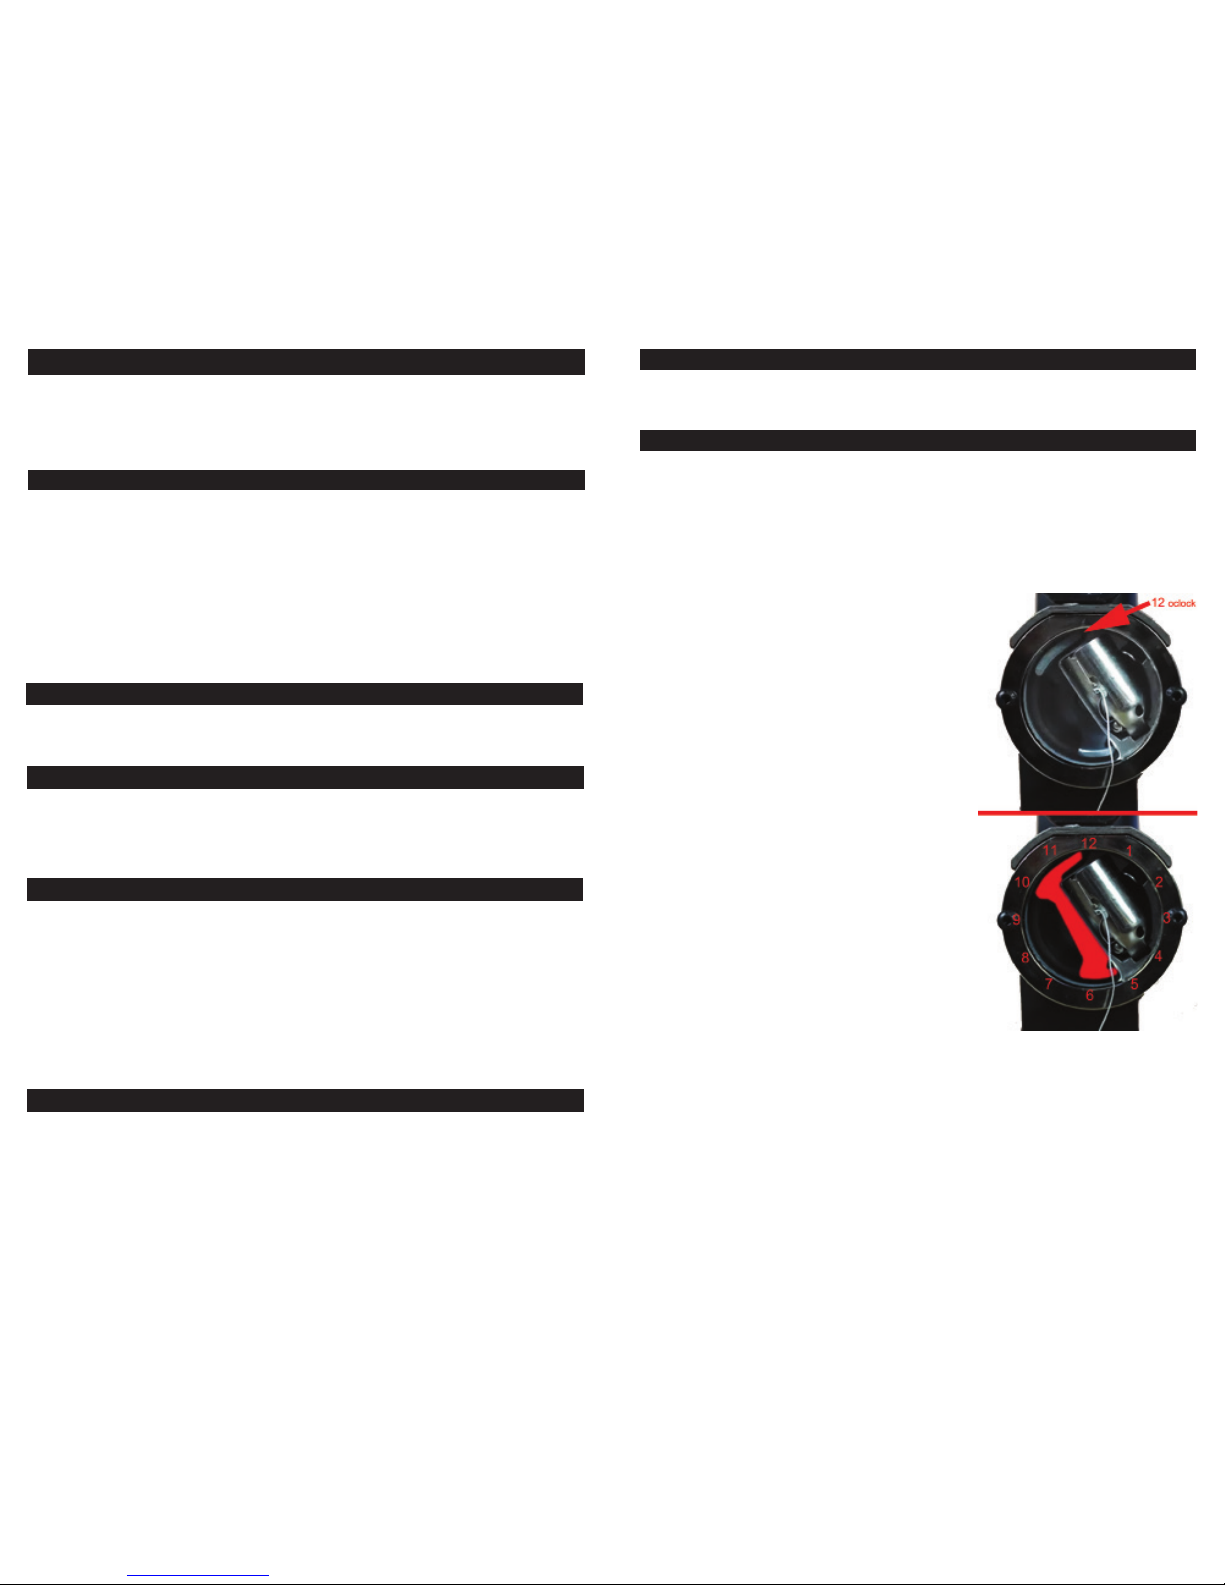
• To Check* the Stitching Handle:
(*Always be sure needle foot path is clear of hands, tools etc.)
With machine secured to a stable work bench, cycle the needle foot,
by pulling the Stitch Handle completely down and then return it com-
pletely to the upright position.
3
This Tippmann “BOSS®” hand stitcher sewing machine is surrendered by Tippmann Industrial
Products, Inc., with the understanding that the purchaser assumes all liability resulting from unsafe
operation. Tippmann Industrial Products, Inc., shall not be liable for personal injury resulting from
the use of this machine under any circumstances.
All information in this manual is subject to change without notice and in no way represents a com-
mitment on the part of Tippmann Industrial Products, Inc. We reserve the right to make changes
and improvements to products without incurring any obligation to incorporate such improvements in
products previously sold.
The ownership of this machine places upon you the total responsibility of its safe operation. You must
observe the same safety precautions as you would any piece of equipment to assure the safety of
not only yourself but everyone around you.
Outlined here are some general precautions to be aware of: the operator should at all times use
common sense when using this machine and be sure others who may operate are also familiarized,
responsible and safety conscious. Do not attempt to operate this machine until you have read and
are familiar with this manual. Common sense includes reading, reviewing and understanding these
written instructions before operating or setting up this machine including but not limited to:
• Before changing needles.
• Before threading needles.
• Before changing bobbin.
• Before disassembly of machine. • Before moving machine.
• Do not attempt to operate this machine until it is securely fastened to a sturdy
work surface.
• Do not operate this machine when parts have been removed as damage to the
machine and/or injury to operator may result.
• Keep hands clear of presser foot and needle at all times.
Make .................................................................................................................. TIPPMANN
Model ......................................................................................................................“BOSS 2”
Type Feed .......................................................................Needle Feed/Lower Needle Guide
Type Stitch .......................................................................................................... Lock Stitch
Type Bed .................................................................................................... 3 “ Cylinder Bed
Throat Depth ...................................................................................................................6.5”
Stitch Cycle Rate .................................. Variable - 1 to 100 Stitches (1” to 15”+ per minute)
Presser Foot Clearance............................................................................................ 7/8 inch
Maximum Sewable Thickness ................................................................................. 3/4 inch
Needle System ........................................................................................794 Series & 7 x 3
Thread Sizes ......................................................................................................... 69 to 415
Stitch Length Adjuster..................................................................... 4 per inch to 16 per inch
Machine Weight ..................................................................................................23 Pounds
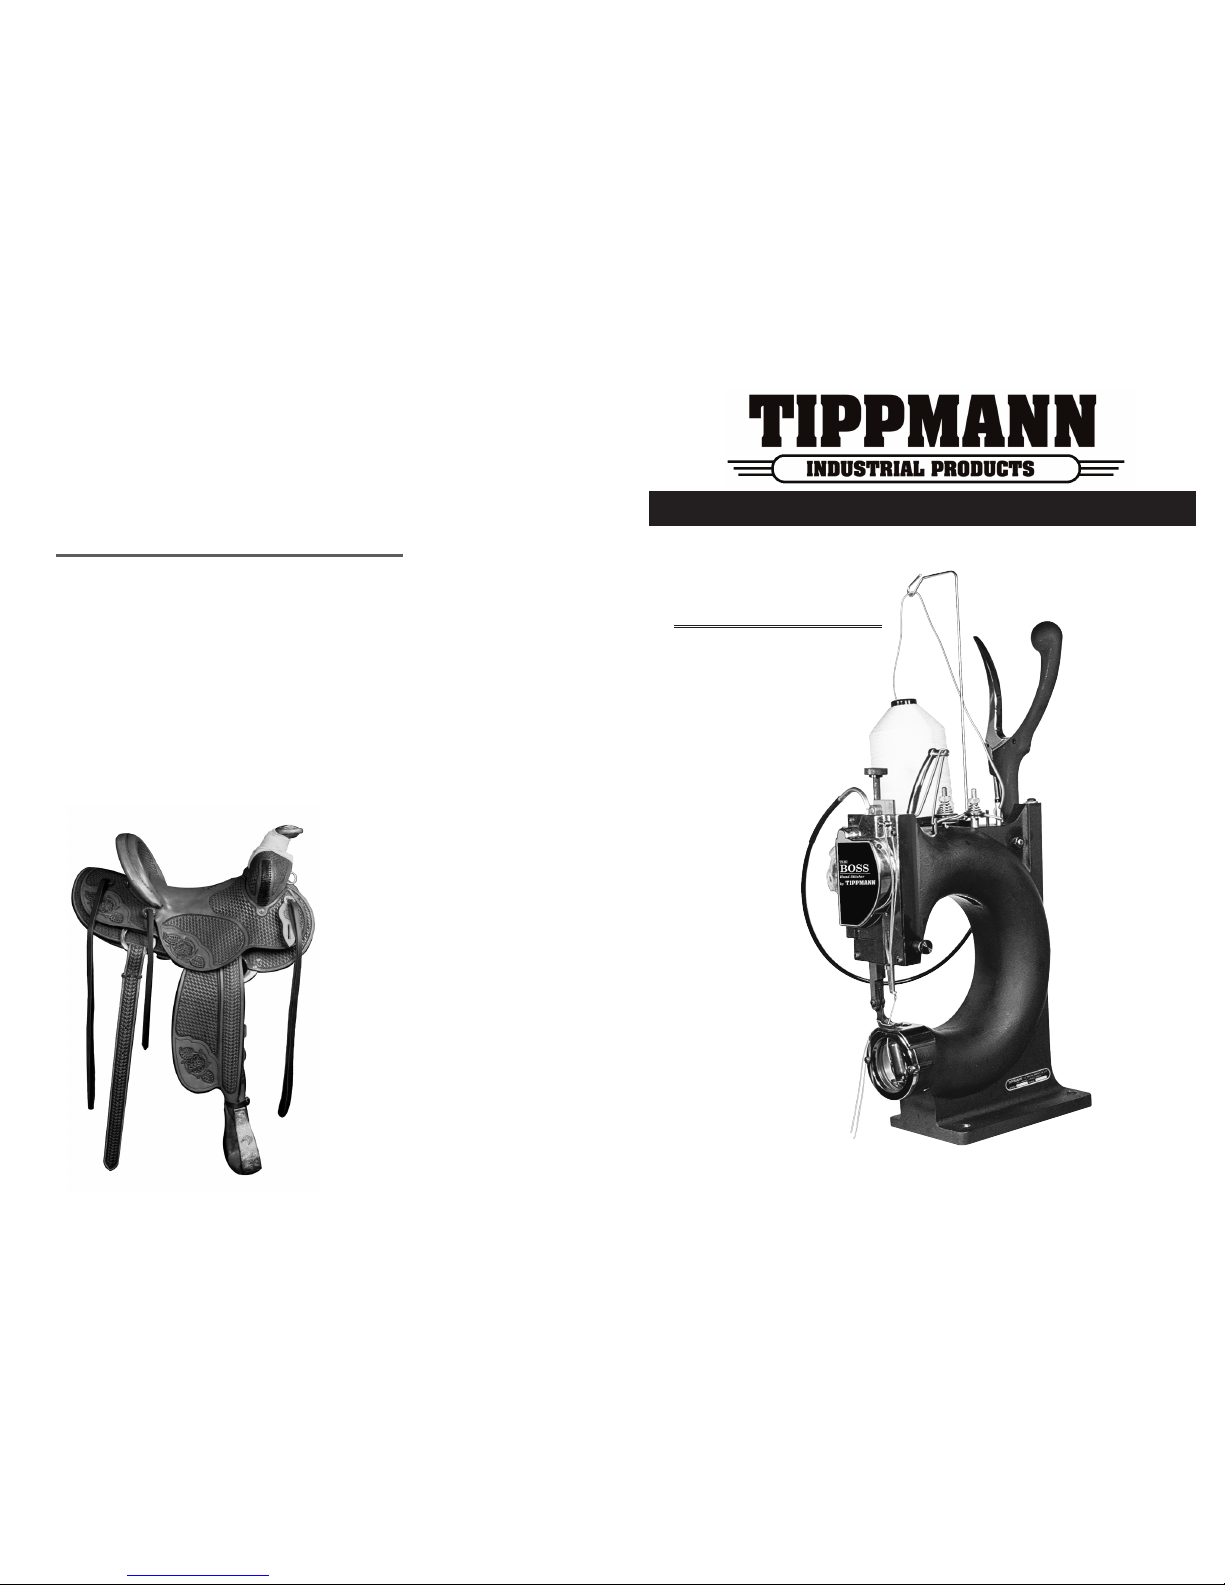
The Tippmann “BOSS” hand stitcher sewing machine is a needle-feed, lock-stitch machine. The
“BOSS” is designed and built to achieve precision quality stitching, extreme durability of the machine
itself and maximum owner satisfaction for many years.
SPECIFICATIONS
GENERAL DESCRIPTION
SAFETY IS YOUR RESPONSIBILITY!
WARNING / LIABILITY STATEMENT SETUP INSTRUCTIONS
AR-73
AR-73-1
LOCK WASHER

4
• Lower the needle foot
by lowering the stitch
handle until the
needle set screw
is visible.
• Loosen needle set
screw with furnished
allen wrench to allow
needle to be inserted
into needle bar hole.
• Insert needle
shank rst,
fully into
needle bar
hole with
scarf spot
facing the
needle
set screw.
• With needle fully
inserted and
scarf spot facing
the needle set screw,
tighten set screw
rmly using the allen wrench
provided with your machine.
5
• Locate the bobbin shuttle in the end
of the cylinder bed. Press the shuttle
release latch to release the bobbin
cylinder (point A).
• Remove the empty bobbin spool
and wind with thread.
Do not ll bobbin to the point that it
has to be forced into bobbin shuttle!
(See bobbin lling instruction sheet in
Tippmann Toolbox.)
• Insert wound bobbin with
6 - 8 inches of thread kept out
counterclockwise as pictured.
• Hold bobbin in place to keep it from
turning. Now pull thread down the
tension spring slit (B) until thread
reaches thread slot in the shuttle.
• Secure shuttle by snapping the bobbin
cylinder back into place. There should
be 6 - 8 inches of thread hanging out
of the Bobbin Shuttle at the end of the
cylinder bed at this point.
Test bobbin tension by pullling on string.
It should pull evenly with 1/2 the tension
of the top string.
INSTALLING THE NEEDLE INSTALLING BOBBIN IN BOBBIN SHUTTLE
*IMPORTANT*

6
Place selected thread on thread stand. Lead thread through all
threading points as shown.
1. Loop thread over thread stand - Thread Guide (A) .
2. Pass thread through 2 holes in Thread Guide (B) .
3. Weave thread around guide post (C) as shown above.
4. Loop the thread counterclockwise once around back side of
Secondary Tensioner Wheel (D) as shown above.
NOTE: Wheel shown from top view.
5. Loop thread clockwise once around the Primary Tensioner
wheel (E) as shown above.
NOTE: Wheel shown from top view.
6. Pass thread through guide post (F) as shown above.
7. Pass thread through Take-up Arm (G) as shown above.
NOTE: The primary tensioner wheel should rotate clockwise
as thread is drawn through the thread take-up arm).
8. Continue thread through thread guide (H) as shown above and
down edge of machine, through needle foot as shown above.
You are now ready to thread the needle. (Above Needle — shown
threaded.) 7
• Pass the thread down through the needle foot then
thread through the needle eye from left to right as shown
in illustration.
• Pull about 6-8 inches of thread through the eye of
the needle.
(Continued on page 8)
THREADING THE MACHINE THREADING THE NEEDLE
DRAWING BOBBIN THREAD UP THROUGH NEEDLE PLATE
STEP 2: Looping bobbin and needle
threads.
• Hold the needle thread lightly to the
rear as shown and cycle the handle (pull
down & up completely one time without
releasing the end of the needle thread.)
This action loops the bobbin and needle
threads together inside the cylinder bed.
If it does not loop, be sure to hold the
thread gently to the rear as outlined in
Step 1 and try again. NOTE: Be care-
ful not to pull the thread tightly or the
loop will not form and the shuttle will
not be able to pass through the loop as
required.
STEP 1:
• Place the thread under the presser
foot and hold very lightly to the back .
*IMPORTANT*
While threading (D), make sure to pull the
thread tight against post (not visible on
outside of disc)

How do I start and nish locking a stitch?
• You will want to make sure that your sewing machine is on a
sturdy work surface before starting any set up or maintenance of
your machine.
• Start on your material about ¼” from where you would
normally start.
• Sew to where you would normally start, then turn your
material around and sew back through the previous holes and
continue on.
Locking A Stitch
• When you are to the end of your stitchline, lift your presser foot
and move back to the 2nd to last hole and stitch again. Then go
back 1 stitch and stitch again. Your stitch is now locked.
8
Adjust the stitch length with the Stitch
Length Adjustor.
• For a larger stitch.
Turn the Stitch Length Adjustor clockwise .
• For a smaller stitch.
Turn the Stitch Length Adjustor
counterclockwise .
• When the material thickness is
increased, the stitch
length shortens.
Length of stitch is proportional to the thickness of
a material. To maintain an even stitch length,
adjust accordingly. Turn the stitch length adjustor
tor approximately 1/4 turn clockwise for 1/4 inch
climb (increased thickness). 9
The Presser Foot Adjustor adjusts the Presser Foot Pressure.
A properly adjusted Presser Foot will
advance the material without slipping.
• Use a piece of the material to be sewn.
• Insert the sample material under the
Presser Foot and sew a couple stitches.
• Observe the test material
during stitching.
- If the material is not advanced by the
Presser Foot, the pressure needs
to be increased.
- If the presser foot leaves a deep
impression on the material, the pressure
needs to be decreased. NOTE: There will
always be a slight impression.
To determine the proper pressure for
the material to be sewn, perform the
following test.
To increase the Pressure.
• Turn the Presser Foot Adjustor clockwise . Re-test as before and
adjust until the material is advanced by the Presser Foot
without slipping.
To decrease the Pressure.
• Turn the Presser Foot Adjustor counterclockwise . Re-test and
adjust until the material is advanced by the Presser Foot without
leaving a deep impression.
STEP 4: Aligning threads to sew.
STEP 3: Drawing up the bobbin thread.
• Lift the presser foot and pull the needle
thread up. The bobbin thread will come
up with it through the needle plate.
• Align both threads under the presser foot
to the back as shown.
• You are now ready to sew.
NOTE: It is necessary to hold thread ends
to begin stitching.
DRAWING BOBBIN THREAD UP THROUGH NEEDLE PLATE
HOW TO SEW:
PRESSER FOOT ADJUSTMENT
STITCH LENGTH ADJUSTMENT
*IMPORTANT*
This step may take a couple of tries.
If not successfull on the 1st try, attempt again.

11
10

13
12
NEEDLE AND THREAD GUIDE
After selecting the desired thread and needle
point, place the thread through eye of needle and
hold the thread as pictured with hands about 10
inches apart. If needle does not slide
freely down the thread,
then you should select
a larger needle.
SELECTING THE CORRECT NEEDLE (RULE OF THUMB)
Groz-Beckert German made needles offer the
highest standard in the industry. Tippmann
stocks over 5000 needles, so you can be as-
sured that they are in stock and ready to ship.
American Efrid has over 115 years of textile
experience and is the industry leader in thread.
Tippmann is proud to distribute A & E thread
and would be happy to send you a free thread
sample kit.
About Tippmann Needles and Thread:
ROUND POINT VS. CHISEL POINT
There are two different styles of needles used in the Tippmann BOSS.
The round point needles are “universal” needles, and work well in just about any
material, including rubber, vinyl, cloth, leather, etc.
The Chisel point needles are used specically for leather. Instead of punching a
hole in the material like a round point, it “slices” through the leather. This can pre-
vent bottom side “blowout” on dry and hard leathers. Chisel point needles are not
recommended for woven fabrics such as nylon halters because it slices the strands
of nylon. If your style of sewing requires a short stitch length (10 per inch or more),
you should not use a chisel point needle because the material can tear from hole
to hole. The round point is better for this application. When ordering needles from
Tippmann, a 7x3 is a Round Point, and a 794 is a chisel point needle.
Note: Change your needle to round point when stitching fabrics other than leather.
Old
size
Tex
Size Yards / lb inches
Z69 T70 F - 7X3110 - 6450 .0090
Z99 T90 - 7X3130 - 4375 .0110
Z138 T135 U-150 - 7X3130 - 3230 .0135
Z207 T210 U-250 3 7x3160 794160 2234 .0180
Z277 T270 U-300 4 7X3180 794180 1615 .0240
Z277 T270 U-300 4 7x3200 794200 1615 .0240
Z346 T350 U-350 5 7X3230 794230 1220 .0260
Z415 T400 U-450 6 7X3250 794230 1060 .0290
Thread size Cord Equivalent
7x3
Needle 794 Leather Needle
Average
Linear Density Diameter
THREADING THE BOBBIN
You can wind the bobbin as you would any bobbin, or you can use
the tooled bobbin winder which operates as pictured on right.
Provided with your “BOSS” hand
stitcher is a tooled bobbin winder
which ts into the end of a drill.
Once secured into the drill, place
the bobbin on its slotted end and
start winding the thread until you
can complete winding the bobbin
with the drill.
Note: As always, be careful when
using power equipment. Do not wind
the thread on the bobbin to the point
that it has to be forced into bobbin
shuttle.
If you do not have your needle package, or
if the kit provided with the “BOSS” is open
or has spilled, you may not know what type
and size of needle you have. In order to
identify your needle,
you will need a magnifying glass or
microscope. You will nd a small inscript-
ion on the side (shaft) of the needle
(e.g. 230 / 26, as shown in the illustration on
the right. The rst three numbers represent
the size of the the needle you will need when
ordering and the last two numbers represent the
size of the needle in metric.

15
ADJUSTING THE STITCH
A PERFECTLY LOCKED STITCH
results with upper and lower tensions
balanced so that needle and bob-
bin threads are drawn into material
equally.
TENSION IS TOO HIGH OR TIGHT
If the knot is laying on top of the
material, the top tension is most likely
too tight. Loosen the two tension
nuts on top of the machine. Loosen both nuts the same amount, making 1/2
turn adjustments until the knot is centered in the material. After adjusting,
make 3-4 full stitches to see the change in tension.
TENSION IS TOO LOW OR LOOSE
If the knot is laying on the bottom of
the material, the top tension is most
likely too loose. Tighten the two ten-
sion nuts on top of the machine. Tighten both nuts the same amount, making
1/2 turn adjustments until the knot is centered in the material. After adjust-
ing, make 3-4 full stitches to see the change in tension,.
ADJUSTING THE BOBBING TENSION
*IMPORTANT*
Only adjust the bobbin if absolutely necessary. Rarely will you need to adjust
tension on the bobbin shuttle. if you are unable to get the stitch correct by
adjusting the top tensioners, you may need to adjust bobbin tension. To adjust
tension, loosen the locking screw. You can then increase or decrease tension
on the bobbin string by turning the adjustment screw. For most materials, you
need less than half the tension of top string thread.
TROUBLE SHOOTING
PROBLEM POSSIBLE CAUSES
My machine is skipping
stitches
1. Timing
2. Check your needle vs thread size
3. Needle plate adjustment (see pg. 16)
4. Needle orientation
5. Bent needle
6. Bad needle
7. Take up bracket (see pg. 16)
8. Presser foot tension (see pg. 16)
9. Takeup spring tension (see pg. 16)
My string is tangled
underneath my material.
My machine is fraying /
splitting / breaking thread
1. Make sure that you are completing
your stitch. (see pg. 16)
2. Timing
3. Take up bracket
4. Take up spring tension
1. Burr on needle plate, needle foot (see pg. 16)
2. Needle plate
3. Need to replace needle
4. Tension is too tight
5. Not threaded correctly
6. Needle positioning
7. Timing
My machine keeps
breaking needles
1. Needle plate
2. Timing
3. Needle is not seated properly
I am marking my leather up
too much
1. Presser foot tension
2. Style of presser foot
3. Presser foot needs to be buffed
My machine is not advanc-
ing or feeding.
1. Stitch length adjustment
2. Presser foot tension
3. Presser foot needs to be buffed
My foot is catching on
my material.
1. Are you using correct foot
2. Place a piece of duct tape over
needle plate insert
14
LOCKING SCREW

17
16
NEEDLE PLATE ADJUSTMENT
STEP 1: Loosen needle plate screw
STEP 2: Center the needle in SM-11-1 needle plate insert
STEP 3: Tighten screw
TAKE UP BRACKET ADJUSTMENT
STEP 1: Loosen bolt
STEP 2: Push the handle all of the way up
STEP 3: Rotate the bracket until it touches the take up lever
STEP 4: Tighten bolt
STEP 5: Pull the handle down and then push it back up. Hold the
handle up with your right hand, check for up and down play
on take up lever. The play should be 1/16” or less.
PRESSER FOOT TENSION
STEP 1: Tighten presser foot tension until the material
feeds correctly.
TAKE UP SPRING TENSION
If take up lever “falls” when you pick it up. (serial #s 2300-9500)
STEP 1: Loosen the nut on the nut on front
STEP 2: Tighten the shoulder bolt
COMPLETE YOUR STITCH
*IMPORTANT*
The “BOSS” Sewing Machine is dependent on the user pulling the
handle all of the way down and then pushing the handle all of the
way back up, for every stitch. The machine will bind up, skip stitch-
es, and generally frustrate the user if you don’t make a complete
stitch. This is a common mistake when rst using the machine, or
attempting to go too fast.
REMOVING BURRS
STEP 1: Check your needle foot, presser foot, needle plate, bobbin
shuttle, shuttle tension screw, and retainer shuttle for burrs.
STEP 2: Remove burrs with 240 grit sand paper or emery cloth.
BUFF PRESSER FOOT
STEP 1: Using a bufng wheel or sandpaper, round the hard edges
which are making the marks.
FINE TOOTH TIMING ADJUSTMENT
*Loosen bolt 1 turn. Do not remove the bolt.
NOTE: If you do remove the bolt, see regular timing
instructions for replacing gear rack.
*After you loosen the bolt 1 turn, raise or lower the gear rack
to nely tune the machine.
STEP 1: Locate the AR-42 Shuttle Driver
(Figure A.) When the stitching handle is all
the way up, the tip of the longer tine of the
AR-42 Shuttle Driver (shown in red in Figure B)
is at Top Dead Center, or 12 O’clock. If it is
not, disengage the CAR-08 Gear Rack “from”
the AR-05 Shuttle Gear and rotate the AR-04
Bottom Shaft.
STEP 2: Re-Engage the Gear Rack from
the AR-05 Shuttle Gear and rotate the
AR-04 Bottom Shaft.
STEP 3: Re-Engage the Gear Rack and
shuttle Gear and check timing again.
STEP 4: Once your Shuttle Driver is in the
correct position with the Stitching Handle
all the way up as shown in (Figure B), you
can replace the needle and dust cover and
put the gear rack keeper back in place.
A.
B.

19
18
SM-16-3 SM-16-4
Fleece &
padded
material
foot
SM-16-2
SM-16-5
SM-52: single
Left
presser
foot
Right
presser
foot
Center
presser
foot
Thread bobbins
SM-52-5 5 pack
SM-55
Stirrup
Attachment
CMG-1
Material Guide
Attachement
(retractable)
CSM-38 HS-60
Flatbed Attachment shown with
HS-60 Flatbed Material Guide.
(iincluded with this item)
Flatbed Attachment Flatbed Material Guide
Needle........................794160
Needle........................794200
Needle........................794250
Needle.......................7x3110
Needle.......................7x3130
Needle.......................7x3160
Needle.......................7x3180
Needle.......................7x3200
Needle.......................7x3230
Needle.......................7x3250
Chisel Point Needles Round Point Needles
SM-140 SM-141
Thread Lube Box
Lube Box is hinged to allow for easy
thread insertion. Lube sold separately.
Dyno silicone thread
lubricant
• Container size 1 pt.
* Chisel Point Needles are used specically for
leather crafting while round point needles can
be used for about any material, including
rubber, vinyl, cloth, leather, etc.
CHS-210
Wood Cobblers
Bench • Includes Steel
Riser.
Thread:
1 lb. Spools
Colors:
• White
• Natural
• Brown
• Dark Brown
• Black
Sizes:
• z69
• z99
• z138
• z207
• z277
• z346
• z415

21
20
WARRANTY AND REPAIR POLICY
Tippmann Industrial Products, Inc. is dedicated to providing you with
the precision manufactured Tippmann “BOSS®” hand stitcher
sewing machine and the quality support necessary for the utmost
satisfaction in its use. In the event that warranty or other non-war-
ranty related repairs are required, we are here for you. We are open
Monday - Friday - 8:30 to 5:00 Eastern Time. You can also email us.
will respond to your question on the next business day.
For assistance with warranty and repair, call 260-441-9603
WARRANTY STATEMENT
Tippmann Industrial Products, Inc. warrants that this product is
found free from defects in materials and workmanship for a period
of 1 year from the original date of purchase by the initial owner/pur-
chaser. On claims submitted as outlined in “WARRANY OR RE-
PAIR PROCEDURE” Tippmann Industrial Products, Inc. will repair
or replace, without charge, any parts that have failed trhough defect
in material or workmanship.
WARRANTY OR REPAIR PROCEDURE
For warranty and non-warranty repair, after contacting Tippmann
Industrial Products, Inc., ship or deliver your sewing machine or
specic parts to Tippmann Industrial Products, Inc., with a brief
statement regarding the requested repair, your name, address and
telephone number where you can be reached during normal busi-
ness hours, if possible.
SHIP TO:
TIPPMANN INDUSTRIAL PRODUCTS, INC.
3518 ADAMS CENTER RD,
FORT WAYNE, IN 46806
CLEANING AND LUBRICATING THE MACHINE
Your Tippmann “BOSS” should always be kept clean from lint and
dust buildup to ensure proper operation. Periodically check the
external and internal components of the machine to remove any
buildups which may have occured.
• After cleaning any lint or dust buildups, place a drop or two of oil
at the wear points such as those indicated below.
NOTE: Use a quality sewing machine oil when oiling the “BOSS”
Other manuals for BOSS
2
Table of contents