TIRE MINDER TM55 User manual

The Minder Research, Inc.
3000 SE Waaler Street
Stuart, FL 34997
772 463-6522
info@MinderResearch.com
www.MinderResearch.com

Wireless Tire Pressure
Monitoring System
for cars, light trucks
and SUVs

The TireMinder® TM55™ TPMS Operang Manual
Table of Contents___________________________________________Page
Congratulaons and Overview…...................................…………………………………....... 2
So Let’s Get Started.............……………….……............................................................... 3
1) Understanding the Monitor ……………………………….............................................. 3
2) Aluminum or Brass Valve Stems?………………………………....................................... 5
3) Seng the Baseline Pressures……………………………………...................................... 6
4) Baery Installaon.........………………………………………………………........................... 7
5) Mounng the Tranmsiers…………………………...................................................... 7
6) Convert to “Learn Mode”…………………………………………........................................ 8
7) Replacing a Single Transmier…………………………………………….............................. 11
8) Auto Sleep Mode and Power O…………………………………………............................. 12
9) Power On…………………………………………………………................................................. 13
10) Low Baery Indicator……………………………………………………………........................... 13
11) Accuracy of Pressure Gauges and TPMS………………………….................................. 15
12) Mutliple Alerts............…………………………………………………………............................. 16
13) Technical Specicaons……………………………………………......................................... 21
14) TireMinder® Limited Warranty………………………………………………........................... 23
15) Contact Info and Kit Includes............................................................................... 24
“Be Safe on the Road”™ 1

Congratulaons, you’ve done your homework and decided on the best TPMS on the
market (Trailer Life and Motor Home Magazine’s “Reader’s Choice” Gold awards). If
you have read any “User Comments” on various web sites, you will know that it’s not
just the product that got us the award. Minder has outstanding customer service.
If you have a queson or problem, call or write. You’ll quickly become a believer.
The Minder Team
Overview
The TireMinder® TM55™ Tire Pressure Monitoring System (TPMS) allows for
constant monitoring of a vehicle’s Tire Pressure & Temperature. The system can
receive wireless informaon from up to 5 wheels. Various levels of warnings are
issued for pressure changes (under & over), high temperatures
and low baery status.
We realize people rarely read instrucons.
The TM55™ is a highly sophiscated product which requires unique programming and
understanding. Do everyone a favor – read on!
#1 Rule Antenna Up! 2

So Let’s Get Started
Don’t put the transmiers on the res (yet).
1) Understanding your Monitor
The monitor should be parally charged so you can start
programming right away. Press and release the
center buon to turn it on.
1.1) Charging
If the unit does not light up immediately, simply plug it into a live 12 volt power outlet
using the cigaree lighter adapter or the USB cable to any USB port. You may work
with the unit while is charging or aer 15 to 20 minutes, it will have sucient power
to do a complete installaon without being plugged in.
Monitor Baery Status
When only one bar is visible or if the icon ashes and beeps,
it is me to recharge the monitor. An eight hour (or overnight)
charge is recommended. This should be sucient for more
than two weeks of operaon (this depends on how many hours
per day the unit is acve). 3

1.2) Units of Measure (PSI/kPa – °C/°F)
The monitor is set up to measure in PSI and ᵒF.
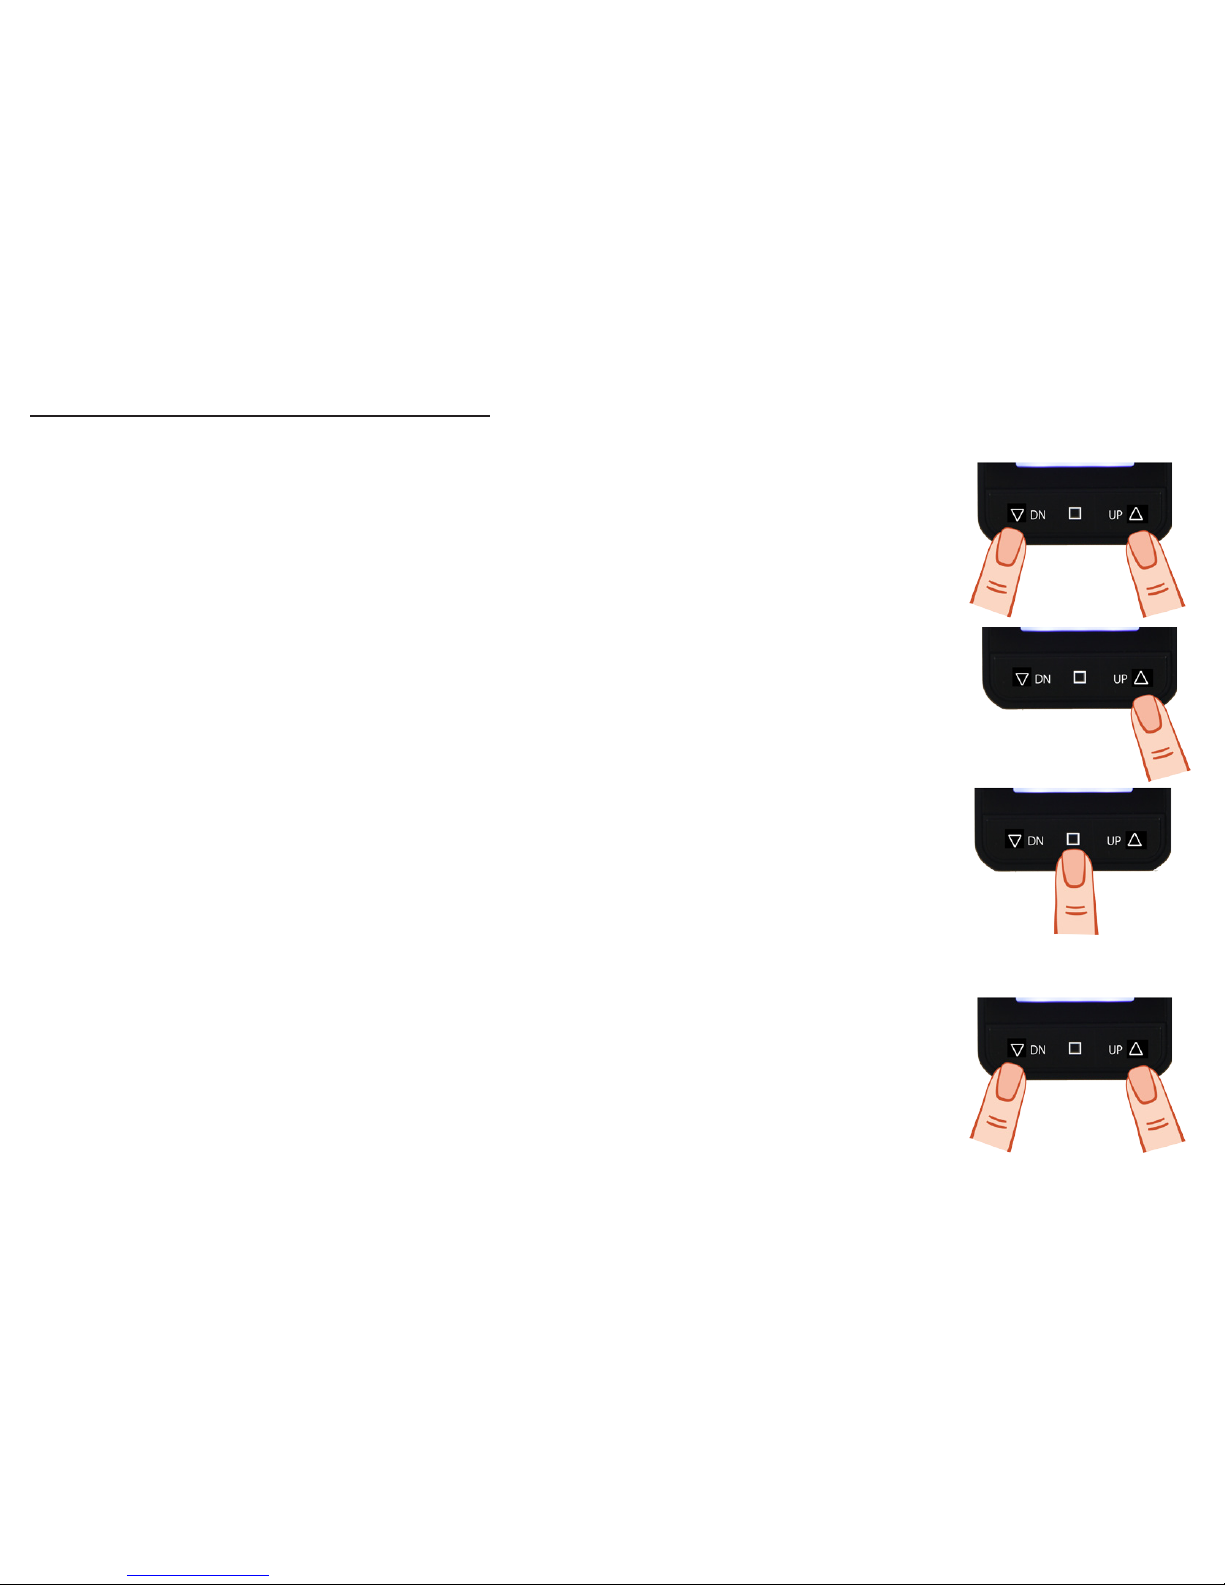
To switch units, simply press the DN or UP buon while in the monitoring mode.
1.3) Three Monitor Modes
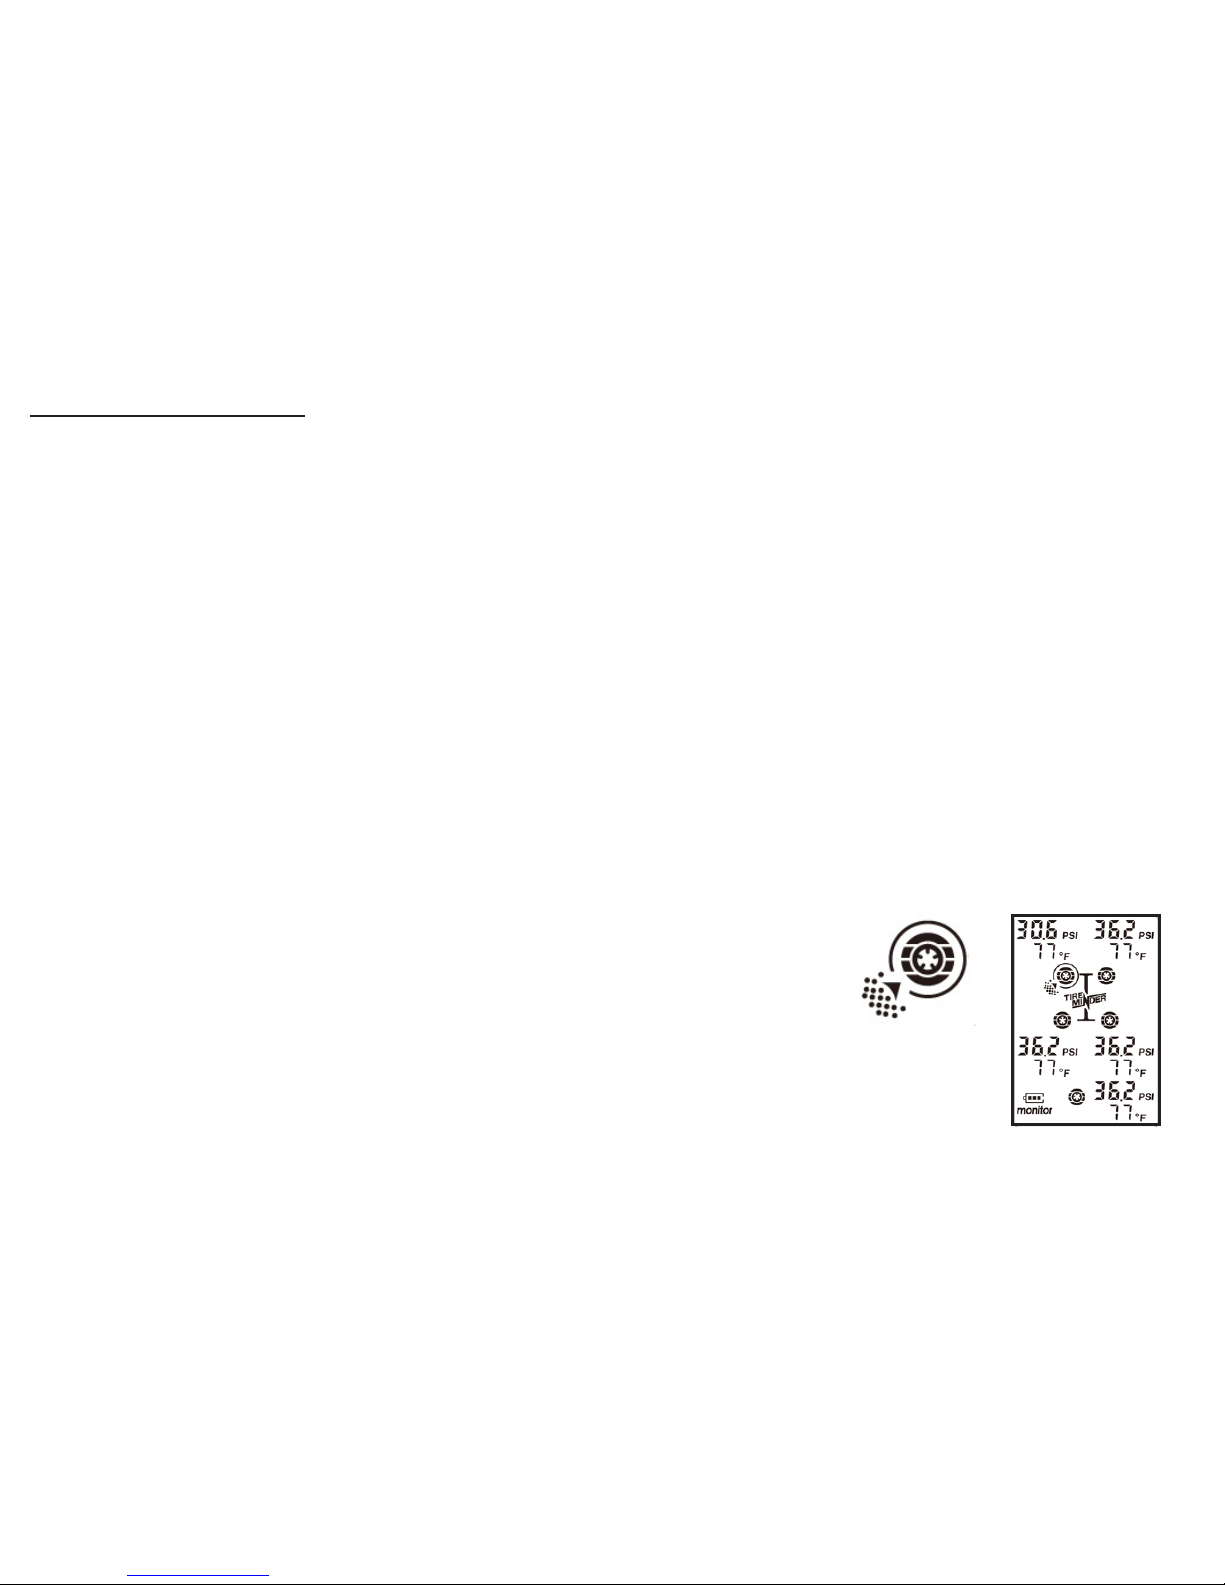
a) Monitoring Mode - You will be in the “Monitoring Mode” 99%
of the me. All wheel posions are shown displaying pressures
and temperatures. Pressing and releasing the center buon turns
on the white backlight.
Pressing the DN or UP buons changes the units of measure
(psi/kPa/°C/°F).
b) Pressure Seng Mode – One of the 5 wheel posions
is ashing. Pressing the DN or UP buon raises or lowers
the pressure next to that posion. This is used when seng
the baseline (cold) pressures you would normally run in
your res. To enter this mode, (from the “Monitoring Mode”),
press and hold the center buon for 5 seconds. The le
front re posion will ash showing a pressure (36.2 psi
if new). See secon 3.
4

c) Learn Mode– This is only used for inial installaon or when changing
transmiers. In this mode, you “marry” the transmiers to individual wheel
posions (there’s just got to be a beer word???)! To enter the “Learn mode,” (from
the “Monitoring Mode”), press and hold the DN and UP buons
for 5 seconds. The le front posion will ash. If a transmier
has not been installed, you will see a solid RED light. If a
transmier has been installed, the light will be GREEN. See secon 6.
2) Aluminum or Brass Valve Stems?
We hope you purchased the correct system for your vehicle. There are two basic
TM55™ kits. One comes with brass transmiers (TM55-B) and the other with
aluminum transmiers (TM55-A). The determining factor lies in the type of valve
stems found on your car, SUV or truck. If the valve stems are rubber with brass
threads, then you need model TM55-B. If your valve stems are metal with a dull
silver color, then you need model TM55-A. These laer aluminum valve stems are
only found on newer vehicles with factory installed Tire Pressure Monitoring Systems
(TPMS). If you plan to order a 5th transmier for your spare re, be sure to order the
correct one.
Do not put transmiers on the res (YET). 5

6
3) Convert Monitor to “Pressure Seng Mode”
Seng the Baseline pressures (0 to 80psi)
3.1) From the “Monitoring Mode” (1.3a) press & hold the
center buon for approximately 5 seconds. Release the
center buon when you hear the beep.
3.2) All 5 re posions will show 36.2 psi (if the monitor is new). The le front re will
be ashing.
3.3) Press DN or UP buon unl you see your desired “cold
pressure”. This should be what is recommended by the vehicle
manufacturer and is usually found on the driver’s side door
jamb (NOT ON THE TIRE).
TIP: Holding the DN or UP buon will make the numbers change rapidly.
3.4) Press and release the center buon to move to the next re
posion.
Repeat step 3.3. Do this for all 4 (or 5) posions.
3.5) To EXIT, press and hold center buon for approximately
ve seconds. Display will “beep” and revert to the “Monitoring Mode.”

4) Baery Installaon
Your monitor is now ready to receive informaon from each
transmier. In order for this to happen, you will need to install
the CR1632 lithium baeries.
Look at the illustraon. Note that the baery slides UNDER the aluminum “bridge”,
“clip” or “bracket”. Do NOT place it on top!! Be sure the plus (+) side is UP. Incorrect
inseron may burn out the circuit or break the solder connecon.
The cover should be nger ght (snug) so as to remain waterproof. Please, DO NOT
use pliers and a pipe wrench! Over ghtening will damage the O-ring.
Be sure to send in your warranty card to register for our FREE baery exchange
program (details under Secon 14).
5) Mounng the Transmiers (nally!!)
We are about to start mounng the transmiers on your vehicle. Keep the following
in mind.
TIPS:
• First, air up your res to the baseline pressures you set in Secon 3. 7

• Check that valve stem threads are not scratched, rusted or damaged.
• Once a transmier is mounted on the valve stem, be sure it does not touch any
solid poron of the wheel or hub cap.
• As TireMinder® transmiers weigh less than an ounce they should not aect re
balance.
• Even though we prefer metal valve stems, TireMinder® transmiers may be used
on wheels equipped with rubber valve stems. Consider going to metal the next
me you buy new res.
• Remember that once transmiers are learned to a re posion, they are “married”
to that re posion (there’s that word again). Mark your transmiers before re
rotaon so they can return to the learned posion.
• The locking rings are there if you really really need them. They do not aect the
operaon of the system. They make good sinkers!
6) Convert Monitor to “Learn Mode”
6.1) From “Monitoring Mode” (1.3a) press and hold
DN and UP buons simultaneously (that’s like at the same
me – EH?) for approximately 5 seconds. Release the
buons when you hear a beep. 8

6.2) If the monitor is new, the le front posion will ash with a solid RED LED
illuminated. There will be no pressure or temperature readings “- - - PSI.”
6.3) Mount any transmier (FINALLY!!!) at the ashing locaon
indicated on the screen. The LED will turn GREEN and the
PSI/temperature will be displayed within 30 seconds. If the screen
has gone dark (at any me), simply press and release the center buon
to see the numbers.
If synchronizaon is not achieved (light stays red), remove the transmier for 10
seconds and re-mount. It’s also a good idea to have the monitor close by with
ANTENNA FULLY EXTENDED.
6.4) Press the UP buon to move to the next posion.
Repeat steps 6.3 and 6.4 unl all 4 (or 5) transmiers have
been installed.
6.5) Aer having seen 4 or 5 green lights, Exit the “Learn Mode”
by pressing and holding the DN and UP buons for approximately
5 seconds unl you hear a “beep.” 9

The system is now in the “Monitoring Mode.” You will see all of your res displayed
with the current pressures and temperatures. There should be no GREEN or RED light
at the top.
Press the center buon to illuminate the screen.
The UP or DN buons will only change the units
of measure.
For now, you are ready to roll. Mount the monitor where it does not obstruct your
view of the road. The TM55™ antenna is an integral part of the unit and should be
fully extended at all mes!
The rest of this document contains important operang informaon. We suggest
you “scan” through it. Some secons will apply to your situaon either now or in the
future.
PLEASE DON’T LOSE these instrucons. If you do, just visit www.MinderResearch.com
for a copy.
Remember: Antenna UP! 10
11
7) Replacing a single transmier
If you need to replace a single transmier, rst enter the “Learn Mode.”
From the “Monitoring Mode,” press and hold the
DN and UP buons unl you hear a “beep.”
Press and release the UP buon unl you get to the re
posion you wish to replace.
Press and hold the center buon unl the green LED light
at the top of the monitor turns to red with a “- - - PSI.”
Aach the new transmier (assumes you already removed the
old transmier). The LED should turn green within 10 to 15 seconds.
Exit the “Learn Mode” the same way you entered, press
and hold both the DN and UP buons unl you hear a “beep.”
Voila, your new transmier is installed!

8) Auto “Sleep Mode” and Manual Power O
It is not necessary to power o the system as it will shut itself down in “Sleep Mode”
aer 15 (een) minutes of no acvity. “No acvity” means the vehicle is not moving
and there is nothing (or no one) moving about.
The monitor is vibraon sensive and will re-start automacally when you re-enter
the vehicle.
To manually turn o the system
From the “Monitoring Mode,” press & hold the center buon
unl the screen goes completely blank. This will take about
10 seconds.
TIP: The unit will enter the “Pressure Seng Mode” aer 5 seconds at which me
you will see the baseline pressure for your le front re. Connue to hold down the
center buon unl the screen goes completely blank.
To turn the system back on, just simply press and release the
center buon.
12

13
9) Power On
Press and release the center buon to turn on the monitor.
The unit will now start to search for updated informaon. The
readings you see will be in the memory of the monitor from when it was
last turned o (night before, the week before or whenever it was last acve.) It will
take approximately 20 minutes to update all pressures and temperatures.
TIP: If when you press the center buon the unit does not light up, it simply needs to
be re-charged.
10) Low Baery Indicator (Monitor and Transmier)
10.1) Monitor Baery
The TM55™ monitor has a built-in Lithium-Ion rechargeable baery which under
normal use will funcon for over 2 weeks before requiring a re-charge. The level of
charge is displayed in the lower le of the monitor. You may recharge the unit at any
me if you feel it may be necessary.
If the last bar disappears, the unit will beep several mes and the baery icon will
ash. If you don’t plug it in soon, the monitor will shut down completely.

14
To re-charge, simply use the supplies 12/24V USB car charger.
A full charge takes approximately 8 hours using a cigaree type outlet. If using a USB
power outlet, the me required may be more or less depending on the power of the
outlet.
10.2) Transmier Baery & “no S (5)”
Is your Antenna Up?
This alert indicates the transmier has lost contact with the monitor. If you see an
outline of a ashing baery icon below the temperature line next to the re posion
with the problem then it is me to replace the CR1632 in the transmier.
If you have a voltage meter available, you may check the voltage which should be
3.0 volts or higher. If it’s under 3.0v and the system is older than 9 months, replace
all the baeries on all your transmiers at the same me. If the voltage is above 3.0,
then the loss of signal may be due to electronic interference.
Contact a TPMS specialist at Minder Research to discuss the problem.

11) Accuracy of Pressure Gauges and TPMS
No (reasonably priced) pressure gauge is going to be 100% accurate. Likewise, NO
TPMS is going to be 100% accurate. What’s important is that they are reasonably
close and relavely consistent. You engineers and pilots probably have steam coming
out of your ears aer that last statement!!
Maybe this will help…
• The TireMinder® transmiers are accurate to ± 3% (that’s +/- 1psi on 32 psi res!)
• TireMinder® brand pressure gauges (mechanical or digital) are among the most
accurate on the market at ± 2 psi.
So if you are running 32 psi in your res, you could have a gauge reading 2 psi high
and a TPMS transmier reading 1 psi low leaving a dierence of 3 psi. This is not
uncommon and is considered totally acceptable. Keep in mind, many gauges can be
o by 4 or 5 psi!
What is important to understand is that the TireMinder® TM55™ (and any other
brand for that maer) is designed to warn you of changes. For exmple, on a 32psi
baseline re, theTPMS really does not care whether it starts at 35 psi or 29 psi. It is
the change and deviaons from the baseline you need to know about. 15
12) Mulple Alerts
The TireMinder® TPMS monitors re pressure & temperature in real me (that’s like
every 6 seconds). To save baery power, the REGULAR pressures and temperatures
are updated on the monitor every 4 minutes if a change has occurred. Should an
abnormality occur, the monitor will react within 6 seconds. There are mulple levels
of alerts which vary in style & intensity depending on the severity of the abnormality.
Alerts are acvated whether moving or staonary.
Above all else folks, DO NOT PANIC! Also, the DRIVER SHOULD NEVER try to gure
out what the problem is. Let your husband (or wife), co-pilot, navigator, partner,
etc., look at the monitor or simply wait for a convenient me to carefully pull o
the road. At that me, check the monitor to see which re posion is causing the
alert and why. Nine out of 10 mes it will be due to a pressure change (15% below
or 20% above the baseline you set in Secon 3).
12.1) Rapid Air Loss (Blow Out)
If you have never seen this icon, simply loosen a transmier.
The below descripon will happen. Make a mental note of what
it looks like. If convenient, why not do that right now ?
This is the most important alert to watch for and requires correcon ASAP. 16

Condion: A re losses 3 or more psi in less than 2 minutes.
Alert Descripon:
• Audible “Beep” 15 mes
• White LCD screen lights up and stays lit for 5 minutes
• RED LED ashes as does the oending re posion
• “Blow Out” icon appears next to the oending re posion
• Digital re pressure ashes – you will see the psi number go down as the re
connues to lose pressure.
Acon Required:
If you encounter this alert while driving, cauously bring your vehicle to a safe,
o-road locaon to check the oending re.
12.2) Semi Rapid Air Loss
Condion: A re loses 6 or more psi in 2 to 10 minutes.
Alert Descripon:
• Intermient “Beep Beep”
• Red LED ashes as does the oending re posion
• Tire posion icon ashes
• Modied “blow out” icon ashes
• Digital re pressure ashes and shows remaining psi 17

This warning would most oen occur should you pick up a nail or sharp object punc-
turing the re causing a semi-rapid air loss. This alert may also be acvated due to a
rapid drop in temperature causing a corresponding drop in pressure.
Acon Required:
Cauously bring the vehicle to a safe o road locaon and check the oending re.
12.3) Normal Pressure Loss
Condion: Over a long period of me, pressure in a specic re
has dropped 15% below the “baseline” pressure you set up for
this posion. Example: You originally set up the system for this
re to contain 35 psi. If pressure drops to 29.7 psi (15% loss), the
system will issue an alert.
Alert Descripon:
• Intermient “Beep” for 5 (ve) minutes.
• Tire posion icon will ash and display lower than normal pressure
• Pressure icon (circle beside oending re) will ash and show 75% full
• To turn o the alert, press CENTER buon. If the abnormality is not corrected, the
alert will re-acvate aer 1 (one) hour.
Acon Required:
Monitor the pressure and bring it up to normal soon. 18
This manual suits for next models
1
Table of contents
Other TIRE MINDER Automobile Accessories manuals

Popular Automobile Accessories manuals by other brands


Rightline Gear
Rightline Gear 100605 Setup guide

SeaSucker
SeaSucker SX6150-SS-MonkeyBars installation instructions

Cruz
Cruz Evo Rack Alu A32-170 Assembly instructions

Whelen Engineering Company
Whelen Engineering Company SA315 installation guide

MotoTote
MotoTote MTX Series Intended Use and Limitations

SCC
SCC Alloy Radial Chain Installation and Removal Instructions


