TKB Home TZ75 User manual

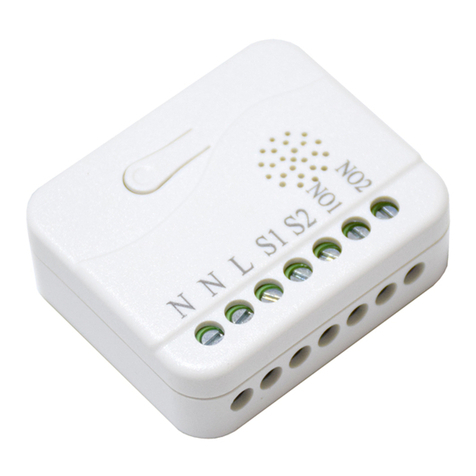
TZ75 Roller shutter controller
-1-
On/off knob
LED indicator
Note: This module must be"Included in the network" , and suitable forwhere it will be
permanently installed. The proper operation of this node in the mesh network is
dependent on it knowing it's location with respect to other nodes. You can not
"test bench" configure this module, then install.
The in-wall Roller Shutter Controller is designed to switch rise/lower roller shutter
connected to its terminals using radio waves, controllers and a push button directly
connected to this Roller Controller.
TM
The in-wall Roller Shutter Controller is a transceiver which is a Z-Wave enabled
TM
device and is fully compatible with any Z-Wave enabled network. Slim design let
the Controller can easily hide itself into the wall box and that will be good for the
house decoration.
The new smart relay calibration technology can reduce the inrush current caused by
the load and let the module work perfectly with many kind of Roller Shutters.This
in-wall Roller Shutter Controller is able to detect position of the Shutter by using the
patterned power measuring method, so it can be remote controlled not only fully up

-3--2-
or down, but also can be adjusted to ex. 30% or 50%. And when manual controlled by
push button, the controller also can memorize the position and send the new shutter
position to its controller (ex. IP-Gateway).
TM
Adding to Z-Wave Network
In the front casing, there is an on/off button with LED indicator which is used to stop
motor stalling or carry out inclusion, exclusion, reset or as so ci at io n. Wh en first
power is applied, its LED flashes on and off alternately and repeatedly at 2-second
intervals. It implies that it has not been assigned a node ID and can not work with
Z-Wave enabled devices.
The table below lists an operation summary of basic Z-Wave functions. Please refer
TM
to the instructions for your Z-Wave certificated primary controller to access the
setup function, and to include/exclude/associate devices.
function Description LED Indication
No node ID
Add
Remove
The Z-Wave controller does not
allocate a node ID to the switch.
1.Have Z-Wave controller entered
inclusion mode.
2. Pressing On/Off button three times
within 1.5 seconds will enter inclusion
mode.
1. Have Z-Wave controller entered
exclusion mode.
2. Pressing On/Off button three times
within 1.5 seconds will enter exclusion
mode.
1-second on,1-second off
Press for on
Release for off
Press for on
Release for off
function Description LED Indication
Reset
Association
Node ID has been excluded.
1. Pressing On/off button three times
within 1.5 seconds will enter inclusion
mode.
2. Within 5 second, press On/Off
button again for 1 seconds until LED
is off.
3. IDs are excluded.
1. Have Z-Wave controller entered
associaton mode.
Or Pressing On/Off button three
times within 1.5 seconds will enter
association mode
2. There is only one group for the switch
(it can associate max five devices)
LED twinkle once
Press for on
Release for off
LED twinkle once
Press for on
Release for off
Including a node ID allocated by Z-Wave controller means Add. Excluding a
node ID allocated by Z-Wave controller means Remove.
Failed or success in including/excluding the node ID can be viewed from the
Z-Wave controller.
Association: it can be associated by Z-Wave devices with association
Use the"Reset" procedure only in the event that the network primary controller
is missing or otherwise inoperable

The group identifier is "Group 1".
Association group info report command class
Profile: General lifeline (Profile MSB=0,Profile LSB=1)
Association group name report command class
Group 1: lifeline
LED Indication
To distinguish what mode the TZ75 is in, view from the LED for identification.No matter
up or down, close or open, Led will flash every two seconds while Motor activate.
Under normal operation, when the TZ75 has not been allocated a node ID,the LED
flashes on and off alternately at 1-second intervals. By pressing S1,S2 0r Include button,
it will stop flashing temporary. However, after disconnect and reconnect the TZ75,
the LED will flash on and off alternately at .
When overload state occurs, the TZ75 is disabled of which LED flashes on and off
alternately at 0.5 second intervals. Overload state can be cleared by disconnect and
reconnect the TZ75 to the main power.
Installation an operation
1. Put the in wall TZ75 into a wall box and connect the AC power wire L, N to TZ75
connector L, N.
2. Connect the wall switch to the TZ75 .
3. lt is important to carry out a shutter calibration process before you control the
shutter to move. Press inclusion button over 3 seconds and release before the 6th
second, the roller shutter controller will start the shutter calibration process. The
process is composed of three continue stages. The shutter move to the BOTTOM
in first stage, and move to the TOP in second stage, and move to the BOTTOM
again in
1-second intervals
third stage. Then TZ75 will know the total range of UP and DOWN.
4. During the shutter calibration process, any emergencies happen you can press and
release the include button to stop the process.
5. If user found the direction is reverse, this may because the wrong connection of
NO1 and NO2 to the motor, please change NO1 and NO2 connection and execute
calibration process again.
6. To manually switch up and down of the shutter, simply press S1or S2 .
7. TZ75 built in meter function and can read the Watt, KWh, V(Voltage), I(Current)
PF(Power Factor) of the load by using Z-Wave command class.
8. TZ75 have overload protection function, and can help to prevent short circuit
caused by load.
Configuration
Parameter
Function Size
(Byte) Value Unit Default Description
1
2
3
4
2
2
2
720
6
1100
0
0x01-
0x7FFF
10-1100
0-10000
Watt Meter
Report period
KWH Meter
Report period
Threshold of
Watt for load
caution
Threshold of
KWH for load
caution
5s 5*720s=3600s
=1 hour
6*1min=1 hour
10min
1 Watt
Kwh
20x01-
0x7FFF
Z-Wave Configuration
Watt Meter Report Period:
If the setting is configured for 1 hour (set value =720), the TZ75 will report its instant
-5--4-

power consumption every 1 hour to the node of correspond Group. The maximum
interval to report its instant power consumption is 45 hours (5s*32767/3600=45hr).
Default value is 1 hour
KWH Meter Report Period:
If the setting is configured for 1 hour (set value =6), the TZ75 will report its Accu-
mulated Power Consumption (KW/h) every 1 hour to the node of correspond Group.
The maximum interval to report its Accumulated Power Consumption (KW/h) is 227.55
days (10min*32767/1440=227.55 days). Default value=1 hour
Threshold of Watt for Load Caution
This is a warning when the wattage of load over the preset threshold value, If the
setting value is 1100, when the load wattage over this value, TZ75 will send Watt
Meter Report command to the node of correspond Group. Default value=1100W.
Threshold of KWh for Load Caution
This is a warning when the KWh of load over the preset threshold value, If the setting
value is 10000, when the Accumulated Power Consumption of Relay 1 or Relay2 over
this value, TZ75 will send KWh Meter Report command to the node of correspond
Group, minimum value is 1 KWh . Default value is 0 kWh . It means no warning when
the KWH of load over the preset threshold value and not send KWH Meter Report.
Z-Wave Supported Command Class
COMMAND_CLASS SWITCH_BINARY
COMMAND_CLASS BASIC
COMMAND_GLASS MANUFACTURER SPECIFIC_V2
COMMAND_CLASS_DEVICE_RESET_LOCALLY
COMMAND_CLASS ASSOCIATION
COMMAND_CLASS METER_V3
COMMAND_CLASS CONFIGURATION
COMMAND_CLASS SWITGH_ MULTILEVEL_V3
Wrong connection of
NO1 and NO2 to the
motor
Swap the NO1 NO2
connection
The shutter move
direction is reverse
Symptom Cause of Failure Recommendation
The TZ75 not working
and LED off
1. The TZ75 is not
connect to the Main
power
2. The TZ75 break down
1. Check power connections
2. Don't open up the TZ75
and send it for repair.
TZ75 LED light work fine
But can not control
1. No association setting
2. Same frequency
interference
1. Carry out association
2. Wait for a while to retry
Operating Voltage
Maximum Load
110 240VAC
Resistive Load 1100W/600W(EU/US) max
Minimum 40m in door ,70m outdoor line of sight
0 40℃
868.4MHz(EU) 908.42MHz(US) 921.42MHz(AUS)
~
℃~
Range
Operating temperature
Frequency Range
Specifications are subject to change and improvement without notice.
Specification
Troubleshooting
-7--6-

Wiring diagram
Product size (mm)
L:Line voltage input
NO1,NO2: motor connector
N: Line neutral
S: Connect to wall switch input
Warning:
1. Do not dispose of electrical appliances as unsorted municipal waste use separate
collection facilities.
2. Contact your local government for information regarding the collection systems
available.
3. If electrical appliances are disposed of in landfills or dumps, hazardous substances
can leak into the groundwater and get into the food chain, damaging your health and
well-being.
4. When replacing old appliances with new one, the retailer is legally obligated to take
back your old appliance for disposal at least for free of charge.
,
TZ75-V1.0-2017.4.29
L
N
S2 S1 L N N
M
NO1
NO2
COM
-9--8-
16.5
39
46.6

Other TKB Home Controllers manuals
Popular Controllers manuals by other brands
Panasonic
Panasonic CZ-256ESMC2U installation instructions
Advantek
Advantek xLite T8-S Mk2 user manual
Vimar
Vimar BY-ALARM PLUS 03824 quick start guide
Phocos
Phocos CIS-N-LED Series user manual
Siemens
Siemens SIMATIC S5 operating instructions
National Instruments
National Instruments PXI-8109 installation guide

Cole Parmer
Cole Parmer Electrothermal MC810B instruction manual
NetApp
NetApp StorageGRID Webscale SG6000 Series Hardware installation
Haier
Haier YR-E20 Operation & installation manual
Linear Technology
Linear Technology LTC1877 Demo Manual
Mitsubishi Electric
Mitsubishi Electric MELSEC Q Series Reference manual
SENSY
SENSY DISP-FP Series manual
