Hold the calibration card
and have the participant
focus on the center
point...
...then press the
calibrate button and
allow the
calibration process
to complete. You
are now ready to
start recording.
2- Calibrating a participant
Step 3
Step 4
0.50m - 1.50m
(1.65ft - 4.9ft)
Step 1
Gently fit the Head
Unit onto the
participant as shown
below. Exchange the
Nose Pad if necessary.
Step 2
Gently attach the Recording
Unit to the participant’s belt
or clothing.
Calibrating and Recording with Tobii Pro Glasses 2
Start up the “Tobii Pro Glasses Controller”. If this is your first ever recording, create a new
Project before proceeding. Then press “Start New Recording” on the relevant pair of Tobii
Pro Glasses 2.
Type the participant’s name and relevant info, then press “Create”.
1- Creating a new recording
If the calibration is successful, press the record
button.
(If not, ask the participant to look at the calibration
target again then press the recalibrate button.)
To stop a recording, press the stop button.
You have now completed a recording with
the Tobii Pro Glasses 2.
3 -Start a recording 4-Stop a recording
Calibrate the participant
1 h 57 min 3 h 30 min
Make sure the Calibration Target
provided is focused by the
participant and tap the
“Calibrate” button below.
Calibrate
Cancel
Field Study 001
Glasses #4
Recording 19 - Doug Stamper
Dashboard Live Viewer Recordings Participants 1 h 46 min (35%)
1 h 57 min 3 h 30 min
Cancel
Field Study 001
Glasses #4
Recording 19 - Doug Stamper
Successful calibration!
Tap “Record”
to start a new recording
Realibrate Record
Dashboard Live Viewer Recordings Participants 1 h 46 min (35%)
1 h 57 min 3 h 30 min
Cancel
Field Study 001
Glasses #4
Recording 19 - Doug Stamper
Pause Stop
Dashboard Live Viewer Recordings Participants 1 h 46 min (35%)
1 h 57 min 3 h 30 min
Cancel
Field Study 001
Glasses #4
Recording 19 - Doug Stamper
PauseStop
Dashboard Live Viewer Recordings Participants 1 h 46 min (35%)
Tobii Pro Lab Analyzer Edition
Using the “Tobii Pro Lab Analyzer Edition” choose a
name for your new project and where to save it, then
press create.
At the Project Dashboard press “Import > Glasses
Recording”. Locate and select the data file (*.ttgp) on the SD
memory card to import it.
You are now ready to begin analyzing your data.
Step 1 Step 2
Download, install and open “Tobii Pro Lab Analyzer
Edition” on your Windows tablet/computer.
1- Software installation
Remove the SD memory card from your Recording Unit and
insert it into your computer
2 - Create a project 3- Import your data
www.tobiipro.com/downloads
2345
6
7
8
1
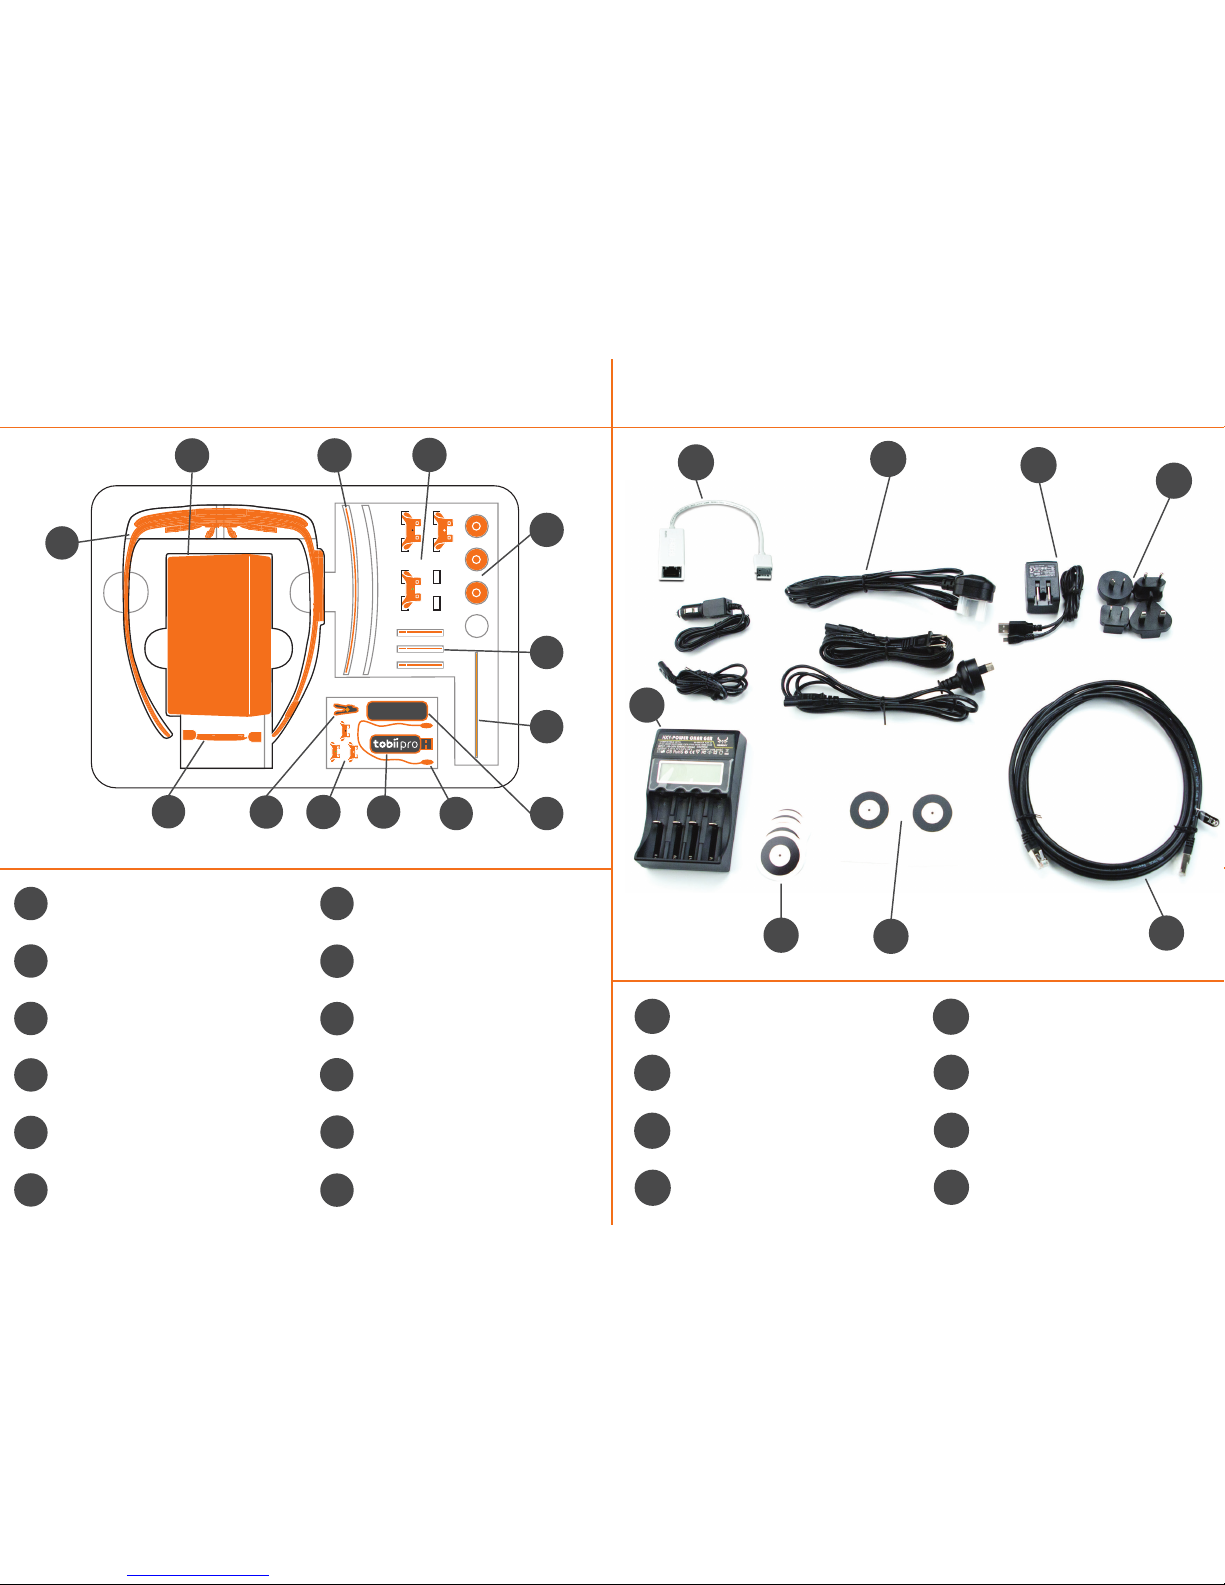
1 x Battery charger for Li-Ion
batteries
1 x USB Ethernet Adapter
4 x Power plugs for USB
charger (EU, US, UK + AUS)
5 x Power cables for battery
charger (EU, US, UK + AUS)
1 x Ethernet cable (3 Meters)
1 x USB charger for Recording
Unit
2 x Calibration cards
10 x Calibration stickers
2
3
4
5
6
7
8
1
What’s in the Accessories Box?
Download, install and open “Tobii Pro Glasses
Controller” on your Windows tablet/computer.
www.tobiipro.com/downloads
Optional
Head Strap.
If using a wired
connection, securely
connect the Ethernet
cable to the Recording
Unit and to your
computer.
Find and connect to your Pro Glasses 2 via WLAN.
(Look on the back of the Recording Unit for the
serial number, this will be the name of the WLAN
network.)
Insert the HDMI cable, then press and hold the power
button for a few seconds or until the LEDs stop
flashing to turn on your Recording Unit.
Insert SD
memory card.
Install charged battery.
6-Software installation
2- Recording Unit preparation
4-Head Unit preparation 5-Powering the Recording Unit
7-Connecting to your device
Insert
HDMI cable.
Secure cable
in clip.
Wired
Wireless
Step 1
Step 2
Step 1
Step 2
Recording Unit LEDs The unit is connected to the Tobii Pro
Glasses Controller and ready to start a
recording.
(SD LED off) The SD Memory Card ready or the Recording
Unit is powered off.
(SD LED blinking green) The Recording Unit is busy writing
to the SD Memory Card. Do NOT remove the SD Memory
Card.
(SD LED solid red) The SD Memory Card is corrupted.
Change the SD memory card.
(SD LED blinking red) The SD Memory Card is Read-Only.
Remove lock or replace the SD Memory Card.
(Connection LED off) The Recording Unit is disconnected
from Tobii Pro Glasses Controller.
(Connection LED solid green) The Recording Unit is
connected to Tobii Pro Glasses Controller.
(Power LED off) The Recording Unit is turned off. All other
LED indicators are off.
(Power LED solid green) The battery is good or charging.
(Power LED solid yellow) The battery running out of power.
Battery change recommended
(LED blinking yellow) The battery is critical. Change the
battery.
V
1-Charge the batteries
Insert the batteries into the charger. The battery is fully charged
when the icon below is displayed on the screen:
Gently squeeze the nose pads together and insert the Nose Pad
into the two holes on the head unit.
3- Attach the Nose Pad
Preparing and Connecting Tobii Pro Glasses 2
(LED Slow blinking) No power to the Head Unit. Ensure the
head unit is connected correctly.
(SD LED blinking green) Missing SD Memory Card. Insert an
SD Memory Card.
The different color
stickers indicate the 3
different sizes. Please
choose the appropriate
size for the participant.
The WLAN password for your Tobii
Pro Glasses 2 is “TobiiGlasses”
with a capital T and G.
(SD LED blinking yellow) The Recording Unit is busy writing
to an SD Memory Card which has critically low storage.
Stop recording and change the SD Memory Card.
(SD LED solid yellow) The SD Memory Card has critically
low storage. SD Memory Card change recommended.