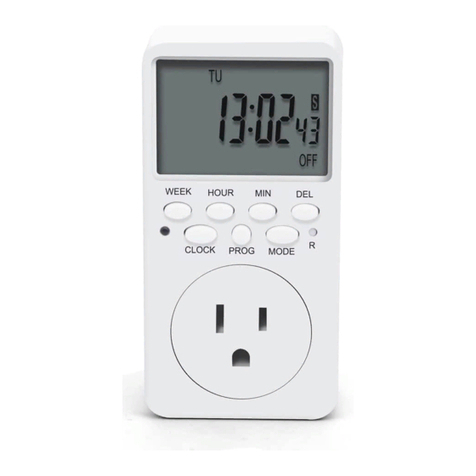
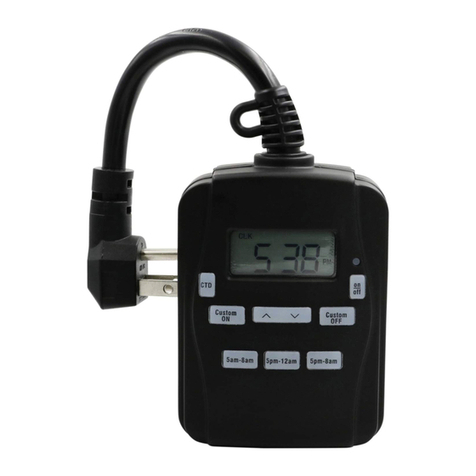
TOGOAL TE06 User manual

INSTRUCTION MANUAL
TOGOAL Plug-in Timer Outlet
Important
Please read these direcons and follow all the steps, including the TIPS and
NOTES, before you use the device. These notes can help you make beer use
of the device. If you are not 100% sasfied for any reason, before leaving a
negave review, please contact us at
enoverus@foxmail.com
We will immediately resolve any issue you may have.
Safety Use & Care
If the screen is blank, please plug the mer into an acve wall socket, and
then use a pin to press the RESET buon for about 5 seconds.
Please keep this manual in a safe place for future reference.
Heaters, pet feeders and similar appliances should never be le
unaended during operaon. The manufacturer recommends such
appliances not be connected to mers.
DO NOT aempt to repair, disassemble or modify under any circumstances.
Features
Up to 18 groups of ON-OFF mer programs; every program you set repeats
once each week
Countdown funcon to turn off appliances automacally aer pre-set me
Random seng for lights to go on and off at varying mes while you’re
away from home
NOTE: The on-off mer program, the random, and the countdown funcon
cannot run concurrently. To use the random feature, please exit the
countdown. To use the on-off mer programs, please cancel the countdown
and the random funcon.
To Set the Digital Clock
For example, to set the me as 9:30am Tuesday in DST.
1. Press the RESET buon with a pin to reset the mer. The mer will enter
the "Clock Mode".
2. While holding the CLOCK buon down, press the TIMER buon to choose
12-hour mode. "AM" will appear on the screen.
3. While holding the CLOCK buon down, press the ON/AUTO/OFF buon to
toggle between Standard Time and Daylight Saving Time (DST). The clock will
increase by one hour and the display will show "S" when changed to the DST.
4. While holding the CLOCK buon down, press WEEK to adjust the day to TU.
5. While holding the CLOCK buon down, press HOUR repeatedly to set the
me to 9:00AM.
6. While holding the CLOCK buon down, press MINUTE repeatedly to set the
me to 9:30AM.
TIPS: Press and hold the HOUR or MINUTE buon during seng, you can
navigate quickly through the numbers.
To Set the ON-OFF Programs
You can set up to 18 programs. To set a program, you will need to enter both
the ON me and OFF me. For example, to set the mer to come on at
8:30AM and go off at 10:30PM every Monday thru Friday, please do the
following:
1. Press TIMER to begin to set the ON me for the 1st program.
2. Press WEEK repeatedly to set the day combinaon to "MO TU WE TH FR".
The pre-set day combinaons will advance in the following sequence: MO TU WE TH FR SA SU -> MO
-> TU -> WE -> TH -> FR -> SA -> SU -> MO TU WE TH FR -> SA SU -> MO TU WE TH FR SA -> MO WE FR
-> TU TH SA -> MO TU WE -> TH FR SA -> MO WE FR SU
3. Press HOUR repeatedly (or press and hold it) to adjust the me to 8:00AM,
and then the MINUTE buon to adjust the me to 8:30AM.
4. Press the TIMER buon again to begin to set the OFF me for the 1st
program.
5. Refer to steps 2~3 to set the off me to 10:30PM every MO TU WE TH FR.
(Note: Do not forget to select the desired day combinaon for the off me as
MO TU WE TH FR.)
6. Press TIMER again, you will be able to set the 2nd, the 3rd... and totally up to
18 programs by referring the steps above.
7. When all programs needed are finished, press CLOCK to go back to the clock
mode. Plug the mer into an acve outlet and it is ready for use.
TIPS: Please leave the ON-OFF switch of your appliance always on in order to
use it with the mer.
*IMPORTANT : If you plug the mer into the wall socket between any on-off
interval you set(8:30AM~10:30PM every Monday thru Friday), the mer may
not come on immediately on that day the moment you plug it in. Instead, it will
stay inacve and automacally come on at 8:30AM next morning, and then
repeat the programs you set automacally. Under this circumstance, if you want
to have the mer on the moment it is plugged in, please hit the ON/AUTO/OFF
buon to manually turn on the mer first, and then press the buon once more
to put the screen back to AUTO.
TIPS:
1. When seng the programs, you can press the RES/RCL buon to erase the
current seng or press the buon once more to restore.
2. To review the programs you set, press the TIMER buon repeatedly.
During review, you can also modify the sengs according to your needs.
3. If you have mulple programs, please make sure that the on-off intervals
of the programs do not overlap with each other, especially when using the day
combinaon opon.

Manual Operaon - ON/AUTO/OFF Buon
You can manually turn on/off the mer by pressing the ON/AUTO/OFF buon.
Manual ON: Screen shows "ON" and mer is switched on permanently, with
the LED indicator always on.
Manual OFF: Screen shows "OFF" and mer is switched off permanently, with
the LED indicator always off.
Please set the mer to AUTO if you want it to work automacally based on the
programs you set. When switched to AUTO, there are 2 situaons:
Manual ON to AUTO: Screen shows AUTO, and the mer will stay on with the
LED indicator on unl the next off seng arrives. And then, the mer will work
exactly as you programmed.
Manual OFF to AUTO: Screen shows AUTO and the mer will stay off with the
LED indicator off unl the next on seng arrives. And then, the mer will work
exactly as you programmed.
For example, the mer is set to come on at 8:30AM and go off at 10:30PM
every day (MO TU WE TH FR SA SU). When you switch the mer from MANUAL
ON/OFF to AUTO, the following are some scenarios:
1: Between Tuesday10:30PM~ Wednesday 8:30AM, if the mer is switched
from Manual ON to AUTO, the mer will stay on unl 10:30PM Wednesday,
and then work exactly as you programmed;
2: Between Tuesday 10:30PM~ Wednesday 8:30AM, if the mer is switched
from Manual OFF to AUTO, the mer will stay off unl 8:30AM Wednesday,
and then work exactly as you programmed;
3: Between Wednesday 8:30AM~ Wednesday 10:30PM, if the mer is
switched from Manual ON to AUTO, the mer will stay on unl 10:30PM
Wednesday, and then work exactly as you programmed;
4: Between Wednesday 8:30AM~ Wednesday 10:30PM, if the mer is
switched from Manual OFF to AUTO, the mer will stay off unl 8:30AM
Thursday, and then work exactly as you programmed.
Tips for temporarily override the mer:
1. To temporarily override program and turn on the mer when it is OFF: Press
the ON/AUTO/OFF buon unl ON shows on screen and immediately press
once to return to AUTO. The mer will stay ON unl the next scheduled OFF
me. Then, the mer work exactly as you programmed.
2. To temporarily override program and turn off the mer when it is ON: Press
the ON/AUTO/OFF buon unl OFF shows on screen and immediately press
once to return to AUTO. The mer will stay OFF unl the next scheduled ON
me. Then, the mer work exactly as you programmed.
An-the Random Funcon
In the random mode, the mer will go on and off in a random manner from
6:00PM~6:00AM every day. Each on interval ranges from 1 min~16mins and off
interval ranges from 16mins~32mins. When random is acvated, the mer
programs and countdown program will stay inacve.
1. Make sure the mer is in the AUTO mode (screen shows AUTO).
2. Press the RND/CTD buon to acvate or deacvate this funcon. An "R" will
appear on the le of the screen when acvated. Plug the mer into an acve
outlet and it is ready for use.
Countdown and Turn OFF (1seconds~100hours)
With this feature, you will be able to set your appliance to automacally go off
aer a given period of me. For example, to set the mer to go off aer
30hours 40mnites and 50 seconds:
1. Press and hold the CLOCK buon, and then press the RND/CTD buon to
enter(or exit) the countdown seng.
2. Press HOUR repeatedly (or press and hold) to make the screen show
30:00:00.
3. Press MINUTE repeatedly (or press and hold) to make the screen show
30:40:00.
4. Press WEEK repeatedly (or press and hold) to make the screen show 30:40:50.
5. Press the ON/AUTO/OFF to start the countdown. The screen will show how
much me is remaining.
TIPS:
1. During seng, you can use the RES/RCL buon to erase the seng; during
countdown, you can press the RES/RCL buon to pause or resume the
countdown.
2. During countdown, you can press the ON/AUTO/OFF buon to stop or
restart the countdown.
3. When countdown runs up, the mer will turn off. You can press the
ON/AUTO/OFF buon to rerun the countdown.
Specificaons
Model No.: TE06
Voltage: 120V AC/ 60Hz
Rang: 120V AC / 15A / 1800W
Operang Temperatures: -10℃~+40℃
Accuracy: +/-1 Minute per Month
Minimal Seng: 1 Minute (1s for countdown)
Maximum Seng: 7 Days
Baery: NIMH1.2V > 100 Days
Customer Quesons & Answers
1. How long is the warranty for this product?
We offer a 12-month limited warranty on this mer. If your mer is broken,
please email your order number and describe the issue. We will immediately
issue a full refund or arrange a new replacement aer verificaon. We believe
what makes us different is not just the product we offer but also our outstanding
customer service. We also hold the belief the buyer and seller can achieve a
win-win outcome through mutual effecve communicaon.
2. What should I do if I am having trouble seng up the mer?
Please tell us the programs you need via email: enoverus@foxmail.com. Our
technical support team will give you personal step-by-step guidance illustrated
with pictures.
Other TOGOAL Timer manuals
Popular Timer manuals by other brands
Schellenberg
Schellenberg TIMER PLUS manual
KingShield
KingShield T80-C Installation & operating instructions

Digi Sport Instruments
Digi Sport Instruments DT710 manual
Gelia
Gelia CONNECT 2 HOME 4000040092 instruction manual
Xavax
Xavax Digital weekly timer switch Quick start quide
TFA
TFA 38.2032 instruction manual
