Toku TMM-140A User manual
Minimighter
TOKU PNEUMATIC PRODUCTS
TMM-140A
TMM-140AE
M A N U A L
INSTRUCTION MANUAL
Carefully read all instructions before operating
or servicing any TOKU tools.
TOKU PNEUMATIC CO., LTD. 06-08 No.3
www.air-allied.com.au
Air & Allied Sales (Pacific) Pty Ltd
www.air-allied.com.au

1
INTRODUCTION
Caution indicates a potentially hazardous situation, which may cause minor or
moderate injuries and property damage.
* Store this manual nearby and read it over continuously.
* If this manual is damaged or is lost, immediately contact your dealer to have it
replaced.
* If the Hoist is used by more than one person, please have the new person read this
manual before operating this hoist.
* If the Hoist is transferred to another location, please make sure this manual is read
by the next operator/owner.
If you have any questions about the hoist or the instruction manual, please contact
the manufacturer.
Thank you for purchasing the Toku Air Manipulator.
This manual is a guide which will show you how to use the Air Manipulator safely and
efficiently. Please read the manual in its entirety and understand the contents
before proceeding to operate the hoist. Also convey this information to the actual
operators of the hoist.
The Air manipulator was designed to operate on compressed air to lift and lower loads.
As a result before operating the Air manipulator, it is necessary to also read the
instruction manual for the compressor. In addition, for proper regulations about
usage of the Air manipulator, consult the “Crane safety regulations standards” usage
other than the ones written in this manual should be performed safety and with
responsibility.
Before reading the manual, it is important to understand the following terms.
Precautions concerning safety, the following points should be obeyed.
△
!WARNING ;
Warning indicates an immediate hazardous situation, which could result in death of
fatal injuries and property damage.
△
!CAUTION ;
Air & Allied Sales (Pacific) Pty Ltd
www.air-allied.com.au

2
CONTENTS
Page
Introduction
1
Contents
2
Precautions concerning safety
3
Basic Precautions
5
Specifications
6
Description of Parts
6
Before operation
7
Preparation before operation
9
How to operate
11
Information on the Auto−Stop valve
Emergency button
14
14
Changing the handle for Right/Left hand use
15
Maintenance and inspection
17
Trouble shooting
19
Air & Allied Sales (Pacific) Pty Ltd
www.air-allied.com.au

3
PRECAUTIONS CONCERNING SAFETY
Do not remove screws or covers which are on the hoist.
Do not modify and operate the hoist. It is a very dangerous practice.
The manufacture will not take any responsibility if a unit has been modified and an
accident result from the modification.
△
!WARNING ;
When operating the hoist, obey the safety precautions stated in this manual.
△
!WARNING ; OBEY FACTORY SAFETY RULES
Operators who use this hoist must have training.
Obey all facility rules, safety precautions and operational regulations.
△
!WARNING ; WEAR PROPER CLOTHING AND SAFETY EQUIPMENT
Wear proper clothing during operation of the hoist.
Do not forget to wear a Helmet, safety boots and gloves when operating the hoist.
Also if the Noise level is high, it is necessary to wear ear protectors.
Do not operate the hoist wearing a tie or with open sleeves. It is possible that these
loose items may get rolled in with the cable.
△
!WARNING ; SAFE OPERATION STARTS FRON A STABLE POSITION
Do not operate the hoist in an unstable position. Always have good footing and a
stable base when operating the hoist.
△
!WARNING ; INSTALL THE AIR MAINPULATOR SECURELY
Make sure the hoist is placed securely in a safe place. Also the hook must be
securely in place.
△
!WARNING ; DO NOT MODIFY THE HOIST
Air & Allied Sales (Pacific) Pty Ltd
www.air-allied.com.au

4
!WARNING ; DO NOT USE THE ROPE OR HANGING EQUIPMENT AS
Lifting the load side ways or setting the load side ways will lead to accidents.
The wire will not wind properly when the hoist is used in the side ward direction and
will put unnecessary load on the hoist leading to a possible accident. The hoist
should be used in the up/down direction only.
EARTH (GROUND)
When performing welding operations, do not use the rope or hoist as ground or earth.
This may become the cause of an accident or breakage in the hoist.
△
!WARNING ; USING THE HOIST INCORRECTLY LEADS TO ACCIDENTS
Do not use the hoist over its capacity.
Incorrect operation of the hoist will lead to damage of the hoist or fatal injuries.
△
!WARNING ; DO NOT LIFT, OR SET THE LOAD SIDE WAYS WITH THE
HOIST
Air & Allied Sales (Pacific) Pty Ltd
www.air-allied.com.au
5
BASIC SAFETY PRECAUTIONS
Storage of the hoist is also very important.
Store the hoist in a dry area. When storing the hoist for a longer period of time,
to prevent internal rust, apply 3 cc of lubrication into the air hose and operate the
hoist for 3〜4 seconds.
△
!CAUTION ; Keeping the area tidy is the first step to safety.
●Keeping the job site tidy is the first step to a safe environment.
●Keep the facility clean and neat at all times.
△
!CAUTION ; Stay away from the job site if you do not operate the hoist.
●If you are not the operator, stay away from the job site.
△
!CAUTION ; Difficult operations will lead to accidents.
●Do not use the hoist for operations over its capacity. These operations may lead to
damage to the hoist and should be avoided.
△
!CAUTION ; Stop operating the hoist if trouble is detected.
●When operating the hoist, if trouble is found, immediately stop operating the hoist
and inspect or repair.
△
!CAUTION ; Handle the hoist with care.
●Do not drop or hit the hoist externally. This will lead to cracks and damage the
hoist. Also do not stamp or engrave information directly onto the hoist. If a
crack does develop, and air is leaking through this crack, do not operate the hoist.
△
!CAUTION ; Good maintenance will extend the life of the hoist.
●Keep a good maintenance program for the hoist and keep it clean.
△
!CAUTION ; Periodic inspection of the hoist is basic safety.
●Periodic inspection of the hoist will allow your hoist to operate smoothly and safely.
Refer to the crane safety standards. Daily and monthly inspection programs
should be performed.
△
!CAUTION ; For inspection or repair of the hoist, consult your dealer.
●Contact your dealer for repairs or inspection of the hoist. When parts need to be
replaced, use only genuine parts.
△
!CAUTION ;
Air & Allied Sales (Pacific) Pty Ltd
www.air-allied.com.au
6
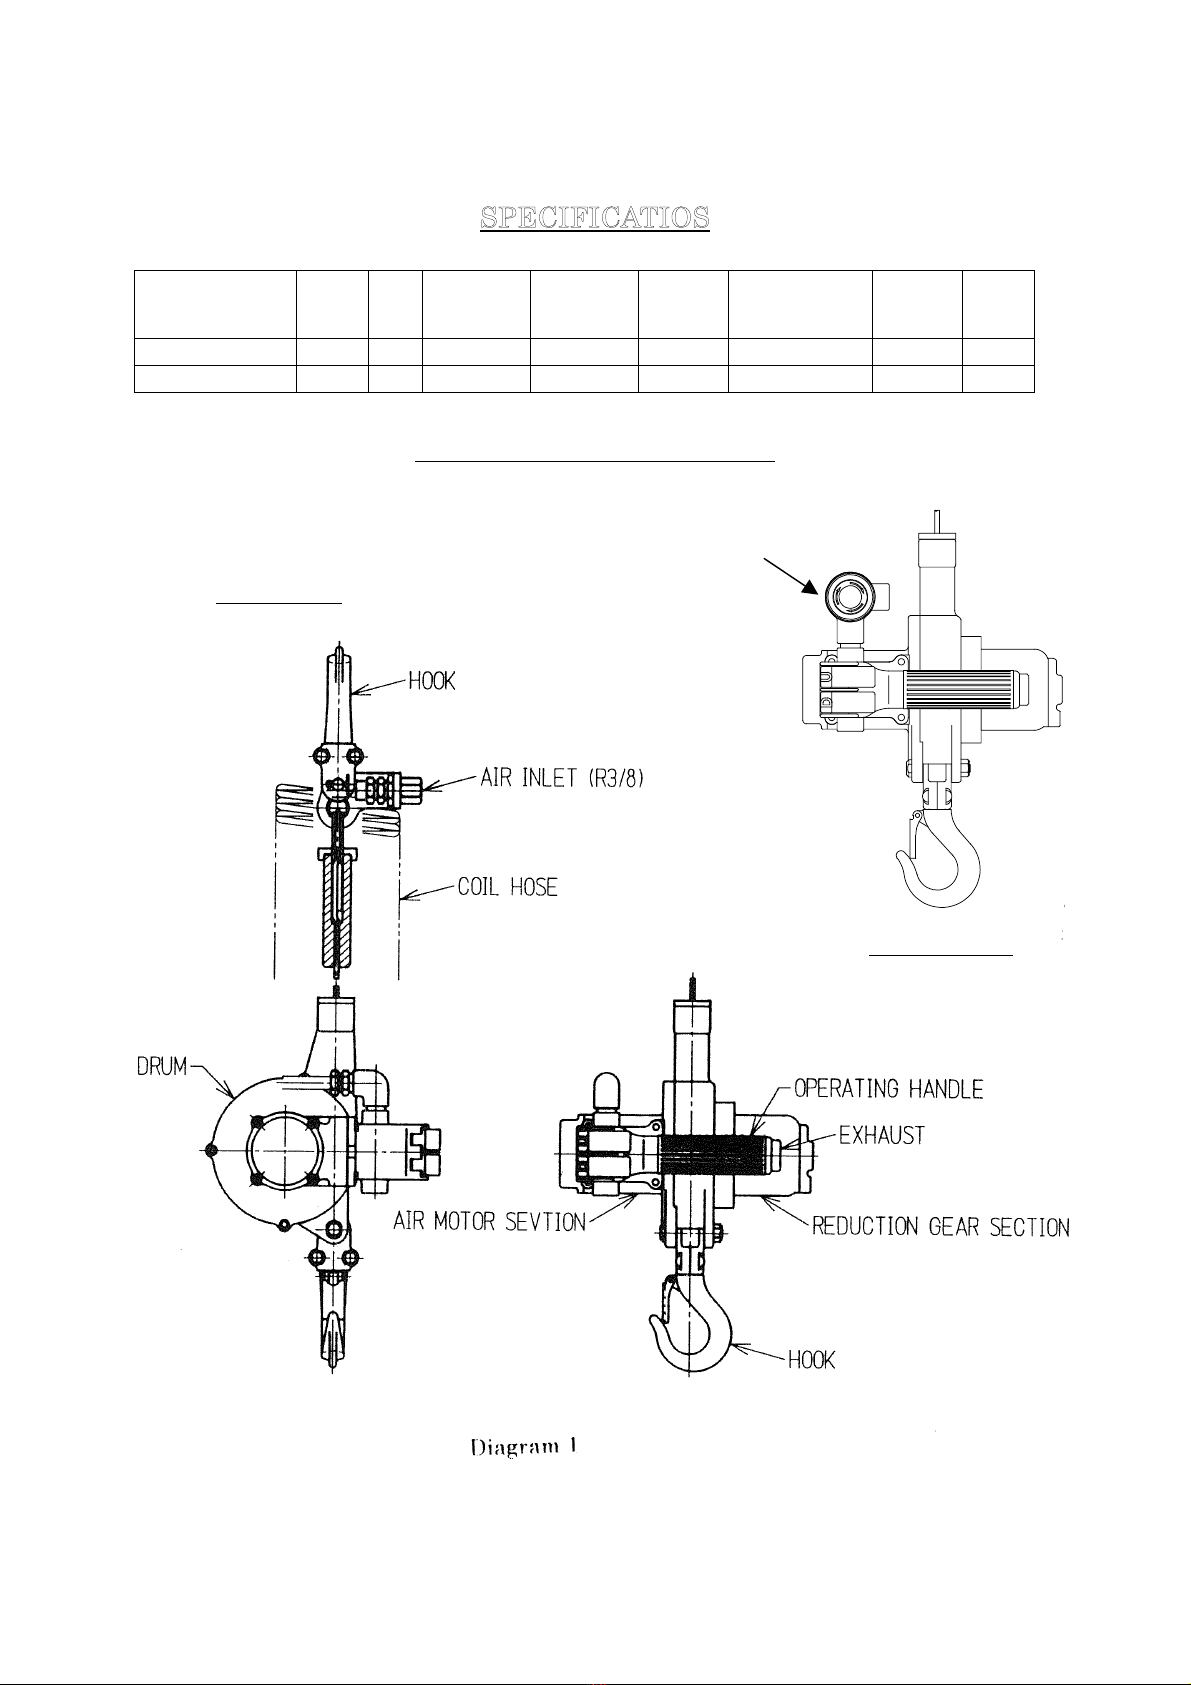
SPECIFICATIOS
Model
Rated
Load
(kgs)
Lift
(m)
Air
Pressure
(kg/cm2)
Wire
Rope
Dia×Len.
Speed
(m/min)
Air
Consumption
(m3/min)
Weight
(kgs)
Hose
Size
(inch)
TMM-140A 140 2 4~6 4×2.8 10 0.6 10 R3/8
TMM-140AE 140 2 4~6 4×2.8 10 0.6 11 R3/8
DESCRIPTION OF PARTS
TMM-140A
TMM-140AE
EMERGENCY BUTTON
Air & Allied Sales (Pacific) Pty Ltd
www.air-allied.com.au

7
BEFORE OPERATION
The operating air pressure range is 4〜6 kg/cm2.If the hoist is
operated below 4 kg/cm2or higher than 6 kg/cm2, this will effect the life,
performance and safety of the hoist. As a result, confirm the air pressure from the
compressor and piping is correct before usage.
( The best air pressure to operate the hoist is 6 kg/cm2 )
1. PIPING
△
!CAUTION ; Install a filter, regulator and oiler near the hoist.
Piping size of 3/4” is recommended to meet hoist specifications.
△
!CAUTION ; Recommended air hose; Larger than 3/8”(9.5mm).
If the air hose length is longer than 10 meters, use one size larger air hose.
( This is to avoid drop in pressure due to friction within the air hose. )
△
!CAUTION ; Install a Drain port in the lowest area of the piping. It is
important to drain the line periodically. If the air contains high levels of moisture,
this will be the cause of rust within the hoist, and will eventually lead to
malfunction of the hoist.
△
!CAUTION ; Before connecting the air hose to the hoist, always blow flush the
air inlet area. This will prevent any foreign substances from entering the hoist.
△
!CAUTION ; Before connecting the air hose to the hoist, apply about 10 cc of
lubricating oil into the inlet port of the hoist. This will provide the initial
lubrication to the hoist.
2. CONFIRMATION OF OPERATING AIR PRESURE
△
!CAUTION ;
Air & Allied Sales (Pacific) Pty Ltd
www.air-allied.com.au

8
3. LUBRICATION
The rated load for this hoist is 140 kgs. Do not operate the hoist
with a load over the rated load of this hoist. This will damage the hoist and
reduce the life of the parts. This may also lead to accidents.
△
!CAUTION ;
★To provide lubrication to the air motor, use the line oiler in situated in the piping.
The recommended amount of oil is 10~15 drops/minute, or 2~3 cc.
★Lubrication for reduction gears;
When the hoist is dis-assembled for maintenance ( recommended once a year )
apply gear grease to the gears.
★ Apply lubrication to the wire periodically.
Type of Lubrication recommended for the TMM-140A Hoist;
Lubrication : Turbine oil JIS, Type 2, ISO VG 46
Grease : Litumue grease NLGI No.2 or equivalent
4. WEIGHT OF LOAD
△
!CAUTION ;
Air & Allied Sales (Pacific) Pty Ltd
www.air-allied.com.au

9
PREPARATION BEFORE OPERATION
Check for loose bolts or screws.
Check to see if any bolts or screws are loose. If any areas are loose, tighen them
immediately.
Inspect for cracks or breakages.
Check each part for cracks or breakages. If any parts show damage, do not use
the hoist. Contact your dealer for repair.
1. Selection of Compressor and Drain removal
Method of Selection : The Air consumption for the hoist is shown in the
Specification chart on Page 6.
( Air Consumption ×10 ) ×No. of units <Compressor Horsepower
Method of Drain removal
Rust will develop leading to the cause of trouble if you do not drain the compressor.
Open the drain at the bottom of the air tank on your compressor.
Remove excess water and oil. Supply clean dry air to the hoist. ( Refer to the
Compressor manual for details. )
2. Hose and couplings
Size of hose ; For the hoist, a hose with an inside diameter of 9.5 mm ( 3/8” )
should be used. If the hose is going to be longer than 10 meters, use a hose size
one larger than 9.5 mm ( 3/8” ).
△
!CAUTION ; Before connecting the hose, make sure the connection area is free
of dirt or foreign substances.
△
!CAUTION ; If the hose is too long, this will result in a drop of pressure at the
hoist and the performance of the hoist will not be maintained.
3. Inspection of hoist
Air & Allied Sales (Pacific) Pty Ltd
www.air-allied.com.au
10
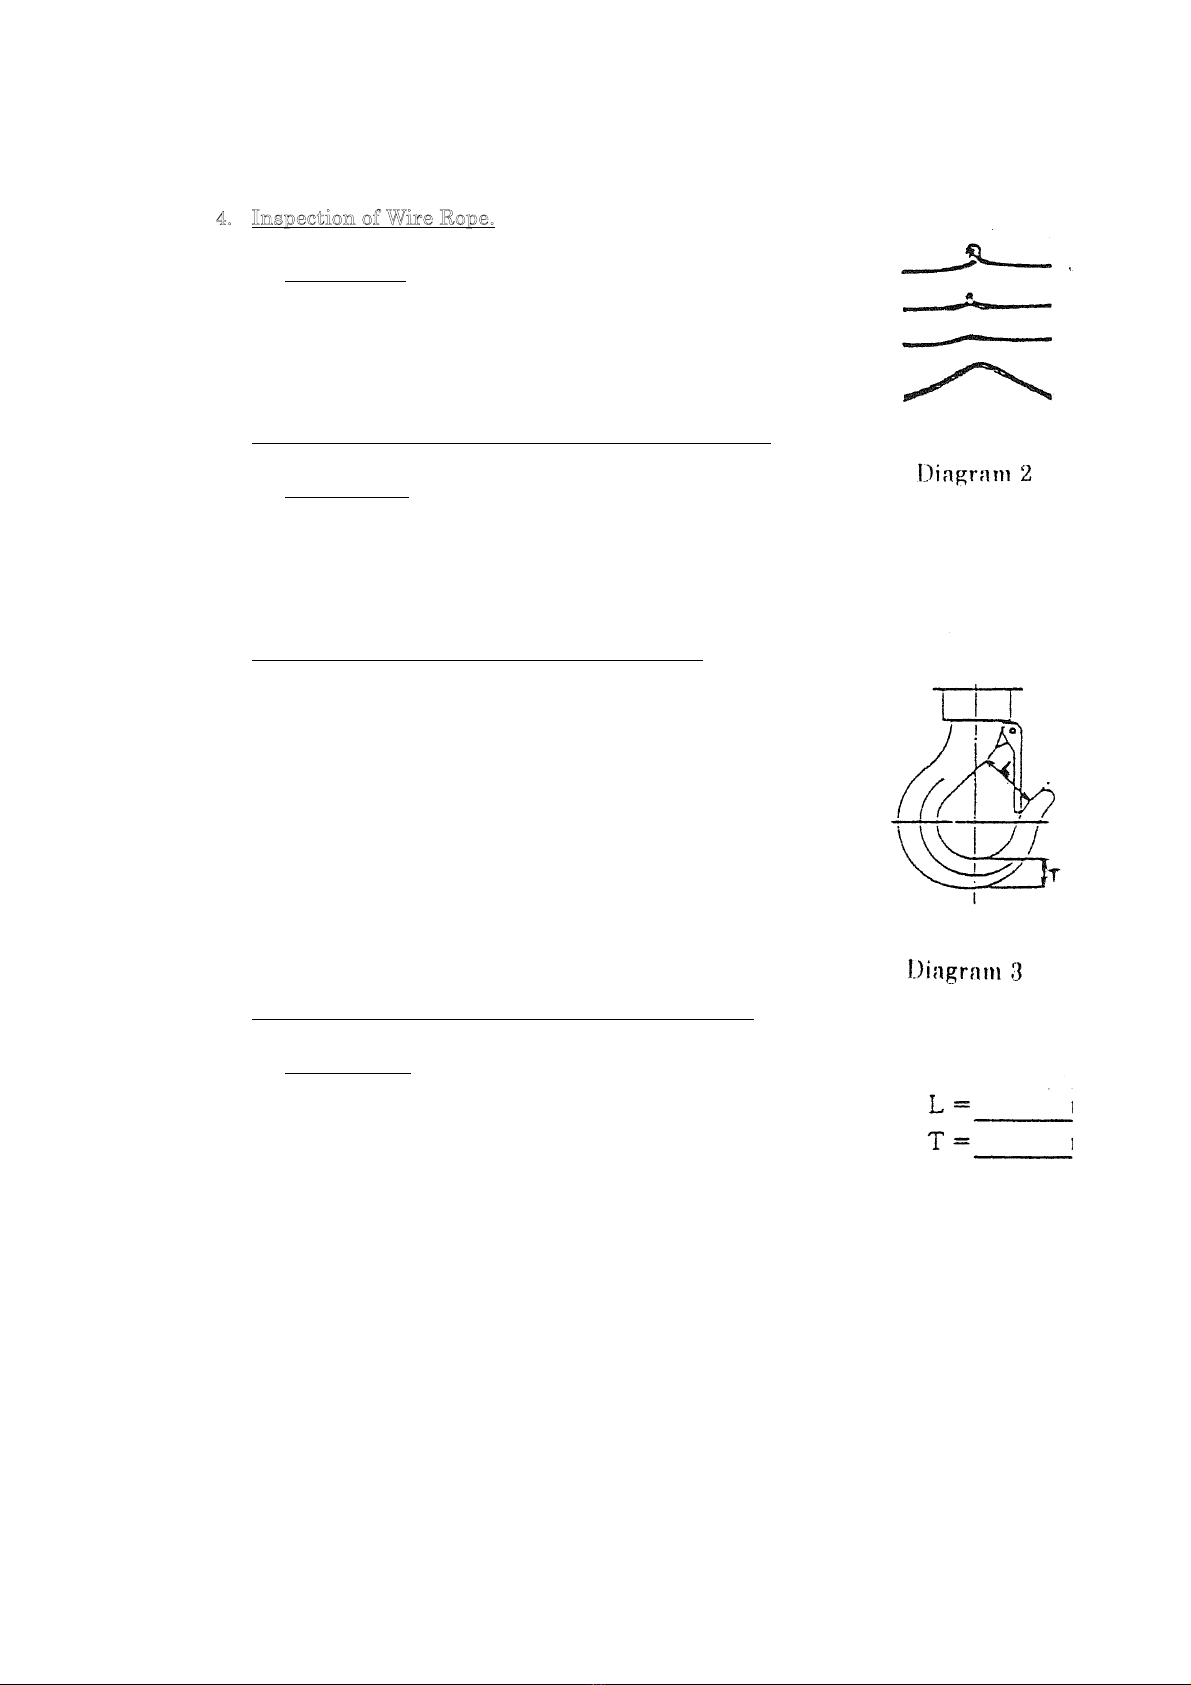
4. Inspection of Wire Rope.
This hoist has an overwind prevention device
installed in the unit, but do not use this mechanism to stop th e
hoist as a normal operation. This device was designed as an
Emergency stop feature and not for normal stopping of the hoist. As
a result, if this device is used for normally stopping, this will lead to
the cause of wire damage or breakage, leading to the dropping of
the load and may lead to a human accident. When assembling the
wire, make sure the lift has some allowance in the up/down
direction as asafety factor.
△
!WARNING ; Do not use a Wire rope which has a kink or
is deformed. ( See sketch to the right )
Do not use a wire rope which has broken strands.
5. Re-confirm strength of area where hoist is attached.
△
!WARNING ; Before mounting the hoist to its position,
make sure the Mounting area is within the safety factor of
the rated load of the Hoist.
6. Confirmation of Upper and Lower hook.
When the hook is new, measure dimension " L" and "T" and
record there figures. If dimension " L " opens more than
0.5 mm and " T " dimension wears more than 1 mm, it is
necessary to replace the hook. If the hoist is continued to
be used, the hook may open up and lead to a major accident.
( See diagram 3 for details )
●Make sure the safety claw is in the correct position when
using the hoist.
7. Make sure the load is within 2 meters of the hoist.
△
!WARNING ;
Air & Allied Sales (Pacific) Pty Ltd
www.air-allied.com.au
11
HOW TO OPERATE
1. Starting and Stopping the Hoist
1-1. Operating Handle (Lever)
△
!WARNING ; Do not use or operate the operating handle
if it is not necessary to operate the hoist. If the hoist is
not operated properly, it may lead to unwanted accidents.
1-2. Operation
△
!WARNING ; For initial start up, operate the hoist slowly
by pushing the lever gradually. If the wire rope is loose
and a load is suddenly lifted, this wll put unwanted stress on
the wire rope and hoist body leading to possible damage to
the hoist or shorter life of parts.
1-3. Operation in the opposite direction
△
!WARNING ; Do not suddenly operate the hoist in the
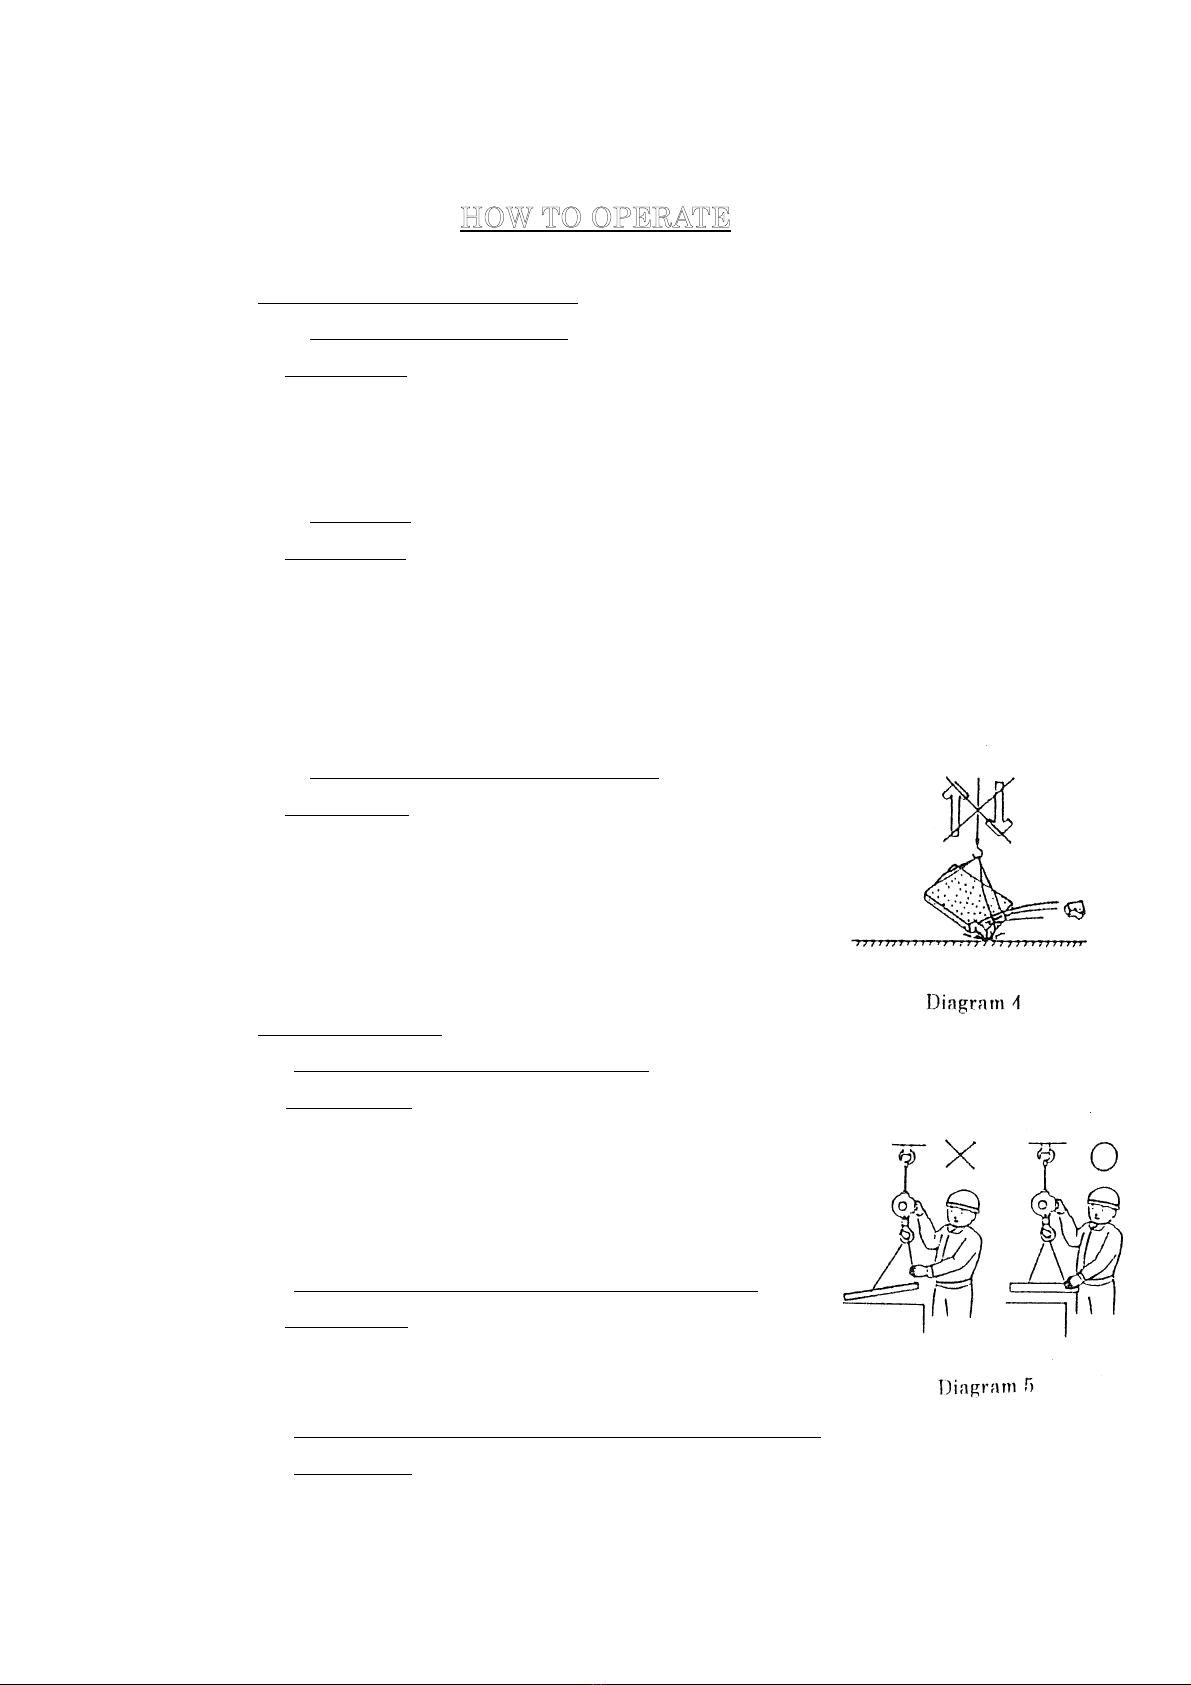
opposite direction. ( See diagram 4)
This will lead to an impact load to the wire rope and body of
the hoist, leading to damage to the hoist or shorter life of
parts.
2. Operation of Hoist
2-1. Confirmation of Slings/Sling chains
△
!WARNING ; Before using slings, wire ropes or chain
slings always check the rated load for these items before
usage. Do not use slings do not meet the rated load of the
hoist.
2-2. Confirmation of the balance when using slings
△
!WARNING ; When using a sling, confirm the load is
balanced correctly. ( See diagram 5 )
2-3. Avoid sudden operation or sudden change in direction
of the hoist.
Air & Allied Sales (Pacific) Pty Ltd
www.air-allied.com.au
12
!WARNING ; Do not perform sudden lifts or sudden
lowering of the hoist. Also, do not suddenly operate the
hoist in the opposite direction. ( See diagram 4 )
This will lead to damage of the wire rope or hoist body.
The load may also fall over leading to an accident.
2-4. Do not lift people using the hoist
△
!WARNING ; This hoist is designed to lift loads. Do not
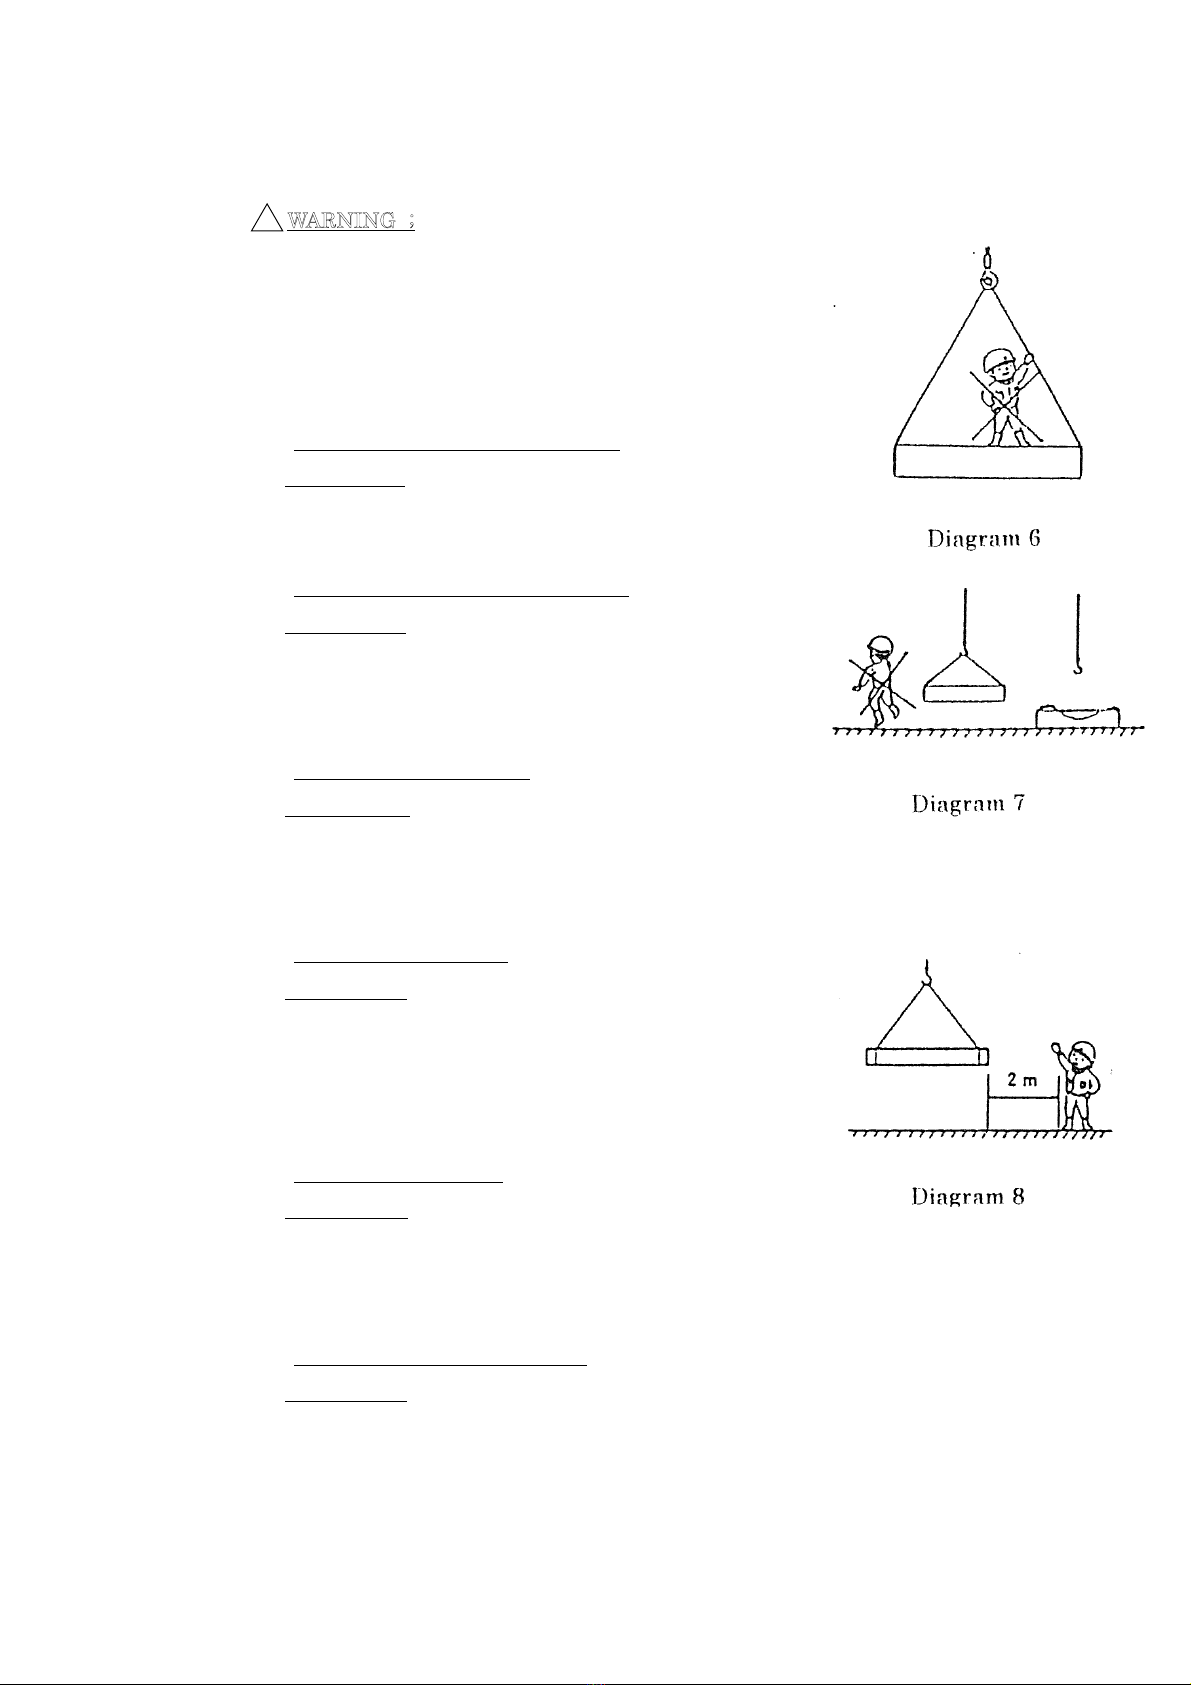
at any time try to lift people. ( See diagram 6)
2-5. Do not leave the hoist with a load
△
!WARNING ; Do not leave the hoist with a load. When
leaving a load, lower the load to a stable position and remove
the hook from the load. ( See diagram 7)
2-6. Safe Operating position
△
!WARNING ; Do not operate the hoist under the load.
Stay as far away from the load as possible while operating
the hoist.
2-7. Distance from load
△
!WARNING ; Do not allow anyone except the operator of
the hoist to be near the load. ( See diagram 8)
Anyone except the operator of the hoist should be at least 2
meters away from the load/hoist.
2-8. Signals at Job site
△
!WARNING ; When using the hoist jointly with another
person, use signals agreed at the job site and obey them
during a joint operation.
2-9. Precautions during operation
△
!WARNING ; During operation of the hoist, do not touch
the area of where the wire enters or moves. This is very
dangerous.
Air & Allied Sales (Pacific) Pty Ltd
www.air-allied.com.au

13
2-10. Caution after using the Hoist
Do not touch the hoist right after operation
of it. It may get warm after operating the hoist for long
periods of time.
△
!WARNING ;
Air & Allied Sales (Pacific) Pty Ltd
www.air-allied.com.au
14
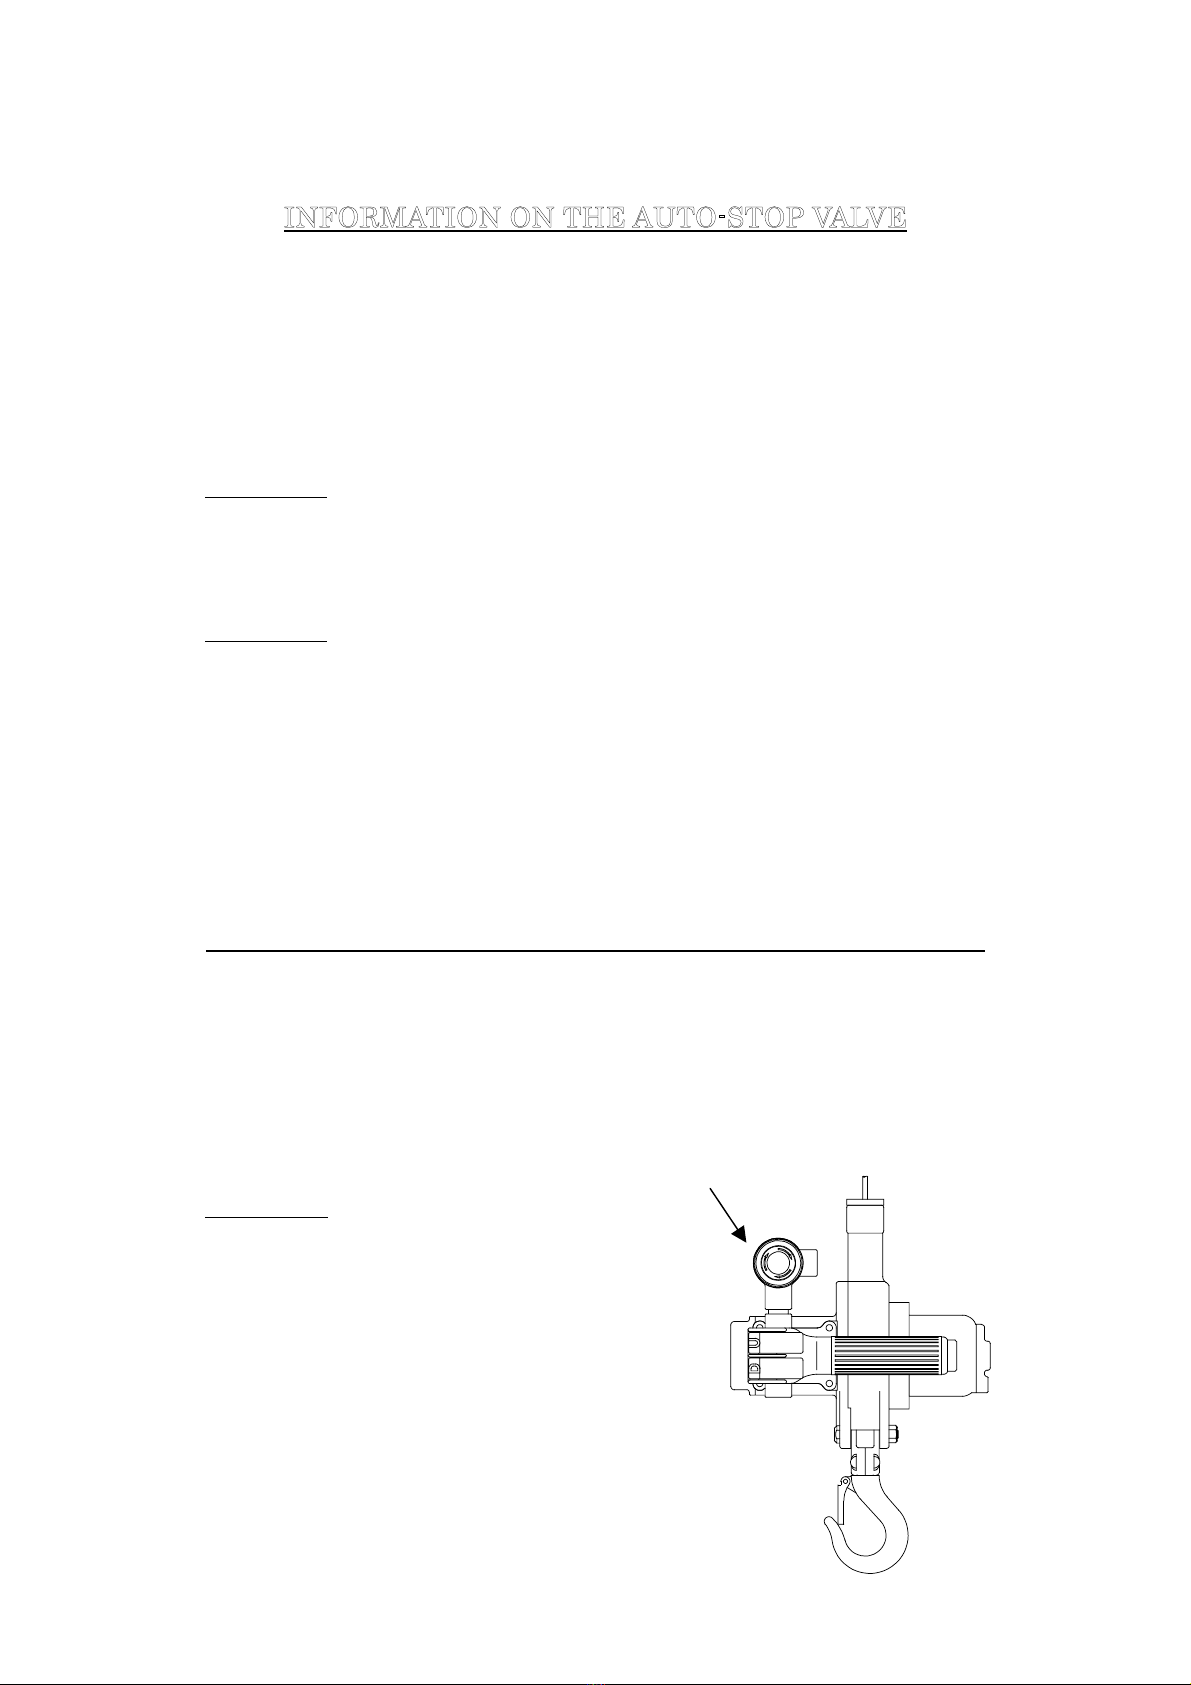
INFORMATION ON THE AUTO-STOP VALVE
An auto-stop valve is equipped in this hoist.
When the DOWN button is pushed and the hoist lowers to its full extent, the auto-stop
valve will activate stopping the hoist from lowering any further.
Inorder to de-activate the auto-stop valve push the UP button.
△
!WARNING ; If the hoist moves in the UP direction when the DOWN button is pushed.
Immediately advise your dealer or distributor.
△
!WARNING ; This hoist has an overwind prevention device installed in the unit, but do not use
this mechanism to stop the hoist as a normal operation. This device was designed as an Emergency
stop feature and not for normal stopping of the hoist. As a result, if this device is used for normally
stopping, this will lead to the cause of wire damage or breakage, leading to the dropping of the load
and may lead to a human accident. When assembling the wire, make sure the lift has some allowance
in the up/down direction as a safety factor.
EMERGENCY BUTTON (Equipped with the TMM-140AE)
If the control of the lever on the operating handle is out of order in operation, push the
emergency stop button immediately to stop the operation.
Once push the red button, the operations stop. Turn the button clockwise to remove the
emergency stop.
△
!WARNING ;
When using the , did not HIT the button.
Press the button with your finger.
EMERGENCY BUTTON
Air & Allied Sales (Pacific) Pty Ltd
www.air-allied.com.au

15
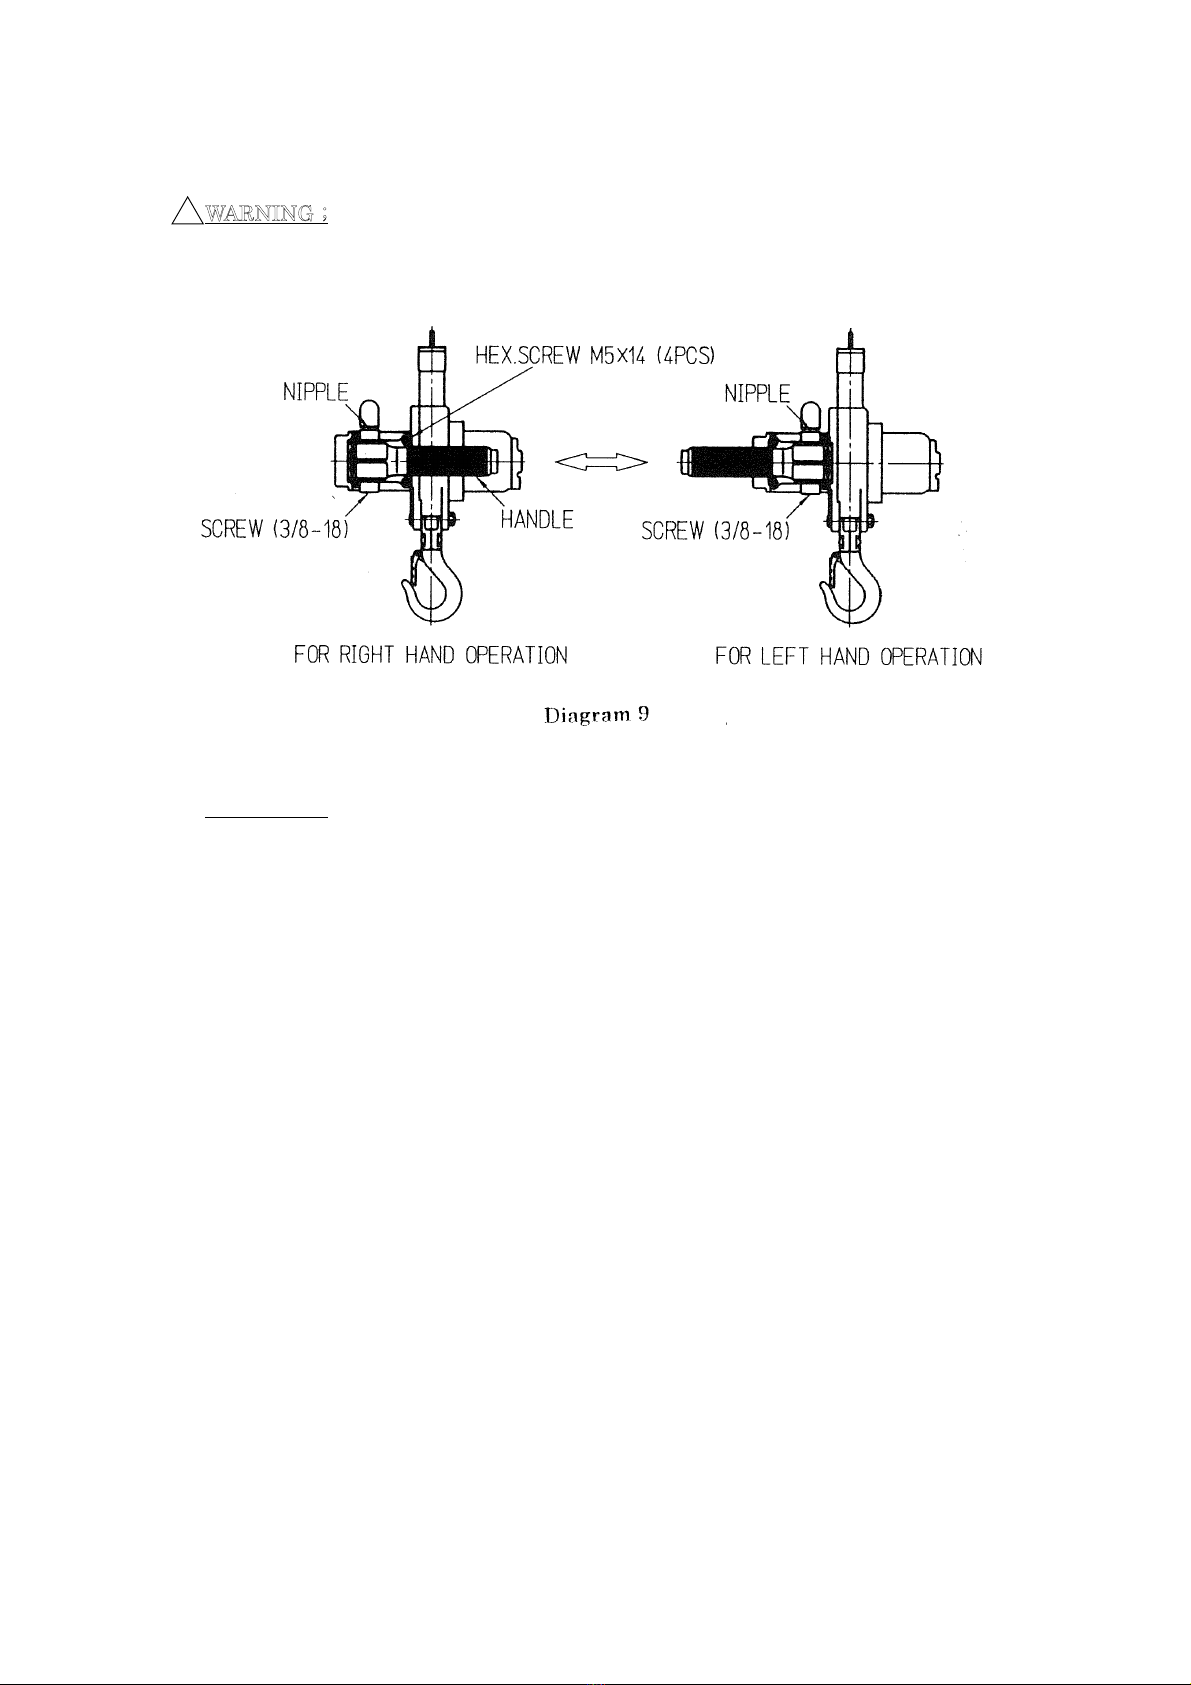
CHANGING THE HANDLE FOR RIGHT/LEFT HAND USE
1. Remove the hoist from its hanging position and dis-connect the air supply. Push the
operating buttons to confirm that the hoist does not operate.
2. Remove the M5 14 Hex screws which hold the handle in place. Make sure the
springs do not spring from under the handle when the hex screws are removed.
3. Remove the Hose nipple and Hex taper plug ( 3/8−18) from the handle.
4. As shown in the diagram bellow, situate the handle for Left or Right hand usage.
5. Re-assemble the Hose nipple and Hex taper plug ( 3/8−18 ) as instructed in section 3
above. Assemble the handle onto the hoist.
6. Assemble the 4−Hex screws ( M5 14) in section 2 into the handle and onto the hoist.
At this time do not forget to assemble the springs. Also remove any dirt from the
packing and align the 4 holes in the handle with the hoist.
7. Apply air to the hoist and check for air leakage.
8. Hang the hoist in position and slowly check the Up and Down movement of the hoist.
The handle on this hoist can be changed to suit right handed or left handed operators. In
order to make the change, follow the following instructions to make the change in the
handle.
△
!CAUTION ; When removing and changing the handle, please be assured not to allow
dust, dirt or foreign matter enter the hoist.
Procedure of making the change in the handle
Air & Allied Sales (Pacific) Pty Ltd
www.air-allied.com.au
16
!WARNING ; If the hoist shows air leakage or does not operate properly, immediately
stop operating the hoist and stop the air flow to the hoist.
Re-perform the above procedure as stated able. If the hoist still does not operate
correctly contact your dealer or distributor.
MAINTENANCE AND INSPECTION
△
!WARNING ; To operate the hoist safely, it is necessary to inspect the hoist regularly.
When the hoist is in use, obey the regulations in the crane safety standards and perform
the following inspections.
Air & Allied Sales (Pacific) Pty Ltd
www.air-allied.com.au

17
MAINTENANCE AND INSPECTION
1. Check the Wire rope
Check the rope wire for damage or broken stands.If a problem is seen, the wire
rope should be replaced.
2. Check Operation of brake
Check the operation of the brake. If the rated load slowly moves down, the
operation of the hoist should be stopped and repairs should be performed. In this
case, contact your dealer or distributor.
DAILY INSPECTION
1.Inspection of Air pressure and Oil.
Confirm that the hoist is operating between 4~6 kg/cm2air pressure. Also make
sure the line oiler is operating correctly. If oil does not get to the motor, this will
lead to early wear of the motor parts.
2.Inspect the hook and hook claw.
If the hoist is used with without the hook being able to rotate, the wire rope will
become twisted and the load may rotate leading to an accident. Also the safety
claw may disengage.
3.Inspection of the Wire Rope.
Check the wire rope for the following
Is the wire rope lubricated.
Is there signs of rust on the wire rope.
Are there any strands broken.
If the wire rope is not lubricated properly, this will lead to premature wear of the
wire.
4.Does the hoist operate smoothly without abnormal sounds?
Stop the hoist if you hear any abnormal sounds when the hoist is operating.
MONTHLY INSPECTION
Air & Allied Sales (Pacific) Pty Ltd
www.air-allied.com.au

18
3. Check the Hoist
Check for loose bolts, rust on the hoist, paint removal or other damaged areas. If
any of these problems are seen, repairs should be performed immediately.
ANNUAL INSPECTION
1. Remove all debris or dirt from the hoist.
2. After using the hoist inorder to prevent rust build up, apply about 10 cc of lubricating
oil into the inlet of the hoist and operate the hoist for about 3〜4 seconds.
3. To prevent dirt or debris from entering the inlet of the hoist, apply a plug storage.
4. To prevent rust, store the hoist in a dry place.
1.The hoist should be disassemblied and inspected once a year. ( For details, contact
your dealer or distributor. )
2.For repairs, contact your dealer or distributor.
STORAGE
Air & Allied Sales (Pacific) Pty Ltd
www.air-allied.com.au

19
TROUBLE SHOOTING
△
!WARNING ; For dis-assembly or repairing the hoist, please contact your dealer or
distributor before proceeding.
Item Cause Countermeasure
*Lack of air pressure *Check air pressure and
consumption
*Hose size too small *Confirm air hose size
*Brake is not opening fully *Check with dealer
*Lack of lubrication *Supply lubrication to hoist
*Wearing of vanes *Check with dealer
Poor lifting performance
*No air supply *Check air line for bending
of hose
*Foreign material in motor *Dealer must dis-assembly
and remove
*Brake is not opening *Check with dealer
Does not operate
Air is leaking *Damage to the packing or
O-rings
*Have parts replace by
dealer
Air & Allied Sales (Pacific) Pty Ltd
www.air-allied.com.au
This manual suits for next models
1
Table of contents
Other Toku Industrial Equipment manuals


