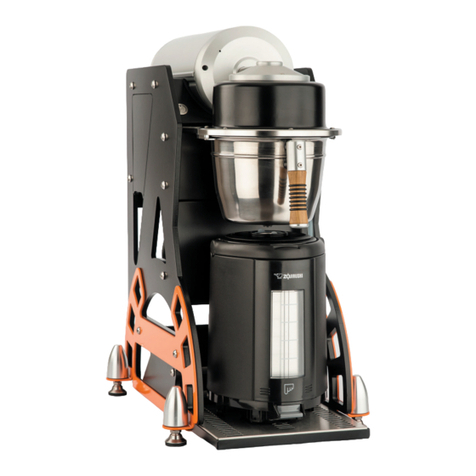
Tone TOUCH 03 User manual

03
ORIGINAL INSTRUCTIONS
TOUCH 03

Content
02
TOUCH 03
02 | Summary
03 | Dimensions
04 | General instruction
05 | Installation instruction
06 | Plumbing connection
07 | Electrical connection
08 | General terms for safe use / Initial Set-Up
09 | Machine overview
10 | Button functions
11 | Button functions
12 | Connecting the TONE Touch 03
13 | Connecting the TONE Touch 03
14 | Edit recipes
15 | Edit recipess
16 | Edit recipess
17 | Edit recipess
18 | Edit recipess
19 | Edit recipess
20 | Advanced tab
21 | Advanced tab
22 | Service tab
23 | Service tab
24 | Cleaning / Descaling
25 | Warranty
26 | TOUCH 03 - Wiring
27 | Technical Data / Declaration / Contact

Dimensions
03

General instruction
04
This appliance can be used exclusively by skilled professionals. Avoid the use of this appliance by children or
unqualified persons.
This machine shall be destined exclusively to the use it has been expressly designed for. Any other use shall be
considered ill-suited and improper. The manufacturer shall not be considered responsible for any damages
caused by improper use.
Children shall be supervised and never allowed to play with the appliance.
Children shall be never allowed to clean or maintenance the appliance.
The electric safety of the machine is achieved only when the machine is correctly connected to a grounded
electric system.
The user shall arrange electric, water and draining systems in a suitable position to allow correct machine
installation.
The installer of TONE devices is not responsible for making modifications to existing water and power
connections in the customers facilities.
If the electric supply cable is damaged, it must be replaced by another cable
provided by the manufacturer or by its Technical Service.
For good machine functioning and maintenance, it is mandatory to install a water softener in order to avoid scale
formation. This must be evaluated by the installer and the user shall leave a space for the correct
installation of a water softener, following the instructions contained in its manual.
The machine shall be placed on a surface guaranteeing secure support. The machine must be connected
exclusively to an appropriate cold drinking water source, in compliance with national norms and rules.
The pressure of the incoming water must be between 1.5bar and 3bar. If this requirement is not met, consult the
manufacturer.
A shut-o tap must be installed between machine water hose and water system to block water flow in case of
necessity.
Do not use water jet devices in the area where TONE 03 is installed!
Do NOT tilt TONE 03 during operation! Max. tilt angle < 5°.
Only to be operated by trained personnel!

Installation instruction
05
Cold Water | Softener
|
Powercord
P | N | GR
CAUTION
Improper electrical installation will damage electronic components.
Damage caused by incorrect electrical connections in not covered by warranty.
CAUTION
Power to brewer must be OFF before
proceeding with plumbing installation.
Ethernet connection cable

Plumbing connection
06
INSTALLATION INSTRUCTIONS
• Brewer should be installed on a secure, level, surface capable of fully supporting the weight of the brewer,
including accessories that may be placed on the brewer (such as coffee decanters, filters, etc.).
• A potable water line (cold water) capable of consistently supplying the minimum flow rate within the noted
pressure range is required at the install location.
• A grounded electrical connection to a circuit that meets the electrical specifications of the brewer and is
protected by the appropriate size and type of breaker is required.
CAUTION:
POWER TO BREWER MUST BE OFF BEFORE PROCEEDING WITH PLUMBING INSTALLATION.
The brewer must be rinsed after being connected to the water supply line. Remaining air in the system will be
removed. Otherwise it may lead to malfunctions and noise in the housing. Follow instructions in section
Button functions.
The pressure of the water line must be within 1.5bar – 3bar.
The installation of a water softening filter system is mandatory for the use of TONE equipment. Any violation of
this regulation will lead to a complete loss of any warranty on the complete system.
The brewer has a descaling tracking function available…

Electrical connection
07
WARNING:
The brewer must be disconnected from the power source until specified in INITIAL SET-UP.
CAUTION – Improper electrical installation will damage electronic components. Damage caused by incorrect
electrical connections is not covered by warranty.
An electrician must provide electrical service as specified in conformance with all local, state and federal
electrical codes.
Use a voltmeter to check the voltage and color coding of each conductor at the electrical source.
Ensure power switch on rear of brewer is in the off position. Connect brewer to power source and verify
voltage. If plumbing has been hooked up, brewer is ready for Initial Set-Up. If not, disconnect brewer from
power source.
WARNING: Before servicing or opening this device make sure the brewer is disconnected from power by
pulling its plug. The service technician has to see the pulled plug during the whole service operation.

General terms for safe use / Initial Set-Up
08
This machine is only intended for the use for which it was basically developed. Any other use shall be considered
ill-suited and improper. The manufacturer shall not be considered responsible for any damages
caused by improper use. The electric safety to the machine is achieved only when the machine is correctly
connected to a grounded electric system.
This fundamental requirement shall be assessed by qualified personnel. Manufacturer and installer shall not be
held responsible for any damages caused by the lack or inefficiency of system grounding.
Some fundamental rules shall be followed when using any electric appliance:
• Do not use the appliance barefoot or when hands / feet are wet.
• Children shall be supervised and never allowed to play with the appliance.
• Unplug the appliance from the electric system and turn of water supply before carrying out any cleaning and
ordinary maintenance.
• Do not put the appliance under a jet of water, nor plunge it into water to clean it.
• Do not leave the appliance turned-on and unattended for long periods (e.g. 1 day)
• In order to ensure the efficiency and correct functioning of the appliance, it is necessary to follow the
instructions provided by the manufacturer and to carry out its ordinary maintenance.
• The appliance shall be installed so that the highest surface is at least 1 metre high.
• The appliance shall be placed on a level horizontal surface to ensure a safe use.
• Ideally the appliance is bolted onto the working surface using the included pair of slotted countersunk screws
(M10, stainless).
• The temperature range of the environment surrounding the appliance shall be included between 5°C and 30°C.
In case the appliance is tempo- rarily placed in an environment where the temperature is below 0°C, contact a
local Technical Service authorized by the manufacturer.
• When installing the appliance, use exclusively the current set of functions provided with the appliance itself.
• In case of appliance breakdown and/or malfunctioning, turn the main switch OFF and refrain from trying to
repair it. Then contact a local Technical Service that has been authorized by the manufacturer.
WARNING: Before servicing or opening this device make sure the brewer is disconnected from power by
pulling its plug. The service technician has to see the pulled plug during the whole service operation.
If the above-mentioned instructions are not followed, the safety and wear of the appliance can be
jeopardized and its guarantee is no longer valid.
This appliance can be used exclusively by skilled professionals. Avoid the use of this appliance by children or
unqualified persons. This appliance shall be used only for the use it has been designed for. Any other use shall be
considered wrong or unreasonable and therefore the manufacture shall not be held responsible for any damages
caused to persons, animals or things due to a wrong or unreasonable use of this appliance.

Machine overview
09
COMPONENTS TOUCH 03
1 | power switch (on back side)
2 | four programmable buttons for recipe selection
3 | spray head
4 | support for smaller brewing vessels
5 | drip tray
1
3
5
2
4

Button functions
10
Recipe selection:
Descaling:
Rinsing:
Button 1 – 4 (from left to right)
Push and hold Button 1 while switching the main switch ON
Push and hold button 1 & 2 while switching the main switch ON.
Stop the rinsing by switching the main switch OFF
-> rinse the device after a long-lasting down time or when there
may be air inside the system.
-> Before air transport or exposure to temperatures below 4°C all
remaining water inside the brewer has to be removed. Disconnect
the water supply and start the rinsing procedure. Insert an air-loa-
ded syringe into the waterline and carefully push all remaining
water out.
NEVER USE COMPRESSED AIR! This will destroy the sensitive flow
meter.
Blue chasing light after switching the brewer ON and after finishing
a recipe
->->->-> <-<-<-<- ->->->->
-> Descaling necessary
-> Follow instructions in section Cleaning / Descaling
Buttons 3 & 4 light up blue
-> No flow / water supply interrupted (Heating element can
overheat) Flow meter defective
-> Check water supply. Otherwise contact the customer support.
Buttons 2 & 4 light up blue
-> Proportional valve is leaking
-> Contact the customer support.
Buttons 2 & 3 & 4 light up blue
-> Brewer overheated / error on heating element / defective
thermostat / Flow problem not resolved / missing signal from
solid state relay
-> Switch brewer OFF and let it cool down. This can be accelerated
by rinsing with cold water (s. Button Functions -> Rinsing).
Otherwise contact the customer support.

11
Buttons 1 & 3 light up blue
-> NTC thermal sensor disconnected
-> Contact the customer support.
Brewing
Equip a brewing vessel of your choice with a filter and fill in an appropriate amount of brewing ingredients.
Place the brewing vessel with loaded filter underneath the spray head and select the desired recipe by pushing
the corresponding button. As soon as the program is running the button starts to blink. Be aware that the
water flow may be interrupted during the brewing process once or several times. Wait until the recipe is
processed completely (button stops to blink).
Remove the brewing vessel from the appliance and the TONE TOUCH 03 is ready for use again immediately.
The program can be aborted by pushing the chosen button again during process.
There are four factory standard recipes installed on every TOUCH 03 (from left to right):
1 Volume: 300ml Taste: mild
2 Volume: 300ml Taste: medium
3 Volume: 300ml Taste: bold
4 Volume: 300ml Taste: xbold
The recipes can be exchanged or modified by connecting the TONE Tablet PC to the TOUCH 03.
The TONE Tablet pc is an optionally available device, which can be purchased directly from TONE or any qualified
service partner. It is also possible to order new settings as a part of a service operation.
Trouble shooting
If vibrating noises are heard from the machine housing, there could be air in the system. This can be the case in
particular if the water supply line has been interrupted. In order to remedy the fault, the device must be rinsed.
Follow the instructions in the section Button Functions.
In case of any other issues, please contact your service partner. A replacement of the Blackbox might be
necessary.

Connecting the TONE Touch 03
12
Option 1
LAN-2-USB Converter
You need a LAN-2-USB Converter (#650309)
and a TABLET computer (#650308)
-> connect the TONE to the LAN-2-USB converter
-> connect the TABLET to the LAN-2-USB converter
-> only one TONE can be connected to the TABLET
Option 2a
WiFi-Router
You need a WiFi router (#650310)
(router pre-configured by TONE)
and a TABLET computer (#650308)
-> connect the TONE to the WiFi router.
-> connect the TABLET to the WiFi router.
-> you can connect one or more TONEs to the tablet.
Option 2b
LAN-switch / LAN-router and LAN-2-USB Converter
You need a LAN switch or router (#650310)
and a LAN-2-USB converter (#650309)
(router pre-configured by TONE)
and a TABLET computer (#650308)
-> connect the TONE to the LAN switch
-> connect the LAN switch to the tablet via a
LAN-2-USB converter
-> you can connect one or more TONEs to the tablet.

13
Option 3
Ethernet-2-WiFi Converter
For each TONE you need a Ethernet-2-WiFi Converer
(#650307)
(converter pre-configured by TONE)
a WiFI Router (#65310)
and a TABLET computer (#650308)
-> connect the TONE to the WiFi router.
-> connect the TABLET to the WiFi router.
The password to unlock the tablet is “tone”.
Configuring of the USB-C adapter (Gigabit Ethernet) for other device than TONE Tablet
1. Connecting the adapter with your device
2. Control panel -> Network and Internet -> Network and Sharing Center -> Change adapter settings ->
Ethernet -> Properties
3. Click on Internet Protocol Version 4 (TCP/Pv4) -> Properties
4. Select Use the following IP address: and enter the following address
IP address: 192.168. 1 . 1
Subnet mask: 255.255.255. 0
Default gateway: leave empty
IOGear GWU637 Ethernet-2-Wifi
The adapter is preconfigured as follows:
SSID: ToneTouchHotspot
Encryption: WPA2-PSE(AES)
Password: tone2020hotspot
Please consider the user manual from IOGear for the configuration to other networks.

Edit recipes
14
Connect your TONETouch03 brewer with the TONE tablet computer as described in the previous section.
Once the installation is complete, switch your TONE Touch 03 ON and it will appear in the list of available TONE
equipment on the left side of the Touch03 tab. The factory pre-set name will be ToneTouch03_XXXXX
(XXXXX=serial number). This can be customised later (s. Service tab).
Click on your device in the list and the standard configuration of the recipe selection buttons will be displayed. You
can either change this configuration by clicking each button individually and chose recipes from the list which will
be explained later. Or you can select a whole set of recipes which you can compose in the Sets tab.
Please remark that your adaptions are made directly on the device. There is no need for a transfer command or a
click on a confirmation checkbox here.

15
The Basic tab provides a tool for a quick and successful recipe creation. There are four pre-set options for coffee
and three for tea, which will result in different flavour intensities of the beverage.
For the coffee recipes, the brewing temperature and the pulsation of the water flow is pre-defined, based on
the experience of TONE coffee experts. You can simply adjust the amount of water (click or click and hold on the
arrows) and choose between cone and flat filters. Make sure you have installed the correct spray head insert for
each filter type. For the cones you need to install the insert with 5 holes, for the flat filter the insert with 18 holes.

Edit recipes
16
Click on the save button and your recipe will appear on the recipe list.
The name of the recipe tells you the strength of the coffee, the amount of water and the applied filter type.
The settings of the tea recipes are slightly different. Choose the water temperature considering the type of tea
which shall be prepared. The colours of the button frames correspond to the tea types. The different tea options
differ regarding the number of pulses and their characteristics.

17
The name of a tea recipe will tell you the strength of the flavour, the amount of water and the brewing
temperature.
See below a list of sample recipes for each pre-set button. When a recipe is no longer needed, you can delete it in
this window by clicking “delete recipe”.
The Set tab is empty when used for the first time. You can compose a set of recipes by clicking on each of the four
square buttons and choosing a recipe from the list.

Edit recipes
18

19
Once you have made your selection of recipes, click on the button “new set” and give it a meaningful name.
Your set then appears on the set list on the right side of the window. This list will be displayed when you click on
the set bar in the Touch 03 tab. Set which are not needed anymore can be deleted by clicking on “delete set”.

Advanced tab
20
The Advanced tab provides you a very intuitive and comprehensive tool for the creation of new recipes. You can
set the temperature of each extraction phase (bloom, turbulence, development) and define the characteristics of
the water pulses (quantity, flow ratio, duration, interval). Just drag the blue points in the corner of the pulses into
the desired position. The current values will be displayed at the top the graphical input screen.
Dragging vertically will change the flow ratio. Dragging horizontally affects time-correlated features.
First of all, you should set the water target which you would like to produce. This value will not be exceeded.
Varying the bloom or the turbulence phase will adapt the development phase automatically. The development
phase itself is self-adjusting between duration and flow ratio of its pulses. Depending on how detailed you would
like to compose your recipe, the display resolution can be set 1 or 0.1.
Other manuals for TOUCH 03
2
Table of contents
Other Tone Brewing System manuals
