Topaz 19" TOPAZ SL Instructions for use

TOPAZ™ SL SERIES
Hardware User Manual
Manual Version TPZ-SL 1.0s

TOPAZ™ SL Series –Hardware User Manual
1
Our Full Product Range
Full details of all TOPAZ™ products available can be found by visiting our web site
www.topazdigital.com
Small Format POS
Your NOT so silent sales partner!
This counter top display is the ideal
way to get your message noticed,
deliver dynamic content and drive
your sales message to your
customer at the point of decision
With inputs including HDMI, DVI &
VGA, the NEW 10” TOPAZ™
Display is designed to mirror our
current 10” POS whilst offering the
perfect solution when looking to link
into an existing network or deploy
an enterprise level solution.
Small enough to fit into areas not
generally able to take large format
advertising screens, yet big
enough to make a real statement
with your promotional messages.
The patented HalO™ ensures your
message stands out and truly gets
noticed delivering the very best
ROI.
Large Format Displays
Our best seller! This screen features the ‘Smart Insert’
compartment to house your media player conveniently
behind the display together with one of the lowest Total
Cost of Ownership [TCO] on the market today with the
energy saving features built into the display.
Create maximum impact with the TOPAZ™ 55”
LCD –120Hz technology drives this display
ensuring the most exceptional graphics together
with high brightness this display really makes a
statement.
This display is ultra sleek with its thin and elegant
design coupled with the LED backlighting giving
breathtaking results your audience will be captivated by
this display.
Our 46” LED display delivers all the design
features associated with the brand together with
the added benefit of an in-built media player for
basic stand-alone digital signage presentations.
10” TOPAZ POS
23” TOPAZ POS
42” TOPAZ LCD
55” TOPAZ LCD
40” TOPAZ LED
46” TOPAZ LED
10” TOPAZ HDMI

TOPAZ™ SL Series –Hardware User Manual
2
Our Full Product Range
Full details of all TOPAZ™ products available can be found by visiting our web site
www.topazdigital.com
SL Series
Our SL Series screens with inbuilt Wi-Fi allow you to seamlessly connect to our TOPAZ™ CMS. With
this model of screen no other equipment is required to deliver networked digital signage from
anywhere in the world. We include everything you need… Just add Power!
19” TOPAZ SL
32” TOPAZ SL
42” TOPAZ SL
55” TOPAZ SL
22” TOPAZ SL

TOPAZ™ SL Series –Hardware User Manual
3
Contents:
1. Introduction................................................................................................................................ 5
1.1 Box Contents ................................................................................................................... 5
1.2 Product Overview ........................................................................................................... 5
1.3 Remote Control............................................................................................................... 6
1.4 Replacing the Remote Control Battery ...........................................................................7
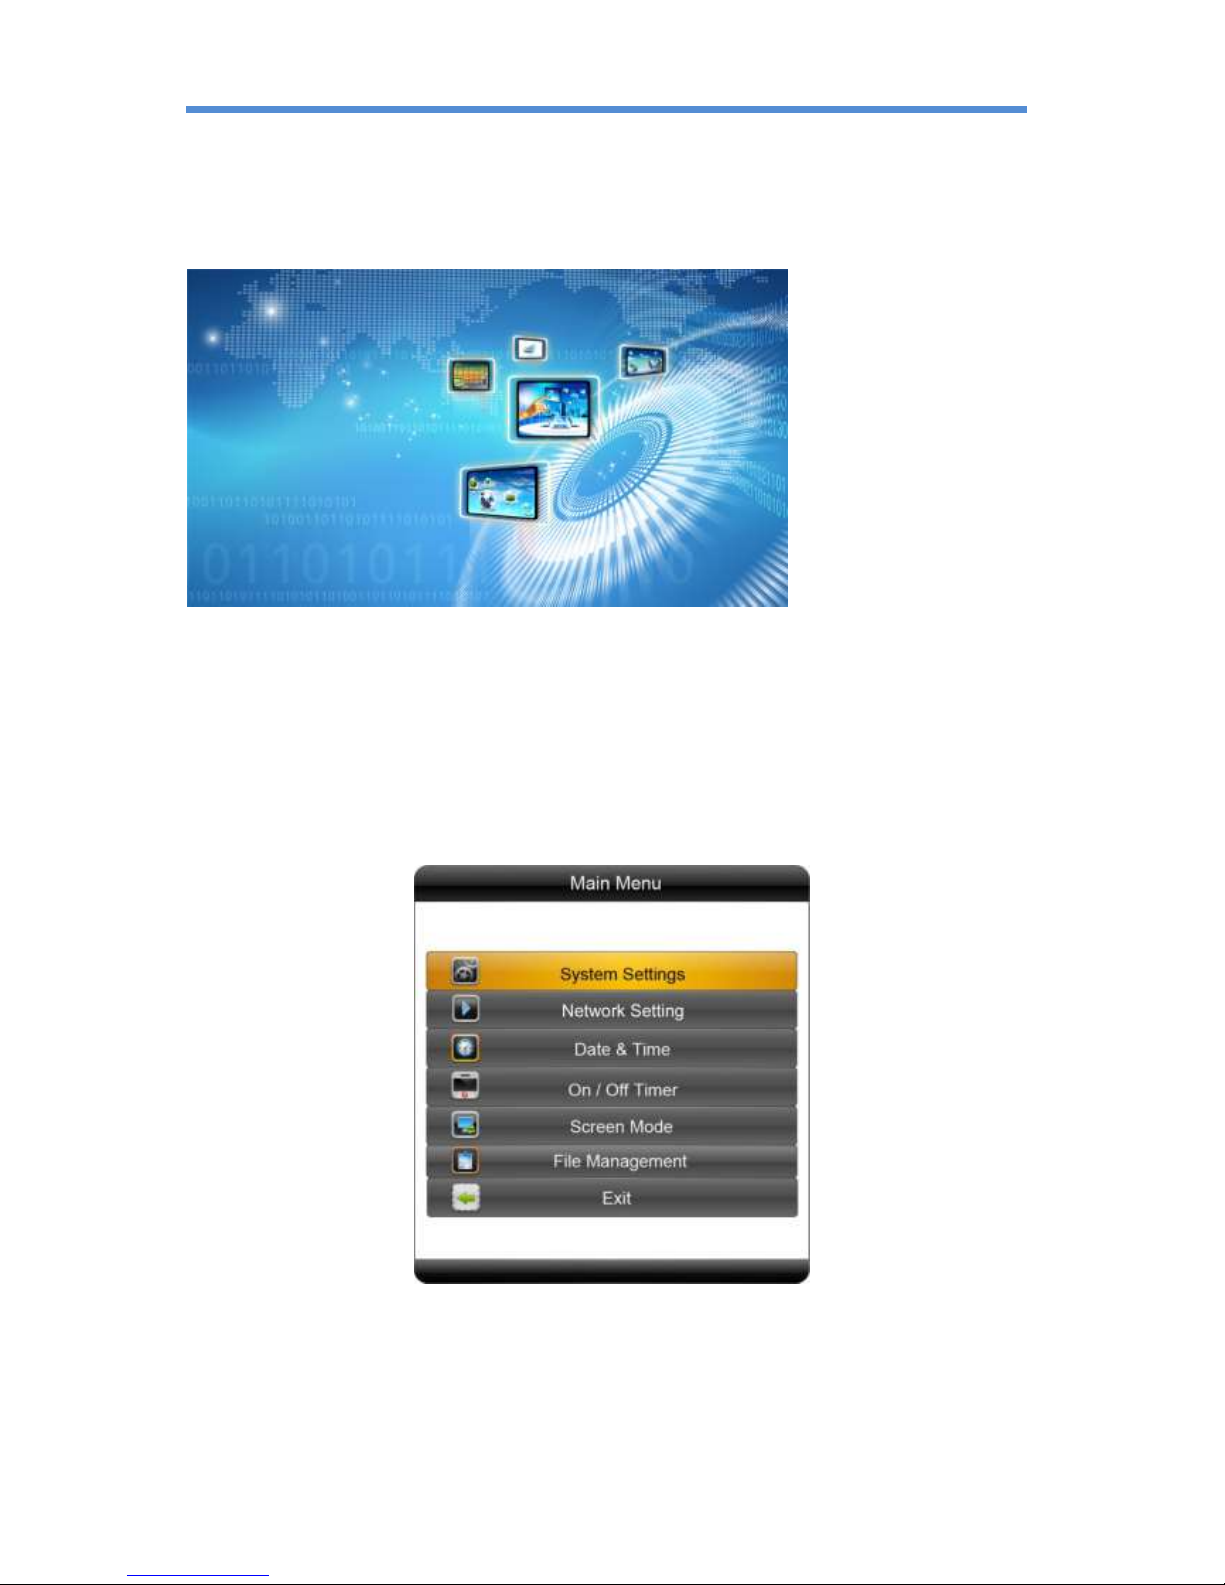
1.5 System Menu Operation .................................................................................................8
1.5.1 System Settings ........................................................................................................9
1.5.2 Network Setting .....................................................................................................12
1.5.3 Date & Time ...........................................................................................................17
1.5.4 On/Off Timer.......................................................................................................... 18
1.5.5 Screen Mode .......................................................................................................... 20
1.5.6 File Management ...................................................................................................20
1.5.7 Exit..........................................................................................................................21
1.6 Display Settings .............................................................................................................22
2. System Operation ..................................................................................................................... 25
2.1 Supported Media Files ..................................................................................................25
2.2 Inputs ............................................................................................................................ 25
3. Installation ................................................................................................................................ 26
3.1 Wall Mounting...............................................................................................................26
4. F.A.Qs and Troubleshooting Guide ...........................................................................................31
4.1 Why is my screen displaying "Error (Screen Mode Unmatch)"?................................... 31
4.2 How do I update my screen if it is not connected to the internet? (Plug and play
method) 32
4.3 How do I play PowerPoint presentations on my display?............................................. 37
4.3.1 Option 1 (for plain slides with no animation): ....................................................... 37
4.3.2 Options 2 (for presentations with animation): ......................................................37
4.4 My media file does not fit properly on the screen .......................................................38
4.5 My moving GIF files will not move................................................................................ 38
Table of Figures
Figure 1 Product Overview...................................................................................................................5
Figure 2 Home Screen.......................................................................................................................... 8

TOPAZ™ SL Series –Hardware User Manual
4
Figure 3 Screen Inputs........................................................................................................................25
Figure 4 Security Screw...................................................................................................................... 30

TOPAZ™ SL Series –Hardware User Manual
5
1. Introduction
Congratulations on the purchase of your TOPAZ SL Screen. Please read carefully and follow all
instructions in the manual before first use.
This product should not be exposed to any liquids dripping or splashing and no objects filled with
liquids, such as vases, should be placed on the product.
For user convenience, a number of operations can be performed through the remote control.
Attention:
1. Do not change any default setting when it is unnecessary.
2. Keep the product far away from water during installation and use.
1.1 Box Contents
1 x TOPAZ SL Screen
1 x Mounting Plate (with Security Screw).
1 x Power Cable.
1 x CD (User Manual).
1 x Remote Control (with 2xAAA batteries).
1 x Locking Key.
1 x Wi-Fi Aerial.
1.2 Product Overview
Figure 1 Product Overview

TOPAZ™ SL Series –Hardware User Manual
6
1.3 Remote Control

TOPAZ™ SL Series –Hardware User Manual
7
Replacing the Remote Control Battery
1. Slide the battery cover off, as shown below.
2. Remove the used batteries.
4. Insert the two new AAA batteries with their terminals corresponding to the indicators.
5. Put the cover back on.

TOPAZ™ SL Series –Hardware User Manual
8
1.4 System Menu Operation
In order to access the Setup Menu you must first press “STOP” button to go back to the home screen
(pictured below). You can then bring up the Main Menu by pressing “SETUP”.
Figure 2 Home Screen
Main Menu includes following sub-menus: System Settings, Network Setting, Date & Time, ON/OFF
Timer, Screen Mode, File Management and Exit.
Press ↑ & ↓to select the right item, press “PLAY” to confirm selection. Choose Exit to exit the Main
Menu.

TOPAZ™ SL Series –Hardware User Manual
9
1.4.1 System Settings
The sub-menus within this section are OSD Language, Clock Display, Scrolling Text, USB Port as well
as Restore to Factory Settings and Return to Main Menu options.
OSD Language
The On Screen Display supports four languages –Chinese, English, French and Japanese. As with all
menu operation press ↑ & ↓to select the right item, press “PLAY” to confirm selection.
Clock Display
There are 5 options as pictured below:
Top Left: The time will be displayed on top left of the screen.
Bottom Left: The time will be displayed on bottom left of the screen.
Top Right: The time will be displayed on top right of the screen.
Bottom Right: The time will be displayed on bottom right of the screen.
Off: The screen doesn’t display time.
Note: You should set this to “Off” if you wish to add a clock via the Content Management System
later.

TOPAZ™ SL Series –Hardware User Manual
10
Scrolling Text
This setting is irrelevant and is only significant if the screen is being used as a standalone display and
is not networked.
USB Port
This setting is irrelevant and is only significant if the screen is being used as a standalone display and
is not networked.

TOPAZ™ SL Series –Hardware User Manual
11
Restore To Factory Settings
Highlight “Yes” and press “PLAY” to restore factory settings; this will restore all system settings back
to default.
Play Log and Synchronous Set
Please do not alter these settings, doing so may affect the functionality of your screen.

TOPAZ™ SL Series –Hardware User Manual
12
1.4.2 Network Setting
Server Setting
There are two options here, IP Mode and Domain Mode. This feature directs your screen to the
server it will be collection information from. By default your screen should already be set to “IP
Mode” with the IP address of: 185.17.196.194 Port 80.
Local ID
This is your screen’s serial number. This is pre-set and cannot be changed.
MAC Address
This is your screen’s MAC Address. This is pre-set and cannot be changed.
IP Address
There are two options here, DHCP and Stable IP. By default your screen should already be set to
DHCP mode, however if your internet connection is subject to strict security settings or a firewall
that only allows devises with authorised IP addresses to access the internet, you may need to input
these settings into the “Stable IP” section. Here you will be asked to input the following:
IP Address
Subnet Mask
Default Gateway
DNS Server
Network Type
There are three options here, 3G, WiFi and LAN. Please make sure your screen is set to “WiFi”.
Wireless Network Settings
Here is where you set up your screen’s Wi-Fi connection. When you open this menu you should first
see a list of available Wi-Fi networks, navigate to yours and press “PLAY” on the remote control.

TOPAZ™ SL Series –Hardware User Manual
13
You will now be asked to enter your Wi-Fi network password. Press “PLAY” to bring up the on-screen
keyboard.

TOPAZ™ SL Series –Hardware User Manual
14
If your password contains numbers you can access the number keypad by highlighting “123” and
pressing “PLAY”. Once you have entered your password, highlight the “Enter” key and press “PLAY”.
Now highlight “Connect” and press “PLAY”.

TOPAZ™ SL Series –Hardware User Manual
15
You will now see the following as your screen attempts to connect to your Wi-Fi network. The status
should be “Connecting…”.
Once your screen has established a connection to your network the status will change to “Has
connected”.

TOPAZ™ SL Series –Hardware User Manual
16
Finally, navigate to “Exit” and press “PLAY”. This will bring you back to the “Network Settings” menu.
Navigate to “Save and Reboot” and press “PLAY”. This will save your network settings and ensure
that every time your screen is powered up it will use these settings to connect to your Wi-Fi
network.
Your screen is now ready to be updated via the CMS software.
Note: If you have made any changes to this section you must highlight and select “Save and
Reboot” before they can take effect.

TOPAZ™ SL Series –Hardware User Manual
17
1.4.3 Date & Time
To set the date and time first select this menu to open the options pictured below. Next, use ←& →
to select which value you wish to modify. Now you can change the setting by pressing ↑& ↓.
We recommend that you keep the “Time Zone” set as “GMT” and the “NTP Mode Set” to “Sync at
power on”. This means that you do not have to manually set the time or date, it will automatically
retrieve these details from the internet.
To confirm, highlight “Update Date & Time” and pres “PLAY”. The date and time have been updated;
you can now select Return to the Main Menu.

TOPAZ™ SL Series –Hardware User Manual
18
1.4.4 On/Off Timer
There are 2 modes to choose from - Daily and Weekly.
Weekly
You can set the on/off timer for each individual day of the week. For example, on Sunday, 6:00am
on, 11:00am off:
1. Choose Weekly in the On/Off Timer menu, press “PLAY”to confirm:
2. Choose Timer in the Timer Mode, then the three Timer items become selectable. Choose the
Status of Timer(1) to be ON, then make the On Time to be 06:00, Off Time to be 11:00.
3. Choose Save New Settings to finish the setting. Then highlight and select Return.

TOPAZ™ SL Series –Hardware User Manual
19
Daily
You can also set the on/off timer to be the same every day.
Choose Daily in the On/Off Timer menu, press “PLAY”to confirm:
There are 3 options available:
Timer: user can set 3 timer groups; each group can set “On” or “Off”.
Always On: after connecting the power cable, the product will powered on.
Always Off: after connecting the power cable, the product will power off automatically one
minute later.
Note: Any timer settings can later be overridden by the Content Management System. If you want all
of your screens to have the same On/Off times we recommend that you control this using the
Content Management Software to save time.
This manual suits for next models
4
Table of contents
Popular Interactive Whiteboard manuals by other brands

Genee
Genee G-Touch user manual

Ideaboard
Ideaboard Interactive whiteboard user manual

SMART
SMART 8070i-SMP installation guide

I.SOUND
I.SOUND MY MESSENGER BOARD user guide

Smart Technologies
Smart Technologies Parts Kit for SMART Board 580 manual

Smart Technologies
Smart Technologies Smart Board quick reference