TOPMAQ MJ10-SB250 User manual
250MM CIRCULAR SAWBENCH
MODEL :
MJ10-SB250
CAUTION: Read the instruction manual before using the appliance

This manual has been prepared for the owner and operators of Model HM-TS200. Its purpose, aside from
machine operation, is to promote safety through the use of accepted correct operating and maintenance
procedures. Completely read the safety and maintenance instructions before operating or servicing the machine.
To
obtain maximum life and efficiency from your circular saw bench, and to aid in using the machine safely, read
this manual thoroughly and follow instructions carefully.
Table ofContents
Safety Rules ................ ...………………………………………………………………………….. ………..………2-4
Safety Decals .............……………………………………………………………………….....……………..……...4
General Safety Procedures for circular sawbench………………………………………………..……….…….4-5
Grounding Instructions ...................................................................................................………………..…............ .5
Features ... ....………………………………………………………………………............. ..……………….……......6
Specifications ............... ..……………………………………………………………………………………….….….. 6
Receiving .....................………………………………………………………………………….………….……... ...6
Installation & Assembly ...……………………………………………………………………………..………….…... 7
Mounting and Adjusting the Splitting Wedge ..……………………………….………………….………………..7
Adjusting the Longitudinal Limit Stop …………………………………………………………………………...7-8
Adjusting the Cutting Height………………………………………………………………………………………..8
Adjusting the Pivot…………………………………………………………………………………………………8-9
Working with the circular sawbench…………………………………………………………………………………...9
Cutting narrower work pieces, edges and strips ……………………………………………………………………9
Diagonal limit stop……………………………………………………………………………... ...…………………..9
Cross-cutting narrower work pieces………………………………………………………………………………. 10
Angular limit stop ..………………………………………………………………………………….………………... 10
Malfunctions ………… .............................................................................................…... ...…………………... 11
Parts Lists & Exploded Views Table Saw ............….………………………………………..………............ ... 12-14
Optional Accessories .....………………………………………..……………….………….……………………... 15
Safety Rules
As with all machines, there is a certain amount of hazard involved with the use of this circular sawbench. Use the
machine with the respect and caution demanded where safety precautions are concerned. When normal safety
precautions are overlooked or ignored, personal injury to the operator can result.
Read, understand and follow the safety and operating instructions found in this manual. Know the
limitations and hazards associated with this circular sawbench.
Electrical grounding. Make certain that the machine frame is electrically grounded and that a ground lead
is
included in the incoming electrical service. In cases where a cord and plug are used, make certain that
the
grounding plug connects to a suitable ground. Follow the grounding procedure indicated in the local
electrical
code.
Eye safety.
Wear an approved safety shield, goggles, or glasses to protect eyes. (
NOTE:
Common eye
glasses are
not
safety glasses.)
Personal protection. Before operating the machine, remove tie, rings, watch and other jewelry and roll up
sleeves above the elbows. Remove all loose outer clothing and confine long hair. Protective type footwear
should be used. Do not wear gloves.
Guards. Keep the machine guards in place for every operation for which they can be used. If any guards are
removed for maintenance, DO NOT OPERATE the machine until the guards are re-installed.
Work area.
Keep the floor around the machine clean and free of scrap material, saw dust, oil and other
liquids to minimize the danger of tripping or slipping. Be sure the table is free of all scrap, foreign material
and tools before starting to cut. Make certain the work area is well lighted and that a proper exhaust system
is used to minimize dust. We recommend the use of anti-skid floor strips on the floor area where the operator
normally stands and that each machine’s work area is marked off. Provide adequate work space around the
machine.
Operator position. Maintain a balanced stance and keep your body under control at all times. Do not stand
in line with the saw blade or work piece and do not allow anyone else to do so. Never climb on or near the
2HM-TS250 250MM CIRCULAR SAWBENCH
VER 07-07-2013

saw.
Do not overreach. Use a support table or have a helper or “tailman” take stock away from the back side of the
blade.
Housekeeping. Before turning on machine, remove all extra equipment such as keys, wrenches, scrap, and
cleaning rags away from the saw.
Careless acts. Give the work you are doing your undivided attention. Looking around, carrying on a
conversation, and “horseplay” are careless acts that can result in serious injury.
Disconnect machine before performing any service or maintenance or when changing blades. A machine
under repair should be RED TAGGED to show it should not be used until the maintenance is complete.
Alignment. Check the alignment of the splitter, fence and miter slot to the blade. A caution decal is installed on
each guard and splitter to remind the operator of the dangers of mis-alignment.
Maintain tools in top condition. Check the saw blade for cracks or missing teeth. Do not use a cracked or
dull blade or one with missing teeth or improper set. Make sure the blade is securely locked on the arbor.
Hand safety. Keep hands clear of the blade area. Do not reach past the blade to clear parts or scrap with the
saw blade running. Never saw free hand. Avoid awkward operations and hand positions where a sudden slip
could cause your hand to contact the blade.
Safety devices. Always use the splitter, blade guard, push stick and other safety devices for all operations
where they can be used. On operations such as dadoing or molding where the blade guard cannot be used,
use
feather boards, fixtures and other safety devices and use extreme caution. Reinstall the splitter and
blade
guard immediately after completing the operation that required their removal.
Saw blade rotation. Be sure the saw blade rotates clockwise when viewed from the motor side (left side) of the
machine.
Adjustments. Make all adjustments to the machine and operational setup with the power off. Never remove the
insert with the blade running.
Material condition. Do not attempt to saw boards with loose knots or with nails or other foreign material, on
its
surface. Do not attempt to saw twisted, warped, bowed or “in wind” stock unless one edge has been
jointed
for guiding purposes prior to sawing.
Large stock. Do not attempt to saw long or wide boards unsupported where spring or weight could cause the
board to shift position.
Job completion. If the operator leaves the machine area for any reason, he should turn “off” the power to the
table saw motor and wait until the saw blade comes to a complete stop before his departure. In addition, if the
operation is complete, he should clean the table saw and the work area. NEVER clean off the table saw with power
“on” and NEVER use the hands to clear sawdust and debris; use a brush.
If you are not
thoroughly familiar with the operation of this circular sawbench, obtain advice from your
supervisor, instructor or other qualified person.
Drugs, alcohol, medication. Do not operate this machine while under the influence of drugs, alcohol, or any
medication.
Health hazards.
Some dust created by power sanding, sawing, grinding, drilling and other construction
activities contains chemicals known to cause cancer, birth defects or other reproductive harm. Some
examples of these chemicals are:
* Lead from lead-based paint.
* Crystalline silica from bricks and cement and other masonry products. *
Arsenic and chromium from chemically-treated lumber.
Your risk from these exposures varies, depending on how often you do this type of work. To reduce your
exposure to these chemicals, work in a well-ventilated area, and work with approved safety equipment, such as
those dust masks that are specifically designed to filter out microscopic particles.
3HM-TS250 250MM CIRCULAR SAWBENCH
VER 07-07-2013

Use proper extension cord: Make sure your extension cord is in good condition.When using an extension cord,
be sure to use one heavy enough to carry the current your product will draw. An undersized cord will
cause a
drop in line voltage resulting in loss of power and overheating. If in doubt, use the next heavier
gauge the
smaller the gauge number, the heavier the cord.
Familiarize yourselfwith the following safety notices used in this manual:
Familiarize yourself with the location of these decals on your table saw.
CAUTION: (This means that if precautions are not heeded, it may result in minor or moderate injury
and/or possible machine damage)
WARNING:
(This means that if precautions are not heeded, it could result in serious injury or
possibly even death).
Safety Decals
GeneralSafety Procedures for Table Saw
This machine has been built exclusively for woodworking. Do not alter the design of the machine or use it for
purposes not intended by the manufacturer. The manufacturer is not liable for damage or injury, which
results from incorrect assembly, operation or electrical connections. This machine must be operated under strict
safety regulations. This is the only way to reduce the risk of accidents.
……Location
Certain types of woods. press boards, etc. produce hazardous dust emissions when being processed. For
this
reason, processing procedures must be performed with an exhaust unit (air speed at the connection
points:
20m/s) Be sure to switch on the machine and the exhaust unit simultaneously. The main cable plug
must be
connected as appropriate for the electrical installation and must have an earth lead (or a directly
earth
conductor for 380 V). It is advisable to have a qualified electrical connection. Appropriate lighting must be provided
in the work area.
4HM-TS250 250MM CIRCULAR SAWBENCH
VER 07-07-2013

……The Operator
Read the operating manual carefully to prevent machine accidents. Never work while under the influence of
drugs, alcohol or medications. Wear tight-fitting work clothes, safety goggles and safety shoes and tie back long
hair. Remove rings, wrist watches and bracelets before working.
Ear protection is recommended. Never climb onto the machine table: the machine may fall and cause injuries. Keep
children and visitors out of the work area.
……Before working
Check that the sawing tool type is suited for the intended work. Immediately replace damaged or dull sawing
tools. Only work with the appropriate standard accessories. Always work with well-sharpened sawing tools
increase the risk of wood kick back. Note the correct rotational direction. As a general rule, check that sawing
tool wrenches and other items have been removed. Check that the sawing tool can rotate freely and does
not contact the limit stop, the safety equipment, the work piece or other objects. Keep out of the kick-back
zone.
……While working
Wood must be hand fed uniformly and without jerking into the sawing tool, slightly more slowly when
processing hard wood or work pieces, which produce large amounts of dust. Never move the work piece
during a processing operation. Avoid uncomfortable working stances to reduce the risk of contacting the
rotating sawing tool. Do not bend over the rotating sawing tool. Remove debris from the machine table only
when the machine is off. Never use the machine table as a worktable while the sawing tool is rotating.
……After working
Never leave the machine operating without supervision. Remain at the machine until the sawing tool has
come
to a complete stop. Remove debris and clean the machine and surrounding area so that the machine is ready to
use the next time.
……Machine maintenance
Unplug the mains cable before any mechanical or electrical work is per-formed or when the sawing tool is
changed. Regularly lubricate mechanical parts: threaded rods, gears, driving chains, hinges, sliding parts,
etc.
Grounding Instructions
Caution: This toolmust be grounded while in use to protect the operator from electric shock.
In the event of a malfunction or breakdown, grounding provides a path of least resistance for electric current
to
reduce the risk of electric shock. This tool is equipped with an electric cord having an
equipment-grounding conductor and a grounding plug. The plug must be plugged into a matching outlet that is
properly installed and grounded in accordance with all local codes and ordinances.
Do not modify the plug provided. If it will not fit the outlet, have the proper outlet installed by a qualified
electrician.
Improper connection of the equipment-grounding conductor can result in a risk of electric shock. The
conductor, with insulation having an outer surface that is green with or without yellow stripes, is the
equipment-grounding conductor. If repair or replacement of the electric cord or plug is necessary, do not
connect the equipment-grounding conductor to a live terminal.
Check with a qualified electrician or service personnel if the grounding instructions are not completely
understood, or if in doubt as to whether the tool is properly grounded. Use only three wire extension cords that
have three-prong grounding plugs and three-pole receptacles that accept the tool’s plug.
Repair or replace a damaged or worn cord immediately.
5HM-TS250 250MM CIRCULAR SAWBENCH
VER 07-07-2013

Features
Fig. 1
Specifications
Table size … ...
(With extension table) ...
Saw blade / bore size ...
Motor ...
Blade speed ...
Max. depth of cut at 90 degree ...
Max. depth of cut at 45 degree ...
Cutting width with extension table...
Cutting width without extension table ...
Coupling joint for vacuum exhaust...
..………………... . 635 (L) x 430(W) mm
..……... ........... 635(L) x 1030(W)mm
.…................
..……………..…250 mm Dia., 30 mm
...………………….1500W, 230V/400V, Induction Motor
...………………... . 4750 RPM
.………………... 80mm
...…………………………..……. 60mm
..………………... 750mm
...…….................………………... .150mm
..…………………... ..50/25mm
Net Weight (include floor stand)………………………………………………………………………..…….. 83kg
Receiving
Remove the saw and accessories from the shipping carton and inspect for damage. Any damage should be
reported to your distributor and shipping agent immediately. Before proceeding further, read your instruction
manual thoroughly to familiarize yourself with proper assembly, maintenance and safety procedures.
Contents ofthe box
Saw body with switch 1 set
250 mm saw blade 1 pc
900mitre gauge 1 pc
Splitting wedge 1 pc
Blade guard 1 pc
Guide fence 1 set
Push stick 1 pc
Slide rail 1 pc
Sliding carriage (optional, check with localdealer) 1 set
Side extension table (optional, check with local dealer) 1 set
Floor stand (optional, check with localdealer) 1 set
Assembly and operating instruction/parts list 1 pc
6HM-TS250 250MM CIRCULAR SAWBENCH
VER 07-07-2013
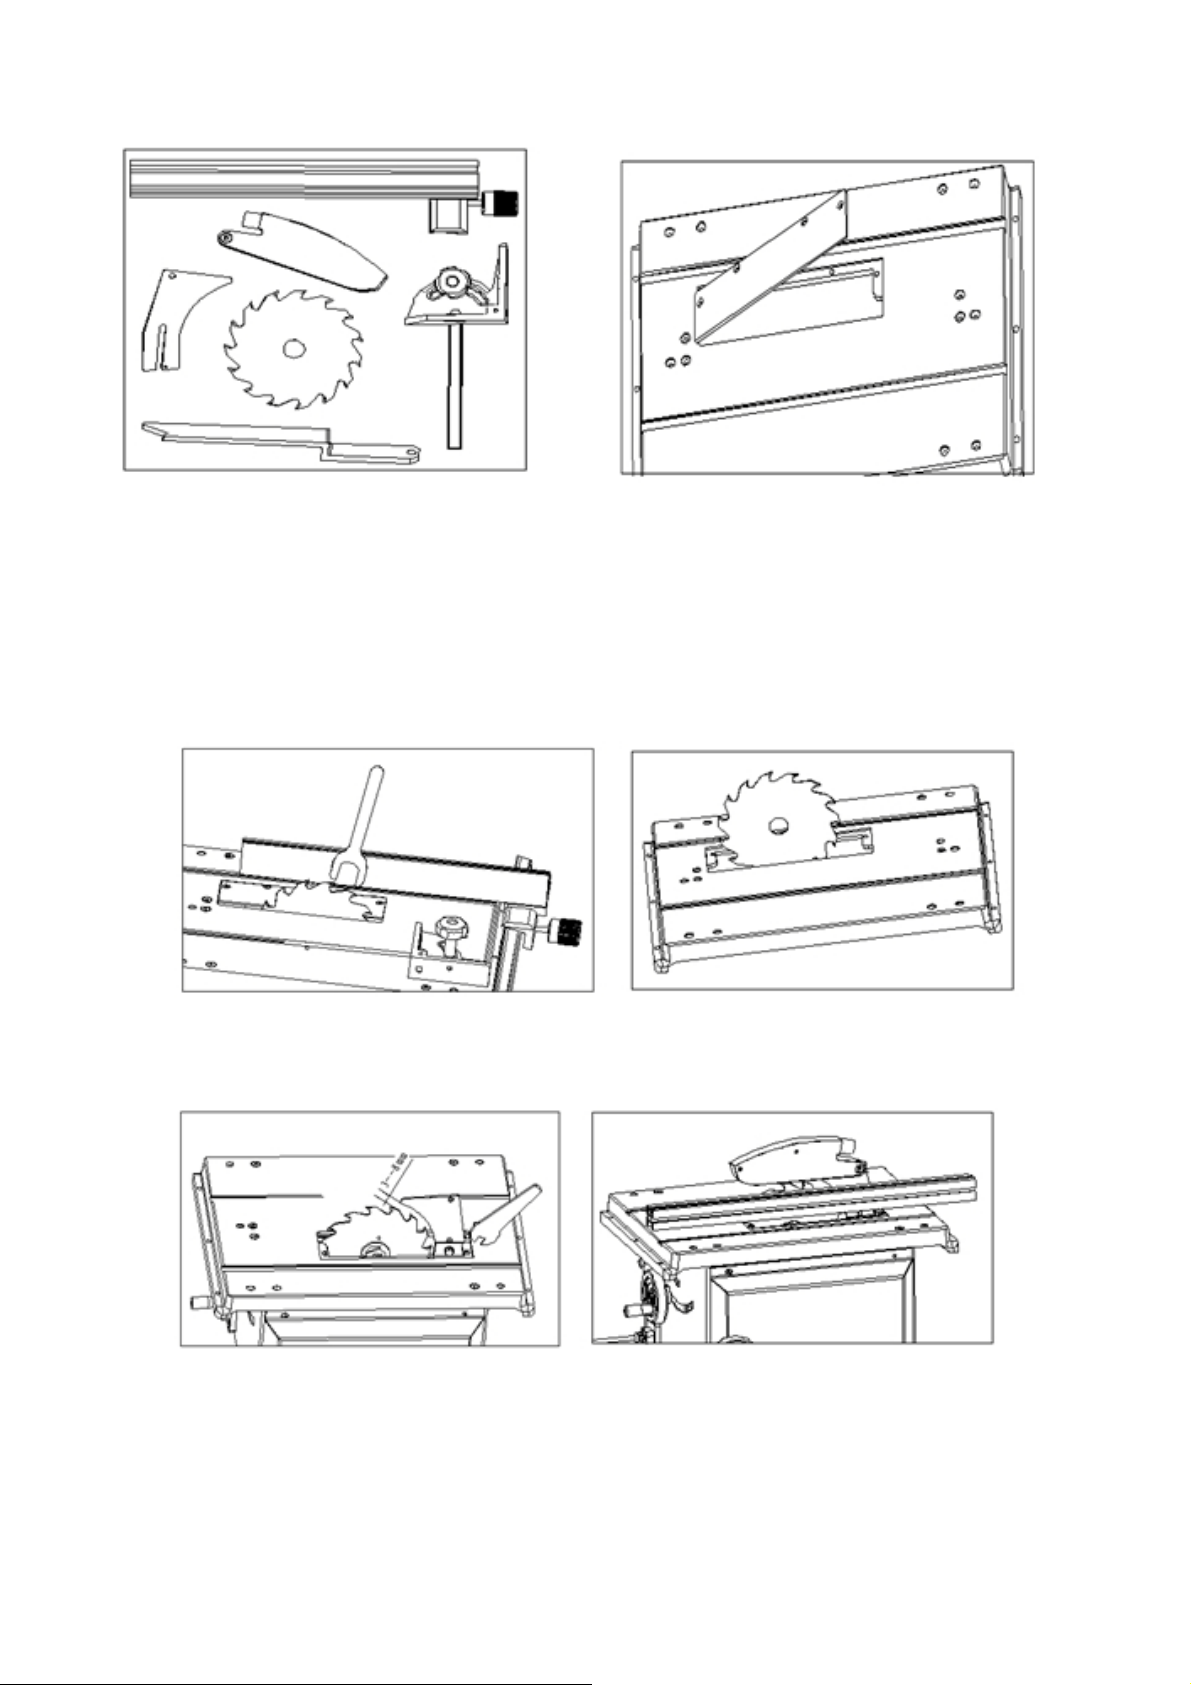
Fig. 2 Fig. 3
Installation &assembly
Remove the table insert
Block the spindle with current sawing tool; remove the flange (Fig. 3) & (Fig. 4) (thoroughly clean when
reassembling).
Note the direction of the teeth when replacing the saw blade. Replace the various connection elements (Fig.
5)
Fig. 4 Fig. 5
Mounting and adjusting the splitting wedge
Fig. 6 Fig. 7
Loosen the flange base with a 13 mm wrench and insert the splitting wedge. Adjust the splitting wedge and
be sure to maintain a distance of approx. 3mm to the saw blade (Fig. 6). Securely fasten the splitting wedge
with screw. Check that the splitting wedge is parallel to the saw blade by means of the table insert (Fig. 7).
Adjusting the longitudinallimit stop
The longitudinal limit stop must be adjusted so that it is exactly parallel to the saw blade. Firstly, set the
7HM-TS250 250MM CIRCULAR SAWBENCH
VER 07-07-2013
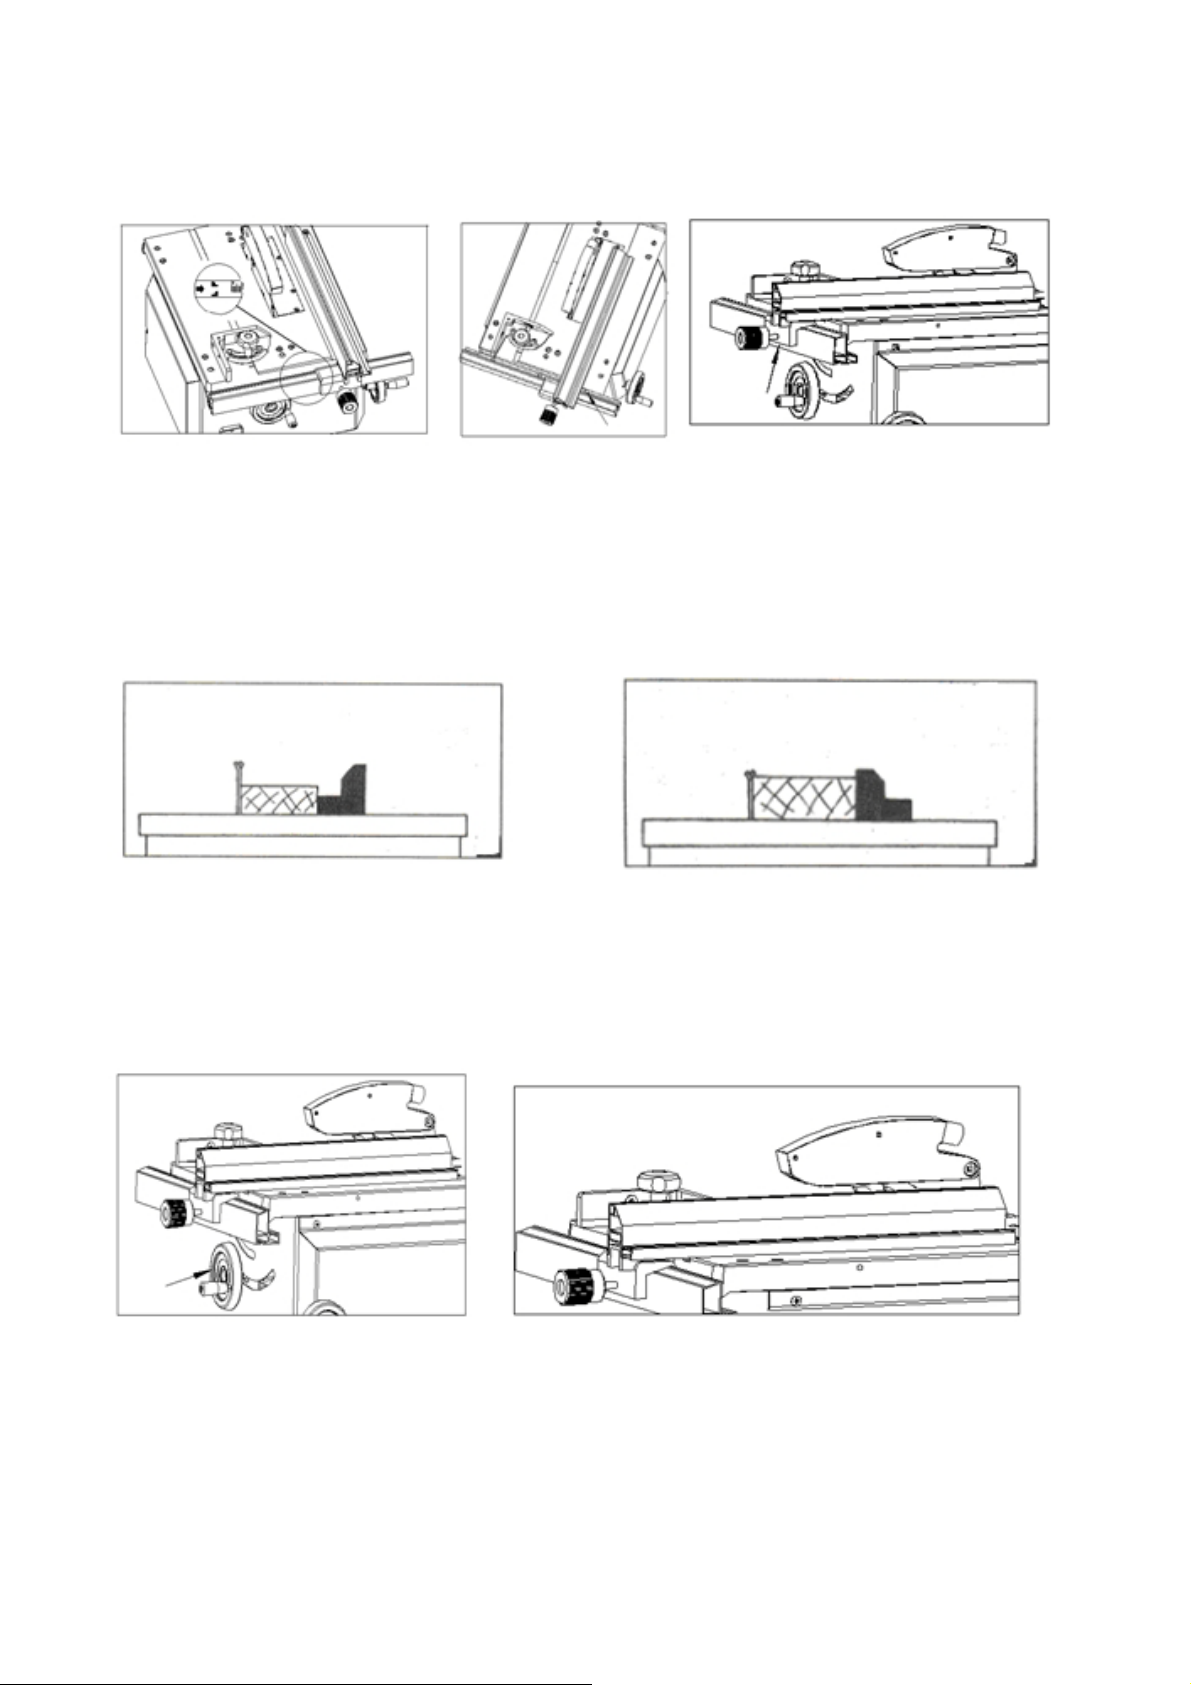
longitudinal limit stop to zero on the limit stop guide rail scale and then set the limit stop with the guide rail
precisely with respect to the saw blade. Secure the adjustment with the left hexagonal socket screw (Fig. 8). (This
procedure should be repeated each time the saw blade is replaced.)
Fig. 8 Fig. 9 Fig. 10
Use the right guide notch as an optical reference to check that the longitudinal limit stop setting is parallel. (Fig. 9)
& (Fig. 10). Then longitudinal limit stop can be moved or turned for flat work pieces by loosening the lower M8
clamp screw in the limit stop holder. (Fig. 11) & (Fig. 12).
The longitudinal limit stop can be used on the left or the right side of the saw blade.
NOTE: Regularly check that the longitudinal limit stop is parallel to ensure perfect cutting.
Fig.11 Fig. 12
Adjusting the cutting height
Adjust the height with the hand wheel (Fig. 13)
Select a cutting height such that the saw blade teeth still protrude from the work piece to be processed.
(Fig.14)
Fig. 13 Fig. 14
Adjusting the Pivot
Release the lock knob A (Fig.15). The saw blade can be lowered by up to 45º by applying pressure to the
hand wheel B (Fig.15). The height can then be adjusted as the pressure on the hand wheel is removed.
8HM-TS250 250MM CIRCULAR SAWBENCH
VER 07-07-2013
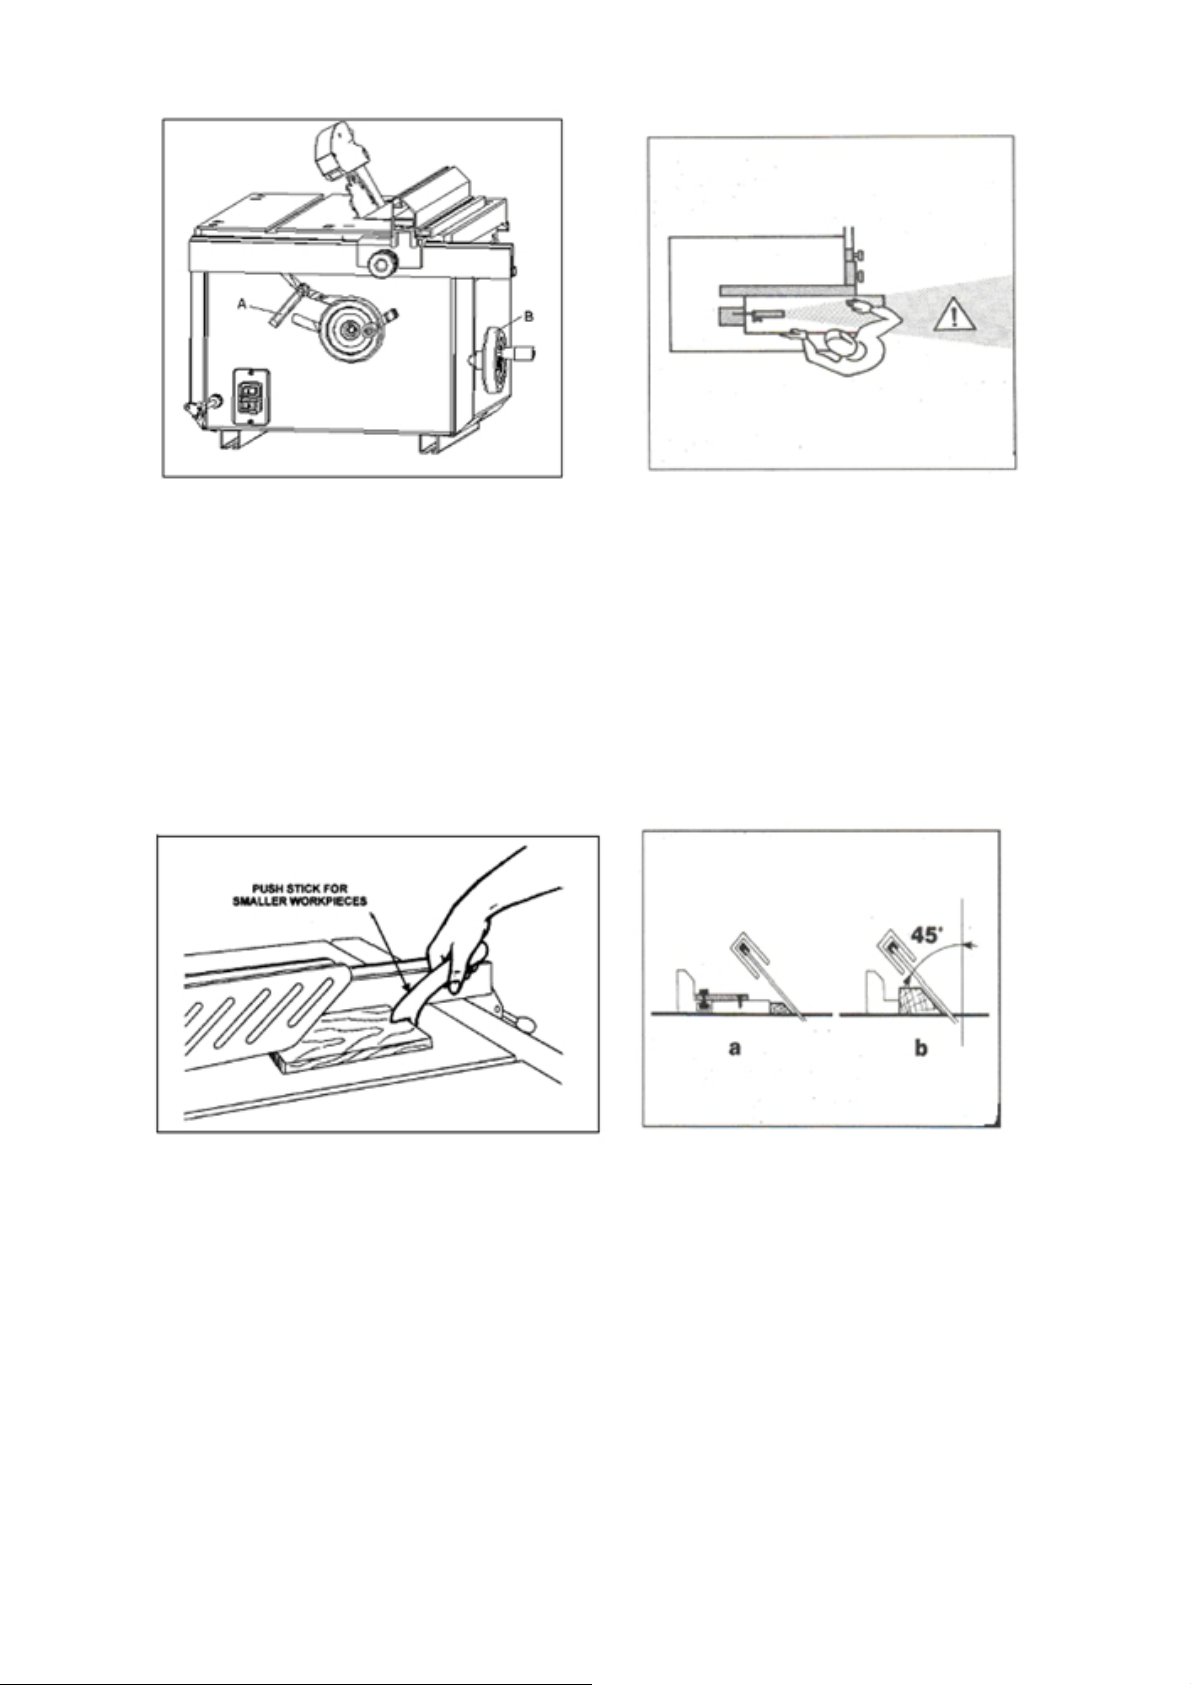
Fig. 15 Fig. 16
Note: The maximum height adjustment must be reduced by 10 mm at pivot angles of 30ºor more.
Working with the circular table saw
Only use sharp, uniformly and sufficiently crossed circular saw blades. Adjust the splitting wedge and fasten it
securely. Adjust the protective cover appropriately for the sawing tool thickness. Adopt a working stance as
indicated in the figure. Keep out of the danger zone. (Fig 16)
Feed the work piece with both hands (be sure to use the feeding rod near the saw blade) until it is behind the
splitting wedge. Secure longer work pieces so that they do not flip after the cutting procedure (i.e. with a
table extension). (Fig.17)
Fig. 17 Fig. 18
Cutting narrower work pieces,edges and strips…
Use the flat edge of the longitudinal limit stop for work pieces narrower than 120 mm. Use a parallel
intermediate piece if necessary. Secure longer work piece so that they do not flip after the cutting procedure (i.e.
with a table extension). (Fig 18)
Diagonal limit stop
The diagonal limit stop can be mounted on the left or right hand side of the saw blade in the T-groove.
Diagonal cuts between 90ºand 45ºcan be exactly made due to the optional diagonal positioning. ( Fig.19)
Diagonal positioning is made possible by the 90ºorientation of the two supporting surface of the limit stop.
9HM-TS250 250MM CIRCULAR SAWBENCH
VER 07-07-2013
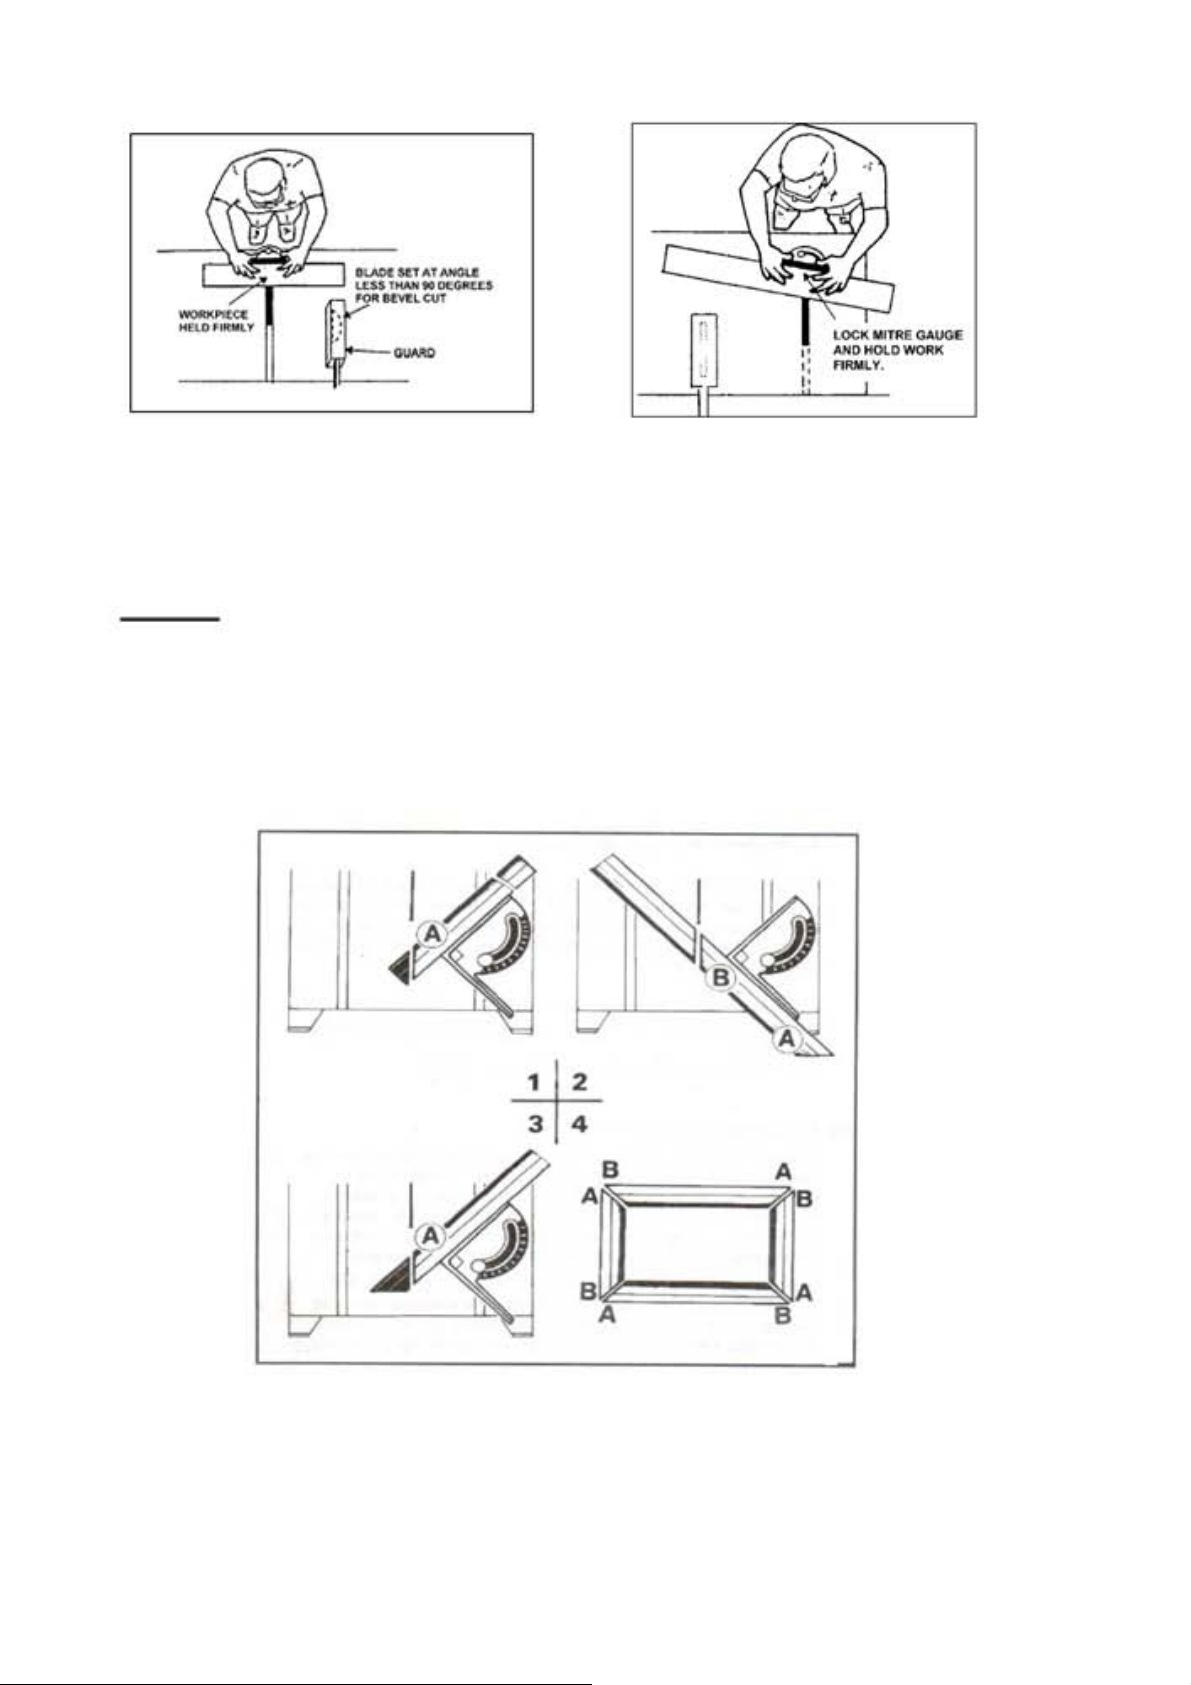
Fig. 19 Fig. 20
Cross-cutting narrower work pieces
Adjust the guard rail so that the work piece parts arenot able to contact the upwards rotating part of the saw blade.
Feed work pieces only with a cross limit stop or a cross feeder. (Fig. 20)
(CAUTION: Do not remove pieces of debris from the sawing tool area with your hands.)
Angular limit stop
The angular limit stop can be inserted into the machine table T-grooves on the right or left hand side of the saw
blade. Cross-cuts can be made at all angles by pivoting the limit stop. The 90ºmilled angular limit stop is especially
suited for exact miter cuts. See the frame-cutting example. (Fig. 21)
Fig. 21
10 HM-TS250 250MM CIRCULAR SAWBENCH
VER 07-07-2013

Malfunctions
Machine vibrates
Clamping levers for height and diagonal adjustment are not tightly screwed.
Sawing tool is not tightly screwed.
Cuts are not clean/wood is burned
Sawing tool is dull.
Sawing tool is incorrectly mounted.
Rapid sawing toolwear
Sawing tool is incorrectly sharpened.
Contaminated wood (cement, sand, nails).
Motor becomes too warm (It is too hot to touch with bare hands, it continuously shuts itself off.) By all
means have a qualified electrician inspect the motor.
Machine comes to a stop
Overloading (feeding too rapid, sawing tool is dull).
Wood is raised by the rear side ofthe saw blade
Longitudinal limit stops are not parallel.
Splitting wedge is not aligned or crossing is too weak.
The spindle height is difficult to adjust
Thoroughly clean and lubricate the threaded rod, gears and slide tracks.
Check the operation of the clamping lever.
Miscellaneous
Bearings make unusual noises. Inspect the bearings and replace if necessary.
Check the tension of the poly-v belt (poly-v belts are accessible when the exhaust cover is removed).
11 HM-TS250 250MM CIRCULAR SAWBENCH
VER 07-07-2013

Part Lis t
Part No Des cription Q’TY Part No Description Q’TY
1 Set screw 1 45 nut 2
2 Shaft 1 46 Washer 1
3 Hand wheel 1 47 nut 2
4 Pin 1 48 Sawing base 1
5 Sharp 1 49 Pin 1
6 Pin 1 50 Set screw 1
7 Screw 1 51 Plate 1
8 Motor 1 52 nut 1
9 C-Spring 1 53 nut 1
10 Motor guidance plate 1 54 Screw 1
11 Arbor 1 55 Screw 1
12 Washer 3 56 Hand wheel 1
13 Set screw 3 57 Screw M20 2
14 Set screw 2 58 Nut M20 1
15 Washer 1 59 Threaded shaft 1
16 Long plate 1 60 Plate 1
17 Washer 1 61 Plate 1
18 Nut 2 62 Set screw 12
19 Motor pulley 1 63 Base 1
20 Extractor connecting piece 1 64 Switch Box 1
21 Washer 1 65 Switch 1
22 Set screw 1 66 Clamp for cord 1
23 Riving Knife (Splitting wedge) 1 67 Set screw 4
24 Flange 1 68 Power Cord 1
25 Washer 1 69 Washer 1
26 Set screw 1 70 Arbor 1
27 Washer 2 71 Plate 2
28 Set screw 2 72 Supporting rear 2
29 Holding plate A 1 73 Washer 2
30 Riving Knife (Splitting wedge) 1 74 Nut M20 1
31 Holding plate B 1 75 Table 1
32 Poly-V belt HR410 1 76 Cover 1
33 Spindle pulley 1 77 Screw 6
34 Set screw 2 78 Screw 4
35 Ball bearing 1 79 Pin 1
36 Ball bearing 1 80 Scale 1
37 C-Spring 1 81 Lock handle 1
38 Shaft 1 82 Stop ruler 1
39 Set screw 1 83 Plate 1
40 Protective guard 1 84 Guide 1
41 Supporting plate 1 85 Lock handle 1
42 Washer 2 86 Scale 1
43 Nut 2 87 Guide 2
44 Washer 1 88 Bolt 1
12 HM-TS250 250MM CIRCULAR SAWBENCH
VER 07-07-2013

Exploded View
13 HM-TS250 250MM CIRCULAR SAWBENCH
VER 07-07-2013

14 HM-TS250 250MM CIRCULAR SAWBENCH
VER 07-07-2013

OptionalAccessories
MJ 10-SB250-1# Extens ion Table
MJ 10-SB250-2# Floor Stand
MJ 10-SB250-3# Sliding Carriage
15 HM-TS250 250MM CIRCULAR SAWBENCH
VER 07-07-2013

MJ 10-SB250-3# Sliding Carriage
Part List for MJ10-SB250-3# Sliding Carriage
Part No Description Q’TY Part No Description Q’TY
1 C-shaped ring 1 19 Hex bolt M6X25 1
2 sliding axle 1 20 Angle fence 1
3 Eccentric bush 1 21 “E” ring φ16 1
4 Hex thin nut M8 1 22 Press handle 1
5 Set screw M8X25 1 23 Square toes nut 1
6 Eccentric nut 2 24 Angle.ruler 1
7 Trolley 4 25 Sliding table 1
8 Washer φ6 4 26 Locking nut M10 1
9 T-shaped bolt 1 27 Washer φ10 1
10 Set screw M8X10 1 28 Turing plate 1
11 Homocentric nut 2 29 Small handgrip 1
12 Socket countersunk screw 4 30 Washer φ6 1
13 Rhombic handgrip 2 31 Locating pole 1
14 Washer φ6 3 32 Hex bolt M6X35 1
15 Connecting block 2
16 Nut M6 1
17 Washer φ6 1
18 wood block 1
16 HM-TS250 250MM CIRCULAR SAWBENCH
VER 07-07-2013
Please dispose of packaging for the product in
a responsible manner. It is suitable for
recycling. Help to protect the environment,
take the packaging to the local amenity tip
and place into the appropriate recycling bin.
Only for EU countries
Do not dispose of electric tools together with
household waste material!
In
observance of European Directive
2002/96/EC on waste electrical and electronic
equipment and its implementation in
accordance with national law, electric tools
that have reached the end of their life must be
collected separately and returned to an
environmentally compatible recycling facility.
17 HM-TS250 250MM CIRCULAR SAWBENCH
VER 07-07-2013
Table of contents
Other TOPMAQ Saw manuals


