TOPMAQ FTC200 User manual

TILE CUTTING SAW
FTC200
Operating/user manual
NOTE: Before you use the machine, carefully read instructions properly. Before attempting to operate the machine
properly, familiarize yourself with the controls and make sure you know how to stop it quickly in an emergency. Save this
user's manual and the other documents supplied with this machine for future reference.
TOPMAQ: 32 Hammersmith Drive, Wigram, Christchurch 8042.
http://www.topmaq.co.nz

- 2 -
CONTENTS PAGE
I. SPECIFICATION----------------------------------------------------------------------------3
II.OPERATOR’S INSTRUCTIONS--------------------------------------------------------4
RANGE OF APPLICATIONS AND PROPER USE----------------------------------------------4
KNOW YOUR PRODUCT-----------------------------------------------------------------------------4
GENERAL SAFETY RULES --------------------------------------------------------------------------4
TRANSPORTATION-------------------------------------------------------------------------------------7
III.SPECIFIC SAFETY RULES--------------------------------------------------------------7
IV. SPECIAL SAFETY INSTRUCTIONS--------------------------------------------------8
V. INSTALLATION AND OPERATING-----------------------------------------------------9
A. STARTING AND STOPPING THE SAW------------------------------------------------------- 9
B. ASSEMBLY-------------------------------------------------------------------------------------------- 9
C. FILLING THE WATER TRAYAND DRAINING-----------------------------------------------10
D. MAKING A STRAIGHT CUT-----------------------------------------------------------------------11
E. MAKING A MITRE CUT-----------------------------------------------------------------------------11
F. MAKING A BEVEL CUT-----------------------------------------------------------------------------11
G. MOVING THE SAW----------------------------------------------------------------------------------11
H. REPLACING THE DIAMOND BLADE-----------------------------------------------------------12
VI.MAINTENANCE-----------------------------------------------------------------------------12
VII.TROUBLE SHOOTING-------------------------------------------------------------------14
VIII. ACCESSORIES -------------------------------------------------------------------------14
IX. SERVICE--------------------------------------------------------------------------------------15

- 3 -
Read operator’s instructions
Dear customer, thanks for your choice of stone cutter FTC200. Please read this
manual carefully before installation and operation, and follow it. Please keep this manual
in a safety place for future reference.
ⅠSPECIFICATION
Mains voltage (Volt): 230 VAC/50Hz
Motor capacity: 900W
Insulationclass B
House protection class IP54
No load speed (rpm): 2950
Max.CuttingDept.(mm): 35mm
Max. Cutting Length.(mm): 620mm
Max.CuttingWidth(mm): 725mm
Diamond blade size: 200X2X22.23 (bore)
Tilting range: 0~45°
Outer Dimensions (LWH): 1112X476X1235mm
Netweight: 41kgs
Noise emission values determined according to EN 61029 and EN 12418:
The sound pressure level at the work station,
No load: LpA <=71.4dB (A) LpA <=72.3dB (A)
Under
load: LpA=97.9dB(A) LpA=99.1dB(A)
Uncertainty KpA=1.5 m/s2Uncertainty KpA=1.5 m/s2
The sound power level of the machine,
No load: LwA=84.4dB(A) LwA=85.3dB(A)
Uncertainty KwA=1.5 m/s2Uncertainty KwA=1.5 m/s2
Under load: LwA=110.9dB(A) LwA=112.1dB(A)
Uncertainty KwA=1.5 m/s2Uncertainty KwA=1.5 m/s2
Vibration total values determined according to EN 61029:
No load: Vibration emission value ah=1.20 m/s2Vibration emission value ah=1.20 m/s2
Uncertainty K=0.73 m/s2Uncertainty K=0.76 m/s2
Under load: Vibration emission value ah=1.15 m/s2Vibration emission value ah=1.15 m/s2
Uncertainty K=2.95 m/s2Uncertainty K=3.04 m/s2
Cooling water pump specification:
Power 10W
Qmax 700L/H
Qhead 1.4m
Caution! Any modification which could lead to a change in the original characteristics of the
machine, such as rotational speed or maximum diameter of the cutting-off wheel may be carried
out only by the manufacturer of the machine.
- 4 -
ⅡOPERATOR’S INSTRUCTIONS
RANGE OF APPLICATIONS AND PROPER USE
This cutting saw is developed for the cutting of small and moderate size ceramic, marble, granite, and
masonry sheet. This saw has the possibility to tilt the diamond blade to cut on the bias (45-90 degree).
The diamond blade is cooled by water pump.
Use only the continuous rim diamond blade recommended by the manufacturer.
Warning: Never attempt to cut wood, metal and other similar material with this machine.
Never use this machine in potential explosive environment or underground environment.
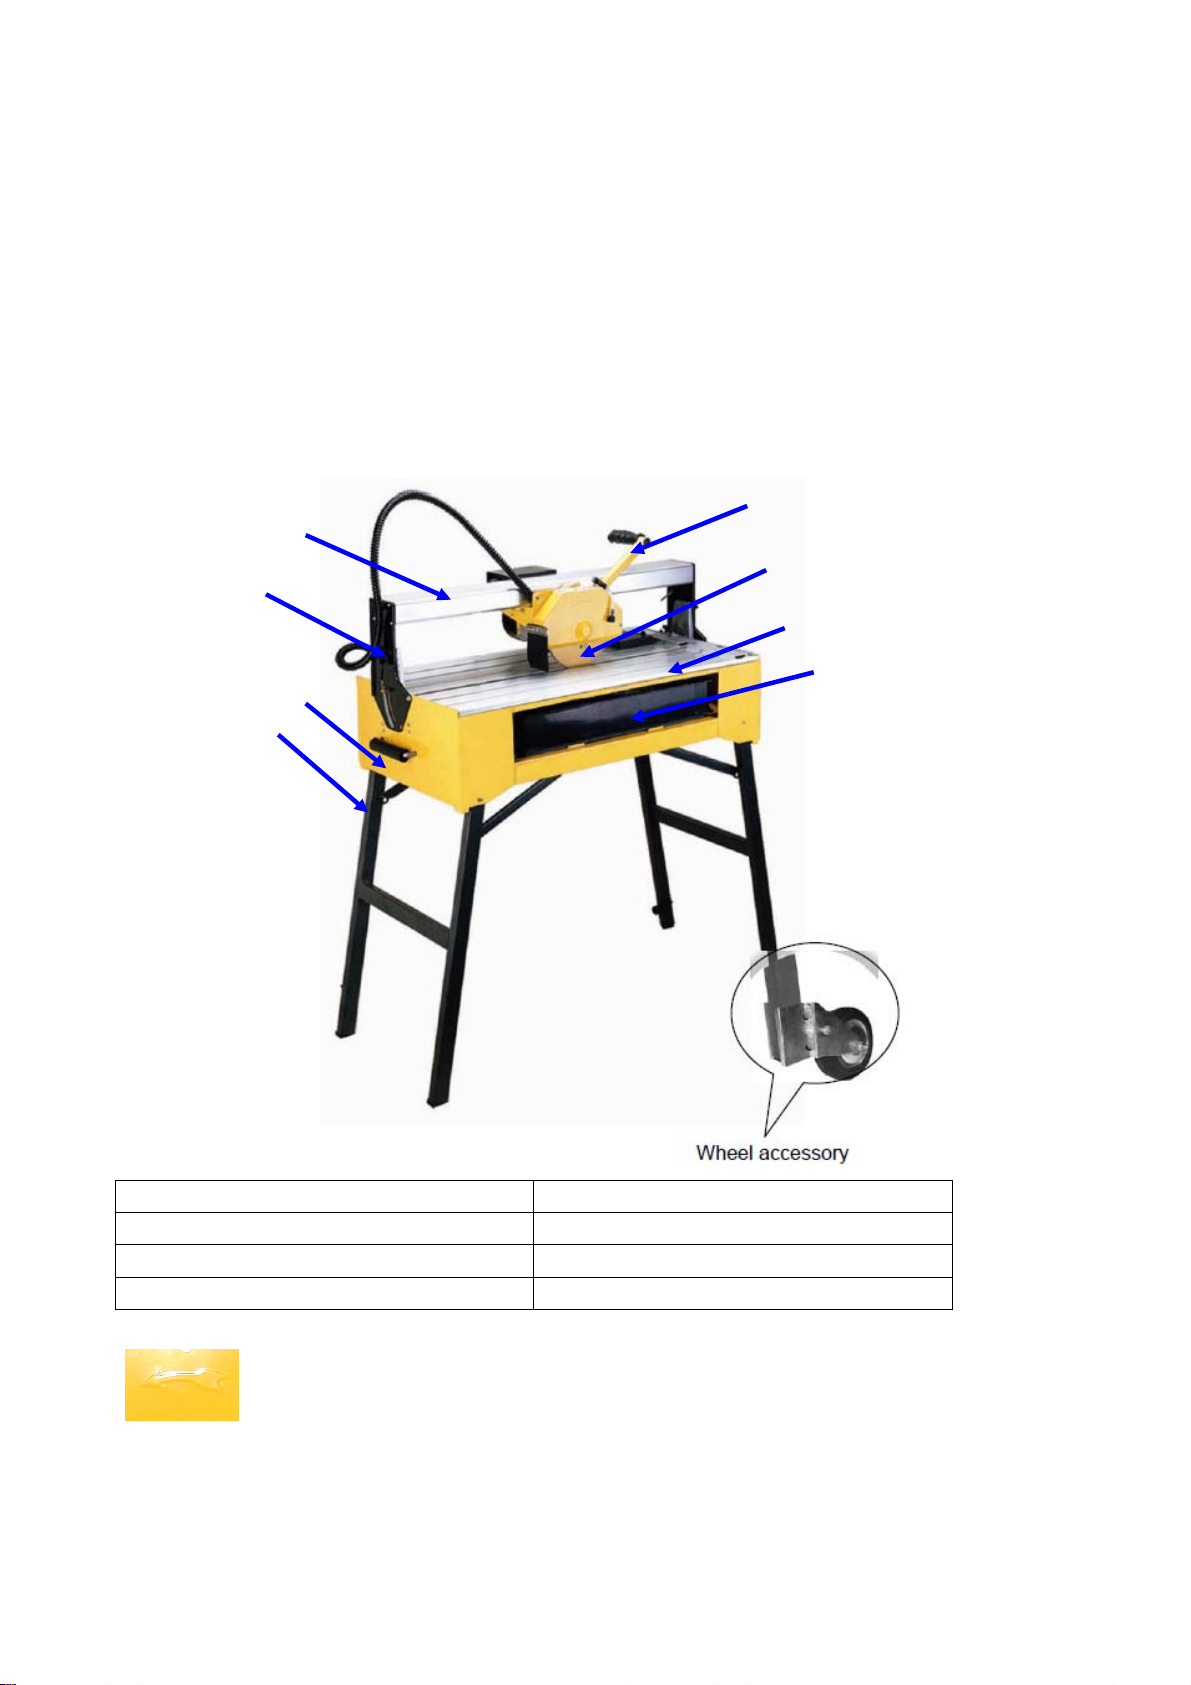
KNOW YOUR PRODUCT:
DIRECTION OF BLADE: Please make sure the diamond blade always towards the same
direction as the arrow which is molded on the blade guard.
1.Stand 5. Handle
2. Machine frame 6. Diamond blade
3. Rail stand 7. Table
4. Slide Rail 8. Stand
1 2
3
4 5
7
6
8

- 5 -
GENERAL SAFETY RULES
WARNING! When using electric tools basic safety precautions should always be followed to reduce the
risk of fire, electric shock and personal injury including the following.
Read all these instructions before attempting to operate this product and save these instructions.
1 –Keep work area clear
-Cluttered areas and benches invite injuries.
2 – Consider work area environment
-Do not expose tools to rain.
-Do not use tools in damp or wet locations.
-Keep work area well lit.
-Do not use tools in the presence of flammable liquids or gases.
3 – Guard against electric shock
-Avoid body contact with earthed or grounded surfaces (e.g. pipes, radiators, ranges,
refrigerators).
4 – Keep other persons away
-Do not let persons, especially children, not involved in the work touch the tool or the extension
cord and keep them away from the work area.
5 -Store idle tools
-When not in use tools should be stored in a dry locked-up place, out of reach of children.
6 – Do not force the tool
-It will do the job better and safer at the rate for which it was intended.
7 – Use the right tool
-Do not force small tools to do the job of a heavy duty tool.
-Do not use tools for purposes not intended, for example do not use circular saws to cut tree limbs
or legs.
8 –Dress properly
-Do not wear loose clothing or jewelers; they can be caught in moving parts.
-Non-skid footwear is recommended when working operations create dust.
-Wear protective hair covering to contain long hair.
9 -Use protective equipment
-Use safety glasses.
-Use face or dust mask if working operations create dust.
10 –Connect dust extraction equipment
-If the tool is provided for the connection of dust extraction and collecting equipment, ensure these
are connected and properly used.
11 – Do not abuse the cord
-Never yank the cord to disconnect it from the socket. Keep the cord away from heat, oil and
sharp edges.
12 –Secure work
-Where possible use clamps or a vice to hold the work. It is safer than using your hand.
13 –Do not overreach
-Keep proper footing and balance at all times.
14 –Maintain tools with care

- 6 -
-Keep cutting tools sharp and clean for better and safer performance.
-Follow instruction for lubricating and changing accessories.
-Inspect tool cords periodically and if damaged have them repaired by an authorized service
facility.
-Inspect extension cords periodically and replace if damaged.
-Keep handles dry, clean and free from oil and grease.
15 –Disconnect tools
-When not in use, before serving and when changing accessories such as blades, bits and cutters,
disconnect tools from the power supply.
16 –Remove adjusting keys and wrenches
-Form the habit of checking to see that keys and adjusting wrenches are removed from tool before
turning it on.
17 –Avoid unintentional starting
-Ensure switch is in “off” position when plugging in.
18 –Use outdoor extension leads
-When the tool is used outdoors, use only extension cords intended for outdoor use and so
marked.
19 –Stay alert
-Watch what you are doing, use common sense and do not operate the tool when you are tired.
20 –Check damaged parts
-Before further use of tool, it should be carefully checked to determine that it will operate properly
and perform its intended function.
-Check for alignment of moving parts, binding of moving parts, breakage of parts, mounting and
any other conditions that may affect its operation.
-A guard or other part that is damaged should be properly repaired or replaced by an authorized
service center unless otherwise indicated in this instruction manual.
-Have defective switches replaced by an authorized service center.
-Do not use the tool if the switch does not turn it on and off.
21 –Warning
-The use of any accessory or attachment other than one recommended in this instruction manual
may present a risk of personal injury.
22 –Have your tool repaired by a qualified person
-This electric tool complies with the relevant safety rules. Repairs should only be carried out by
qualified persons using original spare parts, otherwise this may result in considerable danger to
the user.
23 - Caution!
- Please follow the instruction of PRCD to avoid affection of the tool by water.
- The inspection of hoses and other critical parts which could deteriorate and the maximum
permitted pressure of the water supply.
- Never use the tool without the PRCD delivered with the tool.
- Replacement of the plug or the supply cord shall always be carried out by the manufacturer of the
tool or his service organization,
- Keep water clear off the electrical parts of the tool and away from persons in the working area.

- 7 -
TRANSPORTATION
●Before transportation, first to lock the cut unit by the lock system.
●This machine is equipped with one set of wheel systems for one person transports it easily from
car to job site and for mobility once on the job site. Please refer to part of Moving the saw.
Note: Before moving the saw, the water should be drained out of the water tray.
ⅢSPECIFIC SAFETY RULES
●Ensure that the directional arrow marked on the diamond blade corresponds with the rotational
direction of the motor.
● With the machine disconnected from the power supply, rotate the diamond blade by hand to ensure
it is free from obstruction.
● Always keep the blade-securing arbor and collars clean.
● Ensure that the blade-securing bolt is securely tightened.
● Never try to cut freehand. Always ensure that the tile to be cut is pressed firmly against the rip
fence.
● Ensure that the work piece that will be cut off has sufficient room to move sideways. Failure to do
so may result in the off-cut binding against the blade.
● Never cut more than one tile at a time.
● Never cut pieces too small to be held securely against the rip fence without leaving enough space
for the hand to be a safe distance from the diamond blade.
● Ensure that the table and surrounding area are clear with the exception of the tile to be cut.
● Before cutting a tile piece, let the diamond blade run freely for a few seconds. If it makes an
unfamiliar sound or vibrates excessively, switch it off immediately and disconnect from the power
supply.
● Let the diamond blade reach full speed before start cut.
● Let the diamond blade come to a complete stop before removing any jammed or off cut material
from around the blade area.
● Never allow the diamond blade to run dry. Failure to keep the water tray topped up will result in
possible over-heating of the diamond.
● Do not expose to rain or moisture.
● Wear suitable protective equipment.
Eye protection ear protection Caution, risk of cutting Hand protection
Shallbeworn shallbeworn shallbeworn
Always ensure that the splitting wedge is correctly set for the work.
Adopt a working position to the left of the diamond blade.
Ensure that cut off tile pieces are not caught by the blade and sent flying.
Never remove loose splinters, Chips pieces while the diamond blade is moving.
Before repairing faults or removing jammed tile, always switch the cutter off and pull out the mains
plug.
If the cutter slot has been knocked out of position, replace the bench liner. Pull out the mains plug

- 8 -
first.
Before switching on, check that all spanners and setting tools have been removed.
When leaving the workplace, switch off the motor and pull out the plug.
After carrying out repair or maintenance work all safety and security fixtures must be replaced
immediately.
The manufacturer’s safety, working and maintenance instructions and the dimensions stated in the
Technical Information must be adhered to.
The relevant regulations for the prevention of accidents and other generally recognized safety
regulations must be followed.
Observe the code of practice drawn up by the trade association .
Operation of the cutter in confined spaces is permissible only if a suitable suction extraction system
is used.
Caution! Switch off cutter immediately and pull out plug if
-the power feed lead and switch are damaged
-the motor is overheating
-Smoke is emitted or there is a smell of charred insulating material.
Use only diamond blade for which the maximum possible speed is not less than the maximum
spindle speed of the cutter and the material to be cut;
When transporting the machine, use only transportation devices and do never use guards for
handling or transportation;
Fill the cooling tank 3/4 full of water. It is quite normal for the equipment to cause spluttering during
use.
Pay attention to the width of the work piece. Please get reference from the Fig.1, if the width on “a”
is more than 315 mm and the width on “b” is more than 410mm, please put an object to support the
work piece.
Fig.1
IV SPECIAL SAFETY INSTRUCTIONS BEFORE USING THE MACHINE
●Check the following points:
1. Does the voltage of the motor correspond to the mains voltage?
2. A grounded mains connection (wall socket) needs to be used.
3. Are the mains lead and the mains plug in a good condition without any loose ends or damage.

- 9 -
●Avoid using long extension cables.
●Always place the cutting machine on a flat surface to prevent instability.
●While using the machine
1. Never use-cracked diamond blade, replace them.
2. Be sure that the switch is in the OFF-position before connecting the machine to the mains voltage.
3. Always keep away the mains lead from moving parts of the machine.
4. Do not apply side-pressure to the diamond blade. It can break the blade and cause the danger.
5. Remove the plug out of the wall socket before you open the machine.
Warning: before any operation with this machine, make sure sufficient local lighting has been
provided.
●IMMEDIATELY SWITCH OFF THE MACHINE IN CASE OF:
1. Malfunction of the mains plug, socket or damaged cables.
2. Broken switch.
3. Smoke or smell caused by scorched insulation.
V INSTALLATION AND OPERATING
A.STARTING AND STOPPING THE SAW Insert the plug into a socket with a safety contact. This must
be protected with a fuse e.g. in the terminal box. If an extension cable is required, please note that with
a cable length of up to 20 m cable with a cross-section of 1.5 mm² must be used.
To start the saw, press the green button marked “I”.
To stop the saw, press the red button “O”. (Fig.2)
WARNING: For your own safety, always push the Switch “O” position
when the tool is not in use...in the event of a power failure (all of your
lights go out) or blown fuse or tripped circuit breaker, turn switch “O”
position and remove the key. This will prevent the tool from starting up
again when the power comes back on.
Overload Protection: the motor is equipped with Circuit Breaker.
If the motor is over loaded, gets too hot or the current gets very big,
the circuit breaker will act automatically. If this occurs, please wait a
few minutes until the motor has cooled down and then press
the reset button (beside the On-/Off-Switch) and the cutter can restart.
Note: Residual Circuit Device (RCD) is strongly recommended be installed for your own safety.
B. ASSEMBLY Read the manual carefully before installation
1. Clean the working area.
2. Take out of the machine from the carton, you will find the assembled machine.
3. Lay the machine on its side on the ground (Fig.3).
4. Pull out the stand legs and the support brackets (Fig.4). Attach the brackets to the legs with the key hole
and support pin located on each leg (Fig.5).
5. Stand the saw upright.
6. Adjust the balance screw on right leg (Fig.6).
Fig.2

- 10 -
7. To mount the handle, position the handle on the trolley and secure it using the 2 screws (Fig 7).
8. The motor trolley is secured during shipment, please loosen knob before using (Fig.8).
Warning: To fix the motor trolley against the rail stand by the knob again before any maintenance.
Fig.3 Lay the saw on its side on the
ground Fig.4 pull out right stand
Fig.5 Attach the brackets to the legs
with the key hole and support pin
Fig.6 Adjust the balance screw
Fig.7 Mount the handle Fig.8 Loosen the knob before using
C. FILLING THE WATER TRAY AND DRAINING
1. Fill the tray with water through the cutting slot. Don't add chemicals or detergents to the water.
2. Be sure that the water is enough so that the diamond blade turns through appropriate water level.
This is necessary to cool the blade in a correct way.
3. If the machine is not used, water should be drained. Remove the plug from the bottom of the tray, the
water will flow out or you can remove the tray and pour the water out (Fig.9).
Fig.9 Drain the water tray Fig.10 Set measuring guide Fig.11 position the tile
D. MAKING A STRAIGHT CUT
1. Push the motor trolley away from the operator until it reaches the stroke limit.
2. Position the tile on the cutting table.
3. Properly set the measuring guide and squaring tool (Fig 10).
4. Adjust the guides as needed so that the tile rests against the measuring guide and squaring tool (Fig 11).
5. Pull the motor trolley slowly towards the material to be cut (Fig 12).
6. When you have completed the cut push motor trolley/blade away and remove the cut pieces, and any
debris on cutting surfaces.
- 11 -
Fig.12 pull the motor
trolley
Fig.13 Making diagonal cut
Fig.14 Loosen the knob
Fig.15 Tilt the bridge
E. MAKING A DIAGONAL CUT
1. Follow the same procedure for a straight cut.
2. Loosen the nut on the squaring tool, and position the tile diagonally (Fig.13).
3. Lock the nut and perform the cut following procedure for a straight cut.
F. MAKING A BEVEL CUT
1. Loosen the knobs located on each rail stand of stoner cutter (Fig.14).
2. Tilt bridge to the desired angle up to 45 degrees (Fig 15). Tighten knobs at either end of bridge, and
proceed with cutting tile following same procedure as listed in the “straight cut” section.
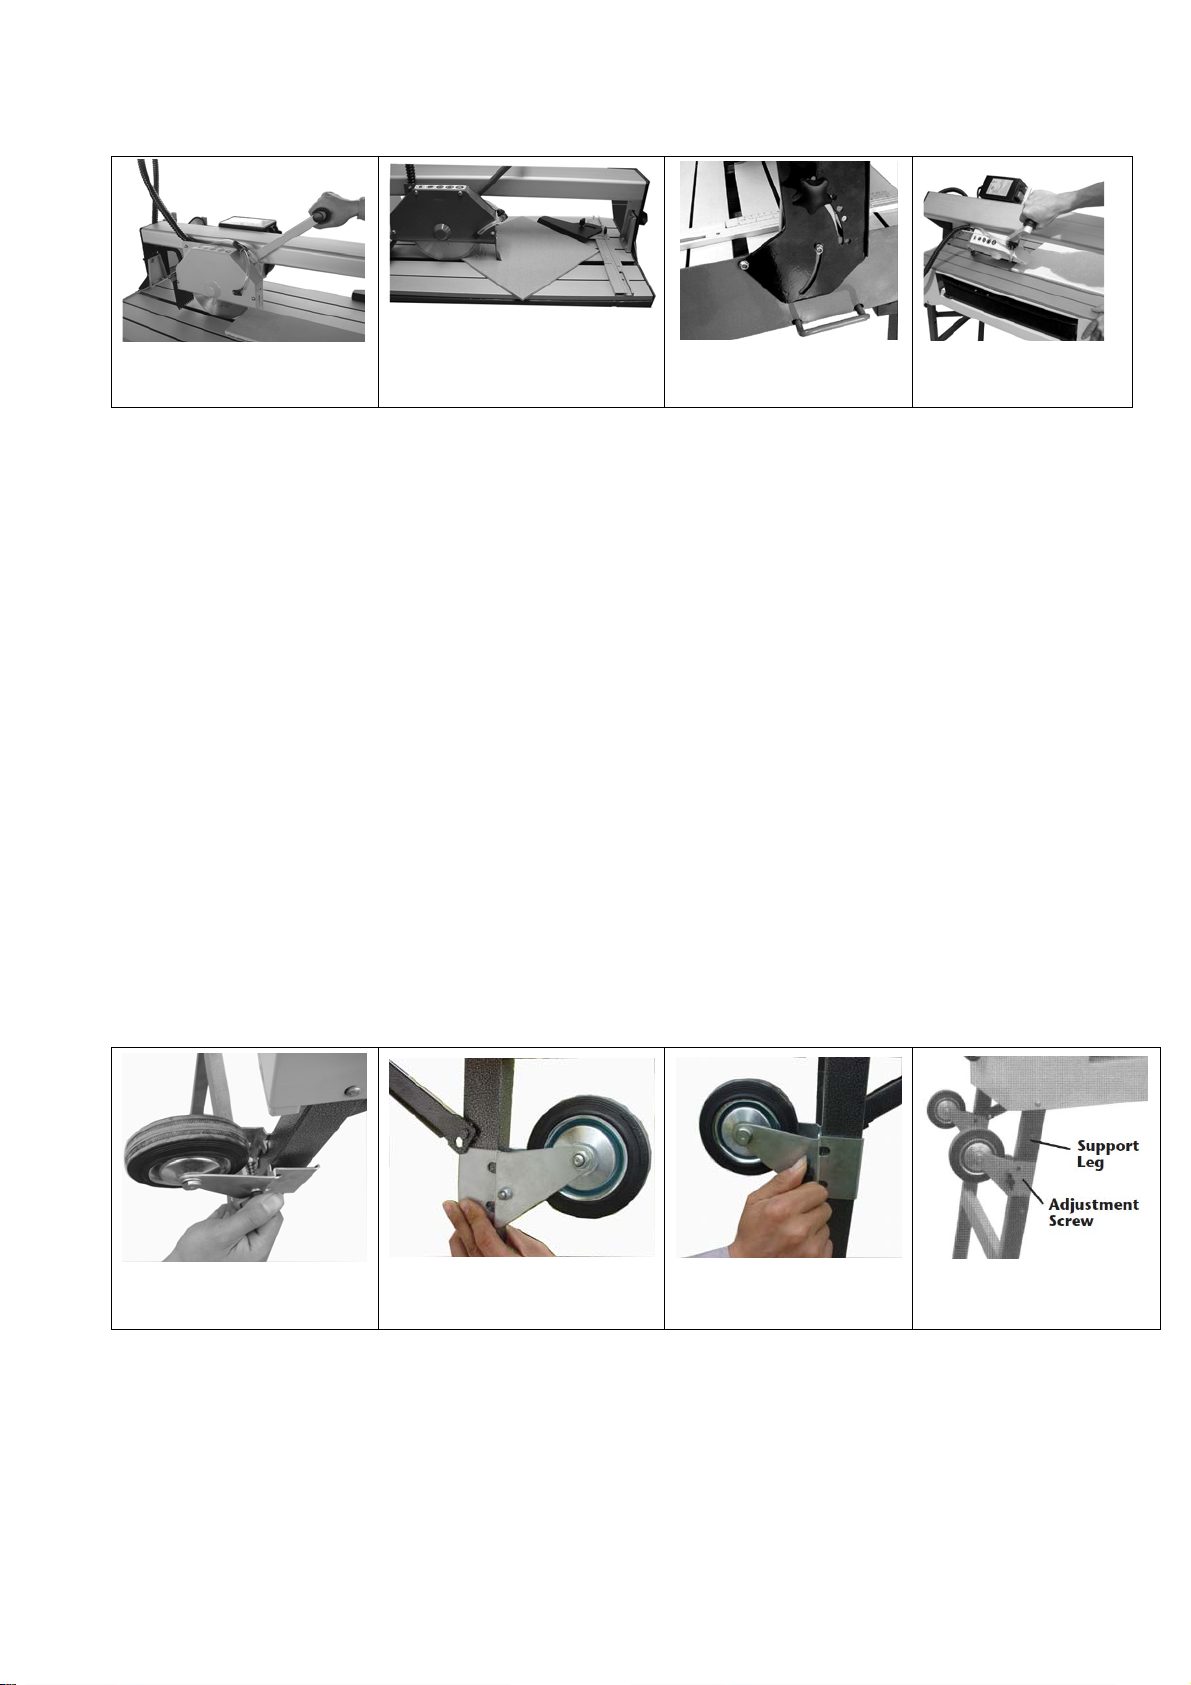
G. MOVING THE SAW
Warning: Before moving the saw, drain the water tray and lock the cut unit.
This saw is supplied with wheel accessory for easier moving.
REAR WHEEL MOUNTING INSTRUCTIONS
1. Open the wheel bracket by rotating the adjustment screw. (Fig.16)
2. Place the wheel bracket on the saw support leg so the top of the bracket touches the round button part of
the angle bracket. (Fig.17)
3. Tighten the adjustment screw, so the wheel bracket is tight against the saw leg. (Fig. 18)
4. Fold the legs for transporting the saw.
5. Lift the saw leg with the front handle and transport the saw. (Fig.19)
Fig.16 pull the motor
trolley Fig.17 Making diagonal cut
Fig.18 Loosen the knob Fig.19 Tilt the bridge

- 12 -
Fig.19
Fig.20
Fig.21
ALTERNATIVE WHEEL MOUNTING
1. The wheels may also be mounted at the bottom of the support legs, for easier transport on the job site (Fig.
20).
2. Once the wheels are in place, lift the saw with the opposite handle to move the saw (Fig.21).
H. REPLACING THE DIAMOND BLADE
WARNING! Disconnect the power supply before installing or making adjustments to
the diamond blade.
1. CHOICE OF THE SAW BLADE. O Only use diamond blade with diameter of 200mm, the bore of the
blade must be 22.23mm.
2. REPLACING THE SAW BLADE
A. First, press the blue rings on the water hose connector and remove the water tubes (Fig 22).
B. Remove the blade guard by removing the 2 screws (Fig 23).
C. Use the hexagonal wrench to hold the blade nut and use the spanner wrench provided to hold the shaft.
Loosen the nut turning clockwise as in (Fig 24).
D. Ensure that the shaft and flanges are clean. Mount blade back on to shaft ensuring that the directional
arrow on the blade is rotating towards the material to be cut.
E. Insert flange and lock nut. Tighten counterclockwise.
F.Close the blade guard and secure the knob.
VII MAINTENANCE
While maintaining and cleaning the machine, pull the plug from the mains socket. Never use water or
other aggressive liquids while cleaning electrical parts of the machine.
● Periodic maintenance of the cutting machine after each operating is required. Use soft cloth to
Fig.22
Fig.23
Fig.24
- 13 -
clean the water and dust on the machine.
● Keep the ventilation slots of the tile machine clean to prevent overheating of the motor.
● Dry the cutting machine as much as possible after using.
● All maintenance must be performed by a competent person.
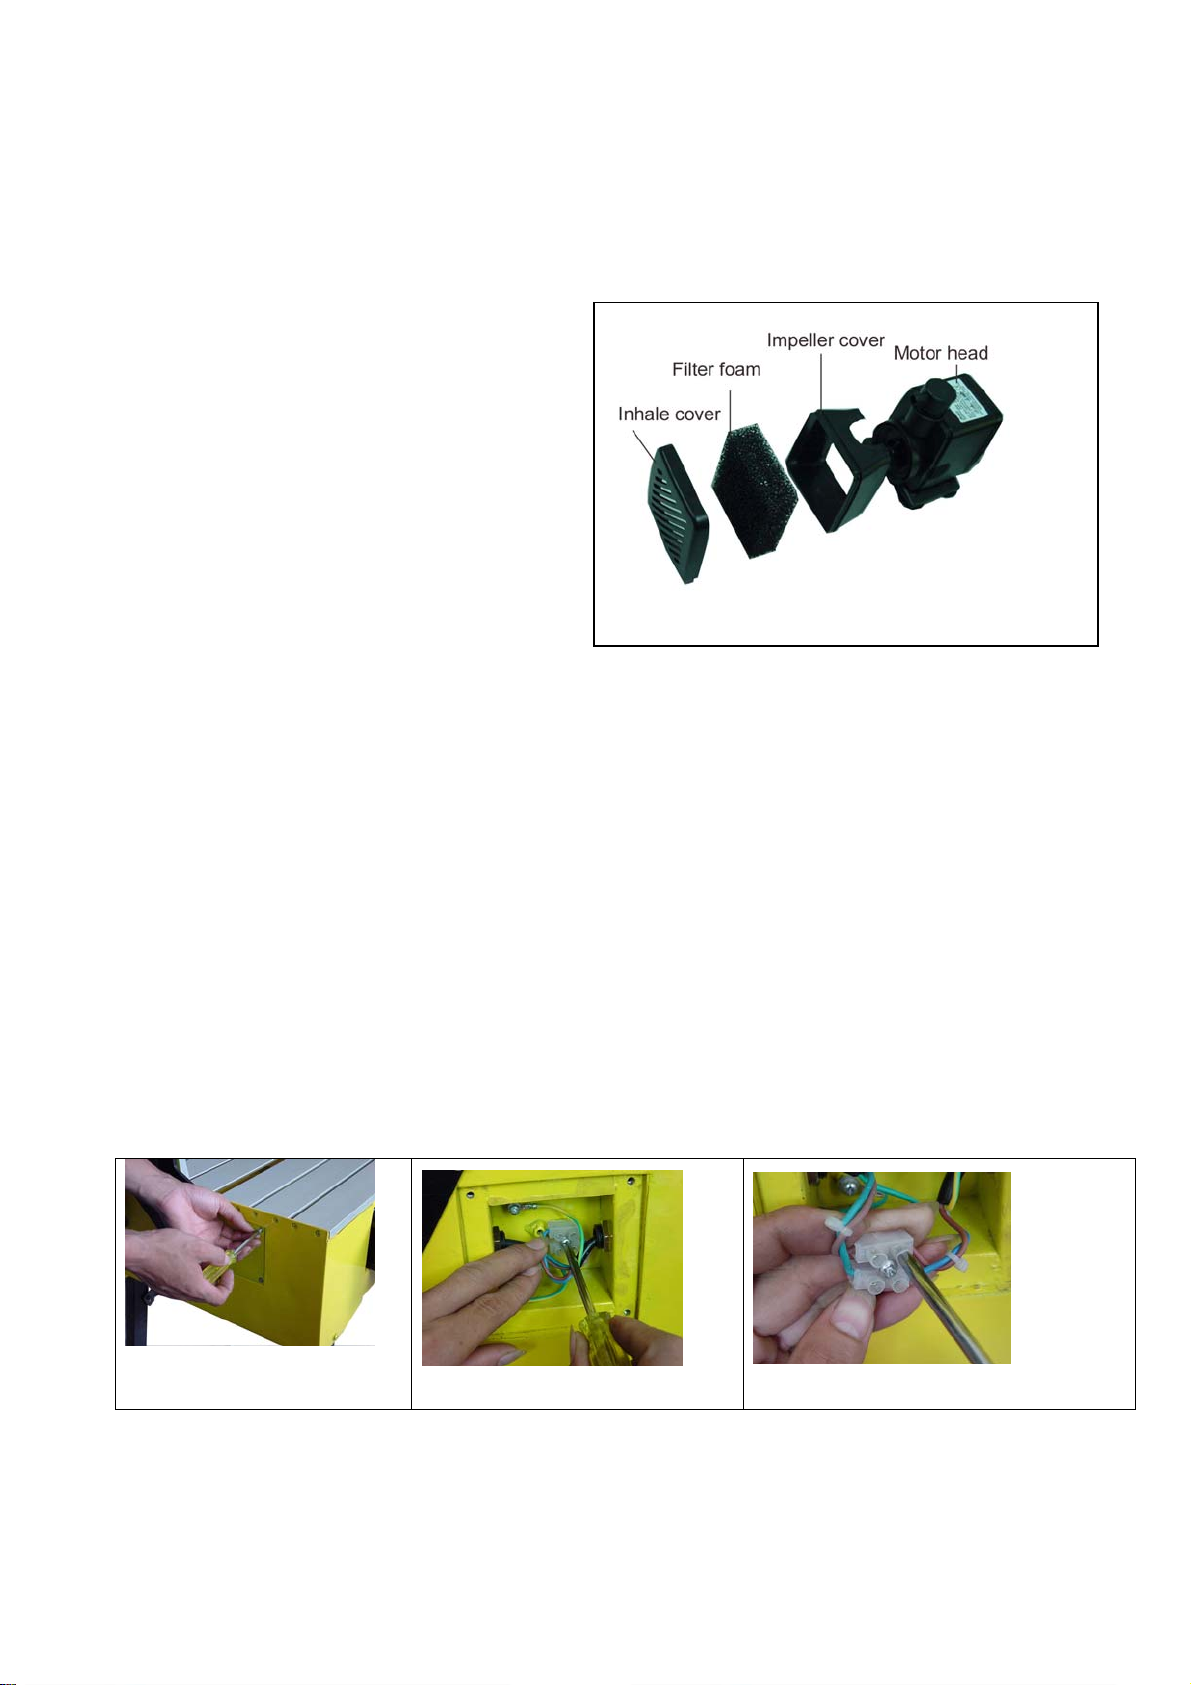
PUMP MAITENENCE
1. Clean the pump
To clean the pump, remove the inhale
Cover, and then take out of the filter foam
and impeller cover. Use a small brush
or stream of water to remove any debris
on the foam and the impeller.(Fig.25)
Note: Please clean the pump immediately
after you stop use.Otherwise the filter
foam and the impeller could be stuck by
the dry debris. So you must replace the filter foam or the pump.
2. Replace the filter foam To replace the filter foam, remove the inhale cover, then take out of the
filter foam and put into a new one.
3. Replace the pump After replace a new filter foam, if the pump is still not work, you must replaced
by a new pump, only use the pump recommended by the manufacturer of the machine, the
changing procedures is as follows:
1) Pull out the plug of power cord;
2) Follow the procedure as MAKING A BEVEL CUT and tile the rail to 45-degree. Then loosen
the screws of the cover on the left side of the frame. (Fig.26-1)
3) Take out of the cover and the plastic pad, and then loosen the wire connector (Fig.26-2)
4) Loosen the wires. (Fig.26-3) (Fig.26-4)
5) Loosen the earthed wire (Fig.26-5)
6) Loosen the plastics nut of the cable lock on the connecting box (Fig.26-6&7) by a wrench
(Fig.26-8). Now the pump cable can be pulled out from the connecting box. (Fig.26-9,10&11);
7) Replace the old pump with a new one, and just reverse the procedures 1) to 6).
Fig.26-1
Fig.26-2
Fig.26-3
Fig.25

- 14 -
VII TROUBLE SHOOTING
Below we have listed a number of possible causes and corresponding solutions in case the machine
dose not function as it should:
●The motor gets hot.
1. The ventilation slots in the motor are blocked with dirt:
-Clean the cool ventilation slots;
2. The motor is defective:
-Have your stone cutter repaired by your supplier.
●The connected machine does not work.
1. Interruption in the mains connection;
-Check mains connection for fracture.
2. The switch is broken.
-Have your stone cutter repaired by your supplier.
VIII ACCESSORIES
1. Rip/mitre cutting guide.
2. Hexagonal blade wrench.
3. Motor shaft holding wrench.
Fig.26-4
Fig.26-5
Fig.26-6
Fig.26-7
Fig.26-8
Fig.26-9
Fig.26-10
Fig.26-11

- 15 -
4. Handle.
IX SERVICE AND ADDRESS:
TOPMAQ: 32 Hammersmith Drive, Wigram, Christchurch 8042.
http://www.topmaq.co.nz
Table of contents
Other TOPMAQ Saw manuals


Popular Saw manuals by other brands

Femi
Femi GOLD Instructions for use and maintenance

Ferm
Ferm FKS-185L user manual

Scheppach
Scheppach PL55 Original instruction manual

Gude
Gude GTKS 315/230V Translation of original operating instructions

King Canada
King Canada KC-10MB instruction manual

Bosch
Bosch GCB 120 Professional Original instructions


