ToronTek E400 User manual

User Instructions
This Manual is written and compiled in accordance with the council directive MDD93/42/EEC for
medical devices and harmonized standards. In case of modifications and software upgrades, the
information contained in this document is subject to change without notice.
The Manual describes, in accordance with the Pulse Oximeter’s features and requirements, the main
structure, functions, specifications, correct methods for transportation, installation, usage, operation,
repair, maintenance and storage, etc. as well as the safety procedures to protect both the user and
equipment. Refer to the respective chapters for details.
Please read the User Manual carefully before using this product. The User Manual which describes the
operating procedures should be followed strictly. Failure to follow the User Manual may cause
measuring abnormality, equipment damage and human injury. The manufacturer is NOT responsible for
the safety, reliability and performance issues and any monitoring abnormalities, human injury or
equipment damage due to users' negligence of the operation instructions. The manufacturer’s warranty
service does not cover such faults.
Regrettably, owing to the forthcoming renovation, the specific products you received may not be totally
in accordance with the description of this User Manual.
This product is a medical device and can be used repeatedly.
WARNING:
Discomfort or pain can occur if the device is used ceaselessly, especially for
microcirculation barrier patients. It is recommended that the sensor should not be applied
to the same finger for longer than 2 hours.
For special patients, there should be a more prudent inspection of the placing process. The
device should not be clipped on an edema or tender tissue.
The infrared light emitted from the device, though invisible, is harmful to the eyes. Avoid
staring at it.
The patient cannot use nail enamel or other makeup.
The patient’s fingernails must be clipped short.
Please refer to the related content about clinical restrictions and caution.
This device is not intended for treatment.
TORONTEK-E400 Pulse Oximeter

Table of Contents
1. Safety..................................................................................................................................................... 1
1.1 .Instructions for Safe Operations ......................................................................................................1
1.2. Warning............................................................................................................................................ 1
1.3. Hazards ............................................................................................................................................ 1
2. Overview..............................................................................................................................................2
2.1. Features............................................................................................................................................ 2
2.2. Major Applications and Scope of Application .................................................................................3
2.3. Environment requirements............................................................................................................... 3
3. Principle................................................................................................................................................3
4. Technical specifications ........................................................................................................................4
4.1. Main performance............................................................................................................................4
4.2. Main parameters............................................................................................................................... 4
5. Installation............................................................................................................................................5
5.1. View of Front Panel ........................................................................................................................5
5.2. Installing the Wrist Strap.................................................................................................................5
5.3. USB Port..........................................................................................................................................5
5.4. Accessories.......................................................................................................................................5
6. Operating guide.................................................................................................................................... 6
6.1. Application Method .........................................................................................................................6
6.2. Attention for Operation................................................................................................................... 9
6.3. Clinical Restrictions...................................................................................................................... 10
7. Maintenance, Transportation and Storage.......................................................................................10
7.1. Cleaning and Disinfection............................................................................................................. 10
7.2. Maintenance..................................................................................................................................10
7.3. Transportation and Storage ...........................................................................................................10
8. Troubleshooting.................................................................................................................................. 11
9. Key of symbols....................................................................................................................................12
10. Function specification......................................................................................................................13
Appendix 1............................................................................................................................................... 14
TORONTEK-E400 Pulse Oximeter

1. Safety
1.1. Instructions for Safe Operations
Inspect the main unit and all accessories periodically to ensure that there is no visible damage
that may affect the patient’s safety, and monitor the performance of cables and transducers. It is
recommended that the device should be inspected at least once a week. If there is obvious
damage, stop using the device.
Necessary maintenance must be performed by qualified service engineers ONLY. There are no
user serviceable parts and users are not permitted to service the device by themselves.
The Oximeter must not be used together with accessories not specified in the User Manual.
Only accessories specified or recommended by the manufacturer can be used with this device.
This product is calibrated before leaving the factory.
1.2. Warning
Explosive hazard—DO NOT use the Oximeter in an environment with flammable gas, such as
some ignitable anesthetic agents.
DO NOT use the Oximeter while the patient is measured by MRI and CT.
Be careful with the use of the wrist strap. Improper use of the wrist strap will cause damage not
covered under the manufacturer’s warranty. Swinging the device by the wrist strap will void the
warranty. Please do not use the wrist strap if allergic to the material.
The disposal of this instrument and its accessories and packaging (including batteries, plastic
bags, foams and paper boxes) should follow local laws and regulations.
Please check the packaging before use to make sure the device and accessories are in complete
accordance with the packaging list or else the device may not work normally.
Use only accessories approved by the manufacturer or else risk damaging the device.
Please only use the battery charger which is accompanies by the product and is in compliance
with the requirements of IEC 60601-1. Using a different charges might damage the device.
Do not use the device while it is charging.
1.3. Hazards
Keep the Oximeter away from dust, vibrations, corrosive substances, explosive materials,
high temperatures and moisture.
Stop operating the Oximeter if it gets wet.
DO NOT use the device immediately after moving it from a cold environment to a warm or
humid environment.
DO NOT operate the keys on the front panel with sharp objects.
High temperature and high pressure steam disinfection of the Oximeter is not permitted.R
efer to the User Manual in the relative chapter (7.1) for instructions on cleaning and
disinfection.
1
TORONTEK-E400 Pulse Oximeter

DO NOT immerse the Oximeter in liquid. If it needs cleaning, wipe the surface with medical
alcohol using a soft material. Do not spray any liquid directly onto the device.
When cleaning the device with water, ensure that the temperature of the water is lower than
60℃.
Thin or cold fingers will affect the normal measure of the patient's SpO2and pulse rate. Be
sure to clip a thick finger such as the thumb or middle finger deeply enough into the probe.
The update period of data is less than 5 seconds. This is changeable according to different
individual pulse rates.
The waveform is normalized. Please read the measured value when the waveform on-screen
is uniform and steady-going. This measured value is the optimal value and this waveform is
the standard one.
If abnormal conditions appear on the screen during the test process, pull out the finger and
reinsert it to restore normal use.
The device has a lifespan of three years after the first electrified use.
The wrist strap attached to the device is made from non-allergenic material. If you are
sensitive to the wrist strap, stop using it. In addition, pay attention to the use of the wrist
strap. To avoid harm, DO NOT wear it around the neck.
This device has an alarm function.
Provided the alarm function is turned on, an alarm will automatically go off if the measured
data goes beyond the highest or lowest limit.
The alarm function can either be paused or turned off (default setting). The function can be
turned back on through menu operation. Please refer to Chapter 6.1 for more information on
the alarm function.
The device may not work for all patients. If you are unable to achieve stable readings,
discontinue use.
A flexible circuit connects the two parts of the device. DO NOT twist or pull on the
connection.
2. Overview
The peripheral capillary oxygen saturation (SpO2) is the percentage of oxyhemoglobin (HbO2) in the
total hemoglobin (Hb) in the blood, or the oxygen concentration in the blood. It is an important bio-
parameter for respiration. A number of diseases relating to the respiratory system may cause a decrease
of SpO2in the blood. Furthermore, some other causes such as the malfunction of the body's self-
adjustment, damage during surgery, and injuries caused by some medical examinations could also lead to
a low oxygen supply in the human body. As a consequence, symptoms such as vertigo, impotence and
vomiting would appear. Serious symptoms might endanger the patient’s life. Therefore, prompt
information of patients' SpO2is of great help for doctors to discover potential dangers and is of great
importance in the clinical medical field.
The Pulse Oximeter features a small size, low power consumption, convenient operation and portability.
The patient only needs to put one of their fingers into a probe for diagnosis and a display screen will
directly show the measured value of pulse oxygen saturation with high accuracy.
2.1. Features
A. Operation of the product is simple and convenient.
B. The product is small in size and light in weight, making it convenient to carry.
C. The device has low power consumption.
2
TORONTEK-E400 Pulse Oximeter

2.2. MajorApplications and Scope of Application
The Pulse Oximeter can be used to measure the pulse oxygen saturation and pulse rate through a finger.
The device is suitable for use in the home, hospitals, oxygen bar, community health care, and physical
care in sports (it can be used before or after doing sports and is not recommended to be used during
sporting activities).
The problem of overrating will emerge if the patient is suffering from toxicosis caused by
carbon monoxide. The device is not recommended to be used under these circumstances.
2.3. Environment requirements
Storage Environment
a) Temperature :-40℃~+60℃
b) Relative humidity :≤95%
c) Atmospheric pressure :500hPa~1060hPa
Operating Environment
a) Temperature:10℃~40℃
b) Relative Humidity :≤75%.
c) Atmospheric pressure:700hPa~1060hPa
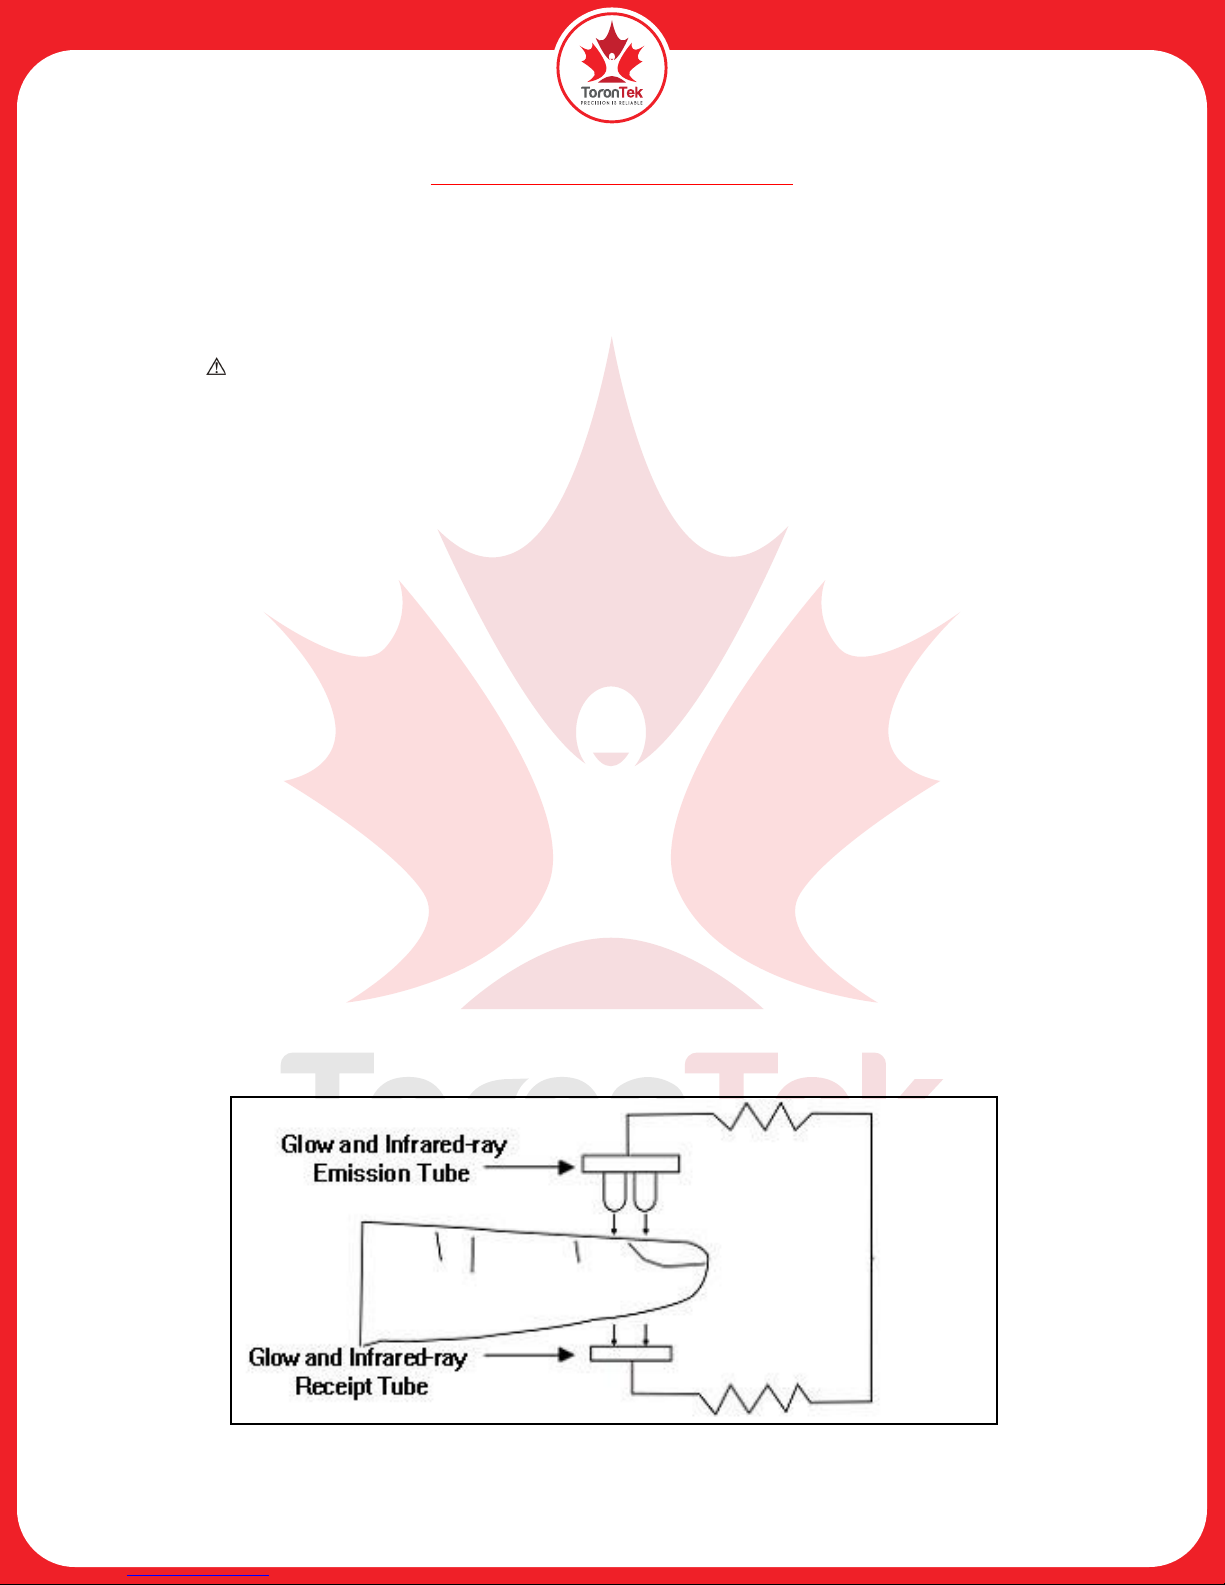
3. Principle
Operation principle of the Oximeter: Photoelectric Oxyhemoglobin Inspection Technology is applied
together with Capacity Pulse Scanning & Recording Technology so that two beams of light of different
wavelengths can be focused onto a human nail tip through a perspective clamp finger sensor. A measured
signal is obtained by a photosensitive element and acquired information will be shown on-screen through
treatment in electronic circuits and microprocessors. calculation of blood oxygen level the device uses a
formula to process the data according to Lambert Beer Law and Spectrum Absorption Characteristics of
Reductive Hemoglobin (Hb) and Oxyhemoglobin (HbO2) in glow & near-infrared zones.
Figure 1
3
TORONTEK-E400 Pulse Oximeter

4. Technical specifications
4.1. Main performance
A. SpO2value display.
B. Pulse rate value display, bar graph display.
C. Pulse waveform display.
D. Low battery indication: low battery indicator appears when the battery is drained. Device may
work abnormally when the battery is low.
E. Automatic power off function: if a finger is not placed in the probe within 5 seconds while on
the measuring interface, the device will automatically power off.
F. The display mode can be changed.
G. Screen brightness can be changed.
H. A pulse rate sound indication.
I. Alarm function.
J. SpO2value and pulse rate value data can be uploaded to a computer.
4.2. Main parameters
A. Measurement of SpO2
Measurement Range:0~100%
Accuracy:70~100%,±2%;0~69%, unspecified
B. Measurement of pulse rate
Measurement Range:30bpm~250bpm
Accuracy: ±2 bpm or ±2% (select larger)
C. Resolution
SpO2: 1%, Pulse rate: 1bpm.
D. Measurement Performance in Weak Filling Condition:
SpO2and pulse rate can be shown correctly when pulse-filling ratio is 0.4%. SpO2error is ±4%, pulse
rate error is ±2 bpm or ±2% (select larger).
E. Resistance to surrounding light:
The deviation between the value measured in the condition of man-made light or indoor natural light and
that of a dark room is less than ±1%.
F. Power supply requirement: : 3.6 V DC ~ 4.2V DC.
G. Optical Sensor
Red light (wavelength is 660nm,6.65mW)
Infrared (wavelength is 880nm, 6.75mW)
H. Adjustable alarm range:
SpO2: 0%~100%
Pulse Rate: 0bpm~254bpm
4
TORONTEK-E400 Pulse Oximeter

5. Installation
5.1. View of Front Panel
Figure 2 Front View
5.2. Installing the Wrist Strap
A. Put the thinner side of the strap through the hole.
B. Put the wider side of the strap through the thinner side and tighten it.
5.3. USB Port
Figure 3
USB port : Used to connect a personal computer to export the trend data or charge the lithium battery via
a data line.
5.4. Accessories
A. 1 Wrist strap
B. 1 User manual
5
TORONTEK-E400 Pulse Oximeter

C. 1 Power adapter
D. 1 Data line
E. 1Disk (PC software)
6. Operating guide
6.1. Application Method
A. Squeeze the clamp, put a finger into the rubber hole, then release it.
a) Press the Power Button on the front panel until the device turns on.
b) Do not shake the finger. Keep the patient still and at ease during the process.
c) The data can be read directly from the screen on the measuring interface.
Fingernails and the luminescent tube should be on the same side.
If the alarm function is on, the device will provide a medium-priority alarm signal when
the finger is removed. Intermittent alarm will go off and the user interface will display
"FINGER OUT".
Figure 4
(Medium priority indicating that prompt operator response is required.)
B. Change display direction:
On the measuring interface, you can change the display direction by pressing the button shortly.
C. Pause alarm:
a) Alarms include the alarm of measured data going beyond the limits, the low battery alarm, and
the alarm of the finger moving out of position.
b) You can pause the alarm when it goes off by clicking the power button while on the measuring
interface. The alarm will restart in 60 seconds.
c) Use the menu operations to turn the alarm off permanently.
D. Menu operations:
On the measuring interface, the display direction can be changed by pressing the power button. There are
four modes of data display that can be viewed.
6
TORONTEK-E400 Pulse Oximeter

Press the power button with a prolonged push (1 second) to enter the Settings Menu Interface (see Figure
5).
Note: When the display direction on the screen is in Portrait View, you cannot enter the Menu Interface.
Press the power button to switch to Landscape View.
The user can set up the following parameters in the Settings Menu – Backlight brightness, Alarm high-
low limits, Data transmission, Data storage (recording), Data upload to computer.
Please note in the Settings Menu:
CLICK = short press of power button and PRESS = prolonged push of power button (1sec)
Figure 5. Main Menu
a) Back-light adjustment
On the main menu, select "Brightness." Press and hold the power button and to adjust the back-light
brightness.
b) Setting alarms
On the main menu, select "Alarm." Press the power button (1sec) to enter the alarm settings as shown in
Figure 6:
a. Adjusting the high and low limits of alarms
Click the power button to select “Dir”, then Press the button to choose Up or Down (this will be the
direction the value of the high-low limits of SpO2and pulse rate will be adjusted.)
To raise the SpO2 and pulse rate limit, select "Up", then click the power button to select the parameter to
be adjusted: SpO2high limit (SpO2ALM HI), SpO2 low limit (SpO2ALM LO), Pulse rate high limit (PR
ALM HI), Pulse rate low limit (PR ALM LO). Press and hold the power button to adjust the selected
limit to the desired higher value and release it once the desired higher limit has been reached.
To lower the SpO2and pulse rate limit, select “Down", then click the power button to select the
parameter to be adjusted. Press and hold the power button to adjust the selected limit to the desired lower
value and release it once the desired lower limit has been reached.
If the alarm function is on, the device will provide medium-priority alarm signal when the
data of SpO2or pulse rate is beyond the set limit. An intermittent alarm will go off and the
measurement will be displayed in yellow.
Medium-priority alarm indicates immediate operator response is required.
b. Setting the alarm
Select “Alarm”, then select “On” or “Off.”
Figure 6. Alarm Settings Menu
7
TORONTEK-E400 Pulse Oximeter

c. Pulse sound indication setting
Select "Pulse Sound", choose to have the Pulse Sound (heart beat) alarm either "On" or "Off."
d. Exiting the Alarm settings
Select "EXIT" to exit the Alarm Settings Menu.
C. Data transmission setting
First, please install the affiliated software onto the computer. Two icons will appear on the desktop after
installation. The SpO2icon is a program for receiving real-time data (as shown in figure 7.) The SpO2
Review icon is a program for receiving stored data (shown in figure 8.)
a.Connect the device to a computer with the data line, then double click the SpO2 icon to start the
program.
b.On the main menu interface, Click the power button to select "USB", then Press the power button
to choose whether to transmit the real-time data to the computer which displays the data
synchronously or not. Choose “on” to permit transmission; choose “off” to forbid transmission.
c.When you unplug the data line from the computer, a dialog box "Save data at view" appears on the
desktop, in which you can input the patient's basic information.
Figure 7. SpO2program
Figure 8. SpO2Review program
If the user chooses to turn on the display function on the computer, it will take several
seconds for the data to appear on the computer screen.
D. Data storage settings
This device has the ability to store 24 hours worth of data. It can store the measured pulse rate and SpO2
value accurately, transfer the data to a computer, display the data and print reports (with the included
SpO2 Software - Green Heart.)
a.From the “Settings Menu”, Click the power button to select “Record”, then Press the power button
to enter the start time of data storage test (see figure 9).
b.Click the power button to move the underline to the time to be set (hours and minutes), then Press
and hold the power button to adjust the time setting. After setting the time, Click the power
button to move the underline to “Y” and Press the power button to exit the “time setting menu”.
Recording will begin. If you move the underline to “N”, and Press the power button to quit the
“time setting menu”, the recording will not begin. The data stored in memory will not be
deleted.
c.If the data storage function is turned on, a red "REC" sign and a flashing red dot will appear on-
screen on the measuring interface. This means the device is in a state of storing data.
d. In the state of storing, whatever interface the device is on (measuring interface or menu
8
TORONTEK-E400 Pulse Oximeter

interface), the sign "Recording" will appear on the screen in 30 seconds, then the screen will be
automatically shut down. If you push the button, the sign "Recording" will appear on the screen,
and then the screen will be automatically shut down again; if you press and hold the button, the
device will return to the former interface.
e.If you turn the data storage function on, the previous data stored will be automatically removed.
f. To save power during the state of data storage, the screen is automatically shut down and the
pulse sound indication is turned off.
g.When the storage space is full, the screen displays the warning “Memory is full”, and shuts down
after a few seconds. The warning will still be displayed the next time the device is turned on for
the purpose of alerting the user. If you press the button again, it will enter the measuring
interface.
Figure 9
E. Uploading data to a computer after recording
a.Connect the device to a computer via the data line which is affiliated with the device. Double click
the "SpO2Review" icon to open the program. Click the ‘New Session’ icon in the software,
enter the patient data and then click ‘OK’. The Software will display “device connected, waiting
for data”.
b. Press the power button to enter the “Settings Menu” and then Click the power button to select
“Upload”. Press the power button to select “on”. The data will be transferred to your computer.
c.The users cannot upload stored data to a computer while the device is in the state of storing.
d. You cannot cancel the upload of stored data. When the upload is finished, the menu choice bar
will move to "Exit" automatically.
F. Exit the main menu
Select “EXIT” to exit the Main Menu.
G. Charging
There are two charging methods:
a) Connect the device to a computer via data line. The device will begin charging.
b) Connect the device to a power supply via a power adapter. The device will begin charging.
When the device is charging, the indication light is orange. When the battery is full, the light turns green.
If the alarm function is on, the device will produce a high-priority alarm signal when the
battery is low. An intermittent alarm will go off and the battery icon will flash red.
High-priority alarm indicates that immediate operator response is required.
6.2. Attention for Operation
A. Please check the device before use to ensure that it is working normally.
B. The finger should be placed in the proper position or else it may result in inaccurate
measurement (see the illustration in Figure 4).
C. The SpO2sensor should not be used at a location or limb tied with an arterial canal or blood
9
TORONTEK-E400 Pulse Oximeter

pressure cuff, or receiving intravenous injection.
D. Do not fix the SpO2sensor with adhesive or else it may result in venous pulsation and
inaccurate measure of the SpO2 and pulse rate.
E. Excessive ambient light may affect the measuring result. This includes fluorescent lamps, dual
ruby lights, infrared heaters, direct sunlight etc.
F. Strenuous action of the patient or extreme electrosurgical interference may also affect accuracy.
G. Patient cannot use nail enamel or other makeup.
H. Please clean and disinfect the device after operating it according to the User Manual (7.1).
6.3. Clinical Restrictions
A. As the measurement is taken on the basis of arteriole pulse, substantial pulsating blood flow of
the subject is required. For a subject with weak pulse due to shock, low ambient/body
temperature, major bleeding, or use of vascular contracting drugs, the SpO2waveform (PLETH)
will decrease. In this case, the measurement will be more sensitive to interference.
B. For those with a substantial amount of staining dilution drugs (such as methylene blue, indigo
green and acid indigo blue), carboxyhemoglobin (COHb), methionine (Me+Hb) or thiosalicylic
hemoglobin, and some with an icterus problem, the SpO2determination by this monitor may be
inaccurate.
C. Drugs like dopamine, procaine, prilocaine, lidocaine and butacaine may also be a major factor
blamed for serious errors of SpO2measurements.
D. As the SpO2value serves as a reference value for judgment of anemic anoxia and toxic anoxia,
some patients with serious anemia may also report good SpO2measurement.
7. Maintenance, Transportation and Storage.
7.1. Cleaning and Disinfection
Use alcohol wipes to disinfect the device and leave to air-dry. Otherwise, clean the device with a
soft cloth.
7.2. Maintenance
A. Please clean and disinfect the device before use according to the User Manual (7.1).
B. Please recharge the battery when the screen shows the low battery icon: .
C. Recharge the battery soon after discharge. The device should be recharged every six months if it
is not regularly used. This will extend the battery life.
D. Users are advised to calibrate the device termly (or according to the calibrating program of the
hospital). It can also be performed at the state-appointed agent or you can contact us for
calibration.
7.3. Transportation and Storage
A. The packed device can be transported by ordinary conveyance or according to transport
contract. DO NOT transport the device with toxic or corrosive materials.
B. The best storage environment of the device is -40ºC~60ºC ambient temperature and not higher
than 95% relative humidity.
10
TORONTEK-E400 Pulse Oximeter

8. Troubleshooting
Problem Possible Reason Solution
The SpO2 and Pulse Rate
are not displayed
normally
1. The finger is not
properly positioned.
2. The patient’s SpO2is
too low to be detected.
1. Place the finger properly and try
again.
2. Try again; Go to a hospital for a
diagnosis if you are sure there is nothing
wrong with the device.
The SpO2 and Pulse Rate
are not displayed stably
1. The finger is not
placed inside deeply
enough.
2. The finger is shaking
or the patient is moving.
1. Place the finger properly and try
again.
2. Let the patient keep calm and still.
The device cannot be
turned on
1. The battery is drained
or almost drained.
2. Malfunction of the
device.
1. Recharge the battery
2. Please contact the local service center.
The display turns off
suddenly
1. The device is set to
automatically power off
within 5 seconds if it
cannot detect any signal.
2. The battery is drained
or almost drained.
1. Normal
2. Recharge the battery
The battery is not fully
charged even after 10
hours charging time. The battery is broken. Please contact the local service center.
11
TORONTEK-E400 Pulse Oximeter

9. Key of symbols
Signal Description
Warning – See User Manual
%SpO2The pulse oxygen saturation(%)
bpm Pulse rate (bpm)
Fully charged
Low battery
Turn alarm off
Pause alarm
Turn alarm on
Turn pulse sound indication off
Turn pulse sound indication on
Menu button/Power button/
Function button
Type BF
USB
SN Serial number
1. No finger inserted
2. Probe error
3. Signal inadequacy indicator
IP22 International Protection
WEEE (2002/96/EC)
12
TORONTEK-E400 Pulse Oximeter

10. Function specification
Information Display Mode
The Pulse Oxygen Saturation(%SpO2) 2-digit digital OLED display
Pulse Rate(bpm) 3-digit digital OLED display
Pulse Intensity (bar-graph) bar-graph OLED display
SpO2Parameter Specification
Measuring range 0%~100%, (the resolution is 1%).
Accuracy 70%~100%:±2% ,Below 70% unspecified.
Average value
Calculate the Average value in every 4 measure
value.
The deviation between average value and true value
does not exceed 1%.
Pulse Parameter Specification
Measuring range 30bpm~250bpm, (the resolution is 1bpm)
Accuracy ±2bpm or ±2% (select larger)
Average pulse rate
Calculate the Average pulse rate of every 4 cardio-
beats cycle.
The deviation between average value and true value
does not exceed 1%
Safety Type Interior Battery, BF Type
Pulse Intensity
Range Continuous bar-graph display. Higher display
indicates stronger pulse.
Battery Requirement
Voltage 3.7 rechargeable lithium battery × 1
13
TORONTEK-E400 Pulse Oximeter

Battery working life
Charge and discharge no less than 500 times.
Power Adapter
Input Voltage 100 to 240 VAC, 50/60 Hz
Output voltage 5 VDC
Output current 250mA
Output power 1.25 W
Oximeter Probe
Wavelength: 660nm 880nm
Dimensions and Weight
Dimensions 57(L) × 32(W) × 30 (H) mm
Weight About 50g (with the lithium battery*1)
Appendix 1
State Alarm condition delay Alarm signal generation
delay
Low voltage alarm 60s 5ms
SpO2alarm 1s 5ms
Pulse rate alarm 1s 5ms
Probe error alarm 16ms 5ms
14
TORONTEK-E400 Pulse Oximeter
Table of contents
Other ToronTek Medical Equipment manuals