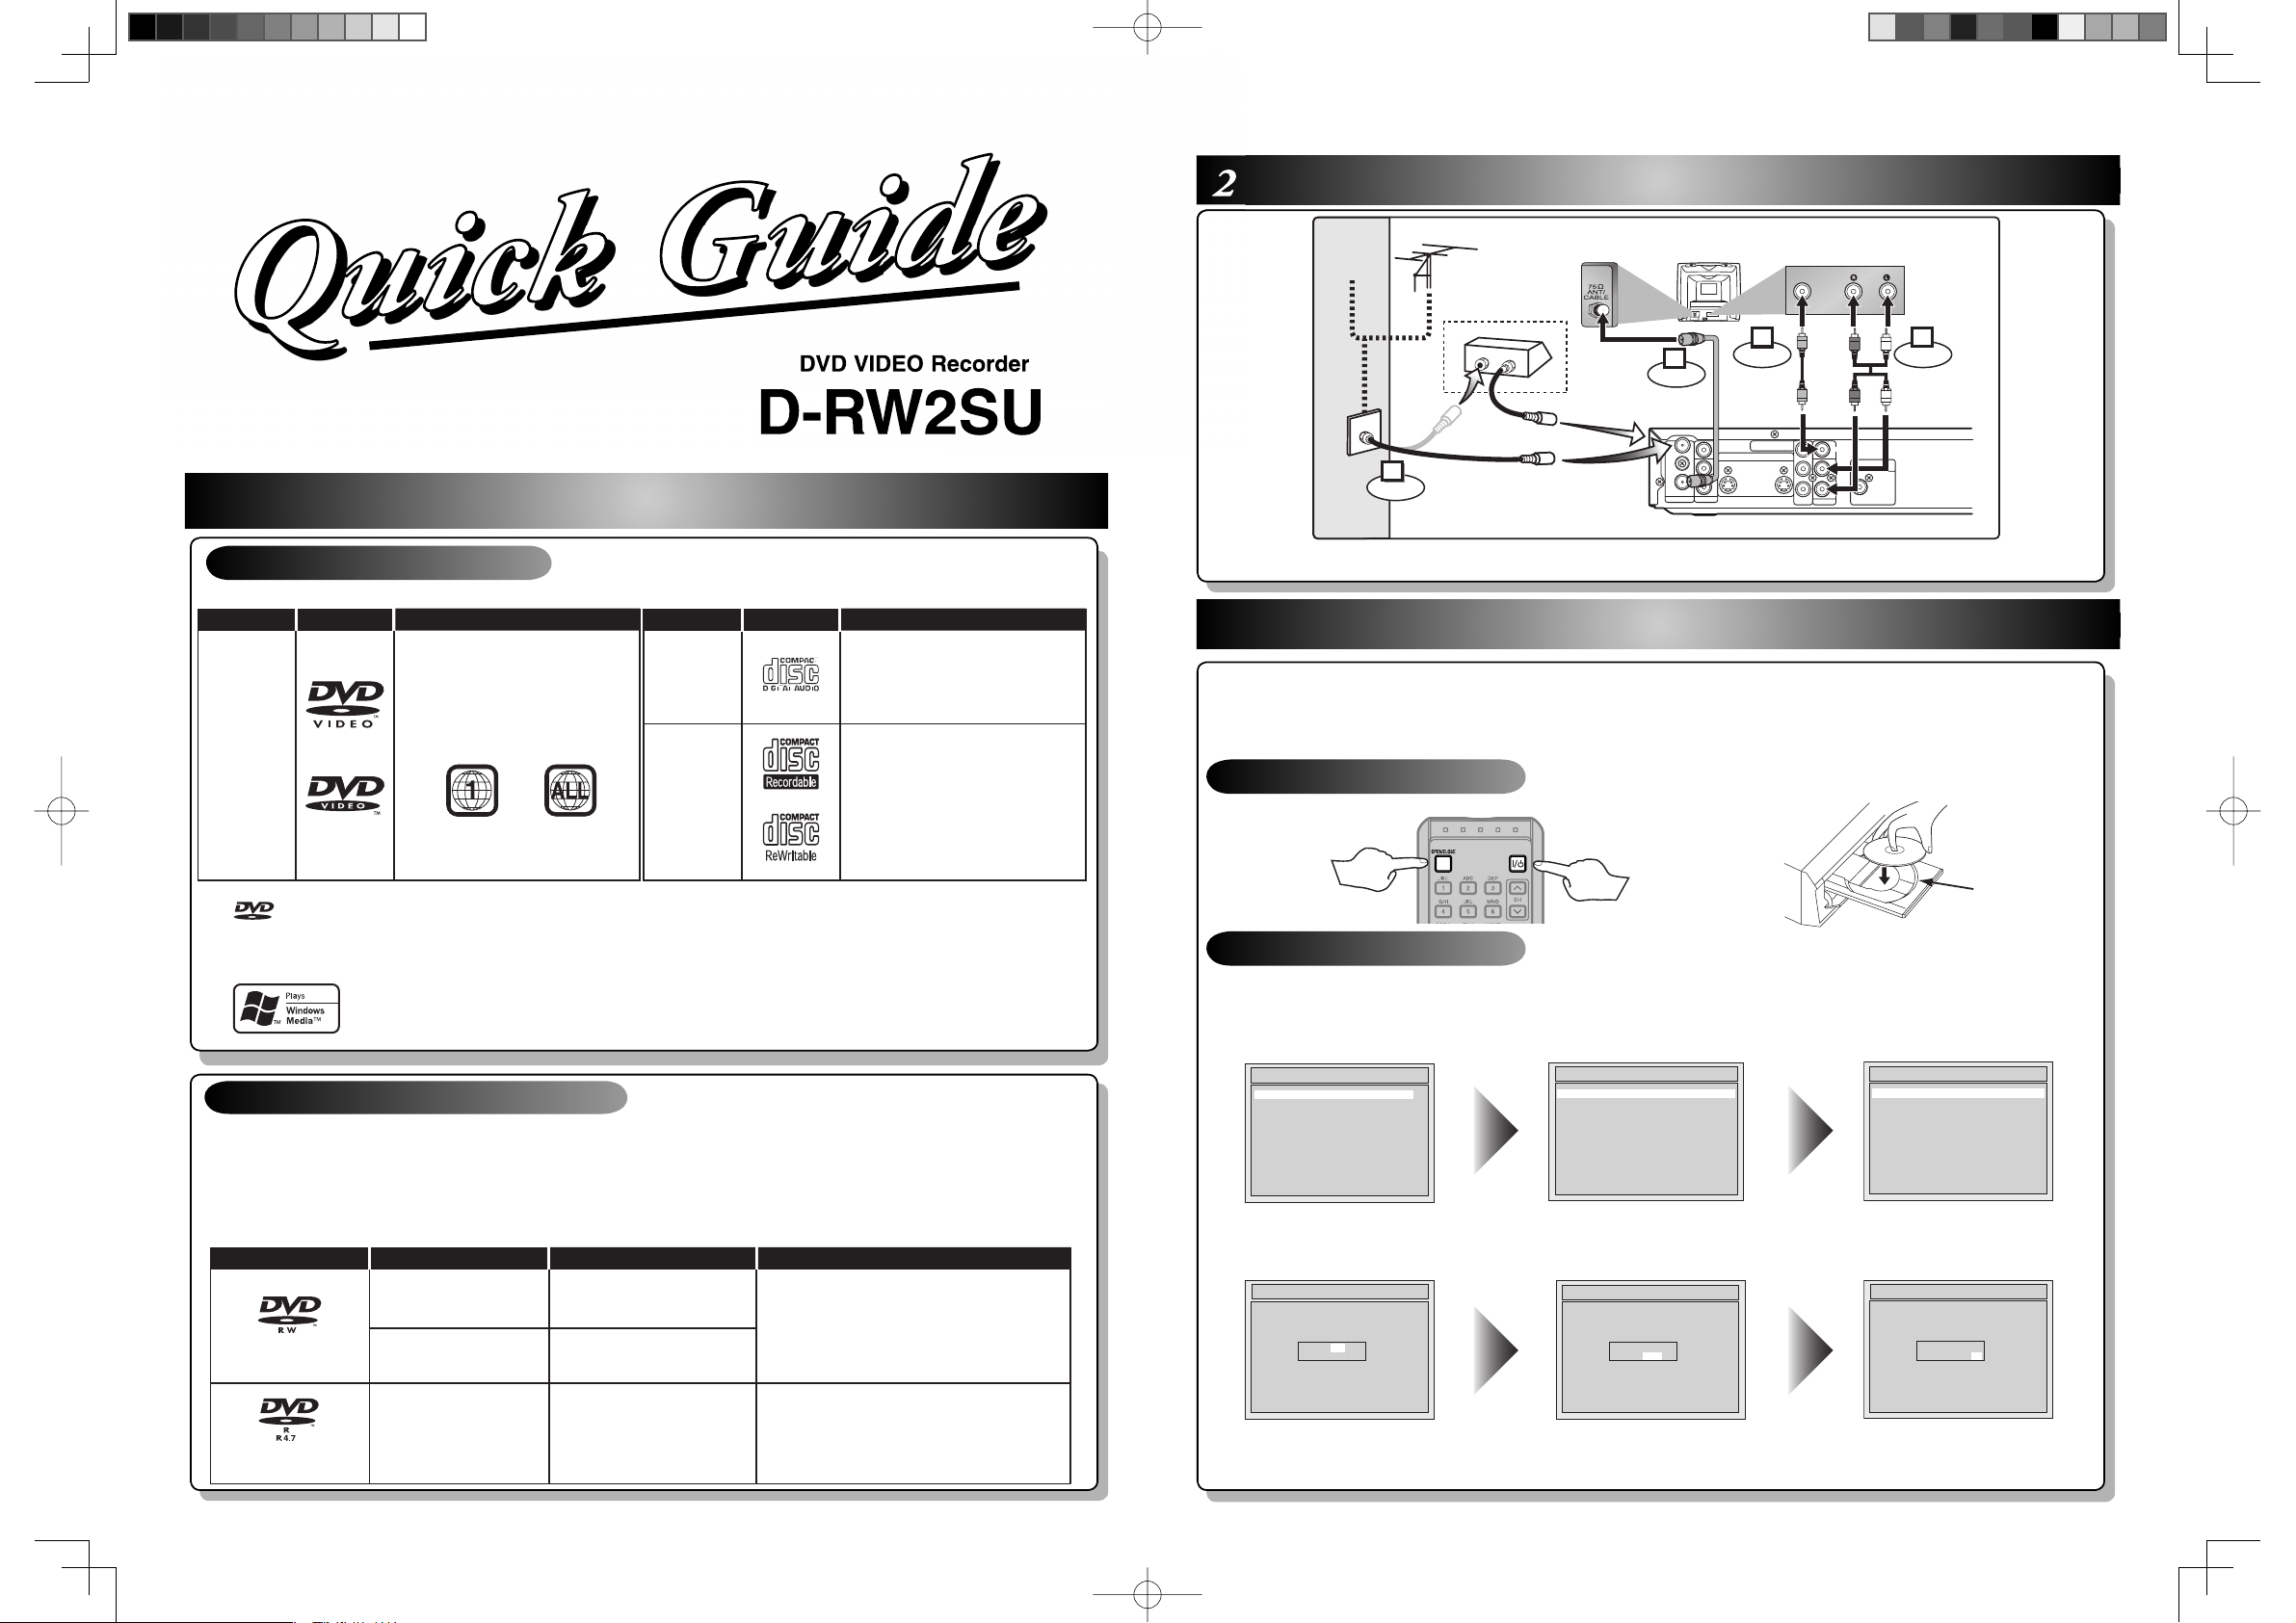
manuals.online logo
Brands
  1. Home
  2. •
  3. Brands
  4. •
  5. Toshiba
  6. •
  7. DVR
  8. •
  9. Toshiba D-RW2SU User manual

Toshiba D-RW2SU User manual

Other manuals for D-RW2SU

4

Other Toshiba DVR manuals

Toshiba SD46VSR User manual

Toshiba

Toshiba SD46VSR User manual

Toshiba D-R150SB User manual

Toshiba

Toshiba D-R150SB User manual

Toshiba D-R410KU User manual

Toshiba

Toshiba D-R410KU User manual

Toshiba RD-XS35SC User manual

Toshiba

Toshiba RD-XS35SC User manual

Toshiba D-RW2SU User manual

Toshiba

Toshiba D-RW2SU User manual

Toshiba D-VR7KC2 User manual

Toshiba

Toshiba D-VR7KC2 User manual

Toshiba RD99DTKB User manual

Toshiba

Toshiba RD99DTKB User manual

Toshiba RD-X2 User manual

Toshiba

Toshiba RD-X2 User manual

Toshiba SD 2800 User manual

Toshiba

Toshiba SD 2800 User manual

Toshiba RD-XS52SU User manual

Toshiba

Toshiba RD-XS52SU User manual

Toshiba D-RW2SC User manual

Toshiba

Toshiba D-RW2SC User manual

Toshiba D-R1SU User manual

Toshiba

Toshiba D-R1SU User manual

Toshiba D-R2S User manual

Toshiba

Toshiba D-R2S User manual

Toshiba RD-XS35SU User manual

Toshiba

Toshiba RD-XS35SU User manual

Toshiba RD-85DTSB User manual

Toshiba

Toshiba RD-85DTSB User manual

Toshiba D-KVR20KU User manual

Toshiba

Toshiba D-KVR20KU User manual

Toshiba IPSe8-X Mounting instructions

Toshiba

Toshiba IPSe8-X Mounting instructions

Toshiba Surveillix XVR16-120-X User manual

Toshiba

Toshiba Surveillix XVR16-120-X User manual

Toshiba D-R265SE User manual

Toshiba

Toshiba D-R265SE User manual

Toshiba RD-XS32SB User manual

Toshiba

Toshiba RD-XS32SB User manual

Toshiba D-R420KU User manual

Toshiba

Toshiba D-R420KU User manual

Toshiba D-R2SU User manual

Toshiba

Toshiba D-R2SU User manual

Toshiba Surveillix XVSv16-240-X User manual

Toshiba

Toshiba Surveillix XVSv16-240-X User manual

Toshiba SURVEILLIX KV-KLR User manual

Toshiba

Toshiba SURVEILLIX KV-KLR User manual

Popular DVR manuals by other brands

Pace TDC577X manual

Pace

Pace TDC577X manual

Zavio NQ2040 user manual

Zavio

Zavio NQ2040 user manual

KGuard Security KG-SHA104 user manual

KGuard Security

KGuard Security KG-SHA104 user manual

SanDisk V-Mate Quick manual

SanDisk

SanDisk V-Mate Quick manual

Panasonic WJND200 - NETWORK DISK RECORDER Setup instructions

Panasonic

Panasonic WJND200 - NETWORK DISK RECORDER Setup instructions

Hunt Electronic HVRM-T1600Q Install & user's guide

Hunt Electronic

Hunt Electronic HVRM-T1600Q Install & user's guide

Portwell PIVS-6104 user manual

Portwell

Portwell PIVS-6104 user manual

AVer EXR6004 Mini Quick user guide

AVer

AVer EXR6004 Mini Quick user guide

Security Labs SLD261 owner's manual

Security Labs

Security Labs SLD261 owner's manual

Swann DIGITAL VIDEO RECORDER instruction manual

Swann

Swann DIGITAL VIDEO RECORDER instruction manual

EverFocus ECOR 4 instruction manual

EverFocus

EverFocus ECOR 4 instruction manual

Xoro HRK 7550 user manual

Xoro

Xoro HRK 7550 user manual

FLIR M3100E Series instruction manual

FLIR

FLIR M3100E Series instruction manual

VTRACKPRO FPRO300 user manual

VTRACKPRO

VTRACKPRO FPRO300 user manual

Swann NVR-7085 models instruction manual

Swann

Swann NVR-7085 models instruction manual

RMRC FPV1000 manual

RMRC

RMRC FPV1000 manual

urmet domus 1093/004AHD instructions

urmet domus

urmet domus 1093/004AHD instructions

CMOS DOTCOM ANX-1670 manual

CMOS DOTCOM

CMOS DOTCOM ANX-1670 manual

manuals.online logo
manuals.online logoBrands
  • About & Mission
  • Contact us
  • Privacy Policy
  • Terms and Conditions

Copyright 2025 Manuals.Online. All Rights Reserved.

ANTENNA
AUDI O IN
VIDEO IN
L
R
AUDIO OUT
VIDEO OUT
(L1)
IN
IN
OUT
OUT
S-VIDEO
COMPONENT
VIDEO OUTPUT
L
Y
P
B
/C
B
P
R
/C
R
R
DIGITAL AUDIO OUTPUT
PCM / BITSTREAM
COAXIAL
AUDIO INVIDEO
Video
cable
(supplied)
Audio
cable
(supplied)
(Back of TV)
or
Cable
TV signal
Connect
Connect
Connect Connect
Antenna
(Back of this unit)
2
1
34
IN
OUT
(Cable box or
Satellite box)
RF cable (not supplied)
RF
cable
(supplied)
This unit can record to DVD-R and DVD-RW discs.
DVD-R discs can only be recorded once, and cannot be
erased. DVD-RW discs can be recorded and erased many
times.
DVD-R discs can only be recorded in Video mode, while
DVD-RW discs can select a recording format between Video
mode and VR mode.
• We strongly recommend using any DVD-R 2x,
DVD-RW 4x and MAXELL DVD-R 16x
disc to assure good recording quality.
• Discs that have been tested and are proven to be
compatible with this recorder:
VERBATIM DVD-R 8x VERBATIM DVD-RW 2x
MAXELL DVD-R 16x JVC DVD-RW 4x
2 Connections
3 Watching TV/DVD
Turn to the back side of this sheet.
disc tray
guide
Insert a disc.
This unit is compatible to play the following discs.
Disc type Functions
DVD-RW: 1-4x
DVD-R: 2x.4x.8x
Attributes
8cm/12cm, single-sided, single layer disc
Approx. max. recording time (SEP mode):
600 minutes (4.7GB) (for 12cm)
180 minutes (1.4GB) (for 8cm)
8cm/12cm, single-sided, single layer disc
Approx. max. recording time (SEP mode):
600 minutes (4.7GB) (for 12cm)
180 minutes (1.4GB) (for 8cm)
Playing, limited recording,
limited editing
Playing, limited recording,
limited editing
Playing, recording,
Original/Playlist editing
Disc format
Video mode
VR mode
Video mode
D-RW2SU
3 – 1 DVD Playback
3 – 2 Initial Setting
Press [I/yON/STANDBY]
to turn the unit on.
Press [OPEN/CLOSE] to
open the disc tray.
After all the necessary connections,
• Turn on the equipment connected to the recorder.
• Select the corresponding video input on your television.
Perform these selections whenever you operate the recorder.
DVD VIDEO Recorder
1 – 1 For playback only
1 – 2 For recording / playback
• Both A/V and RF cables must be connected to the TV for operation.
• See page 26 of the Owner's Manual for the connection with the RF modulator.
1. Turn on this unit for the first time,
“Initial Setting” will appear.
Using [K/ L], select your desired
language for the OSD. Then press
[ENTER] to go to next step.
2. Press [ENTER] to start Channel
Preset. The unit will start getting
channels available in your area.
3. Clock Setting menu will appear.
Press [ENTER] twice, default date
will appear.
Initial Setting
Français
Español
English
4. Using [K/L], enter the date
(month / day / year).
Press [{/B]to move the cursor.
FEB/ 01 / 2006(WED)
12: 00 AM
Initial Setting
5. Using [K/L], enter the time
(hour / minute). Press [{/B]to
move the cursor.
6. Press [K/L]to select “AM” or
“PM”. Press [ENTER].
TV Program will automatically
appear. (usually near channel 0)
FEB/ 01 / 2006(WED)
12: 00 AM
Initial Setting
is a trademark of DVD Format/Logo Licensing Corporation.
*This DVD/CD player cannot playback the disc contents protected by Windows Media Digital Rights Management (DRM).
Microsoft, Windows Media, and the Windows logo are either registered trademarks or trademarks of
Microsoft Corporation in the United States and/or other countries.
Initial Setting
Channel Preset
Initial Setting
Clock Setting
1 Choosing a Disc
FEB/ 01 / 2006(WED)
12: 00 AM
Initial Setting
Disc Specification
DVD video
disc Audio CD
(CD-DA)
• 12cm (43/4in.) / 8cm (31/4in.)
• Region codes:The number
inside the globe refers to
region of the world.This unit
can play DVDs that are labeled
for ALL or for Region 1.
• 12cm (43/4in.) / 8cm (31/4in.)
• Color system: NTSC
Mark Disc Specification
CD-R
CD-RW
Mark
• 12cm (43/4in.)
• CD-DA FORMAT, MP3, WMA*,
JPEG files
E7A70UDQGEN1224.indd1E7A70UDQGEN1224.indd1 2005/12/2417:57:392005/12/2417:57:39
Press repeatedly to select desired recording time.
Set the date.
Set start and end time.
Timer Programming
2. ---
3. ---
4. ---
1. JAN/01 12:57AM --:-- L1
Date Start End CH Mode
Select the channel number to record.
Timer Programming
2. ---
3. ---
4. ---
1. JAN/01 12:57AM 1:57AM CH 8
Date Start End CH Mode
Select the recording speed.
Timer Programming
2. ---
3. ---
4. ---
1. JAN/01 12:57AM 1:57AM CH 8 Auto
Date Start End CH Mode
Save the Timer Program setting.
4 – 2 Timer Recording
After all recordings, finalize your disc.
After recording, you must finalize the disc in order to play on other
units. To finalize the disc, see page 74 of the owner's manual.
Select the recording
mode.
Record on DVD disc.
Select the desired
channel.
Stop the recording.
Press [TIMER PROG.].
• You can set up to 8 programs (once, daily or weekly).
• Be sure to set the clock before starting a timer programming.
Timer Programming list appears.
Select any blank line with [K/L] and press [ENTER].
Timer Programming
2. ---
3. ---
4. ---
5. ---
6. ---
7. ---
8. ---
1. ---
Date Start End CH Mode
Move to next
Move to next
Move to next
1VMN22370 / E7A70UD ★★★★★
Recording times appear on the TV screen
(30 minutes to 8 hours).
Recording will start.
When the unit reaches the specified time,
it will be turned off automatically.
Set the Timer Standby mode
How to select the recording mode:
4 – 1 Easy Recording
4 DVD Recording
Daily (Everyday)
MON-SAT (Monday to Saturday)
JAN/01
JAN/31 (one month later minus one day)
MON-FRI (Monday to Friday)
SAT (Saturday)
FRI (Friday)
SUN (Sunday)
Timer Programming
2. ---
3. ---
4. ---
1. JAN/01 --:-- --:-- L1
Date Start End CH Mode
Turn the unit off.
Timer Recording
is now set.
• Formatting is not needed when inserting a new
disc. UNIT AUTOMATICALLY PREPARES THE
DISC FOR RECORDING.
• Timer Recording will not work when the power is
on.
Hints for DVD Recording
0:30
(Normal Recording)
8:00 7:30
1:00
I 0:30
indicator will appear on the front panel display.
RECMODE
REC
CH
ON/STANDBY
I/y
Finalizing*
This unit DVD player
Playable
Not Playable
* You cannot finalize discs recorderd in other DVD recorders.
Disc Size Recording
mode
Recording
time
Video/Sound
Quality
8cm Disc
XP 18 min ★★★★★★
SP 36 min ★★★★★
LP 72 min ★★★★
EP 108 min ★★★
SLP 144 min ★★
SEP 180 min ★
12cm Disc
XP 60 min ★★★★★★
SP 120 min ★★★★★
LP 240 min ★★★★
EP 360 min ★★★
SLP 480 min ★★
SEP 600 min ★
When pressing [L] at the current date, the
Date will change as follows:
e.g. January 1st at present
E7A70UDQGEN1224.indd2E7A70UDQGEN1224.indd2 2005/12/2417:57:422005/12/2417:57:42