Tosima W3 User manual

WINDOW CLEANING ROBOT
DUAL DIRECTION WATER SPRAY
W3 USER MANUAL

ENGLISH
Important safeguards 4
5
6
10
11
7
INDEX
Parts list
Content of the box
Installation intructions
Instruction and cautions
Bluetooth connection
(optional app control)
Path planning 12
Spot cleaning route
Meanings of led indicator lamp and
voice
13
13
Remote control 14
Parameters
Water tank maintenance
15
15
Troubleshooting
Safety
16
17
FRANÇAIS
Mesures de sécurité importantes
Liste des pièces
Contenu de la boîte
Instructions d'installation
Instructions et précautions
Connexion bluetooth
(contrôle via l’app en option)
Planification de trajet
Parcours de nettoyage des taches
Signification des signaux vocaux et du
voyant led
Télécommande
Paramètres
Entretien du réservoir d'eau
Dépannage
Sécurité
18
19
20
24
25
21
26
27
27
28
29
29
30
31
DEUTSCH
Wichtige sicherheitsmaßnahmen
Stückliste
Inhalt der box
Installationsanweisungen
Anweisungen und vorsichtsmaßnahmen
Bluetooth-verbindung
(optionale app-steuerung)
Routenplanung
Punktuelle reinigung
Bedeutung der led-anzeigelampe und
stimme
Fernbedienung
Parameter
Wartung des wassertanks
Fehlerbehebung
Sicherheit
32
33
34
38
39
35
40
41
41
42
43
43
44
45
ESPAÑOL
Precauciones de seguridad importantes
Lista de piezas
Contenido de la caja
Instrucciones de instalación
Instrucciones y precauciones
Conexión bluetooth
(control opcional de la aplicación)
Planificación de la ruta
Ruta de limpieza por puntos
Significados del indicador led y de la voz
Mando a distancia
Parámetros
Mantenimiento del depósito de agua
Solución de problemas
Seguridad
46
47
48
52
53
49
54
55
55
56
57
57
58
59
2
60
61
62
66
67
63
INDEX
3
68
69
69
70
71
71
72
73
74
75
76
80
81
77
82
83
83
84
85
85
86
87
ITALIANO
Significato della spia led e della voce
Manutenzione del serbatoio dell'acqua
Importanti misure di sicurezza
Elenco parti
Contenuto della scatola
Istruzioni per l'installazione
Istruzioni e precauzioni
Connessione bluetooth
(controllo app opzionale)
Pianificazione del percorso
Percorso di pulizia a punti
Telecomando
Parametri
Risoluzione dei problemi
Sicurezza
日本語
安全にご利用いただくために
部品リスト
付属品
インストール手順
使用方法と注意事項
Bluetooth 接続
(オプションのアプリ制御)
清掃ルート
スポットクリーニングルート
LED表示ランプと音の意味
リモコン操作
仕様
水タンクのメンテナンス
トラブルシューティング
安全上のご注意

ENGLISH
ENGLISH
4
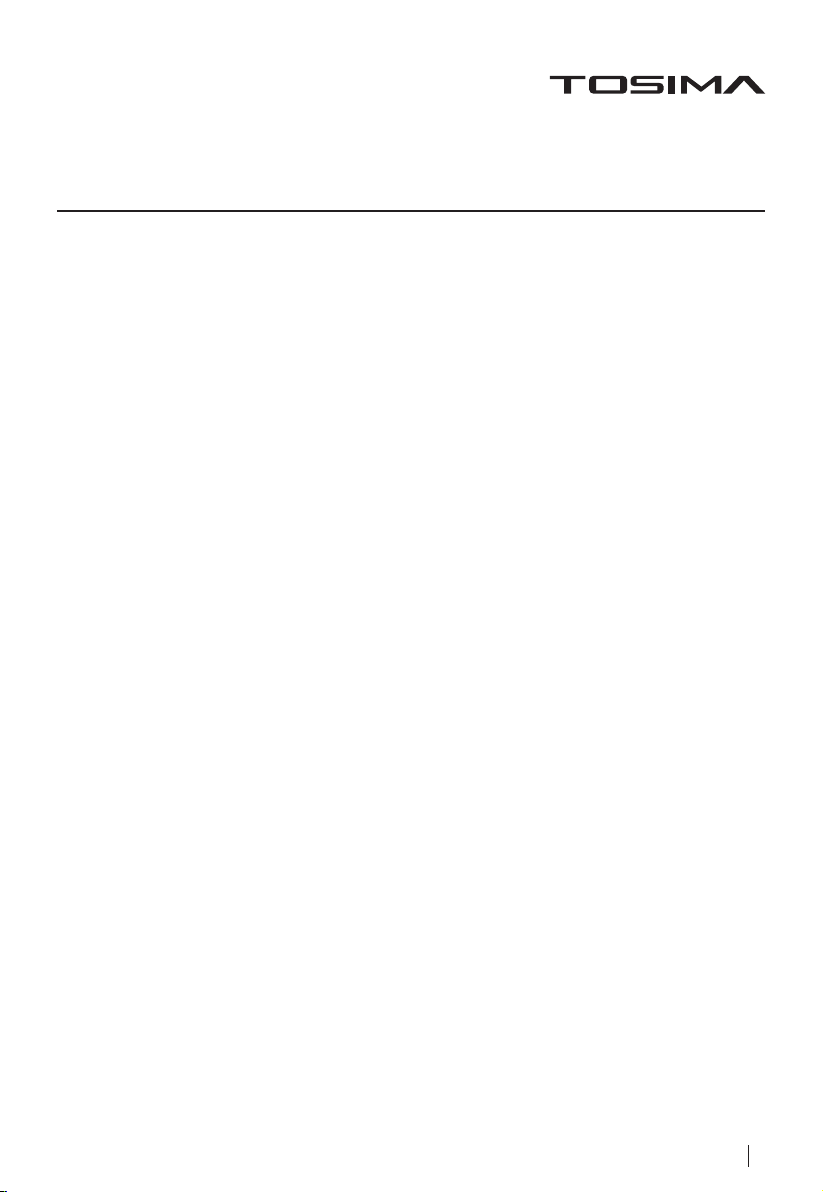
PARTS LIST
Water tank cover
Press and hold for 3 seconds: Switch on/off
Long press 8 seconds: Bluetooth reset
(see Bluetooth connection page)
Status Indicator
Buzzer
Sideview
Cord installed Port
Nozzle
(normally not disassembled, )Direct load wipes
Nozzle
Power Cord Hole
ON/OFF/Pause Button
Mop Holder
ENGLISH 5
Short press: start/continue/pause

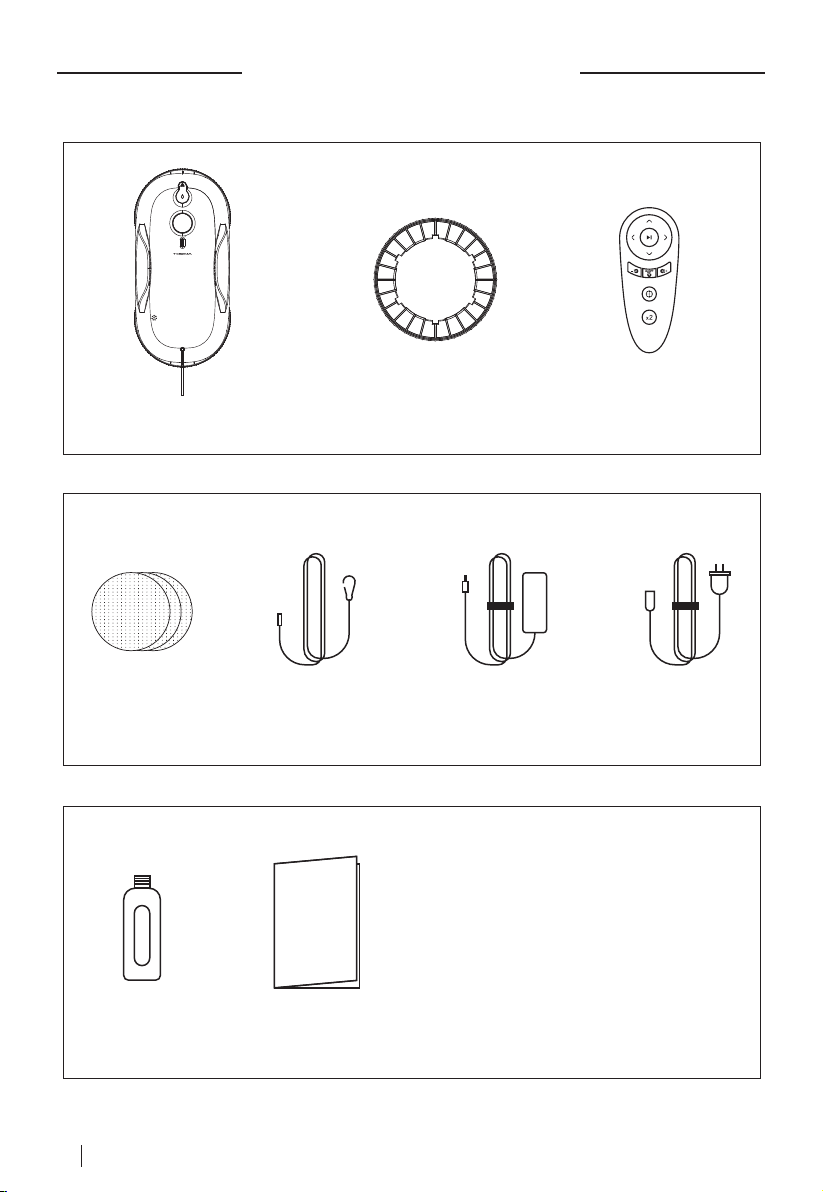
(installed) Remote Control x1
Safety Cable x1 Adapter x1
Water Bottle x1 User Manual x1
AC wire x1
CONTENT OF THE BOX
Window Cleaning Mop Holder x2
Robot x1
Mops x12
ENGLISH
6
If there are sand and dust on the glass surface, it is recommended to clean it manually first to
avoid scratching the glass when the robot is working. If manual cleaning is not possible, it is
recommended to turn off the water spray function and use dry mops to wipe off the sand and
dust first.
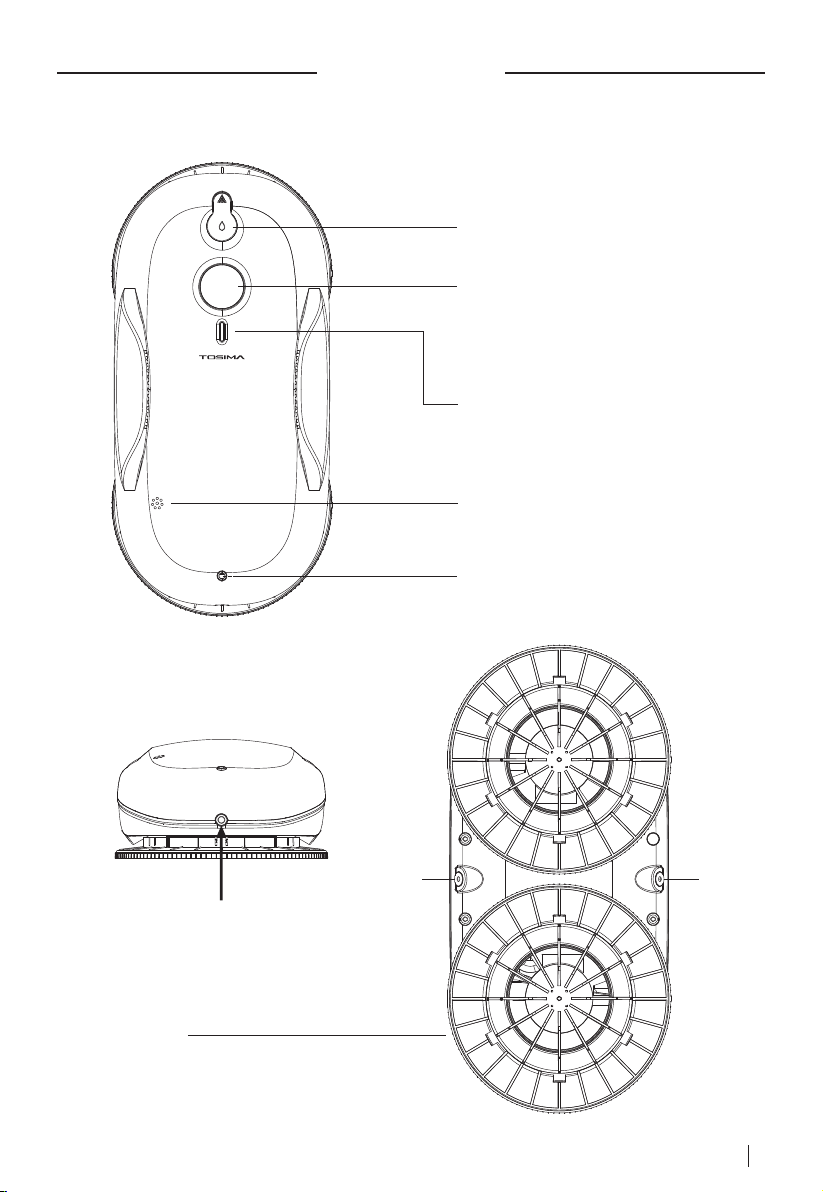
INSTALLATION INTRUCTIONS
Ensure the knob of the safety cable is fully tightened to the frame.
We recommend to fasten the buckle side of the safety cable to an object which is strong
enough and will not be dragged, and reserve a suitable length for the device to work.
Cover each mop holder with a mop.
ENGLISH 7

Please make sure the Mop Holder is installed inproper position
before use
Solution Shortage Alarm:
When the water spray function is turned on, if the robot detects the shortage of solution in the
water tank, the buzzer will short sound 5 alarm (5 short “Di” at 5-second intervals).
When the water spray function is turned off, if the robot does not detect the shortage of solution
in the water tank, the buzzer will not alarm accordingly.
o
After the holder is installed, please observe from sideways 360 to ensure that each snap is
stuck in place to avoid air leakage.
This product cannot be drenched, dry the surface residual moisture after filling with water.
Fill the water tank and cover with the plug
Using concentrated cleaning liquid in this product is strictly prohibited, so as not to block the
spray hole and pump.
ENGLISH
8

Power/Start button
Insert the windows cleaner power cord into the end of the adapter
and tighten them. Connect the two ends of the AC wire to the
adapter and the socket respectively.
Long-press the power button (more than 3 seconds), and the
robot will turn on. After the fan is running, attach the robot on
the glass at a location far away from the window frame.
If the robot can't suck on glass, please check whether the holder has buckled up to cause
air leakage.
ENGLISH 9

INSTRUCTION AND CAUTIONS
Safety Rope
Working Environment Inspection
Do not use on broken and cracked glass.
If outside working at height is required, ground safety warnings must be set up to
prevent accidental personal injury.
Wet and Dry Wipe
If there is slipping and twisting when the robot climbing, please install a dry wipe and
turn on the water spray.
If there are small areas of stubborn stains, you can use "spot cleaning" and turn on
the water spray.
Start
Ensure the power cord and plug are completely connected.
Remove Robot from Glass
Power Outage Protection
Ensure the glass surface is dry, please do not use it when it is raining or when the
glass surface is foggy.
If the robot has serious shaking or rattling, please install a dry wipe cloth.
Long press the Start /Power button (more than 3 seconds) the robot will turn on.
After the fan is running, attach the robot on the glass to a location far away from the
window frame.
Check whether the safety rope is intact and is on a stable object.
The robot cannot be used when there are stickers or oil on the glass surface, to
avoid robot slipping and falling from glass.
If there are sand and dust on the glass surface, it is recommended to clean it manually
first to avoid scratching the glass when the robot is working. If manual cleaning is
not possible, it is recommended to turn off the water spray function and use dry mops
to wipe off the sand and dust first.
If there are only dirt stains, it can be wiped directly with the water spray (default turn
on water spray).
Ensure the robot has been stuck to the glass and then let go.
Short press the power button to start the robot.
When the robot is running, hold the safety cable with one hand, short press to stop
the robot and take it down with the other hand.
If you cannot reach the robot, and do not have the remote control on hand, please
stay close to the glass to drag the safety rope, and slowly pull the robot back to the
location reachable by hand, then remove the robot from the glass after powering off.
After completely taking down the robot, long-press the power button (more than 3
seconds) to turn it off.
This robot is equipped with an internal battery, which can hold on the robot for twenty
minutes in case the robot is accidentally removed from the power cord and it will raise
an audible and visual alarm. Please take down the robot as soon as possible.
When the light indicator is red before turning on the device, it means the internal battery
is too low to start the robot. Please, keep the robot connected to the electricity to
charge it until the red lamp is off.
ENGLISH
10

BLUETOOTH CONNECTION
(OPTIONAL APP CONTROL)
1.Bluetooth Reset
(1) Turn off the robot, disconnect the DC power
supply, and plug in the DC power supply again.
(2) Press and hold the power/start button for
more than 8 seconds.
(3) When the reset is successful, the fan will
stop rotating and then the buzzer will beep for
2 seconds
Long press for more
than 8 seconds
2.Turn on the Phone
Network and Bluetooth 3.Download Tuya Smart
App Register and Login
4.Adding Devices
5.Press“+” 6.Press“Done” 7.User Interface
ENGLISH 11
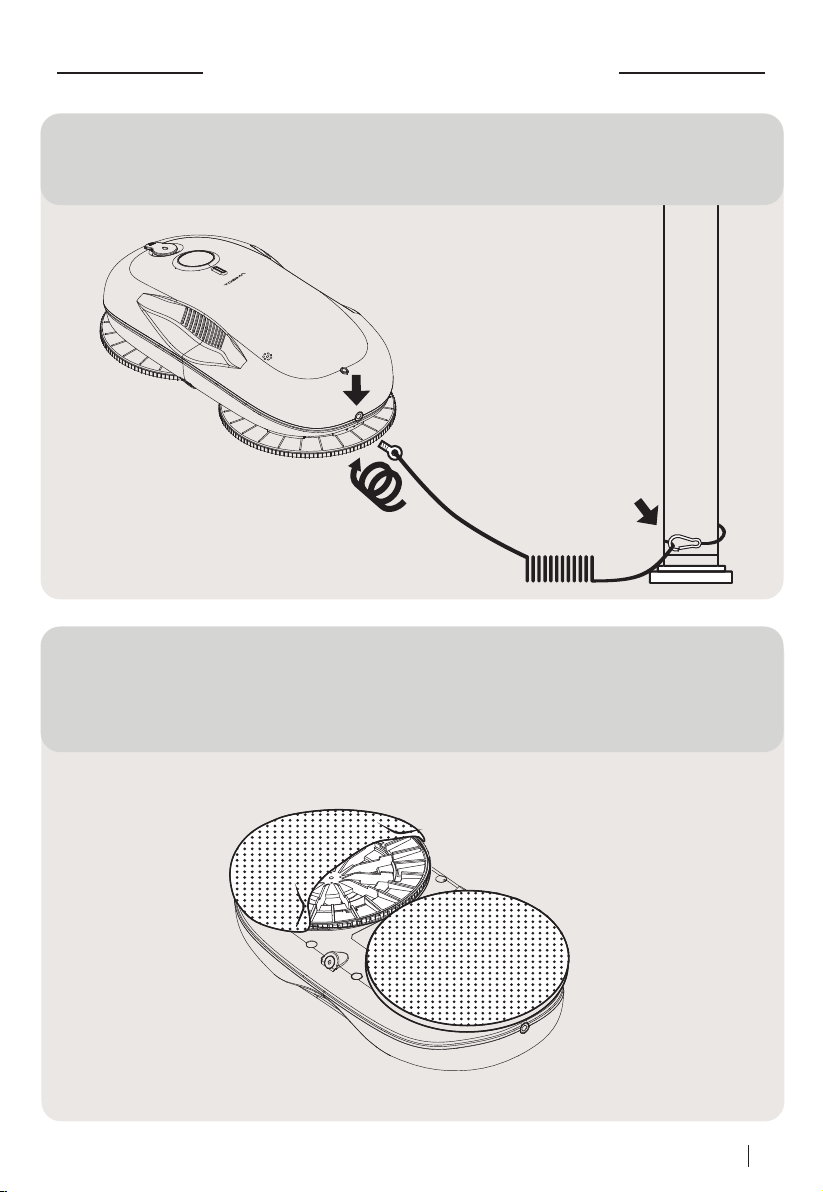
PATH PLANNING
Put the windows cleaner in the centre of the glass far away from the window frame. Long press
the Power/Start button to turn the robot on, and then short press the button to start it. The robot
will automatically move upward, then move right. At last, it will reach the top right corner of the
glass.
After the robot has reached the top right corner; it will start to clean the glass by drawing an
S-shaped curve from top to bottom. If the robot's water spray function is turned on, when the
robot works forward to the right, the right nozzle sprays water and the left nozzle does not
spray water. When the robot works forward to the left, the left nozzle spray water, and the right
nozzle does not spray water.
After completing the cleaning, the robot will stop at the lower-left or right corner according to
the glass shape.
Note: When the robot begin to work, it will climb to the upper right corner of the
glass. The left and right nozzles will not spraying water when the robot move
from the upper right corner of to the upper left corner for the first time, even with
the water spray function turned on (a default software setting).
ENGLISH
12

SPOT CLEANING ROUTE
Spot Wiping:
In the user specified area range, the robot will start up and down cleaning at Spot
Cleaning. Open the water spray function when cleaning dirty areas. The upward
nozzle will spray water while cleaning to reach a better cleaning result.
LED
lndicator Means
Status Indicator
Green Light
Green Light
Window cleaning is complete.
Charging indicator Red Light
Status Indicator
Red Flashing
Red and Green
Alternation
Working normal.
Three Long Beep
The built-in battery power is insufficient,
please charge 15 minutes above to turn
on the robot.
The robot is disconnected; please connect the
power supply or remove the robot from glass.
Insufficient suction power; please check if the
robot is air leaking.
Friction with the glass is too large or too small,
replace the wipe cloth accordingly.
Robot error, please contact customer
service staff.
MEANINGS OF LED INDICATOR LAMP AND VOICE
ENGLISH 13

REMOTE CONTROL
Small water spray Large water spray
Water spray on/off Spot Cleaning
Cleaning twice
Start(x1)/Pause
/Continue
To prevent misuse by children, please press pause
button between commands via remote controller.
Otherwise, the controller commands button is invalid
To Top/Bottom Left/Right
Stop at the end of the glass
ENGLISH
14

PARAMETERS
Model: W3
Voltage: 24V
90W
70db
278*140*80mm
300mA
650mAh
2200-3000pa
300*300mm
Decibels:
Size:
Current:
Capacity
UPS Battery Using Time
Suction Power
Minimum Using area
Watt:
Approx 20 mins (the remaining power
of Built-In Battery will affect the time)
WATER TANK MAINTENANCE
Please Ensure water or solution do not spill out of the water tank.
If accidentally spilled, please dry immediately to avoid causing
water damage to the robot.
When the robot is not in use, please Ensure there is no residual
liquid in the water tank. If you use solution for cleaning, it is
recommended to pour out the solution and then fill with a little fresh
water to clean the water tank, and do not left any water in the tank.
Ensure there is not impurities in the added solution
to avoid blocking the nozzle and pump.
ENGLISH 15
TROUBLESHOOTING
When the error indicator is flashing red with continuous and short
sounds, please inspect if:
The plug of the power cord is loosened or damaged and results in power off or
poor contact.
The glass or mop is too wet and results in too low friction.
The glass has impurities attached and results in too high friction.
The mop holder is incorrectly installed and results in air leakage.
The glass surface has sticky objects causing too much friction on the wipe
The suction port is blocked.
The error indicator is flashing red and green alternately with alarming
sound. It means trouble occurs on the inside hardware of the robot,
please contact the customer service directly.
On the condition of special glass, when cleaning the bottom of glass,
it needs more time for cleaning up, please use remote control.
In the case of the robot can't walk freely, please change the mop or
inspect the screws on the cleaning roller, ensure they are not loosened.
If the robot mop holder shakes too strong when the robot is working,
please check if the wipe cloth is too wet, and replace with a dry cloth.
There will be a little delayed water spraying when the robot start to
work, this is a normal phenomenon.
“Di Di Di Di Di” 5 alarms every 5 seconds interval, when there is a
shortage of solution.
After cleaning, there's residual round marks on the glass surface,
please change a new mop.
After completing the whole process of cleaning, the robot continues
to move and doesn't stop automatically, press the Pause Button and
take it down.
When it is in use, maybe bug occurs occasionally, please restart the
robot as the solution.
If there is a downward sliding when the robot is working, please
inspect if:
The cloth is too wet or too dirty.
The robot cannot resume work after a while, replace it with a dry and clean wipe cloth.
The cloth is too dry to cause slips, turn on the water spray function to moisten the
wipe cloth, then the robot can resume work.
Cause of Air Leakage,please inspect if:
The mop holder is installed correctly.
The wipe cloth installation for flatness.
The surface of the glass or other targeted surface are curved or covered with an
uneven-surfaces such as stickers.
The robot goes to the window frame, the mop holder will be warped to produce a
wide range of air leakage.
ENGLISH
16
SAFETY
Usage requirements:
Battery&Charging:
Do not continue to use the charger if it is damaged or broken,please contact
customer service.
If the product is to be shipped,it is recommended that in its original packaging
with the robot turned off.
Make sure the safety rope is not broken, and fixed in an immovable object when
Do not drenched with water. Do not use in the rain or glass humid and foggy.
Do not use on cracked and broken glass, confirm that the window area is larger
than 30*30cm (height) before use, Please check if the glass with super narrow
frame, beveled frame, beveled glass, no frame or glass glue with uneven,
raised, leaking seams, gaps and other abnormal situation, use the remote
control to control the robot if necessary.
* Not recommended or need to be guarded to use on above situation, abnormal
used environment may cause a fall.
Be sure to turn off the robot when cleaning the surface of the robot to avoid
danger during the movement of the robot.
Please place the robot and accessories out of the reach of children and forbid
children to operate this product. When the robot is working, it is strictly prohibited
for fingers and any part of the body to touch this product.
Please use this product following the instructions, please contact customer
service if you can not troubleshoot. Do not repair by yourself to avoid danger.
Only for 32°F~108°F (0°C ~ 40°C) home environment temperature, when the
temperature is lower, it is recommended to use anti-freeze glass water.
The storage environment should be dry, avoid direct light, please do not store
the robot with oil, gas, flammable items.
Do not use third-party adapter and do not disassemble and modify the robot,
battery and adapter.
Place the adapter away from heat sources.
If you do not use the product for a long time, please fully charge and shut down
the robot and placed in a cool, dry place. At least every 3 months to charge once
to avoid the battery over discharge and shortage the battery lifetime.
use the robot. When need to work at height outside, you must set up a ground
safety warning to prevent falling accidental personal injury.
ENGLISH 17
FRANÇAIS
MESURES DE SÉCURITÉ IMPORTANTES
Merci d'avoir choisi notre nettoyeur de vitres. Avant d'utiliser l'appareil, et pour en assurer la
meilleure utilisation, lisez attentivement ces instructions.
Les mesures de sécurité reprises dans ce manuel réduisent les risques de décès, de blessure et de
choc électrique lorsqu'elles sont correctement respectées. Conservez ce manuel dans un endroit
sûr pour vous y référer ultérieurement, ainsi que les éléments suivants : la carte de garantie remplie,
le reçu d'achat et l'emballage. Le cas échéant, transmettez ces instructions au prochain propriétaire
de l'appareil. Respectez toujours les consignes de sécurité de base et les mesures de prévention
des accidents lorsque vous utilisez un appareil électrique. Nous n'assumons aucune responsabilité
si le client ne se conforme pas à ces exigences.
Lors de l'utilisation d'un appareil électrique, il convient de toujours respecter les mesures
de sécurité de base.
Inspectez attentivement le câble de sécurité, assurez-vous qu'il n'est pas endommagé et qu'il est
solidement attaché à un objet.
Lorsque l’appareil fonctionne en hauteur, prévoyez des marques d'avertissement sur le sol.
Ne vaporisez pas d'eau dans l’appareil et ne l'utilisez pas sur de la vitre fissurée.
Lorsque vous nettoyez la surface externe de l'appareil, éteignez-le afin d’éviter les blessures
corporelles causées par l'appareil en marche.
Ne touchez pas les parties rotatives ou les ouvertures de l'appareil avec votre main ou toute autre
partie de votre corps.
Lorsque vous utilisez l'appareil, veuillez suivre les instructions de ce manuel. Si vous ne parvenez
pas à résoudre un problème, contactez directement le service clientèle. Ne réparez pas l'appareil
sans autorisation, cela pourrait entraîner des blessures corporelles.
L'appareil ne peut être utilisé que dans un environnement domestique.
N'utilisez pas de chargeur d'une tierce partie et ne retirez pas le cadre, la batterie et le chargeur
sans autorisation.
En cas de dommage ou de fissure sur l'appareil, arrêter de l'utiliser et contactez le service clientèle.
Gardez le chargeur loin des sources de chaleur.
Si vous souhaitez transporter l'appareil, nous vous recommandons d'utiliser l'emballage d'origine
et d'éteindre l'appareil.
Si vous n'avez pas l'intention d'utiliser l'appareil pendant une longue période, chargez-le
complètement et éteignez-le. Stockez l'appareil dans un endroit frais et sec. Celui-ci doit être
rechargé au moins tous les trois mois pour éviter que la batterie ne soit hors service après un
arrêt d’utilisation prolongé.
18 FRANÇAIS

Buzzer
LISTE DES PIÈCES
Couvercle du réservoir d'eau
Bouton ON/OFF/Pause
Appuyer sur ce bouton et maintenir enfoncé
pendant 3 secondes : Allumer/éteindre
Maintenir enfoncé pendant 8 secondes:
réinitialisation Bluetooth (voir la page sur
la connexion Bluetooth)
Appuyer brièvement : démarrer/continuer/pause
Voyant de statut
Trou pour le cordon d'alimentation
Vue de côté
Port d’installation du cordon
Buse
Buse
Porte-brosse
(normalement non démonté,
charge directement les lingettes)
19
FRANÇAIS
CONTENU DE LA BOÎTE
Robot nettoyeur
de vitres x 1 Porte-brosse x2
(installés)
Télécommande x1
Brosses x12 Câble de sécurité x1 Adaptateur x1 Câble CA x1
Bouteille d'eau x1 Manuel de l'utilisateur x1
20 FRANÇAIS
Table of contents
Languages:
Popular Cleaning Equipment manuals by other brands


Menzer
Menzer ESM 406 Floor Tec Translation of the original operating instructions

Lydsto
Lydsto G1 instruction manual

BioSure
BioSure EOS8131-CL Installation & operation manual

Kwunphi
Kwunphi Kwun-B20L2 manual

Fanset
Fanset Fantom Professional PROCART 450 Assembly manual

Bestway
Bestway Flowclear 58648 manual

probst
probst EASYCLEAN EC-60 operating instructions

Reer
Reer 36120 instruction manual

Meec tools
Meec tools 011387 operating instructions

SCANMASKIN
SCANMASKIN Stripper 250 World Series instruction manual

Microdyn Nadir
Microdyn Nadir BIO-CEL BC50 Assembly instruction

Motion Pro
Motion Pro 08-0592 instructions