Reer 36120 User manual

UV-C-Desinfektionsgerät
Gebrauchsanleitung // Art.Nr.: 36120
UV disinfecting device
Instruction manual // Art. no.: 36120
Appareil de désinfection à UV
Notice d‘utilisation // Art. Núm. : 36120
Dispositivo di disinfezione a UV
Istruzioni per l‘uso // Art. Nr.: 36120
Esterilizador por UV
Manual de uso // N° d‘art.: 36120
Uv-desinfectie-apparaat
Gebruiksaanwijzing // Art. nr.: 36120
Urządzenie do dezynfekcji UV
Instrukcja obsługi // Nr. art.: 36120
UV dezinfekční přístroj
Návod k použití // Artikl č: 36120
FR
CZ
PL

1
UV-C-Desinfektionsgerät
Inhalt
UV-C-Desinfektionsgerät
Gebrauchsanleitung Seite 01 bis 07
UV disinfecting device
Instruction manual page 08 to 14
Appareil de désinfection à UV
Notice d‘utilisation page 15 á 21
Dispositivo di disinfezione a UV
Istruzioni per l‘uso pagina 22 a 28
Esterilizador por UV
Manual de uso página 29 a 35
Uv-desinfectie-apparaat
Gebruiksaanwijzing pagina 36 naar 42
Urządzenie do dezynfekcji UV
Instrukcja obsługi strana 43 na 49
UV dezinfekční přístroj
Návod k použití strona 50 do 56
Wir bedanken uns für deine Wahl zum Kauf des UV-C-Desinfektionsgeräts von reer. Durch Verwendung von
energiesparenden UV-Lampen wird eine schnelle Desinfektion erreicht, ohne die Verwendung von Wasser oder
Dampf, so bleiben die Produkte trocken und kühl und sind sofort wieder einsatzbereit. Das Gerät desinziert
Fläschchen, Fütterungszubehör und Stillzubehör schonend und umweltschonend ohne Zusatz von Chemikalien.
Wenn die Desinfektion beendet ist, schaltet sich das Gerät automatisch ab.
Wir sind sicher, Du und Deine Familie werden lange Zeit Freude an der Qualität unseres Produktes haben.
1 x UV-C-Desinfektionsgerät, 1 x herausnehmbare Edelstahlwanne, 1 x Kohle-Luftlter
Kontrollleuchte
der UV-Lampe
Abdeckung
UV-Lampenschutz
Philips UV-Lampe
Fläschchenfach
Luftlter
Zubehörfach
Digitales Display
Funktionstasten Auto-
modus
Programm-
dauer
Desinfektions-
modus
Trocknungs-
modus
Aufbewahrungs-
modus
Lieferumfang und Gerätebeschreibung .............01
Technische Daten ..................................02
Allgemeine Sicherheitshinweise ....................02
Sicherheitshinweise zur Installation .................03
Funktionen .........................................04
Sicherheitshinweise bei Inbetriebnahme............04
Vor der ersten Nutzung .............................05
Inbetriebnahme ....................................05
Reinigung und Wartung ............................06
Hinweise zum Umweltschutz .......................06
Problembehebung .................................07
Gewährleistung ....................................07
Lieferumfang und Gerätebeschreibung
DE
GB
FR
IT
ES
NL
PL
CZ
DE
A
AUTO STORAGE
UV
UV
DRY
A
AUTO STORAGE
UV
UV
DRY

32
Technische Daten
DE DE
Desinfektionsgerät:
Betriebsspannung: 220–240 V; 50Hz
Leistung: 110 W
Schutzklasse: 1
Kabellänge: 133 cm
UV-C-Lampe:
Betriebsspannung: 29 V
Leistung: 4 W
Stromverbrauch: 0.17 A
UV-C Strahlung: 0.9 W
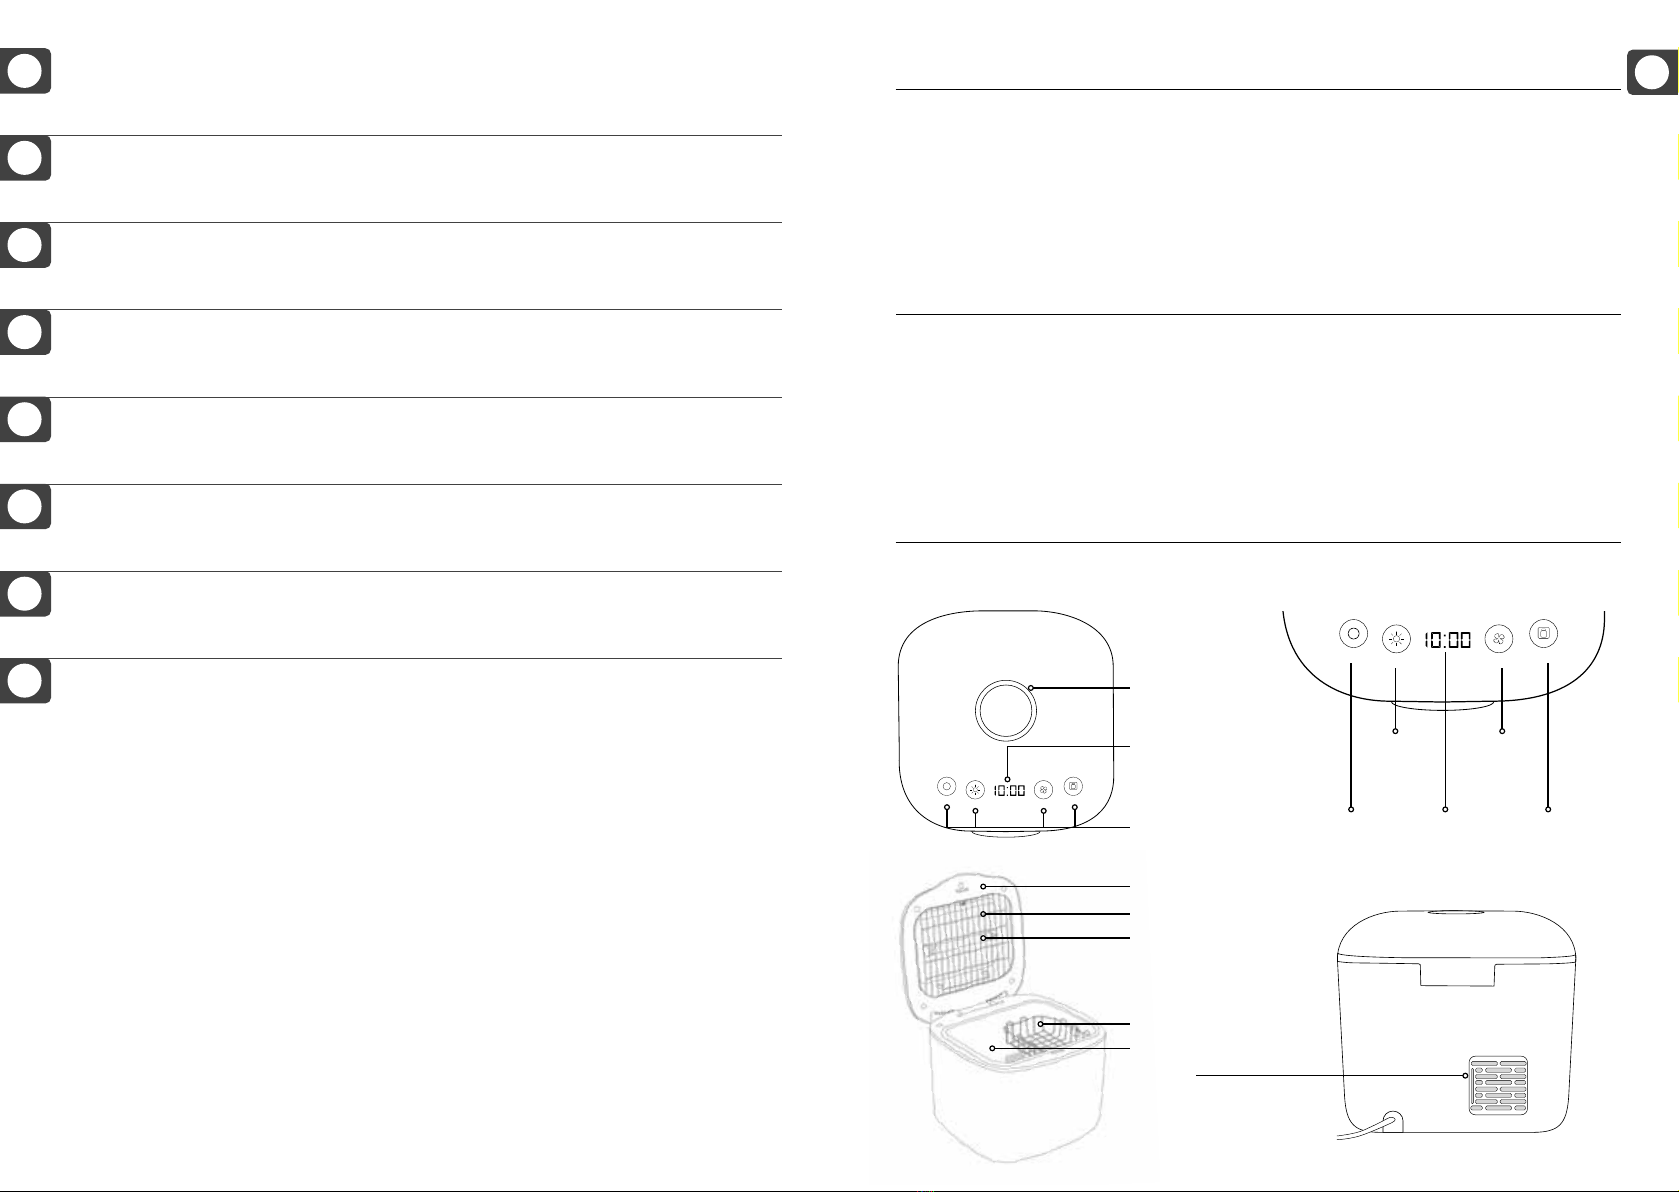
UV-Lampe
Unser UV-Desinfektionsgerät enthält eine hochwertige, schmale und zweiseitig gesockelte UVC-Lampe (keim-
tötende Lampe) von Philips, welche auch in Wasser- und Luftentkeimungsgeräten für den Wohnbereich verwendet
wird.
Der geringe Durchmesser der Lampe von 16 mm ermöglicht ein kleines Systemdesign mit exibler Gestaltung.
TUV TL Mini-Lampen bieten eine nahezu konstante UV-Leistung über ihre gesamte Lebensdauer, was eine
maximale Sicherheit der Desinfektion und eine hohe Wirksamkeit des Systems gewährleistet.
ACHTUNG!
Die UV-Lampe bitte nicht selbst ersetzen, wende Dich bitte an deinen Händler.
GEFAHR DURCH UVLICHT
Vermeiden Sie es, direkt ins Licht zu schauen. Direkte und übermäßige Exposition gegenüber UV-Licht kann zu
dauerhaften Augenschäden führen.
Das Gerät ist mit UV-beständigem Material und Sicherheitsmechanismen ausgestattet, um die Exposition gegen-
über ultravioletter Strahlung zu verhindern.
• Vor Gebrauch des Gerätes die Gebrauchsanleitung lesen! Sie enthält wichtige Hinweise zur Inbetriebnahme und
Handhabung des Gerätes. Diese Sicherheitshinweise sind unbedingt zu beachten!
• Bewahre die Gebrauchsanleitung für späteres Nachschlagen sorgfältig auf. Sie muss bei Weitergabe an dritte
Personen mit ausgehändigt werden.
• Benutze das Gerät ausschließlich für den privaten und den dafür vorgesehenen Zweck. Dieses Gerät ist nicht für
den gewerblichen Gebrauch bestimmt.
• Um Feuer- und Stromschlaggefahr zu vermeiden, schließe das Gerät direkt an die Steckdose an.
• Betreibe das Gerät niemals mit einem beschädigten Kabel oder Stecker.
• Halte das Kabel von stark frequentierten Bereichen fern. Um Brandgefahr zu vermeiden, verlege das Kabel
NIEMALS unter Teppichen, in der Nähe von Heizkörpern, Heizstrahlern, Öfen oder Heizgeräten.
• Stelle das Gerät immer so auf, dass es nicht leicht von Personen im Haushalt umgestoßen werden kann.
• Verwende das Gerät nicht in der Nähe von Wasser.
• Berühre das Gerät niemals mit nassen Händen.
• Desinziere nur Produkte, die für die Sterilisation zugelassen sind und die einer mäßigen UV-Bestrahlung stand-
halten.
• Stecke niemals einen Gegenstand in die Entlüftungsönung, die Löcher oder andere Önungen.
• Beseitige vor der ersten Verwendung sämtliches Verpackungsmaterial sowie nicht verwendete Bauteile, damit
Dein Kind nicht verletzt wird oder etwas verschlucken kann.
• Überprüfe das Gerät vor jeder Benutzung auf oensichtliche Beschädigungen. Solltest Du Schäden feststellen,
darf dieses Gerät nicht verwendet werden.
• Prüfe, insbesondere auf einer Auslandsreise, ob die lokale Netzspannung mit der angegebenen Spannung auf
den Geräten bzw. den Netzteilen übereinstimmt.
• Wenn das Gerät nicht in Benutzung ist, ziehe stets den Netzstecker, damit es nicht unbeabsichtigt eingeschaltet
werden kann.
• Sichere das Netzkabel und achte darauf, dass nicht versehentlich daran gezogen wird und das Gerät dadurch zu
Boden fällt. Lasse das Netzkabel nicht mit heißen Oberächen in Kontakt kommen.
• Verwende das Gerät immer auf einer achen, hitzebeständigen Oberäche.
• Tauche das Gerät, das Netzkabel oder den Netzstecker nicht in Wasser oder andere Flüssigkeiten.
• Die Abdeckung muss während des Betriebs immer geschlossen bleiben.
• Reinige vor dem ersten Gebrauch den Korb und führe den Desinfektionsvorgang einmal ohne Desinfektionsteile
im Gerät durch.
• Vor dem Önen des Deckels den Betrieb über das Betriebsfeld stoppen.
• Zur Reinigung oder dem Tausch der UV-Lampe immer den Netzstecker ziehen.
Allgemeine Sicherheitshinweise
• Verwende kein Chlor oder scharfe Chemikalien zur Reinigung des Geräts, da dies zu Schäden am Gerät führen
kann.
• Zwischen der Rückseite des Geräts und der Wand sollte ein Mindestabstand von 12 cm eingehalten werden, um
eine gute Luftzirkulation zu gewährleisten.
• Wische trockene Wasserecken nach jedem Gebrauch im Innenraum ab. Getrocknete Wasserecken können die
Leistung der UV-Lampen beeinträchtigen und Schäden an der Edelstahl-Innenausstattung verursachen.
• Wasche und spüle den Luftlter wie empfohlen, um die Qualität der Luftlterung im Gerät zu gewährleisten.
Überlade die Produkte im Inneren des Geräts nicht. Lasse immer genügend Abstand zwischen den Gegen-
ständen, um eine gute Belichtung mit UV-Licht während des Betriebs zu gewährleisten.
• Das Netzkabel dieses Geräts kann nicht ausgetauscht werden. Wenn das Kabel beschädigt ist, muss das Gerät
verschrottet werden.
• Kinder dürfen nicht mit dem Gerät spielen. Das Gerät und sein Netzkabel müssen von Kindern unter 3 Jahren
ferngehalten werden.
• Reinigung und Benutzerwartung dürfen nicht von Kindern durchgeführt werden, es sei denn, sie sind 8 Jahre
oder älter und werden beaufsichtigt.
• Personen (einschließlich Kinder), die aufgrund Ihrer physischen, sensorischen oder geistigen Fähigkeiten oder
Ihrer Unerfahrenheit oder Unkenntnis nicht in der Lage sind, das Gerät sicher zu benutzen, sollten dieses Gerät
nicht ohne Aufsicht oder Anweisung durch eine verantwortliche Person benutzen.
• Gerät nicht innerhalb der Reichweite von Kindern benutzen.
• Dieses Gerät ist nur für die Verwendung im Haus gedacht. Nicht im Außenbereich benutzen.
• Reparaturen dürfen nur vom Kundendienst oder autorisierten Händler durchgeführt werden. Selbst darf das
Gerät keinesfalls geönet oder repariert werden, da sonst eine einwandfreie Funktion nicht mehr gewährleistet
ist. Bei Nichtbeachten erlischt die Gewährleistung. Solltest du noch Fragen zur Anwendung unserer Geräte
haben, so wende dich bitte an deinen Händler.
Sicherheitshinweise zur Installation

54
Funktionen
Sicherheitshinweise bei Inbetriebnahme
Lese vorher die Gebrauchsanweisung der Gegenstände, die Du mit diesem Gerät desinzieren oder trocknen willst,
sorgfältig durch. Dieses Gerät kann im Allgemeinen mit den meisten der unten aufgeführten Gegenstände sicher
verwendet werden:
Kunststoutensilien (Bsp. Fläschchen):
Spielzeug (Bsp. Beißringe):
Geschirr und Glas (Bsp. Besteck):
Pegeutensilien (Bsp. Nagelschere):
Medizinische Utensilien (Bsp. Nasensauger):
Vor der ersten Nutzung
Inbetriebnahme
1. Stelle das UV-Desinfektionsgerät auf eine ebene und ache Fläche. Stelle das Gerät nicht an einem Ort auf, an
dem die Gefahr eines Sturzes besteht. Halte das Gerät mindestens 12 cm von der Rückwand entfernt, um eine
gute Belüftung zu gewährleisten.
2. Es ist nicht ungewöhnlich, dass bei einem Neugerät ein leichter Geruch nach neuem Material wahrzunehmen
ist. Dieser ist nicht gesundheitsgefährdend. Lasse den Deckel vor dem ersten Gebrauch oen, um den Innen-
raum zu lüften und den unerwünschten Geruch zu entfernen.
3. Überprüfe, ob die Lampe oder das Innere des Geräts während des Transports beschädigt wurde. Wende dich
bitte an den Händler, wenn Du Schäden am Gerät oder eine defekte UV-Lampe feststellst.
4. Entferne und spüle die verdrahteten Einlegeböden und wische sie vor dem Zusammenbau trocken.
5. Verwende ein sauberes, feuchtes Handtuch und wische den Innenraum aus.
6. Montiere den Einlegekorb an seinem Platz.
1. Reinige Flaschen, Schnuller, Beißringe, Löel und Schalen gründlich mit einem milden Reinigungsmittel,
danach unter klarem Wasser rückstandslos ausspülen.
2. Schüttle die restlichen Wassertropfen aus.
3. Öne den Deckel des UV-Desinfektionsgerätes.
4. Stelle die Flaschen in das Desinfektionsgerät und lege die Kleinteile in das Zubehörfach. Beachte dabei folgende
Anwendungshinweise:
- Fläschen mit der Önung nach unten ins Gerät stellen:
- genügend Abstand zwischen den Gegenständen lassen:
- mind. 2 cm Abstand zum Deckel:
- Kleinteile in seine Einzelteile zerlegen:
5. Schließe den Deckel und wähle auf dem Bedienfeld den gewünschten Funktionsmodus aus.
DE DE
Automodus:
Die voreingestellte Arbeitszeit für dieTrocknung und Desinfektion im Automodus beträgt 50 Minuten: 39 Minuten für
die Heißlufttrocknung, 1 Minute für die Kaltlufttrocknung und die verbleibenden 10 Minuten für die Desinfektions-
funktion. Die Arbeitszeit kann durch erneutes Drücken der Auto-Taste von 50 Minuten auf 60 Minuten oder 70 Minuten
umgestellt werden. Nach Beendigung der Arbeit schaltet das Gerät automatisch in den Aufbewahrungsmodus um.
Desinfektionsmodus:
Die Standardarbeitszeit beträgt 10 Minuten. Durch erneutes Drücken der Sterilisationstaste kann die Arbeitszeit auf
15 Minuten umgestellt werden. Nach Beendigung des Desinfektion schaltet sich das Gerät automatisch in den
Aufbewahrungsmodus um.
Trocknungsmodus:
Die Standard-Arbeitszeit beträgt 40 Minuten. Durch erneutes Drücken der Trocknungstaste kann die Arbeitszeit
auf 50 Minuten bzw. 60 Minuten umgestellt werden. Bei jeder Arbeitszeit ndet in der letzten Minute der Kaltluft-
trocknungprozess statt, der Rest der jeweiligen Arbeitszeit bendet sich das Gerät in der Heißlufttrocknungsphase.
ACHTUNG! NICHT für elektrische Geräte anwenden. Diese sollten nur desinziert werden.
ACHTUNG! Innenraum und Kleinteilekorb bleiben nach der Trockenfunktion heiß!
Aufbewahrungsmodus:
Hält alle Gegenstände bis zu 72 Stunden keimfrei, UV-Lampe schaltet sich automatisch alle 3 Stunden erneut für
3 Minuten ein.
A
A
x
x
x
x
✓
✓
✓
✓

76
DE DE
Reinigung und Wartung
1. Vor der Reinigung den Betrieb unterbrechen, den Stecker ziehen.
2. Die Innenäche des UV-Desinfektionsgerätes und das Display sollten nur mit einem sauberen Mikrofasertuch
und nur mit warmem destilliertem Wasser gereinigt werden, um Kratzer auf dem hochglanzpolierten Edelstahl
zu vermeiden. Bei hartnäckigen Wasserecken lasse das warme und feuchte Mikrofasertuch längere Zeit zum
Lösen der Wasserecken auf der Stelle liegen.
3. Wische die Feuchtigkeit mit einem trockenen Tuch ab.
ACHTUNG!
Gieße kein Wasser in das Gerät, um es zu reinigen.
Das Gerät sollte niemals mit anderen Reinigungsmitteln als Wasser in Berührung kommen. Dies führt zu irreversiblen
und kumulativen Schäden an der Innenäche des Desinfektionsgerätes oder an der UV-Schutzbeschichtung auf
dem Glas.
Häuges Reinigen kann zu einer Vergilbung der Oberäche führen.
Es besteht die Möglichkeit einer leichten Verfärbung des Geräts sowie der eingelegten Gegenstände aufgrund von
UV-Strahlung.
Denke immer daran, die Innenäche gründlich sauber zu halten.
Reinigung der Trockenluftlter
Der Lufteinlasslter besteht aus einem Aktivkohleltermaterial, der auf der oberen Rückseite des UV- Desinfektions-
geräts angebracht ist. Er bietet Schutz vor toxischen Substanzen und festen Partikeln aus der Luft. Schütze zusätzlich
das Gehäuse vor Staub aus der Luft. Der Auslasslter besteht aus Nylon und bendet sich an der unteren Rückseite
des UV- Desinfektionsgeräts.
Alle Filter müssen alle 3 Monate gereinigt werden (wenn das Gerät täglich benutzt wird).
Der Aktivkohlelter muss nach 6 Monaten ausgetauscht werden (wenn das Gerät täglich benutzt wird).
• Entferne die Schutzabdeckung und nimm den Filter heraus.
• Reinige ihn mit klarem Wasser, trockne ihn dann oder setze ihn wieder ein.
• Setze ihn wieder ein und schließe die Schutzabdeckung.
Hinweise zum Umweltschutz
Dieses Produkt darf am Ende seiner Lebensdauer nicht über den normalen Hausmüll entsorgt werden,
sondern muss an einer Sammelstelle für das Recycling von elektrischen Geräten abgegeben werden.
Das Symbol auf dem Produkt, in der Gebrauchsanleitung oder auf der Verpackung weist darauf hin. Die
Werkstoe sind gemäß Ihrer Kennzeichnung wieder verwendbar. Mit der Wiederverwendung, der
stoichen Verwertung oder anderen Formen der Verwertung von Altgeräten leistest Du einen
wichtigen Beitrag zum Schutze unserer Umwelt. Bitte frage bei Deiner Gemeindeverwaltung nach der zuständigen
Entsorgungsstelle.
Das entsprechende Symbol auf dem Produkt, in der Gebrauchsanweisung oder auf der Verpackung weist auf diese
Pichten hin.
Problembehebung
Problembeschreibung Möglicher Grund Lösung
UV Lampe ist aus Das Gerät ist möglicherweise
nicht richtig an das Stromnetz
angeschlossen.
Stelle sicher, dass das Netzkabel
richtig in das Gerät und die Steck-
dose eingesteckt ist.
Der Deckel ist nicht richtig
verschlossen.
Stelle sicher, dass der Deckel richtig
verschlossen ist.
UV-Lampe ist nicht richtig
installiert.
Stelle sicher, dass die UV-Lampe
richtig installiert ist.
Wenn die UV-Lampe etwa 6.000
Stunden genutzt wurde.
Die UV-Lampe muss möglicher-
weise ersetzt werden.
Heißluft ist aus Das Gerät ist möglicherweise nicht
richtig an die Stromversorgung
angeschlossen.
Stelle sicher, dass das Netzkabel
richtig in das Gerät und die Steck-
dose eingesteckt ist.
Der Deckel ist nicht richtig
verschlossen.
Stelle sicher, dass der Deckel richtig
verschlossen ist.
Utensilien trocknen nicht richtig Die Trocknungszeit ist zu kurz. Versuche, eine längere Zeit für die
Trocknung einzustellen.
Überschüssiges Wasser bleibt im
Objekt.
Schüttle das Restwasser gründlich
ab, bevor du es in das Gerät legst.
Gewährleistung
Bitte Kaufbeleg, Gebrauchsanleitung und Artikelnummer aufbewahren. Gewährleistungsansprüche oder Ansprüche
aus Garantieversprechen sind ausschließlich mit dem Händler abzuwickeln.
Alle technischen Daten, Informationen sowie Eigenschaften des in diesem Werk beschriebenen Produktes wurden
nach bestem Wissen zusammengestellt und entsprechen dem Stand bei Veröentlichung. Die von reer bereit-
gestellten Informationen sollten korrekt und zuverlässig sein. Die Firma reer übernimmt dennoch keinerlei Haftung
für mögliche Fehler in diesem Dokument und behält sich das Recht vor, ohne vorherige Ankündigung, Änderungen
am Produktdesign beziehungsweise an den Spezikationen vorzunehmen. Vervielfältigung und Weitergabe von
Informationen aus diesem urheberrechtlich geschützten Werk in irgendeiner Form oder auf irgendeine Weise,
grasch, elektronisch oder mechanisch, durch Fotokopieren, Aufzeichnen auf Band oder Speichern in einem Daten-
abfragesystem, auch auszugsweise, bedürfen einer vorherigen schriftlichen Genehmigung der Firma reer.

98
GB GB
UV disinfecting device
Contents
Thank you for choosing to buy reer’s disinfecting device. The device disinfects bottles, feeding equipment and
nursing accessories in a fast, automatic and environmentally friendly manner without the addition of chemicals.
Once disinfecting has nished, the device switches itself o automatically. Thanks to the use of energy-saving UV
bulbs, rapid disinfecting is achieved without the use of water, meaning that products remain dry.
We’re condent that you and your family will enjoy the quality of our product for many years to come.
1 x UVC disinfecting device, 1 x removable stainless steel tub, 1 x carbon air lter
Deliverables and unit description ...................08
Technical specication..............................09
General safety instructions..........................09
Safety instructions for installation . . . . . . . . . . . . . . . . . . . 10
Functionality .......................................11
Safety instructions on use...........................11
Before rst use......................................12
Operating instructions..............................12
Cleaning and maintenance .........................13
Environmental protection ..........................13
Troubleshooting....................................14
Warranty ...........................................14
Deliverables and unit description
Technical specication
Disinfecting device:
Operating voltage: 220–240 V; 50Hz
Power: 110 W
Protection class: 1
Cable length: 133 cm
UV bulb:
Operating voltage: 29 V
Power: 4 W
Power consumption: 0.17 A
UVC radiation: 0.9 W
UV bulb
Our UV disinfecting device contains a high-quality, slim-line UVC bulb from Philips with pins on two sides
(germicidal bulb) that can also be used in water and air disinfection devices for living spaces.
The bulb’s small diameter of 16 mm enables a small system design with a exible approach. TUV TL mini bulbs oer
almost constant UV performance across their entire lifetime, guaranteeing maximum disinfecting safety and high
system eectiveness.
CAUTION!
Please do not replace the UV bulb yourself; please contact your retailer.
DANGER FROM UV LIGHT
Avoid looking directly into the light. Direct and excessive exposure to UV light can lead to permanent damage to
eyes.
The device is tted with UV-resistant material and safety mechanisms to prevent exposure to ultraviolet radiation.
• Read the instruction manual before using the device! It contains important information on setting up and using
the device. These safety instructions must be taken note of!
• Keep the operating instructions in a safe place for future reference. It must be handed over to third parties if it
is passed on.
• Use the device exclusively for private and intended use. This device is not intended for commercial use.
• To avoid the risk of re and electric shock, connect the device to the socket directly.
• Never use the device if it has a damaged cable or plug.
• Keep the cable away from heavily frequented areas. To avoid the risk of re, NEVER place the cable beneath rugs
or near radiators, heaters, ovens or heating devices.
• Always set the device up in such a way that it cannot be easily knocked over by people in the household.
• Do not use the device near water.
• Never touch the device with wet hands.
• Only disinfect products that can be sterilised and that can withstand moderate UV radiation.
• Never place an object in the air vent, the holes or other openings.
• Do not use chlorine or strong chemicals to clean the device, as this may lead to the device being damaged.
General safety instructions
Control light
for the UV bulb
Cover
UV bulb protection
Philips UV bulb
Bottle compartment
Air lter
Accessories compartment
Digital display
Function buttons Auto
mode
Programme
length
Disinfecting
mode
Drying
mode
Storage
mode
A
AUTO STORAGE
UV
UV
DRY
A
AUTO STORAGE
UV
UV
DRY

1110
GB GB
• Remove all packaging materials and unused components before rst use so your child cannot be injured or
swallow anything.
• Check the device for obvious damage before each use. If you nd any damage, do not use this device.
• Check – especially when travelling abroad – that the local mains voltage matches the voltage specied on the
devices and/or mains adapters.
• When the device is not in use, always unplug it so that it cannot be inadvertently switched on.
• Secure the power cable and ensure that it cannot be pulled on by mistake, causing the device to fall to the
ground. Do not allow the power cable to come into contact with hot surfaces.
• Always use the device on a at, heat-resistant surface.
• Do not immerse the device, the power cable or the plug in water or other liquids.
• The cover must always remain closed during operation.
• Clean the basket before initial use and carry out the disinfecting process once without items requiring
disinfecting in the device.
• Before opening the lid, stop operation using the operating panel.
• To clean or replace the UV bulb, always unplug the device.
• There should be a minimum distance of 12 cm between the back of the device and the wall to ensure good air
circulation.
• Wipe o dry water marks in the interior after each use. Dried water marks can impair the performance of the UV
bulbs and cause damage to the stainless steel interior.
• Wash and rinse the air lter as recommended to ensure the quality of air ltration in the device. Do not stack
products inside the device. Always leave enough distance between the objects to ensure good exposure to UV
light during operation.
• The power cable on this device cannot be replaced. If the wire is damaged, the device must be scrapped.
• Children must not play with the device. The device and its power cable must be kept away from children under
3 years of age.
• Cleaning and user maintenance must not be performed by children unless they are 8 years or older and are
supervised.
• People (including children) who are not capable of using the device safely due to their physical, sensory or intel-
lectual abilities or their inexperience or lack of knowledge should not use such devices without supervision or
instruction by a responsible person.
• Do not use the device within the reach of children.
• This device is only intended for use in the home. Do not use outside.
• Repairs may only be carried out by customer services or authorised retailers. You should by no means open or
repair the device yourself, as it can then no longer be guaranteed to be in perfect working order. The warranty
is rendered void if this is not complied with. Should you have any further questions on using our devices, please
contact your retailer.
Safety instructions regarding installation
Functionality
Safety notes for start-up
Carefully read the instructions for the items that you wish to disinfect or dry with this device before use. This device
can generally be used safely with most of the items listed below:
plastic utensils (e.g. bottles):
toys (e.g. teething rings):
tableware and glassware (e.g. cutlery):
care utensils (e.g. nail scissors):
medical utensils (e.g. nasal aspirator):
Auto mode:
The pre-set work time for drying and disinfecting in auto mode is 50 minutes: 39 minutes for hot air drying, 1 minute
for cold air drying and the remaining 10 minutes for the disinfecting function. The work time can be changed from
50 minutes to 60 minutes or 70 minutes by repeatedly pressing the auto button. Once it has nished its work, the
device automatically switches into storage mode.
Disinfecting mode:
The standard working time is 10 minutes. By pressing the sterilisation key again, the working time can be changed
to can be changed to 15 minutes. Once it has nished its work, the device automatically switches into storage
mode.
Drying mode:
The standard working time is 40 minutes. By pressing the drying key again, the working time can be changed to
can be changed to 50 minutes or 60 minutes. In each working time, the cold air drying process takes place in the
last minute. The unit is in the hot air drying phase for the rest of the respective working time.
CAUTION! DO NOT use on electrical equipment. These should only be disinfected.
CAUTION! The interior and small parts basket will remain hot after the drying function!
Storage mode:
Keeps all items germ-free for up to 72 hours; UV bulb works automatically for 3 minutes every 3 hours.
A
A

1312
GB GB
Before initial use
Operating instructions
1. Place the UV disinfecting device on a level and at surface. Do not position the device in a place where there is
a risk of it falling. Keep the device at least 12 cm from the rear wall to guarantee good ventilation.
2. It is not unusual for a new device to emit a slight smell of new materials. This is not a health hazard. Leave the lid
open before initial use to air the interior and remove the unwanted smell.
3. Check whether the bulb or the inside of the device was damaged during transport. Please contact the retailer if
you notice damage to the device or a defective UV bulb.
4. Remove and rinse the wire racks and wipe them dry before assembly.
5. Use a clean, damp cloth and wipe out the interior.
6. Place the removable basket in its place.
1. Clean bottles, dummies, teething rings, spoons and bowls thoroughly with a mild cleansing agent and then
rinse in clean water until no residue remains.
2. Shake o any remaining drops of water.
3. Open the lid of the UV disinfecting device.
4. Place bottles in the disinfecting device with the opening to the bottom and place small parts in the accessories
compartment.
- place the vial in the device with the opening facing downwards:
- leave enough space between the objects:
- at least 2 cm distance to the lid:
- disassemble small parts into its component parts:
5. Close the lid and select the desired mode on the operating panel.
x
x
x
x
✓
✓
✓
✓
Cleaning and maintenance
1. Before cleaning, stop operation and unplug.
2. The interior surfaces of the UV disinfecting device and the display should only be cleaned with a clean
microbre cloth and with warm, distilled water to avoid scratching the high-gloss stainless steel. In the event
of stubborn watermarks, leave the warm, damp microbre cloth on the spot for a longer period to dissolve the
watermarks.
3. Wipe away dampness with a dry cloth.
CAUTION!
Do not pour water into the device to clean it.
The device should never come into contact with cleansing agents other than water. This will lead to irreversible and
cumulative damage to the interior surfaces of the disinfecting device or to the UV protection coating on the glass.
Frequent cleaning may result in the yellowing of the surface.
It is possible that the device and the items placed in it may change colour slightly due to the UV radiation.
Always remember to keep the interior surfaces completely clean.
Cleaning the dry air lter
The air inlet lter consists of an activated carbon lter material that is attached to the top rear side of the UV disin-
fecting device. It provides protection against toxic substances and solid particles from the air, and it also protects the
casing from dust from the air. The outlet lter consists of nylon and is on the lower rear side of the UV disinfecting
device.
All lters must be cleaned every 3 months (if the device is used daily).
The activated carbon lter must be replaced after 6 months (if the device is used daily).
• Remove the protective cover and take out the lter.
• Clean it with clear water, then dry it or place it back in.
• Place it back in and close the protective cover.
Environmental protection notes
At the end of its service life, this product must not be disposed of with normal household waste. It must
be taken to a collection point for the recycling of electrical equipment. The symbol on the product, in
the operating instructions or on the packaging indicates this.The materials can be reused according to
their marking. With the reuse, the recycling or other forms of recovery of waste equipment, you are
making an important important contribution to the protection of our environment. Please ask your
local authority for the responsible disposal point.
The corresponding symbol on the product, in the instructions for use or on the packaging indicates these obligations.

1514
FR
GB
Troubleshooting
Description of problem Possible reason Solution
The UV bulb is o The device may not be correctly
connected to the electricity
network.
Ensure that the power cable is
correctly inserted in the device and
the socket.
The lid is not closed correctly. Ensure that the lid is closed
correctly.
The UV bulb is not installed
correctly.
Ensure that the UV bulb is installed
correctly.
If the UV bulb has been used for
around 6,000 hours.
The UV bulb may need to be
replaced.
The hot air is o The device may not be correctly
connected to the electricity supply.
Ensure that the power cable is
correctly inserted in the device and
the socket.
The lid is not closed correctly. Ensure that the lid is closed
correctly.
Utensils not drying properly The drying time is too short. Try to set a longer time for drying.
Excess water remains in the item. Shake o residual water thoroug-
hly before placing it in the device.
Warranty
Please keep proof of purchase, instructions for use and item number. Warranty claims or claims from warranty
promises are to be settled exclusively with the dealer. All technical data, information and characteristics of the
product described in this document have been compiled to the best of our to the best of our knowledge and
correspond to the status at the time of publication. The information provided by reer information should be correct
and reliable. Nevertheless, the company reer assumes no liability for possible errors in this document and reserves
the right, without prior notice, to make changes to product design to the product design or specications without
prior notice. Reproduction and distribution of information from this copyrighted work in any form or by any means,
graphically, electronically or mechanically, by photocopying, recording on tape or storing in a retrieval system, even
in part, requires the prior written consent of the company reer.
Appareil de désinfection à UV
Nous vous remercions d’avoir choisi cet appareil de désinfection de marque reer. Cet appareil désinfecte dans le re-
spect de l’environnement, sans ajout de produits chimiques, rapidement et automatiquement les biberons, les ac-
cessoires d’alimentation et d’allaitement. Quand la désinfection est terminée, l’appareil s’arrête automatiquement.
L’utilisation de lampes à UV à faible consommation d’énergie permet d’obtenir une désinfection rapide sans utiliser
d’eau. Ainsi, les produits restent secs.
Nous sommes convaincus que toi et ta famille pourrez proter longtemps de la qualité de notre produit.
1 x appareil de désinfection par UV-C, 1 x cuve en acier inoxydable amovible, 1 x ltre à charbon
Contenu de la livraison et description de l‘appareil ..15
Données techniques. . . . . . . . . . . . . . . . . . . . . . . . . . . . . . . . 16
Toutes les mesures de sécurité......................16
Conseils de sécurité pour l‘installation ..............17
Fonctionnement ...................................18
Consignes de sécurité pour la mise en service ......18
Avant la première utilisation ........................19
Mode d’emploi .....................................19
Nettoyage et entretien .............................20
Conseils pour la protection de l‘environnement .....20
Résolution des problèmes ..........................21
Garantie ............................................21
Contenu de la livraison et description de l‘appareil
Contenu
Voyants de contrôles
de la lampe à UV
Capot
Protection de la lampe à UV
Lampe à UV Philips
Compartiment pour biberons
Filtre à air
Compartiment pour accessoires
Écran numérique
Touche de contrôle Mode
Auto
Durée du
programme
Mode
Désinfection
Mode
Séchage
Mode
Conservation
A
AUTO STORAGE
UV
UV
DRY
A
AUTO STORAGE
UV
UV
DRY

1716
FR FR
Données techniques
Appareil de désinfection:
Tension de service : 220–240 V; 50Hz
Puissance : 110 W
Classe de protection : 1
Longueur de câble : 133 cm
Lampe à UV:
Tension de service : 29 V
Puissance : 4 W
Consommation électrique: 0.17 A
Rayonnement UV-C: 0.9 W
Lampe à UV
Notre appareil de désinfection à UV contient une lampe à UV-C ne et d’excellente qualité, à culot double (lampe
germicide) de la marque Philips, également utilisée dans les appareils de désinfection de l’eau et de l’air pour les
habitations.
Le petit diamètre de la lampe (16mm) permet un format compact et polyvalent. Les mini-lampes TUV TL orent
une puissance d’UV presque constante sur toute leur durée de vie, ce qui garantit une sécurité maximale de la
désinfection et une haute ecacité du système.
ATTENTION !
Ne remplace pas la lampe à UV toi-même. Adresse-toi à un revendeur.
DANGER DU RAYONNEMENT UV
Évite de regarder directement la lumière. L’exposition directe et prolongée au rayonnement UV peut entraîner des
lésions graves des yeux.
L’appareil est doté d’un matériau résistant aux UV et de mécanismes de sécurité destinés à éviter l’exposition au
rayonnement ultraviolet.
• Lire le mode d’emploi avant d’utiliser l’appareil! Il contient des remarques importantes à propos de la mise en
service et de la manipulation de l’appareil. Ces consignes de sécurité doivent être impérativement respectées!
• Conserve soigneusement le mode d‘emploi pour pouvoir le consulter ultérieurement. Il doit être remis en cas
de transmission à des tiers.
• Utilise l‘appareil uniquement à des ns privées et pour l‘usage auquel il est destiné. Cet appareil n‘est pas destiné
à un usage professionnel.
• An d’éviter tout risque d’incendie et de choc électrique, raccorde l’appareil directement à la prise.
• N’utilise jamais l’appareil avec un câble ou une prise endommagée.
• Isole le câble des zones très fréquentées. An d’éviter tout risque d’incendie, ne pose JAMAIS le câble sous des
tapis, près de radiateurs, de dispositifs de chauage, de fours ou d’appareils chauants.
• Place toujours l’appareil de manière à éviter que des personnes du foyer le heurtent.
• N’utilise pas l’appareil près de l’eau.
• Ne touche jamais l’appareil avec les mains mouillées.
• Désinfecte seulement les produits autorisés pour la stérilisation et supportant un rayonnement UV modéré.
• Ne place jamais d’objet dans l’ouverture de ventilation, les trous ou d’autres ouvertures.
• Avant la première utilisation, retire tout l’emballage et les parties inutilisables an que ton enfant ne risque pas
de se blesser ou d’avaler quelque chose.
• Avant chaque utilisation, vérie que l‘appareil ne présente pas de dommages apparents. Si tu constates des
dommages, cet appareil ne doit pas être utilisé.
• Vérie, surtout en voyage à l’étranger, que la tension locale correspond à celle de l’appareil ou de l’adaptateur.
• Quand l’appareil n’est pas utilisé, débranche toujours la prise pour éviter les mises en marche involontaires.
• Sécurise le cordon d’alimentation et veille à ce qu’il ne soit pas tiré accidentellement et que l’appareil tombe pas
au sol. Éloigne le cordon d’alimentation des surfaces chaudes.
• Utilise toujours l’appareil sur une surface plane et résistante à la chaleur.
• Ne plonge pas l’appareil, le cordon d’alimentation ou la prise dans l’eau ou d’autres liquides.
• Le capot doit toujours rester fermé pendant le fonctionnement.
• Avant la première utilisation, nettoie la cuve et procède à un cycle de désinfection à vide.
• Avant d’ouvrir le capot, arrête le fonctionnement en appuyant sur la touche d’arrêt.
• Débranche toujours le cordon d’alimentation pour nettoyer ou changer la lampe à UV.
Toutes les mesures de sécurité
• N’utilise pas de chlore ou d’autres produits chimiques pour nettoyer l’appareil. Cela pourrait endommager l’ap-
pareil.
• Laisse un écart minimum de treizecentimètres entre l’arrière de l’appareil et le mur pour permettre une bonne
circulation de l’air.
• Essuie les taches d’eau séchées à l’intérieur après chaque utilisation. Les taches d’eau séchées peuvent aecter
la performance des lampes à UV et occasionner des dommages sur l’équipement intérieur en acier inoxydable.
• Nettoie et rince le ltre à air selon les recommandations pour garantir la qualité du ltrage de l’air dans l’appareil.
N’empile pas les produits à l’intérieur de l’appareil. Laisse toujours assez d’écart entre les objets pour garantir une
bonne exposition aux rayons UV pendant l’utilisation.
• Il est impossible de remplacer le câble de cet appareil. S’il est endommagé, l’appareil doit être mis au rebut.
• Ne laisse pas les enfants jouer avec l’appareil. Tenir l’appareil et son câble d’alimentation hors de portée des
enfants de moins de 3ans.
• Le nettoyage et l‘entretien par l‘utilisateur ne doivent pas être eectués par des enfants, à moins qu‘ils n‘aient 8
ans ou plus et qu‘ils soient surveillés.
• Les personnes (y compris les enfants) dans l’incapacité d’utiliser l’appareil en toute sécurité pour des raisons
physiques, sensorielles ou psychiques ou en raison de leur inexpérience ne doivent pas utiliser cet appareil sans
surveillance ou contrôle d’une personne responsable.
• N’utilisez pas l’appareil à proximité des enfants.
• Cet appareil est conçu pour un usage à l’intérieur. Ne pas utiliser à l’extérieur.
• Les réparations ne peuvent être eectuées que par le service après-vente ou par le revendeur autorisé. Il est
interdit d’ouvrir ou de réparer l’appareil, faute de quoi il est impossible de garantir son parfait fonctionnement.
Le non-respect de ces règles met n à la garantie. Si tu as d’autres questions à propos de l’utilisation de nos
appareils, adresse-toi à ton revendeur.
Consignes de sécurité concernant l’installation

1918
FR FR
Fonctionnement
Consignes de sécurité pour la mise en service
Lis attentivement le mode d’emploi des objets que tu veux désinfecter ou sécher avec cet appareil. Cet appareil est
généralement utilisé en toute sécurité avec la plupart des objets ci-dessous:
ustensiles en plastique (par ex. biberons) :
jouet (par ex. anneaux de dentition) :
vaisselle et verres (par ex. couverts) :
ustensiles de soin (par ex. ciseaux à ongles) :
ustensiles médicaux (par ex. mouche-bébé):
Avant la première utilisation
Istruzioni per l’uso
1. Place l’appareil de désinfection à UV sur une surface plane et stable. Ne pose pas l’appareil dans un endroit où il
risque de tomber. Place l’appareil à au moins 12cm du mur pour assurer une bonne ventilation.
2. Il n’est pas inhabituel qu’une légère odeur de neuf se dégage de l’appareil. Ce n’est pas dangereux pour la santé.
Laisse le capot ouvert avant la première utilisation pour aérer l’intérieur et éliminer l’odeur.
3. Vérie si la lampe ou l’intérieur de l’appareil a été endommagé(e) pendant le transport. Adresse-toi à ton reven-
deur si tu constates des dégradations sur l’appareil ou une lampe à UV défectueuse.
4. Élimine et rince les supports en treillis et essuie-les avant de les réinstaller.
5. Utilise un chion propre et humide pour essuyer l’intérieur.
6. Insère la corbeille à sa place.
1. Lava accuratamente biberon, ciucci, massaggiagengive, cucchiai e ciotole con un detersivo delicato, dopodiché
sciacqua via tutti i residui sotto l’acqua corrente.
2. Scuoti per eliminare le gocce d’acqua.
3. Apri il coperchio del dispositivo di disinfezione a UV.
4. Place les biberons dans l’appareil de désinfection avec l’ouverture vers le bas, place les petites pièces dans le
compartiment à accessoires.
- placer les acons dans l‘appareil, ouverture vers le bas :
- laisser susamment d‘espace entre les objets :
- au moins 2 cm d‘écart avec le couvercle :
- démonter les petites pièces en ses éléments :
5. Chiudi il coperchio e sul pannello di controllo seleziona la modalità di funzionamento che desideri.
Mode Auto:
La durée de cycle paramétrée pour le séchage et la désinfection en mode Auto est de 50minutes: 39minutes de
séchage à air chaud, 1minute de séchage à air froid et les 10minutes restantes pour la désinfection. La durée du cycle
peut passer de 50minutes à 60ou 70minutes en appuyant de nouveau sur la touche Auto. Une fois que le cycle est
terminé, l’appareil passe automatiquement en mode Conservation.
Mode Désinfection:
La durée standard du cycle est de 10minutes. Appuie sur la touche Stérilisation pour passer la durée du cycle à
10/15minutes. Une fois que le cycle est terminé, l’appareil passe automatiquement en mode Conservation.
Mode Séchage:
Le temps de travail standard est de 40 minutes. En appuyant une nouvelle fois sur la touche de séchage, le temps
de travail peut être pour passer à 50 minutes ou 60 minutes. Pour chaque temps de travail, le processus de séchage
à l‘air froid a lieu pendant la dernière minute. Le reste du temps de travail, l‘appareil est en phase de séchage à l‘air
chaud.
ATTENTION ! NE PAS utiliser pour les appareils électriques. Ceux-ci doivent uniquement être désinfectés.
ATTENTION ! La cuve et l’insert destiné aux petites pièces restent chauds après séchage!
Mode Conservation:
Conserve tous les objets sans germes jusqu’à 72heures, la lampe à UV fonctionne automatiquement troisminutes
toutes les troisheures.
A
A
x
x
x
x
✓
✓
✓
✓

2120
FR FR
Nettoyage et entretien
1. Avant de le nettoyer, interromps l’utilisation, débranche le cordon d’alimentation.
2. La paroi intérieure de l’appareil de désinfection à UV et l’écran ne doivent être nettoyés qu’avec un
chion microbre propre et seulement avec de l’eau chaude distillée, an d’éviter les rayures sur l’acier
inoxydable poli miroir. En cas de tache d’eau persistante, pose le chion microbre humide sur la tache un
certain temps pour la dissoudre.
3. Essuie l’humidité avec un chion sec.
ATTENTION !
Ne verse pas d’eau dans l’appareil pour le nettoyer.
L’appareil ne doit jamais entrer en contact avec d’autres détergents que de l’eau. Cela entraînerait des dégâts cumu-
latifs et irréversibles sur la paroi intérieure de l’appareil de désinfection ou à la surface de protection anti-UV du verre.
Des nettoyages fréquents peuvent entraîner le jaunissement de la surface.
Le rayonnement UV peut entraîner une légère décoloration de l’appareil et des objets qui y ont été placés.
Pense toujours à tenir propre la paroi intérieure.
Nettoyage des ltres à air sec
Le ltre d’entrée d’air se compose d’un matériau au charbon actif xé en haut au dos de l’appareil de désinfection à
UV. Il protège des substances toxiques et des particules solides présentes dans l’air. Il protège également l’intérieur de
la poussière. Le ltre de sortie est en nylon. Il se trouve en bas au dos de l’appareil de désinfection à UV.
Tous les ltres doivent être nettoyés tous les 3mois (en cas d’utilisation quotidienne de l’appareil).
Le ltre à charbon actif doit être changé au bout de 6mois (en cas d’utilisation quotidienne de l’appareil).
• Retire le capot de protection et retire le ltre.
• Nettoie-le à l’eau claire, sèche-le ou remplace-le.
• Place-le et referme le capot de protection.
Remarques sur la protection de l‘environnement
En n de vie, ce produit ne doit pas être éliminé avec les déchets ménagers ordinaires, mais doit être
remis à un point de collecte pour le recyclage des appareils électriques. Le symbole sur le produit, dans
le mode d‘emploi ou sur l‘emballage l‘indique. Les matériaux sont réutilisables conformément à leur
marquage. La réutilisation, la valorisation recyclage des matériaux ou d‘autres formes de valorisation
des appareils usagés, tu contribues à la protection de l‘environnement. contribution importante à la
protection de notre environnement. Renseigne-toi auprès de ton administration communale sur le lieu d‘élimination
compétent.
Le symbole correspondant sur le produit, dans le mode d‘emploi ou sur l‘emballage indique ces obligations.
Résolution des problèmes
Description du problème Raison possible Solution
La lampe à UV est éteinte L’appareil n’est peut-être pas bien
raccordé au réseau électrique.
Assure-toi que le cordon d’ali-
mentation est bien branché sur
l’appareil et sur la prise.
Le capot n’est pas bien fermé. Assure-toi que le capot est bien
fermé.
La lampe à UV n’est pas bien
installée.
Assure-toi que la lampe à UV est
bien installée.
Si la lampe à UV a servi environ
6000heures.
Il faut peut-être remplacer la lampe
à UV.
L’air chaud est éteint L’appareil n’est peut-être pas
bien raccordé à l’alimentation
électrique.
Assure-toi que le cordon d’ali-
mentation est bien branché sur
l’appareil et sur la prise.
Le capot n’est pas bien fermé. Assure-toi que le capot est bien
fermé.
Les objets ne sèchent pas
correctement
La durée de séchage est trop
courte.
Essaie de paramétrer un temps de
séchage plus long.
Un excédent d’eau reste dans
l’objet.
Vide l’eau résiduelle avant de le
placer dans l’appareil.
Garantie
Veuillez conserver la preuve d‘achat, le mode d‘emploi et le numéro d‘article. Les demandes de garantie ou les
résultant de promesses de garantie doivent être traitées exclusivement avec le revendeur. Toutes les données
techniques, les informations ainsi que les caractéristiques du produit décrit dans cet ouvrage ont été sont établies
en toute bonne foi et correspondent à la situation au moment de la publication. Les informations fournies par reer
informations devraient être correctes et ables. La société reer n‘assume cependant aucune responsabilité pour
les éventuelles erreurs contenues dans ce document et se réserve le droit de modier sans préavis de procéder à
des modications de la conception du produit ou des spécications. Reproduction et transmission d‘informations
informations contenues dans cet ouvrage protégé par des droits d‘auteur, sous quelque forme ou de quelque
manière que ce soit, graphiquement, électroniquement ou mécaniquement, par photocopie, enregistrement sur
bande ou stockage dans un système d‘extraction de données, même sous forme d‘extraits, nécessitent l‘autorisation
écrite préalable de la société reer.

2322
IT IT
Dispositivo di disinfezione a UV
Indice
Ti ringraziamo per aver scelto di acquistare il dispositivo di disinfezione di reer. Il dispositivo garantisce la disinfezione
rapida e automatica di biberon, accessori per la pappa e per l’allattamento, nel rispetto dell’ambiente e senza l’aggiunta
di prodotti chimici. Una volta terminata la disinfezione, il dispositivo si spegne automaticamente.
Grazie all’uso di lampade UV a risparmio energetico, si ottiene una disinfezione rapida senza utilizzare acqua, pertanto
i prodotti rimangono asciutti.
Siamo certi che tu e la tua famiglia rimarrete soddisfatti della qualità del nostro prodotto.
1 x dispositivo di disinfezione a UV-C, 1 x vaschetta in acciaio inossidabile estraibile, 1 x ltro dell’aria ai carboni
Dotazione e descrizione dell‘apparecchio ...........22
Dati tecnici .........................................23
Avvertenze di sicurezza generali ....................23
Sicurezza per l‘installazione .........................24
Fonctionnement ...................................25
Consignes de sécurité pour la mise en service ......25
Avant la première utilisation ........................26
Mode d’emploi .....................................26
Pulizia e manutenzione .............................27
Indicazioni per la protezione dell‘ambiente .........27
Soluzione problemi.................................28
Garanzia............................................28
Dotazione e descrizione dell‘apparecchio
Dati tecnici
Dispositivo di disinfezione:
Tensione di funzionamento: 220–240 V; 50Hz
Potenza: 110 W
Classe di protezione: 1
Lunghezza del cavo: 133 cm
Lampada UV:
Tensione di funzionamento: 29 V
Potenza: 4 W
Consumo energetico: 0.17 A
Emissione di raggi UV-C: 0.9 W
Lampada UV
Il nostro dispositivo di disinfezione a UV contiene una sottile lampada UV di alta qualità a doppio attacco (lampada
germicida) di Philips, utilizzata anche in apparecchi per la disinfezione dell’aria e dell’acqua in ambienti domestici.
Il ridotto diametro della lampada di soli 16 mm consente un design compatto dalla congurazione essibile. Le
mini lampade TUV TL orono una potenza UV pressoché costante per l’intera durata di vita, il che garantisce la
massima sicurezza della disinfezione e un’elevata ecacia del sistema.
ATTENZIONE!
Non sostituire da soli la lampada UV, rivolgersi al proprio rivenditore.
PERICOLO DOVUTO A LUCE UV
Evitare di guardare direttamente la luce. L’esposizione diretta ed eccessiva alla luce UV può causare danni
permanenti agli occhi.
Il dispositivo è fabbricato con materiali resistenti agli UV e meccanismi di sicurezza che evitano l’esposizione ai raggi
ultravioletti.
• Prima di usare il dispositivo leggere le relative istruzioni! Contengono importanti informazioni sulla messa in fun-
zione e sulla gestione del dispositivo. Le presenti istruzioni di sicurezza devono essere rispettate senza eccezioni!
• Conservare le istruzioni per l‘uso in un luogo sicuro per future consultazioni. Non deve essere consegnato a terzi.
• Utilizzare l‘apparecchio solo per l‘uso privato e previsto. Questo apparecchio non è destinato all‘uso commerciale.
• Per evitare il pericolo di incendio e folgorazione, collega il dispositivo direttamente alla presa.
• Non mettere mai in funzione il dispositivo in presenza di danni al cavo o alla spina.
• Tieni lontano il cavo da aree molto frequentate. Per evitare il rischio di incendio, non collocare MAI il cavo sotto
tappeti, nelle vicinanze di caloriferi, radiatori, stufe o apparecchi di riscaldamento.
• Posiziona sempre il dispositivo in maniera tale che le persone in casa non possano farlo cadere facilmente.
• Non utilizzare il dispositivo in prossimità di acqua.
• Non toccare mai il dispositivo con le mani bagnate.
• Disinfetta solo i prodotti per i quali è consentita la sterilizzazione e che resistono a una moderata emissione di
raggi UV.
• Non inserire mai oggetti nell’apertura di ventilazione, nei fori o in altre aperture.
• Non utilizzare cloro o prodotti chimici aggressivi per pulire il dispositivo, poiché potrebbero danneggiarlo.
Avvertenze di sicurezza generali
Spia di controllo
della lampada UV
Copertura
Protezione della lampada UV
Lampada UV Philips
Vano per biberon
Filtro dell’aria
Vano per accessori
Display digitale
Pulsante funzione Modalità
automatica
Durata del
programma
Modalità di
disinfezione
Modalità di
asciugatura
Modalità di
conservazione
A
AUTO STORAGE
UV
UV
DRY
A
AUTO STORAGE
UV
UV
DRY

2524
IT IT
• Prima del primo utilizzo, rimuovi tutto il materiale d’imballaggio e le componenti non utilizzate, in maniera che il
tuo bambino non possa farsi male o ingerire qualcosa.
• Prima di ogni utilizzo, vericare che l‘unità non presenti danni evidenti. Se si riscontrano danni, non utilizzare
l‘unità.
• Verica, soprattutto in viaggio all’estero, che la tensione di rete del luogo corrisponda alla tensione indicata sugli
apparecchi o sugli alimentatori.
• Quando l’apparecchio non è in uso, staccalo sempre dalla presa, in modo che non possa essere acceso per
sbaglio.
• Assicura il cavo di alimentazione e fai attenzione che non venga tirato inavvertitamente facendo cadere a terra
l’apparecchio. Evita che il cavo di alimentazione entri a contatto con superci molto calde.
• Utilizza sempre l’apparecchio su una supercie piana e resistente al calore.
• Non immergere l’apparecchio, il cavo di alimentazione o la spina in acqua o in altri liquidi.
• Durante il funzionamento la copertura deve sempre restare chiusa.
• Prima del primo utilizzo pulisci il cestello ed esegui una volta il ciclo di disinfezione senza alcun utensile.
• Prima di aprire il coperchio, arrestare l’apparecchio tramite il pannello di controllo.
• Per pulire o sostituire la lampada UV staccare sempre la spina.
• Per garantire una buona circolazione dell’aria, tra il retro dell’apparecchio e la parete dovrebbe essere rispettata
una distanza minima di 12 centimetri.
• Dopo ogni utilizzo, pulisci le macchie d’acqua asciutte all’interno del dispositivo. Le macchie d’acqua secche pos-
sono compromettere le prestazioni delle lampade UV e causare danni alla nitura interna in acciaio inossidabile.
• Per garantire la qualità del ltraggio dell’aria nel dispositivo, lava e sciacqua il ltro dell’aria come consigliato. Non
impilare di prodotti all’interno del dispositivo. Lascia sempre una suciente distanza tra gli oggetti, in modo da
garantire un’illuminazione ottimale con la luce UV durante il funzionamento.
• Il cavo di alimentazione di questo dispositivo non può essere sostituito. Se il cavo è danneggiato, il dispositivo
deve essere smaltito.
• I bambini non devono giocare con l’apparecchio. Tenere l’apparecchio e il relativo cavo di alimentazione lontani
da bambini di età inferiore ai 3 anni.
• La pulizia e la manutenzione da parte dell‘utente non devono essere eseguite da bambini, a meno che non
abbiano almeno 8 anni e siano sorvegliati.
• Le persone (bambini inclusi) che, in ragione delle loro facoltà siche, sensoriali o mentali o della loro inesperienza
o inconsapevolezza, non fossero in grado di utilizzare l’apparecchio in modo sicuro non dovrebbero usare questi
dispositivi senza la supervisione o la guida di una persona per loro responsabile.
• Non utilizzare mai l’apparecchio entro la portata dei bambini.
• Questo apparecchio è destinato esclusivamente all’uso in casa. Non utilizzare all’aperto.
• Eventuali riparazioni possono essere eseguite solo dal servizio di assistenza alla clientela o da rivenditori auto-
rizzati. In nessun caso l’apparecchio può essere aperto o riparato autonomamente, altrimenti il corretto funzio-
namento non è più garantito. In caso di inosservanza, decade la prestazione di garanzia. Se dovessi avere altre
domande sull’uso dei nostri apparecchi, rivolgiti al tuo rivenditore.
Istruzioni di sicurezza per l’installazione
Modalità di funzionamento
Avvertenze di sicurezza per la messa in funzione
Prima di inserirli, leggi attentamente le istruzioni d’uso degli oggetti che desideri disinfettare o asciugare con questo
dispositivo. In linea di massima, questo apparecchio può essere utilizzato in sicurezza con la maggior parte degli
oggetti di seguito riportati:
utensili in plastica (ad es. biberon):
giocattoli (ad es. massaggiagengive):
stoviglie e bicchieri (ad es. posate):
utensili per la cura personale (ad es. forbicine):
utensili medici (ad es. aspiratori nasali):
Modalità automatica:
Il tempo di lavoro preimpostato per l’asciugatura e la disinfezione in modalità automatica è di 50 minuti. 39 minuti per
l’asciugatura con aria calda, 1 minuto per l’asciugatura con aria fredda e i restanti 10 minuti per la funzione di disinfezi-
one. Premendo nuovamente il pulsante della modalità automatica, il tempo di lavoro può essere portato da 50 a 60 o
70 minuti. Al termine, il dispositivo passa automaticamente alla modalità di conservazione.
Modalità di disinfezione:
il tempo di lavoro standard è di 10 minuti, premere il pulsante di sterilizzazione per impostare il tempo di lavoro su
10 minuti/15 minuti, al termine del lavoro l’apparecchio passerà automaticamente alla funzione di conservazione.
Modalità di asciugatura:
Il tempo di lavoro standard è di 40 minuti. Premendo di nuovo il pulsante di asciugatura, il tempo di lavoro può es-
sere modicato a a 50 minuti o a 60 minuti. In ogni tempo di lavoro, il processo di asciugatura ad aria fredda avviene
nell‘ultimo minuto. Per il resto del tempo di lavoro l‘apparecchio è in fase di asciugatura ad aria calda.
ATTENZIONE! NON utilizzare su apparecchi elettrici. Questi devono essere solo disinfettati.
ATTENZIONE! Dopo la funzione di asciugatura l’interno e il cestello per i pezzi piccoli sono bollenti!
Modalità di conservazione:
Mantiene tutti gli oggetti sterili no a 72 ore, la lampada UV si mette automaticamente in funzione ogni tre ore per
3 minuti.
A
A

2726
IT IT
Prima del primo utilizzo
Istruzioni per l’uso
1. Posiziona il dispositivo di disinfezione a UV su una supercie piana e uniforme. Non collocare il dispositivo in
un posto in cui possa cadere. Mantieni il dispositivo a una distanza di almeno 12 cm dalla parete per garantire
una buona ventilazione.
2. Può succedere che ai primi utilizzi il dispositivo emani un leggero odore di nuovo. Non è pericoloso per la salute.
Prima del primo utilizzo lascia aperto il coperchio per arieggiare gli interni ed eliminare l’odore sgradevole.
3. Verica che la lampada o l’interno del dispositivo non siano stati danneggiati durante il trasporto. Rivolgiti al
rivenditore se noti danni sul dispositivo o se ti accorgi che la lampada UV è difettosa.
4. Rimuovi e sciacqua i ripiani e prima di rimontarli asciugali con un panno.
5. Lava l’interno passando un panno pulito e inumidito.
6. Monta il cestello al suo posto.
1. Lava accuratamente biberon, ciucci, massaggiagengive, cucchiai e ciotole con un detersivo delicato, dopodiché
sciacqua via tutti i residui sotto l’acqua corrente.
2. Scuoti per eliminare le gocce d’acqua.
3. Apri il coperchio del dispositivo di disinfezione a UV.
4. Posiziona i biberon nel dispositivo con le aperture rivolte verso il basso sistemando i pezzi piccoli nel vano
accessori.
- inserire la ala nell‘unità con l‘apertura rivolta verso il basso:
- lasciare uno spazio suciente tra gli oggetti:
- a una distanza di almeno 2 cm dal coperchio:
- smontare le piccole parti nei loro singoli componenti:
5. Chiudi il coperchio e sul pannello di controllo seleziona la modalità di funzionamento che desideri.
x
x
x
x
✓
✓
✓
✓
Pulizia e manutenzione
1. Prima della pulizia, interrompere il funzionamento staccando la spina.
2. La supercie interna del dispositivo di disinfezione a UV e il display dovrebbero essere lavati solo con un
panno in microbra pulito e acqua distillata tiepida, in modo da evitare gra sulla nitura a specchio dell’acciaio
inossidabile. In presenza di macchie d’acqua ostinate, per scioglierle lascia in posa il panno in microbra inumi-
dito con acqua tiepida per un po’ di tempo.
3. Elimina l’umidità con un panno asciutto.
ATTENZIONE!
Non versare acqua nel dispositivo per pulirlo.
L’apparecchio non dovrebbe mai entrare a contatto con mezzi di pulizia diversi dall’acqua. Ciò può causare danni
progressivi e irreversibili alla supercie interna del dispositivo o al rivestimento di protezione dai raggi UV sul vetro.
La pulizia frequente può ingiallire la supercie.
L’emissione di raggi UV potrebbe modicare leggermente il colore del dispositivo e degli oggetti inseriti.
Ricorda sempre di mantenere ben pulita la supercie interna.
Pulizia del ltro dell’aria di asciugatura
Il ltro d’ingresso dell’aria è composto da un materiale ltrante ai carboni attivi ed è collocato in alto sul retro del
dispositivo di disinfezione a UV. Protegge dalle sostanze tossiche e dalle particelle solide dell’aria. Protegge inoltre
il telaio dalla polvere proveniente dall’aria. Il ltro di sato è in nylon e si trova in basso sul retro del dispositivo di
disinfezione a UV.
Tutti i ltri devono essere puliti ogni 3 mesi (se l’apparecchio viene utilizzato tutti i giorni).
Il ltro ai carboni attivi deve essere sostituito dopo 6 mesi (se l’apparecchio viene utilizzato tutti i giorni).
• Rimuovi la copertura protettiva ed estrai il ltro.
• Lavalo con acqua corrente, asciugalo e poi reinseriscilo.
• Reinseriscilo e chiudi la copertura protettiva.
Note sulla protezione ambientale
Al termine della sua vita utile, questo prodotto non deve essere smaltito con i normali riuti domestici,
Deve essere portato in un centro di raccolta per il riciclaggio degli apparecchi elettrici. Il simbolo sul
prodotto, nelle istruzioni per l‘uso o sulla confezione lo indica. I materiali possono essere riutilizzati in
base alla loro etichettatura. Riutilizzo, riciclaggio o altre forme di riciclaggio o altre forme di recupero
dei riuti, si dà un importante contributo alla tutela dell‘ambiente. importante contributo alla tutela
dell‘ambiente. Rivolgetevi alle autorità locali per conoscere il punto di smaltimento responsabile.
Il simbolo corrispondente sul prodotto, nelle istruzioni per l‘uso o sull‘imballaggio indica questi obblighi.

2928
IT
ES
Risoluzione dei problemi
Descrizione del problema Possibile motivo Soluzione
La lampada UV è spenta Probabilmente l’apparecchio non
è collegato correttamente alla rete
elettrica.
Assicurati che il cavo di alimenta-
zione sia correttamente inserito
nell’apparecchio e nella presa
elettrica.
Il coperchio non è chiuso bene. Assicurati che il coperchio sia
chiuso bene.
La lampada UV non è installata
correttamente.
Assicurati che la lampada UV sia
installata correttamente.
Se la lampada UV è stata utilizzata
circa 6.000 ore.
Probabilmente la lampada UV
dev’essere sostituita.
L’aria calda non funziona Probabilmente l’apparecchio non è
collegato correttamente all’alimen-
tazione elettrica.
Assicurati che il cavo di alimenta-
zione sia correttamente inserito
nell’apparecchio e nella presa
elettrica.
Il coperchio non è chiuso bene. Assicurati che il coperchio sia
chiuso bene.
Gli utensili non si asciugano bene Il tempo di asciugatura è troppo
breve.
Prova a impostare un tempo si
asciugatura più lungo.
Presenza di acqua in eccesso negli
oggetti.
Prima di sistemarli nell’apparec-
chio, scuoti bene gli oggetti per
eliminare l’acqua residua.
Garanzia
Conservare la prova d‘acquisto, le istruzioni per l‘uso e il numero di articolo. Le richieste di garanzia o i reclami di garan-
zia devono essere risolti esclusivamente con il rivenditore. Tutti i dati tecnici, le informazioni e le proprietà del prodotto
descritti nel presente documento sono stati redatti al meglio delle nostre conoscenze e sono corretti al momento
della pubblicazione. Al meglio delle nostre conoscenze e corrispondono allo stato al momento della pubblicazione.
Le informazioni fornite da reer. Le informazioni fornite da reer dovrebbero essere corrette e adabili. Ciononostante,
la società reer non si assume alcuna responsabilità per eventuali errori nel presente documento e si riserva il diritto,
senza preavviso, di apportare modiche al design del prodotto o alle speciche senza preavviso. Al design del prodot-
to o alle speciche senza preavviso. La riproduzione e la distribuzione delle informazioni contenute in questo lavoro
protetto da copyright in qualsiasi forma o con qualsiasi mezzo, graci, elettronici o meccanici, mediante fotocopia,
registrazione su nastro o archiviazione in un sistema di recupero, anche solo in parte, richiede il previo consenso scritto
della società reer.
Esterilizador por UV
Muchas gracias por adquirir el esterilizador por UV de reer. El dispositivo esteriliza biberones y accesorios de ali-
mentación y lactancia de manera rápida, automática y ecológica sin necesidad de añadir productos químicos. Una
vez naliza la esterilización, el dispositivo se desconecta automáticamente. Mediante lámparas de luz ultravioleta
se consigue una esterilización rápida, que además no requiere agua, por lo que los productos permanecen secos.
Estamos seguros de que tú y tu familia vais a disfrutar durante mucho tiempo de la calidad de nuestro producto.
1 esterilizador por UV, 1 bandeja extraíble de acero inoxidable, 1 ltro de carbón para aire
Volumen de suministro y descripción del aparato ...29
Datos técnicos......................................30
Instrucciones generales de seguridad...............30
Instrucciones de seguridad para la instalación ......31
Funciones ..........................................32
Instrucciones de seguridad para la puesta
en servicio..........................................32
Antes del primer uso ...............................33
Puesta en servicio ..................................33
Limpieza y mantenimiento .........................34
Notas sobre la protección del medio ambiente .....34
Solución de problemas .............................35
Garantía ............................................35
Volumen de suministro y descripción del aparato
Contenido
Piloto de control de
la lámpara de luz UV
Cubierta
Protector para la lámpara de luz UV
Lámpara de luz UV de Philips
Compartimento para biberones
Filtro de aire
Compartimento para accesorios
Pantalla digital
Botón de función Modo
automático
Duración del
programa
Modo de
esterilización
Modo de
secado
Modo de
almacenaje
A
AUTO STORAGE
UV
UV
DRY
A
AUTO STORAGE
UV
UV
DRY

3130
ES ES
Datos técnicos
Esterilizador:
Tensión de funcionamiento: 220–240 V; 50Hz
Potencia: 110 W
Clase de protección: 1
Longitud del cable: 133 cm
Lámpara de luz UV:
Tensión de funcionamiento: 29 V
Potencia: 4 W
Consumo eléctrico: 0.17 A
Radiación UV-C: 0.9 W
Lámpara de luz UV
Nuestro esterilizador por UV contiene una delgada lámpara con terminal doble UV-C de alta calidad (lámpara
germicida) de Philips, que también se utiliza en aparatos de esterilización de agua y aire.
El reducido diámetro de la lámpara (16 mm) ha permitido diseñar un dispositivo de reducidas dimensiones. Las
minilámparas TUV TL tienen un rendimiento de luz UV prácticamente constante a lo largo de toda su vida útil,
lo cual garantiza la máxima seguridad de la esterilización y una elevada efectividad del sistema.
ATENCIÓN!
No sustituyas tú mismo la lámpara de luz UV, ponte en contacto con tu distribuidor.
PELIGRO POR LUZ UV
No mires a la luz directamente. Una exposición directa y excesiva a la luz UV puede ocasionar daños oculares
duraderos.
El dispositivo se ha fabricado con material resistente a la luz UV y dispone de mecanismos de seguridad que evitan
la exposición a la radiación ultravioleta.
• ¡Leer el manual de instrucciones antes de utilizar el dispositivo! El manual contiene información importante
sobre la puesta en servicio y mantenimiento del dispositivo. ¡Es obligatorio cumplir las presentes indicaciones
de seguridad!
• Conserve las instrucciones de uso en un lugar seguro para futuras consultas. No debe entregarse a terceros.
• Utilice el aparato sólo para uso privado y previsto. Este aparato no está diseñado para uso comercial.
• Para evitar incendios y descargas eléctricas, conecta el dispositivo directamente a la toma de corriente.
• No utilices el dispositivo si el cable o el enchufe están dañados.
• Mantén el cable alejado de zonas de tránsito frecuente. Para evitar el peligro de incendio, NO tiendas NUNCA el
cable bajo las alfombras ni cerca de radiadores, calefactores, estufas o calentadores.
• Coloca el dispositivo siempre de tal manera que a las personas que habitan en el hogar les resulte difícil tirarlo
al suelo.
• No utilices el dispositivo cerca del agua.
• No toques nunca el dispositivo con las manos mojadas.
• Esteriliza únicamente productos susceptibles de ser esterilizados y capaces de soportar una cantidad moderada
de radiación UV.
• No introduzcas nunca ningún objeto en el oricio de ventilación, los agujeros o el resto de oricios.
• No utilices cloro ni productos químicos agresivos para limpiar el dispositivo, puesto que esto podría causar daños
en el mismo.
• Antes del primer uso, retira el material de embalaje al completo y las piezas que no vayas a utilizar. Así evitarás
que tus hijos sufran lesiones o puedan atragantarse.
• Compruebe que la unidad no presenta daños evidentes antes de cada uso. Si encuentra algún daño, no utilice
esta unidad.
• Comprueba que la tensión nominal coincide con la tensión indicada en los aparatos o en la fuente de alimenta-
ción, sobre todo cuando viajes al extranjero.
• Cuando no estés utilizando el dispositivo, desenchufa el cable de alimentación para que el mismo no pueda
ponerse en funcionamiento accidentalmente.
• Fija el cable y asegúrate de que no sea posible tirar accidentalmente de él; así evitarás que el dispositivo caiga al
suelo. No permitas que el cable de alimentación entre en contacto con supercies calientes.
• Utiliza el dispositivo siempre sobre una supercie plana y resistente al calor.
• No sumerjas nunca el dispositivo, el cable de alimentación o el enchufe en agua ni en ningún otro líquido.
• Mientras el dispositivo está en funcionamiento, su cubierta debe permanecer cerrada siempre.
• Antes del primer uso, limpia la bandeja y lleva a cabo un ciclo de desinfección sin introducir piezas para esterilizar
en el dispositivo.
• Antes de abrir la tapa, detén el funcionamiento pulsando la supercie de control.
• Para limpiar o cambiar la lámpara de luz UV, extraer siempre el enchufe de la toma de corriente.
Instrucciones generales de seguridad
• Para garantizar la circulación del aire, entre la parte trasera del dispositivo y la pared debería haber siempre una
distancia mínima de unos 12 cm.
• Después de cada uso, seca las manchas de agua que puedan quedar en el interior del dispositivo. Las manchas
de agua secas pueden llegar a menoscabar el rendimiento de las lámparas de luz UV y dañar el interior de acero
inoxidable del dispositivo.
• Lava y enjuaga el ltro para aire tal y como se recomienda para garantizar la calidad del ltrado de aire en el
dispositivo. No apiles productos en el interior del dispositivo. Deja siempre suciente distancia entre los objetos
para garantizar que durante el funcionamiento del dispositivo los mismos quedan bien expuestos a la luz UV.
• El cable de alimentación del dispositivo no puede sustituirse. Si el cable se daña, hay que eliminar el dispositivo.
• No dejes que los niños jueguen con el dispositivo. Mantén el dispositivo y su cable de alimentación fuera del
alcance de los niños menores de 3 años.
• La limpieza y el mantenimiento del usuario no deben ser realizados por niños, a menos que tengan 8 años o más
y estén supervisados.
• Aquellas personas (niños incluidos) que debido a sus capacidades físicas, sensoriales o mentales, o debido a
su falta de experiencia y conocimientos no sean capaces de manejar el dispositivo con seguridad no deberían
utilizarlo sin supervisión o sin que una persona responsable les haya instruido antes.
• No utilices el dispositivo en lugares que estén al alcance de los niños.
• El presente dispositivo ha sido diseñado exclusivamente para uso doméstico. No utilizarlo en exteriores.
• Los únicos que pueden realizar reparaciones en el dispositivo son el servicio de atención al cliente o el distribui-
dor autorizado. El usuario no puede abrir o reparar el dispositivo bajo ningún concepto, puesto que de hacerlo
ya no es posible garantizar su perfecto funcionamiento. El incumplimiento de esto conlleva la extinción de la
garantía. Si todavía tienes preguntas sobre nuestros dispositivos, ponte en contacto con tu distribuidor.
Indicaciones de seguridad para la instalación

3332
ES ES
Funcionamiento
Instrucciones de seguridad para la puesta en funcionamiento
Antes de desinfectar o secar cualquier objeto, lee atentamente y por completo las instrucciones del objeto que
desees esterilizar o secar. Por norma general, el presente dispositivo puede usarse con total seguridad con la mayoría
de objetos detallados a continuación:
utensilios de plástico (p. ej. biberones):
juguetes (p. ej. mordedores):
vajilla y vasos (p. ej. cubiertos):
utensilios para cuidado personal (p. ej. tijeras para las uñas):
utensilios sanitarios (p. ej. aspiradores nasales):
Antes del primer uso
Manual de instrucciones
1. Coloca el esterilizador por UV sobre una supercie lisa y plana. No coloques el dispositivo en lugares en los que
corra peligro de caerse. Mantén el dispositivo a por lo menos 12 cm de distancia de la pared trasera. Así garan-
tizarás una buena ventilación del mismo.
2. No es inusual que al utilizar un dispositivo nuevo se perciba un ligero olor a material nuevo. Este olor no es per-
judicial para la salud. Antes del primer uso, deja la tapa abierta para ventilar el interior del dispositivo y eliminar
el olor no deseado.
3. Comprueba que la lámpara o el interior del dispositivo no han sufrido daños durante el transporte. Ponte en
contacto con el distribuidor si constatas que el dispositivo ha sufrido daños o que la lámpara de luz UV está
defectuosa.
4. Extrae y enjuaga los estantes cableados; sécalos antes de volver a montarlos.
5. Limpia el interior del dispositivo con un paño limpio y húmedo.
6. Monta la cesta interior en su sitio.
1. Lava a fondo los biberones, chupetes, mordedores, cucharas y cuencos con un detergente suave y a continua-
ción enjuágalos con agua limpia hasta que no quede ningún resto.
2. Sacude las gotas de agua que puedan quedar.
3. Abre la tapa del esterilizador por UV.
4. Introduce los biberones en el esterilizador con el oricio hacia abajo y deposita las piezas pequeñas en el com-
partimento para accesorios.
- coloque el vial en la unidad con la abertura hacia abajo:
- dejar suciente espacio entre los objetos:
- a una distancia mínima de 2 cm de la tapa:
- desmontar las piezas pequeñas en sus componentes individuales:
5. Cierra la tapa y escoge, en el panel de control, el modo de funcionamiento que desees.
Modo automático:
El tiempo de funcionamiento precongurado para el secado y esterilización en el modo automático es de 50 minutos:
39 minutos para el secado con aire caliente, 1 minuto para el secado con aire frío y los 10 minutos restantes para la
función de esterilización. El tiempo de funcionamiento puede ampliarse de 50 a 60 o 70 minutos pulsando de nuevo
el botón Auto. Una vez nalizado el funcionamiento, el dispositivo pasa automáticamente al modo de almacenaje.
Modo de esterilización:
El tiempo de funcionamiento estándar es de 10 minutos. Pulsa el botón de esterilización para ajustar el tiempo
de funcionamiento a 10 o 15 minutos. Una vez nalizado el tiempo de funcionamiento, el dispositivo pasará
automáticamente a la función de almacenaje.
Modo de secado:
El tiempo de trabajo estándar es de 40 minutos. Pulsando de nuevo el botón de secado, el tiempo de trabajo puede
cambiarse a a 50 minutos o 60 minutos. En cada tiempo de trabajo, el proceso de secado con aire frío tiene lugar
en el último minuto.
El aparato está en la fase de secado con aire caliente durante el resto del tiempo de trabajo.
ATENCIÓN! NO utilizar en aparatos eléctricos. Éstos sólo deben desinfectarse.
ATENCIÓN! ¡Tras nalizar la función de secado, el interior del dispositivo y la cesta para piezas pequeñas siguen
estando calientes!
Modo de almacenaje:
Mantiene los objetos esterilizados hasta 72 horas; la lámpara de luz UV se enciende automáticamente cada 3 mi-
nutos.
A
A
x
x
x
x
✓
✓
✓
✓

3534
ES ES
Limpieza y mantenimiento
1. Antes de limpiar el dispositivo, debe detenerse su funcionamiento y extraer el enchufe de la toma de corriente.
2. La supercie interior del esterilizador por UV y la pantalla solo pueden limpiarse con un paño de microbra
limpio y agua destilada caliente; así se evita que aparezcan arañazos en el acero inoxidable pulido. En caso de
manchas de agua persistentes, deja el paño de microbra húmedo y caliente durante algo más de tiempo sobre
la mancha de agua.
3. Elimina la humedad con un paño seco.
ATENCIÓN!
No viertas agua en el dispositivo para limpiarlo.
El dispositivo no debería entrar nunca en contacto con ningún producto de limpieza a parte de agua. En caso con-
trario se pueden producir daños acumulativos e irreversibles en el esterilizador o en el revestimiento de protección
contra la luz UV del cristal.
Limpiar el dispositivo con frecuencia puede derivar en un amarilleamiento de la supercie.
Cabe la posibilidad de que el dispositivo o los objetos introducidos se decoloren ligeramente debido a la luz UV.
No olvides mantener la supercie interior siempre limpia.
Limpieza de los ltros de aire seco
El ltro de entrada de aire es de un material ltrante de carbón activado y se ubica en la parte trasera superior del
esterilizador por UV. Este ltro protege el dispositivo de las sustancias tóxicas y las partículas que se encuentran en
el aire. Además, también protege la carcasa del polvo que se encuentra en el aire. El ltro de salida es de nailon y se
ubica en la parte trasera inferior del esterilizador por UV.
Todos los ltros deben limpiarse cada 3 meses (si se utiliza el dispositivo a diario).
El ltro de carbón activado debe cambiarse cada 6 meses (si se utiliza el dispositivo a diario).
• Retira la cubierta protectora y extrae el ltro.
• Límpialo con agua limpia, sécalo o vuelve a introducirlo.
• Vuelve a introducirlo y cierra la cubierta protectora.
Notas sobre la protección del medio ambiente
Al nal de su vida útil, este producto no debe desecharse con la basura doméstica normal, debe
llevarse a un punto de recogida para el reciclado de aparatos eléctricos. El símbolo en el producto,
en las instrucciones de uso o en el embalaje así lo indica. Los materiales de materiales pueden
reutilizarse de acuerdo con su etiquetado. Reutilización, reciclado u otras formas de reciclaje u otras
formas de valorización de los residuos de aparatos, usted está haciendo una importante
contribución a la protección de nuestro medio ambiente. Por favor, pregunte a su autoridad local por el punto de
punto de eliminación.
El símbolo correspondiente en el producto, en las instrucciones de uso o en el embalaje indica estas obligaciones.
Solución de problemas
Descripción del problema Posible causa Solución
La lámpara de luz UV no se
enciende
Es posible que el dispositivo no
esté bien conectado a la red
eléctrica.
Asegúrate de que el cable de ali-
mentación está bien conectado al
dispositivo y a la toma de corriente.
La tapa no está bien cerrada. Asegúrate de que la tapa está bien
cerrada.
La lámpara de luz UV no está bien
instalada.
Asegúrate de que la lámpara de luz
UV está bien instalada.
Si se ha utilizado la lámpara de luz
UV unas 6000 horas.
Puede que sea necesario sustituir
la lámpara de luz UV.
El aire caliente no se enciende Es posible que el dispositivo
no esté bien conectado a la
alimentación eléctrica.
Asegúrate de que el cable de ali-
mentación está bien conectado al
dispositivo y a la toma de corriente.
La tapa no está bien cerrada. Asegúrate de que la tapa está bien
cerrada.
Los utensilios no se secan
correctamente
El tiempo de secado es demasiado
corto.
Intenta congurar un tiempo de
secado más prolongado.
El agua sobrante permanece sobre
el objeto.
Sacude a fondo el agua restante
antes de introducirlo en el
dispositivo.
Garantía
Conserve el comprobante de compra, las instrucciones de uso y el número de artículo. Las reclamaciones de
garantía o de garantía deben resolverse exclusivamente con el distribuidor. Todos los datos técnicos, informaciones
y propiedades del producto descritos en este documento han sido recopilados según nuestro leal saber y entender
y son correctos en el momento de su publicación. según nuestro leal saber y entender y corresponden al estado en
el momento de la publicación. La información facilitada por reer la información facilitada por reer debe ser correcta
y able. No obstante, la empresa reer no asume responsabilidad alguna por posibles errores en este documento y
se reserva el derecho, sin previo aviso, de realizar cambios en el diseño del producto al diseño del producto o a las
especicaciones sin previo aviso. La reproducción y distribución de información de esta obra protegida por derechos de
autor en cualquier forma o por cualquier medio gráca, electrónica o mecánicamente, mediante fotocopia, grabación
en cinta o almacenamiento en un sistema de recuperación, incluso parcialmente, requiere el consentimiento previo
por escrito de la empresa reer.

3736
NL NL
Uv-desinfectie-apparaat
Inhoud
Hartelijk dank voor de aanschaf van het uv-desinfectie-apparaat van reer. Het apparaat desinfecteert snel en
automatisch essen, voedingsaccessoires en accessoires voor borstvoeding op een milieuvriendelijke manier
zonder toevoeging van chemicaliën. Als de desinfectie voltooid is, schakelt het apparaat automatisch uit. Dankzij
het gebruik van energiebesparende uv-lampen zorgt het apparaat voor een snelle desinfectie zonder het gebruik
van water, zodat de producten altijd droog zullen blijven.
Wij zijn ervan overtuigd dat jijzelf en je familie lange tijd van de kwaliteit van ons product zullen genieten.
1x uv-c-desinfectie-apparaat, 1x uitneembare roestvrijstalen plank, 1x koolstolter
Leveringsomvang en beschrijving van het apparaat. . 36
Technische gegevens...............................37
Algemene veiligheidsinstructies ....................37
Veiligheidsinstructies voor de installatie ............38
Functies ............................................39
Veiligheidsinstructies voor inbedrijfstelling ..........39
Voor het eerste gebruik .............................40
Inbedrijfstelling.....................................40
Reiniging en onderhoud............................41
Opmerkingen over milieubescherming .............41
Problemen oplossen................................42
Garantie ............................................42
Leveringsomvang en beschrijving van het apparaat
Technische gegevens
Desinfectie-apparaat:
Bedrijfsspanning: 220–240 V; 50Hz
Vermogen: 110 W
Beschermingsklasse: 1
Kabellengte: 133 cm
Uv-lamp:
Bedrijfsspanning: 29 V
Vermogen: 4 W
Elektriciteitsverbruik: 0.17 A
Uv-c-straling: 0.9 W
Uv-lamp
Ons uv-desinfectie-apparaat bevat een hoogwaardige, smalle uv-c-lamp (kiemdodende lamp) met twee uiteinden
van Philips, die ook wordt gebruikt in desinfectie-apparaten voor water en lucht voor gebruik binnenshuis.
De kleine diameter van de lamp van 16 mm maakt een klein systeemontwerp met een exibele indeling mogelijk.
De TUV TL mini-lampen leveren een vrijwel constant uv-vermogen gedurende hun gehele levensduur, waardoor
een maximale desinfectieveiligheid en een hoge systeemeciëntie gegarandeerd kunnen worden.
ATTENTIE!
Vervang de uv-lamp niet zelf, maar neem contact op met je retailer.
GEVAAR DOOR UVLICHT
Kijk niet rechtstreeks in het licht. Directe en overmatige blootstelling aan uv-licht kan permanent oogletsel ver-
oorzaken.
Het apparaat is uitgerust met uv-bestendig materiaal en veiligheidsmechanismen om blootstelling aan ultraviolet-
te straling te voorkomen.
• Lees de gebruiksaanwijzing alvorens het apparaat in gebruik te nemen! Deze bevat belangrijke informatie over
het eerste gebruik en de bediening van het apparaat. Deze veiligheidsaanwijzingen moeten worden opgevolgd!
• Bewaar de gebruiksaanwijzing op een veilige plaats voor toekomstig gebruik. Het moet aan derden worden
overhandigd.
• Gebruik het apparaat alleen voor privé-gebruik. Dit apparaat is niet bedoeld voor commercieel gebruik.
• Sluit het apparaat rechtstreeks op het stopcontact aan om het risico op brand en elektrische schokken te voor-
komen.
• Gebruik het apparaat nooit met een beschadigde kabel of stekker.
• Plaats de kabel uit de buurt van plekken met veel mensen. Laat de kabel NOOIT onder tapijten of in de buurt van
radiatoren, kachels, ovens of verwarmingstoestellen lopen om brandgevaar te voorkomen.
• Plaats het apparaat altijd op een plek waar het niet gemakkelijk kan worden omgestoten door personen in het
huishouden.
• Gebruik het apparaat niet in de buurt van water.
• Raak het apparaat nooit met natte handen aan.
• Desinfecteer uitsluitend producten die zijn goedgekeurd voor sterilisatie en die bestand zijn tegen matige
uv-straling.
• Plaats nooit een voorwerp in de ventilatieopening, gaten of andere openingen.
Algemene veiligheidsinstructies
Controlelampje van
de uv-lamp
Deksel
Deksel uv-lamp
Philips uv-lamp
Flessencompartiment
Luchtlter
Compartiment voor accessoires
Digitaal display
Functietoets Auto-
modus
Programma-
duur
Desinfectie-
modus
Droog-
modus
Opberg-
modus
A
AUTO STORAGE
UV
UV
DRY
A
AUTO STORAGE
UV
UV
DRY
Table of contents
Languages: