Toslon TF750 Duo User manual


1
Preface
As Yachting Electronic Co., Ltd is continuously improving this product, we retain the
right to make changes to the product at any time which may not be reected in this
version of the manual. Please contact your dealer if you require any further assistance.
It is the owner’s sole responsibility to install and use the instrument and transducers in a
manner that will not cause accidents, personal injury or property damage. The user of
this product is solely responsible for observing safe boating practices.
Sonar Performance
The accuracy of the sonar depth display can be aected by many factors, including the
type and location of the transducer and water conditions.
The choice, location, and installation of transducers are critical to the performance of
the system as intended. If in doubt, consult your local dealer.
To reduce the risk of misusing or misinterpreting this unit, you must read and under-
stand all aspects of this Installation and Operation Manual. We also recommend that
you practice all operations using the built-in simulator before using this unit on the
water.
Global Positioning System:
The Global Positioning System (GPS) is operated by the US Government which is solely
responsible for its operation, accuracy and maintenance. The GPS is subject to changes
which could aect the accuracy and performance of all GPS equipment anywhere in
the world, including this instrument.
Warnning: disassembly and repair of this electronic unit should only be performed
by authorized service personnel. Any modication of the serial number or attempt to
repair the original equipment or accessories by authorized individuals will void the
warranty.
We may nd it necessary to change or end our policies, regulations and special
oers at any time. We reserve the right to do so without notice. All features and
specications subject to change without notice.

2
Contents
Overview
Check the Content
Installation
Transducer Installation
GPS Receiver Instrallation
Antenna Installation
Connection
Powering
Using Instruction
Some warnnings
What’s on the display
Key Function
Quickly Operation
Start Using
Set HOME position
Save a waypoint
Go to target waypoint
Import KML
Go back
Add Waypoints to [Waypoints list] from KML le
Import a multi-waypoints route from KML le
Save *.csv le to SD card
Connect to laptop, and save data by Reefmaster
Record all real-time data to SD card
Select better sonar beam for dierent water enviroment
Menu Opertion
Basic
Sensitivity
Surface Clarify
Fish ID. Sens
2
5
6
7
7
10
12
13
15
17
17
18
19
20
22
22
22
23
24
25
26
28
30
31
31
33
34
34
34
34
34

3
Background
Color Adjust
Color Style
Route Color
Advanced Mode
Sonar
Depth Range
Sonar Gain
Sonar Beam
Load New Color
Overlap Data
Depth Oset
Temp. Oset
Boat Vtg. Oset
Shallow Alarm
GPS SETTINGS
GPS Filter
Distance Unit
Speed Unit
Time Zone
24-Hour Time
Sample Step
Arrive Alarm
Calibrate compass of display
Calibrate compass of boat
Compass Test
Autopilot
Wirling Test
Boat Type
Channels Reverse
Channel 1 Speed
Channel 2 Speed
Steering Sens.
35
35
35
35
35
36
36
36
36
37
37
37
37
37
37
38
38
38
38
38
38
39
39
39
40
41
42
42
42
43
43
43
43

4
System
Simulator
Backlight
Key Tone
Language
Baud Rage
Battery Alarm
Boat Vtg. Alarm
Default Settings
System Info.
Radio Bind
Update R-Boxes.
Quick Qperation
Quick Marker
Waypoint
Route
Go back
Set Home Pos.
Go to Home
Stop Autopilot
Clear Map
Import Outline
Overlap Data
Data Logger
Work Mode
Multi-Target Autopilot
Specications
Warranty
Unit Care
FAQ (Frequenly Asked Questions)
44
44
44
44
44
44
45
45
45
45
45
46
47
47
48
49
50
50
50
50
50
50
51
52
52
53
55
56
57
58
5
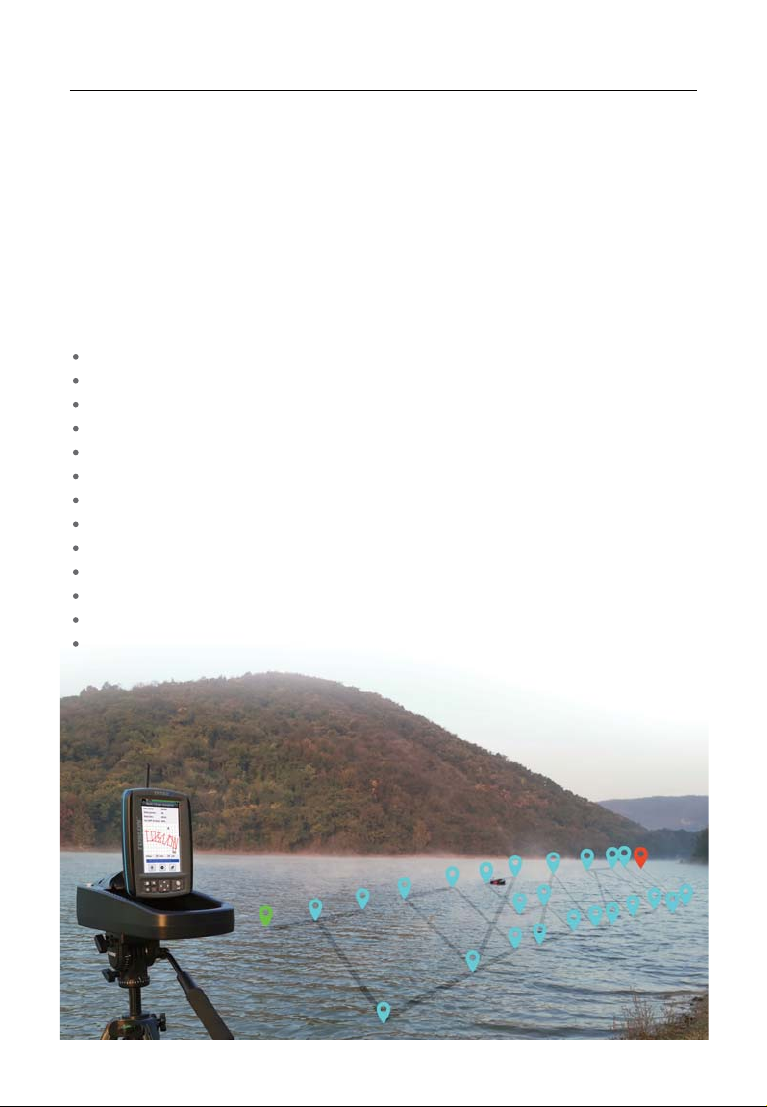
Overview
TF750 is an ALL-IN-ONE Autopilot navigation and sonar system, it
provides users multi-target autopilot function for the boat. And
sonar data of TF750 can be saved as *.csv le to SD card, which can
be imported to Reefmaster to create 3D map.
Users also can connect TF750 to laptop, and save depth/coordinate
by Reefmaster or Thirdpart software
Push-Go Key (shortcut)
Multi-Target autopilot
Pick Up Waypoint form Map
KML Import to Dene Lake Boundary
Wide(115Khz)/narrow(455Khz) sonar beam selection
Two Propellers Boat Support
Propeller & Rudder Boat Support
Steering Sensitivity Adjustable
Built-in Lithium battery Charger
Hardware Gain Adjustable
Color Route to Indicate Depth (2D Map)
Advanced radio system (FHSS/DSSS)
Saving date to SD card or thirdpard software
What’s the advantage of TF750?
6
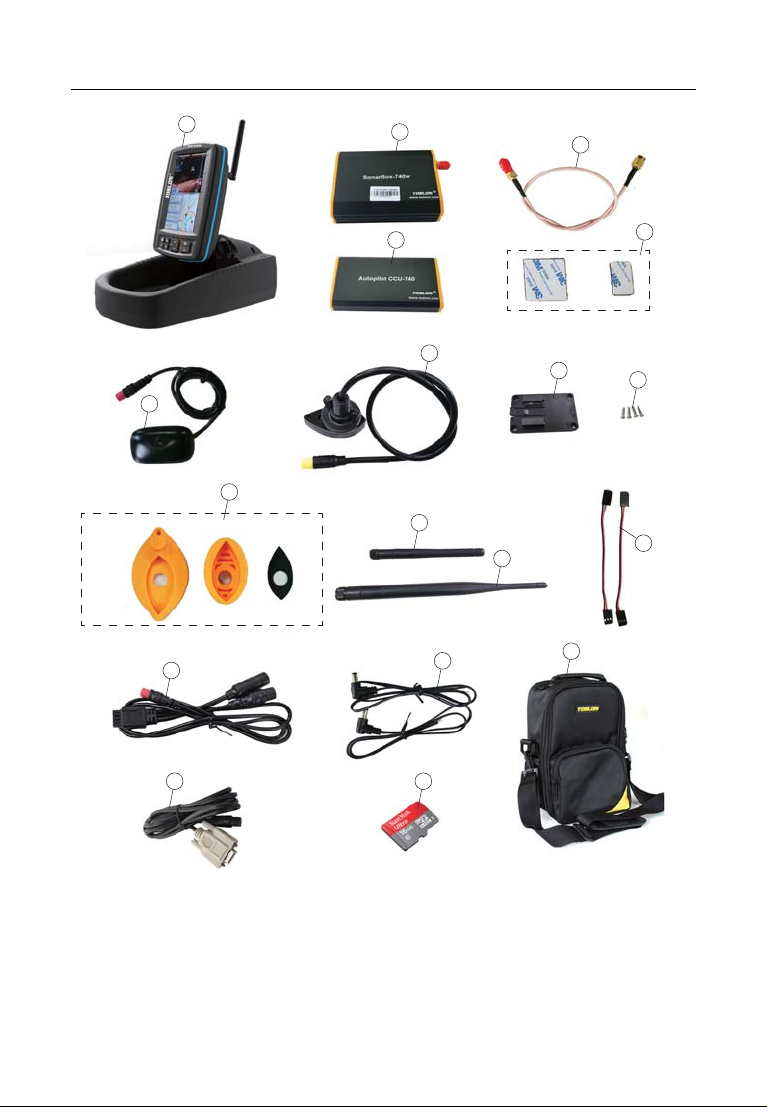
Check the content
3
12
15
15
14
14
4
5
12
12
13
13
16
16
17
17
18
18
11
11
8
10
10
6
7
9
1.Display
2. SonarBox-740w
3. Autopilot CCU740
4. XGPS 740
5. Transducer
6.Rubber for
transducer
7. SonarBox extending cable
8. Power cable
9. Servo cable
10. Antenna for boat
11.Antenna for display
12. Bracket of GPS receiver
13. Screws (4pcs)
14. Valco
15. Antenna extending cable
16. DB9 data cable
17. SD Card (built-in display)
18. Nylon bag
7
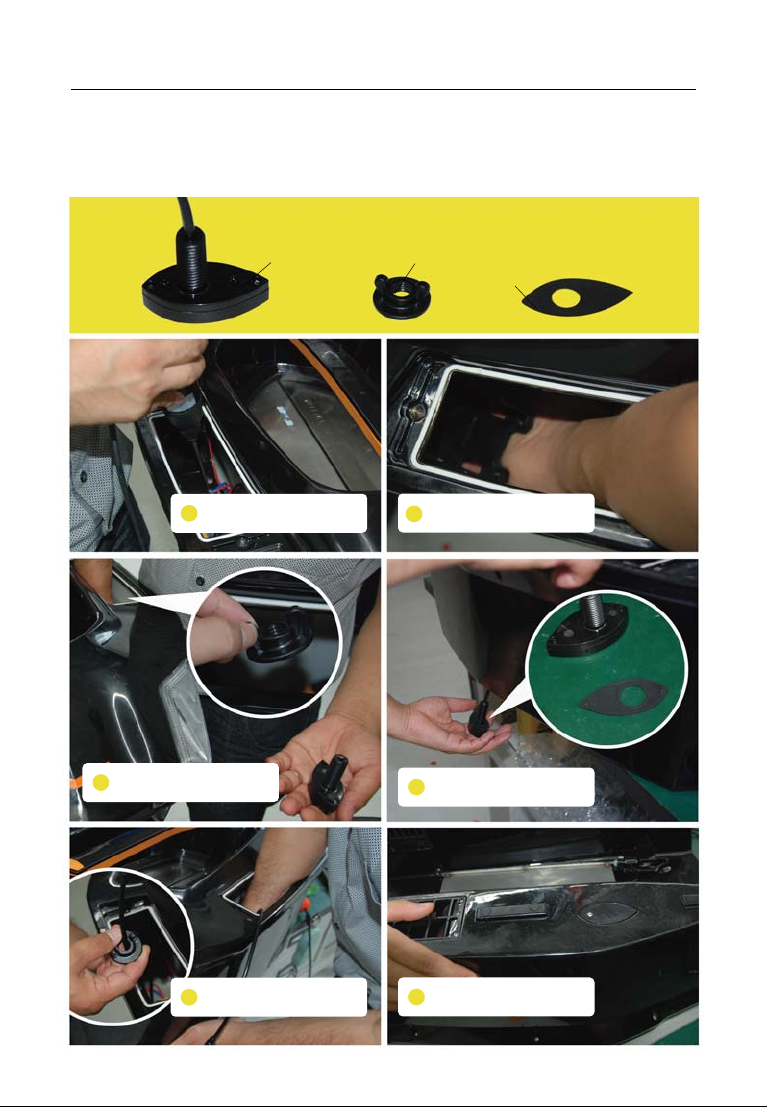
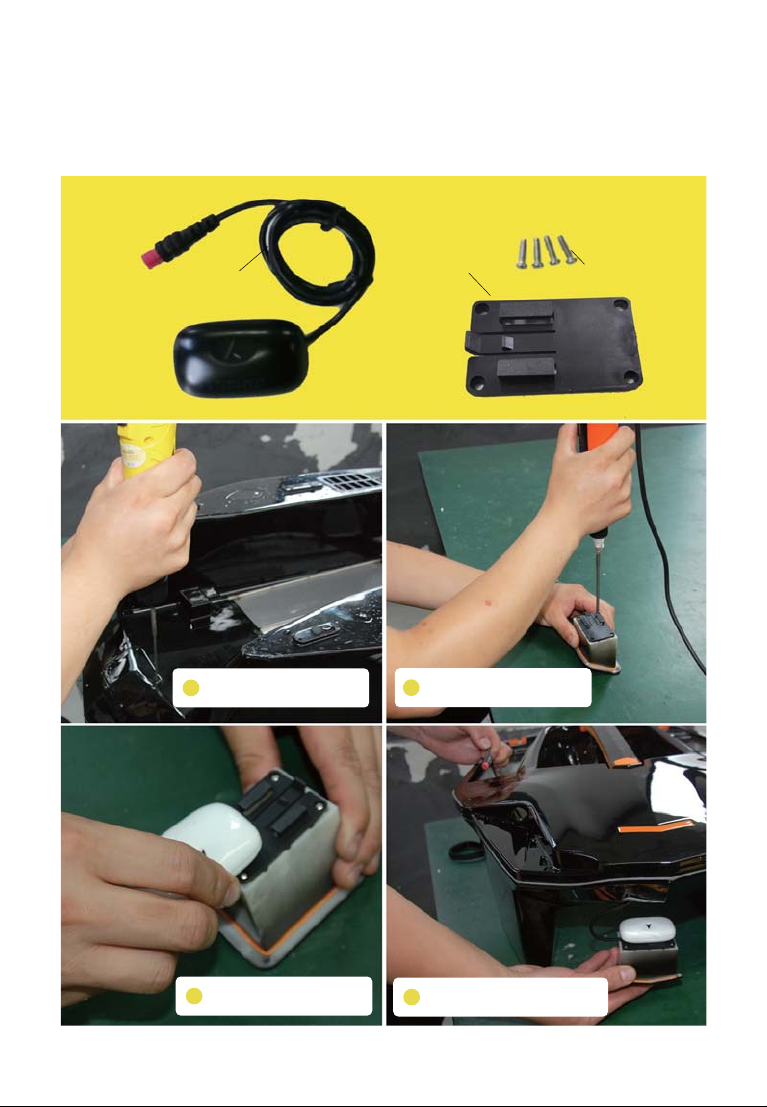
Transducer Installation
1) for XBOAT730
Installation
Transducer
Mounting Instruction
Transducer Knob
Rubber
Screw down the 2 screws to
loose the battery support
1
take the knob and dummy
transducer down
3
screw tight the knob
5installation was nished
6
hold the transducer(with
rubber) through the boat
4
loose the knob of xed
dummy transducer by hand
2

8
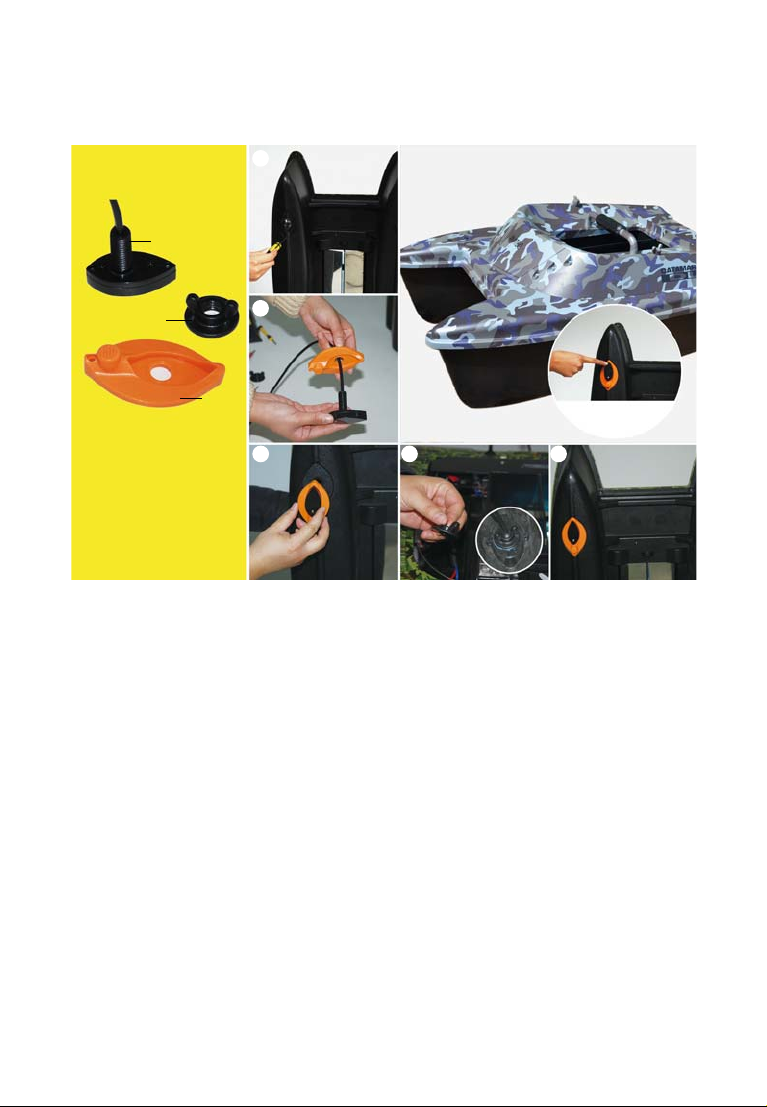
2) for general bait boats ( like Carp Madness, Viper, etc)
For these bait boats, there is no transducer groove on the bottom housing. So, you
need to drill a hole on the boat bottom to x the transducer.
3) for bait boats of Carplounge/Waverunner/Vegaboat/Carp, etc
For these bait boats, there is a transducer groove on the boat bottom. So, you only need
to simply match the transducer to the boat with a rubber.
Transducer
Knob
Rubber
Transducer
Mounting Instruction
1) Choose a proper position
2) Drille a hole (14mm) on the
selected position.
3) Assemble the transducer
and rubber.
4) Hold the assembled
transduer and rubber through
the housing. Then use the knob
to screw tighten the transducer
from the inner housing.
5) The nished installation.
1
2
3 4 5
keep the sharp end the same
direction with head of
boat
9
4) for Anatec catamaran bait boat
For the boat, you only need simply match the transducer to the boat with the rubber
Transducer
Mounting Instruction
1) Take o the transducer
cover from the boat.
2) Assemble the transducer
and rubber.
3) Hold the assembled
transduer through the groove.
4) Use the knob to screw
tighten the transducer from
the inner housing.
5) The nished installation
1
2
3 4 5
keep the sharp end the same
direction with head of
boat
Transducer
Knob
Rubber
10
1) for XBOAT730
GPS receiver Installation
Transducer
GPS receiver Screws
GPS bracket
Take the GPS lid down from
XBoat
1
Slid the GPS receiver to the
GPS lid
3Hold the assembled GPS receiver
and lid going through the boat
4
Fix the GPS bracket on the
GPS lid
2

11
Note: when begin installing the GPS receiver, some key points should be noted:
1) The antenna for transmitter should be at least 30cm away from any other antennas.
2) The GPS receiver should be mounted where is far away from any magnet things,
such as icro, nickel, etc. Which may cause interference of compass.
3) The icon of arrow on the GPS receiver should be oriented in the same direction with
the heading direction of boat.
4) After the installation, please check the compass. If you nd the compass does not
show proper direction, please calibrate the compass by manual operation. For the
details, please refer to page 31 (Calibrate Compass of Boat).
5) For water proof: the GPS/compass receiver is IP55 waterproof (water spray) grade.
Please seal around the receiver with rubber glue after the installation.
1
2
3
4
2) for general bait boats ( like Anatec, Vegaboat, etc)
Find a proper location on the boat, then x the GPS bracket on the boat. And nally
install the GPS receiver on the bracket.
12
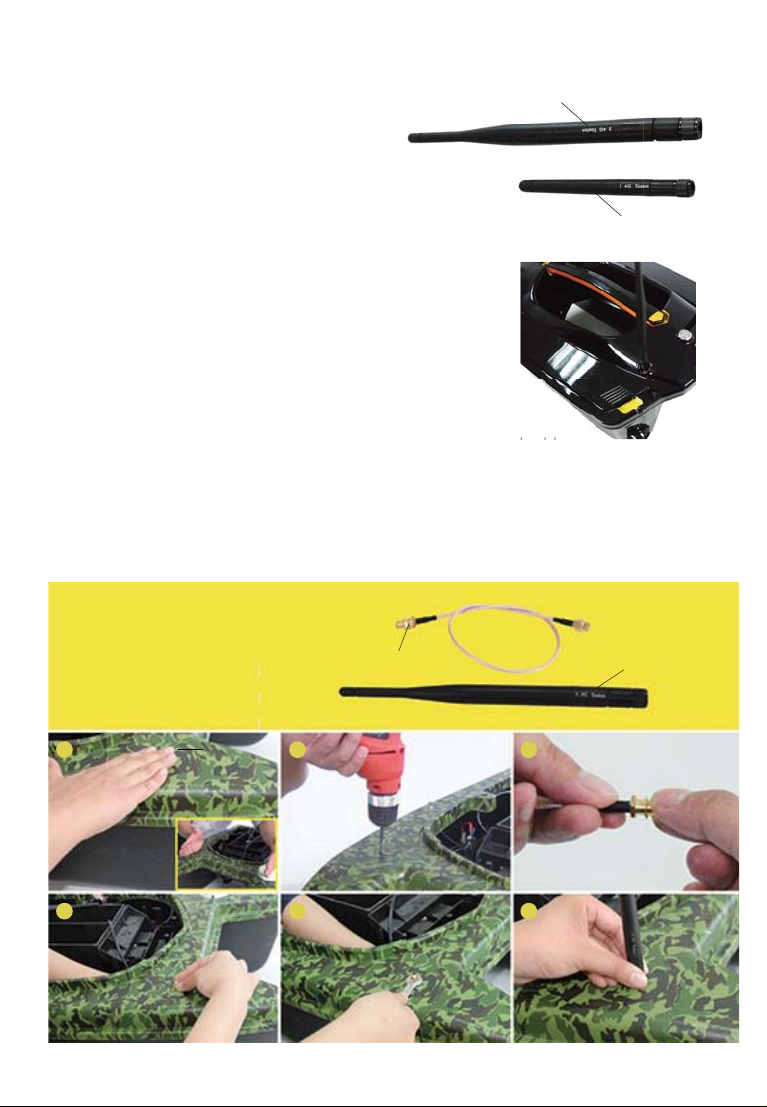
Following is the instruction to install the antenna on boat:
1) Choose an proper installation position.
2) Drill an hole (5mm diameter) on the selected position.
3) Screw down the wisher and nut from the antenna extended cable.
4) Hold the DC cable through the hole from inner housing, then put the
wisher and the nut.
5) Screw tighted the nut by an wrench.
6) Finally, screw the antenna on the boat.
Screwing the antenna to the boat will be ok.
for display
for transmitter
for display
2) for general bait boats ( like Anatec, Vegaboat, etc)
1) for xboat730
Install antenna for transmitter
In the package, you can nd 2 antennas. one is for
transmitter, another is for display.
d
bl
Antenna Installation
Knob
Install Antenna
on boat
Instruction
1
antenna extended cable antenna for transmitter
2 3
4 5 6
13
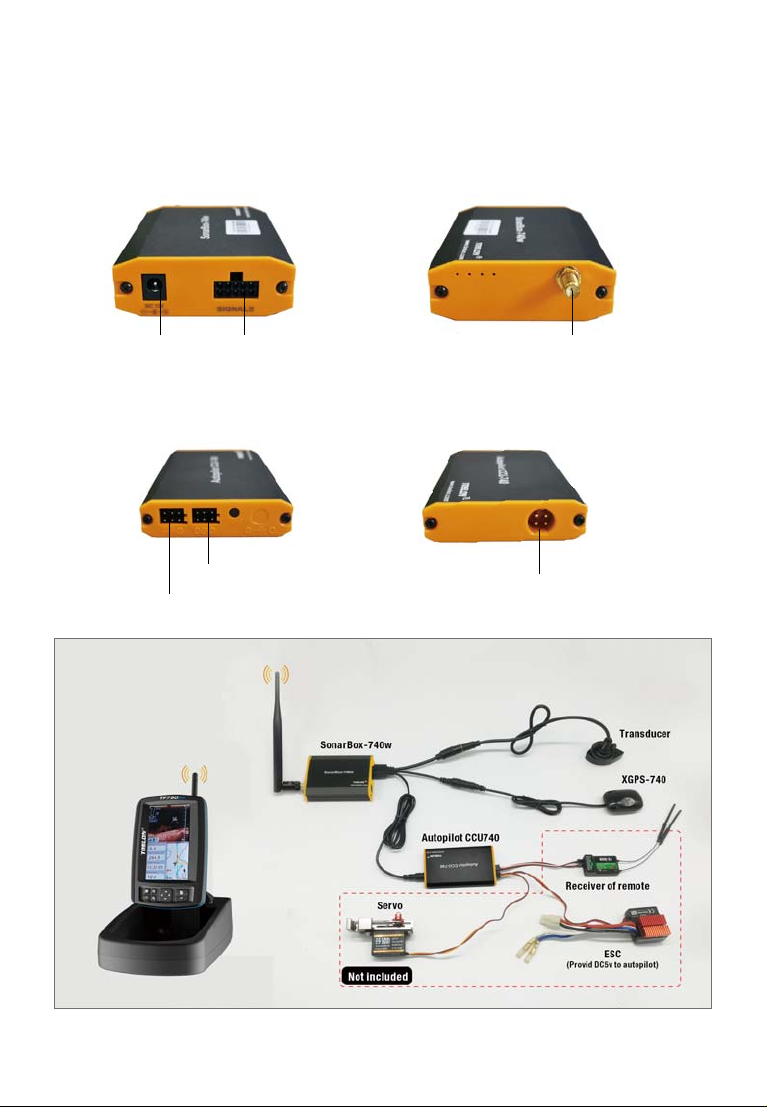
Connection
After all the installatiion are nished, please make the connection as following ture.
Sonar Box
Autopilot CCU
Power
(DC 12V)
Signal port
to servo / ESC of boat
to remote receiver to Sonar Box-740W
to antenna

14
Connection of CCU-Autopilot
connected to
SonarBox-740w
Port B is connected to
Reciver of the remote
Port A is connected to Speed
Contorller(ESC) or Servo
The following gures instruct how to connect the Autopilot CCU740 with your bait boat.
The system could control most 2 engineers or 1 engine (with rudder) boat with proper
settings.
Xboat mode ESC of Right Motor ESC of Left Motor
2 Engines ESC of Right Motor ESC of Left Motor
1 Engine ESC Servo
channel-3 channel-1
channel of right Motor channel of left Motor
channel of ESC channel of servo
Port A
Transmitter connection & function
Port B

15
Recomended voltage
Absolute Maximum voltage
For display
9-15V
16.0V
For transmitter
6-12V
14.8V
There are 2 ways to power the TF750 display
1) Use a inner 3S lithium (12.6v) battery pack as shown in the picture.
2) Use a outer lithium battery
Note:
3S Lithium battery is optional (users can buy it from local dealer)
DC15V /1A wall-charger support (optional)
The device work while battery-charging support
indicator LED of working
3S lithium battery pack
1) charging port
2) outer battery connection
indicator LED of working
Powering
16
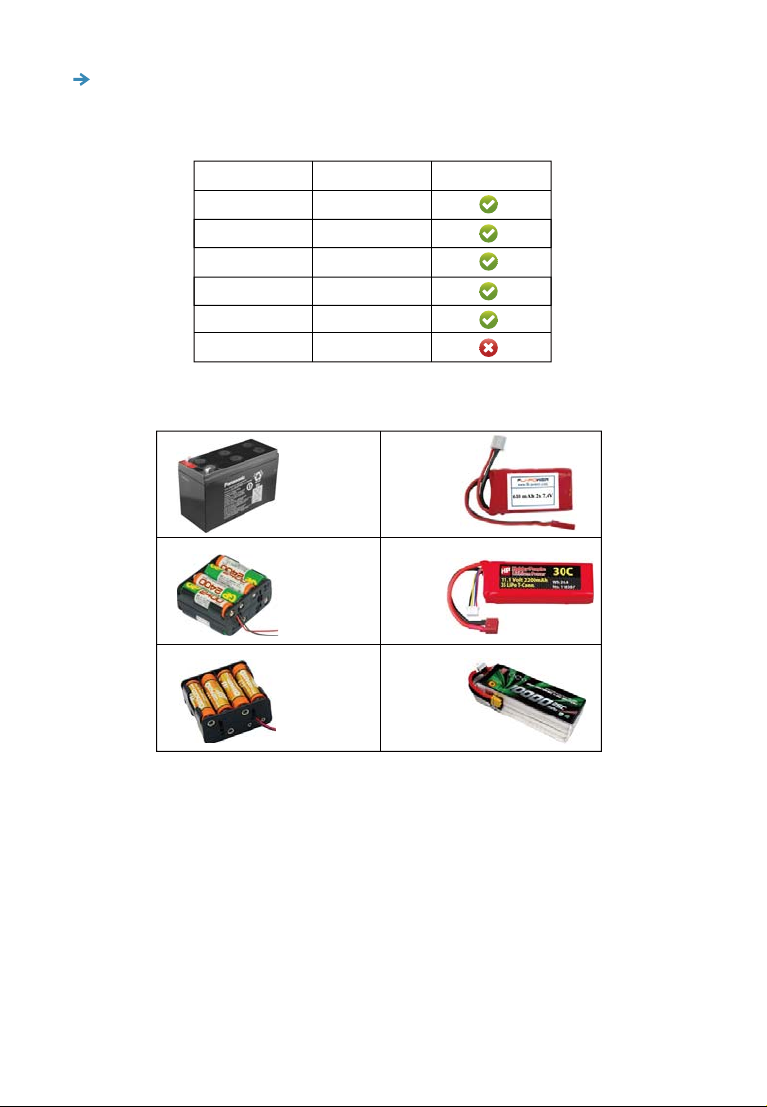
Battery Type
12V Lead-acid
8*AA NiMH
8*AA Alkaline
2S Lithium
3S Lithium
4S Lithium
Voltage
10.8v~14.8V
7.8V~10.6V
7.5V~12.8V
5.6~8.4V
8.4~12.6V
11.2V~16.8V
Permission
12V
lead-acid
8AA
NiMH
8AA
Alkaline
2S
Lithium
3S
Lithium
4S
Lithium
Note: overvoltage may burn the elements in the device!
From bellow shows the voltage range of the most popular batteries in the market:
17
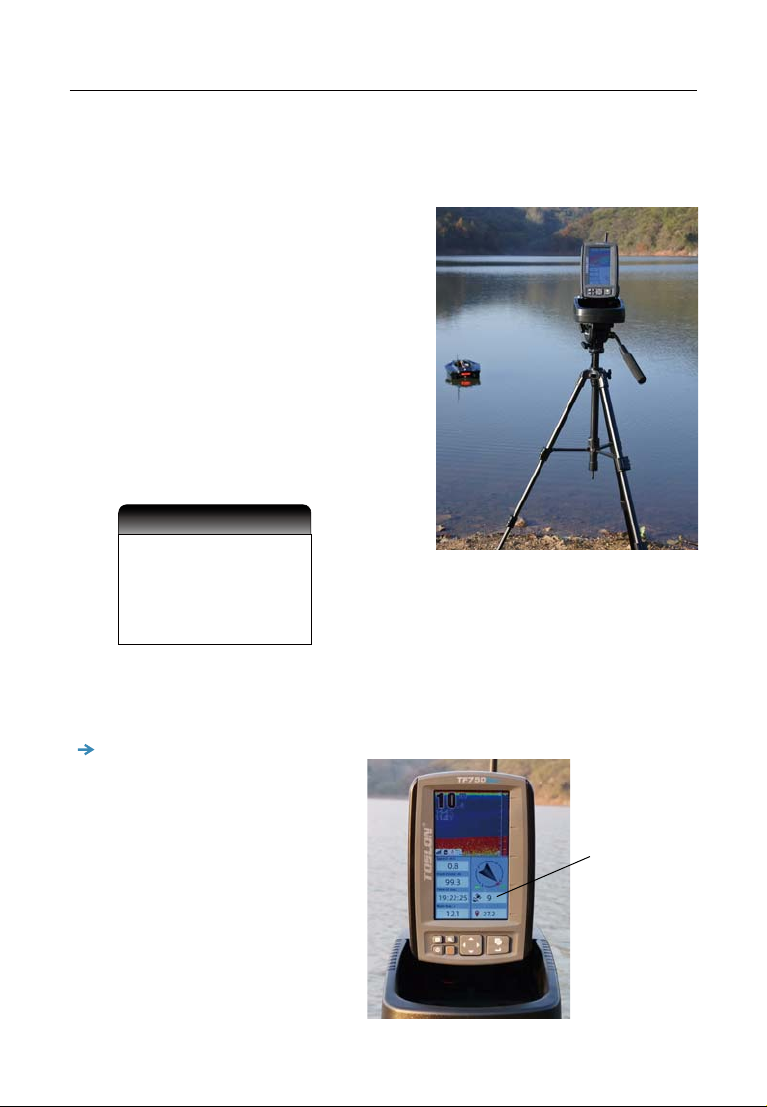
Using instruction
Special Notications
Before you start using the device, there is something you should know:
1) please do not put the display on ground
during the operation, which could cause a
short R/C distance.
The proper way is using an tripod to
support the display, and keep it at least
1.2m above the ground.
2) Please turn on the SonarBox and X-Pilot
CCU rst, then turn on the display. Otherwise
the display will indicate an error message as
following:
3) Please start using the device only when the Satellite Number reach more than 7,
which means the GPS signal is strong enough.
Note: the most satellite number
TF750 can reach is 12.
Radio module......Fail
Sonar module......Fail
GPS module......Fail
Compass module......Ok
Autopilot module......Fail
System check
Satellite Number
18
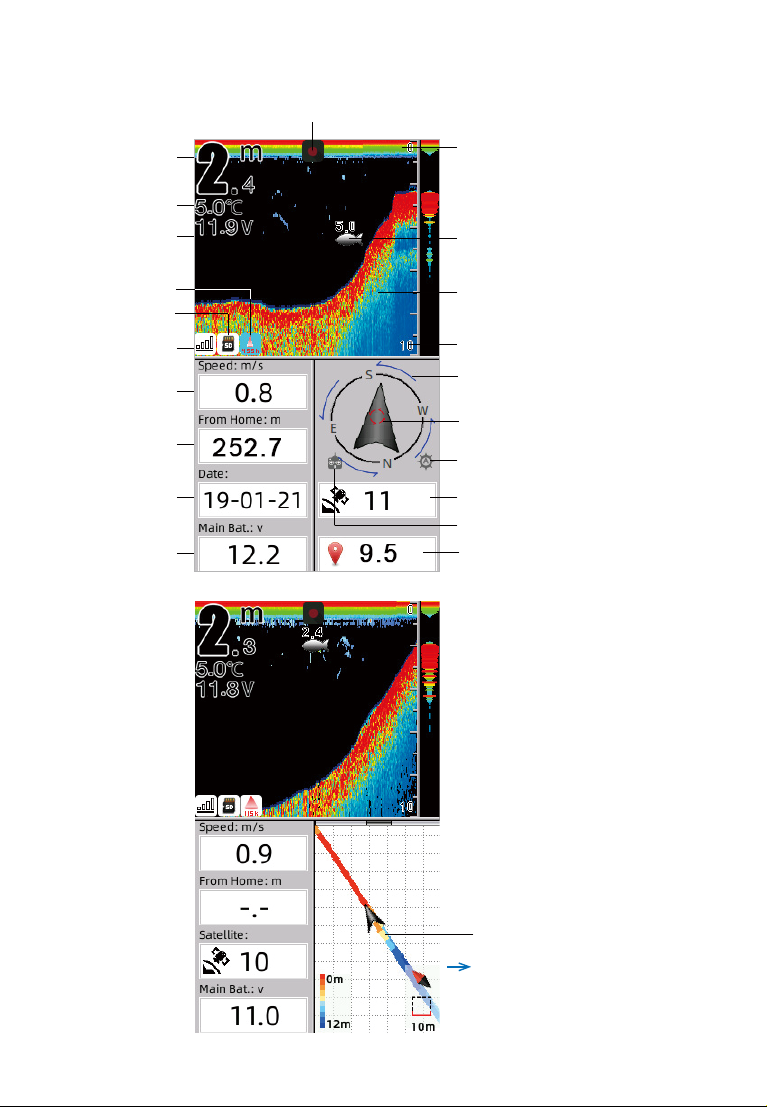
What’s on the display
Lower range
of detection
Fish symbol
Icon of Recording
Bottom Structure
Number of satellite
Distance to Target
Autopilot mode
Compass(boat)
calibrate required
Compass(screen)
calibrate required
Remote status
Surface
clutter
Depth
readout
Water temp
Voltage of
bait boat
SD Card in
Sonar Beam
Strength of
Radio signal
Distance
to Home
Date
Speed
of boat
Voltage of
display
Note: on the route, dierent color
means the depth changing of the
water during the boat is running.
Route of boat

19
MENU
ZOUT/ZIN KEYPAD
PAGE
POWER PUSH-GO ENTER
Key Function
MENU Open Menu settings( Basic, Sonar Setting and GPS Setting).
One push to command the boat "Back-home/Go-to-cursor-position/
Enter-Way points-list/Go-to-target"
KEYPAD Selects items on menus; increase & decrease a value of option.
POWER Turns unit on/o. Also be use to quit a menu setting.
PAGE
ENTER
PUSH-GO
ZOUT /ZIN Used to zoom out GPS route on the screen.
Used to switch between main menus or some sub menus.
Finalizes menu selections; conrm a setting.
ENTER key is also used to enter into QUICK OPERATION menu.
Table of contents
Other Toslon Marine Equipment manuals


Popular Marine Equipment manuals by other brands


Federal Signal Corporation
Federal Signal Corporation G-SND-MV-D Installation and maintenance instructions

Sonardyne
Sonardyne DPT6 quick start guide

Fusion
Fusion MS-RA70 owner's manual

Bosch
Bosch FNM-320-SRD Installation

AUTOHELM
AUTOHELM ST50 PLUS Operation and installation

Furuno
Furuno DS-8500 installation manual


