Toslon TF520 User manual

1
positive electrode
negative electrode
Monitor
1) SonarBox 520W
2) Power cable (DC5.5-2.1)
3) Transducer adapter connector
4) Antenna for monitor
5) Antenna for SonarBox
6) SMA radio cable
7) Valcro
SonarBox
1 2
3
1) Transducer 2) Knobs 3) Rubber
Note: the rubber is dierent according to
dierent bait boats
Transducer
Check the content
(Optional) (Optional)
7
45
1
236
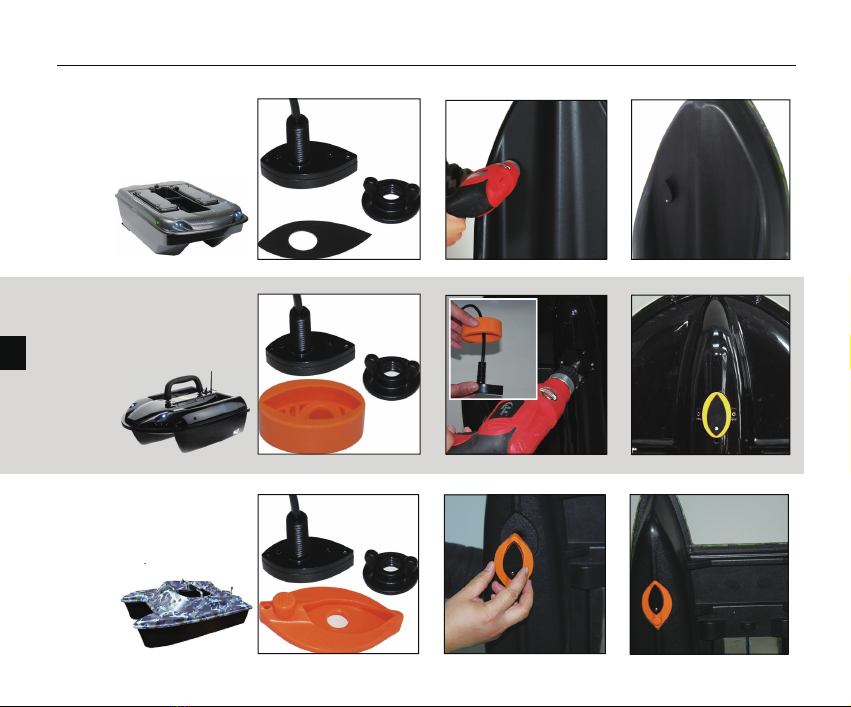
Installation (transducer)
2
1) For general boats, like Carp
Madness, Anatec Monocoque,
you need to drill a hole on the
boat bottom to x the
transducer.
2) For boats of Carplounge/-
Waveruner/ Vegaboat/Carpboat
etc, there is a transducer groove
on the bottom. So, you only need
to simply match the
transducer to
the boat
with a
rubber.
3) For Anatec catamaran bait
boat, there is a transducer
groove on the bottom. So, you
only need simply match the
transducer to the
boat with
a rubber.
r to t
h
e
3
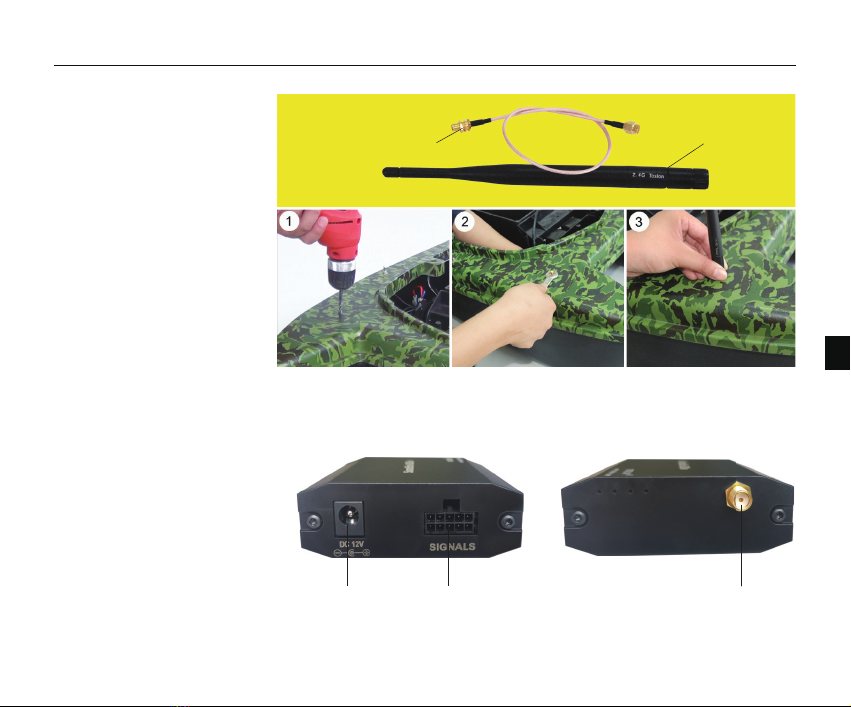
1) Drill an hole (5mm diameter)
on the selected position.
2) Install the SMA cable in the
hole and lock the nut of SMA
connector with washer.
3) Screw the antenna on boat.
SMA radio cable
antenna for SonarBox
Antenna Installation
After all the installation are
nished, please connect the
parts (transducer, antenna,
battery) to the SonarBox.
Then x the SonarBox inside
the boat.
Wiring
Installation (antenna & wiring)
connect to battery connected to transducer
with transducer adapter
connector
connect to antenna
with SMA radio cable
4
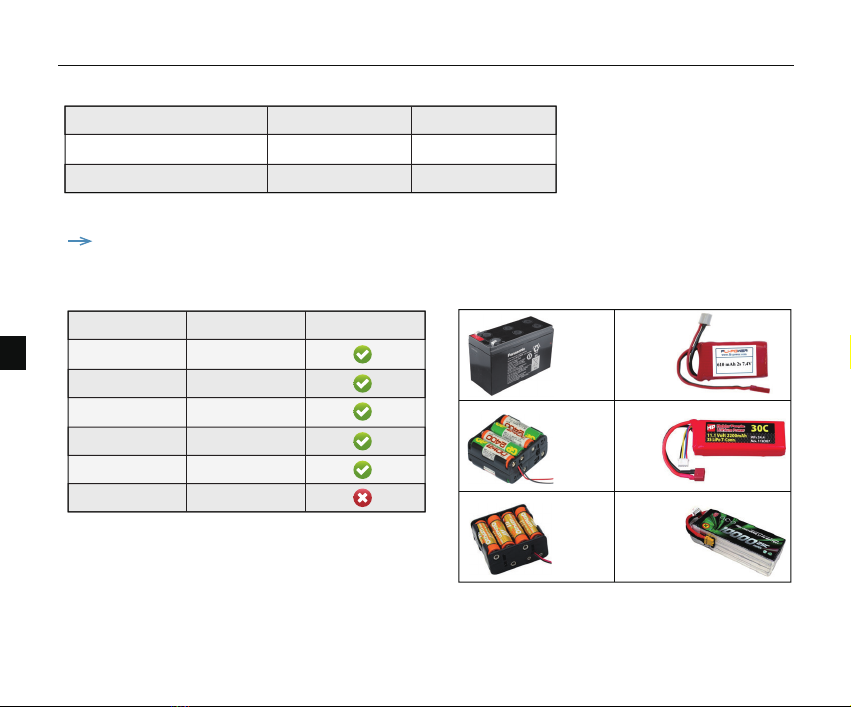
Powering
Battery Type
12V Lead-acid
8*AA NiMH
8*AA Alkaline
2S Lithium
3S Lithium
4S Lithium
Voltage
10.8v~14.8V
7.8V~10.6V
7.5V~12.8V
5.6~8.4V
8.4~12.6V
11.2V~16.8V
Permission
12V
lead-acid
8AA
NiMH
8AA
Alkaline
2S
Lithium
3S
Lithium
4S
Lithium
Recomended voltage
Absolute Maximum voltage
For Monitor
9 ~15V
16.0V
For SonarBox
9 ~12V
14.8V
Note: overvoltage may burn the elements in the device!
From bellow shows the voltage range of the most popular batteries in the market:
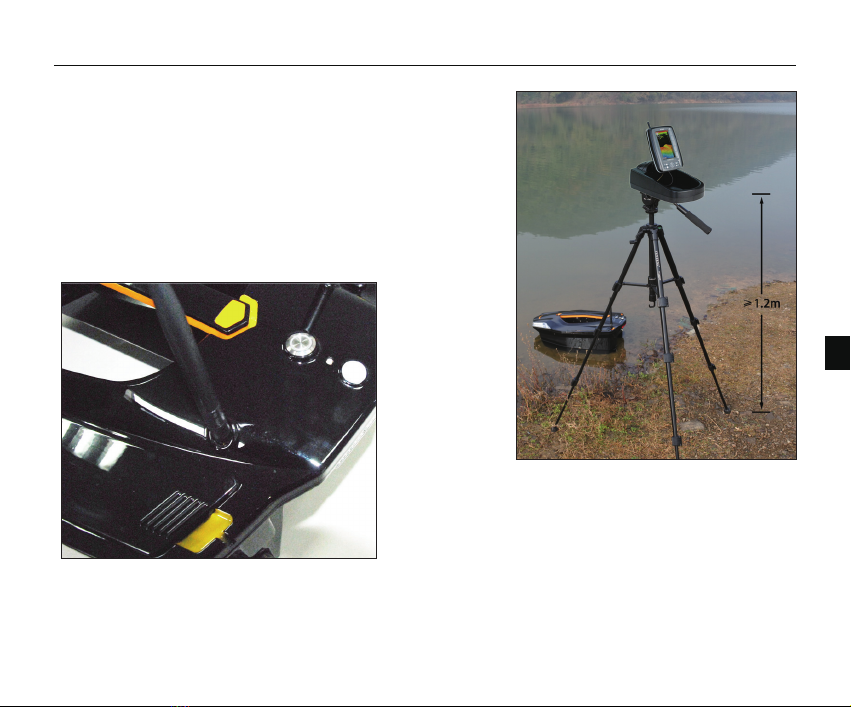
Using Instruction
5
1. Please do not put the display on ground during the
operation, which could cause a short R/C distance.
It is recommended to install the monitor on a tripod, which
can ensure that the monitor is at least 1.2 meters above the
ground.
2. Make sure the antenna is tighten on the boat, otherwise
the R/C distance will be greatly shorten.

Key function
Menu Open Menu settings; Switch between menus
Up arrow Move up to select menu; increase a value of option
Down arrow Move down to select menu; decrease a value of option
Power & Exit Turns unit on/o. Also be use to quit a menu setting
Ent Finalizes menu selections; conrm a setting
6

What’s on the display
7
Depth readout
Water temp.
Voltage of bait boat
Fish symbol
Bottom Structure
signal indicator Lower depth range
Fish-arc
Upper depth range
Real-time echo window
Voltage of monitor

Menu Operation
8
In most time the default setting is enough. However in some situation, to
achieve the best performance of the system, you need adjusting the menu
setting.
Determines how echoes will be displayed on the screen. Increasing the
sensitivity will make you see more details on the screen.
In deep water, increasing the sensitivity. whereas in shallow decreasing the
sensitivity.
1. Sensivity
Wave action, boat wakes, and temperature inversion can cause on screen
clutter near the surface. The surface clarify option reduces surface clutter by
decreasing the sensitivity of the receiver near the surface.
2. Surface Clarify
How to set the Sensivity?
1) Press MENU Key, and use keypad to choose【Sensivity】
2) Press ENT key to conform the selecon.
3) Press UP arrow/Down arrow key to increase/decrease the value.
4) Press ENT key to confirm the seng.
Menu Operation
9
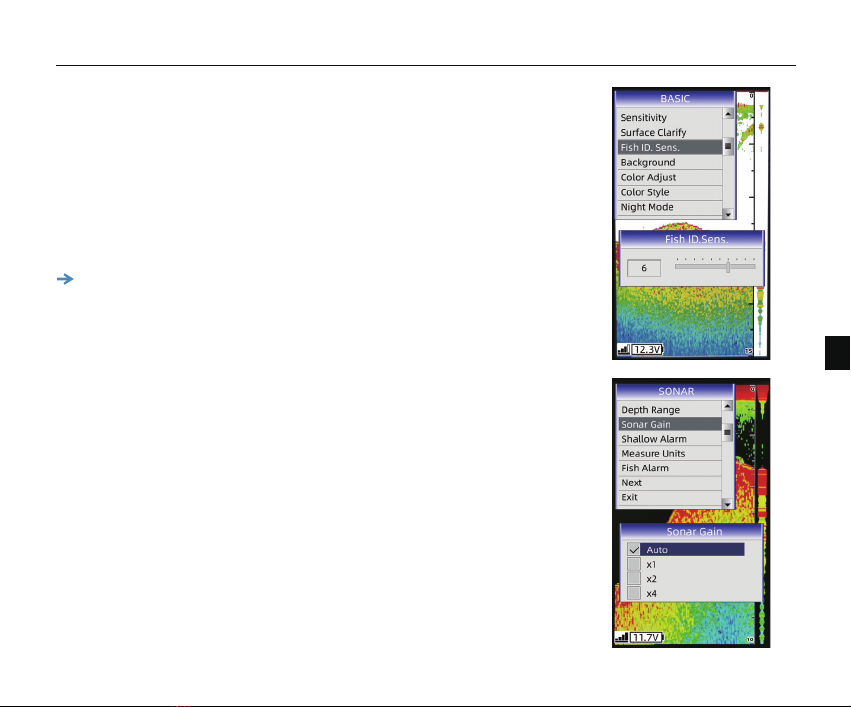
3. Fish ID Sens.
Fish ID. Sens. adjust the threshold of sh size display.
Selecting a higher setting allows weak returns being being displayed as
sh, which is helpful especially when you are intending to nd smaller
sh species or bait sh.
Selecting a low setting will prevent weak sonar returns being displayed as
sh, which will be very helpful when you are seeking large species of sh.
Note: If you hope to nd big sh, please set the value to 1; However if
you hope to nd all the sh, including small ones, set the value to 9.
4. Sonar Gain.
The gain controls the sensitivity of the hardware receiver. A higher gain
makes the sonar more sensitive to echo returns, allowing it to display
weaker targets.
If the gain is set too high, the image might be cluttered with background
noise.

Menu Operation
10
5. Radio Bind
For the TF520, each SonarBox has an "Identity Card". It only can be
connected with one monitor. And for all the TF520 we sold, the
autorization process has been done in advance by our factory.
However, in some cases you may mix the monitor and the SonarBox.
Then you need do the radio bind as following instruction:
How to make Radio Bind?
1) Enter【Radio Bind】menu, a message shown to remind you to
power on the SonarBox.
2) Power on the SonarBox, device will make radio bind automatically.
Note: before making Radio Bind, please power o the SonarBox in
advance.

Menu List
11
Adjust the threshold of sh size display. Higher setting allows weak returns being
displayed as sh, while a low setting will prevent it being displayed as sh.
Sensivity
Surface Clarify
Fish ID. Sens.
Background
Color Adjust
Color Style
Night Mode
Depth Range
Sonar Gain
Shallow Alarm
Measure Units
Fish Alarm
Simulator
Backlight
Key Tone
Language
Battery Alarm
Boat Vtg. Alarm
Default Settings
System Info.
Radio Bind
Update Devices
Controls the level of details shown on the display.
Reduces surface clutter by decreasing the sensivity of the receiver near the surface.
Change the background of the screen.
Adjust the contrast & brightness of sonar image.
Users can choose different color style for sonar image.
Adjust the brightness of backlight to suit device using at dark environment.
Determine in which portion the bottom will be displayed on the screen.
Controls the sensitivity of the hardware receiver.
Sounds when the depth becomes equal to or less than the menu setting.
Selects the units of measure for all distance and temperature related readouts
Sounds when the fishfinder detects what it determines to be a fish.
Used to let you practicing using the Fishfinder as if you were on the water.
Adjust the brightness of backlight.
Set if the sonar unit sound a tone or not when a key is pressed.
Select the display language for menus.
Sounds when the input battery voltage of display is equal to or less than the setting.
Sounds when the input battery voltage of SonarBox is equal to or less than the setting.
Used to restore original factory setting.
Show system information of device.
Make autorization between monitor and SonarBox.
Update monitor or SonarBox with latest version of software.
BasicSonarSystem

12
Specifications and Features
Display size: 4.3"TFT LCD; Sunlight Viewable
Resolution: 480*272Pixels; 65,536 color
Language: Multi-language
Monitor and Display Real-time Voltage of Bait boat Battery
IPX6 Level Waterproof Casing Design
Depth Capability: 30m (100ft)
Sonar Frequency: 115Khz
Sonar Beam Angle: 60deg @-10db
Sonar Alarms: Fish / Shallow / Low Battery
Radio Frequency: 2.4Ghz
RC Power: 20dBm
DC 9~15V / 3S lithium battery
Battery: 3S 18650 (Optional)
Sensor Cable Length: 0.5m
Sonar unit size: 153 x110 x 44mm; Portable Case Size: 262 x 150 x 98mm
Operational Temperature: -10°C ~ 50°C
Water Temp. Included in Transducer
Frequency-hopping spread spectrum (FHSS)
Direct-sequence spread spectrum (DSSS)
Hardware gain adjustable
Built in 3S lithium battery charging function
Stable wireless performance even in bad condition
Full two-year warranty; extended warranties avaiable
Display
Sonar
R/F
Power
Features
Technical and
casing
Specications and features
*
*Note:
[1] Not available with TF520 version B, which with a power-adjustable radio system.
[2] For version B, please ensure the TX power compliant with local radio regulations before increasing the radio power.

Table of contents
Other Toslon Marine Equipment manuals


Popular Marine Equipment manuals by other brands

Mercury
Mercury VesselView 703 quick guide

Raymarine
Raymarine SmartPilot ST8002 quick start guide

AMC
AMC SR135 FIRE 24V quick start guide

SmartCell
SmartCell SC-32-0110-0001-99 installation guide

Vetus
Vetus TMWQ Installation instructions and operation manual

auto maskin
auto maskin Marine Pro 400 Series Quick installation guide

Autonnic
Autonnic A5022 user manual

CORRECT CRAFT
CORRECT CRAFT LINC PANORAY owner's manual

Kannad Marine
Kannad Marine SafeLink EPIRB user manual

Lofrans
Lofrans IRIS II Installation and user manual

INIM
INIM Air2-Smarty/W Installation and programming manual

Danelec Marine
Danelec Marine DM100 S-VDR G2 user guide


