Clarion M303 Original instructions

Owner•s
manual
& Installation manual
Mode
d•emploi
et
manuel d
1
installation
Manual
de
instrucciones
y
de
instalaci6n
M303
MARINE
Bluetooth®
CD/USB/MP3/WMA
RECEIVER
lECTEUR
MARINE
Bluetooth®
CD/USB/MP3/WMA
RECEPTOR
MARINO
Bluetooth®
CD/USB/MP3/WMA

CLARION PRODUCTREGISTRATION INFORMATION
Dear Customer:
For USA and Canada
only
www.clarion.com
Congratulations on your purchase of a Clarion mobile electronic products.
We
are confident
that you'll enjoy your Clarion experience.
There are many benefits
to
registering your product.
We
invite you to visit our website at
www.clarion.com
to register your Clarion product.
We
have made product registration simple with our easy to use website. The registration form
is
short and easy to complete. Once you're registered, we can keep you informed of important
product information.
Register at
www.clarion.com
-it's easy
to
keep your Clarion product
up
to
date.
INFORMATIONS
DEL'
ENREGISTREMENT
DE
PRODUITS
CLARION
Cher client:
Pour les Etas Unis et le Canada seulement
www.clarion.com
Nous vous remercions d'avoir achete ce produit electronique mobile Clarion. Nous sommes
confiants que
vous
apprecierez
votre
experience Clarion.
II
y a beaucoup d'avantage
a
enregistrer votre produits. Nous
VOUS
invitons
a
visiter notre site
Web
www.clarion.com
pour enregistrer votre produit Clarion.
Nous avons facilite
Ia
tache d'enregistrement de produit simple et facile grace
a
notre siteWeb.
Le
formulaire d'enregistrement est court et facile
a
completer. Lorsque vous etes enregistrer,
nous pouvons vous tenir informe des informations important de produits.
Enregistrer
a
www.clarion.com
-c'est facile de mettre
a
jour votre produit Clarion.
INFORMACION
DEL
REGISTRO
DE
PRODUCTO
DE
CLARION
Querida Cliente:
Para USA
y
Canada
nomas
www.clarion.com
Felicitaciones por
su
compra de producto electr6nico m6vil de Clarion. Estamos seguros que
usted gozara de
su
experiencia con
el
producto de Clarion.
Hay muchas ventajas
al
registrar su prodJcto.
Le
invitamos a que visite nuestro sitio
en
internet
www.clarion.com
para registrar
su
producto de Clarion.
Hemos hecho
el
registro de prod.Jcto facil
en
nuestro sitio.
La
forma de registro
es
corta y facil
de completar. Una
vez
que lo registre, podremos proporcionarle
Ia
informacion de
su
prodJcto.
Registrese
en
www.clarion.com
-
es
facil mantener
su
producto de Clarion actualizado.
Under Industry Canada regulations, this radio transmitter
may
only operate using an antenna
of
a
type and maximum (or lesser) gain approved for the transmitter by Industry Canada
To
reduce
potential radio interference to other users. the antenna type and its gain should be so chos6;,
that the equivalent isotropically radiated power
(eir.p.)
is
not more than that necessary for
successful communication.
Conformement
a
Ia
reglementation d'lndustrie Canada,
le
present emetteurradio peut
fonctionner avec une antenne d'un type et d'
un
gain maximal (ou inferieur) approuve pour
l'emetteur
par
lndustrie Canada. Dans
le
but de redwre les risques de brouillage radioelectrique
a
/'intention des autres utilisateurs, il taut choisir
le
type d'antenne et son gain de sorte que
Ia
puissance isotrope rayonnee equivalente
(p
.
ir
.e.)
ne
depasse pas /'intensite necessaire
a
l'etablissement d'une communication satisfaisante.
2
M303
Contents
Thank you for purchasing this
Clarion
product.
• Please fully read this owner's manual before operating this equipment.
• Check the contents of the enclosed warranty card and store it
in
a safe place with this manual.
1. FEATURES .......................................................................................................................3
2.
PRECAUTIONS ................................................................................................................3
Front Panel
I
Generalities ............................................................................................
..
5
USB Port ...............................................................
..
...........
...
......................................... 5
Remove the DCP ...............................
...
..
.....
..
.........
..
..................................
..
..
............... 5
Attach the DCP ..............................................................................................................5
Storing the DCP
in
the DCP Case .................................................................................5
3.
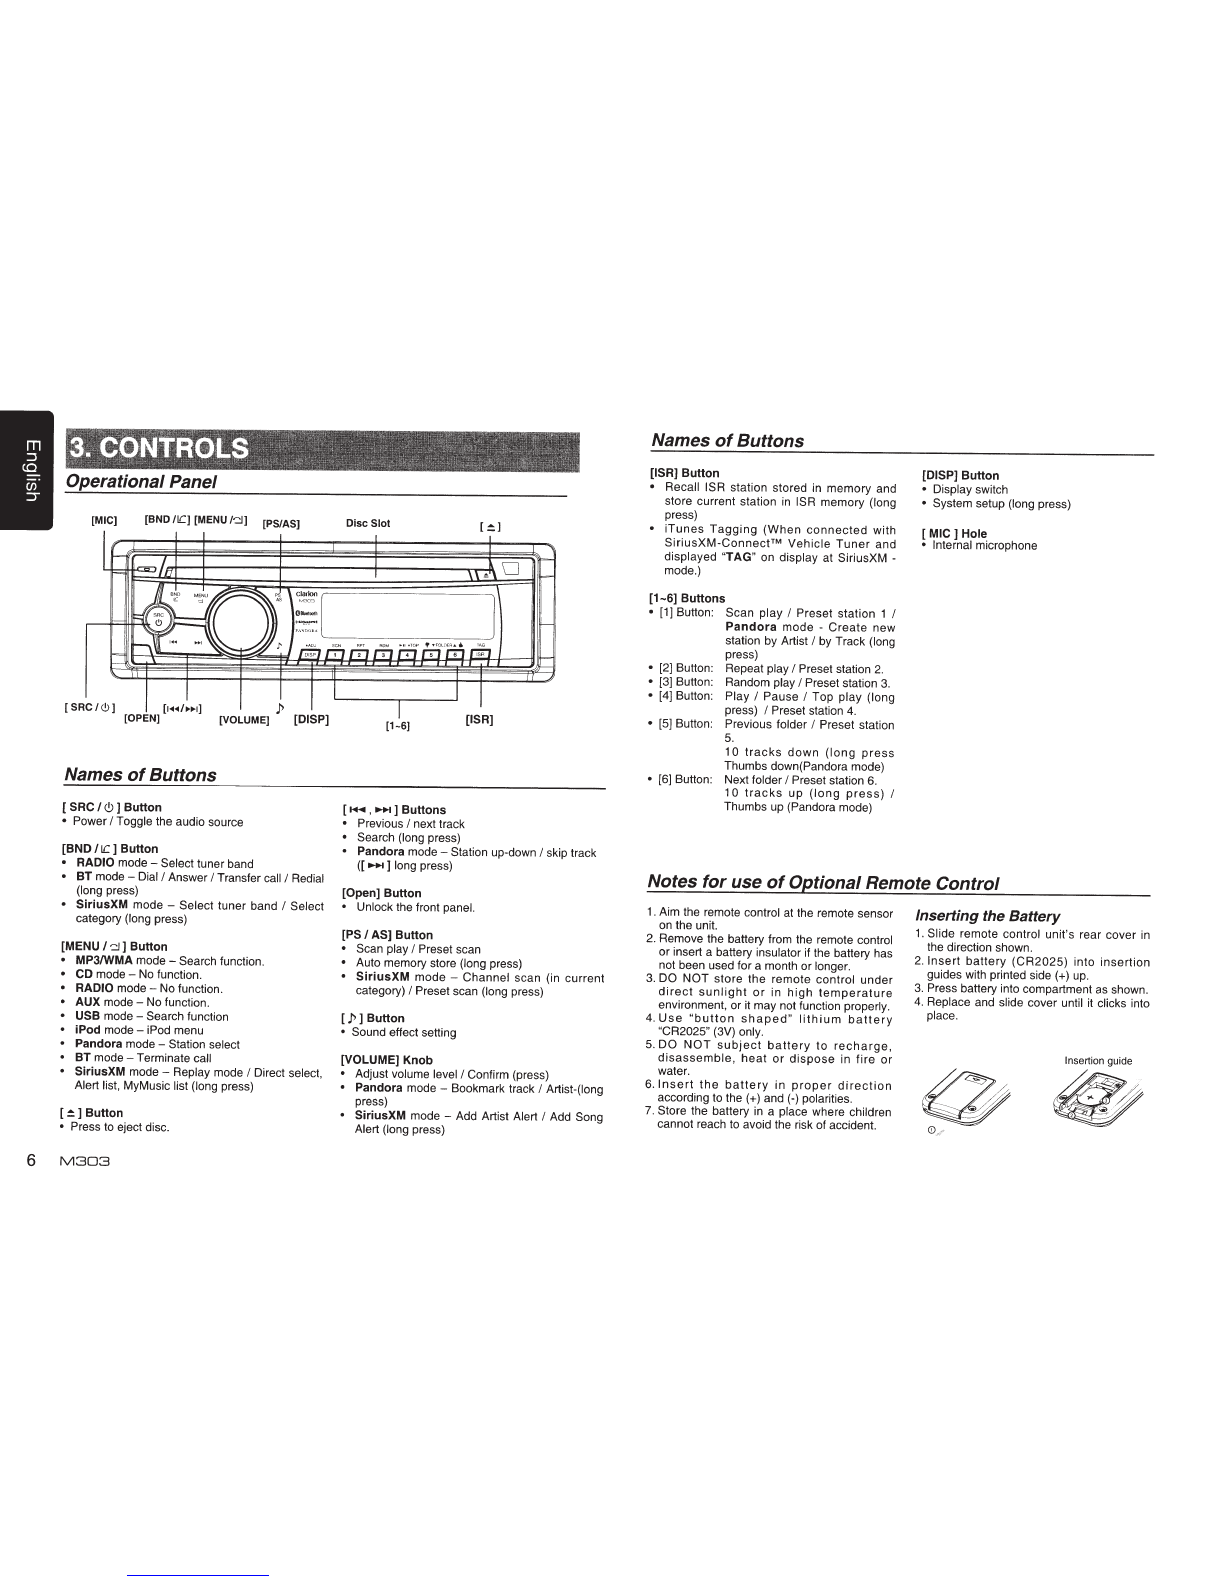
CONTROLS ......................................................................................................................6
Operational Panel ....................................
...
................................................................... 6
Names of Buttons...........................................................................................................6
Notes for use of Optional Remote Control ..................................................................... 6
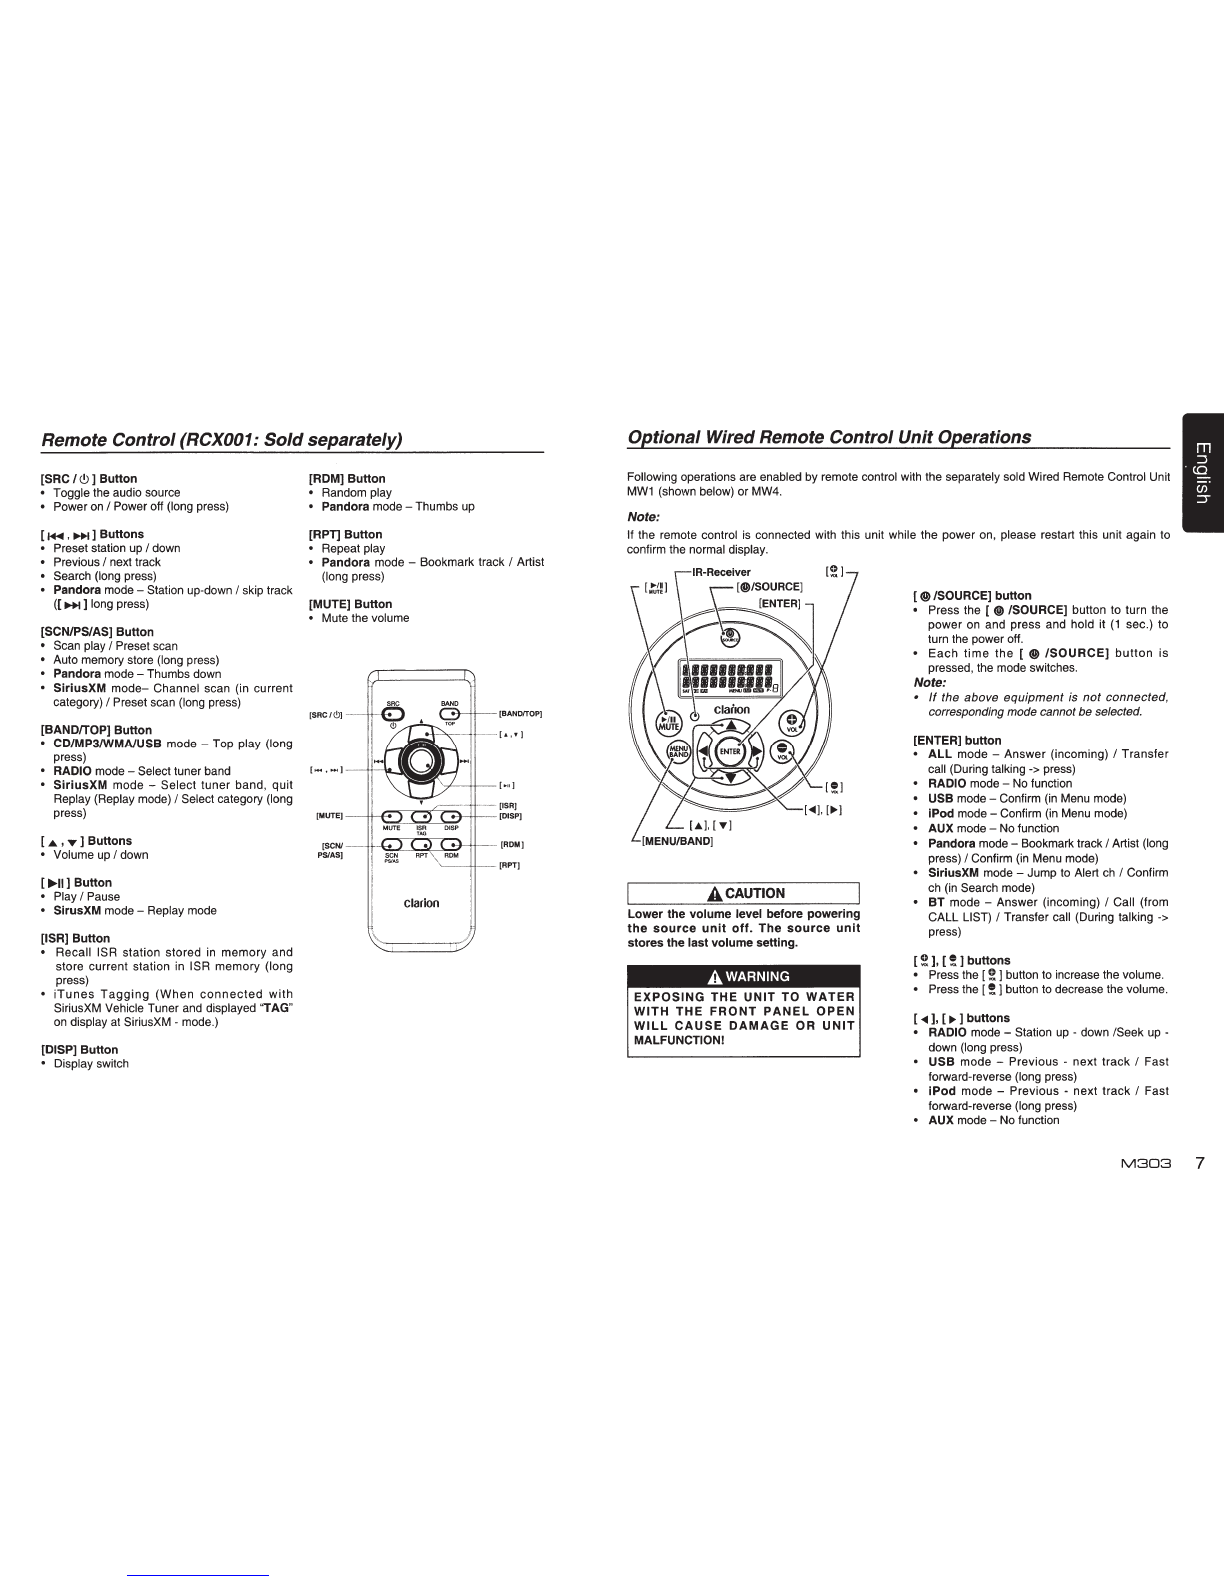
Remote Control (RCX001: Sold separately) .................................................................. 7
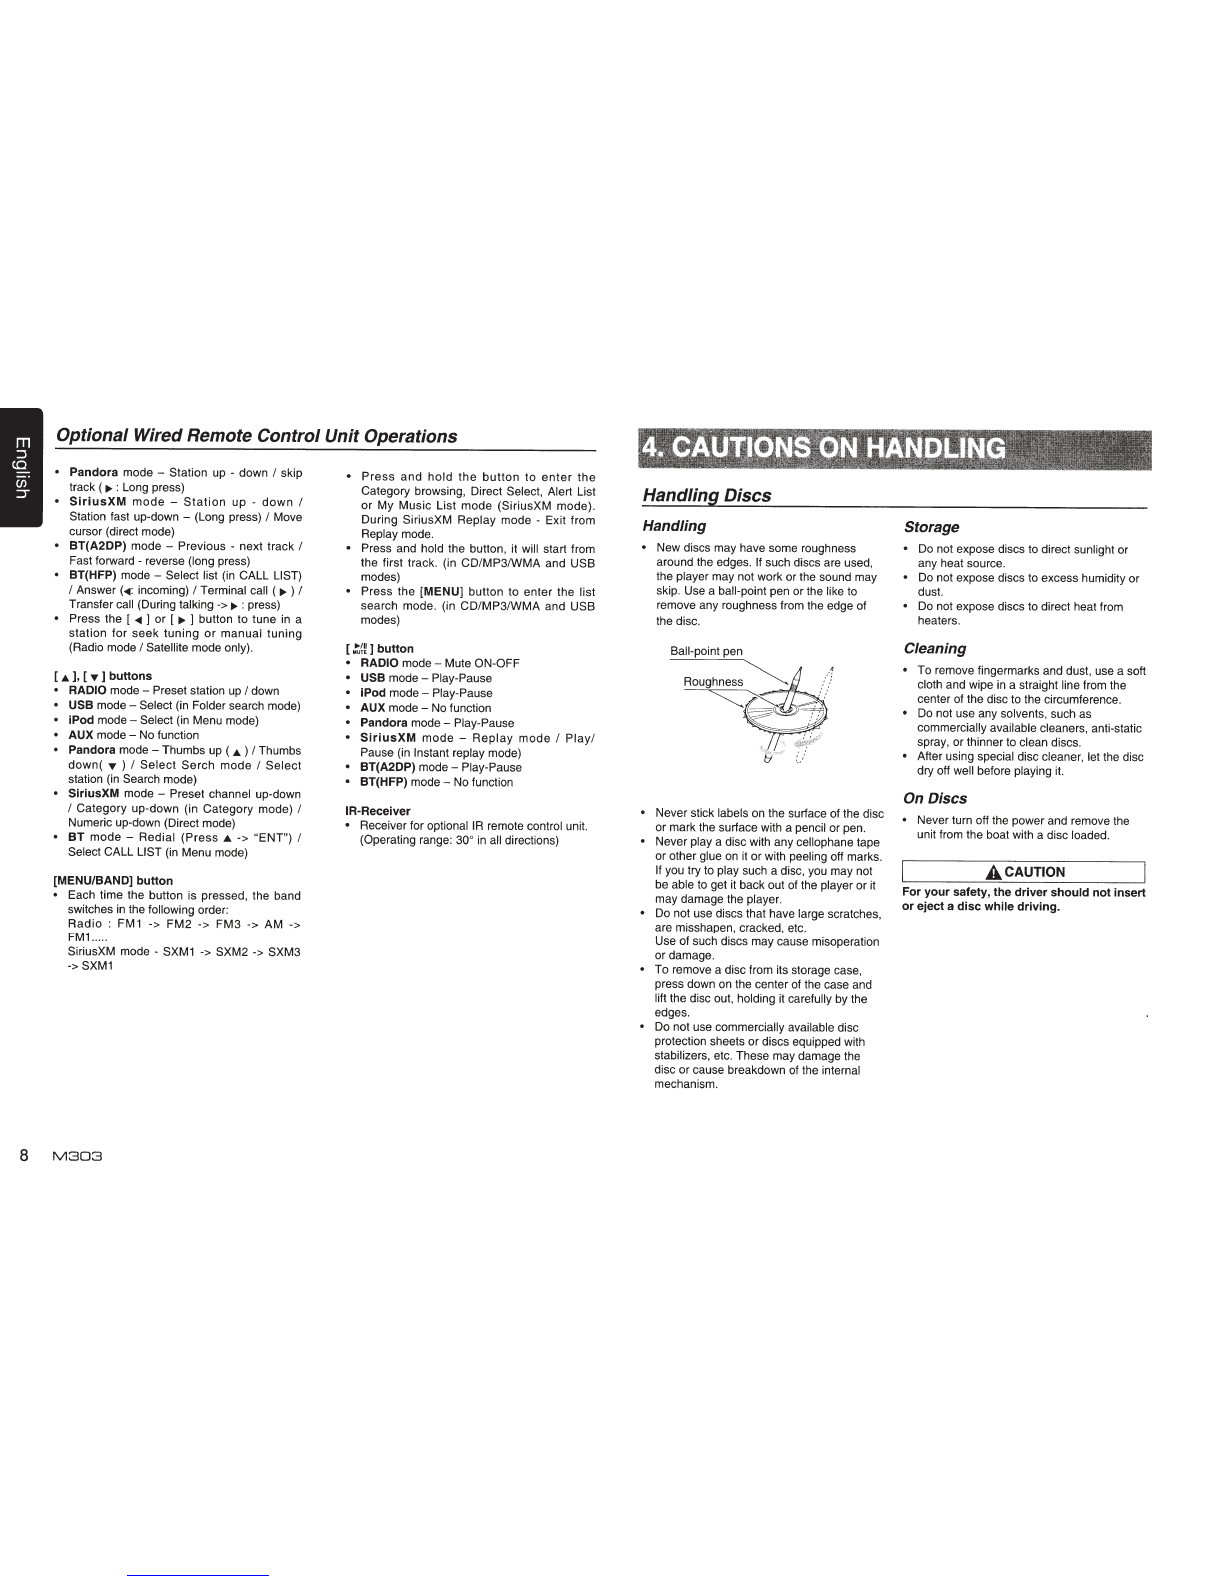
Optional Wired Remote Control Unit Operations ........................................................... 7
4.
CAUTIONS ON HANDLING .............................................................................................8
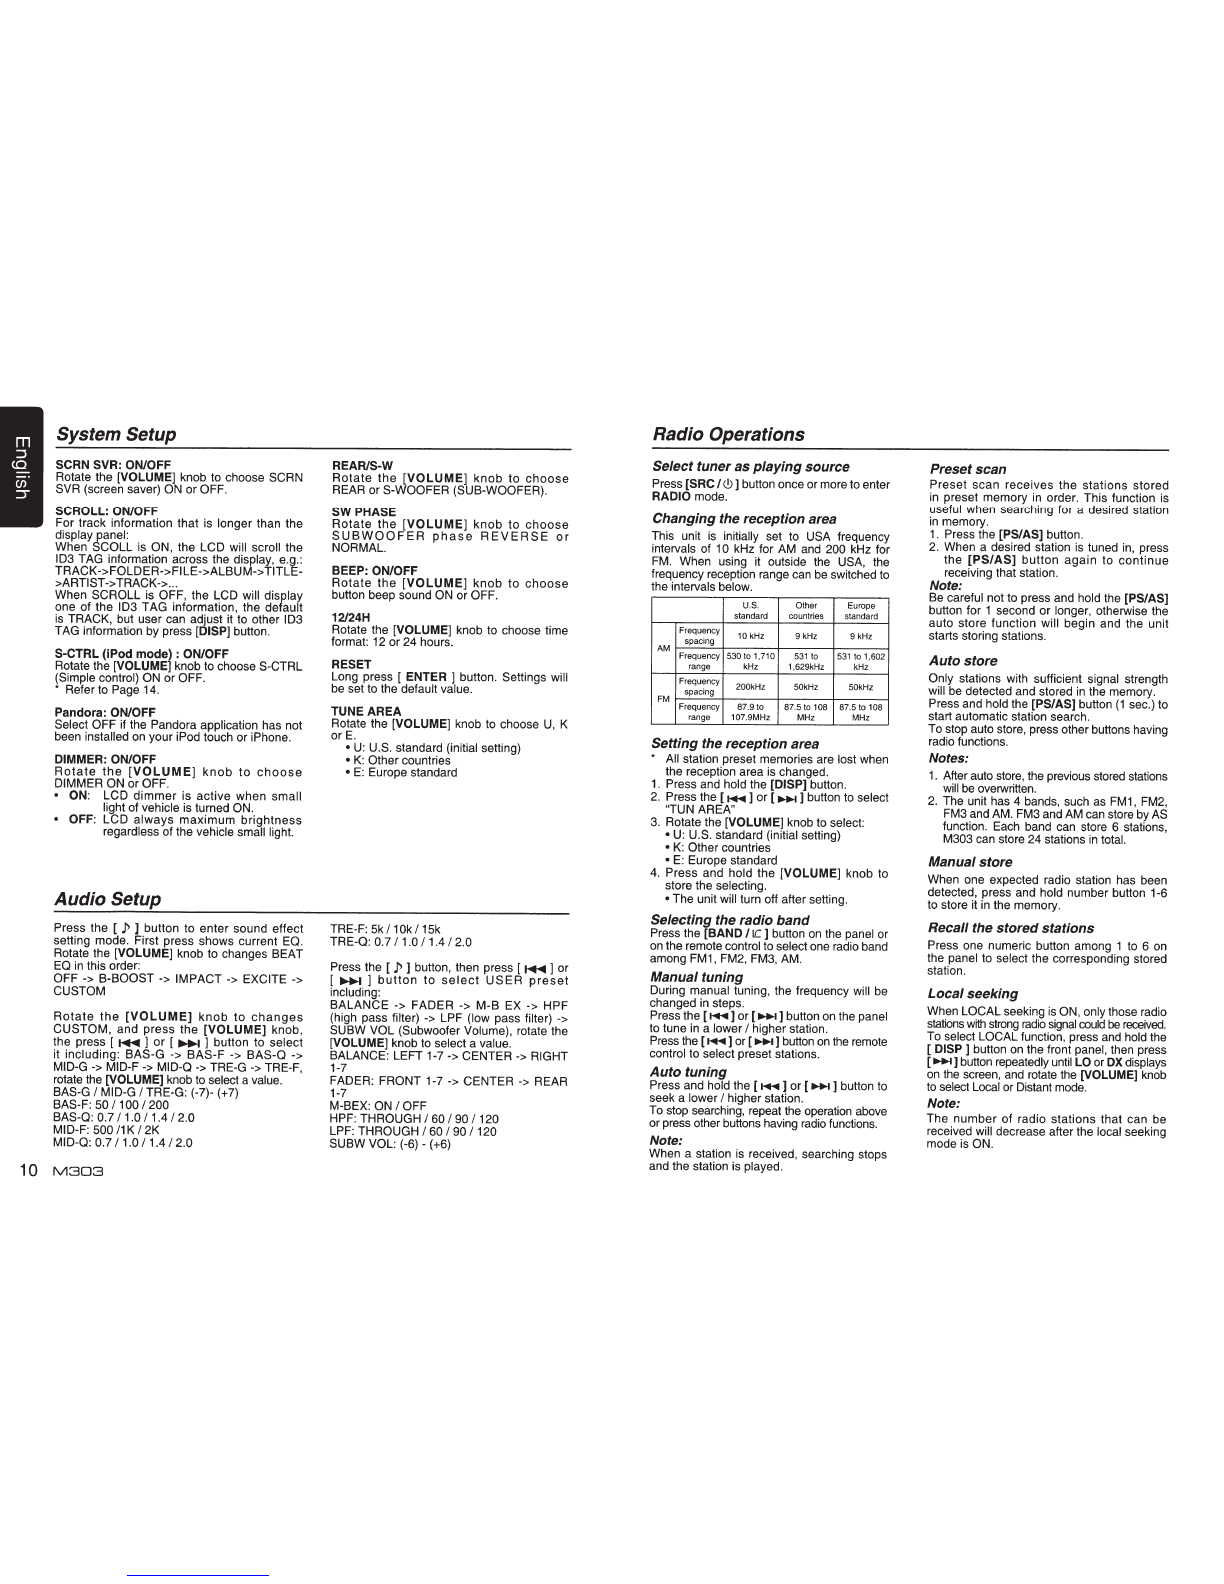
Handling Discs ...............................................................................................................8
5.
OPERATIONS
...................................................................................................................9
Basic Operations............................................................................................................9
System Setup..............................................................................................................
..
.9
Audio Setup............................................................
..
........................
...
..........
...
............ 10
Radio Operations .........................................................................................................1
0
SiriusXM Satallite Radio Operations............................................................................
11
CD/MP3/WMA Operations ...........................................................................................
12
USB Operations ........................................................................................................... 13
iPod
&
iPhone Operations............................................................................................ 14
Bluetooth Operations ................................
..
.................................................................
15
AUX Operations ........................................................................................................... 16
6.
TROUBLE SHOOTING...................................................................................................17
7. ERROR DISPLAYS
.........................................................................................................18
8.
SPECIFICATIONS ..........................................................................................................18
9. INSTALLATION
I
WIRE CONNECTION GUIDE ............................................................ 19

•
Compatible
with
iPod®
I
iPhone®
with
Pandora®
internet
radio
App
•
Built-in
Parrot
8/uetooth®
Handsfree (HFP)
and
Audio
Streaming
(A2DP & AVRCP)
• SiriusXM-Ready™
with
iTunes®
Tagging
illJol~@
Parrot
PANDORA
0
Bluetooth
~
move
wireless
DIGITAL
AUDIO
USB
Made for
I
MP3/WMAI
((<Siriusxm>))
~
iPod
CJ
iPhone
READY
Expanding Systems
Expanding audio features
6?
~
USBMemory
4 Channel
Amplifier
~,
iPodliPhone
~~~~~~~~~~~~~R
(Co~viaUSB)
iDfi_--
_._
.jfj
m1
~
j _
RRR!!l"'-['lf9
•
_-
Biuetooth® SiriusXM-Connect™
cellular phone Vehicle Tuner
Note:
• The items listedonly
show
connectivityoptions
and
are
not
includedwith the unit·
• CCA-750:
Sold
separately
For
your
safety,
the
driver
should
not
operate
the
controls
while
driving.
Also,
while
driving,
keep
the
volume
to
a
level
at
which
external
sounds
can
be
heard.
1.
When the interior of the boat
is
extremely
cold and the player is used soon after
switching
on
the heater, moisture may
form
on
the disc or the optical parts of the
player and proper playback may not be
possible.
If
moisture forms
on
the disc,
wipe
it
off with a soft cloth.
If
moisture
forms
on
the optical parts of the player,
do not use the player for about one hour.
The condensation will disappear naturally
allowing normal operation.
2.
Driving
on
extremely bumpy surface can
cause the disc to skip during playback.
3.
This unit uses precision parts and
components for its operation.
In
the event
that trouble arises, never open the case,
disassemble the unit, or lubricate the
rotating parts. Contact your Clarion dealer
or service center.
4.
FCC STATEMENT
4.1. This device complies with Part 15 of the
FCC Rules. Operation is subject to the
following two conditions:
(1)
This device may not cause harmful
interference.
(2)
This
device
must
accept
any
interference
received,
including
interference
that
may
cause
undesired operation.
4.2. Changes or modifications not expressly
approved
by
the
party
responsible
for
compliance
could void
the
user's
authority to operate the equipment.
NOTE:
This equipment has been tested and found
to comply with the limits for a Class B digital
device,
pursuant
to Part 15 of
the
FCC
Rules. These limits are designed to provide
reasonable
protection
against
harmful
interference
in
a residential installation.
This
equipment generates uses and can
radiate radio frequency energy and, if not
installed and used in accordance with the
instructions, may cause harmful interference
to radio communications. However, there
is no guarantee that interference will not
occur
in a
particular
installation.
If
this
equipment does cause harmful interference
to radio or television reception, which can
be determined by turning the equipment
off and on, the user is encouraged to try to
correct the interference by one or more of
the following measures:
•
Reorient
or
relocate
the
receiving
antenna.
•
Increase
the
separation
between
the
equipment and receiver.
• Connect the equipment into
an
outlet on
a circuit different from that to which the
receiver
is
connected.
•
Consult
the
dealer
or an
experienced
radio/TV technician for help.
FCC Radiation Exposure Statement
This equipment complies with FCC radiation
exposure limits set forth for
an
uncontrolled
environment.
This
equipment
should be
installed
and
operated
with
minimum
distance 20cm between the radiator & your
body
5.
"Made for iPod," and "Made for iPhone"
mean that
an
electronic accessory has
been designed
to
connect specifically to
iPod, or iPhone, respectively, and has
been certified by the developer to meet
Apple performance standards.
Apple
is
not responsible for the operation
of this device or its compliance with safety
M303
3

and regulatory standards. Please note
that the use of this accessory with iPod or
iPhone may affect wireless performance.
iPhone, iPod and iTunes are trademarks
of Apple Inc., registered
in
the U.S. and
other countries.
6.
Pandora, the
Pandora
logo and
other
Pandora
marks
are
trademarks
or
registered trademarks of Pandora Media,
Inc.
or its subsidiaries worldwide.
"If you have any issues with the Pandora
application
on
your mobile phone, please
direct them to pandora-support@pandora.
com."
7.
The Bluetooth word mark and logos are
owned by the Bluetooth SIG,
Inc.
and any
use of such marks by Clarion Co.,Ltd. is
under license.
Other trademarks and trade names are
those of their respective owners.
8.
SiriusXM and all related marks and logos
are trademarks of SiriusXM Radio, Inc.
All
rights reserved.
4
M303
9.
-English:
This
device
complies
with
Industry
Canada licence-exempt
RSS
standard(s).
Operation
is
subject
to
the
following
two conditions: (1) this device may not
cause interference, and (2) this device
must accept any interference, including
interference that may cause undesired
operation of the device.
-French:
Le present appareil est conforme aux
CNR
d'lndustrie
Canada
applicables
aux appareils radio exempts de licence.
L'exploitation
est
autorisee
aux
deux
conditions suivantes : (1) l'appareil ne
doit pas produire de brouillage, et (2)
l'utilisateur
de
l'appareil doit accepter tout
brouillage radioelectrique subi, meme
si le
brouillage
est
susceptible
d'en
compromettre
le
fonctionnement.

( E
2200
IIOOB.
M303
clarion
12V
6
GROUND
~~:
:
:~~==~·::~;.~
==1SALoed4Q
ISA
:AM!31·1121kttz/FIII7.$-10111Hz
TliiSOEVICECOMPl.IESWITHPART150Fll£FCCRULES
OPERATION IS SUBJECT TO
THE
FOLLOWING TWO CONDITIONS
(1)THISOEVICEMAYNOTCAUSEHARMFULINTERFERENCE,ANO
(2)THISOEVICEMUSTACCEPTANYINTERFERENCERECEIVED
INCLUDING
INTERFERENCE
THAT
MAY
CAUSE
UNDESIRED
OPERATION
THISOEVIC
ECOMPLIESWITHDHHSRULES21CFRCHAPTERI
SUBCHAPTER
J
APPLICABLE
AT
DATE OF MANUFACTURE
CLARION
CO.
,LTO
7-2.SHtNTOSHN.CHIJO...KU,SAfTAMA.SHI.SAITAMA-KEN,JAPAN
I
cuss
1
LASER
PfiOOUCT
I
BI~-QDIDNo
. •
,,.,
e
051
722 877
@
FC~I~
..
:
~~
:
g
:
~=
==
=~
!
@AC:;
~~
~
IINFORMATION FOR USERS:
Changes
or modifications to this product
unapproved
by
the manufacturer will void the
warranty and will violate FCC approval.
Front PanelI Generalities
For a longer service life,
be
sure to read the
following cautions.
•
Do
not allow any liquids
on
the unit from
drinks, umbrellas, etc. Doing
so
may
damage the internal circuitry.
•
Do
not disassemble or modify the unit
in
any way. Doing
so
may result
in
damage.
•
Do
not let cigarettes burn the display.
Doing
so
may damage or deform the
body.
• If a problem should occur, have the unit
inspected at your store of purchase.
• The remote control unit may not work if
the remote control sensor is exposed to
direct sunlight.
Cleaning the body
• Use a soft, dry cloth and gently wipe off
any dirt or dust.
• For tough dirt, apply some neutral
detergent diluted
in
water to a soft cloth,
wipe off the dirt gently, then wipe again
with a dry cloth.
•
Do
not use benzene, thinner, boat cleaner,
etc., as these substances may damage
the body or cause the paint to peel. Also,
leaving rubber or plastic products
in
contact with the body for long periods of
time may cause stains.
USB Port
•
The
USB
memory
sticks
must
be
recognized as "USB mass storage class"
to work properly. Some models may not
operate correctly.
When the memorized data is lost or
damaged by any chance, Clarion shall
not
be
liable for any damage.
When using the USB memory stick, we
recommend that you backup your data
stored
on
it
before
using
a
personal
computer etc.
• Data files may
be
broken when using USB
memory sticks in the following situation:
When
disconnecting
the USB
memory
stick
or
turning
the
power
off
during
reading data.
When
affected
by
static
electricity
or
electric noise.
Connect/disconnect the USB memory stick
when it
is
not accessed.
•
Connecting
with
the
computer
is
not
covered.
Remove the DCP
The control panel can
be
detached to prevent
theft. When detaching the control panel, keep
it in the safety place and prevent scratches.
We
recommend
taking
the
DCP
(DETACHABLE CONTROL PANEL) with you
when leaving the boat.
1.
Press the
[SRC
I<!>]
button
(1
sec.) to turn
off the power.
2.
Deeply push
in
[OPEN]
button to unlock
the DCP.
3.
Hold the side
popped
out, remove the
DCP.
Attach the DCP
1.
Hold the DCP and ensure that the panel
faces towards you. Set the right side of the
DCP into the DCP bracket.
2.
Press the left side of the
DCP
until it locks.
Storing the DCP in the
DCP
Case
Hold the DCP, as shown
in
the figure below,
and put it into the supplied DCP case.
DCP
Note:
If the DCP
is
dirty, wipe off the dirt with a soft,
dry cloth only.
• The DCP can easily be damaged by shocks.
After removing
it,
be
carefully not to drop it or
subject it to strong shocks.
• Once the
[OPEN]
button is pressed and DCP
is unlocked, vibrations can cause the DCP to
fall.
•
The
connector
for
the main unit and
DCP
is
extremely
important.
Be
careful
not
to
damage it by pressing on it with fingernails,
screwdrivers, etc.
M303
5

Operational Panel
[MIC] [BND /IC]
[MENU/~]
[PS/AS]
[ SRC
I
<.9]
[1..,...,./~~~]
p
[OPEN] [VOLUME]
[DISP]
Names
of
Buttons
[ SRC I
<9
]
Button
• Power I Toggle the audio source
[BND
llC]
Button
• RADIO mode -Select tuner band
• BT mode -
Dial/
Answer
I
Transfer call
I
Redial
(long press)
•
SiriusXM
mode -Select tuner band
I
Select
category (long press)
[MENU
I~]
Button
MP3/WMA
mode-
Search function.
CD
mode-
No
function.
RADIO
mode-
No function.
AUX
mode-
No
function.
USB mode -Search function
iPod mode -iPod menu
Pandora mode -Station select
BT
mode-
Terminate call
SiriusXM mode -Replay mode
I
Direct select,
Alert list, MyMusic list (long press)
[~]Button
• Press to eject disc.
6
M303
Disc Slot
[~]
[1-6]
[...,..
,
~1
Buttons
• Previous I next track
• Search (long press)
• Pandora mode -Station up-down I skip track
([~]long
press)
[Open]
Button
• Unlock the front panel.
[PSI
AS] Button
• Scan play
I
Preset scan
• Auto memory store (long press)
•
SiriusXM
mode -Channel scan (in current
category) I Preset scan (long press)
[
P]
Button
• Sound effect setting
[VOLUME] Knob
• Adjust volume
level/
Confirm (press)
• Pandora mode -Bookmark track I Artist-(long
press)
• SiriusXM mode -Add Artist Alert I Add Song
Alert (long press)
Names
of
Buttons
[ISR]
Button
• Recall ISR station stored
in
memory and
store current station
in
ISR memory (long
press)
•
iTunes
Tagging
(When
connected
with
SiriusXM-Connect™
Vehicle
Tuner
and
displayed "TAG" on display at SiriusXM -
mode.)
[1-6]
Buttons
• [1] Button: Scan play I Preset station 1 I
Pandora
mode -Create new
station by Artist
I
by Track (long
press)
•
[2)
Button: Repeat play
I
Preset station
2.
• [3] Button: Random play I Preset station 3.
• [4] Button: Play
I
Pause
I
Top play (long
press) I Preset station
4.
• [5] Button: Previous folder
I
Preset station
5.
10
tracks
down
(long
press
Thumbs down(Pandora mode)
•
[6)
Button: Next folder I Preset station
6.
10
tracks
up
(long
press)
I
Thumbs
up
(Pandora mode)
[DISP]
Button
• Display switch
• System setup (long press)
[
MIC]
Hole
• Internal microphone
Notes
for
use
of
Optional Remote
Control
1.Aim the remote control
at
the remote sensor
on
the unit.
2.
Remove the battery from the remote control
or insert a battery insulator if the battery has
not been used for a month or longer.
3.
DO NOT store the remote control under
direct
sunlight
or
in
high
temperature
environment, or it may not function properly.
4.
Use
"button
shaped"
lithium
battery
"CR2025" (3V) only.
5.
DO
NOT
subject
battery
to
recharge,
disassemble,
heat
or
dispose
in fire or
water.
6.
Insert
the
battery
in
proper
direction
according
to
the (
+)
and
(-)
polarities.
7.
Store the battery
in
a place where children
cannot reach
to
avoid the risk of accident.
Inserting the Battery
1.
Slide remote control unit's rear cover
in
the direction shown.
2.
Insert
battery
(CR2025)
into insertion
guides with printed side(+)
up.
3.
Press battery into compartment
as
shown.
4.
Replace and slide cover until
it
clicks into
place.
Insertion guide
~
h
~

Remote Control(RCX001:
Sold
separately)
[SRC I
Q)
] Button
• Toggle the audio source
• Power
on
I Power off (long press)
[
~
,
11+1
] Buttons
• Preset station up I down
• Previous I next track
• Search (long press)
• Pandora mode -Station up-down I skip track
([
11+1]
long press)
[SCN/PS/AS] Button
• Scan play I Preset scan
• Auto memory store (long press)
• Pandora mode
-Thumbs
down
• SiriusXM
mode-
Channel scan (in current
category) I Preset scan (long press)
[BAND/TOP] Button
• CD/MP3/WMAIUSB
mode-
Top play (long
press)
• RADIO mode -Select tuner band
•
SiriusXM
mode -Select tuner band, quit
Replay (Replay mode) I Select category (long
press)
[ 4 , ..., ] Buttons
• Volume
up
I down
[..,..II] Button
• Play I Pause
• SirusXM mode -Replay mode
[ISR] Button
• Recall ISR station stored
in
memory and
store current station in ISR memory (long
press)
•
iTunes
Tagging
(When
connected
with
SiriusXM Vehicle Tuner and displayed "TAG"
on
display at SiriusXM- mode.)
[DISP] Button
• Display switch
[ROM] Button
• Random play
• Pandora mode
-Thumbs
up
[RPT] Button
• Repeat play
• Pandora mode -Bookmark track I Artist
(long press)
[MUTE] Button
• Mute the volume
[SCNI---
PS/AS]
clarion
[BAND/TOP]
··[ROM]
----
[APT]
Optional Wired Remote
Control
Unit
Operations
Following operations are enabled by remote control with the separately sold Wired Remote Control Unit
MW1
(shown below) or MW4.
Note:
If the remote control
is
connected with this unit while the power on, please restart this unit again to
confirm the normal display.
A
CAUTION
Lower the volume level before powering
the
source
unit
off.
The
source
unit
stores the last volume setting.
AWARNING
EXPOSING
THE
UNIT
TO
WATER
WITH
THE
FRONT
PANEL
OPEN
WILL
CAUSE
DAMAGE
OR
UNIT
MALFUNCTION!
[®/SOURCE]
button
• Press the
[®/SOURCE]
button to turn the
power on and press and hold it
(1
sec.) to
turn the power off.
•
Each
time
the
[ ®
/SOURCE]
button
is
pressed, the mode switches.
Note:
•
If
the
above
equipment
is
not
connected,
corresponding mode cannot be selected.
[ENTER] button
ALL
mode -Answer (incoming) I Transfer
call (During talking -> press)
RADIO mode -
No
function
USB
mode-
Confirm
(in
Menu mode)
iPod
mode-
Confirm
(in
Menu mode)
AUX mode -
No
function
Pandora mode -Bookmark track I Artist (long
press) I Confirm
(in
Menu mode)
SiriusXM mode -Jump
to
Alert
ch
I Confirm
ch
(in
Search mode)
BT
mode -Answer (incoming) I Call (from
CALL LIST) I Transfer call (During talking ->
press)
[!
],
[!]buttons
• Press the (! ]button to increase the volume.
• Press the
[!
]button to decrease the volume.
[
..._
], [
~
] buttons
• RADIO mode -Station
up
-down /Seek
up
-
down (long press)
• USB mode -Previous -next track I Fast
forward-reverse (long press)
•
iPod
mode -Previous -next track I Fast
forward-reverse (long press)
• AUX mode -
No
function
M303
7

Optional Wired Remote Control Unit Operations
• Pandora
mode -Station up -down I skip
track (
1JJ>
:
Long press)
•
SiriusXM
mode
-
Station
up -
down
I
Station fast up-down -(Long press) I Move
cursor (direct mode)
• BT(A2DP)
mode -Previous -next track
I
Fast forward- reverse (long press)
• BT(HFP)
mode -Select list
(in
CALL LIST)
I
Answer
(<IIIII:
incoming)
I
Terminal call (
IJJ>
)
I
Transfer call (During talking
->
IJJ>
:
press)
• Press the [
<IIIII
)
or [
..,.
] button to tune
in
a
station for seek tuning
or
manual tuning
(Radio mode I Satellite mode only).
[
.._
], [
-.
] buttons
RADIO
mode -Preset station
up
I down
USB
mode-
Select
(in
Folder search mode)
iPod
mode-
Select
(in
Menu mode)
AUX
mode -No function
Pandora
mode -Thumbs
up
(
JJ..
)
I
Thumbs
down(
-.
)
I
Select
Serch
mode
I
Select
station (in Search mode)
SiriusXM
mode -Preset channel
up
-down
I
Category up-down (in Category mode)
I
Numeric up-down (Direct mode)
BT
mode -Redial
(Press
JJ..
->
"ENT")
I
Select CALL LIST
(in
Menu mode)
[MENU/BAND] button
• Each time the button is pressed, the band
switches
in
the following order:
Radio
: FM 1
->
FM2
->
FM3
->
AM
->
FM1
...
..
SiriusXM mode -
SXM1
->
SXM2
->
SXM3
->
SXM1
8
M303
•
Press
and
hold
the
button
to
enter
the
Category browsing, Direct Select, Alert List
or My Music List mode (SiriusXM mode).
During SiriusXM Replay mode -Exit from
Replay mode.
• Press and hold the button, it will start from
the first track. (in CD/MP3/WMA and USB
modes)
• Press the
[MENU]
button to enter the list
search mode. (in CD/MP3/WMA and USB
modes)
[
~~~
] button
• RADIO
mode -Mute ON-OFF
• USB
mode -Play-Pause
• iPod
mode -Play-Pause
• AUX
mode -
No
function
• Pandora
mode -Play-Pause
•
SiriusXM
mode
-
Replay
mode
I
Play/
Pause
(in
Instant replay mode)
• BT(A2DP)
mode -Play-Pause
• BT(HFP)
mode -No function
I
A-Receiver
• Receiver for optionaiiR remote control unit.
(Operating range: 30°
in
all directions)
Handling Discs
Handling
• New discs may have some roughness
around the edges.
If
such discs are used,
the player may not work or the sound may
skip. Use a ball-point pen or the like to
remove any roughness from the edge of
the disc.
Ball-point pen
~
~
..
.....
..
)
~:
.:
..=====:
•••••
••
o.
<
<1!t•~1i:JF§
'
&·<
::
.
.:
• Never stick labels
on
the surface of the disc
or mark the surface with a pencil or pen.
• Never play a disc with any cellophane tape
or other glue
on
it
or with peeling off marks.
If
you try
to
play such a disc, you may not
be able
to
get it back out of the player or it
may damage the player.
•
Do
not use discs that have large scratches,
are misshapen, cracked, etc.
Use of such discs may cause misoperation
or damage.
• To remove a disc from its storage case,
press down
on
the center of the case and
lift the disc out, holding
it
carefully by the
edges.
• Do not use commercially available disc
protection sheets or discs equipped with
stabilizers, etc. These may damage the
disc or cause breakdown of the internal
mechanism.
Storage
• Do not expose discs to direct sunlight or
any heat source.
•
Do
not expose discs to excess humidity or
dust.
• Do not expose discs to direct heat from
heaters.
Cleaning
• To remove fingermarks and dust, use a soft
cloth and wipe
in
a straight line from the
center of the disc
to
the circumference.
•
Do
not use any solvents, such as
commercially available cleaners, anti-static
spray, or thinner
to
clean discs.
• After using special disc cleaner, let the disc
dry off well before playing
it.
On Discs
• Never turn off the power and remove the
unit from the boat with a disc loaded.
A
CAUTION
For your safety, the driver should not insert
or eject a disc while driving.

Basic Operations
Note:
• Refer to the diagrams
in
"3.
CONTROLS"
when reading this chapter.
ACAUTION
When the unit is turned on, starting and
stopping the engine with its volume raised to
the maximum level may harm your hearing.
Be careful about adjusting the volume.
Power on I
off
Notes:
• Start the engine before using this unit.
• Be careful about using this unit for a long
time without running the engine.
If
you
drain the battery too far, you may not be
able to start the engine and this can reduce
the service life of the battery.
1.
Start the engine. The power button
I
knob
illumination
on
the unit will light
up.
~
EngineON
\...!::?WJ
position
2.
Press the
[SRC
I
c.9
]
button
on
the front
panel or the remote control
to
turn
on
the
power under standby mode. The unit goes
back
to
the last status after power
on.
3.
Press and hold the
[SRC
I
c.9]
button
on
the
front panel or the remote control
to
turn off
the power.
Mute
Press the
[MUTE]
button
on
the remote control
to mute the volume from the unit.
Note
:
Doing the operation above again or adjusting
volume will release muting.
Volume adjustment
Rotate the
[VOLUME]
knob
on
the front panel
or press the [
..a.
]
or [
.,..
] button
on
the remote
control.
The adjustable range of volume is 0
to
40.
ACAUTION
While driving, keep the volume level at
which external sounds can still be heard.
Playing source selection
Press
[SRC
I
c.9
]
button
on
the front panel or
remote control repeatedly to choose desired
playing source.
Note:
Playing source selection means selecting which
mode, such as
DISC
mode,
RADIO
mode and
AUX
mode.
Display system time
Press the
[DISP]
button
on
the front panel or
remote control to switch the display information
from clock, station information (radio mode), or
track information
(CD
mode).
RESET
If
you have following problems, please press
[RESET]
button.
• Unit can not power
on
• Nothing happens when buttons are pressed
• Display is not accurate
Note:
*
When the
[RESET]
button
is
pressed, preset
radio stations, audio setting, etc.stored
in
memory are retained.
~
0
~
1:1
=(f)
~
0
~
[]
RESET
System Setup
In
any mode, press and hold
[DISP]
button to
enter system setup. Press [ ...,... ] or [ ..,_.. ]
button to select options, rotate the
[VOLUME]
knob to adjust.
CLOCK
Press the
[VOLUME]
knob to
enter
clock
setting mode, rotate the
[VOLUME]
knob to
set clock, press [ ...,... ] or [ ..,_.. ] button to
select hour or minute, press and hold the
[VOLUME]
knob to confirm.
DX/LO (RADIO mode)
Rotate the
[VOLUME]
knob to choose radio
local or distant at
RADIO
mode.
•
LO:
Only stations with strong signal can
be received.
•
OX:
Stations with strong and weak signals
can be received.
AUX SENS (AUX mode)
Rotate the
[VOLUME]
knob to choose AUX
Input sensitivity LOW, MID or HIGH at
AUX
mode.
PARENTAL PASSWORD (SiriusXM mode)
Chanae parental password. Original code
is
"OOOO'ff
LOCK CH (SiriusXM mode)
Lock the current channel
UNLOCK CH (SiriusXM mode)
Unlock current locked channel.
UNLOCK ALL CH (SiriusXM mode)
Unlock all parental locked channels.
ALERT: ON/OFF (SiriusXM mode)
Activate interruption by Artist and Song alert
DELETE ALL ALERT (SiriusXM mode)
Delete saved alert items for artist and song.
SELECT (BT mode)
This
"SELECT"
menu
is
intended
to
automatically paired by selecting a mobile
phone was stored.
This unit can store three mobile phones. The
mobile phone will be stored
in
paired order
to the unit. The fourth mobile phone can not
be stored.
If
you want to store a fourth mobile
phone, please delete unwanted mobile phone
from
"DELETE"
menu.
1.
Rotate the
[VOLUME]
knob to
choose
the paired mobile phone name from the
pairing list.
2.
Press and hold the
[VOLUME]
knob to
confirm.
DELETE (BT mode)
1.
Rotate the
[VOLUME]
knob to choose
the paired mobile phone name from the
pairing list.
2.
Press and hold the
[VOLUME]
knob to
confirm.
DISCONNECT (BT mode)
Disconnect
currently
connected
mobile
phone.
1.
Rotate
the
[VOLUME]
knob,
mobile
phone displays are currently connected.
2.
Press and hold the
[VOLUME]
knob to
disconnect.
MIC GAIN (BT mode)
Rotate the
[VOLUME]
knob to choose Mic
gain: -5,-4,-3,-2,-1
,0,
1,
2,
3,
4,
5.
You can change the gain of MIG when a
telephone partner cannot hear your voice.
MIC SEL (BT mode)
Rotate
the
[VOLUME]
knob
to
choose
Microphone EXTERNAL or INTERNAL.
TONE SEL (BT mode)
You can get mobile phone ring tone from the
speaker.
Rotate
the
[VOLUME]
knob
to
choose
AUTO or INTERNAL.
• AUTO:
Mobile phone ring tone from the speaker.
INTERNAL:
The
unit
original
ring
tone
from
the
speaker.
AUTO ANS (BT mode)
To answer incoming calls automatically.
Rotate
the
[VOLUME]
knob
to
choose
AUTO ANS
ON
or
OFF.
AUTO CON: ON/OFF (BT mode)
Automatically connects the mobile phone
was last connected.
Rotate
the
[VOLUME]
knob
to
choose
AUTO CON
ON
or
OFF.
PIN CODE
Rotate
and
press
the
[VOLUME]
knob
to
choose
a 4-digit password. Press the
[VOLUME]
knob more than 1 seconds to
confirm.
The
PIN
CODE default setting
is"
0000 ".
M303
9

System Setup
SCRN SVR: ON/OFF
Rotate the
[VOLUME]
knob to choose SCAN
SVR (screen saver) ON or OFF.
SCROLL: ON/OFF
For track information that is longer than the
display panel:
When SCOLL is ON, the LCD will scroll the
ID3 TAG information across the display, e.g.:
TRACK->FOLDER->FILE->ALBUM->
TITLE-
>ARTIST->
TRACK->
...
When SCROLL is OFF, the LCD will display
one of the ID3 TAG information, the default
is
TRACK, but user can adjust
it
to other ID3
TAG information by press
[DISP]
button.
S-CTRL (iPod mode) : ON/OFF
Rotate the
[VOLUME]
knob to choose S-CTRL
(Simple control) ON or OFF.
*
Refer to Page 14.
Pandora: ON/OFF
Select OFF
if
the Pandora application has not
been installed on your iPod touch or iPhone.
DIMMER: ON/OFF
Rotate
the
[VOLUME]
knob
to
choose
DIMMER ON or OFF.
• ON:
LCD
dimmer
is active when small
light of vehicle
is
turned ON.
• OFF:
LCD
always
maximum
brightness
regardless of the vehicle small light.
Audio Setup
Press the [
P]
button to enter sound effect
setting mode. First press shows current EQ.
Rotate the
[VOLUME]
knob to changes BEAT
EQ
in
this order:
OFF->
B-BOOST ->
IMPACT->
EXCITE->
CUSTOM
Rotate
the
[VOLUME]
knob
to
changes
CUSTOM, and press the
[VOLUME]
knob,
the press [
~
]
or
[ ...,.. ] button to select
it including: BAS-G -> BAS-F -> BAS-Q ->
MID-G
->
MID-F
->
MID-Q -> TRE-G
->
TRE-F,
rotate the
[VOLUME]
knob to select a value.
BAS-G I MID-G I TRE-G: (-7)- (+7)
BAS-F: 50 I 100 I 200
BAS-Q: 0.7 I 1.0 I 1.4 I 2.0
MID-F: 500
11
K
I
2K
MID-Q: 0.7 I 1.0 I 1.4 I 2.0
10
M303
REAR/S-W
Rotate
the
[VOLUME]
knob
to
choose
REAR or S-WOOFER (SUB-WOOFER).
SW PHASE
Rotate
the
[VOLUME]
knob
to
choose
SUBWOOFER
phase
REVERSE
or
NORMAL.
BEEP: ON/OFF
Rotate
the
[VOLUME]
knob
to
choose
button beep sound ON or OFF.
12/24H
Rotate the
[VOLUME]
knob to choose time
format: 12 or 24 hours.
RESET
Long press [
ENTER ]
button. Settings will
be
set to the default value.
TUNE AREA
Rotate the
[VOLUME]
knob to choose
U,
K
or
E.
•
U:
U.S. standard (initial setting)
•
K:
Other countries
•
E:
Europe standard
TRE-F:
5k
I 10kI 15k
TRE-Q: 0.7 I 1.0 I 1.4 I 2.0
Press the [
.P
]
button, then press [
~
] or
[ ...,.. ]
button
to
select
USER
preset
including:
BALANCE -> FADER -> M-B EX -> HPF
(high pass filter) -> LPF (low pass filter) ->
SUBW VOL (Subwoofer Volume), rotate the
[VOLUME]
knob to select a value.
BALANCE: LEFT 1-7
->CENTER
-> RIGHT
1-7
FADER: FRONT 1-7
->CENTER->
REAR
1-7
M-BEX: ON I OFF
HPF: THROUGH I 60 I 90 I 120
LPF:
THROUGH I 60 I 90 I 120
SUBW VOL:
(-6)-
(+6)
Radio Operations
Select tuner as playing source
Press
[SAC
I<!>]
button once or more to enter
RADIO
mode.
Changing the reception area
This unit
is
initially set to USA frequency
intervals of 10 kHz for
AM
and 200 kHz for
FM.
When using
it
outside the USA, the
frequency reception range can
be
switched to
the intervals below.
u.
s.
Other Europe
standard countries standard
Frequency
10kHz
9kHz
9kHz
spacing
AM
Frequency 530 to 1,710
531
to
531
to 1,602
range kHz 1,629kHz kHz
Frequency 200kHz 50kHz 50kHz
FM
spacing
Frequency 87.9 to 87.5
to
108 87.5 to 108
range 107.9MHz MHz
MHZ
Setting the reception area
*
All station preset memories are lost when
the reception area
is
changed.
1.
Press and hold the
[DISP]
button.
2.
Press the
[...,..]
or [..,... ] button to select
"TUN AREA"
3.
Rotate the
[VOLUME]
knob to select:
•
U:
U.S. standard (initial setting)
•
K:
Other countries
•
E:
Europe standard
4.
Press and hold the
[VOLUME]
knob to
store the selecting.
• The unit will turn off after setting.
Selecting the radio band
Press the
[BAND
/tc
]
button
on
the panel or
on
the remote control to select one radio band
among FM1, FM2, FM3,
AM.
Manual tuning
During manual tuning, the frequency will
be
changed
in
steps.
Press the [...,.. ] or [..,... ] button on the panel
to tune
in
a lower I higher station.
Press the
[...,..]
or
[..,...]
button
on
the remote
control to select preset stations.
Auto tuning
Press and hold the [ ...,.. ] or [ ..,... ] button to
seek a lower I higher station.
To stop searching, repeat the operation above
or press other buttons having
radio
functions.
Note:
When a station
is
received, searching stops
and the station
is
played.
Preset scan
Preset scan receives
the
stations stored
in preset memory
in
order. This function is
useful when searching for a desired station
in memory.
1.
Press the
[PS/AS]
button.
2.
When a desired station
is
tuned
in,
press
the
[PS/AS]
button
again
to
continue
receiving that station.
Note:
Be careful not to press and hold the
[PS/AS]
button for 1 second or longer, otherwise the
auto store function will begin and the unit
starts storing stations.
Auto store
Only stations with sufficient signal strength
will
be
detected and stored
in
the memory.
Press and hold the
[PS/AS]
button
(1
sec.) to
start automatic station search.
To stop auto store, press other buttons having
radio functions.
Notes:
1.
After auto store, the previous stored stations
will
be
overwritten.
2.
The unit has 4 bands, such as
FM1,
FM2,
FM3 and
AM.
FM3 and
AM
can store by AS
function. Each band can store 6 stations,
M303 can store 24 stations
in
total.
Manual store
When one expected radio station has been
detected, press and hold number button 1-6
to store it in the memory.
Recall the stored stations
Press one numeric button among 1 to 6 on
the panel to select the corresponding stored
station.
Local seeking
When LOCAL seeking
is
ON, only those radio
stations
with
strong
radio
signal
could
be
received.
To select LOCAL function, press and hold the
[ DISP ]
button on the front panel, then press
[..,...]
button repeatedly until
LO
or
OX
displays
on
the screen,
and
rotate the
[VOLUME]
knob
to
select Local or Distant mode.
Note:
The number of radio stations that can be
received will decrease after the local seeking
mode
is
ON.

SiriusXM Satallite Radio Operations
Everything worth listening to
is
on
SiriusXM,
getting
over
130
channels,
including
the
most commercial-free music, plus the best
sports, news,
talk
and
entertainment.
!o
start
listening
to the SiriusXM™ Satellite
Radio, A SiriusXM Vehicle Tuner (purchased
separately) and Subscription are required.
Displaying the Radio
ID
Before you listen to satellite radio, you must
subscribe to the service using the SiriusXM
Radio
ID
number.
1. Press
[SRC
I(!) ]
button
to
activate
SiriusXM-mode.
2.
Press[...,..]
or[~]
to select channel
"0".
The unit displays Radio I
D.
Notes:
1.
The Radio
ID
is
located
on
the bottom of
the SiriusXM Connect Vehicle Tuner.
2.
Please note that the SiriusXM Radio
ID
does not include the letters
I,
0,
S or
F.
3.
Activate the SiriusXM Connect Vehicle
Tuner using one of the two methods below:
Online: Go to ''www.siriusxm.com/
activatenow".
• Phone: Call 1-866-635-2349.
• To activate SiriusXM Canada service go to
www.xmradio.ca and click
on
"ACTIVATE
RADIO"
in
the top right corner, or call
1-877-438-9677
Storing Channel Presets
1.
Press
[BAND
IIC] to select the desired
band you want to store the preset in.
There are 3 Satellite Radio Preset bands.
Each press of
[BAND
IIC] changes the
band:
SXM1
->
SXM2
->
SXM3
->
SXM1
2.
Tune
to the
desired
channel and then
press and hold one of the preset buttons
(1
through
6),
to store the channel.
3.
Repeat the procedure
to
store
up
to 5 other
channels
on
to the same band.
Note:
• A total of
18
channels can
be
stored
in
the
preset memory, 6 channels for each band
(SXM1
,SXM2
and
SXM3).
Tuning Channels using Presets
1.
Press
[BAND
lte]
to select the desired
band of Presets
you
wish to access.
2.
Press the preset button
(1
through
6)
that
has your desired Satellite Radio channel
stored
in
memory.
Category Browsing
1. Press and hold
[BAND
ltc]
to activate the
Category Browsing mode.
2.
Rotate
the
[VOLUME]
knob to
select
desired category.
3.
Press
[..,..]
or
[~]
to
select
desired
channel within the selected Category.
You
can see channel name, channel number,
artist, title or content by pressing
[DISP].
4.
Press
[VOLUME]
to
tune
to
selected
channel.
Note:
If no operation
is
perfprmed for
10
seconds,
the Category Browsing mode
is
canceled.
Preset scan
Preset scan receives the stations stored
in
preset memory
in
order. This.
functio~
is
useful when searching for a
des1red
stat1on
in
memory.
1.
Press and hold the
[PSIAS]
button.
2.
When a desired station
is
tuned
in,
press
the
[PSIAS]
button again to
continue
receiving that station.
Channel scan (in current category)
Channel
scan
receives
the
channel
(in
current category)
in
order. This function
is
useful when searching for a desired channel
in
current category.
1. Press the
[PS/AS]
button.
2.
When a desired channel
is
tuned
in,
press
the
[PSIAS]
button again to
continue
receiving that channel.
Note:
• Be
careful
not to press and hold the
[PSIAS]
button for 1 second or
_longe_r,
otherwise the preset scan funct1on
w111
begin and the unit starts scaning presets.
Artist
&
Song Alerts
While listening to SiriusXM Satellite Radio,
you can
be
alerted when your favorite songs
or artists are playing
on
other channels. The
radio will display
an
Alert message when a
matching artist or song
is
found
on
another
channel. Then
you
can
choose if
you
want to
tune to that favorite or
you
can ignore
it
and
stay
on
your current channel. Information
SiriusXM Satallite Radio Operations
on setting
up
the Artist and Song alerts is
described below.
1.
While
listening to favorite song, press
[VOLUME]
knob to add the artist or press
and hold
[VOLUME]
knob to add the song
to the "Artist & Song Alerts" list.
2.
Rotate
[VOLUME]
knob and select
"YES",
and press
[VOLUME]
knob to store item.
3.
Rotate
[VOLUME]
knob and select
"NO",
and press
[VOLUME]
knob to quit.
4.
You can manage the stored Alert memory
setting. Press and hold
[MENU
I
'21
]
and
rotate
[VOLUME]
knob to select
"ALERT
LIST".
Press
[VOLUME]
knob to display
stored
alert
items.
Rotate
and
press
[VOLUME]
knob to select desired alert
item. Then select
"ON"
to activate alert,
"OFF"
to deactivate or
"DELETE"
to delete
this item. (press
and
hold
[VOLUME]
knob)
You can also activate and deactivate Alert
function
in
System Setup menu.
Notes: .
• You can store up to 50 items for Art1st
& Song Alerts.
"XU(sed)/YE(mpty)"
is
displayed when the new item
is
stored. X
is
the total number of song titles or artist
names stored
in
memory,
andY
is
the total
number memory locations still available for
storage. . .
• If
either
the artists
or
song
t1tle
1s
not
available,
"NO SONG"
or
"NO ARTIST"
will be displayed. .
• If you try to store item when memory
1s
full,
"MEMORY
FULL"
is
displayed.
If
you want to store another, please delete
existing alert item.
Receiving and Tuning to an Alert
Whenever a stored artist or song
is
playing
on another channel alert message,
"ART
ALERT"
or
"SNG ALERT"
appears
on
the
unit display.To tune to artist or song identified
by the alert, press
[VOLUME]
knob.
Notes:
If
no
operation
is
performed for 5 seconds,
the unit returns to normal mode.
• Artist name and Song title which you have
stored and which are currently playing
will be displayed
in
category called
"MY
MUSIC"
in
search mode.
My Music search
You
can
access
the
channel
which
is
broadcasting the contents
in
the activated Alert
list.
1.
Press and hold
[MENU
I
'21
],
and rotate
[VOLUME]
knob
to
select
"MY
MUSIC
LIST'.
2.
Press
[VOLUME]
knob to display matched
songs which are currently broadcasted
3.
Rotate
[VOLUME]
knob to select desired
song, and press
[VOLUME]
to tune to that
channel.
Note: .
• If there
is
no
matched songs broadcasted,
1t
displays
"MEM
EMPTY".
SiriusXM Replay™ function
The
Replay
feature
allows
y~u
to
pau~e,
rewind, and replay up to 60 mmutes of live
SiriusXM Satellite Radio.
1.
While listening to a SiriusXM channel, press
[MENU
I
'21
]
to enter Replay mode.
~he
display will show"PAUSE" when entenng
this mode.
2.
Press
[~
u]
to
resume playback of the stored
audio from the point at which it was paused.
During playback,the SiriusXM
!une~
will
continue to store the channel
aud1o
unt1l
you
exit the Replay mode.
During REPLAY playback:
• Fast rewind: Press and
hold[~.
• Fast forward: Press and hold
r.....J.
• Returning to the beginning of the current
song:
Press
[..,.].(If
you press
[~]
in
the first
2
seconds
of a
song,you
return to
the
beginning of the previous song.)
Advancing
to the beginning of the next
song: press[..,...].
3.
Press
[MENU
I
'21]]
to finish Replay mode.
Notes: .
• If you continue to press the [..,...] button
unt1l
the end,the Replay mode
is
canceled,
a~d
the unit will change to live SiriusXM
rad1o
mode.
•
If
you change channels while in Replay
mode, the unit will exit Replay mode to
live Satellite mode and clear the Replay
memory.
•
Replay
mode
is
being
kept
when
you
change the source other than SiriusXM
mode.
M303
11

SiriusXM Satallite Radio Operations
iTunes song tagging
With iTunes song tagging, you can tag songs
you hear while listening to SiriusXM Satellite
Radio.
The
tagging information is saved in
your
radio
until
you
connect
your
iPod
or
iPhone and then the tagging information is
transferred to your iPod/iPhone. When your
iPod/iPhone
is
connected
to
iTunes,
you
will then be able
to
preview
and
purchase
the
song
that
you
heard
while
listening
to
SiriusXM Satellite Radio.
Information on using the iTunes song tagging
feature is described below.
1. A song may be tagged while listening to a
SiriusXM channel if the display shows the
"TAG"
icon.
2.
Press
[ISR]
button while the desired song
is playing.
3.
When
completed,
"STORED TAG X OF
64"
is displayed.
X means the number of tag stored.
Notes:
• During tagging, the iPod/iPhone takes
priority
to
save
the
tag
information.
If no
iPod/iPhone
is
connected,
the tag
information is saved to this unit.
•
!his
uni! can store up to 64 pieces of tag
mformat1on. When the memory of the unit
is full,
"MEMORY FULL"
may be displayed.
When iPod/iPhone that doesn't support the
tagging function is connected,
'TRANSFER
FAIL"
may be displayed.
• If
there
is stored tag
information
on
the
unit, when an iPod/iPhone supporting the
tag function is connected, the stored tag
information
will
be
transferred
to
iPod/
iPhone automatically.
•
If
tag
information
already
exists,
"ALREADY TAGGED"
will be
displayed
when you try to tag information again.
Tagging may be canceled by changing the
frequency or station.
• If a
song
is
tagged
and
the
remaining
storage
volume
of
the
connected
iPod/
iPhone is sufficient to hold the song's tag
information, it will be saved on the
iPod/
iPhone.
Changing the Display
Text information, such as the channel name,
12
M303
artist name/feature, song/program title and
content
is
available
with
each
SiriusXM
channel.
The
unit
can
display
this
text
information as explained below.
1.
In
SiriusXM mode, press
[DISP]
button.
Each
time
you
press
this
button,
the
display changes as shown below.
Band/Channel number/channel name =>
Artist
Name=>
Song Title=> Content Info
=>
Category
Name
=>
Clock
=>
Band/
Channel number/channel name
*
If there is no text information,nothing will
be
displayed.
Parental Lock I Unlock
The SiriusXM Parental Control feature allows
you to control access to channels that you
consider inappropriate for younger listener.
When enabled, the Parental Control feature
requires you to enter a password to tune to
the locked channels. Information on setting
up the password,
setting
up the
channels
to
be
locked, and the method to access the
locked channels is described below.
1.
For setting up the password, press and
hold
[DISP]
and
press
[~]
to
select
"PARENTAL
PASSWORD".
Press
[VOLUME]
knob
to
change
password.
Enter
old
password,
new
password.
To
enter
code,
rotate
[VOLUME]
knob
to
decide
number
and
[H-<~~~]
or
[~]
to
select digit. Each time you need to press
and
hold
[VOLUME]
knob
to
confirm
password. (Original password is
"0000")
2.
For setting up the channels to be locked,
press
and
hold
[DISP]
during
tuning
to
the desired channel, and select
"LOCK
CH"
and press
[VOLUME]
knob to start to
lock channel. You will be asked to input
password. Enter
password
and
"LOCK"
will be displayed if it is successful.
3.
For unlocking the locked channel, press
and hold
[DISP],
and press
[~]
to select
"UNLOCKCH".
Enter password and you
can unlock the channel.
4.
For accessing the locked channels, select
channel by
"DIRECT SELECT".
Press
and
hold
[MENU
I
~
]
and
select
"DIRECT SELECT"
by
pressing
[VOLUME]
knob.
Input
desired
locked
channel (need to input 3 digit) and input
password,
then
you
can
tune
to
that
locked channel.
CD/MP3/WMA Operations
This unit can playback MP3/WMA
files
Note:
•
If
you play a
WMA
file with active DRM
(Digital Rights Management), there will be
no audio.
To disable DAM
(Digital Rights Management)
When using Windows Media Player 9/10/11,
click on Tool -> Options
->
Copy Music tab,
then under Copy settings, unclick the Check
box for copy project music. Then, reconstruct
files.
Personally constructed WMA files are used
at your own responsibility.
Precautions when creating
MP3/
WMA
file
Usable sampling rates and bit rates
1. MP3: Sampling rate 8 kHz-48 kHz, Bit rate
8 kbps-320 kbps
I
VBR
·
2.
WMA: Bit rate 8 kbps-320 kbps
File extensions
1.
Always
add
a
file
extension
"
MP3"
".WMA" to MP3, WMA file by
usin~
sing!~
byte letters. If you add a file
extension
other than specified or forget to add the
file extension, the file cannot be played.
2. Files without MP3/WMA data will not play.
The files will not play if you attempt to play
files without MP3/WMA data.
*
When VBR files are played, the play time
display may differ the play location.
*
When MP3/WMA files are played, a little
no sound part is caused between tunes.
Logical format (File system)
1.
When writing
MP3/WMA
file on a CD-R
disc
or
CD-RW
disc,
please
select
"IS09660
level
1,
2 or Joliet" or Apple ISO
as
the
writing
software
format.
Normal
play
may
not
be
possible
if
the
disc
is
recorded on another format.
2.
The
folder
name
and file
name
can be
displayed
as the title
during
MP3/WMA
play but the title must be within 32 single
byte
alphabetical
letters
and
numerals
(including
an
extension).
3.
Do not affix a name to a file inside a folder
having the same name.
Folder structure
A
disc
with
a
folder
having
more
than
8
hierarchical levels will be impossible.
Number of files or folders
1.
Up
to
999
files
can be
recognized
per
folder.
Up to 3000 files can be played.
2.
Tracks are played in the order that they
were
recorded
onto
a
disc.
(Tracks
may
not
always
be
played
in the
order
displayed
on
the PC.)
3.
Some
noise
may
occur
depending
on
the type of encoder software used while
recording.
Eject function
Just pressing the [
~]
button, ejects the disc
Notes:
•
If
you
force
a
CD
into
before
auto
reloading, this can damage the CD.
•
If
a
CD
(12 em) is
left
ejected
for
15
seconds, the CD is automatically reloaded
(Auto reload).
Listening
to
a disc already loaded
in
the unit
Press the
[SAC
I(!) ] button to select the CD/
MP3/WMA mode.
When
the
unit
enters
the
CD/MP3/WMA
mode, play starts automatically.
Loading a CD
Insert
a
CD
into
the
center
of
the
CD
SLOT
with label
facing
up.
The
CD
plays
automatically after loading.

CDIMP3/WMA Operations
Notes:
•
Never
insert foreign objects into
the
CD
SLOT.
• If the CD is not inserted easily, there
may
be another CD in the mechanism
or
the
unit may require service.
,_~
Discs without the
r(lsff:~
or
~IL~~;
mark and
CO-ROMs cannot
6e
'
i)layed
.by this unit.
•
Some
CD-R/CD-RW
discs
may
not
be
usable.
Pausing play
1.
Press the [
4]
button to pause play.
"PAUSE"
appears
in
the display.
2.
To
resume CD play, press the [
4 ]
button
again.
Displaying CD titles
This unit can display title data for
MP3/WMA
disc.
When SCROLL
is
OFF, each time you press
the [
DISP]
button to change the title display.
MP3/WMA disc
Track -> Folder -> File title -> Album -> Title
-> Artist -> Track ...
Notes:
• If
MP3/WMA
disc has no 103 TAG, "NO
TITLE" appears in the display.
• Only ASCII characters can be displayed in
Tags.
Selecting a track
Track-up
1.
Press the [
~
] button to move ahead to
the beginning of the next track.
2. Each time you press the
[~]button,
the
track advances ahead
to
the beginning of
the next track.
3.
For MP3/WMA disc, press and hold the
[
6]
button
(1
sec.) to move ahead to +10
tracks.
Track-down
1.
Press the [
1+11
]
button to move back to
the beginning of the current track.
2.
Press
the
[
1+11
]
button
twice
to
move
back
to
the
beginning
of
the
previous
track.
3.
For MP3/WMA disc, press and hold the
[
5]
button
(1
sec.) to move back to -10
tracks.
Fast-forward/Fast-reverse
Fast-forward
Press and hold the [
~
] button .
Fast-reverse
Press and hold the [
1+11
]
button .
*
For
MP3/WMA
discs, it takes
some
time
until
the
start
of
searching
and
between
tracks. In addition, some errors may occur
in
the play time.
Folder Select
This
function
allows
you to
select
a
folder
containing
MP3/WMA
files and start playing
from the first track
in
the folder.
1.
Press the [
5]
or [
6]
button.
Press
the
[
6 ]
button
to
move
the
next
folder. Press the [
5 ]
button to move the
previous folder.
2. To select a track, press the [
1+11]
or [
~]
button.
Search Function
1.
Press
the
[MENU
I
-::j ]
button
to
enter
FOLD
SCH mode. Press the
[VOLUME]
button to enter the folder list search mode.
2. Tum the [VOLUME] knob to select a folder.
3.
Press the [VOLUME] button to enter the
file list search mode. And then the track
list appears in the display.
4.
Turn the [VOLUME] knob to select a track.
5.
Press the [VOLUME] knob to play.
*
When
play
back
MP3
I
WMA
file,
this
function is performed in the current folder.
CD/MP3/WMA Operations
Top function
The top function resets the CD player to the
first track of the disc. Press and hold the [
4 ]
button
(1
sec.) to play the first track (track No.
1)
on the disc.
*
In
case of MP3/WMA, the first track of the
current folder will be played.
Other various play functions
Scan play
This
function allows you to locate and
play
the first 10 seconds of all the tracks recorded
on a disc.
Press the [ 1 ] button to perform scan play.
Repeat play
This
function allows you to play the current
track
repeatedly
or
play
a
track
currently
being
played
in
the
MP3/WMA
folder
repeatedly.
CD:
1.
Press the [
2 ]
button once or more until
"RPT
ON"
appears on the LCD to perform
repeat play.
USB Operations
1.
Insert a
USB
device
into the rear
of
the
unit USB cable.
When connecting a USB device, the unit
will read the files automatically.
2.
To
remove
the
USB
device, you
should
first
select
another
source
or
turn
off
the
power,
in
order
to
avoid
damaging
the
USB
device.
Then
take
off
the
USB
device.
3.
Operation
is
same
as
MP3/WMA
operation.
2. Press [
2 ]
button again to cancel repeat
playback,
"RPT OFF"
appears
on
the
LCD.
MP3/WMA:
1.
Press the [
2 ]
button once or more until
"TRACK RPT' appears on the display to
perform repeat play, and "RPT" segment
lights on.
2. For
MP3/WMA
files,
press
[
2 ]
button
repeatedly until "FOLD RPT" appears on
the display for folder repeat play.
3.
Press [ 2 ] button repeatedly until "RPT
OFF"
appears
on
the
display
to
cancel
repeat
playback,
and
"RPT"
segment
goes off.
Random play
This
function allows you
to
play all tracks
recorded on a disc in a random order.
Press
the
[
3 ]
button
to
perform random
play.
M303
13

iPod
&
iPhone Operations
Connect
Connect
an
iPod
or
iPhone
to
the
USB
connector via CCA-750 cable.
When connecting a device, the unit will read
the files automatically. The track information
displays on the screen once playback start.
MENU
In
the S-CTRL OFF mode, press [MENU I
-.:j]
button,
rotate
the
(VOLUME]
knob
select
"MUSIC"
or
"VIDEO".
Select "MUSIC", press the [VOLUME] knob,
then rotate
the
[VOLUME]
knob
to
select
PLA
YLISTS I ARTISTS I ALBUMS I SONGS
I
GENRES
I
COMPOSERS
, and press the
[VOLUME] knob to confirm.
Select "VIDEO", press the [VOLUME] knob,
then rotate the
[VOLUME]
knob
to
select
MOVIES I MUSIC VIDEOS I TV SHOWS I
VIDEO PODCASTS
I
RENTALS, and press
the (VOLUME] knob to confirm.
Note:
VIDEO MENU item is different by the model
of connected iPod and language setting.
Repeatplay
This function allows you to play the current
track
repeatedly
or
play
all
tracks
in
your
iPodliPhone repeatedly.
1. Press the [ 2 ] button once or more until
"RPT ON" appears on the LCD to perform
repeat play.
2.
Press [ 2 ] button repeatedly until "RPT
OFF'' appears on the LCD to cancel repeat
playback.
Random play
This
function
allows
you
to
play all
tracks
recorded on a disc in a random order.
1.
Press [ 3 ] button repeatedly until "ROM
ALBUM" appears on the LCD for album
random play.
2. Press the [
3]
button once or more until
"ROM
SONG"
appears
on
the
LCD
to
perform random play.
3.
Press [ 3 ] button repeatedly until "ROM
14
M303
OFF"
appears
on
the
LCD
to
cancel
random playback.
Setting iPod simple control mode
Use
this
function
if
you
wish
to
operate
through your iPod connected to this unit via
the USB cable.
* The factory default setting is " OFF
".
1.
Press and hold [
DISP
] button to
enter
system setup.
2.
Press [....,..]or
[..,...]button
to select
II
S-CTRL".
3. Rotate the [VOLUME] knob to select
" ON " or " OFF " .
• ON: Operations are made through your
iPod.
•
OFF:
Operations
cannot
be
made
through your iPod.
Notes:
• When performing iPod
operations
using
simple control mode, make the operations
slowly
.
If
repetitive
operations
are
performed too quickly, unforeseen errors
may occur.
When performing iPod
operations
using
simple
control
mode,
please
do
not
operate the iPod and the unit at the same
time, otherwise there may be unexpected
event happened.
•
Some
iPod
models
do
not
support
this
function
.
Consult
your
nearest
Clarion
dealer or website to confirm which models
do not support this function.
iPod
&
iPhone Operations
iPod menu alphabet search
This
function
searches
the
subfolders
for
desired alphabetical letters.
1.
Press the [MENU I
-.:j ]
button to select the
iPod menu mode.
2.
Press
the
[VOLUME]
knob
to
switch
between categories.
MUSIC: PLAYLISTS, ARTISTS, ALBUMS,
SONGS, GENRES, COMPOSERS
VIDEO: MOVIES, MUSIC VIDEOS,
TV
SHOWS, VIDEO PADCASTS,
RENTALS
3.
Press the [VOLUME] knob. (The contents
of the category are displayed.)
4. Press and hold the [DISP] button
(1
sec.
).
5.
Rotate the [VOLUME] knob to select the
desired letter to search.
6.
Press
the
[DISP]
button
again
to
next
perform search.
7. Press the
[VOLUME]
knob to confirm.
Listening to Pandora
You can listen to Pandora internet radio by
connecting an iPodliPhone that has Pandora
Application already installed.
To start streaming, connect the iPod/iPhone
with Pandora already launched.
When the unit displays "PLEASE LAUNCH
Pandora
APPLICATION
ON
MOBILE
DEVICE" in Pandora mode, please launch the
Pandora Application by operating the
iPodl
iPhone connected.
1.
Press the
[SRCI
Q)
]
button to
enter
the
Pandora mode.
Selecting a station from list
Press the [MENU I
-.:j ]
button and select "BY
DATE"
or
"A-Z"
by
rotating the
[VOLUME]
knob and press the
[VOLUME]
knob.
• BY DATE: List
in
an created date order
• A-Z: List
in
an alphabetical order
Go
to
next station
or
previous station(an
alphabetical order)
Press the [ ..,... ] button on the panel or remote
control to go to next station.
Press the [
....,..
] button on the panel or remote
control to go to previous station.
Thumbs up/down
Thumbs up:
press the [ 6 ] button on the panel or the [ROM]
button on the remote control for thumbs up.
Giving a track the thumbs up will tell Pandora
to play more tracks like that one.
Thumbs down:
press the [ 5 ] button on the panel or the [SCN]
button on the remote control for thumbs down.
Giving a track the thumbs down will skip to the
next track (subject to skip limit), and Pandora
will
remember
not to play that track on the
station again.
Notes:
•
You
can
personalize
your
stations
by
''thumbs up" or ''thumbs down".
• Pandora limits the number of thumbs
down allowed on their service.
If
you
attempt
to
thumbs
down
tracks
beyond the limit, the current song continues
to playback.
BOOKMARK artist
or
track
Short-press the [VOLUME] knob or the [RPT]
buton
on
the
remote
control
to
Bookmark
current track.
Long-press the [VOLUME] knob or the [RPT]
button on
the
remote control to
Bookmark
current artist of the track.
Creating new stations
Short-press
the
(1]
button on the panel to
create a new station from the current artist.
Long-press
the [1] button on the panel to
create a new track.
Note:
If the name of the station you wish to create
for a track title or an artist name is the same
as the station name currently playing, "
NOW
PLAY" appears on the display and the station
will not be created.
Skip
Long press the [ ..,... ] button on the panel or
on the remote control for the next tracks in
station.

iPod
&
iPhone Operations
Note:
• Pandora limits the number
of
skips allowed
on
their seNice.
If
you
attempt
to
skip tracks
beyond the limit,
"SKIP LIMIT'
is
displayed.
Play/Pause
Press the [ 4 ] button
on
the
panel
or the
[..,.11]
button
on
the remote control for play I pause.
Connect
Connect
an
iPod
or
iPhone
to the
USB
connector via CCA-750 cable.
When connecting a device, the unit will read
the files automatically. The track information
displays
on
the screen once playback start.
MENU
In
the S-CTRL OFF mode, press
[MENU
I
'21
]
button, rotate the
[VOLUME]
knob to select
"MUSIC"
or
"VIDEO".
Select
"MUSIC",
press the
[VOLUME]
knob,
then rotate the
[VOLUME]
knob to select
PLAYLISTS I ARTISTS I ALBUMS I SONGS I
GENRES
I COMPOSERS, and press the
[VOLUME]
knob to confirm.
Select
"VIDEO",
press the
[VOLUME]
knob,
then rotate the
[VOLUME]
knob to select
MOVIES I MUSIC VIDEOS I TV SHOWS/
VIDEO PODCASTS I RENTALS, and press
the
[VOLUME]
knob to confirm.
Note:
VIDEO MENU
item
is
different
by
the model of
connected iPod and language setting.
Repeat play
This function allows
you
to play the current
track repeatedly or play all tracks
in
your
iPod/iPhone repeatedly.
1.
Press the [ 2 ] button once or more until
"RPT
ON"
appears
on
the
LCD
to perform
repeat play.
2.Press [ 2 ] button repeatedly until
"RPT
OFF"
appears
on
the
LCD
to
cancel repeat
playback.
Bluetooth Operations
The Bluetooth allows you to utilize your
boat's built-in audio system for wireless
mobile
phone
or
music
handsfree
communication. Some Bluetooth mobile
phones have the audio features, and some
portable audio players support Bluetooth
feature. This system can play audio data
stored in a Bluetooth audio device. The
audio system with Bluetooth will be able
to retrieve phonebook contacts, received
call, dialed call, missed call, incoming calls,
outgoing call
and
listen
to
music.
Notes:
•
Do
not leave the microphone of Bluetooth
handsfree
in
the places with wind passing
such as air outlet
of
the air conditioner,
etc. This may cause a malfunction.
• If leave it in the places
subjected
to
direct sun, high temperature can cause
distortion, discoloration which may result
in
a malfunction.
•
This
system will not
operate
or
may
operate improperly with some Bluetooth
audio players.
•
Clarion
cannot
guarantee
the
compatibility of
all
mobile phones together
with unit.
• Audio playback will be set to the same
volume level
as
set during telephone call.
This might cause problems, if extreme
volume level
is
set during telephone call.
Handsfree Operations Pairing
1.
Turn
on
Bluetooth function of your mobile
phone.
2.
Enter mobile phone's Bluetooth setup
menu.
3.
Search for new Bluetooth devices.
4.
Select M303 from the pairing list
on
the
mobile phone.
5.
Enter
"0000" as
the
password
(The
password default setting
is"
0000 ").
6.
After pairing successfully, the unit will
enter Bluetooth mode automatically, and
"BLUETOOTH CONNECTED"
will appear
on
the
LCD.
7.
The unit can connect three units.
*
During pairing, depending on type of
mobile phone, a six digit
PIN
code will
be
shown
on
both the source unit's display
and the mobile phone.
In
this case, please make sure that you
have the same
PIN
code
on
both devices,
and then confirm
on
the mobile phone.
Making a call
Operation from Bluetooth menu
Press the
[SRC
I (!) ] button to switch the
source to
"BLUETOOTH".
Press
[MENU
I
'21]
button to select a way to make outgoing call:
• Dial Number
1.
Press the
[MENU
I
'21]
button.
2.
Rotate the
[VOLUME]
knob to switch
"DIAL NUMBER".
3.
Press the
(VOLUME]
knob
to
confirm the
selection.
4.
Rotate the
[VOLUME]
knob to select a
number, press the knob to confirm and
ready to input the next digit. Repeat the
above until
all
numbers inputted.
5.
Press the
[BAND
I
lC
]
button
to
dial.
6.
Press
[MENU
I
'21]
to terminate call.
• Dialled/Missed/ Received
You
can
search
any
Dialled/Missed/
Received.
1.
Rotate the
[VOLUME]
knob to select
"DIALLED", "MISSED", "RECEIVED".
2.
Press the
[VOLUME]
knob to enter the
selected call history.
3.
Rotate the
[VOLUME]
knob to scroll the
contacts.
4.
When the contact name or mobile phone
No. is displayed, press the
[VOLUME]
knob to call the mobile phone
No.
of that
contact.
*
Press the
[MENU
I
'21
]
button to end the
call.
• Call from Phonebook
You can search the contact name in the
phonebook and make call.
M303
15

8/uetooth Operations
1.
Rotate the [VOLUME] knob to select "USER
PHONEBOOK" .
2.
Press
the
[VOLUME]
knob to
enter
the
selected phonebook.
3.
Rotate the
[VOLUME]
knob to scroll the
contacts.
4.
The phone number and the name to scroll
display.When the contact name
is
displayed,
press the [VOLUME] knob to call the mobile
phone
No.
of that contact.
* Press the [MENU I '21] button
to
end the call.
Notes:
• Some mobile phones may not be able to
transfer data of Phonebook.
• After RESET, please wait few minutes until
data transferred following to the Bluetooth
mode selection. During that, "PHONEBOOK
UPDATING"
is
on
the display.
• Redial
You
can call last dialed number.
Press and hold the [BAND
ILC]
button
(1
sec).
• Call Transfer
You can switch Handsfree call and mobile
phone call.
Press the [BAND I
LC]
button during call.
• Answering a call
You
can
answer
an
incoming
call
by
pressing the [BAND
ILC]
button.
* Press the [MENU I
'21
] button to reject
an
incoming call.
Audio Streaming Operations
What is audio streaming?
Audio streaming is a technique for transferring
audio data such that it can be processed as
a steady and continuous stream. Users can
stream music from their external audio player
to their audio system wirelessly and listen to
the tracks through the boat's speakers. Please
consult your nearest Clarion dealer for more
information on the product of wireless audio
streaming transmitter offered.
16
M303
I
ACAUTION
Please avoid operating your connected
mobile phone while audio streaming as
this may cause noise or sound choppy
on the song playback.
Audio
streaming
may
or
may
not
resume after telephone interrupt as this
is dependent on mobile phone.
System
will
always
return
to
Radio
mode
if
audio
streaming
is
disconnected.
Note:
Be
sure
to read the
chapter
"Pairing"
before proceeding.
PlayI Pause a track
1.
Push the [ 4 ] button to pause audio
playback.
2.
To resume audio playback, push the [
4]
knob again.
Selecting a track
Track-up
1.
Press the [
~
] button to move to the
beginning of the next track.
2.
Each time the [
~
] button
is
pressed,
playback proceeds to another track
in
the advancing direction.
Track-down
1.
Press the [
1+111
] button to move to the
beginning of the previous track.
2.
Each time the [
1+111]
button
is
pressed,
playback proceeds to previous track
in
the reverse direction.
Note:
Playing order will depend on Bluetooth
audio
player.
When
[
1+111
]
button
is
pressed, some A2DP devices will restart
the current track depends
on
the duration
of playback.
During
music
streaming
playback,
"A2DP" will be shown on the
display.
When
A2DP
and
HFP
device
is
disconnected,"BLUETOOTH
DISCONNECT"
will
be
shown
on the
8/uetooth Operations
display and return to previously selected audio
source. Some Bluetooth audio players may not
have play I pause synchronized with this unit.
Please make sure both device and main unit are
in
the same play I pause status
in
BT MUSIC
mode.
ID3TAG display
During music streaming playback, for music
information that
is
longer than the display panel:
When SCROLL
is
ON, the LCD will display ID3
TAG information cyclely, e.g: ALBUM->TITLE
->ARTIST.
..
When SCROLL is OFF, the LCD will display
one of the ID3 TAG information, the default
is
TRACK,
but
user
can
adjust
it to
other
ID3
TAG
information
by
press
[DISP]
button.
AUX
Operations
The
rear
AUX
terminals
of
this
system
is
provided to allow playback of sounds and music
from external devices connected to this unit.
Press [SRC I
<!)
] button
on
the panel
to
select
"AUX".
AUX
Input sensitivity setting
1.
Press and hold the [DISP] button
(1
sec.).
2.
Turn the
[VOLUME]
knob to select "AUX
SENS".
3.
If
the output level of connected external audio
player is "HIGH", rotate
[VOLUME]
knob
and choose
"LOW".
And
if
the output level
is
"LOW",
choose "HIGH".

USB
Problem Cause Measure
GENERAL
The
USB
device has been inserted Reversing the connection direction
of
the
USB
device,
USB
device cannot
be
with wrong direction. try it again.
Problem Cause Measure inserted. The
USB
connector
is
broken. Replace with a new
USB
device.
Unit fuse blown.
Replace
with
new
fuse
of
correct
rating.
Unit can not power on. Boat battery fuse blown.
Replace
with
new
fuse
of
correct
rating.
USB
device
is
not
The
USB
device
is
damaged. Disconnect the
USB
device and reconnect.
If
the
recognized. device
is
still not recognized, try replacing with a
Connectors are loose. different USB device.
Turn
off
the
power
and
remove
the
DCP.
Unit can not power on.
Press
the
[RESET]
button
with
a
thin
rod.
Nothing happens
Note:
when buttons are
The
microprocessor
has
When
the
[RESET]
button
is
pressed,
turn
off
pressed.
malfunctioned
due
to
noise,
etc.
the
ACC
power.*
No
sound heard
with
No
MP3/WMA file
is
stored
in
the
the display
"No
File"
USB
device. Store these files properly
in
the
USB
device.
shown.
Sound skips or
is
noisy. MP3/WMA files are
not
encoded Use MP3/WMA files encoded properly.
properly.
Display is not *
When
the
[RESEn
button
is
pressed,
accurate.
frequencies
of
radio
stations,
titles, etc.
stored
in
memory
are
cleared.
Bluetooth
Improper audio output connection.
Check
wiring and correct. Problem Cause Measure
Volume set too low. Increase volume level.
No/low audio output. Speakers damaged. Replace speakers.
Heavily biased volume balance. Adjust the channel balance to center position.
Cannot pair the The device does not
support
the
Use
another device to connect.
Bluetooth enabled profiles required for the system.
device with the The Bluetooth function of the device Refer to the user manual of the device for how to
audio system.
is
not enabled. enable the function.
Speaker
wiring is
in
contact with Insulate all speaker wiring connections.
metal part of boat.
Non-standard disc used. Use a standard disc.
Speaker
power rating does not Replace speakers.
Poor
sound quality
or
match unit.
The audio quality The
microphone
is
not
correctly
Adjust the position of the microphone.
is
poor after positioned. For example, stick
the
microphone onto
the
dashboard
connection with a where close
to
the
driver.
Bluetooth-enabled Move the device closer to
the
audio system or remove
device. The Bluetooth reception
is
poor. any obstacle between the device and
the
system.
distortion. Wrong connections.
Check
wiring and correct. SiriusXM Advisory Messages
Speaker
is shorted.
Check
wiring and correct.
Unit resets itself when Incorrect connection between ACC
Check
wiring and correct.
engine is off. and Battery. Message Description
CHEKTUNER Check the SiriusXM tuner connection
on
the back
of
the unit to ensure that its correctly
connected.
Ensure the SiriusXM antenna cable
is
connected to the SiriusXM tuner correctly.
DISC Player CHK ANTENA Check the SiriusXM antenna wire for breaks or sharp bends. Replace the antenna
if
necessary.
Press RESET located..... If the
messaQe
remains the antenna
may
have been damaoed.
Problem Cause Measure
NO
SIGNAL The vehicle must
be
outside, and the antenna must have a clear view of the southern
sky.
The magnetic antenna must
be
mounted
on
the outside
of
the vehicle for the best reception.
Disc cannot be Another disc is already loaded. Eject the disc before loadinq the new one.
loaded. There is an object install installed Remove the object inside the unit.
the unit.
CHAN UNSUB This channel
is
not included
in
your SiriusXM subscription plan.
Call 1-866-635-2349
to
subscribe.
This channel
is
not a valid SiriusXM channel.
Sound skips
or
is Compact disc is dirty. Clean the compact disc with a soft cloth.
Compact
disc is heavily scratched Replace with a compact disc with no
noisy.
or
warped. scratches.
CH
UNAVAIL The channel number has been entered incorrectly, or the channel was removed from the
SiriusXM channel lineup
The selected channel has been locked
by
the parental controls, or a mature channel has been
Sound is bad when Condensation
may
form on the internal
CH
LOCKED selected.
power is first turned lens when the boat is parked in a Let dry for about 1 hour with power on. A prompt to enter the unlock code will appear. Enter the unlock code as described
on
paoe
12.
on. humid olace. SUBSCRIPTN
An
update
to
your SiriusXM subscription has been received
by
the
SiriusXM tuner. Press any
UPDATED button
to
continue.
M303
17

If
an
error occurs, one of the following displays is displayed.
Take the measures described below to solve the problem.
Display Cause Measure
ERROR 3 Disc is inserted incorrectly. Eject the disc then reload it properly.
The disc format is not supported. Try another disc.
ERROR 5 This is a failure of deck's mechanism. Consult your store of purchase.
If
an
error display other than the ones described above appears, press the
[RESET]
button. If the
problem persists, turn off the power and consult your store of purchase.
*
When the
[RESET]
button is pressed, frequencies of radio stations, titles, etc. stored
in
memory are cleared.
18
M303
FM
Tuner
Frequency range: USA : 87.
9-
107.9MHz
Europe :
87.5-
108.0MHz
Australia :
87.5-
1
08.0MHz
Usable sensitivity: 8dBf
Frequency response: 30Hz-15kHz
Stereo separation: 30dB(1 kHz)
Signal/noise ratio: >55dB
AM
Tuner
Frequency range: USA : 530 -171OKHz
Europe :
153-
279KHz (LW)
531
-1602KHz (MW)
Australia :
531
-1629KHz
Usable sensitivity (S/N=20dB):
30dB~
CD Player
System: Disc digital audio system
Frequency response: 20Hz-20kHz
Signal/noise ratio: >94dB
Total harmonic distortion: Less than 0.1% (1kHz)
Channel separation: >60dB
MP3/WMA mode
MP3 sampling rate: 8 kHz to 48 kHz
MP3 bit rate: 8 kbps to 320 kbps
I
VBR
WMA bit rate: 8 kbps to 320 kbps
Logical format:
IS09660
level 1
,2
Joliet file system
USB
Specification: USB 1.0/2.0
Playable audio format:
MP3(.mp3): MPEG 1/2/Audio Layer-3
WMA(.wma): Ver 7/8/9.1/9.2
Bluetooth
Specification: Bluetooth Ver. 2.0+EDR
Profile: HFP (Hands-free Profile)
A2DP (Advanced Audio Distribution Profile)
AVRCP (AV Remote Control Profile)
PBAP (Phone Book Access Profile)
Send/Receive Sensitivity: Class 2
Audio Amplifier
Maximum power output:
192W (48W X 4)
Speaker impedance:
4.0
(4
to 8 Q allowable)
Input
Audio input sensitivity:
High: 320mV (at 1
V output)
Mid: 650mV (at 1V output)
Low: 1.3V (at 1
V output)
(input impedance 1
0
kQ
or greater)
Aux-in level:
~2V
General
Power supply voltage:
14.4VDC (10.8 to 15.6V allowable),
negative ground
Pre-Amp output voltage:
2.0V (CD play mode: 1kHz,
OdB,
10k!l
load)
Fuse: 15A
Dimensions of the Main Unit:
188mm Width x 58mm Height x 190mm Depth
7-2/5(width) x 2-7/25(Height) x 7-12/25(Depth)
Weight of the Main Unit: 3.301b.(1.50kg)
Dimensions of the Remote Control unit:
43mm Width x
11
mm Height x 113mm Depth
1-2/3(Width) x 2/5(Height) x 4-2/5(Depth}
Weight of the Remote Control Unit:
E
E
0
Ol
1.16oz. (36g) (including battery)
7"
178mm
,-
,
E
m
""'
N
<0
II
6-2/3" 170mm
IIi
~-~=--.......!·~
7-2/5
" 188mm
Note:
50mm
46mm
58mm
•
Specifications
and
design
are
subject
to
change
without
notice
for
further
improvement.
Power Output:
18W
RMS x 4
Channels
at
4Q
and 1% THD+N
Signal to Noise Ratio:
95dBA (reference: 1W into 4)

9. INSTALLATION
I
WIRE
,~
CONNECTION GUIDE
CONTENTS
1) Before Starting ...................................................................... 19
2) Package Contents................................................................. 19
3)
General Cautions .................................................................. 19
4)
Cautions
on
Installation......................................................... 19
5)
Installing the Source Unit ...................................................... 19
6)
Removing the Source Unit ....................................................20
7)
Wiring and Connections ........................................................
21
8)
Connecting the accessories ..................................................
21
1) Before Starting
1.
This set is exclusively for use with a negative
ground 12 V power supply.
2.
Read these instructions carefully.
3.
Be sure to disconnect the battery "terminal" before
starting. This is to prevent short circuits during
installation. (Figure
1)
2)
Package Contents
Figure 1
Battery
Source unit .....................
..
...................
..
.
..
.
..
1
Owner's manual.........
..
.................
..
............. 1
Front panel ..................................................
1
Trim ring
...
...................................................
1
Mounting bracket.............
...
...
...
..........
..
.......
1
Hole block seal (black) .
..
...
...............
...
.
....
.
..
1
L-key........
..
...........
..
....
...
..............................
2
Power supply cable ......
..
.............................
1
DCP case .................................................... 1
3)
General Cautions
1.
Do not open the case. There are no
user serviceable parts inside. If you
drop anything into the unit during
installation, consult your dealer or
an
authorized
Clarion
service center.
Warranty card..........
...
..................
...
............
1
Special screw
(M1.6*5mm,front panel lock) .....
1
Screws M5x6 mm Double Sems ................. 4
Screws M4x5 mm Double Sems ............
....
.
1
Strap.......
..
.................
...
...............................
1
M4 Washer...................................
..
.............
2
M4 Nut
...
...................................................... 1
2.
Use a soft, dry cloth to clean the case.
Never use a rough cloth, thinner,
benzine, or alcohol etc. For tough dirt,
apply a little cold or warm water to a
soft cloth and wipe off the dirt gently.
4)
Cautions on Installation
1. Prepare all articles necessary for
installing the source unit before
starting.
2.
Install the unit within 30° of the
horizontal plane. (Figure 2)
3.
If you have to do any work on the boat
body, such as drilling holes, consult
your boat dealer beforehand.
Max 30'
Figure 2
5) Installing the Source Unit
4.
Use the enclosed screws for
installation.
Using other screws can cause
damage.
(Figure 3)
Chassis Chassis
t~a~age
Max. 6
mm
(MS
screw)
Figure 3
1.
Place the mounting bracket into the instrument panel, use a screwdriver to bend
each stopper of the mounting bracket inward, then secure the stopper.
2.
Wire as shown
in
Section
7).
3.
Insert the source unit into the mounting bracket until it locks.
4.
Take care of the top and bottom of the trim ring and mount it so that all the hooks
are locked.
Notes:
1.
Some boat models require special mounting kits for proper installation.
Consult your
Clarion
dealer for details.
2. Fasten the front stopper securely to prevent the source unit from coming loose.
•
Console
opening
dimensions
I"'
(182mm)
..
1
I.._____Hole
~~]~
M303
19

Notes of installation
1.
Before installation, please make sure
proper connections are conducted and
the unit operates normally. Improper
connection
may
result in
damage
to
the
unit.
2.
Use only accessories designed and
manufactured for this unit
and
other
unauthorized accessories
may
result in
damage
to the unit.
3.
Before installation, please fasten all
power
cables.
4. DO
NOT
install the unit in the place where
close
to
hot area
to
prevent
damage
to
electrical components such
as
the laser
head.
5. Install the unit horizontally. Installing the
unit more than
30
degree vertically
may
result in worse performance.
Mounting Bracket
20
M303
6.
To
prevent electric spark, connect the
positive pole first and then the negative
pole.
7.
DO
NOT
block the cooling fan exit to
ensure sufficient heating dissipation
of
this
unit,
or
it
may
result in
damage
to this unit.
Unit Installation
Method A
1.
Insert mounting bracket into dash board,
choose appropriate mounting tab according
to the gap width, bending the mounting
tab outwards with a screwdriver
to
fix the
mounting bracket in place.
2.
Slide the unit into the bracket until you hear
a click sound.
Screwdriver
• Remove CD mech lock-screw.
• Stick hole block seal for hole of
MethodS
M5x6
~
Mounting Frame
1.
Insert this unit directly to the opening
of
the dashboard.
2.
Place
M5x6
cylindrical screw through the
holes
of
the mounting frame located inside
the opening to holes
of
the unit and fasten
the screws to left
&
right.
Trim ring installation
Attach the trim ring around the front panel.
Take
care
of
the top
and
bottom of the trim
ring and mount it so that all
the
hooks
are locked.
_..Bottom
6) Removing the Source Unit
Disassemble trim ring
1.
Push the trim ring to right
and
pull out the
right part.
2.
Push the trim ring to left
and
pull out the
left part.
Disassemble the unit
1.
Switch off the power.
2. Remove the panel.
3.
Remove the trim ring.
4.
Insert the removal keys straight back until
they lock, then pull the unit out.
5. Disconnect all the wires.
Other manuals for M303
1
Table of contents
Other Clarion Marine Equipment manuals

Clarion
Clarion CMS5 User manual

Clarion
Clarion M4SSA User manual

Clarion
Clarion CMS3 Repair manual

Clarion
Clarion M275 User manual

Clarion
Clarion M475 User manual

Clarion
Clarion M606 User manual

Clarion
Clarion CMS5 User manual

Clarion
Clarion CMD5 User manual

Clarion
Clarion CMD8 Repair manual

Clarion
Clarion CMD6 User manual

Clarion
Clarion CMDB Repair manual

Clarion
Clarion M303 Repair manual

Clarion
Clarion CMM-30BB User manual

Clarion
Clarion M109 User manual

Clarion
Clarion CMD7 User manual

Clarion
Clarion MF2 User manual

Clarion
Clarion CMS1 Repair manual

Clarion
Clarion CMV1 User manual

Clarion
Clarion M502 Repair manual

Clarion
Clarion CMS5 User manual